
Windows Errors? Fix Them Before They Spread
Repair common Windows errors and clear accumulated junk for a smoother, more stable PC - no reinstall needed.Free scan · no reinstallCrashes, No Sound, or Screen Glitches?
Random freezes, missing sound and display glitches usually trace back to one bad driver. Find and replace yours safely.Free scan · under a minuteiTechGuides is reader-supported. When you buy through links on our site, we may earn an affiliate commission. As an Amazon Associate I earn from qualifying purchases. Learn more
If your ESP32-S3 e-paper display will not connect to Wi-Fi, first check whether you are using a generic ESP-IDF application or vendor firmware: the setup steps differ. Start with a 2.4 GHz Wi-Fi network, then identify where the connection fails—finding the access point, authenticating, obtaining an IP address, or staying connected. ESP32-S3 Wi-Fi uses the 2.4 GHz band; Seeed recommends 2.4 GHz for its documented e-paper setup and warns that many ESP32-S3-based devices do not connect to 5 GHz networks. That guidance should not be read as a claim about every third-party board or firmware implementation.
Identify your board and firmware before changing settings
An ESP32-S3 e-paper board does not have one universal Wi-Fi onboarding procedure. The correct steps depend on what is running on it. With your own ESP-IDF application, you configure station mode and handle Wi-Fi events in firmware. With a vendor’s prebuilt firmware, the device may provide a setup flow of its own.
| What you are using | How Wi-Fi is configured | What to do first |
|---|---|---|
| Your own ESP-IDF project | The application configures the network, starts Wi-Fi in station mode, handles connection events, and waits for an IP address before network work. | Set the SSID and password in the project’s configuration, then build, flash, and monitor the device. |
| Seeedash firmware | The device advertises a temporary access point and provides a browser-based configuration page. | Join the temporary access point shown on the display and open the setup page. |
| Other vendor firmware | Depends on that vendor’s documented setup procedure. | Follow the instructions for the exact board and firmware; do not assume it uses Seeedash’s temporary-access-point flow. |
Before troubleshooting, note the board model, firmware or project, router network name, and whether the device has ever connected successfully. This distinguishes a first-time setup problem from a later drop and helps avoid applying instructions for the wrong firmware.
Recommended Free Tools
Check 2.4 GHz compatibility first
If you are asking, “Why won’t my ESP32 connect to 5GHz WiFi?”, begin by trying the router’s 2.4 GHz network. Espressif’s ESP32-S3 documentation identifies Wi-Fi in the 2.4 GHz band. Seeed’s e-paper setup guide likewise recommends 2.4 GHz and cautions that many ESP32-S3-based devices do not connect to 5 GHz networks. The precise behavior of an individual third-party board can depend on its hardware and firmware, so consult that board’s documentation if the band support is unclear.
#1 Best Overall

- High-Performance Dual-Core MCU with Wireless Connectivity: Powered by the ESP32-S3R8 dual-core Xtensa LX7 processor (up to 240MHz), featuring 8MB PSRAM, 16MB Flash, and integrated WF and BT 5 (LE).
- Ultra-Low-Power 3.97-Inch E-Paper Display: Incorporates a 3.97-inch e-paper screen with 800 x 480 resolution, offering high contrast, wide viewing angles, and excellent ambient light readability, ideal for battery-powered and portable applications.
- Comprehensive Onboard Sensors and RTC: Equipped with a QMI8658 6-axis IMU (accelerometer & gyroscope) for motion sensing, an SHTC3 temperature and humidity sensor, and a PCF85063 Real-Time Clock (RTC) chip for precise timekeeping and environmental monitoring.
- Integrated Power Management and Battery Support: Features the TG28 power management chip supporting 3.7V Lithium battery charging, management, and multiple voltage outputs, including a backup battery header to maintain RTC functionality during main battery replacement.
- Rich Expansion and I/O Options:Includes a low-power audio codec chip for voice capture/playback, a TF card slot for storage expansion, a USB Type-C port, and programmable side buttons (PWR and BOOT) for flexible development.
If your router combines 2.4 GHz and 5 GHz under one network name, check its documentation or settings to determine whether you can select the 2.4 GHz network explicitly. Try the network you already have before considering new equipment; the documented setup does not establish that a new router is necessary. Router security options and channel availability may vary with router configuration or local regulations, so use the router and board documentation for those settings.
Connect using generic ESP-IDF station mode
In station mode, the ESP32-S3 joins an existing Wi-Fi access point. The connection process is a sequence, not a single “connected” state: configure the network, start the driver, associate with the access point, obtain an IP address through DHCP, and only then begin IP-based application work.
1. Configure credentials and prepare the project
-
Open the ESP-IDF project’s configuration interface with
idf.py menuconfig, then set WiFi SSID and WiFi Password to the exact credentials for the intended 2.4 GHz network.DriversOutdated Drivers Are Slowing You DownPerformanceWindows Errors? Fix Them Before They SpreadDriversCrashes, No Sound, or Screen Glitches?Special offer. See more information about Outbyte and uninstall instructions. Please review EULA and Privacy policy. -
Check spelling, capitalization, and whether the password belongs to that network name. Avoid changing unrelated router settings until you know which stage is failing.
-
Initialize configuration structures completely and check the return value of each relevant API call. Espressif emphasizes error handling and recovery as fundamentals of robust Wi-Fi applications.
2. Start Wi-Fi and respond to connection events
Follow the ESP-IDF station-mode event flow in the application. After the Wi-Fi driver starts, it emits WIFI_EVENT_STA_START; the application typically responds by calling esp_wifi_connect(). Use the event-handling logic to distinguish a start, a disconnection, and an established IP connection instead of treating a call to connect as proof that the network is ready.
Configure stable Wi-Fi settings before connecting when possible. Espressif notes that changing some settings after connection can cause a reconnect, which can interrupt any work already relying on that connection.
3. Wait for an IP address before using sockets
After successful association with the access point, DHCP begins. Association alone does not mean the application has a usable IP connection. Wait for IP_EVENT_STA_GOT_IP before starting TCP or UDP socket work. If that event never arrives, investigate address assignment rather than repeatedly debugging code that assumes the device is already online.
Espressif describes the Wi-Fi driver as separate from higher-layer code: “The Wi-Fi driver can be considered a black box that knows nothing about high-layer code, such as the TCP/IP stack, application task, and event task.” In practice, the application needs to handle the relevant events and coordinate its own network work with them.
4. Build, flash, and observe the device
The official ESP-IDF Wi-Fi Station example lists ESP32-S3 as a supported target. Its documented workflow is to build and flash the project, then inspect serial output using idf.py -p PORT flash monitor, replacing PORT with the port for your board. Use a data-capable USB cable compatible with the board connector; a cable that only supplies power will not provide the serial connection needed for monitoring. The exact connector and port depend on the board.
Rank #2

- ESP32-S3-ePaper-1.54 development board onboard 1.54inch e-paper display, 200 × 200 resolution, features high contrast and wide viewing angle. Onboard audio codec chip, supports voice capture and playback, enabling AI voice interaction applications
- ESP32-S3 1.54inch e-Paper AIoT development board adopts high-performance 32-bit LX7 dual-core processor, up to 240MHz main frequency. Supports 2.4GHz Wi-Fi (802.11 b/g/n) and Bluetooth 5 (LE), with onboard antenna
- Onboard PCF85063 RTC chip and SHTC3 temperature & humidity sensor for accurate RTC management and environmental monitoring
- Built-in 512KB Static RAM, 384KB ROM, with integrated 8MB Flash and 8MB PSRAM
- Onboard TF card slot for external storage of images or files. Onboard programmable PWR and BOOT side buttons for customized function development. Reserved 2 × 6 2.54mm pitch pin header for convenient external expansion
Use the Seeedash setup flow for Seeedash firmware
Seeed’s documented Seeedash onboarding process is separate from generic ESP-IDF setup. It uses a temporary device access point and a browser configuration page; it is not a universal procedure for ESP32-S3 e-paper products.
Quick wins for a faster PC:
Repair Windows errors before they cause bigger problemsFix Now →Fix the driver behind crashes, sound loss and screen glitchesFind Drivers →-
Look at the e-paper screen for the temporary access point details and connect a phone or computer to that access point.
-
Scan the displayed QR code, or open
192.168.4.1in a browser. -
Select the local Wi-Fi network and enter its password.
-
Wait for the device to join the local network and display a pair code.
Free tools Windows power users keep installed
One-click scans. No signup required.
Special offer. See more information about Outbyte and uninstall instructions. Please review EULA and Privacy policy.
If the configuration page does not open automatically, remain connected to the device’s temporary access point and enter 192.168.4.1 manually. If the displayed access point or screen instructions do not match this description, verify that the board is actually running Seeedash and consult its firmware-specific instructions.
Find the failure stage from events and symptoms
For an ESP-IDF application, log Wi-Fi events and the disconnect reason. A failure to find an access point, an authentication timeout, failure to obtain an IP address, and a later disconnect point to different parts of the process. Espressif documents reasons including “no target AP found” and “authentication timeout”; use the reported reason rather than guessing from the e-paper screen alone.
| Observed symptom | Likely stage | What to check |
|---|---|---|
| The device cannot see or find the access point. | Access-point discovery | Try a 2.4 GHz network, verify the SSID and that it is available, and check whether the board has usable signal where it is located. |
| The access point is visible, but connection fails during authentication. | Authentication | Re-enter the password and check whether the router’s security mode is compatible with the firmware configuration. Inspect the disconnect reason for an authentication timeout. |
| The device associates, but the application cannot use the network. | DHCP/IP assignment or application timing | Check whether IP_EVENT_STA_GOT_IP arrives. Do not start IP-based socket work before it does. |
| The device works, then loses Wi-Fi. | Disconnection and recovery | Log WIFI_EVENT_STA_DISCONNECTED and its reason. Check for a restarted access point or poor signal, then perform appropriate recovery. |
| A scan fails while the device is connecting. | Competing Wi-Fi operations | Avoid running scans concurrently with connection attempts. Delay and retry the scan when appropriate. |
Troubleshoot by symptom
“ESP32-S3 not connecting to WiFi”: the network is not found
-
Confirm that the network you selected is 2.4 GHz. A visible 5 GHz-only network is not a substitute for the documented ESP32-S3 2.4 GHz Wi-Fi band.
-
Check that the SSID is correct and the network is available. If the SSID is not broadcast, confirm the firmware is configured for the intended network rather than a similarly named one.
Special offer. See more information about Outbyte and uninstall instructions. Please review EULA and Privacy policy. -
Consider the board’s location and signal. A router restart or changed signal conditions can also explain a previously working device that no longer finds the access point.
Rank #3
 Waveshare ESP32-S3 3.97inch e-Paper Development Board, 800 × 480 Resolution, Supports Wi-Fi/BLE 5, and AI Voice Interaction, Onboard Microphone
- Equipped with ESP32-S3R8 high-performance dual-core processor, max main frequency up to 240MHz
- Supports 2.4GHz Wi-Fi & Bluetooth 5 (LE), with onboard antenna
- Built-in multi-spec storage, integrated 8MB PSRAM + external 16MB Flash
- Comes with 3.97-inch e-paper display (800×480), high contrast & wide viewing angle
- Onboard audio codec, 6-axis IMU, temp&humidity/RTC chips for multi-scenario expansion
-
In ESP-IDF, inspect the disconnect reason. A no-target-AP result points toward discovery, availability, or configuration-threshold conditions rather than a socket problem.
The access point appears, but the password is rejected
-
Enter the password again and confirm that the SSID and password are a matching pair. Check for accidental capitalization or other typing differences.
-
Check the router’s security mode against the firmware configuration. The documented ESP-IDF guide exposes a disconnect reason such as authentication timeout, which is more informative than treating every failed connection as a bad password.
What’s actually slowing this PC down?
Pick the symptom - the matching free tool is one click away.
Special offer. See more information about Outbyte and uninstall instructions. Please review EULA and Privacy policy. -
If the credentials are correct but authentication continues to fail, consult the router and board documentation for compatible security settings. The available evidence does not establish one security-mode setting that is correct for every board and router.
The device connects to Wi-Fi but has no usable IP connection
Check whether the application has received IP_EVENT_STA_GOT_IP. The access point association happens before DHCP completes, so a connection event at the Wi-Fi layer is not sufficient evidence that TCP or UDP can work. Keep socket startup behind the got-IP event and log whether DHCP completes. If the event is absent, focus on address assignment and the network environment rather than trying to open sockets earlier.
The device disconnects after working
Log WIFI_EVENT_STA_DISCONNECTED and the reason each time it occurs. Then decide whether reconnecting is appropriate for the failure. A restarted access point or weak signal may cause a drop; the event reason helps separate those cases from configuration or authentication problems.
After a disconnect, treat existing sockets as invalid. Close them and create new sockets after the connection has recovered and the device has received an IP address again. Reusing stale sockets can leave application code out of step with the device’s actual network state.
Scanning and connecting interfere with each other
Do not assume a scan can always run while a connection attempt is in progress. Espressif’s guide notes that a scan can fail during connection activity; delay it and retry when appropriate. Keep scan and connection state coordinated in the application rather than repeatedly launching scans from unrelated tasks.
The vendor setup page does not appear
For the documented Seeedash flow, first verify that the phone or computer is connected to the temporary access point shown on the e-paper display. Then open 192.168.4.1 manually if the browser did not launch the page. This address and onboarding sequence apply to that Seeedash procedure, not automatically to other vendors’ firmware.
There are no useful logs
Use the board’s supported serial connection and the ESP-IDF monitor workflow if you control the firmware. Confirm the USB cable supports data and matches the connector, then use the correct serial port in idf.py -p PORT flash monitor. The ESP32-S3 development documentation lists a USB cable as development hardware, but connector and port details are board-specific.
Rank #4
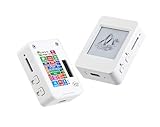
- This is is 1.54inch e-Paper AIoT development board. Onboard 1.54inch e-paper display, 200 x 200 resolution, features ultra-low power consumption and ambient light readability, suitable for portable devices and long-battery-life scenarios. Supports 2.4GHz Wi-Fi (802.11 b/g/n) and Bluetooth 5 (LE), with onboard antenna.
- Integrated with an RTC chip, SHTC3 temperature and humidity sensor, TF card slot, low-power audio codec chip circuit, and Lithium battery recharge management circuit. Reserved interfaces including USB, UART, I2C, and GPIO for easy functionality expansion and sensor connectivity, providing a flexible and reliable development platform for IoT terminals, electronic tags, portable displays, and other applications.
- Supports AI Speech Interaction: Allows access to online large model platforms such as ChatGPT, DeepSeek, Doubao, etc. Onboard audio codec chip, supports voice capture and playback, enabling AI voice interaction applications.
- Built-in 512KB Static RAM, 384KB ROM, with integrated 8MB Flash and 8MB PS RAM. Onboard PCF85063 RTC chip and SHTC3 temperature & humidity sensor for accurate RTC management and environmental monitoring.
- Onboard TF card slot for external storage of images or files. Onboard programmable PWR and BOOT side buttons for customized function development. Reserved 2 × 6 2.54mm pitch pin header for convenient external expansion.
Use a repeatable diagnostic session
When a board is reported as “not connecting,” avoid changing several variables at once. Record the exact SSID, whether it is the router’s 2.4 GHz service, the firmware version or project revision, and whether the problem occurs on first setup or after a successful run. Then capture the serial timeline from startup through the first disconnect or got-IP event.
-
Start with the board close enough to the access point to make signal an unlikely variable, while keeping the same network and credentials.
-
Confirm that the configured SSID is the intended 2.4 GHz network, especially when the router presents one name for two bands.
-
Look for
WIFI_EVENT_STA_START, the call toesp_wifi_connect(), and the resulting disconnect reason. This identifies whether the application started the driver and attempted association. -
Look separately for
IP_EVENT_STA_GOT_IP. Do not label the test a success merely because association occurred.The Tool Desk
Outbyte PC Repair FREERepair Windows errors before they cause bigger problemsFix Now →Outbyte Driver Updater FREEScan for outdated or missing drivers - takes under a minuteDriver Scan →Special offer. See more information about Outbyte and uninstall instructions. Please review EULA and Privacy policy. -
If the test succeeds once and then fails later, compare the event reason and access-point state rather than changing credentials that were already proven correct.
This sequence also prevents a common diagnostic mistake: testing a TCP or UDP client before DHCP has completed, then treating an application error as proof that Wi-Fi authentication failed.
Independent reader supportYour contribution helps us test, update, and keep practical guides available for everyone.Board and accessory checks that affect troubleshooting
When selecting or comparing ESP32-S3 e-paper development boards, verify the display connector, pinout, and panel or driver compatibility separately from Wi-Fi. Also check the vendor’s library and firmware support, the documented provisioning method, and whether the board exposes a practical USB connection for flashing and serial logs. Compatibility with an existing 2.4 GHz network is another useful checkpoint.
These checks are more reliable than assuming all ESP32-S3 e-paper products behave alike. A board may use generic ESP-IDF station code, a temporary access point like Seeedash, or another vendor-specific method. USB connectors also vary, so choose a data-capable cable that actually fits the board; a power-only cable can make a working application appear silent because no monitor output is available.
Do these 3 things before closing this tab:
1Fix the driver behind crashes, sound loss and screen glitches2Clear out junk files and repair common Windows errors3Scan for outdated or missing drivers - takes under a minuteKeep recovery logic aligned with connection state
A robust application should treat Wi-Fi as a stateful service rather than a one-time startup action. Start network-dependent work only after an IP address is assigned; if the connection drops, stop relying on the old connection and recover deliberately.
Best Value
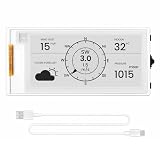
- Powerful ESP32-S3 Performance: The 2.13" ESP32 E-ink display is powered by an ESP32-S3 chip (up to 240 MHz), delivering reliable performance. Supports 3-/4-wire SPI (default 4-wire) for fast, stable integration and a smooth, responsive e-ink development experience
- Ultra-Low Power & Power-Off Retention: Designed for energy efficiency, this epaper display only draws power during screen refresh. Static content stays visible without a continuous power supply, ideal for battery-powered devices, smart tags, electronic shelf labels, and more
- Sunlight-Readable & Anti-Glare: Featuring a reflective display with no backlight, this ESP32-S3 e-paper screen delivers clear readability even in strong direct sunlight. Hard-coated anti-glare surface ensures excellent visibility and durability
- Rich Interfaces & Wide Compatibility: Equipped with BAT interface (2.2 V-3.7 V), UART0, GPIO header, back/menu/reset/boot buttons for flexible wiring and control. The E-ink display is compatible with Arduino IDE, ideal for DIY makers, engineers and IoT projects
- High-Resolution e-ink Display: The 2.13-inch e-ink display with 122×250 resolution delivers crisp black-and-white contrast and a wide viewing angle. Perfect for e-paper readers, smart home dashboards, electronic shelf labels, badges, and other low-power display applications
-
Record the Wi-Fi event and reason code when a connection attempt fails or a connection is lost.
-
Choose whether to reconnect based on the failure and application needs. Espressif’s guidance supports reconnecting when appropriate, not an assumption that every disconnect should trigger identical recovery.
-
After reconnection, wait for
IP_EVENT_STA_GOT_IPagain before resuming IP-based work.Do these 3 things before closing this tab:
1Scan for outdated or missing drivers - takes under a minute2Clear out junk files and repair common Windows errors3Fix the driver behind crashes, sound loss and screen glitchesSpecial offer. See more information about Outbyte and uninstall instructions. Please review EULA and Privacy policy. -
Close and recreate sockets after recovery because sockets from the disconnected session are no longer valid.
-
Check API return values and preserve complete configuration when retrying so that a recovery attempt does not conceal a setup error.
Documentation scope and versions
The ESP-IDF Wi-Fi Driver reference used here is the ESP32-S3 guide for ESP-IDF v5.5.4. Espressif’s ESP32-S3 introduction reviewed for the 2.4 GHz band is v5.3.3. The official station example is on GitHub’s moving master branch, so its contents can change. Seeed’s temporary-access-point steps are from its maintained Seeedash guide. Check the documentation matching your installed ESP-IDF version, exact board, and firmware if an API detail or setup label differs.
Frequently Asked Questions
Can an ESP32-S3 e-paper board connect to a 5 GHz Wi-Fi network?
Start with 2.4 GHz. Espressif identifies ESP32-S3 Wi-Fi in the 2.4 GHz band, and Seeed recommends 2.4 GHz for its documented e-paper setup. Individual third-party hardware and firmware can differ, so check the exact board documentation.
Why does Wi-Fi association succeed but my TCP client fail?
Association happens before DHCP. Wait for IP_EVENT_STA_GOT_IP before opening TCP or UDP sockets; a Wi-Fi-layer connection event alone does not prove that the device has a usable IP connection.
What does “no target AP found” mean?
The device did not find the configured access point. Check the SSID, confirm the network is available and 2.4 GHz, consider signal at the board’s location, and inspect the event reason instead of debugging socket code.
What should I do after an ESP32-S3 disconnects?
Log WIFI_EVENT_STA_DISCONNECTED and its reason. Reconnect when appropriate, wait for IP_EVENT_STA_GOT_IP again, and close and recreate sockets because connections from the disconnected session are no longer valid.
How do I open the Seeedash Wi-Fi setup page?
Join the temporary access point shown on the e-paper display, scan its QR code, or browse manually to 192.168.4.1. Then select the local Wi-Fi network, enter its password, and wait for the pair code.
Outdated Drivers Are Slowing You Down
One free scan finds every outdated or missing driver and matches the right update for your exact hardware.Free scan · exact hardware matchWindows Errors? Fix Them Before They Spread
Repair common Windows errors and clear accumulated junk for a smoother, more stable PC - no reinstall needed.Free scan · no reinstallWhy are ESP-IDF Wi-Fi scans failing during connection?
A scan can fail while a connection attempt is active. Avoid concurrent scans, coordinate scan and connection state, then delay and retry the scan when appropriate.
The Bottom Line
Use the workflow that matches your firmware: generic ESP-IDF station mode or the vendor’s documented onboarding. Begin with 2.4 GHz, verify credentials, watch the event and disconnect reason, and wait for IP_EVENT_STA_GOT_IP before network work. On recovery, reconnect deliberately and rebuild sockets. Those checkpoints separate access-point discovery, authentication, DHCP, and application timing problems without requiring a new router.
Quick Recap
Product prices and availability are accurate as of the date/time indicated and are subject to change. Any price and availability information displayed on Amazon at the time of purchase will apply.

