
iTechGuides is reader-supported. When you buy through links on our site, we may earn an affiliate commission. As an Amazon Associate I earn from qualifying purchases. Learn more
Identify the Mac’s video connector first. If it has Mini DisplayPort or Thunderbolt 1/2, connect an HDMI monitor with a Mini DisplayPort-to-HDMI adapter or cable. For a monitor with a full-size DisplayPort socket, use a Mini DisplayPort-to-DisplayPort cable or a compatible adapter. Then select the monitor input and configure the display in macOS. Audio may require an additional check on older Macs because not every Mini DisplayPort implementation carries sound.
1. Identify the Mac’s connector before buying anything
Mini DisplayPort and Thunderbolt 1/2 use the same physical connector shape, but the Mac’s port and the monitor’s port still determine which accessory you need. Look at the symbol beside the socket and confirm the Mac model’s specifications if the marking is unclear.
| Mac-side port | What it can connect to | Accessory normally required |
|---|---|---|
| Mini DisplayPort | HDMI monitor | Mini DisplayPort-to-HDMI adapter or cable |
| Mini DisplayPort | Full-size DisplayPort monitor | Mini DisplayPort-to-DisplayPort cable or compatible adapter |
| Thunderbolt 1 or Thunderbolt 2 | HDMI monitor | Mini DisplayPort-to-HDMI adapter or cable, provided the accessory supports the Mac’s output |
| Thunderbolt 1 or Thunderbolt 2 | Full-size DisplayPort monitor | Mini DisplayPort-to-DisplayPort cable or compatible adapter |
Apple’s current support guidance groups these outputs together: “Thunderbolt 2, Thunderbolt, or Mini DisplayPort: Connect to HDMI with a Mini DisplayPort to HDMI adapter or cable.” Apple published that guidance on September 22, 2026. The physical fit alone is not a guarantee of resolution, refresh rate, audio, or copy-protection support, so check the accessory specification for the exact Mac and monitor combination.
Quick wins for a faster PC:
Clear out junk files and repair common Windows errorsFree Scan →Scan for outdated or missing drivers - takes under a minuteDriver Scan →Mini DisplayPort is not the same as USB-C
A Mini DisplayPort plug is much smaller than full-size DisplayPort and has a single beveled corner. Do not order a USB-C-to-HDMI accessory merely because the Mac has a small rectangular port; USB-C and Mini DisplayPort use different connectors and signaling. A Thunderbolt 1/2 socket may look like Mini DisplayPort, while Thunderbolt 3/4 uses USB-C and requires a different connection method.
#1 Best Overall

- Lightweight and portable adapter for connecting a Mini DisplayPort (Mini DP or mDP)/Thunderbolt 2 port compatible computer to an HDTV, monitor, or projector with HDMI; A separate HDMI cable (sold separately) is required
- Transmits both audio and video from computer or tablet to HDTV display; Supports video resolutions up to 1920 x 1200 and 1080p (Full HD) and flawless audio pass-thru for uncompressed digital 7.1, 5.1 or 2 channels
- Low-profile connector does not block adjacent ports on your computer, has molded strain-relief for long life, and has ergonomically designed treads for easy plugging and unplugging
- Gold-plated connectors resist corrosion, provide rigidity, and improve the signal performance
- Compatible with Apple MacBook, MacBook Pro, MacBook Air, iMac, Mac mini, Mac Pro; Microsoft Surface Pro 4, Pro 3, Pro 2, Surfacebook (NOT Surface for Windows RT); Lenovo ThinkPad X1 Carbon, X230/X240s, L540, T540p, W540, Helix; Dell XPS 13/14/15/17, Latitude E7240/E7440, Precision M3800; Alienware 14/17/18; Acer Aspire R7/S7/V5/V7; Intel NUC; Asus Zenbook; HP Envy 14/17; Google Chromebook Pixel; Toshiba Satellite Pro S500, Tecra M11/A11
2. Choose HDMI or DisplayPort on the monitor
Use the monitor input that matches the cable’s monitor-side plug. The Mac is the source, so the connection must run from the Mac’s Mini DisplayPort or Thunderbolt 1/2 output to an HDMI or DisplayPort input on the monitor. A cable designed in the opposite direction may not work.
| Monitor input | Best starting choice | Extra considerations |
|---|---|---|
| HDMI | Mini DisplayPort-to-HDMI adapter or one-piece cable | Confirm the accessory’s maximum resolution, refresh rate, HDCP support, and whether it needs USB power or USB audio. |
| Full-size DisplayPort | Mini DisplayPort-to-DisplayPort cable | A direct cable is usually the simplest signal path; verify the supported resolution and refresh rate. |
| Only a different monitor input is available | Use an adapter specifically rated for that direction | Passive and active adapters can have different limits. Do not assume that an HDMI-to-Mini DisplayPort cable works from a Mac to an HDMI display. |
When a direct DisplayPort cable is preferable
If the display has a full-size DisplayPort input, a Mini DisplayPort-to-DisplayPort cable avoids an additional HDMI conversion step. StarTech maintains dedicated Mini DisplayPort and DisplayPort cable and adapter categories, reflecting that this is a standard accessory path. The cable still has to match the monitor connector and list support for the resolution and refresh rate you intend to use.
Rank #2

- 【High Quality Transmission】 This Mini DisplayPort to HDMI adapter gives you 4K@30Hz/1080P@60Hz vision with incredible detail. From any laptop/desktop with Mini DP, Thunderbolt 1 or 2, to your monitor, projector, or HDTV with HDMI, you would enjoy lag-free videos with flawless audio pass-thru for digital 7.1, 5.1 or 2 channels. Backward compatible with 1440p, 1080p, 720p. HDCP 2.2 Compliant. (!!!Only transmits signal from Mini DP source to HDMI monitor)
- 【Excellence Quality】 Thick gold-plated pins, sturdy aluminum case and the Nylon braiding. This Mini DP to HDMI adapter is corrosion-resistant, interference-free with maximum conductivity, and anti-twisting, anti-pet-biting. (!!!Not USB port, Thunderbolt 3 port, DisplayPort port, Lightning port)
- 【Wide Compatibility】 Compatible for early Apple and Surface series, e.g. Apple MacBook Pro (before 2016), MacBook Air (before 2018), iMac (before 2017), Mac Mini (before 2018), Microsoft Surface Pro, Surface laptop, Surface studio/ book/ dock (NOT surface/surface 2 for Windows RT), and any other laptops and desktops with Mini DP or Thunderbolt (Not compatible with USB-C or Thunderbolt 3/4)
- 【Thoughtful Design】 Slim and compact connector does NOT cause any tilts of your laptop, keeps adjacent ports available for optimal use and is easy for plugging and unplugging; The quality braided jacket can withstand 15,000+ bends which assure excellent connection during usage.
- 【Reliable Quality】 You will get 1* Mini DisplayPort to HDMI Adapter, Your satisfaction is our motivation and quality after-sales service is provided to meet any of your needs. If you have any questions about your purchase and use of the process, feel free to contact us, the professional customer service team will provide you with satisfactory solutions within 24 hours.
When an HDMI adapter is the practical choice
Choose Mini DisplayPort-to-HDMI when the monitor, television, docking display, or projector accepts HDMI but not DisplayPort. A one-piece cable is convenient when its length and specification fit your setup. An adapter with an HDMI socket lets you reuse a standard HDMI cable and replace that cable independently if it is damaged.
Do these 3 things before closing this tab:
1Fix the driver behind crashes, sound loss and screen glitches2Repair Windows errors before they cause bigger problems3Scan for outdated or missing drivers - takes under a minute3. Connect the Mac to an HDMI monitor
Follow these steps for a monitor with an HDMI input.
Rank #3
![BENFEI Mini DisplayPort to HDMI Adapter 4K, Thunderbolt 2 to HDMI Adapter Compatible for MacBook Air/Pro, Microsoft Surface Pro/Dock, Monitor, Projector[Gold-Plated Connectors& Aluminium Shell]](https://m.media-amazon.com/images/I/31-aQ80b3QL._SL160_.jpg)
- EXCELLENT TRANSMISSION: BENFEI Mini DisplayPort (❗Not USB port, Thunderbolt 3 port, DisplayPort port, Lightning port) to HDMI Adapter (❗Not USB Adapter) utilizes better chip solution and professional multiple shielding for instaneous and accurate data streaming. [❗Only transmits signal from Mini DP source to HDMI monitor]
- SUPERIOR STABILITY: 24K gold-plated pure copper connectors guarantee stable transmission so as to provide superb quality audio and video (AV), resolutions up to 3840*2160@30Hz(❗Not 3840*2160@60Hz), including 1920 x 1200, 1080p (Full HD) and flawless audio pass-thru for uncompressed digital 7.1, 5.1 or 2 channels
- UNIVERSAL COMPATIBILITY: Compatible with Apple MacBook, MacBook Pro, MacBook Air, iMac, Mac mini, Mac Pro; Microsoft Surface Pro 4, Pro 3, Pro 2, Surfacebook (NOT Surface for Windows RT); Lenovo ThinkPad X1 Carbon, X230/X240s, L540, T540p, W540, Helix; Dell XPS 13/14/15/17, Latitude E7240/E7440, Precision M3800; Alienware 14/17/18; Acer Aspire R7/S7/V5/V7; Intel NUC; Asus Zenbook; HP Envy 14/17; Google Chromebook Pixel; Cyberpower Zeusbook Edge X6; Toshiba Satellite Pro S500, Tecra M11/A11
- UPSCALE DESIGN: Slim, sleek and compact. With aluminum alloy shell and unibody structure, It's a long-lasting portable Mini DP to HDMI Adapter.
- INCREDIBLE DURABILITY: 15,000+ bend lifespan provides you with a heavy-duty Thunderbolt to HDMI Adapter. Ideal for Apple MacBook Air, Apple MacBook Pro, Microsoft Surface Pro, iMac, Surface Book, Surface Studio, monitor (HP, Samsung, Dell, Acer, LG, ASUS), projector, Microsoft Surface Dock, TV, etc.
- Confirm the output. Verify that the Mac has Mini DisplayPort or Thunderbolt 1/2, not a USB-C-only port.
- Choose a correctly oriented accessory. The product description should state Mini DisplayPort or Thunderbolt output to HDMI input. Check its maximum resolution and refresh rate, HDCP support, and audio method.
- Attach the Mac end. Insert the Mini DisplayPort plug firmly into the Mac. If the accessory has a detachable cable, connect the adapter first and then connect the HDMI cable.
- Attach the monitor end. Connect the HDMI plug to the monitor’s HDMI input. With an adapter, use a known-good standard HDMI cable if you are diagnosing a problem.
- Power on and select the input. Turn on the monitor, open its input/source menu, and select the exact HDMI socket you used.
- Open display settings. In macOS, open System Settings > Displays. On older macOS versions, the equivalent path is System Preferences > Displays.
- Choose the desktop arrangement. Select mirroring when both screens should show the same image. Select an extended desktop when the monitor should provide additional workspace. Arrange the displays in the on-screen layout so the pointer moves between them in the expected direction.
- Set audio if required. Open System Settings > Sound > Output (or System Preferences > Sound > Output) and select the HDMI device. If the Mac is a Mac mini and a device is connected to its headphone jack, Apple advises disconnecting that device when HDMI is not receiving audio.
If the monitor remains blank
Keep the monitor on its selected HDMI input while reseating both ends. If an adapter is involved, test a known-good HDMI cable and try another HDMI input on the display. Reopen Displays settings to see whether macOS detects the screen. Detection with no picture usually points to an input selection, cable, adapter-limit, or unsupported mode issue rather than a need to reinstall macOS.
4. Connect the Mac directly to a DisplayPort monitor
A full-size DisplayPort input accepts a Mini DisplayPort-to-DisplayPort cable. This route is often simpler than converting to HDMI.
Rank #4
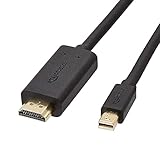
- IN THE BOX: 6-foot Mini DisplayPort to HDMI cable
- VIDEO: Supports video resolutions up to 1080p
- USES: Transmits audio and video from computer or tablet to HD display
- DURABLE DESIGN: Gold-plated connectors, bare copper conductors, and foil-and-braid shielding for strength and reliable connectivity
- CONNECTIVITY: Unidirectional passive cable, only transmits mini display port signal to HDMI monitor Supports Dual-Mode DisplayPort (DP++); compatible with MacBook Air 2010-2017 and MacBook Pro 2010-2015; new models with USB-C port or Thunderbolt port are NOT compatible
- Check the monitor socket. Use a full-size DisplayPort input, not Mini DisplayPort, HDMI, or a similarly shaped USB-C port.
- Verify the cable direction. One end should be Mini DisplayPort for the Mac and the other full-size DisplayPort for the monitor.
- Check the specification. Confirm that the cable is rated for the monitor’s desired resolution and refresh rate. If the monitor requires a particular DisplayPort feature, make sure the cable and Mac output support it.
- Connect both ends. Seat the Mini DisplayPort plug in the Mac and the DisplayPort plug in the monitor.
- Select DisplayPort at the monitor. Use the monitor’s input/source control to choose the DisplayPort socket.
- Configure macOS. Open System Settings > Displays or System Preferences > Displays, then select mirroring or extended desktop.
- Configure sound separately. If the monitor has speakers and the Mac exposes it as an audio device, select it under Sound > Output. If it does not appear, the Mac, cable path, or monitor may not provide audio through that connection.
5. Understand audio limitations on older Macs
Video through Mini DisplayPort does not prove that audio will travel through the same port. Some older Mac and adapter combinations provide video only. Apple’s HDMI instructions say to select the HDMI device in the Sound output pane when an HDMI display receives no audio, but the available output list depends on the Mac and adapter.
USB-audio adapters for video-only Mini DisplayPort output
Some accessories are built specifically for Macs whose Mini DisplayPort output does not include audio. A Cable Matters manual describes an adapter that “integrates Mini DisplayPort video signal and audio signal from USB port into HDMI output.” Its procedure is to connect both Mini DisplayPort and USB, then choose USB Sound Device in macOS Sound settings. This is a product-specific workaround, not a universal property of Mini DisplayPort.
Best Value
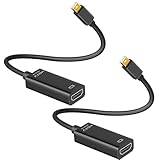
- 4K ULTRA HD CLARITY: This Mini DisplayPort to HDMI adapter (Thunderbolt 1&2 Compatible) supports 4K@30Hz resolution and ensures superior visual clarity and color accuracy. Lag-free and flawless connections make your work and presentations more efficient. The Thunderbolt to HDMI cables is also backward compatible with 2K@60Hz and 1080P@120Hz. NOTE: NOT compatible with Thunderbolt 3/4/USB-C/Mini HDMI.
- WIDE COMPATIBILITY: Connect laptops with a mini DP port to external displays, TVs, or projectors effortlessly. This Mini DP to HDMI Cable is ideal for MacBook Air (2009-2017), MacBook Pro (2009-2015), iMac (2009-2015), Microsoft Surface Pro 1-6, Surface Laptop 1-2, S urface Book 1. The Mini Display to HDMI cable supports Mini DP/Thunderbolt 1/2 output for smooth, high-resolution audio and video connections. NOTE: MacBook 2015 or later models do not support 4K@30Hz output.
- SUPERIOR STABILITY: This Mini Display to HDMI adapter delivers clear and smooth visuals at 4K@30Hz, 1080P@120Hz, along with flawless audio pass-through for uncompressed digital 7.1, 5.1, or 2 channels. Experience lightweight and portable connectivity with the Mini DisplayPort Male to Female adapter. NOTE: The HDMI cable is is required(not included).
- UPSCALE DESIGN: Slim, sleek and compact. With aluminum alloy shell and unibody structure, It's a long-lasting portable Mini DP to HDMI adapter. NOTE: Not support HDMI to MINI displayport.
- MORE CONVENIENT: 2 Pack design, don’t need to take it into your bag or pocket everyday, you can keep one home, and another in office, Don't worry about forgetting to bring it with, more convenient. NOTE: Plug and play, no driver needed.
- Connect the adapter’s Mini DisplayPort plug to the Mac.
- Connect the adapter’s USB lead to the Mac so it can obtain the audio signal or power specified by that adapter.
- Connect HDMI from the adapter to the monitor.
- Open System Settings > Sound > Output (or the equivalent Sound pane in System Preferences).
- Select USB Sound Device if that is the name exposed by the adapter.
Read the adapter manual before buying: some USB connections provide only power, while others carry the audio path. The manual for the exact model is the authority on whether both plugs are required.
Independent reader supportYour contribution helps us test, update, and keep practical guides available for everyone.6. Set realistic resolution and refresh-rate expectations
Apple lists these figures for named Mac models and built-in HDMI outputs:
| Mac/output example | Apple-listed maximum | Qualification |
|---|---|---|
| Compatible newer Mac models using built-in HDMI | Up to 8K at 60 Hz | Only on compatible models; Apple’s 2026 guidance does not make this a Mini DisplayPort-adapter limit. |
| Compatible newer Mac models using built-in HDMI | Up to 4K at 240 Hz | Requires a compatible Mac, display, cable, and mode. |
| Mac mini models introduced in 2018 or later, among other supported Macs | Up to 4K at 60 Hz | Figure refers to the listed built-in HDMI capability. |
| Mac mini models introduced between 2012 and 2014, among other older Macs | Up to 4K at 30 Hz | Figure refers to the listed built-in HDMI capability. |
Those numbers should not be copied directly to a Mini DisplayPort-to-HDMI setup. Apple warns that adapter details determine supported resolutions. The adapter or cable can impose a lower ceiling, and the monitor may impose another. Check all three components: Mac model, accessory specification, and monitor input specification.
The Tool Desk
Outbyte Driver Updater FREEFix the driver behind crashes, sound loss and screen glitchesFind Drivers →Outbyte PC Repair FREEClear out junk files and repair common Windows errorsFree Scan →Why refresh rate can fall below the monitor’s advertised value
- The Mac’s output may support a lower bandwidth than the monitor input.
- The Mini DisplayPort-to-HDMI adapter may have a lower maximum than the Mac.
- A passive adapter may depend on capabilities negotiated by the source and display, while an active adapter may perform additional conversion.
- The selected resolution can change the maximum refresh rate; a monitor that accepts a high refresh rate at one resolution may not accept it at another.
- A long or damaged cable can cause dropouts or force a lower stable mode.
After connecting, open Displays settings and inspect the available resolution and refresh-rate choices. If the desired mode is absent, verify the accessory’s specification before assuming the Mac is defective.
7. Compare adapters and cables before purchase
Use the following checklist when two products appear similar. A value that is not stated by the manufacturer should be treated as unknown rather than assumed.
Quick Recap
| Comparison point | What to verify |
|---|---|
| Connector match | Mini DisplayPort or Thunderbolt 1/2 on the Mac; HDMI or full-size DisplayPort on the monitor. |
| Direction | Mac/source output to monitor/input. A reverse-direction cable may not convert the signal. |
| Maximum resolution | Accessory-specific value; not stated universally because it varies by product. |
| Maximum refresh rate | Accessory-specific value at the resolution you plan to use; not stated universally. |
| Audio support | Whether audio travels through Mini DisplayPort, requires USB, or is video-only; not stated universally. |
| USB requirement | Whether USB is needed for power, audio, or both; check the exact manual. |
| HDCP support | Confirm the version or support claim if protected video matters; not stated universally. |
| Cable length | Choose a length that avoids strain and unnecessary slack; maximum reliable length is accessory-specific. |
| Passive or active design | Use the manufacturer’s description. Do not infer performance solely from the plug shape. |
Quick selection examples
- HDMI monitor, ordinary office resolution: A correctly oriented Mini DisplayPort-to-HDMI cable or adapter is the straightforward choice. Confirm audio and the listed resolution.
- DisplayPort monitor requiring a high refresh rate: Start with a Mini DisplayPort-to-DisplayPort cable whose specification explicitly lists the target resolution and refresh rate.
- Older Mac with no HDMI audio: Choose an adapter that documents USB-audio support and follow its instructions for selecting the USB sound device.
- Mac mini with a headphone cable connected: Remove that connection while testing HDMI audio, following Apple’s guidance.
8. Troubleshoot by symptom
No picture and no monitor detection
- Confirm the monitor is set to the HDMI or DisplayPort input physically used.
- Reseat the Mac end, adapter end, and monitor end.
- With HDMI, replace the detachable HDMI cable with a known-good cable.
- Power-cycle the monitor and reopen Displays settings.
- Check that the adapter is the correct direction and supports the Mac’s output.
Monitor is detected but the screen is black or unstable
- Select a lower resolution or refresh rate that is listed in Displays settings.
- Compare the adapter’s stated maximum with the monitor mode you selected.
- Try a shorter or known-good cable.
- If using HDMI through an adapter, verify that the adapter supports the required HDCP behavior for the content.
Picture works but there is no sound
- Open Sound > Output and select the HDMI or DisplayPort device.
- On a Mac mini, disconnect any device from the headphone jack while testing HDMI audio.
- If the Mac is an older model or the adapter is video-only, use a documented USB-audio adapter and select its USB sound device.
- Check the monitor’s own volume, mute, and speaker settings.
Resolution or refresh rate is lower than expected
- Check the exact Mac model rather than relying on the connector’s appearance.
- Read the accessory’s resolution and refresh-rate limits; Apple notes that adapter details determine supported resolutions.
- Confirm that the monitor input, cable, and adapter all support the requested mode.
- Test direct Mini DisplayPort-to-DisplayPort if the monitor has DisplayPort and the HDMI adapter is the limiting component.
Intermittent dropouts
- Reseat every connection and remove unnecessary couplers or extensions.
- Test another monitor input and another cable where possible.
- Use the adapter’s required USB connection if its manual specifies one.
- Reduce the resolution or refresh rate temporarily. If stability returns, the selected mode may exceed the accessory’s reliable capability.
9. A final setup checklist
- The Mac has Mini DisplayPort or Thunderbolt 1/2, and the accessory is designed for that output.
- The monitor-side connector matches the selected HDMI or full-size DisplayPort input.
- The accessory direction is Mac output to monitor input.
- The monitor is on the correct source.
- Displays settings shows the monitor and is configured for mirroring or extended desktop as intended.
- The accessory’s resolution and refresh-rate limits match the mode you want.
- Sound output is set to HDMI, DisplayPort, or the documented USB sound device.
- Any Mac mini headphone-jack connection has been removed while testing HDMI audio.
Product prices and availability are accurate as of the date/time indicated and are subject to change. Any price and availability information displayed on Amazon at the time of purchase will apply.

