
Crashes, No Sound, or Screen Glitches?
Random freezes, missing sound and display glitches usually trace back to one bad driver. Find and replace yours safely.Free scan · under a minutePC Slower Than It Used to Be?
A free scan shows the junk files, broken settings and background clutter dragging Windows down - then fixes them in one click.Free scan · Windows 10 & 11iTechGuides is reader-supported. When you buy through links on our site, we may earn an affiliate commission. As an Amazon Associate I earn from qualifying purchases. Learn more
A successful budget DDR4 gaming PC starts with a compatible CPU, motherboard, and memory combination, then assigns the remaining budget to the graphics card and reliable supporting hardware. Choose the games, resolution, refresh rate, country, and maximum tower budget first; select the motherboard and CPU as a pair; verify the memory against the board manual; check every physical clearance and power connector; and assemble with the manuals open. DDR4 can still be a sensible value platform in 2026, but prices, firmware support, and stock change, so a parts list should be checked at the exact model level before purchase.
What a budget DDR4 gaming PC needs
Gaming performance is determined by the balance among the processor, graphics card, memory, storage, cooling, and power delivery—not by the DDR4 label alone. A complete tower requires these parts:
- CPU: Runs game logic, operating-system tasks, and other calculations.
- GPU: Produces the game image and is usually the most important performance purchase for a gaming-focused budget.
- Motherboard: Provides the CPU socket, memory slots, expansion slots, storage interfaces, power connectors, and rear/front connectivity.
- Memory: A matched DDR4 kit whose capacity, speed, and module layout are supported by the specific board.
- Storage: An M.2 SSD or SATA drive for the operating system, games, and files.
- Power supply: Delivers the required wattage and connectors to the board, CPU, GPU, drives, and accessories.
- Cooling: A CPU cooler and case airflow that suit the processor and enclosure.
- Case: Must fit the motherboard, GPU, cooler, power supply, drives, and cables while providing usable airflow.
- Peripherals and operating system: Monitor, keyboard, mouse, network access where needed, and an operating system complete the usable system.
Do not treat decorative features, extra lighting, or a premium case as higher priorities than the graphics card, power supply, and compatibility checks. A low component price is useful only when the part still has the connectors, clearances, and support your selected system requires.
What’s actually slowing this PC down?
Pick the symptom - the matching free tool is one click away.
Set the target before choosing parts
“Budget” has no universal number. The same tower can be appropriate for esports at a high refresh rate, a single-player game at a lower resolution, or a mixed-use machine, but those goals distribute money differently. Write down the following before opening a shop page:
#1 Best Overall

- Disclaimer: Maximum Speed requires overclocking/PC BIOS adjustments. Maximum speed and performance depend on system components, including motherboard and CPU
- Hand-sorted memory chips ensure high performance with generous overclocking headroom
- VENGEANCE LPX is optimized for wide compatibility with the latest Intel and AMD DDR4 motherboards
- A low-profile height of just 34mm ensures that VENGEANCE LPX even fits in most small-form-factor builds
- A solid aluminum heatspreader efficiently dissipates heat from each module so that they consistently run at high clock speeds
- The games you actually intend to play.
- The monitor resolution and target refresh rate.
- Your country, because prices, availability, taxes, and warranties differ.
- The maximum tower budget, separate from the monitor and peripherals if you already own them.
- Whether you will buy only new parts or are willing to consider used hardware.
Reserve the largest performance share for the GPU and the parts that make it reliable: a suitable PSU, a case with enough airflow, and storage with the interface your board supports. Decide on capacity and connectivity before spending on appearance. If the target is uncertain, compare candidate builds using total local cost, GPU performance for the named games and display, memory capacity, storage capacity, PSU connectors, physical fit, and realistic upgrade options.
Choose the motherboard and CPU as one decision
DDR4 support belongs to the particular motherboard, not to a general platform name. Boards for the same processor family can be sold in DDR4 and DDR5 versions, and a CPU that supports both memory generations still requires the matching board. Select the board first or simultaneously with the CPU, then verify both on the manufacturer’s support pages and manuals.
Intel LGA1700 DDR4 path
An LGA1700 board explicitly identified as a DDR4 model can pair with a compatible Intel processor. A current editorial example uses an Intel Core i5-14400F with the ASUS B760M-AYW Wi-Fi D4 II and a 16 GB (2×8 GB) DDR4-3200 kit. That combination illustrates the selection process; it is not a universal recommendation, a guaranteed best value, or proof that the same parts are available at the same price in your country. Confirm the board’s supported-CPU list and the BIOS version required for the exact processor before buying.
AMD AM4 DDR4 path
AMD AM4 is another possible DDR4 route. The board and processor still have to be validated together, including the board’s CPU support list and any BIOS requirement. The available material does not establish a complete AMD parts list, comparative gaming results, or a universal upgrade advantage, so treat AM4 as a candidate to verify rather than assuming it is automatically cheaper or faster.
Compatibility checks for the CPU and board
| Check | What to verify | Why it matters |
|---|---|---|
| Memory generation | The board model is explicitly DDR4, not a DDR5 variant. | DDR4 modules cannot be installed in a DDR5-only board. |
| Socket and CPU list | The exact processor appears on the board maker’s supported-CPU list. | A matching family name does not guarantee firmware or electrical support. |
| BIOS version | The minimum BIOS version for that CPU and whether the board can be updated in your situation. | A board may need a firmware update before it will boot with a newer processor. |
| Board size | ATX, microATX, or another form factor matches the case’s supported formats. | Physical mounting and expansion space depend on the board size. |
| Expansion and connectors | Required PCIe slot, M.2/SATA ports, fan headers, USB headers, audio header, and network features. | A board can be electrically compatible yet lack a connector or slot your build needs. |
Use the board manual as the authority for socket installation, pin layouts, front-panel wiring, memory population, storage sharing, and firmware settings. Do not infer compatibility from a retailer’s abbreviated title.
Rank #2

- Actual memory speed may vary depending on the system, CPU, motherboard, BIOS settings, and supported memory configuration. DDR4 3200MHz modules may operate at lower speeds such as 2933MHz or 2666MHz when supported by the host system. Please check your device specifications and compatibility before purchase.
- Adherence to JEDEC and compliance to RoHS with respect to environmental protection regulation, production and manufacturing
- All new generation product of DRAM module. Strict test and verification procedures are performed for products
- Lifetime warranty and Free technical support
- ※ Refer to the latest version on the official website. In case of discrepancies, the official website prevails.
Select DDR4 memory from the board’s documentation
Choose memory only after the motherboard is known. Open its memory support list or QVL and check the exact kit or module family, total capacity, supported speed, and the number of modules. A matched kit is preferable to combining unrelated sticks because the board documentation and testing are based on defined configurations.
Capacity and speed
Set capacity according to the games and other software you run, then choose a speed the board and CPU support. The cited 2026 example uses 16 GB as two 8 GB modules at DDR4-3200, but that is an example configuration, not a capacity rule for every game or workload. If you need more memory, verify that the chosen kit’s total capacity and module arrangement appear in the board’s documentation rather than assuming any two larger modules will work.
Install modules in the documented slots
Slot names and preferred population vary by board. In ASUS’s illustrated ROG STRIX Z690-A GAMING WIFI D4 example, one module goes in A2 and two modules go in A2 and B2. This is a board-specific example, not a universal rule. Read your manual’s diagram, align the notch in each module with the key in the slot, and press evenly until the retention locks close. If the system does not boot, power it down, reseat the modules, and test the configuration specified by the manual.
Choose the GPU for the display you will use
Start with the games and resolution, then select a graphics card that fits that target and the case. Before ordering, record the card’s:
- Length and height.
- Thickness and number of expansion slots it occupies.
- Auxiliary power connector type and number.
- Recommended power requirements from its own specifications.
Check clearance against the case’s maximum GPU dimensions, including front fans, radiators, drive cages, and cable space. Install the card in the primary full-length PCIe slot identified by the motherboard manual, secure its bracket to the chassis, and connect every power lead the card requires. If your CPU has no integrated graphics, connect the monitor cable to the GPU rather than the motherboard’s video output.
Rank #3

- Disclaimer: Maximum Speed requires overclocking/PC BIOS adjustments. Maximum speed and performance depend on system components, including motherboard and CPU
- Hand-sorted memory chips ensure high performance with generous overclocking headroom
- VENGEANCE LPX is optimized for wide compatibility with the latest Intel and AMD DDR4 motherboards
- A low-profile height of just 34mm ensures that VENGEANCE LPX even fits in most small-form-factor builds
- A solid aluminum heatspreader efficiently dissipates heat from each module so that they consistently run at high clock speeds
Match the PSU to the complete system
There is no one-size-fits-all wattage figure. Match the PSU to the selected CPU, GPU, drives, fans, and accessories, and confirm that it has the required motherboard, CPU, and GPU connectors. MSI’s assembly guidance specifically calls for the motherboard 24-pin connection, the CPU 8-pin connection, and the GPU connector appropriate to the card.
The Tool Desk
Outbyte PC Repair FREERepair Windows errors before they cause bigger problemsFix Now →Outbyte Driver Updater FREEScan for outdated or missing drivers - takes under a minuteDriver Scan →Check connector count and cable reach before routing anything. Do not use a lower purchase price as a reason to omit a required connector or compromise the PSU’s suitability. The correct capacity depends on the exact parts; use the component specifications and the PSU maker’s guidance rather than a generic wattage chart.
Verify case, cooler, storage, and header fit
Case and cooling clearances
Confirm that the case supports the motherboard form factor, CPU cooler height or radiator arrangement, GPU length and thickness, PSU size, storage mounts, fan positions, and front-panel connectors. Airflow needs usable intake and exhaust locations; a physically large component can still block a fan or cable path. Exact dimensions must come from the case and component specifications.
Check the CPU cooler’s socket mounting hardware for the chosen platform. Follow the cooler’s instructions for the correct bracket and thermal-paste method. Do not assume a cooler supplied for one socket will mount on another without the specified hardware.
Storage interfaces and M.2 sharing
An M.2 SSD and a SATA drive are both viable storage choices, but the board must provide the required interface and mounting position. Read the motherboard manual for M.2 installation and lane-sharing rules; using a particular M.2 slot can disable or share a SATA port on some boards. If a newly installed M.2 drive is not visible, check the firmware configuration and the manual before replacing the drive.
Rank #4

- Capacity – 32GB RAM KIT (2 x 16GB Modules) Speed up to 2666MHz Non-ECC Unbuffered 288-Pin 1.2V UDIMM.
- Specs – Black PCB Color and Dual Rank (2Rx8).
- Compatibility – Designed for selected DDR4 Desktop PCs and workstations that support 288-Pin UDIMM memory. NOT compatible with Laptop SODIMM slots.
- Installation – Plug-and-Play Upgrade, Quick and Easy to Install, no expertise required (please refer to your system's manual for guidelines).
- Warranty – All Timetec products are high-quality and rigorously tested to meet stringent standards. Backed by Timetec Limited Lifetime Warranty and professional technical support based in the United States.
Headers and front-panel wiring
Count the headers you need: CPU and case fans, front-panel power and reset switches, status LEDs, front USB, and front audio. Connector names and pin layouts are not identical across boards. Keep the motherboard manual open while making each connection instead of relying on a case diagram alone.
Parts checklist before ordering
| Part | Confirm before purchase |
|---|---|
| CPU | Socket, supported board model, required BIOS version, and cooler mounting method. |
| Motherboard | Explicit DDR4 support, form factor, CPU list, memory QVL, M.2/SATA layout, slots, headers, and networking or wireless features you need. |
| Memory kit | Exact kit or module family on the QVL where possible, capacity, speed, number of modules, and documented installation slots. |
| GPU | Performance target, length, height, thickness, slot use, and auxiliary power connector. |
| PSU | Capacity for the complete build, 24-pin and CPU power, GPU connectors, and cable reach. |
| Case | Board form factor, GPU and cooler clearance, PSU size, drive mounts, fan positions, and front connectors. |
| Storage | Compatible M.2 or SATA interface, mounting location, capacity, and any slot-sharing consequence. |
| Cooling | Correct socket hardware, cooler height or radiator fit, fan headers, and thermal-paste instructions. |
| Tools | A clear, well-lit workspace and the screwdrivers required by your hardware; a Phillips screwdriver is commonly needed. |
Assemble the PC in a controlled sequence
Keep power disconnected while installing components. Lay out the manuals and identify every screw, cable, and bracket before forcing a connection. The motherboard manual takes precedence when a case or component guide uses a different connector name.
1. Prepare the workspace and board
- Work on a clear, well-lit surface with enough room to lay the case on its side.
- Unplug the PSU from the wall and leave its rear switch off while installing parts.
- Place the motherboard on its box or another nonconductive surface when the manual permits outside-case work.
2. Install the CPU
- Verify the CPU model and required BIOS support one more time.
- Follow the socket-specific instructions in the motherboard manual; do not force the processor or touch socket contacts.
- Keep the board or case flat during installation if that makes alignment safer, as advised in board guidance.
3. Install memory, M.2 storage, and the cooler
- Use the memory population diagram for the exact board. Align each notch and press until the retention mechanism locks.
- Install an M.2 drive in the documented slot, using its screw or retention mechanism. Follow the manual if a heatsink is supplied.
- Mount the CPU cooler with the correct socket bracket and thermal-paste procedure. Connect its fan to the header specified by the board manual.
4. Optionally test outside the case
Intel describes an optional preliminary test run using the board, CPU and cooler, memory, GPU when required, PSU, and monitor before final installation. This can expose a failed or incompatible part early, but it is optional guidance rather than a requirement for every build. If you perform it, keep the setup stable, prevent conductive objects from touching the board, and disconnect power before changing components.
5. Prepare the case and mount the board
- Install a separate I/O shield if the motherboard uses one, making sure it is oriented correctly.
- Check that the case standoffs match the motherboard’s mounting holes. Remove every extra standoff; one beneath the board can short it.
- Lower the board onto the correct standoffs and secure the screws without overtightening.
6. Install the PSU, drives, and GPU
- Mount the PSU in the case orientation specified by the enclosure and PSU instructions.
- Install SATA drives and their data and power cables, if used.
- Insert the GPU into the primary full-length PCIe slot named by the motherboard manual, press it fully into the slot, and secure its bracket to the case.
7. Connect power and case wiring
- Connect the motherboard’s 24-pin power cable.
- Connect the CPU power cable, commonly an 8-pin connection where the board specifies it.
- Connect the GPU’s required auxiliary power cable or cables.
- Connect CPU and case fans, storage power and data, front-panel switches and LEDs, front USB, and front audio according to the board and case diagrams.
- Route cables so they cannot contact fan blades and so the side panel can close without pressure on connectors.
First boot and firmware checks
Before pressing the power button, perform a deliberate inspection:
Quick wins for a faster PC:
Scan for outdated or missing drivers - takes under a minuteDriver Scan →Repair Windows errors before they cause bigger problemsFix Now →- No loose screws, shipping covers, or tools remain inside the case.
- Every required power cable is fully seated at both ends where the PSU is modular.
- CPU and case fans can turn freely.
- The monitor cable is connected to the GPU when the processor lacks integrated graphics.
- Memory modules and the GPU are fully latched into their slots.
Power on and enter the motherboard firmware. Confirm that the CPU model, installed memory capacity, and storage device are detected. If the CPU is missing, stop and check socket installation and BIOS support. If memory is not recognized, power off and reseat it, then test the manual’s recommended slot arrangement. If an M.2 drive is absent, review the board’s M.2 settings and slot-sharing notes. Use the motherboard manual and manufacturer support instructions for diagnostic lights or beep codes specific to that model.
Best Value
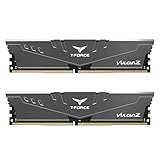
- Simple design to perfectly protect the cooling module with high thermal conductive adhesive
- Supports Intel & AMD motherboards
- Selected high-quality IC
- Supports XMP2.0
- Energy saving with ultra-low working voltage
Common failure points and recovery actions
| Symptom | Likely check | Action |
|---|---|---|
| No power | PSU switch, wall connection, 24-pin cable, CPU power cable, and front-panel power-switch pins. | Disconnect power, reseat each connection, and verify the switch pins against the board diagram. |
| Fans run but no display | GPU seating, GPU power, monitor input, and cable location. | Reseat the GPU and connect the display to it when the CPU has no integrated graphics. |
| Memory missing or boot loop | Notch alignment, retention locks, QVL support, and slot population. | Reseat modules and try the slots shown in the board manual, beginning with the documented single-module configuration if testing one stick. |
| CPU not detected | Socket installation and BIOS version. | Confirm the processor is on the supported list and update firmware using the board’s supported method if required. |
| M.2 drive absent | Drive seating, firmware storage settings, and lane sharing. | Reinstall the drive and read the M.2 section for disabled or shared ports. |
| Case panel will not close | Cooler height, GPU thickness, and cable routing. | Compare the measured clearance with the case specification and reroute cables without bending connectors. |
How to evaluate the 2026 example without overgeneralizing
PC Gamer’s article accessed on October 9, 2026 presents an illustrative DDR4 build centered on the Intel Core i5-14400F, ASUS B760M-AYW Wi-Fi D4 II, and 16 GB (2×8 GB) DDR4-3200. The processor supports DDR4 and DDR5, while the selected motherboard determines which memory generation can actually be installed. This example is useful as a starting reference for an LGA1700 DDR4 workflow, not as a fixed shopping list.
Deal prices and stock are volatile. Recheck the exact board revision, CPU support list, BIOS requirement, memory QVL, GPU dimensions, PSU connectors, and case clearances at the time you order. Do not turn a temporary offer into a durable budget claim, and do not assume the same parts have the same value in another country.
Intel DDR4 and AMD AM4: a practical comparison framework
| Decision factor | Intel LGA1700 DDR4 candidate | AMD AM4 DDR4 candidate |
|---|---|---|
| Evidence available here | A contemporary example uses an i5-14400F with a B760M DDR4 board and a 16 GB DDR4-3200 kit. | The platform is identified as a possible route, but no complete validated parts list is established. |
| First compatibility task | Confirm the board is a DDR4 model, then check the CPU list and BIOS version. | Validate the specific AM4 CPU and DDR4 board combination, including BIOS support. |
| Memory decision | Use the board’s DDR4 QVL and slot diagram. | Use the selected board’s DDR4 QVL and slot diagram. |
| What to compare locally | Total cost, target-game GPU performance, capacity, connectors, fit, connectivity, and upgrade choices. | The same factors, measured from current local parts and documentation. |
| What is not established | No universal gaming ranking or guaranteed upgrade path. | No comparative gaming result or universal upgrade advantage. |
Choose the platform that gives you the strongest verified combination at your local prices and availability. The right answer can change when a board discount, BIOS revision, memory kit, or GPU deal changes.
Recommended Free Tools
Budget decisions that prevent expensive rework
- Buy compatibility before cosmetics: Confirm CPU, board, RAM, PSU, and case fit before adding lighting or premium finishes.
- Protect the GPU budget: A faster card for the stated display target generally contributes more to gaming than decorative motherboard features.
- Do not economize on required power: The PSU must have the capacity and connectors demanded by the exact GPU and board.
- Buy memory as a documented kit: A matched kit listed by the board maker is safer than mixing random modules.
- Leave room for airflow: A case that technically accepts the parts can still be difficult to cool if the GPU, cooler, and fans compete for space.
- Recheck firmware and dimensions immediately before checkout: Product revisions and BIOS support can change while a shopping list is waiting.
A DDR4 build is a set of interdependent choices, not a collection of individually “best” parts. Once the CPU, motherboard, memory, GPU, PSU, case, cooler, and storage have passed their documentation checks, assembly becomes a controlled installation rather than a troubleshooting gamble.
Quick Recap
Product prices and availability are accurate as of the date/time indicated and are subject to change. Any price and availability information displayed on Amazon at the time of purchase will apply.

