
iTechGuides is reader-supported. When you buy through links on our site, we may earn an affiliate commission. As an Amazon Associate I earn from qualifying purchases. Learn more
First identify the exact Casio model and bracelet design. A sliding free-type clasp can usually be repositioned without removing links; a push-and-release design uses its supplied tool; an arrow-marked pin bracelet may allow conditional link removal. Casio recommends having metal-band link changes done by a retailer, factory service center, or authorized service center because special tools and small parts are involved. Only attempt the pin procedure below when your model manual matches the bracelet and the arrows, pins, and construction are clearly the same.
Why there is no universal Casio bracelet adjustment
Casio uses several metal-bracelet constructions. Two watches that look similar may have completely different ways to shorten or lengthen the band. Before touching a pin, turn the bracelet over and identify the model number, the clasp mechanism, and any markings on the links. The model number is normally on the case back or paperwork. Use that number to find the model-specific manual or Casio support instructions for your country.
The practical choices are:
| Adjustment method | When it applies | Tools and risk | Best route |
|---|---|---|---|
| Sliding free-type clasp | The clasp is designed to slide along the bracelet and has no removable-link procedure. | Usually no link-removal tool; forcing links can damage the clasp. | Follow the model instructions and slide the clasp only as described. |
| Push-and-release bracelet | The bracelet documentation specifies a supplied dedicated adjustment tool. | Requires the supplied tool; do not substitute a pin punch unless the manual says to. | Use the supplied tool or ask a service desk. |
| Arrow-marked pin bracelet | Removable links have matching directional arrows and removable pins, and the model instructions describe that construction. | Needs a suitable pin or bracelet-link tool; pins and ferrules are easy to lose. | Professional adjustment is safest; a careful home adjustment is conditional. |
| Any design that does not match | No arrows, unfamiliar fasteners, unusual resistance, or conflicting instructions. | High risk of bent pins, scratched links, or injury. | Stop and use a retailer, Casio, or an authorized service center. |
What Casio recommends
Casio America’s international support guidance, updated February 15, 2024, states: “Special tools are required to change the number of band segments,so you should not try to do it yourself.” Its US support guidance says adding or removing links can be difficult, requires special tools, and should be performed by Casio’s Factory Service Center or a service center authorized for this work. It also describes a route for owners who request procedures, feel confident, and accept responsibility for damage or loss.
Quick wins for a faster PC:
Clear out junk files and repair common Windows errorsFree Scan →Fix the driver behind crashes, sound loss and screen glitchesFind Drivers →Casio’s international FAQ recommends having metal-band segment changes performed by the place of purchase. Casio Japan documents a free-type clasp that is adjusted by sliding and does not permit link removal, plus a push-and-release bracelet that uses a supplied dedicated tool. Its service information notes that prices and repair conditions depend on warranty status and the service route. Availability and procedures therefore vary by country, model, and bracelet.
#1 Best Overall

- 【Liftable platform】The liftable platform is designed for better alignment of the punch pin and the watch link pin hole, helping you to complete the adjustment of the strap more efficiently.
- 【Multifunction】We have combined the watch link remover and strap holder into one tool, you only need this one tool to remove and install the watch link pin.Screw-on watch straps are not applicable.
- 【9PCS replacement punch needles】There are two different lengths of replacement needles in the kit. For most of the straps, you can remove the watch link pin by just using the short punch needle pin. For some very wide straps, you can use the long needle to push the watch link pin out a little further for easy removal.
- 【3PCS punch pins of different diameter】Three different diameter punches for different strap pin diameters, compatible with a wider range of watch straps.
- 【Instruction manual】The instruction manual(in English) combines pictures and text to explain to you in detail the right way to use the tool, avoiding wrong operation to damage your watch, and helping you to solve watch problems at home.
For a valuable, vintage, water-resistant, or limited-edition watch, professional adjustment avoids a cosmetic mistake that can cost more than the original service fee. A retailer or authorized center can also supply model-compatible links, pins, and ferrules.
Check the bracelet before removing anything
1. Confirm the model and manual
Read the case-back model number exactly, including letters and suffixes. A family name is not enough: different references can use different clasps. The manual should show the same clasp, link shape, pin style, and adjustment points that you see on your watch. If the manual is silent or shows another construction, do not apply a generic link-removal method.
2. Look for arrows and matching pins
On a compatible pin-linked bracelet, the underside of removable links normally has arrows indicating the pin’s travel direction. The arrows must correspond to actual pin holes and removable link joints. A smooth underside without arrows, a screw head, a split-pin arrangement, a collar system, or a different release mark means the procedure below may not apply.
Do these 3 things before closing this tab:
1Repair Windows errors before they cause bigger problems2Fix the driver behind crashes, sound loss and screen glitches3Clear out junk files and repair common Windows errors3. Inspect clasp adjustment first
Some bracelets have several spring-bar holes inside the clasp. Moving the spring bar to another hole can provide a small fit change without sacrificing a full link. Other free-type clasps slide along the bracelet. These features are model-specific; never pry the clasp or force a spring bar into a hole that is not identified in the instructions.
4. Decide whether the fit needs a link change
Wear the watch normally and note whether the looseness is only a few millimetres or roughly one whole link. A clasp micro-adjustment is preferable for a small correction. If a link must be removed, plan the final clasp position before opening the bracelet. Keep every removed link, pin, and ferrule in a labelled bag so the bracelet can be restored later.
Rank #2

- 【Difference with other products】 -- Compared with other products, we added the leather strap punch, you can punch to adjust the length of your leather strap; we lengthened the length of the pin punch, increased the grip handle of the double-headed hammer, more conducive to operation; shortened the pin of the pin punch pin, and use metal to protect the pin is not easy to bend and can be replaced.
- 【Two strap remover with use】--metal strap remover is more suitable for taking out the strap pin directly; watch bracket and double-headed hammer is convenient to insert the strap pin, two tools with use more convenient.
- 【Precautions】--When you use the metal strap remover and fail to eject the pin, please check whether the following situations occur: 1. The direction of the punching needle is inconsistent with the direction indicated by the arrow on the strap 2. The pin hole of the strap is not aligned The gap at the front end of the metal strap remover; please adjust the strap, otherwise it is easy to cause the punching needle to bend and damage your watch.
- 【Easy to use】 -- Turdy and durable, easy to carry, practical, easy to operate, you can solve the problem of the watch at home, save the expensive expenses, suitable for beginner families, can be used as a gift for friends and fathers.
- 【High quality professional set】-- A set of professional watch repair tools comes with a user manual(in English), detailed pictures to explain the correct use for you, help beginners to use this tool to avoid wrong operation causing injury to your watch, correct operation helps to improve the service life of the tool.
Tools and a safe work area
For a compatible arrow-marked bracelet, use a purpose-made bracelet link-removal tool or the exact tool specified by the model instructions. An iFixit repair guide describes using a SIM-card eject tool to push a pin on a compatible bracelet, while a specialist Casio bracelet guide uses a dedicated link-removal tool. Those examples do not make either tool suitable for every Casio model.
- A clean, stable table with bright, directed light.
- A soft watchmaker’s mat, folded microfiber cloth, or other surface that will not scratch the case or links.
- A small tray or magnetic parts dish to catch pins and ferrules; keep magnets away from any component for which the manual warns against magnetism.
- Eye protection when a spring-loaded pin may eject.
- The model manual, the correct pin tool, and a way to support the bracelet without bending it.
Do not use a kitchen knife, sewing needle, oversized nail, or pliers as a substitute. A slipping tool can gouge a polished link or puncture a finger. If a pin does not move with firm, controlled pressure, stop rather than escalating force.
PC Slower Than It Used to Be?
A free scan shows the junk files, broken settings and background clutter dragging Windows down - then fixes them in one click.Free scan · Windows 10 & 11Crashes, No Sound, or Screen Glitches?
Random freezes, missing sound and display glitches usually trace back to one bad driver. Find and replace yours safely.Free scan · under a minuteHow to adjust a sliding or clasp-only bracelet
Free-type sliding clasp
Casio’s free-type design is adjusted by sliding the clasp and does not permit link removal. Follow the model’s release instruction to unlock the clasp, move it along the bracelet to the desired position, and close it until it is fully seated. Do not attempt to drive out pins from this design; the absence of a link-removal path is intentional.
Clasp spring-bar micro-adjustment
- Open the clasp and locate the row of adjustment holes shown in the model instructions.
- Support the clasp so the spring bar cannot snap into the case or disappear under the work surface.
- Use the specified tool to compress one end of the spring bar and move it to the next hole. Make only one-hole changes until the fit is checked.
- Confirm both ends of the spring bar are seated in the same hole pair and that the clasp closes without side pressure.
- Pull gently on the bracelet and inspect the bar before wearing the watch.
Small spring bars can slip inside a clasp and be difficult to retrieve. Work over a tray and keep the original position recorded.
Conditional home procedure for an arrow-marked pin bracelet
The following is not a universal Casio method or an endorsement of DIY link removal. It combines a specialist Casio bracelet guide and an iFixit repair guide for compatible pin-linked designs. Proceed only when your exact manual and bracelet agree, and stop at any mismatch.
Rank #3

- You Will Receive: A Watch band link remover and Doubled-ended pin punches,two hammer-like tools for installation and three spare punch needles
- Easy to Use: The tool kit comes with a tool table for placing the bracelet and helping you to adjust it efficiently. The process is convenient, safe and easy to operate.
- Extra-long Service Life:The material chosen for the product is very hard, so the product has a long service life
- Compatible with Watches of Different Sizes:the removal needle can be used to disassemble the bracelet very efficiently, even if it is a bracelet of different sizes, as long as the position is placed correctly, the work can be completed smoothly
- The Storage is Simple:the tools are small and exquisite, and the storage only needs a small bag to be completely packed, so you don't need to worry about losing it.
1. Mark the links and choose the amount
Count the links you expect to remove and mark the intended joints with removable tape. When two or more links are removed, the specialist guidance recommends taking links from both sides of the clasp where possible. Balanced removal keeps the clasp nearer the centre of your wrist and preserves a more natural drape. If the required change is less than a link, use an approved clasp adjustment instead.
Free tools Windows power users keep installed
One-click scans. No signup required.
2. Separate the bracelet only if the manual calls for it
Some procedures begin by releasing the clasp with its spring bar so the bracelet lies flat. That step is bracelet-specific. If your manual does not instruct you to separate the clasp, leave it assembled. Never lever finished surfaces apart with a screwdriver.
3. Position the link over the arrows
Place the bracelet on the support with the underside facing up. Identify the exact pin hole and the arrow printed beside it. The arrow indicates the pin’s removal direction on the compatible designs covered by the repair guides. Align the pin tool squarely with the hole; a tilted tool can flare the hole or scratch the link.
4. Drive the pin out in the indicated direction
Push the pin in the direction of the arrows using controlled pressure. The iFixit guide describes locating the pin hole and placing a SIM-card eject tool on the back side of the arrow; use the side and direction specified by your model’s instructions if they differ. Once the pin protrudes, pull it out with fingers or fine pliers protected by tape. Do not twist the pin or force it through a decorative end link.
5. Capture the ferrule and other tiny parts
Some bracelets release a small ferrule or collar when the pin comes out. It may drop from the joining link without warning. Keep the ferrule, pin, and removed links together in the tray and note their orientation. A missing ferrule can leave the joint loose even when the pin appears to fit.
Rank #4
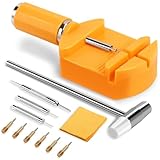
- 1. HIGH QUALITY: Our Watch spring bar, hammer, and watch links are made of rust-resistant, sturdy steel, strong and durable.
- 2. MULTIFUNCTIONAL WATCH REPAIR KITS: With our Hechio watch repair tool, you can use it not only to change the strap, but also to adjust the length of the steel band.
- 3. PACKAGE INCLUDING: Double head hammer*1, Watch band link remover*1, Cleaning cloth*1, Watch spring bar pins*1, Watch spring bar tool*1, Pin punches*2, Spare punch needles*6.
- 4. WARM TIPS: There are small pointed objects inside, please be careful when using it and don't pierce your hand. And keep it out of the reach of children to prevent injury and swallowing.
- 5. HOW TO USE THE YELLOW WATCH LINK REMOVAL KIT?(1).Turn the handle, push the pin forward to push out the hairpin at the steel strap connection.(2).Push out the hairpin according to the arrow on the strap.(3).If there are no arrows on the strap, it is necessary to recognize the shape of the round hole.
6. Remove the planned link and reconnect
Separate only the marked link. If a ferrule was present, place it back in the joining link before inserting the pin. Reconnect the bracelet with the link orientation unchanged. The specialist guide says to insert the pin against the arrow direction; iFixit likewise describes inserting from the arrow side and seating the pin flush. Follow the exact model instruction if it specifies another orientation.
7. Seat and inspect the pin
Press the pin until both ends are flush with the link and no gap remains. A pin that sits proud, rocks, or slides back out is not secure. Do not file, glue, or peen the pin at home. Recheck that the ferrule has not shifted and that the link bends freely without a click or side-to-side looseness.
8. Reinstall the clasp and test the bracelet
If you removed the clasp spring bar, reinstall it exactly as shown in the manual. Close the clasp and pull gently in several directions while holding the case. Then wear the watch over a soft surface for a short fit check before relying on it outdoors. Keep all spare links and pins for future sizing or service.
Independent reader supportYour contribution helps us test, update, and keep practical guides available for everyone.Which way should the pin move?
On a compatible arrow-marked bracelet, push the pin in the direction the arrows point to remove it. For reassembly, the specialist and iFixit instructions describe inserting the pin from the arrow side and driving it against the arrow direction until it is flush. This rule applies only when the arrows, pin holes, and model documentation match. A screw-linked or collar-based bracelet may use a different system entirely.
What’s actually slowing this PC down?
Pick the symptom - the matching free tool is one click away.
If the pin resists normal hand pressure, the tool bends, the arrow is unclear, or the pin begins to mushroom, stop. Forcing it can permanently deform the link and make professional repair harder.
Best Value

- 【Watch strap adjustment kit】-- The kit includes a metal watch band link remover, a pin punch , a strap replacement tool, a double-headed hammer, a watch band holder, 13PCS spare needles, 20PCS of 1.5Φ spring bars (4* 16/18/20/22/24mm) and an instruction manual.
- 【two kinds of watch strap pins remover use together】-- metal strap remover is more suitable for taking out the strap pin; watch bracket and double-headed hammer is convenient to insert the strap pin, two tools with use more convenient.
- 【13PCS Spare Needles】-- We are equipped with 13PCS spare needle to improve the service life of the tool, suitable for pin punch and metal watch band link remover.
- 【Precautions】-- When you use the metal strap remover and fail to eject the pin, please check whether the following situations occur: 1. The direction of the punching needle is inconsistent with the direction indicated by the arrow on the strap 2. The pin hole of the strap is not aligned the gap at the front end of the metal strap remover; please adjust the strap, otherwise it is easy to cause the punching needle to bend and damage your watch.
- 【Picture Operation Manual】-- The kit comes with a user manual (in English). The detailed pictures explain the correct use method to you, avoid damaging your watch by wrong operation, and help you solve the watch problem at home.
How to choose between DIY, a retailer, and Casio service
| Route | Advantages | Limitations | Choose it when |
|---|---|---|---|
| Clasp adjustment at home | Fast, reversible, and usually avoids removing links. | Only works where the clasp provides a documented sliding or micro-adjustment. | The fit correction is small and the model instructions clearly show the feature. |
| Conditional link adjustment at home | Can achieve a larger size change without waiting for service. | Requires compatible arrows, correct tools, careful orientation, and control of ferrules and pins; damage or loss is your responsibility. | You have verified the exact construction and accept the risk. |
| Place of purchase or watch retailer | Staff can identify the bracelet and preserve the finish; often the simplest local option. | Availability, prices, and parts differ by country and shop. | You want a quick fit check or are unsure which system the bracelet uses. |
| Casio Factory Service Center or authorized service center | Appropriate tools, model-specific procedures, and a formal service route. | May involve shipping, a fee, and conditions that vary with warranty status and location. | The watch is valuable, under warranty, damaged, water-resistant, or structurally unfamiliar. |
Casio’s official guidance takes precedence over any generic repair tutorial. Contact the service desk for your country when you cannot verify the model, need replacement links, or have lost a pin or ferrule.
Common mistakes and recovery steps
The clasp still feels loose after moving it
Check that both ends of the spring bar are seated in the same adjustment holes and that the clasp is fully closed. If the bar is bent or one end is not visible, stop wearing the watch and have it replaced.
A pin will not move
Recheck the arrow direction, support the link, and confirm that the tool diameter matches the hole. If controlled pressure does not start movement, do not hammer the tool. A service center can identify whether the joint is a different design or seized.
Recommended Free Tools
The pin came out but the bracelet is still loose
Look for the small ferrule or collar in the tray and verify that the pin is flush after reassembly. Missing or incorrectly oriented parts require the correct model-compatible replacement, not glue or an improvised sleeve.
The bracelet has scratches
Further polishing can remove the factory finish or create uneven surfaces. Protect the watch and ask a professional whether the affected link can be refinished or replaced.
The clasp or link opens during a pull test
Do not wear the watch. An incompletely seated pin, incorrect ferrule, or damaged spring bar can let the case fall and cause expensive damage. Put the loose parts in a bag and use authorized service.
Fit and safety checks before wearing the watch
- The bracelet rests securely without pinching when your wrist flexes.
- The clasp closes completely and its safety catch, if fitted, engages.
- Every moved spring bar is visible at both ends and fully inside its holes.
- Every replaced pin is flush, straight, and stable under a gentle pull.
- No ferrule, link, or pin remains on the work surface unaccounted for.
- The case, crystal, and polished edges have no new tool marks.
Water resistance is not restored by resizing alone. If the case back, crown, or other seals were disturbed, use the model’s service guidance for pressure and seal checks rather than assuming the original rating remains unchanged.
Bottom line
Adjust a Casio metal bracelet at home only after identifying the exact model and matching its construction to the instructions. Use a documented clasp adjustment whenever it provides the needed fit. Treat arrow-marked pin removal as a conditional repair, preserve every ferrule and pin, and stop when resistance or design differs from the guide. For link changes on an unfamiliar, valuable, or warranty-covered watch, a retailer, Casio Factory Service Center, or authorized service center is the safer choice.
Quick Recap
Product prices and availability are accurate as of the date/time indicated and are subject to change. Any price and availability information displayed on Amazon at the time of purchase will apply.

