
The Tool Desk
Outbyte PC Repair FREERepair Windows errors before they cause bigger problemsFix Now →Outbyte Driver Updater FREEFix the driver behind crashes, sound loss and screen glitchesFind Drivers →iTechGuides is reader-supported. When you buy through links on our site, we may earn an affiliate commission. As an Amazon Associate I earn from qualifying purchases. Learn more
For most living rooms, put the centre of the TV screen at your natural seated eye level, or just below it. Measure your eyes from the floor while sitting in the seat you actually use; treat any fixed floor number only as a starting estimate. Furniture height, reclining, bar-stool viewing, glare, cable access and the television’s viewing-angle limits can justify a different position.
The direct answer: aim the screen centre at seated eye level
Sit normally in your primary viewing seat, keep your head in a relaxed position, and measure from the floor to your eyes. That measurement is the initial height for the centre of the visible TV screen. Sony, Philips and LG all describe eye-level centre alignment, or a centre slightly below eye level, as the general target.
Do not confuse screen-centre height with the height of the TV’s bottom edge, the top of a media console or the location of the wall bracket. Those dimensions vary with screen size, bezel size, stand geometry and the television’s VESA mounting holes. The screen centre is the stable reference; calculate the other points from the particular TV and installation hardware.
What’s actually slowing this PC down?
Pick the symptom - the matching free tool is one click away.
Philips states the principle directly in its wall-mounting instructions: “The TV is mounted at the correct height if your eyes are level with the centre of the screen when you sit down.” This is manufacturer guidance rather than a medical or universal engineering standard, so use it as the starting point and then check the actual room.
#1 Best Overall

- Important: Watch the video and learn the”Designed for" details listed below!
- Designed for concrete, brick and wood studs wall (single stud).
- Designed for TVs up to 80 lbs (36.3 KG) and display sized 26" - 55" (66 CM - 140 CM).
- Designed for VESA sized from 3.9'' x 3.9'' through 15.7'' x 15.7''.
- Comfortable View with tilt range from +10° to -5°.
Measure the height that belongs to your room
1. Use the real viewing seat
- Place the sofa, chair or recliner where it will normally remain.
- Sit as you do during a typical programme, rather than perching on the front edge or stretching your neck upward.
- Keep your head neutral and look straight ahead.
- Have another person measure vertically from the floor to the centre of your eyes. Record the result in centimetres or inches.
Repeat the measurement if several people use the room. The primary seat should control the installation; a modest compromise is usually preferable to optimising for an occasional seat while making the main position uncomfortable.
2. Convert the target into screen edges
If the measured eye height is E, the screen centre should initially be at E. To mark the wall, measure the TV’s actual visible screen height H. The intended top edge is approximately E + H/2, and the intended bottom edge is approximately E − H/2. Use the visible panel dimensions, not a guessed diagonal-to-height conversion, because aspect ratio and bezel designs differ.
For a TV on a supplied stand, measure from the floor to the centre of the screen with the TV assembled. If that centre is above your eye-height target, a lower console or a different stand position may be needed. If it is below the target, raising the set can help, provided the furniture remains stable and the manufacturer’s safety instructions are followed.
Free tools Windows power users keep installed
One-click scans. No signup required.
3. Mock up the position before drilling
Mark the proposed screen outline with removable tape, cardboard or a paper template at the measured size. Sit in the primary seat and check the centre, top edge, reflections, speakers, outlets and line of sight. This practical check catches errors caused by measuring to the wall bracket rather than to the panel. It is especially valuable when a fireplace, shelves or a deep console restricts the possible locations.
Rank #2
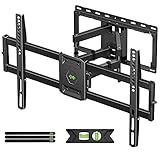
- Universal Design: This full motion TV mount fits for most of 42-90 inch TVs up to 132lbs with VESA size 200*100mm to 600*400mm available and max 16" Wood Stud space. Not perfect fit your TV? Please contact us and we'll do our best to solve the problem for you! If you need the screw M8*50, please message us to get it which be sent from USA.
- Adjustable View Comfortable : This TV bracket with dual articulating arms includes +5° /-15° tilt, ±45°swivel( maximum swivel angle depends on your TV). Want to more swivel angle? Please search for XML035 for the best options. +/-3° post-installation adjustment allows the perfect TV leveling. All these will make your TV flexibility and better view based on your seat in the room.
- Easy To Installation: Tilt mount with detailed instruction and all included hardware in pre-labeled bags. In particular, if your stud is for 16'' wood studs, please screw the bolts into the outermost edge of the holes on both side wall plates of the bracket to ensure compatibility with 16'' wood studs.
- Saving Space: This heavy duty mount can pull out to 16.49 and retract back to 2.40”, which save some valuable space for you and make your house look neat and Max weight 132lbs.
- Product Includes: The articulating mount Comes with bubble level, 3 pieces pack of cable ties and all standard mounting hardware, friendly US-based customer service. However, Concrete Anchors are not provided (If you need 10X50mm concrete anchors, please contact us to get it which be sent from USA).
Useful numbers—and what they do not mean
| Guidance | What it describes | How to use it |
|---|---|---|
| 42 inches (floor to screen centre) | Samsung Support US’s approximate example for a 5-foot-6-inch person on a standard couch | Use only as a rough starting point when you cannot measure the actual seated eye height; Samsung says measurement is preferable. |
| 90–110 cm seated eye height | Philips’s typical range | Compare it with your own measurement; it is not a prescription for every viewer or sofa. |
| 15 cm above eye level | Philips’s fallback when exact centre alignment is not possible: the top edge should be no more than 15 cm above eye level | Attribute this limit to Philips and treat it as fallback guidance, not a universal comfort threshold. |
| 2–5 times screen diagonal | Sony’s general viewing-distance guidance | Use it to assess seating distance separately; it does not calculate TV height. |
The 42-inch example is often repeated as if it were a rule. It is not: a taller viewer, a low sofa, a recliner or a different screen size changes the correct centre height. Likewise, the Philips eye-height range describes what is typical, not what every household should install.
Choose the mounting approach that fits your viewing habits
TV on its supplied stand
A stand is the simplest option when the console already places the screen centre near seated eye level. It avoids drilling and generally leaves the rear ports easy to reach. Check that the furniture is wide and deep enough for the stand, that the TV cannot be pulled forward by children or pets, and that ventilation and the manufacturer’s anti-tip requirements are met.
The limitation is fixed geometry: the stand determines the bottom edge and therefore the centre height. If the console is too high, adding a riser usually moves the screen farther from the target. If it is too low, raising the entire set may create instability. Measure the assembled TV rather than relying on the diagonal size printed on the box.
Recommended Free Tools
Fixed wall mount
A fixed mount can place the screen centre precisely at the measured eye height and can free console space. The wall must support the combined load, and the mount must match the television’s dimensions, weight and VESA hole pattern. Samsung says its TVs are VESA compliant and recommends a VESA-compliant mount designed for the TV’s size; follow the mount’s installation instructions and hardware requirements.
Rank #3
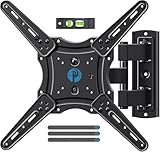
- Wide Compatibility: The Pipishell TV wall mount fits most 26"-65" LED LCD OLED Plasma Flat Curved TVs with VESA patterns 75x75mm up to 400x400mm. Compatible with wood stud, concrete, and brick wall mounting. Do not install the mount on drywall alone.
- Solid & Reliable: Featuring strong construction with articulating arms that are 33% thicker than other mounts, this TV wall mount can support up to 80 lbs. Premium heavy-duty steel, durable faceplate, and security screws provide an extra sense of security.
- Perfect Viewing Angle: The full motion TV mount can tilt +5°/-15° to reduce glare and swivels +/-90° to direct the screen toward your position for a more comfortable experience. Level the TV +/-4° after installation to perfectly fine tune the TV’s position.
- Space-Saving Design: This wall mount can extend 17" for viewing and retracts back to 2.36" for a low-profile look. The single-stud design is ideal for installing in spaces such as a corner or area where only one stud is available.
- Quick & Simple Installation: The single-stud design makes it easier to mount than dual arm models that require two studs. The full motion TV wall mount includes mounting hardware and detailed instructions for fast installation.
Plan cable routing before tightening the bracket. A fixed mount leaves little room to reach rear HDMI, power or antenna sockets, so connect cables first or use an installation method that preserves access. Confirm that the mounted set will not collide with doors, cabinets or a soundbar.
Tilting or adjustable mount
An adjustable mount is useful when the room has competing constraints: a high obstruction, seats at different heights, occasional standing viewers or a need to reach cables. It can let you keep the screen closer to the preferred centre while changing the panel angle. Adjustment does not make an excessively high installation automatically comfortable; a downward tilt changes reflections and viewing geometry but does not remove the need to consider neck posture.
If children, wheelchair users, recliner users or standing viewers are all regular audiences, decide which position deserves priority. A mount with a broad adjustment range may reduce compromise, but its extension, swivel clearance, wall loading and final locked position still have to meet the manufacturer’s specifications.
Wall-mount compatibility and installation checks
- Read the TV specifications. Record the television’s weight without its removable stand, screen size, VESA horizontal and vertical spacing, and the approved screw type and length.
- Select a mount rated for that exact load and size range. A VESA pattern alone does not prove that a mount is suitable; the mount’s weight rating, movement range and hardware must also match.
- Identify the wall construction. Stud, masonry and other wall types require different anchors and fixing methods. Follow the mount manufacturer’s instructions rather than substituting generic fasteners.
- Locate services and clearance. Check for electrical cables, plumbing, ventilation openings, trim, shelves and the required space behind the set for connectors.
- Set the screen-centre mark. Mark the target centre from your seated eye-height measurement, then position the bracket according to the TV and mount diagrams. Bracket-hole height is not the same as screen-centre height.
- Install and verify. Tighten all specified fasteners, secure the TV as directed, and confirm that the panel is level. Recheck the view from the normal seat before hiding cables.
If the mount instructions and the TV manual differ, use the hardware and procedure specified for the particular mount and television, or obtain qualified installation help. The correct height cannot compensate for an under-rated bracket or an unsuitable wall.
Rank #4

- [Sturdy and Safe] You can relax knowing your TV is securely mounted to the wall with this UL-certified TV wall mount, which holds up to 132 lbs without a hitch. Its solid design keeps your TV steady, no wobbling or slipping here! Plus, we’ve got you covered with 10 years of support for this product.
- [Securely Supports TVs Up To 90 Inches] The VESA compatibility of up to 600x400mm ensures a seamless fit with most standard mounting patterns. Designed for 24-inch studs, it offers enhanced flexibility in installation options. This versatility makes it ideal for accommodating various room layouts and TV configurations.
- [Low Profile Design] This design allows your TV to be positioned close to the wall, optimizing space while creating a sleek and modern aesthetic. Despite its slim profile, the mount features a quick release mechanism that facilitates effortless adjustments and connections.
- [Tilt TV to Reduce Glare] The wall mount enables you to tilt your TV forward by up to 10 degrees, effectively reducing glare and enhancing viewing quality.
- [Easy Installation] The package includes all necessary hardware along with clear instructions. A paper template for marking drill holes would have been beneficial. Tips: Do not attempt installation into drywall alone; if concrete anchors are required, please contact us.
Adjust for posture, furniture and room conditions
Reclining seats
Reclining rotates your line of sight upward relative to an upright sofa position. Measure while reclined in the position used most often, then verify that the lower part of the screen is not blocked by an armrest. Do not raise the TV simply because a recliner changes the preferred angle; compare the complete posture and glare trade-off.
Bar stools and standing viewing
A kitchen or sports area may be viewed from a stool or while standing. Samsung’s guidance notes that special viewing positions can change the appropriate placement. If the same screen serves both a sofa and a high counter, prioritise the position used for longer sessions or choose an adjustable mount. A high installation that works for standing can force sofa viewers to look upward for hours.
Fireplaces, consoles and shelves
Furniture clearance is a practical constraint, not proof that the TV belongs above a particular object. Check heat exposure, mantle depth, cable paths and the ability to service the TV. If the eye-level target conflicts with an obstruction, document the compromise and keep the top edge as close to eye level as the room allows; Philips’s 15 cm fallback is one manufacturer-specific reference.
Glare and windows
Reflections can make a correctly positioned screen difficult to watch. Check the view at different times of day with lights on and curtains in their normal position. A small change in wall location or screen angle may solve glare without moving the centre far from eye level. Sony directs readers to the viewing-angle specifications for the particular model, so consult those limits when seats are off to the side.
Best Value

- [Securely supports TVs up to 70''] The full motion TV wall mount fits most 32''-70'' flat and curved TVs with VESA patterns 75x75 to 400x400mm. Designed for installation on 8”/12”/16” wood studs, concrete, and brick walls. Please make sure that the above conditions are met before using it.
- [Solid and Sturdy] This swivel TV wall mount made of heavy-duty steel and dual articulating arms that are 30% thicker. Its solid design keeps your TV steady, no wobbling or slipping here! Plus, we’ve got you covered with 10 years of support for this product.
- [Enjoy Viewing Freedom] The adjustable TV wall mount tilts +5°/-15° to reduce glare and swivels +/-45°. Level your screen +/-4° after installation to fine tune the TV’s position. All these will make you find the most comfortable and healthiest viewing position.
- [Space Saving Design] The TV mount 70 inch allows your TV to be positioned just 3.43 inches from the wall, thereby optimizing space, while the TV arm can also put out to 15.07'' for effortless adjustments and connections.
- [Easy Installation] The package includes all necessary hardware along with clear instructions. A paper template for marking drill holes would have been beneficial. Tips: Need concrete anchors, M8x50mm screws, or missing parts? Don’t run to Home Depot or Lowe’s—we’ll send them to you directly. Just reach out to our US-based support team (available daily) and we’ll get it taken care of quickly.
Viewing distance is separate from height
Sony’s placement guidance gives a general distance of two to five times the screen diagonal. For example, a 55-inch diagonal produces a distance range by multiplying 55 inches by two and by five; it does not tell you how many inches above the floor to mount the set. Height comes from seated eye level, while distance affects perceived size, detail and whether viewers must scan their eyes or turn their heads.
Measure distance from the viewers’ eye position to the screen plane, not from the back wall to the TV mount. If the room forces a distance outside the general range, test the actual image and text from the seat rather than raising or lowering the TV to compensate.
Stand, fixed mount or adjustable mount: a practical comparison
| Option | Best fit | Height control | Key checks |
|---|---|---|---|
| Supplied stand | A room with a suitable, stable console and one main seating position | Limited by stand and furniture dimensions | Console size, anti-tip security, ventilation, port access and screen-centre measurement |
| Fixed wall mount | A clear wall where precise centre alignment and a clean footprint matter | High during installation, minimal afterward | TV weight and VESA pattern, rated mount, wall construction, cable access and clearance |
| Tilting or adjustable mount | Rooms with mixed seating heights, glare or recurring cable-access needs | Adjustable after installation within the mount’s range | Extension and swivel clearance, locked position, wall load, viewing angle and posture |
Common mistakes and how to correct them
- Using a universal floor number: Re-measure seated eye height. The Samsung 42-inch example is approximate and tied to a specific viewer and couch.
- Measuring to the bracket instead of the screen: Use the TV’s dimensional drawing to locate the panel centre relative to the VESA holes.
- Mounting above a fireplace by default: Treat the fireplace as an obstruction and heat/clearance issue; check whether the resulting centre height is acceptable from the main seat.
- Ignoring the sofa’s actual cushion height: Measure after the furniture is assembled and positioned. A replacement sofa can change the target.
- Optimising for occasional standing viewers: Give priority to the viewing position used for the longest sessions, or install an adjustable solution.
- Forgetting side seats: Check the model’s specified viewing angle and whether a swivel mount is needed.
- Hiding cables before testing: Leave service loops and access until the screen position, signal and power are confirmed.
- Assuming tilt fixes excessive height: A downward angle may alter glare but does not make prolonged upward viewing equivalent to eye-level placement.
A final pre-drilling checklist
- Primary seated eye height measured from the floor.
- Screen outline and centre marked at the intended position.
- Bottom and top edges checked against consoles, shelves and speakers.
- Glare checked in daytime and evening lighting.
- Viewing distance considered independently from height.
- TV weight, dimensions, VESA pattern and screw requirements recorded.
- Mount rating and wall-fixing method verified for the wall construction.
- Power, HDMI, antenna and network paths reachable after installation.
- TV and mount instructions read, with a second person available for lifting.
- Final view checked from every regularly used seat.
Bottom line
There is no single best number of inches from the floor. The most defensible starting point is your actual seated eye height, with the screen centre at that level or slightly below. Use Samsung’s 42-inch figure and Philips’s 90–110 cm range only as context, apply Philips’s 15 cm top-edge fallback only as attributed guidance, and keep Sony’s 2–5-times-diagonal distance rule separate. Then select a stand, fixed mount or adjustable mount that fits the TV, wall and room rather than forcing the room to fit a generic height.
Do these 3 things before closing this tab:
1Scan for outdated or missing drivers - takes under a minute2Repair Windows errors before they cause bigger problems3Fix the driver behind crashes, sound loss and screen glitchesQuick Recap
Product prices and availability are accurate as of the date/time indicated and are subject to change. Any price and availability information displayed on Amazon at the time of purchase will apply.

