
Outdated Drivers Are Slowing You Down
One free scan finds every outdated or missing driver and matches the right update for your exact hardware.Free scan · exact hardware matchPC Slower Than It Used to Be?
A free scan shows the junk files, broken settings and background clutter dragging Windows down - then fixes them in one click.Free scan · Windows 10 & 11iTechGuides is reader-supported. When you buy through links on our site, we may earn an affiliate commission. As an Amazon Associate I earn from qualifying purchases. Learn more
For most people, start with Mupen64Plus or the Mupen64Plus-Next core in RetroArch. Use standalone Mupen64Plus when you want direct configuration, a command-line-friendly setup, and potentially better performance on your hardware. Use Mupen64Plus-Next when RetroArch’s controller profiles, playlists, shaders, and content management are more valuable than a separate emulator interface. Choose ParaLLEl N64 when its independent rendering and compatibility settings solve a particular homebrew or game problem. Choose ares when accuracy-oriented testing is the priority and you are comfortable using a front end such as simple64 or RMG.
Modern USB and Bluetooth pads can work well, but “detected” is not the same as “correctly mapped.” You must verify the analog range, C-button arrangement, Z and trigger assignments, Start, D-pad, and rumble. The correct setup also depends on whether you are using standalone Mupen64Plus or a libretro core: they use different configuration layers.
Quick comparison
| Option | Best use | Homebrew and compatibility position | Controller setup | Rendering and front end |
|---|---|---|---|---|
| Standalone Mupen64Plus | Direct control, scripting, and performance-focused setups | Cross-platform, plugin-based emulator with dynamic recompilers and broad game support | Edit InputAutoCfg.ini or use a compatible front end |
Separate plugins and configuration; command-line front end available |
| Mupen64Plus-Next | RetroArch users who want an up-to-date Mupen64Plus port | Strong general-purpose choice with core-specific settings and compatibility notes | RetroArch input profiles and per-core or per-game overrides | RetroArch interface, playlists, shaders, save management, and ZIP loading |
| ParaLLEl N64 | Cases requiring different rendering or compatibility controls | Separate libretro implementation that diverged substantially from Mupen64Plus | RetroArch input layer | Independent core settings, including N64-specific controls such as analog angle snapping |
| ares | Accuracy-oriented homebrew testing | Low-level, accurate multi-system emulator with good N64 support; no universal homebrew guarantee is established | Depends on the chosen front end | Can be used through simple64, RMG, or RetroArch |
The Mupen64Plus project page reports version 2.6.0 at the time of 2026 access. Treat that number as a time-sensitive software identifier, not as a performance rating.
Quick wins for a faster PC:
Clear out junk files and repair common Windows errorsFree Scan →Fix the driver behind crashes, sound loss and screen glitchesFind Drivers →What a homebrew user should evaluate
N64 homebrew is not one uniform workload. A small cartridge-style demo, a modern 3D game, a hardware test, and a ROM hack can stress different parts of an emulator. Select on several axes rather than assuming that the emulator with the highest frame rate is automatically the best.
#1 Best Overall
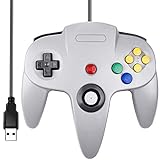
- Plug & Play: Standard USB controller; no drivers needed for compatible devices
- Compatible with Windows PC, macOS, Linux and Raspberry Pi
- Iconic original M-shaped configuration, featuring 10 action buttons, a precision analog Control Stick, and an 8-way D-pad.
- The 3D analog stick provides nuanced control for precise movements and enhanced gameplay comfort.
- Features a 6-foot (1.8 m) cable for comfortable gameplay.
Accuracy and observable hardware behavior
Accuracy matters when a program depends on timing, unusual graphics behavior, audio synchronization, controller polling, or edge cases that commercial games do not exercise. An accuracy-focused emulator can reveal bugs in a homebrew project that a faster, more permissive implementation hides. ares is the clearest candidate in this group because it is described as a low-level, accurate emulator with good N64 support. That description makes it suitable for testing, but it does not establish that every homebrew title will run perfectly.
Compatibility
Compatibility includes more than booting. Check whether the emulator reaches the title screen, renders the expected graphics, accepts input, plays audio, saves correctly, and survives a complete play session. Mupen64Plus and its descendants are practical first choices because their projects document broad game capability and ongoing compatibility settings. If a program fails, test it in a second core rather than changing several settings at once.
Performance and resolution
RetroPie’s documentation states that standalone Mupen64Plus can be more performant than the libretro variants on some systems. It also warns that high internal resolutions can reduce performance and that results vary by hardware. This is a platform-dependent observation, not a universal benchmark. Keep the native or low internal resolution while diagnosing a homebrew problem, then raise it after the program is stable.
Rendering controls
Different cores expose different graphics options. ParaLLEl N64 is not simply another name for Mupen64Plus-Next: it began as a Mupen64Plus-based emulator and diverged significantly. Treat it as an independent core with its own defaults and troubleshooting path. Switching cores can change the result even when the ROM and controller are unchanged.
Controller behavior
The N64 layout is unusual enough that a modern pad can be recognized yet still feel wrong. Evaluate analog range and deadzone, the four C buttons, Z, L, R, Start, the D-pad, and rumble. A second analog stick can be useful as an optional substitute for the C buttons, but it should not silently replace the intended N64 controls for software that expects four independent C inputs.
Standalone Mupen64Plus: when and how to use it
Mupen64Plus is a cross-platform, plugin-based N64 emulator. Its project describes dynamic recompilers for Intel x86/amd64 and ARM, audio, graphics, and input plugins, rumble support, GameShark cheats, speed adjustment, and a command-line front end. That architecture gives advanced users direct control, but it also creates more configuration layers than a single integrated application.
Why choose the standalone build
- You want to select and tune plugins directly.
- You prefer a lightweight or scriptable launcher.
- Your hardware performs better with the standalone build than with a libretro core.
- You need to inspect or edit the controller profile directly.
Do not assume that a setting from a RetroArch guide belongs in standalone Mupen64Plus. The two versions do not share the same setup layer.
Set up a modern controller with InputAutoCfg.ini
- Connect the USB or Bluetooth controller and make sure the operating system sees it before starting the emulator.
- Locate Mupen64Plus’
InputAutoCfg.ini. The exact folder depends on the operating system and package, so use the configuration directory created by your build rather than copying a path from a different platform. - Open the file and look for a section whose name exactly matches the controller device name reported by the system.
- If the section is missing, create a profile named exactly for that device. The official guide’s example warning is
Input: No auto-configuration found for device 'My Awesome Controller'; a similar message means the emulator has not found a matching profile. - Map the N64 controls: A, B, Start, the four C buttons, Z, L, R, the D-pad, and the analog X and Y axes. Map each control to the controller’s button, axis, or hat identifier as reported by the emulator or operating system.
- Save the file, restart the emulator, and test every input in a game or controller-testing screen. Check both directions of each analog axis and confirm that releasing the stick returns to center.
- If rumble is available, enable it only after basic input works. Rumble support is part of Mupen64Plus, but the pad, driver, operating system, and plugin must all expose it.
The guide also documents optional mouse control and sensitivity settings. Leave those disabled unless a particular project needs mouse input; they add another input source while you are still diagnosing the standard pad.
Rank #2

- Use the generic standard USB port, if your program or application accepts USB controller input, it can be used natively without drivers or patches, JUST PLUG AND PLAY!
- Supported Operating system: Windows 98, ME, Vista, 2000, 2003, XP, 7, 8, 8.1, 10; Linux UBUNTU, Linux Mint, Android Linux (via an USB OTG cable); Mac OS X and beyond; Retrogaming operating systems: RetroPie, Recalbox, Happi Game Center, Lakka, ChameleonPi, Piplay.
- Supported Device (With USB storage device): PC, Notebook Computer, Laptop Computer; Android Smartphone: connect via an USB OTG cable; Raspberry Pi (RPI, Raspberry pie): Raspberry Pi 1 Model B, Model A, Raspberry Pi 1 Model B+, Raspberry Pi Zero, Raspberry Pi 2, Raspberry Pi 3 Model B, Raspberry Pi 3, Retro Pie. --- Note: NOT SUPPORT Android TV BOX.
- Supported Game Emulators: Current: Project64, 1964, MAME (MESS), Mupen64Plus, Sixtyforce, CEN64; Historical: Project Unreality, Corn, UltraHLE, Nemu64.
- Super sensitive buttons for precision control. Third party controller, not original Nintendo 64 controller. But it works phenomenal with the Raspberry Pi game emulation and so on. Cord is approx 5.9 ft. Long.
RetroArch: Mupen64Plus-Next and other cores
RetroArch separates the front end from the emulator core. That gives you a consistent library, input system, save-state interface, and content browser while allowing different N64 implementations underneath. RetroPie documents Mupen64Plus, lr-mupen64plus, and lr-mupen64plus-next as separate choices, with separate controller configuration locations.
When Mupen64Plus-Next is the practical default
Mupen64Plus-Next is an up-to-date Mupen64Plus port with core settings and compatibility notes. It is a good starting point when you want RetroArch’s controller handling and do not need to maintain a standalone plugin stack. RetroArch cores can also read content directly from ZIP files, which is convenient for supported distributions and organized libraries.
Map a controller in RetroArch
- Connect the controller before opening RetroArch and confirm that the front end assigns it to port 1.
- Open Settings > Input > RetroPad Binds > Port 1 Controls. Menu wording can vary slightly by RetroArch version or platform package.
- Bind the physical buttons to RetroPad inputs, then open the core’s N64-specific mapping or controls screen if the core exposes one.
- Assign A, B, Start, Z, L, R, the D-pad, and C buttons deliberately. Do not accept a generic gamepad profile without checking where its second stick and triggers landed.
- Save the controller mapping at the appropriate scope: a global profile for a common layout, a core override for one N64 core, or a game override for a single homebrew title.
- Launch the homebrew and verify analog movement, C-button behavior, menu navigation, saving, and rumble. If one core behaves differently, keep its override separate rather than replacing the global profile.
RetroPie’s documentation distinguishes the configuration files for standalone Mupen64Plus and libretro cores. Instructions written for InputAutoCfg.ini therefore should not be pasted into RetroArch, and a RetroArch override will not repair a missing standalone profile.
ParaLLEl N64: a separate troubleshooting path
ParaLLEl N64 started from Mupen64Plus code but diverged substantially. Select it when its rendering behavior or compatibility controls address a specific problem, not because its name sounds interchangeable with Mupen64Plus-Next.
Useful reasons to test it
- A homebrew title renders incorrectly in another core.
- You need an N64-specific control exposed by ParaLLEl N64, such as analog angle snapping.
- You are comparing two implementations to determine whether a failure is core-specific.
Change only one variable at a time: keep the same ROM, controller profile, resolution, and save method while switching cores. Record which core, graphics options, and input scope produced the result. This prevents a core change from being mistaken for a controller fix.
ares for accuracy-focused testing
N64.dev describes ares as a low-level, accurate multi-system emulator with good N64 support. It also notes that a graphical interface can be supplied by simple64, RMG, or RetroArch. This combination is useful when you want to inspect behavior with an accuracy-oriented implementation without giving up a usable front end.
What ares can and cannot establish
Using ares can provide an additional reference point for timing, graphics, and input behavior. It cannot by itself prove that a homebrew project is correct, nor does the description establish a universal compatibility guarantee. If a title works in Mupen64Plus but not ares, or the reverse, compare logs, settings, and the project’s documented requirements before declaring either emulator defective.
Mapping Xbox, PlayStation, and other modern pads to N64 controls
Brand recognition is less important than the profile presented to the emulator. Two controllers with similar layouts can expose different button numbers, axis directions, trigger modes, or hat identifiers. A missing profile requires manual mapping; an automatically detected profile still needs verification.
Rank #3

- Use the generic standard USB port, if your program or application accepts USB controller input, it can be used natively without drivers or patches, JUST PLUG AND PLAY!
- Supported Operating system: Windows 98, ME, Vista, 2000, 2003, XP, 7, 8, 8.1, 10; Linux UBUNTU, Linux Mint, Android Linux (via an USB OTG cable); Mac OS X and beyond; Retrogaming operating systems: RetroPie, Recalbox, Happi Game Center, Lakka, ChameleonPi, Piplay.
- Supported Device (With USB storage device): PC, Notebook Computer, Laptop Computer; Android Smartphone: connect via an USB OTG cable; Raspberry Pi (RPI, Raspberry pie): Raspberry Pi 1 Model B, Model A, Raspberry Pi 1 Model B+, Raspberry Pi Zero, Raspberry Pi 2, Raspberry Pi 3 Model B, Raspberry Pi 3, Retro Pie. --- Note: NOT SUPPORT Android TV BOX.
- Supported Game Emulators: Current: Project64, 1964, MAME (MESS), Mupen64Plus, Sixtyforce, CEN64; Historical: Project Unreality, Corn, UltraHLE, Nemu64.
- Super sensitive buttons for precision control. Third party controller, not original Nintendo 64 controller. But it works phenomenal with the Raspberry Pi game emulation and so on. Cord is approx 5.9 ft. Long.
| N64 input | What to verify on a modern pad | Common design decision |
|---|---|---|
| Analog stick | Both axes, direction, center return, range, and deadzone | Use the primary stick; avoid excessive deadzone that makes fine movement impossible |
| C buttons | Four independent inputs and their physical reach | Use four face buttons, a right stick converted by the core, or another deliberate four-way arrangement |
| Z | Whether the assigned trigger is digital or analog and whether a full press registers | Choose the most accessible shoulder or trigger button for the game |
| L and R | Separate shoulder inputs and correct press behavior | Do not merge them with Z unless the title and your layout make that intentional |
| D-pad | Each direction and diagonal behavior | Keep it independent from the analog stick for menus and titles that require it |
| Start | Single press and accidental activation | Use a central, reachable button that is not easy to hit during movement |
| Rumble | Whether the driver and emulator expose force feedback | Test after mapping; lack of rumble does not necessarily indicate an input failure |
A reliable homebrew testing workflow
- Keep a clean content copy. Store the homebrew ROM or image separately from patched or experimental copies so that a bad patch is not confused with an emulator problem.
- Start with conservative graphics settings. Use the core’s default renderer and native or low internal resolution. High internal resolutions can reduce performance, according to RetroPie’s documentation.
- Launch through one emulator only. Confirm that the title boots, reaches its first interactive screen, and responds to Start and the D-pad before changing settings.
- Exercise every control. Test analog movement at slow and fast speeds, all four C buttons, Z, L, R, Start, and the D-pad. Check that an axis does not remain partially pressed when released.
- Test persistence. Save in the way the homebrew expects, exit normally, relaunch, and verify that the save remains. Do not rely on a save state as proof that cartridge-style saving works.
- Repeat in a second implementation when behavior is suspicious. Mupen64Plus-Next, ParaLLEl N64, standalone Mupen64Plus, and ares have different code and settings. A second result helps isolate an emulator-specific issue.
- Change one setting at a time. Record the core, renderer, resolution, controller scope, and result. This small log is more useful than repeatedly resetting every option.
Troubleshooting common failures
The emulator says no controller profile was found
For standalone Mupen64Plus, read the device name in the warning, then create or rename the matching section in InputAutoCfg.ini. Check spelling, punctuation, and capitalization. For RetroArch, bind the pad through the input menu and save the mapping at the core or game scope you actually use.
The pad works, but C buttons do not
Reopen the mapping and inspect each C input separately. A generic profile may have assigned the second analog stick without creating four independent C buttons, or may have left one direction unbound. If the core offers a right-stick-to-C-button option, test it against a four-button assignment and keep the layout that gives the homebrew the required independent inputs.
Analog movement is too slow, fast, or drifts
Check axis direction, center return, and deadzone before changing game speed. A large deadzone can hide small movements; a small deadzone can expose hardware noise. Test at the emulator’s default resolution and speed so that graphics load is not mistaken for input lag.
Performance drops after increasing resolution
Return to native or low internal resolution and confirm whether the slowdown disappears. RetroPie explicitly notes that high internal resolutions can reduce performance and that results vary by hardware. If the standalone build performs better on your device, use it for that system while retaining RetroArch for convenience elsewhere.
A title works in one core but not another
Keep the ROM, controller, and resolution fixed, then compare core-specific settings. ParaLLEl N64 and Mupen64Plus-Next are separate implementations, and ares has a different accuracy-oriented design. Report the exact core and settings when asking the homebrew author for help.
Rumble is missing
First confirm that ordinary buttons and axes work. Then check whether the controller driver, operating system, emulator input plugin or core, and the game all support force feedback. Mupen64Plus lists rumble support, but that feature does not guarantee rumble on every modern pad or platform.
Which emulator should you choose?
Choose standalone Mupen64Plus if…
- You value direct files, plugins, command-line launching, and manual control.
- Your device benefits from the performance difference documented by RetroPie.
- You are comfortable editing
InputAutoCfg.ini.
Choose Mupen64Plus-Next in RetroArch if…
- You want one input, library, save-state, and shader interface for multiple systems.
- You prefer profile-based controller setup over editing a standalone file.
- You want the convenience of libretro content handling, including direct ZIP loading where supported.
Choose ParaLLEl N64 if…
- You need its distinct renderer or a core-specific option such as analog angle snapping.
- You are testing whether a bug belongs to one implementation.
Choose ares if…
- Accuracy-oriented observation is more important than the simplest setup.
- You are willing to use simple64, RMG, or RetroArch as the interface.
No authoritative source cited here publishes independent market-wide compatibility statistics or a universal homebrew pass rate. Treat these choices as role-based recommendations: select the implementation that matches your testing goal, then verify the exact title and controller combination on your hardware.
The Tool Desk
Outbyte PC Repair FREERepair Windows errors before they cause bigger problemsFix Now →Outbyte Driver Updater FREEScan for outdated or missing drivers - takes under a minuteDriver Scan →Quick Recap
Product prices and availability are accurate as of the date/time indicated and are subject to change. Any price and availability information displayed on Amazon at the time of purchase will apply.

