
What’s actually slowing this PC down?
Pick the symptom - the matching free tool is one click away.
iTechGuides is reader-supported. When you buy through links on our site, we may earn an affiliate commission. As an Amazon Associate I earn from qualifying purchases. Learn more
Print a PC accessory when your case, clearance, or cable route is genuinely unusual and a custom shape solves a problem a standard part cannot. Buy an off-the-shelf part when a compatible product already fits, when the accessory carries an expensive component, or when predictable support and validated performance matter more than customization.
The decision is not simply “filament versus retail price.” You must check geometry, mounting hardware, material, printer capability, operating conditions, iteration time, and the consequences of a failed part. Documented projects show that custom brackets, cable-management bars, radiator mounts, drive cages, and motherboard mounts can be practical, but the available evidence does not establish a universal saving, lifespan, failure rate, or safety rating for 3D-printed accessories.
The short answer: make only when the fit is the advantage
A printed accessory earns its place when it does something a stock part cannot do: clear an unusual obstruction, follow a nonstandard cable route, use an empty space in a custom case, or adapt components with incompatible mounting patterns. The more ordinary the requirement, the stronger the case for buying a compatible part.
| Question | Print it when… | Buy it when… |
|---|---|---|
| Does the shape need to be custom? | Your case, component position, or cable path requires dimensions that standard products do not offer. | A ready-made bracket, tray, mount, or cable guide already clears the surrounding parts. |
| Is an equivalent already included? | The included part cannot route, position, or support your particular layout. | The case manufacturer supplies the same function. For example, CORSAIR identifies its included RapidRoute cable bars as an alternative to a printable cable-management bar. |
| What happens if it fails? | The part is noncritical and easy to inspect or replace. | Failure could drop a graphics card, damage a drive, obstruct a fan, contact an electrical connection, or make an expensive component unsupported. |
| Can your printer and material handle it? | Your machine, filament, and print settings are documented as suitable for the part’s conditions. | You cannot verify material behavior, printer requirements, or dimensional accuracy. |
| What is the real cost? | You already have printer access, suitable filament and hardware, and time for measurement and test prints. | Designing and iterating would cost more time or risk than purchasing a compatible part. |
That framework avoids a common mistake: treating every printable object as automatically cheaper or better. The sources for the documented PC projects do not compare total print cost, retail prices, durability, or failure rates.
#1 Best Overall
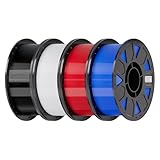
- Ender PETG Filament - combines the advantages of PLA and ABS, offering an eco-friendly, odorless, and user-friendly 3D printing experience. It features enhanced toughness that effectively resists cracking and warping, ensuring smooth and successful prints.
- Excellent Mechanical Properties - This PETG filament boasts high strength, impact resistance, and temperature resistance, with low shrinkage and high elongation at break. Printed models remain sturdy and durable even under repeated bending or stress.
- High Clarity & Glossy Finish - It delivers outstanding transparency and light transmission, making it perfect for visually detailed projects such as lampshades and display cases. The surface finishes with a smooth, glossy appearance.
- Reliable Printing & Compatibility - Dried, vacuum-sealed, and tangle-free, it minimizes clogging, bubbling, and snapping. With a precise diameter of 1.75mm (±0.02mm), it feeds smoothly and is compatible with most FDM printers on the market.
- Safe and Supported - Non-toxic and chemically resistant, Ender-PETG is safe for everyday use. Backed by Creality’s 12-month & 24 hours after-sales service. Note: Please place this product in a dry and ventilated environment, not in an environment of high temperature, sunny or humid conditions.
What counts as a 3D-printed PC accessory?
In this context, an accessory is a non-electronic part that positions, supports, routes, or protects PC components. Examples include a vertical graphics-card bracket, cable-management bar, radiator or fan mount, hard-drive cage, motherboard mount, spacer, and adapter plate.
These parts differ substantially in load, heat exposure, vibration, and access requirements. A cable guide that only keeps wires tidy is a different engineering problem from a bracket that supports a graphics card. Evaluate each design on its own rather than applying one material or infill recommendation to every accessory.
Start with fit and geometry
Measure the real installation space
Measure the case and the accessory interface before opening a CAD program or downloading a model. Record the available width, height, depth, screw-hole locations, nearby connectors, fan blades, radiator edges, side panels, and the path needed to insert or remove the part.
- Measure from fixed reference surfaces, not from a flexible cable or a removable panel.
- Record the screw diameter, head style, usable thread depth, and whether a nut or insert must be captured inside the print.
- Check tool access. A hole that is reachable before installation may be blocked once the motherboard, radiator, or graphics card is in place.
- Leave room for connector bodies and cable bend radius; a part that technically fits may still prevent a cable from seating.
- Check neighboring components at their full travel: fan blades, drive trays, expansion cards, and side panels all need clearance.
Manufacturer files and stated hardware apply to the specific design and case. A model made for one chassis should not be assumed to fit another chassis merely because both use the same component size.
Print a fit test before the final part
Use a low-cost, quick section of the design to test the critical interfaces: screw holes, locating tabs, rails, and clearances. This is especially important for a drive cage or bracket that must slide into a fixed opening. The CORSAIR hard-drive-cage instructions recommend printing a bracket at original scale first, then adjusting only the dimensions designated by that project if the fit is too loose or too tight. Treat that as project-specific guidance, not a universal tolerance rule.
Do not scale an entire model indiscriminately to correct one tight hole. Uniform scaling changes every dimension, including screw spacing and component clearance. Adjust only the parameters the designer identifies, or redesign the interface from your own measurements.
Rank #2

- ①【PETG Filament 1.75mm】SUNLU PETG 3D Printer Filament combines the advantages of both PLA and ABS 3D printer filament, making 3D printing more convenient and easy.
- ②【Excellent Layer Adhesion】PETG filament offers excellent layer adhesion, reducing the risks of warping and ensuring smooth, strong prints with great structural integrity.
- ③【Enhanced Toughness】Known for its toughness, PETG outperforms many other filaments in durability, making it ideal for creating sturdy and resilient items that can withstand stress and use.
- ④ 【High Impact & Mechanical Strength】Stronger than standard PLA and easier to print than ABS. Our PETG filament provides excellent layer adhesion and impact resistance, preventing warping or cracking under stress. Perfect for printing functional parts, RC drone frames, or heavy-duty household tools.
- ⑤【Weather-Resistant for Outdoor Use】Engineered with robust UV and moisture resistance, SUNLU PETG maintains its structural integrity and color vibrancy over time. It is the ideal choice for outdoor planters, car accessories, and weatherproof garden fixtures that endure harsh sunlight or rain.
Check whether the case already solves the problem
Before designing a replacement, inventory the parts supplied with the case. Cable channels, removable brackets, drive trays, fan rails, and motherboard standoffs may already provide the function you need. In CORSAIR’s open-frame build, the documented printable cable-management bar has an explicit alternative: the included RapidRoute cable bars.
An included or compatible purchased part normally avoids a design iteration, a fit test, and the need to source special fasteners. Printing becomes more compelling when the supplied solution leaves a clearance problem, blocks a preferred cable route, or cannot support the layout you are building.
Material choice is part of the design
There is no single “best filament” for PC accessories. The documented projects use PLA, PETG, PC-CF, and TPU for different components. That variety is evidence that material selection follows the part and its conditions, not a blanket rule.
| Material or category | Documented use or guidance | What you still must verify |
|---|---|---|
| PLA | Used for the main parts of CORSAIR’s hard-drive cage and for brackets in the documented ITX build; the ITX build says its own prints used PLA. | Whether PLA remains suitable for your location, sustained load, temperature, and mounting method. The examples do not certify PLA for every case position. |
| PETG | Used for the main parts of the documented hard-drive cage. | Your printer’s PETG settings, dimensional result, and suitability for the accessory’s actual conditions. |
| PC-CF | Used as one of the material options for the documented hard-drive-cage main parts. | Printer compatibility, enclosure and temperature requirements, nozzle and process requirements, and the finished part’s fit. |
| TPU | Used for brackets in the documented hard-drive-cage project. | Whether a flexible bracket provides the required retention and stability in your specific assembly. |
| ABS, ASA, PC, and nylon | Prusa’s enclosure guidance lists these among higher-temperature materials for which an enclosure may be needed and stresses that printer ambient conditions matter. | Current filament documentation and your printer manufacturer’s instructions before attempting the material. |
Material names alone do not tell you the safe load, temperature limit, or service life of a finished part. Confirm those limits from the filament and printer documentation for the exact product and process you intend to use.
Account for the printer, not just the filament
A design that is geometrically correct can still fail as a project if your printer cannot produce it consistently. Check the machine’s build volume, nozzle and bed requirements, temperature capability, enclosure requirements, and ability to hold the dimensions needed at screw holes and locating features.
Prusa’s enclosure guidance explains that ambient conditions affect printing and identifies ABS, ASA, PC, and nylon as materials that may require an enclosure. Verify the current guidance for your printer and material; do not infer compatibility from the fact that a model file exists.
Rank #3

- ①【PETG Filament 1.75mm】SUNLU PETG 3D Printer Filament combines the advantages of both PLA and ABS 3D printer filament, making 3D printing more convenient and easy.
- ②【Excellent Layer Adhesion】PETG filament offers excellent layer adhesion, reducing the risks of warping and ensuring smooth, strong prints with great structural integrity.
- ③【Enhanced Toughness】Known for its toughness, PETG outperforms many other filaments in durability, making it ideal for creating sturdy and resilient items that can withstand stress and use.
- ④【High Impact Strength】With its high impact resistance, PETG is perfect for printing parts that need to endure bumps and drops, ensuring long-lasting performance without cracks or breaks.
- ⑤【Robust Durability】PETG prints are robust and maintain their properties over time, making them suitable for both indoor and outdoor applications where weather resistance is a necessity.
Plan the mounting hardware and assembly
Hardware is part of the accessory, not an afterthought. Count every screw, nut, washer, insert, spacer, and tool required to install and remove the part. A printed mount that cannot be secured with the correct fastener is not a finished solution.
CORSAIR’s open-frame build specifies metric M3, M4, and M6 hardware for the relevant mounts. Those sizes belong to that design; they are not a universal requirement for every printed bracket. Check the model’s bill of materials and verify thread engagement, head clearance, and access before printing.
Decide how threads will be formed
- Use a through-hole and nut when the back side remains accessible and the design allows it.
- Use a captured nut or insert only when the model is designed for it and you can install it without cracking the surrounding plastic.
- Use the specified screw length. Too-short screws can strip or pull out; too-long screws can contact a board, drive, or panel.
- Do not force a screw into a hole that is undersized for the design. Correct the model or use the specified insert method.
Calculate total cost instead of guessing
The evidence does not establish that printing is cheaper than buying. Calculate the local total for each option:
Free tools Windows power users keep installed
One-click scans. No signup required.
Printed-part cost = filament used + printer time or access + electricity if you track it + design time + test prints + failed iterations + hardware + post-processing + replacement risk.
Purchased-part cost = item price + shipping or travel + required adapters or hardware + waiting time + return or replacement effort.
Filament cost alone can make a print look inexpensive while hiding the value of several hours of design and troubleshooting. Conversely, a one-off adapter that requires an unusual retail part may justify printing even when the plastic itself is not the deciding expense. Use your own rates and local prices; no general savings percentage is supported here.
Rank #4

- [Excellent PETG Filament]Our PETG combines the benefits of PLA and ABS to reach Eco-friendly and odorless performance. This PETG Filament is feature in good toughness to avoid cracking and warping, enbale excellent 3D printing.
- [Toughness-enhanced PETG] Our PETG filament choose durable and strong material that delivers excellent clarity, light transmission, and a glossy finish. It is recommended to use a printing temperature of 220-250°C and a base plate temperature of 70-80°C for better printing results.
- [Tangle-Free & Neatly Wound] We ensure that every PETG filament is tightly and neatly wrapped by utilizing full mechanical winding, which effectively minimizes tangles, filament snapping, and line breakage.
- [No Clogging & No Bubbles] Our filaments are thoroughly dried and carefully vacuum sealed to protect them from moisture and dust, which ensures that there will be no issues with clogging or bubbling during printing. Our PETG is designed to be perfectly compatible with the majority of 1.75mm FDM 3D printers, especially suitable for Creality 3D Printers!
- [High Precision & Consistent Performance]Our PETG filament boasts a diameter of 1.75mm, ensuring utmost accuracy with a tolerance of only +/- 0.03mm. With strict quality control and impeccable dimensional precision, our PETG filament guarantees a smooth and steady feeding during printing.
Evaluate the consequence of failure
Classify the accessory before choosing the make-or-buy route.
Recommended Free Tools
| Failure consequence | Examples | Practical threshold |
|---|---|---|
| Low | A cable guide shifts, a cosmetic cover cracks, or a spacer needs replacement. | Printing is reasonable if fit is verified and the part is easy to inspect. |
| Moderate | A drive cage vibrates, a fan mount loosens, or a panel becomes difficult to remove. | Require a test fit, secure fastening, and a material choice suited to the operating conditions. |
| High | A graphics-card bracket drops a component, a mount interferes with a fan, or a part contacts an electrical connection. | Prefer a validated compatible product unless you have strong, part-specific evidence and a way to inspect the installation regularly. |
The cited guides do not provide certified safety limits for arbitrary printed designs. Do not treat a community model, a successful photograph, or a manufacturer’s example build as a safety certification for a different case, load, or material.
A step-by-step process for making an accessory
- Define the function. Write down exactly what the part must hold, route, clear, or position. Identify what must remain removable for maintenance.
- Inventory alternatives. Check the case accessories and compatible retail parts. Record why each existing option fails your layout.
- Measure interfaces. Capture mounting centers, clearances, panel thicknesses, connector positions, and tool access. Take measurements twice from fixed references.
- Select a design source. Use a model whose intended case, component, hardware, and material are documented. Do not assume a similar-looking model is interchangeable.
- Set the material and printer plan. Confirm the filament, printer, enclosure, bed, nozzle, and ambient requirements from current manufacturer instructions.
- Make a fit test. Print only the critical interface at original scale. For a project with designated adjustment dimensions, change only those dimensions.
- Inspect the test. Check screw seating, insertion force, clearance, alignment, and tool access with the actual components and hardware.
- Print the final part. Record the material, printer, orientation, and settings so you can reproduce or revise it.
- Install without forcing it. Stop if a screw, connector, or component must be bent, compressed, or pushed into position. Correct the design instead.
- Test in the installed state. Confirm that panels close, fans rotate freely, cables remain connected, and the supported component cannot shift under normal handling.
- Document the result. Keep the final dimensions, hardware list, and any adjustment notes with the model. This reduces the cost of a future replacement.
A step-by-step process for buying instead
- Identify the exact interface. Match the case model, component generation, mounting pattern, and available clearance rather than shopping by a generic label.
- Confirm the included contents. Check whether screws, brackets, rails, or adapters are supplied. A low item price can become expensive if essential hardware is missing.
- Check dimensions and access. Compare the published measurements with your case and verify that the installed part still allows cable routing, panel removal, and maintenance.
- Check the return and replacement path. A product with clear support can be preferable when the part carries a valuable component or when fit cannot be confirmed in advance.
- Test before final cable management. Install the part, check alignment and clearance, and only then finish routing and securing cables.
What the documented projects show
Open-frame build: several printable functions in one layout
CORSAIR’s “3D Printable Open Frame PC Build” describes printable parts including a vertical GPU bracket, a cable-management bar, and radiator and fan mounts. It also identifies the included RapidRoute cable bars as an alternative to the printed cable-management bar and specifies metric mounting hardware for the relevant designs.
The lesson is not that every open-frame build should be printed. It is that an exposed, customized layout can create several geometry problems at once, making a tailored bracket or mount useful. Each part still needs its own load, clearance, material, and hardware check.
Hard-drive cage: fit adjustment is deliberately limited
CORSAIR’s “3D Printable Hard Drive Cage” uses PLA, PETG, and PC-CF for its main parts and PLA and TPU for brackets. Its instructions call for an original-scale bracket print first and allow adjustment only to designated dimensions when the fit is too loose or too tight.
Crashes, No Sound, or Screen Glitches?
Random freezes, missing sound and display glitches usually trace back to one bad driver. Find and replace yours safely.Free scan · under a minutePC Slower Than It Used to Be?
A free scan shows the junk files, broken settings and background clutter dragging Windows down - then fixes them in one click.Free scan · Windows 10 & 11This is a practical example of controlled iteration: test the interface, change the intended variables, and avoid hiding a measurement error with arbitrary scaling.
Best Value

- High Performance & Strength: PETG filament combines the strengths of PLA and ABS. It offers low shrinkage, high impact resistance, excellent temperature resistance, and high elongation at break, models can bend repeatedly and remain firm and sturdy
- High Transparent & Glossy: PETG has a high degree of transparency. The finished product has a fine surface with exquisite details. This makes PETG material ideal for making transparent parts and models, such as lampshades, display boxes, and more
- Non-toxic Material: Creality CR-PETG 3D printing filament has excellent wether resistance and chemical resistance, no odor, and non-toxic, green environmental protection
- Wide Compatible: CR-PETG filament is wildly used in FDM 3D printers on the market.Compatible with most popular 3D printers such as MK3, Creality Ender series/CR series, ELEGOO, Anycubic, and more
- Creality Support: Creality provides 12-month & 24 hours after-sales service. Note: Please place this product in a dry and ventilated environment, not in an environment of high temperature, sunny or humid conditions
ITX motherboard mount: one documented PLA example
CORSAIR’s “3D Printable Open Frame ITX PC Build” documents a printable motherboard mount and says the build’s own prints used PLA. That demonstrates one successful build context; it does not establish that PLA is appropriate for every motherboard mount, case location, sustained load, or thermal environment.
Common failure modes and fixes
The part is too tight
Do not sand away material indiscriminately if the tight feature controls alignment. Recheck the measurement, confirm that the model was printed at 100% scale, and adjust only the dimension the design identifies. Print another small fit test before committing to the full part.
The part is too loose
Check whether the looseness comes from the interface, a missing washer or insert, or a measurement taken from the wrong reference surface. Use the model’s designated adjustment dimension when available. Adding random adhesive may make later service impossible.
Do these 3 things before closing this tab:
1Repair Windows errors before they cause bigger problems2Fix the driver behind crashes, sound loss and screen glitches3Clear out junk files and repair common Windows errorsScrews do not seat correctly
Verify the specified metric size, head style, length, and thread engagement. A hole intended for a nut or insert cannot be treated as a self-tapping hole without confirming the design. Stop if the screw bottoms out before clamping the part.
The print fits but blocks a component
Reinstall the surrounding hardware and test the entire assembly, not just the printed part on a bench. Check fan rotation, radiator clearance, connector insertion, side-panel closure, and drive removal. Modify the clearance in the model rather than forcing the component into place.
The material or printer cannot meet the requirement
Check current filament and printer instructions, including enclosure and ambient requirements. If the machine cannot reliably produce the chosen material or the needed dimensions, switch to a compatible design or buy a validated part instead of hoping a different slicer setting will solve a hardware limitation.
A support part begins to move after installation
Power down, remove the load, and inspect the fastener, surrounding plastic, and mounting surface. Do not continue operating a component that is no longer positively secured. Replace the part or choose a more appropriate mounting solution after identifying why it moved.
The Tool Desk
Outbyte Driver Updater FREEScan for outdated or missing drivers - takes under a minuteDriver Scan →Outbyte PC Repair FREERepair Windows errors before they cause bigger problemsFix Now →Decision examples
| Situation | Likely choice | Reasoning |
|---|---|---|
| A cable route is blocked by a nonstandard radiator and the case’s supplied bars cannot reach it. | Print, after a fit test. | The value is the custom route. Confirm that the bar does not interfere with fans, connectors, or panel removal. |
| Your case includes a cable-management system that reaches all required ports. | Use the included part. | It already solves the function without design, printing, or extra hardware. |
| You need a bracket for a graphics card in a layout with unusual vertical spacing. | Print only with strong validation; otherwise buy. | The custom geometry may justify a print, but the consequence of failure is high and the cited guides provide no universal safety rating. |
| You need a replacement drive cage for a documented compatible model and can verify the mounting pattern. | Compare both options. | A printed cage can solve availability or fit issues, while a purchased cage may reduce iteration and support risk. |
| You need a decorative panel or simple spacer with little load. | Print if the dimensions are clear. | The failure consequence is low, so customization can outweigh the value of a retail part. |
Questions to answer before you commit
- What exact dimension makes the stock solution fail?
- Which surfaces carry the load, and how will the load reach the case?
- What temperature, vibration, and service conditions will the part experience?
- Which material is documented for the design, and can your printer process it under the manufacturer’s guidance?
- Which screws, nuts, inserts, and tools are required, and are they available locally?
- Can you print a fit test at original scale before producing the final part?
- What is the consequence if the part cracks, loosens, or shifts?
- Would a compatible purchased part or an included case component solve the same problem with less iteration?
The practical rule is simple: make the accessory when custom fit is the main benefit and you can verify the complete installation. Buy when compatibility is already solved or when predictable support and failure resistance matter more than a tailored shape. Treat material, hardware, printer capability, time, and failure consequences as part of the decision—not as details to check after the print is finished.
Quick Recap
Product prices and availability are accurate as of the date/time indicated and are subject to change. Any price and availability information displayed on Amazon at the time of purchase will apply.

