This guide teaches you how to use Windows 10 disk management to initialize, or un-Initialize a disk, Shrink, or Extend a disk volume.
How to Open Disk Management
The most logical place to start this comprehensive guide is to teach you different ways to open Disk Management MMC. This section shows you 3 different methods to open this essential Windows tool.
Method 1: Open Disk Management From Search
The easiest way to open Windows 10 Disk Management is to search for it. Follow the steps below to open Disk Management via search:
- On the bottom left of your Windows taskbar, enter disk management into the search box.
- Then, from the search result, click Create and format hard disk partitions.

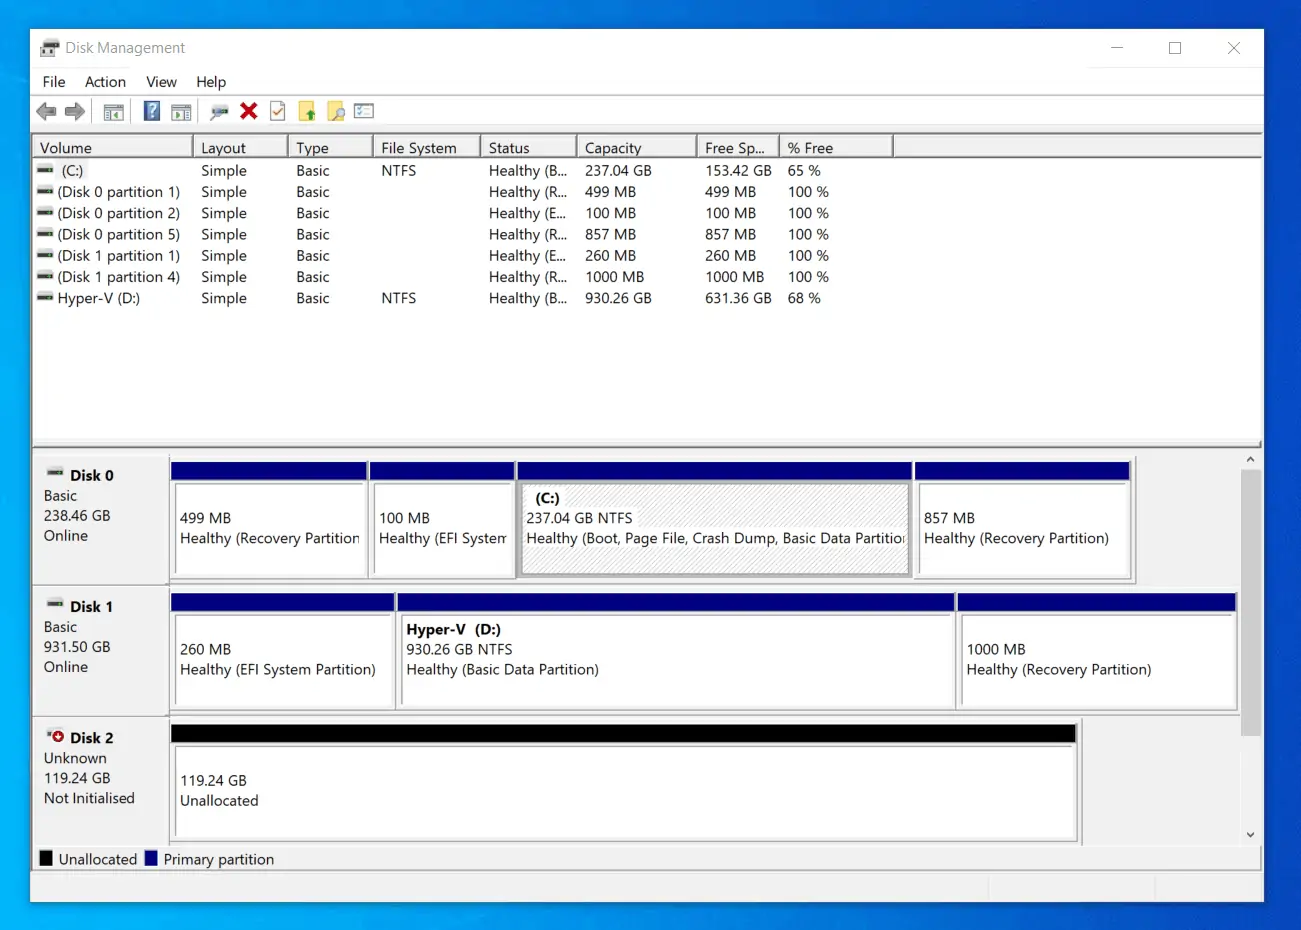
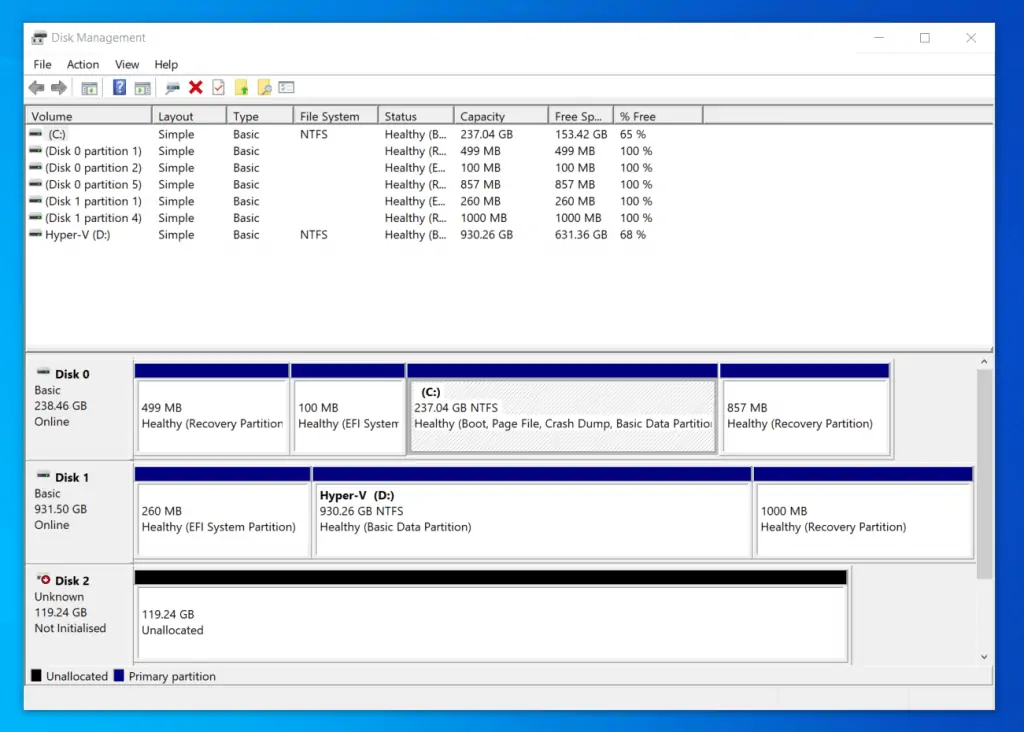
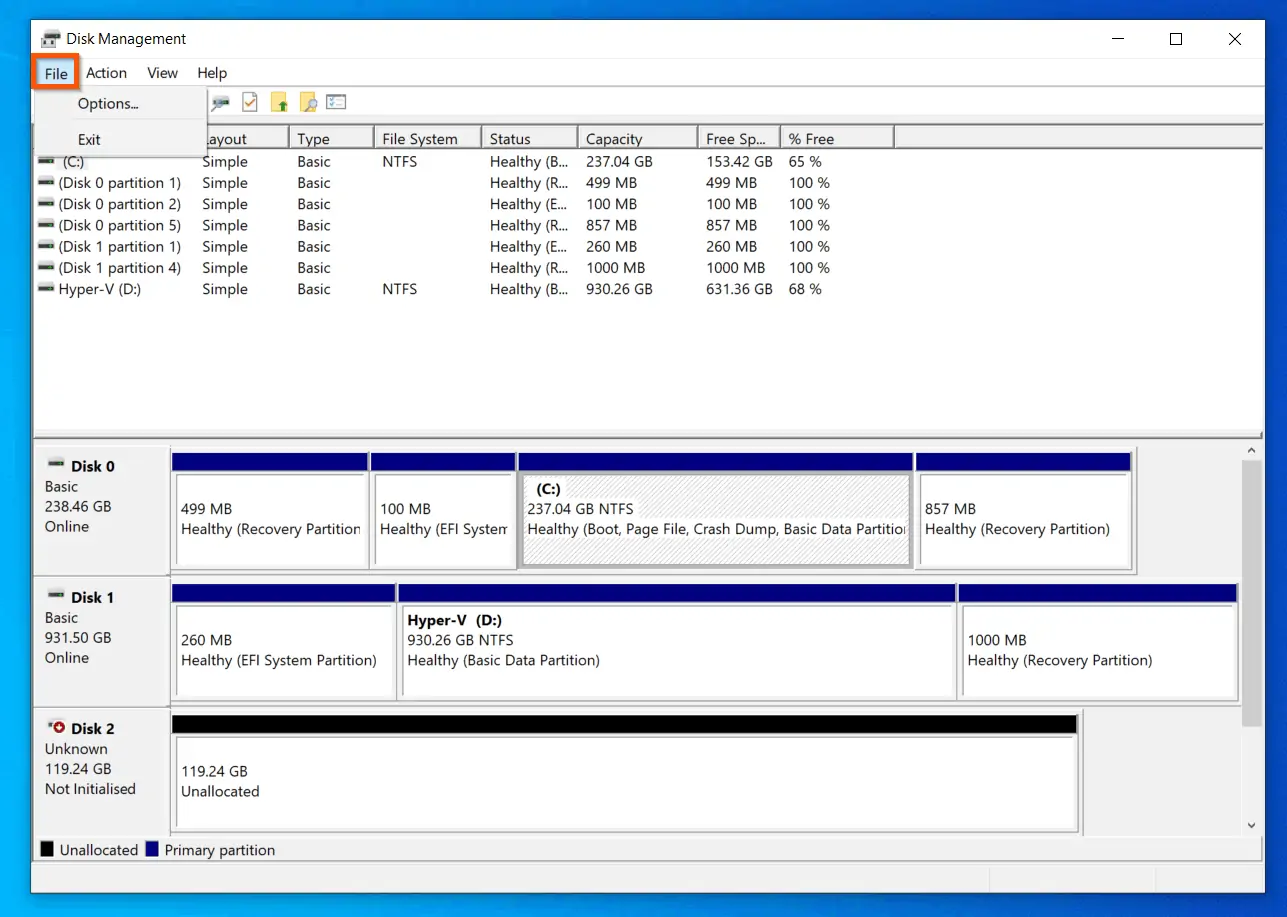
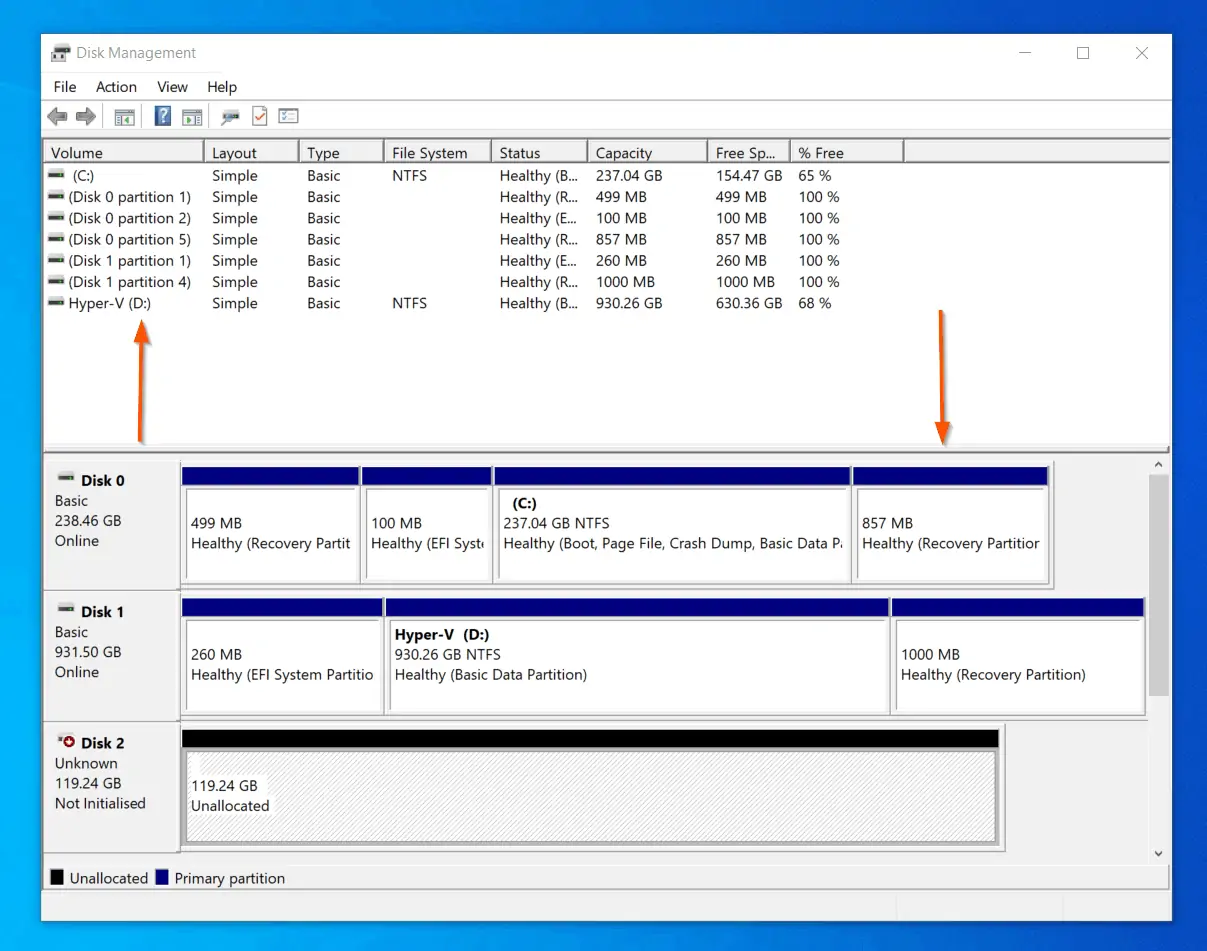
Windows 10 Disk Management tool will open. Here is what it looks like. In the next section, I will walk you through the Disk Management interface.
Method 2: Open Disk Management From Run
Another common method to open the Disk Management tool is to do it via the Run command. Here are the steps:
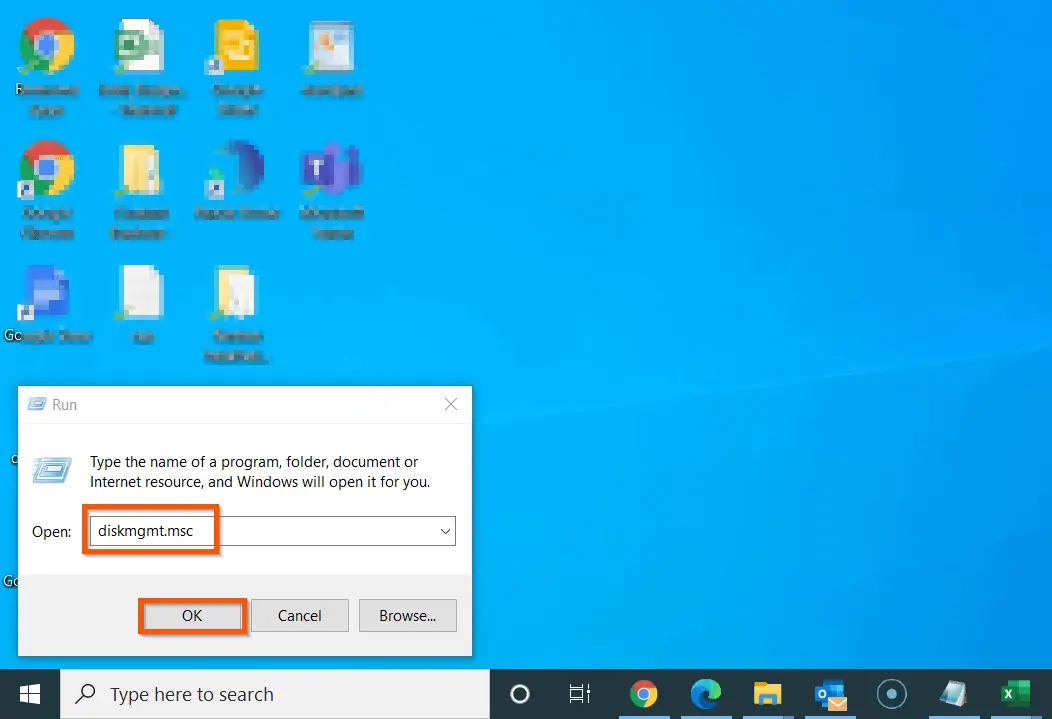
- Right-click Start Menu and select Run.

- Then, enter diskmgmt.msc into the Run field and click OK.
Method 3: Open Disk Management From the Start Menu
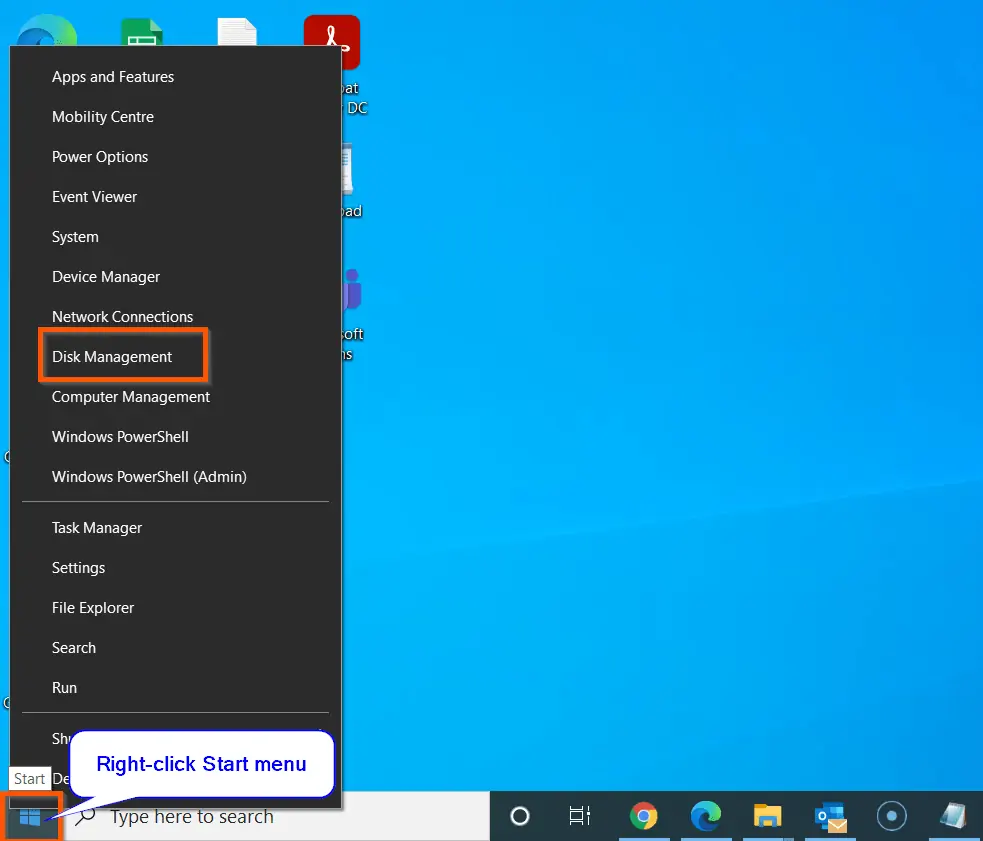
Here is the last method you can use to open Windows 10 Disk Management Tool: Right-click Start Menu. Then, from the displayed options, click Disk Management.
Disk Management Interface Explained
In this section, I will walk you through the Disk Management interface.
Specifically, the first sub-sections in this section explains the Disk Management menu. Moreover, the second sub-section explains disks and volumes and what you can do with them.
Disk Management Menu Explained
Once you have opened the Disk Management tool, the next thing you will want to learn – especially if it is your first time opening the tool – is the interface. This section walks you through the Disk Management menu.
Disk Management has items in the top menu – File, Action, View and Help.

File Menu
When you click File in the menu, it displays Options and Exit. If you click Exit, Disk Management will close.
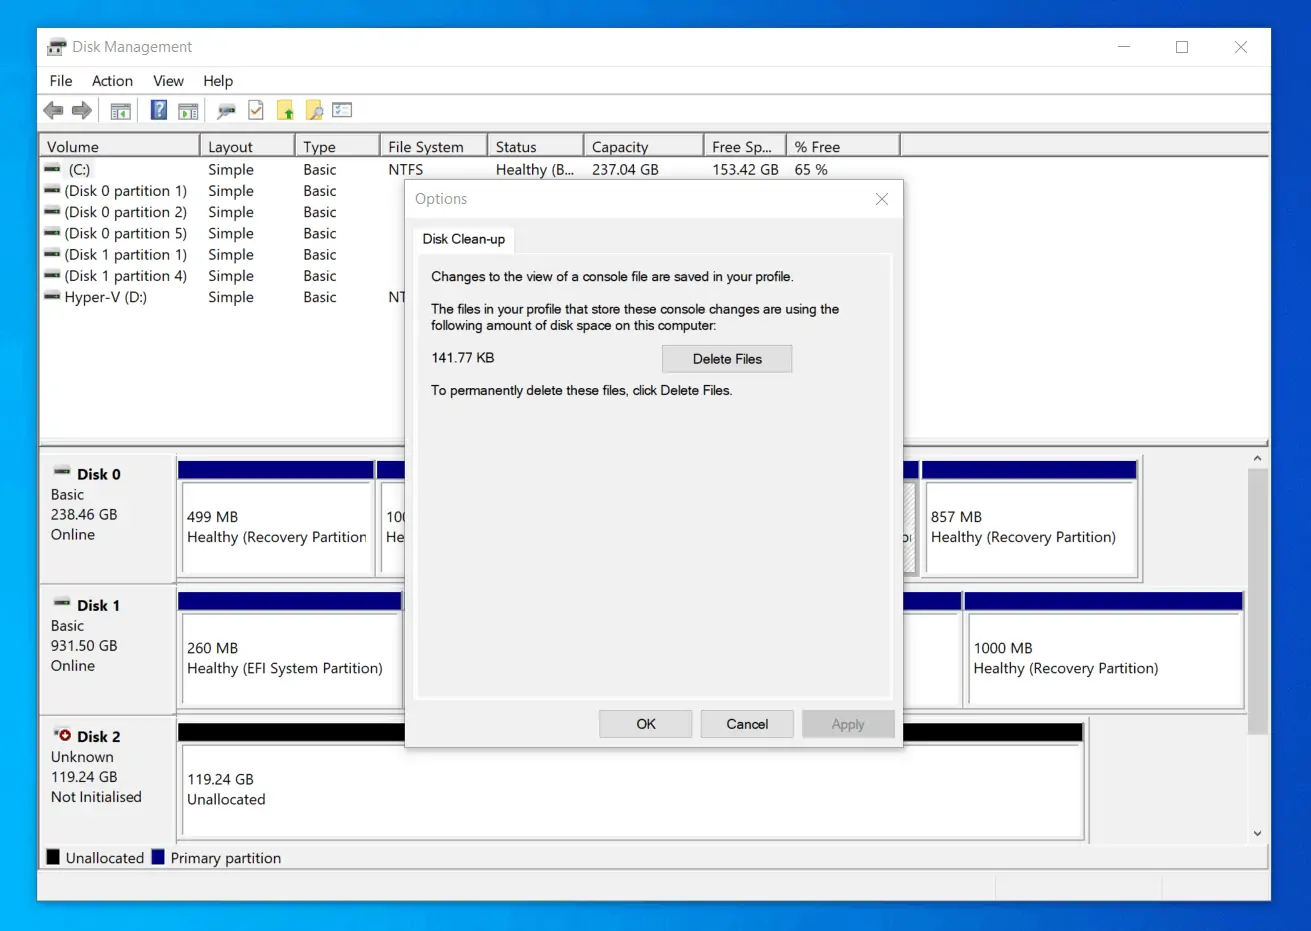
However, if you click Options, Disk Clean-up is displayed. This is not the general disk clean-up tool. This disk clean-up tool is used to delete Disk Management console file views stored in your profile.
To permanently delete these files and free up space they occupy, click Delete Files.
Action Menu
Arguably, the Disk Management “Action” menu is the most under-utilized feature. When you click Action in the menu, it displays six options –
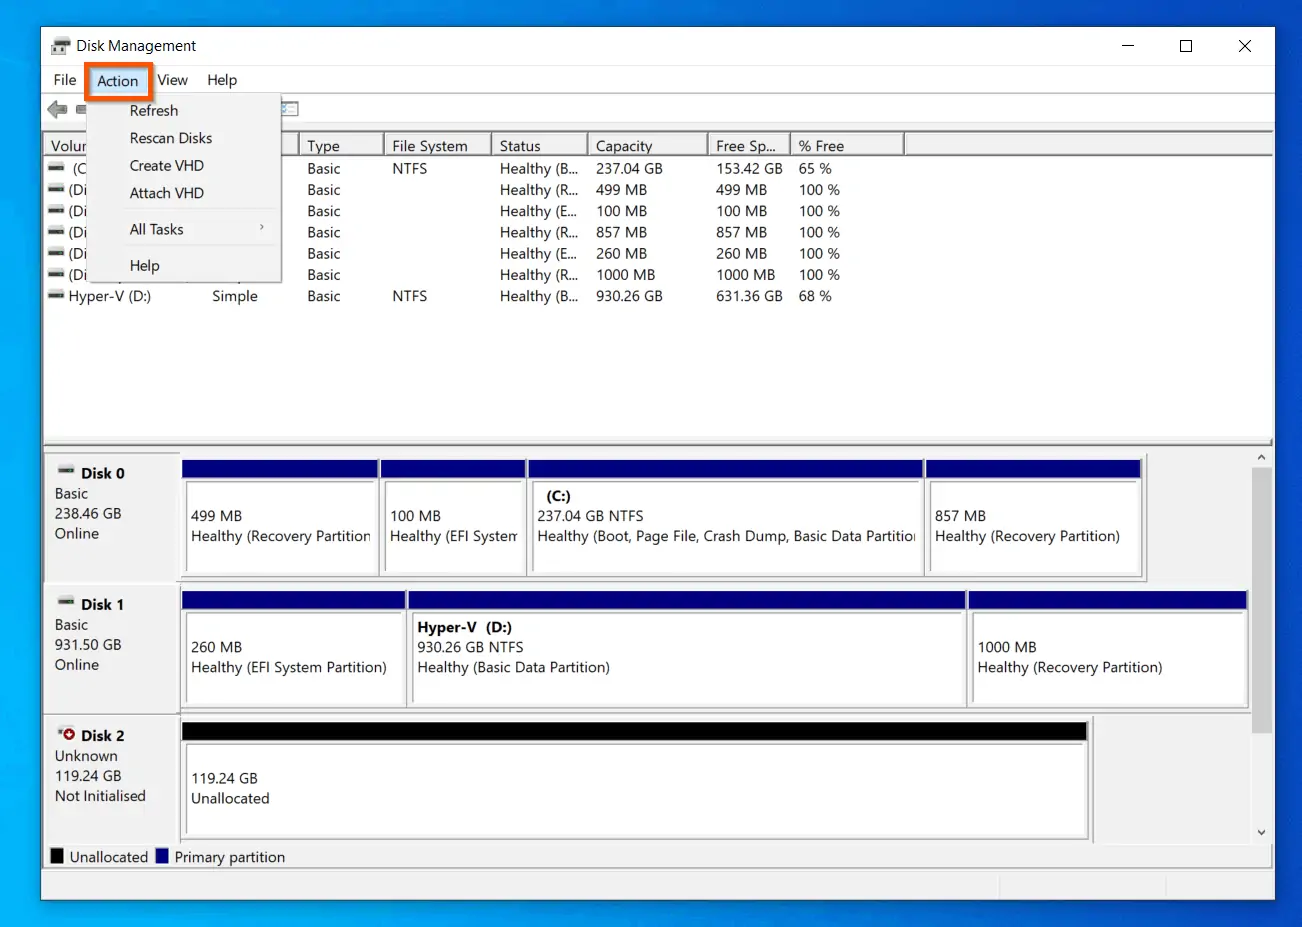
- Refresh – clicking this updates the interface and displays the latest information
- Rescan Disks – this forces Disk Management to check for new disks connected to the computer while it was already open.
- Create VHD – This option allows you to create a new VHD or VHDX disk and attach it to DiskmManagement
- Attach VHD – Opens the interface to attach a virtual hard disk. You can attach the VHD or VHDX as Read Only.
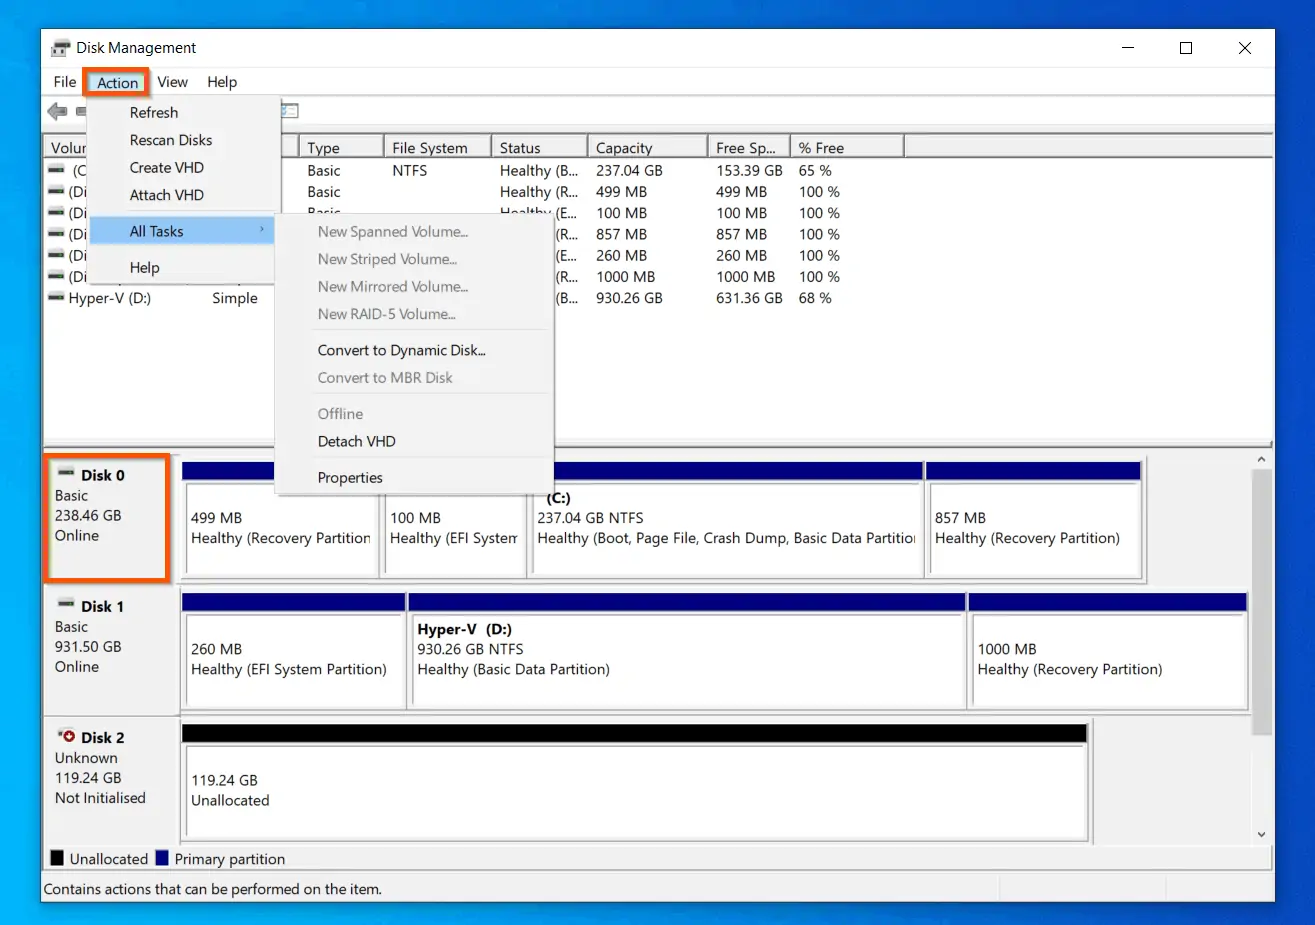
- All Tasks – This option will only be available in the Action menu if you selected a volume of a disk before clicking the Action menu.
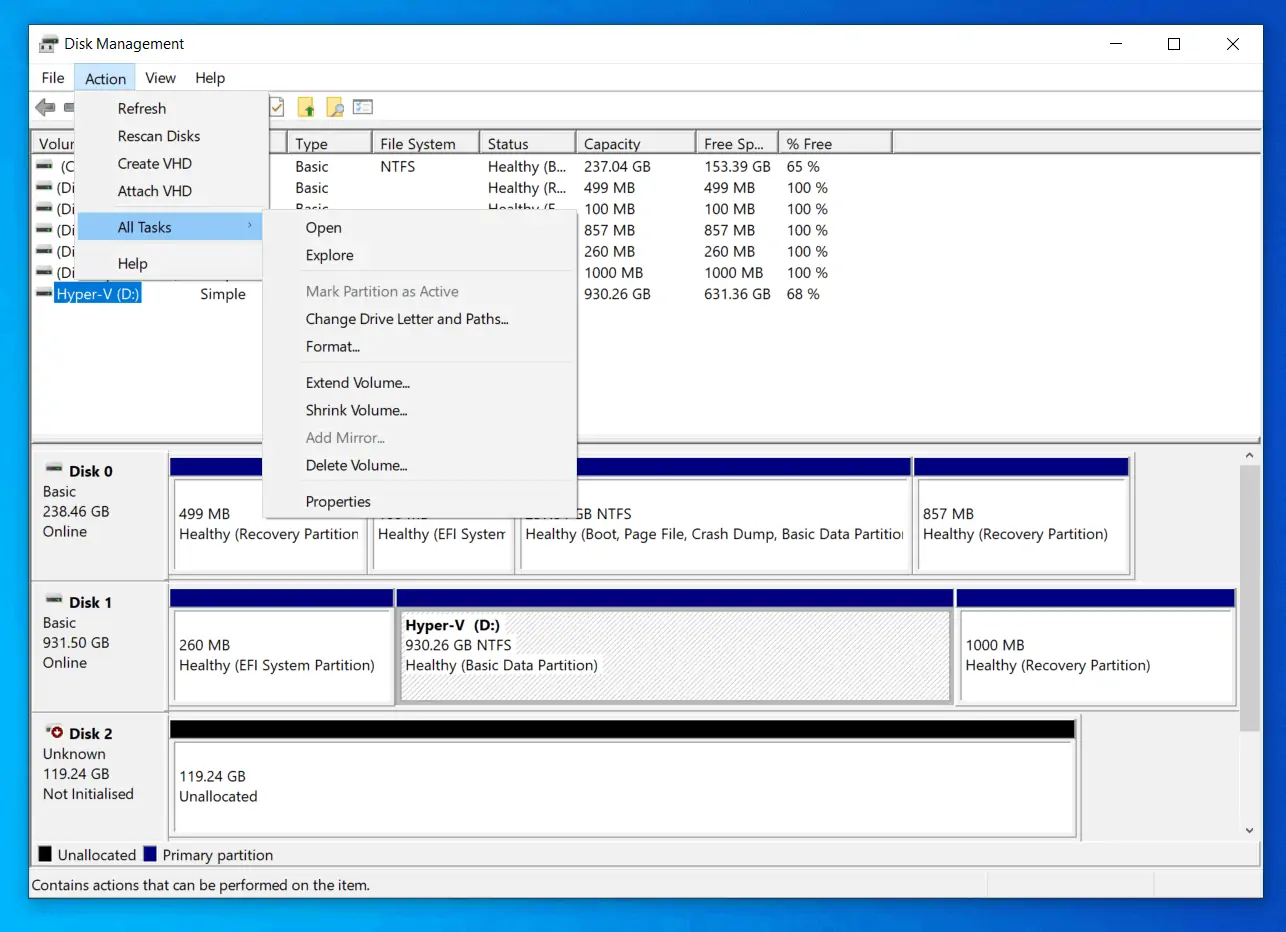
The options displayed in the All Tasks sub-menu depend on whether you selected a volume or disk before accessing this option.
If you selected a volume before accessing Action -> All Tasks, the All Tasks sub-menu will display the options shown in the screenshot below. As you can see from the options in the All Tasks sub-menu, you can perform all tasks usually available for a volume.
We have been discussing the options displayed in the All Tasks sub-menu if you selected a disk volume before accessing the Action -> All Tasks sub-menu.
On the contrary, if you selected an initialized disk before accessing the Action -> All Tasks sub-menu, it will display the options shown in the screenshot below.
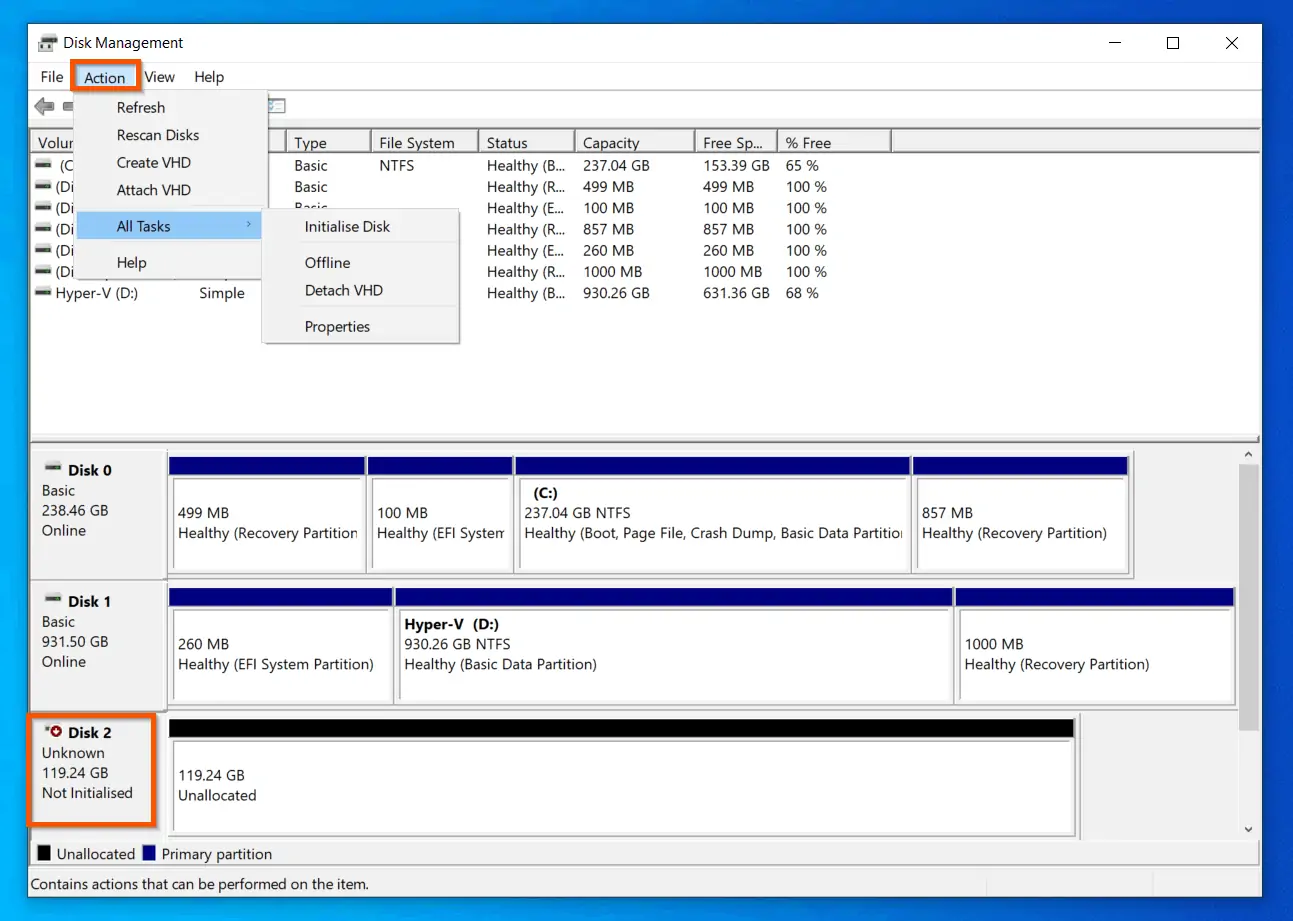
However, if you selected an uninitialized disk before accessing the Action -> All Tasks sub-menu, you will be offered a different set of options.
On top of the list – as you would expect – is Initialized Disk. You cannot perform any additional action on a disk unless it is initialized first. Additionally, you have the option to take the disk Offline, Detach VHD or view the Properties of the disk.
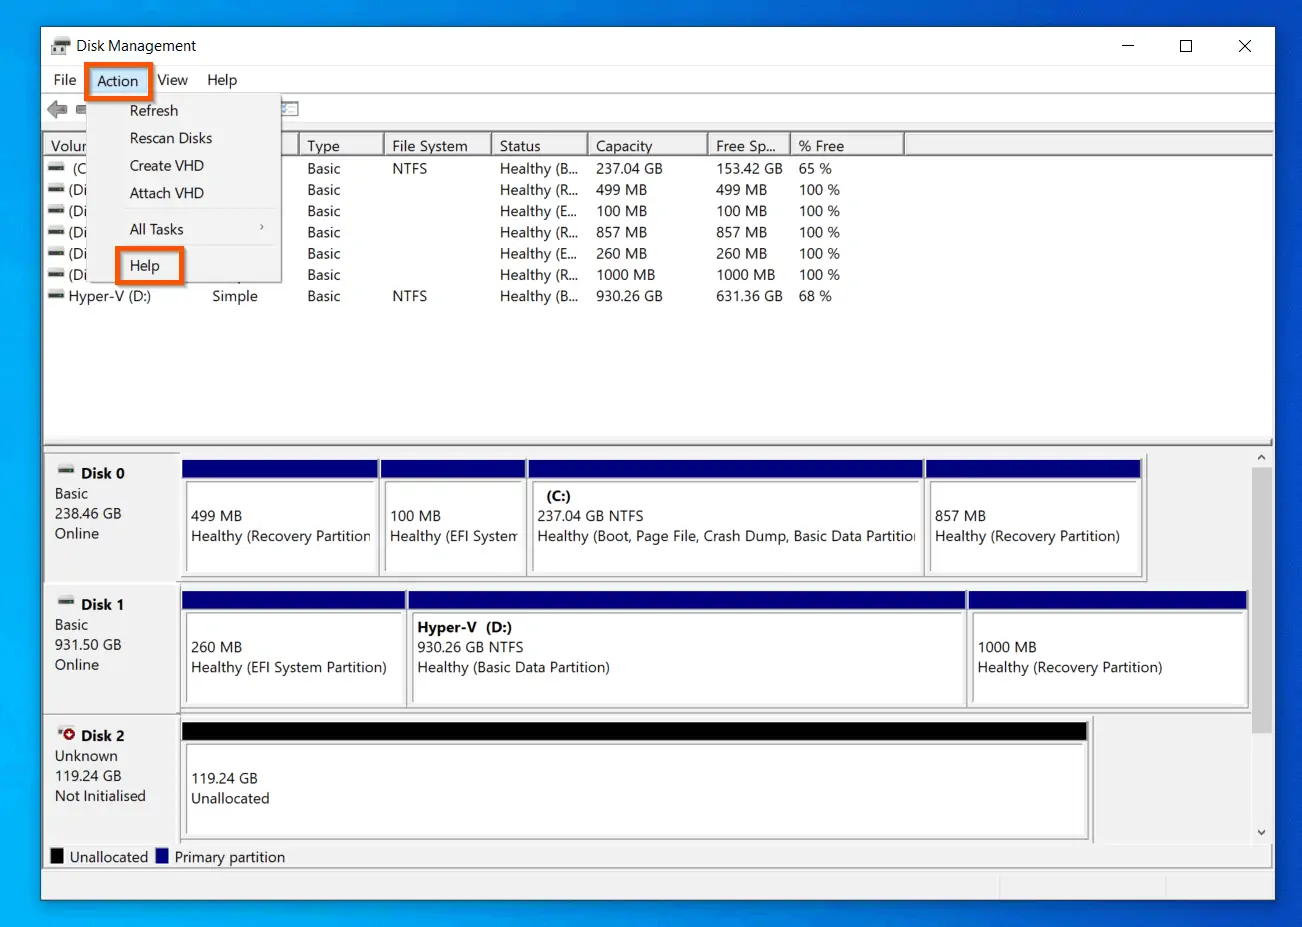
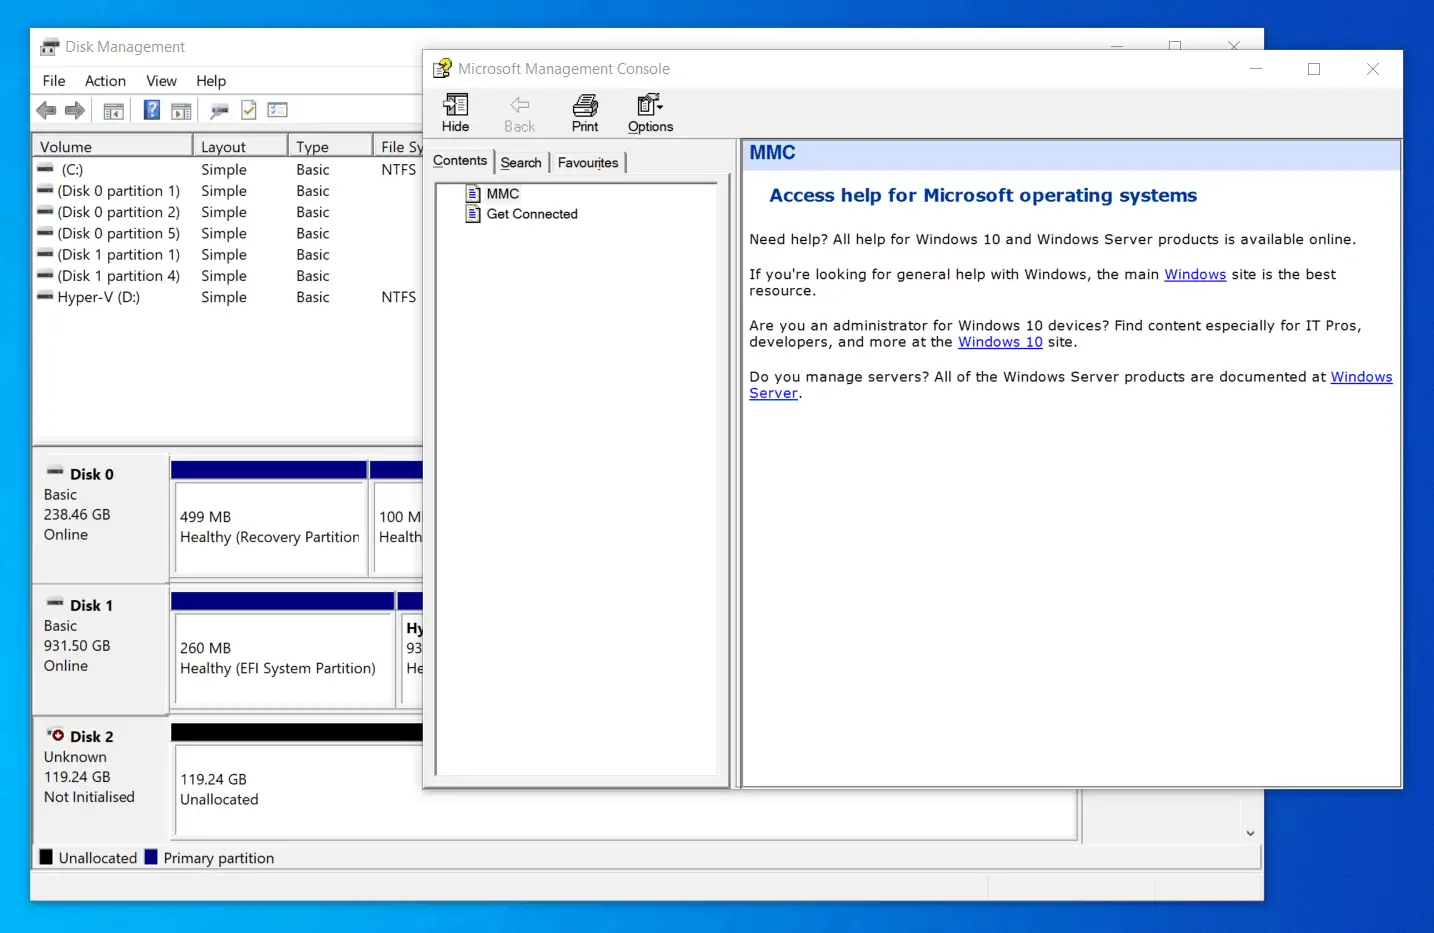
- Help – This is the 6th item displayed in the Action menu. When you click Help, it opens the Microsoft Management Console help topic – not very useful for Disk Management help!
View Menu
As you may have guessed, you can use the View menu to modify how Disk Management displays volumes and disks in its interface.
To be completely honest with you, this is part of the menu you will least likely need to use. However, I will still explain how to use the menu in case you ever need to use it.
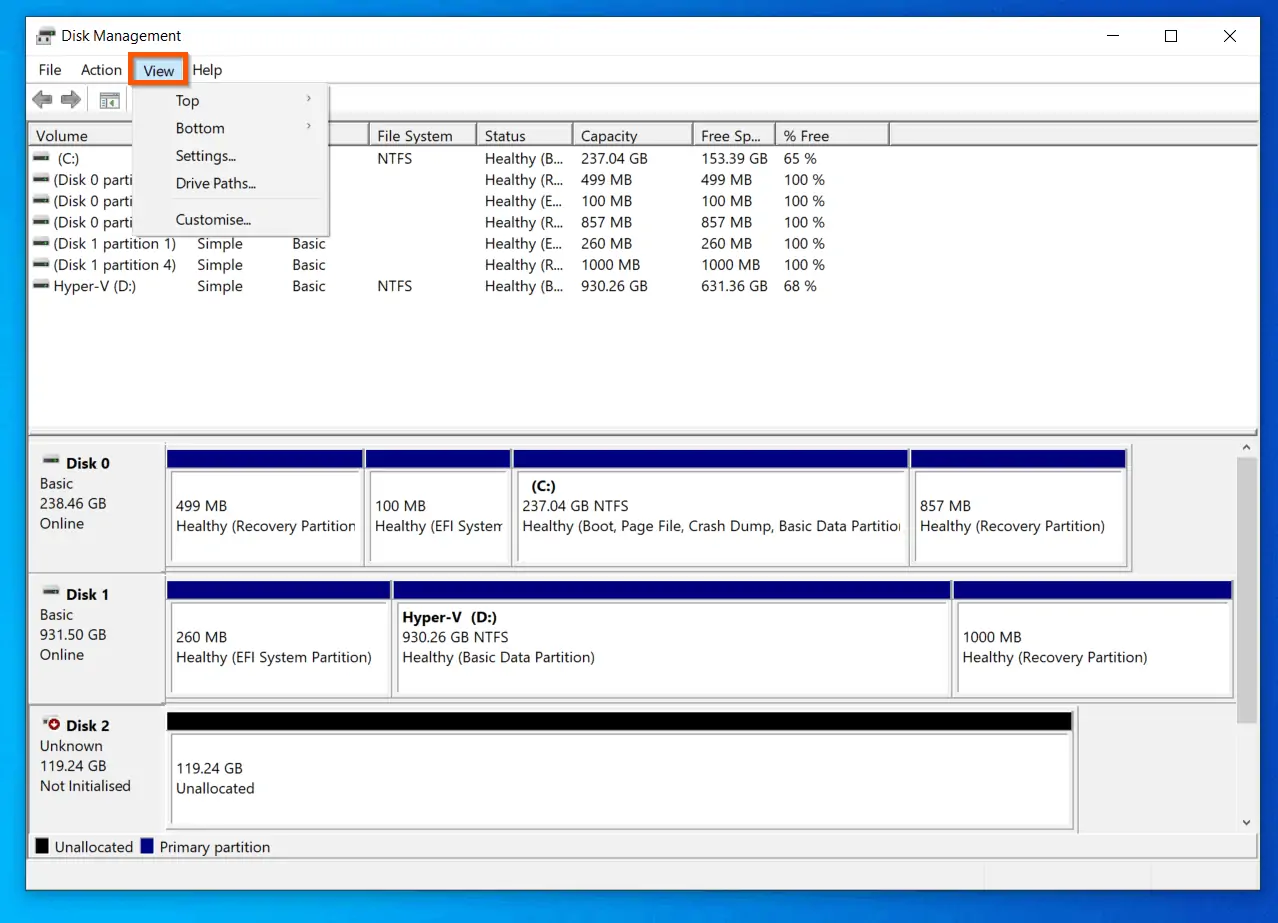
As shown in the screenshot above, when you click the View menu, it displays five options:
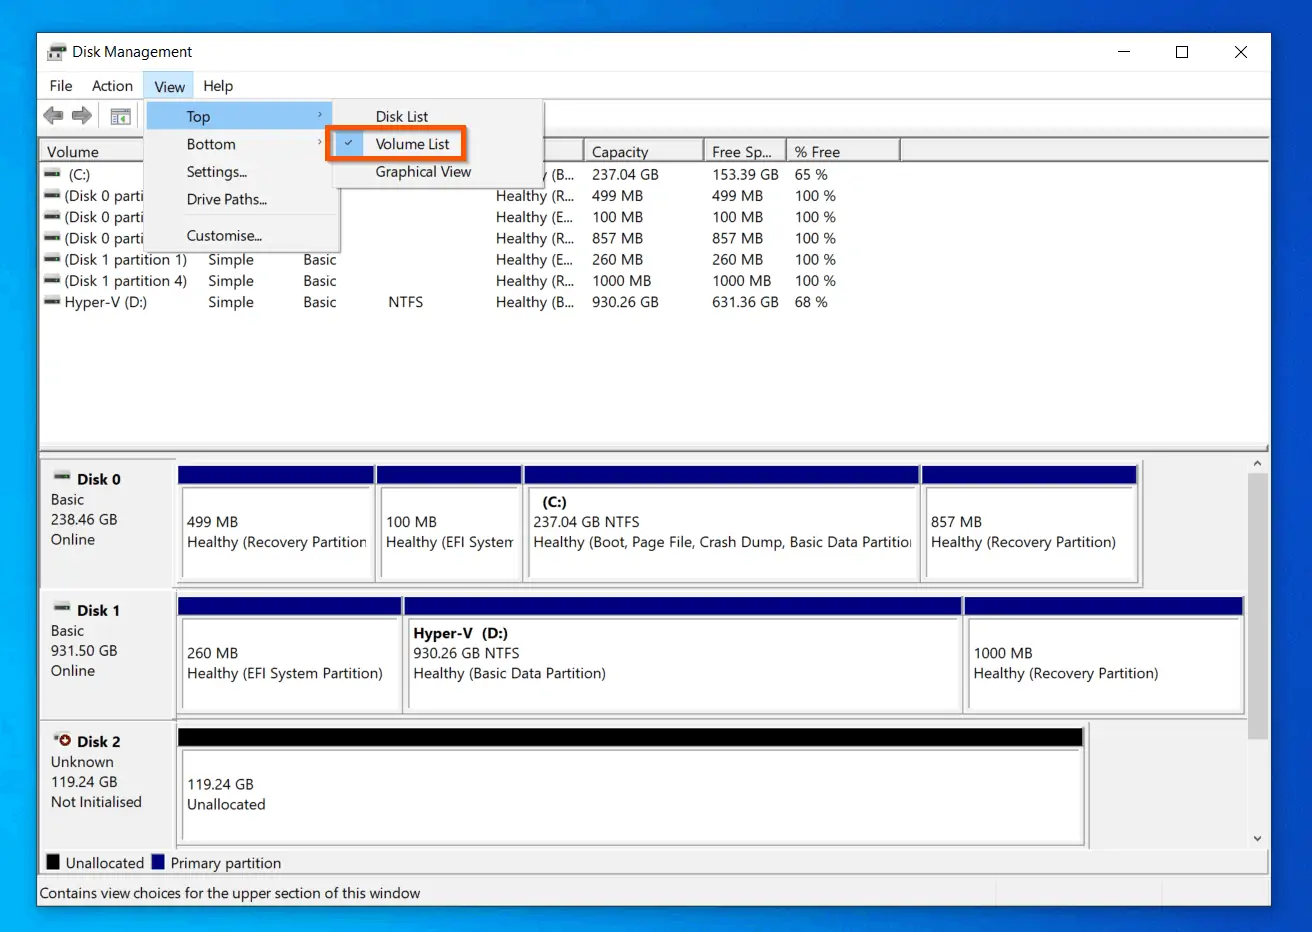
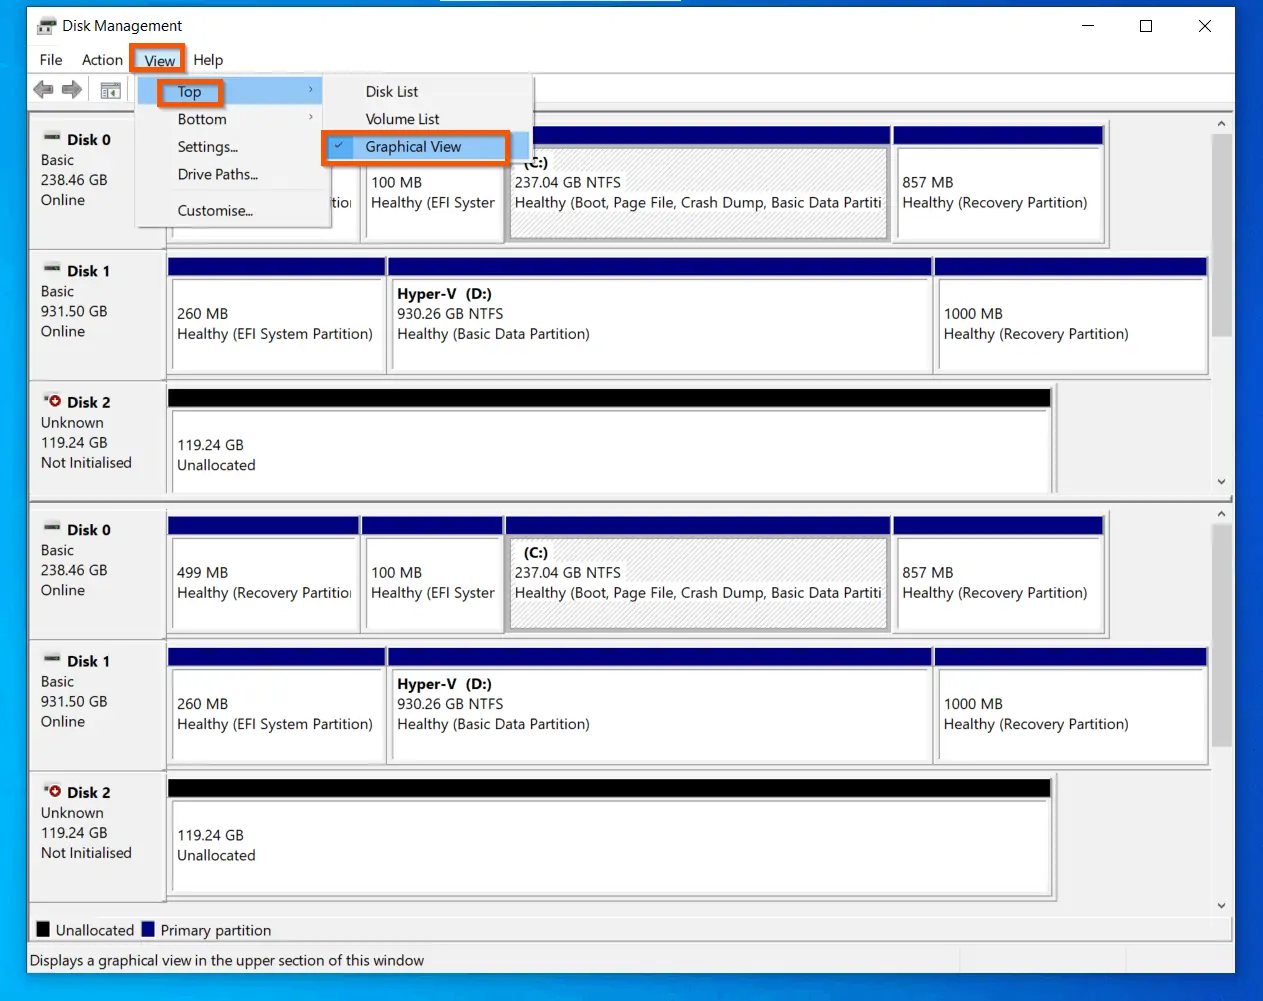
- Top – this is used to set how the volumes at the top of the Disk Management interface are displayed.
The default view for the top part of the interface is Volume List. This is the most useful view and you may never need to change this view.
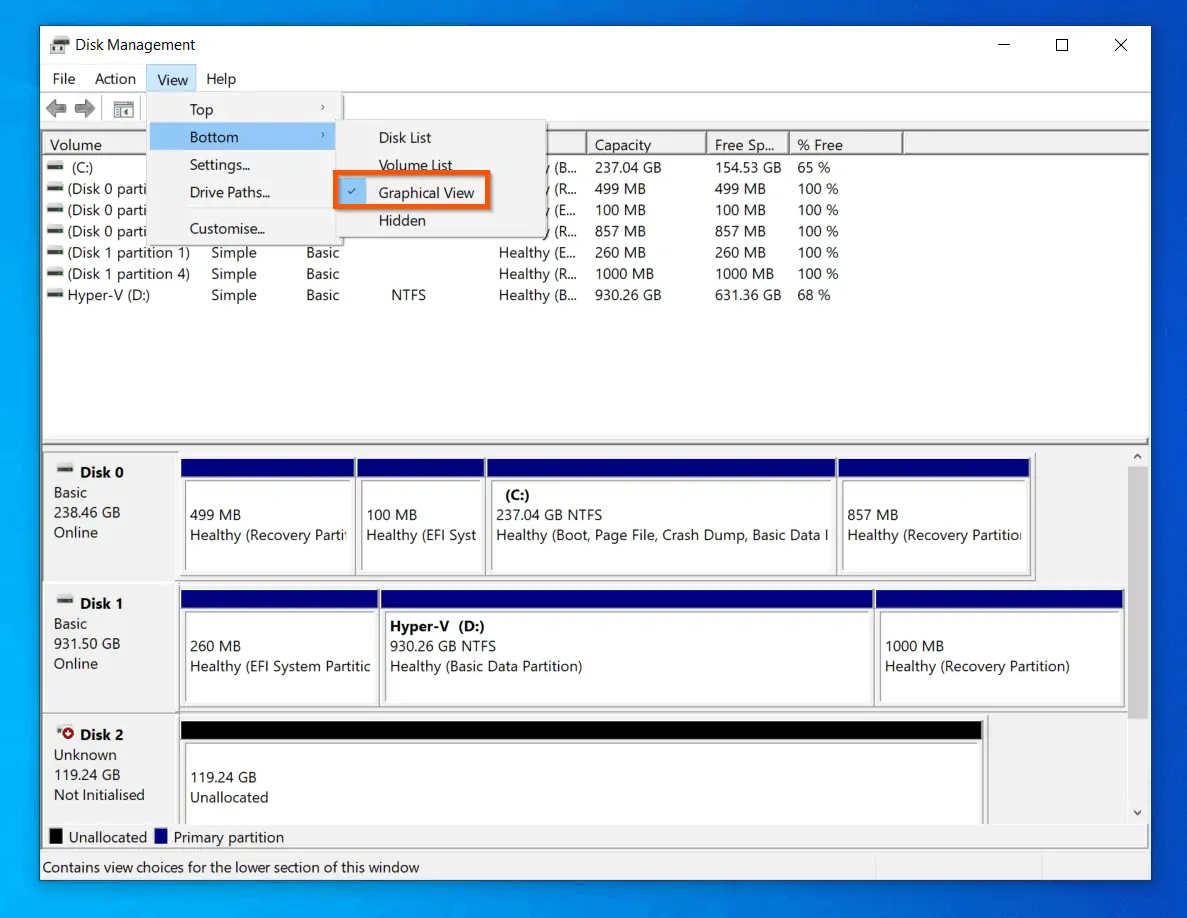
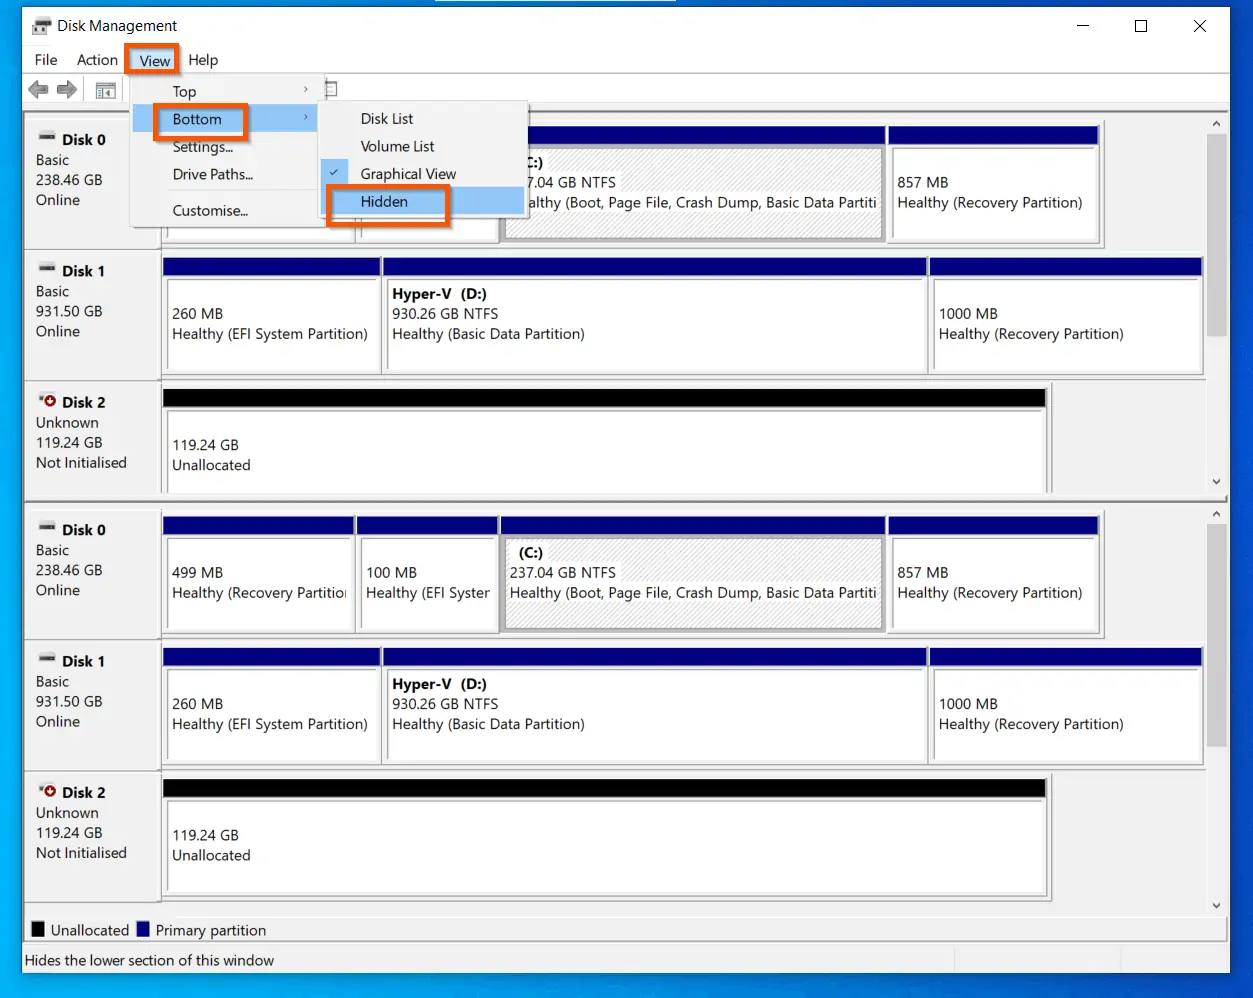
- Bottom – this is the next item in the View menu. View -> Bottom sub-menu is used to configure the bottom view of the Disk Management interface.
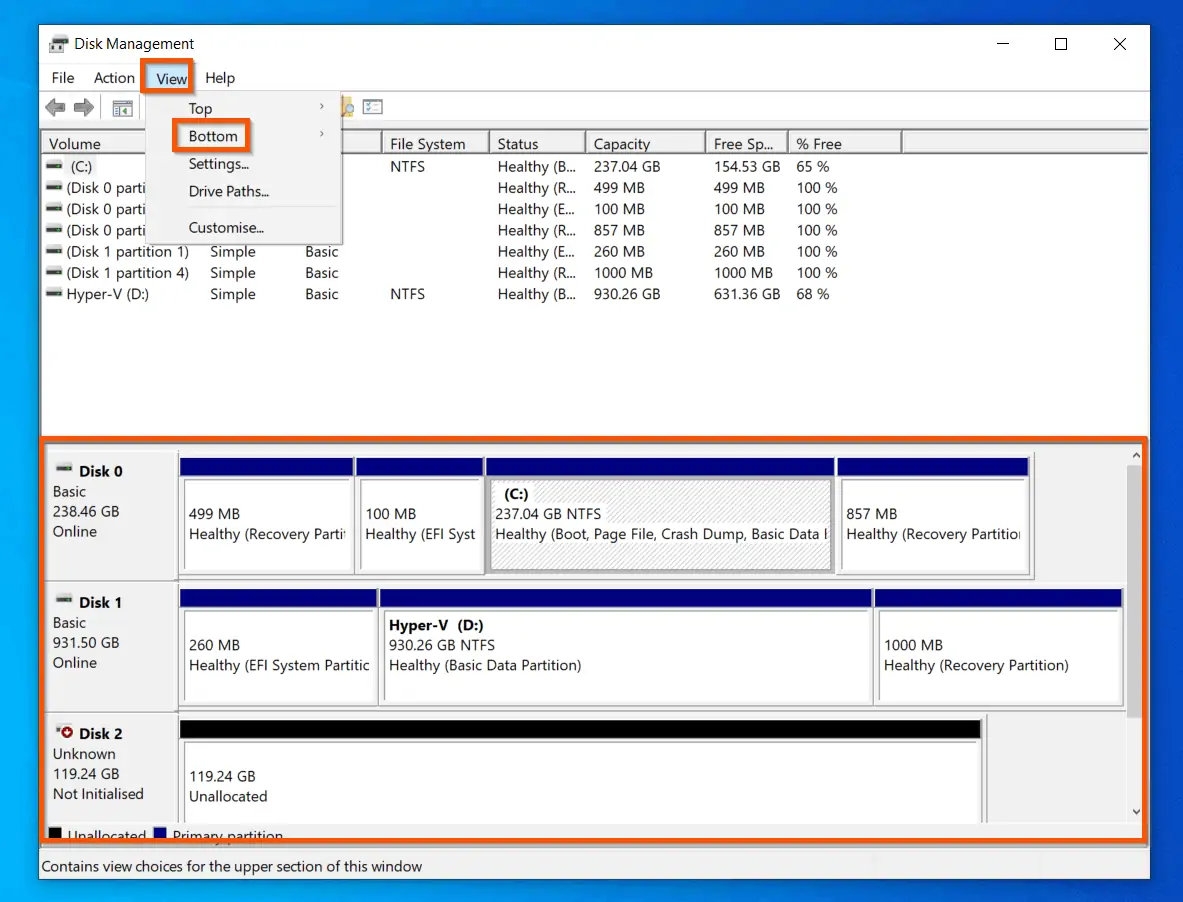
The default view of the bottom section of the Disk Management interface is Graphical View. Once again, like the Top view, you rarely need to change this view as it is usually the most efficient view for this section of Windows 10 Disk Management.
- Settings – this is the third sub-menu in the View menu.
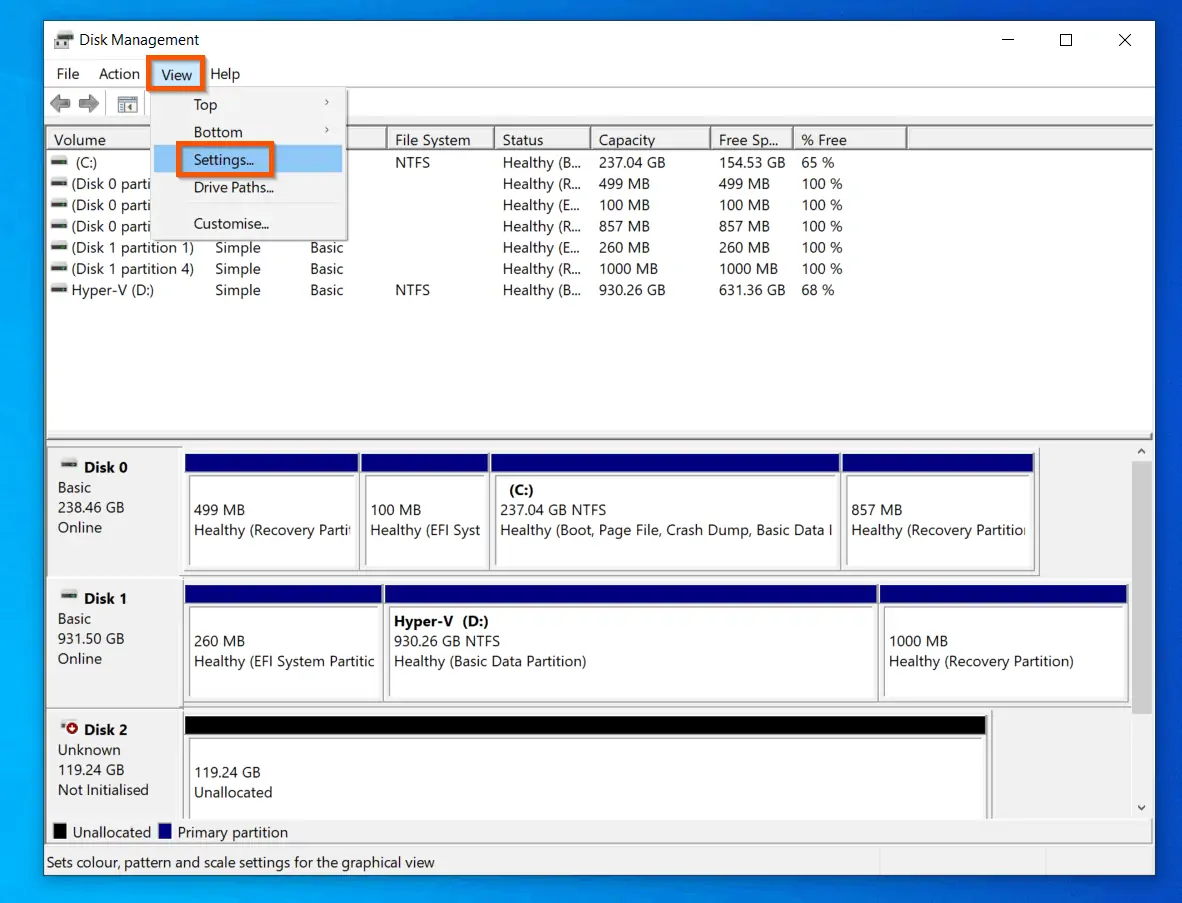
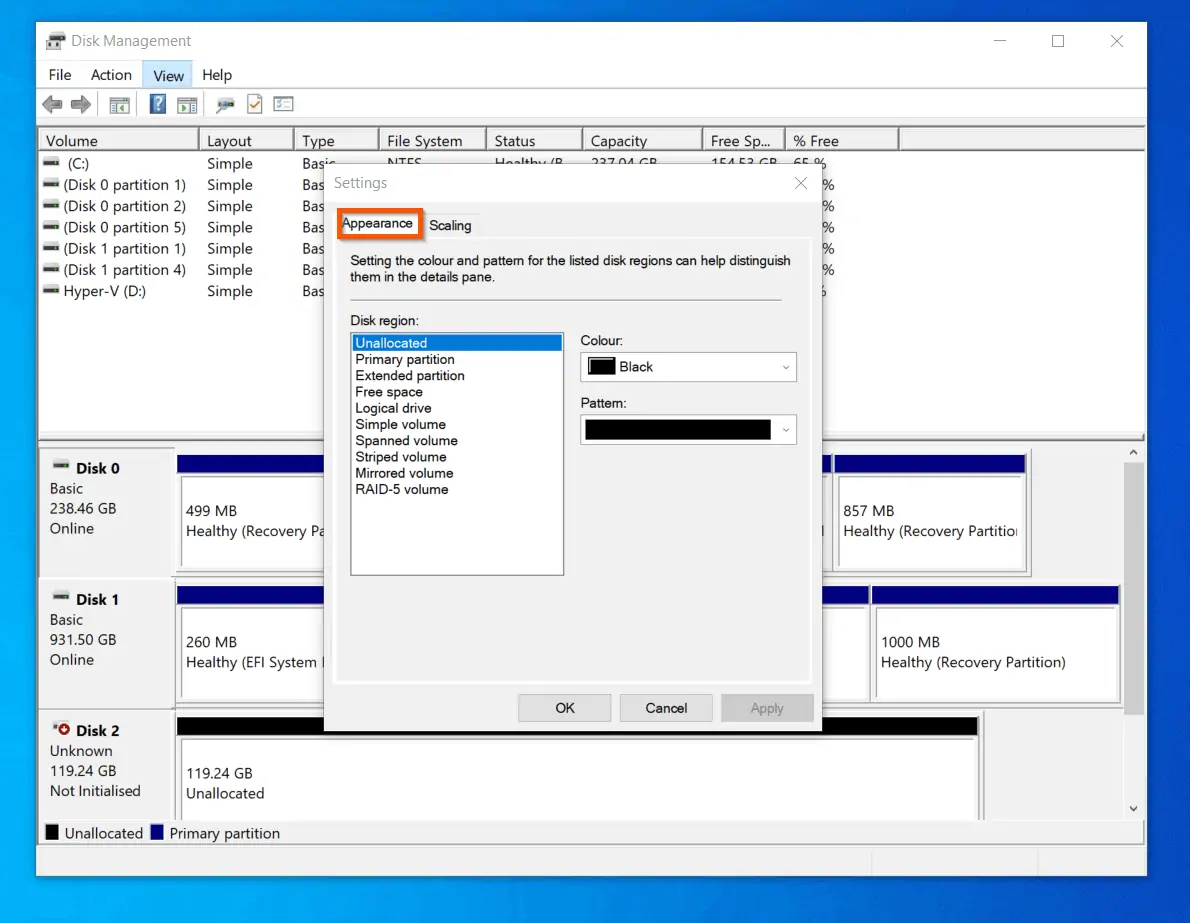
When you click Settings it displays a new window with two tabs – Appearance and Scaling. The Appearance tab is used to adjust the color display of the different types of disks.
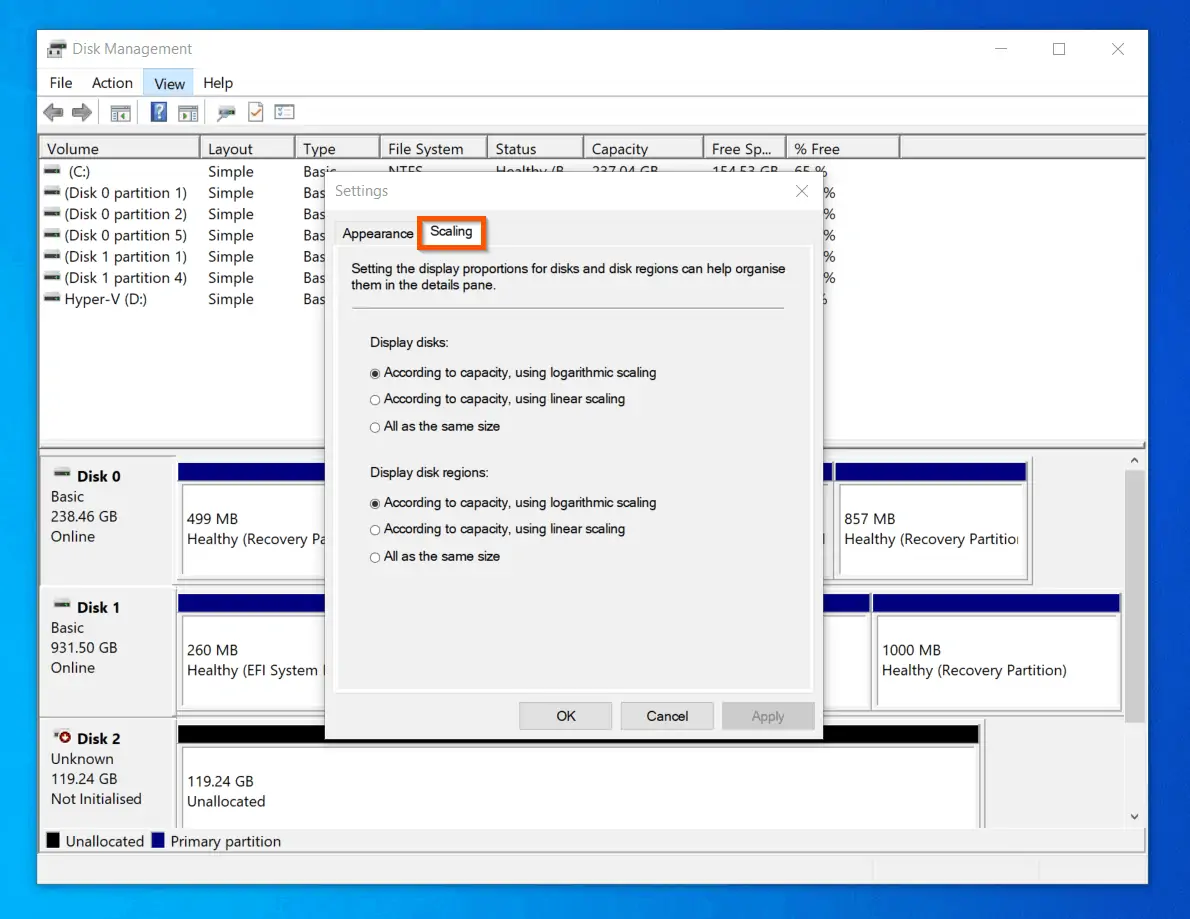
Furthermore, the Scaling tab is used to set how the disks are displayed. See the screenshot below for scaling options.
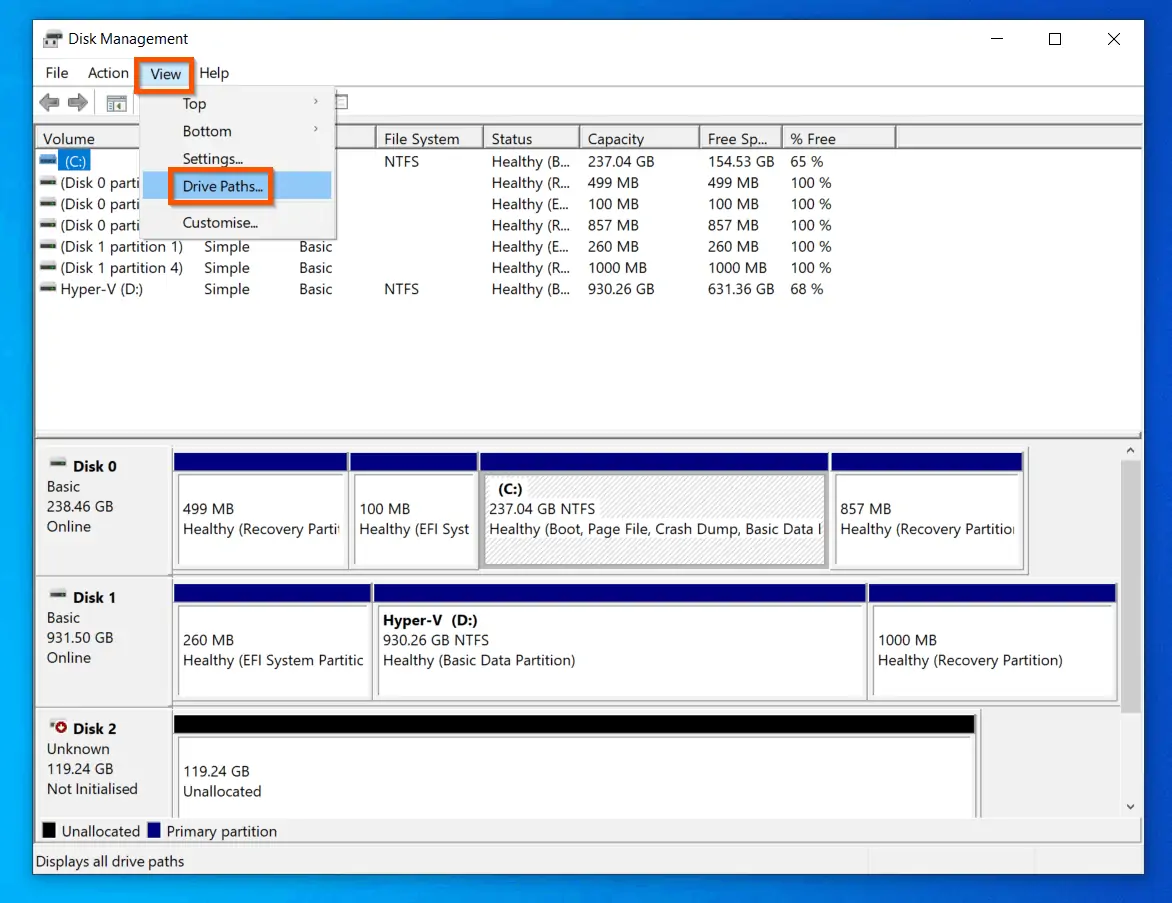
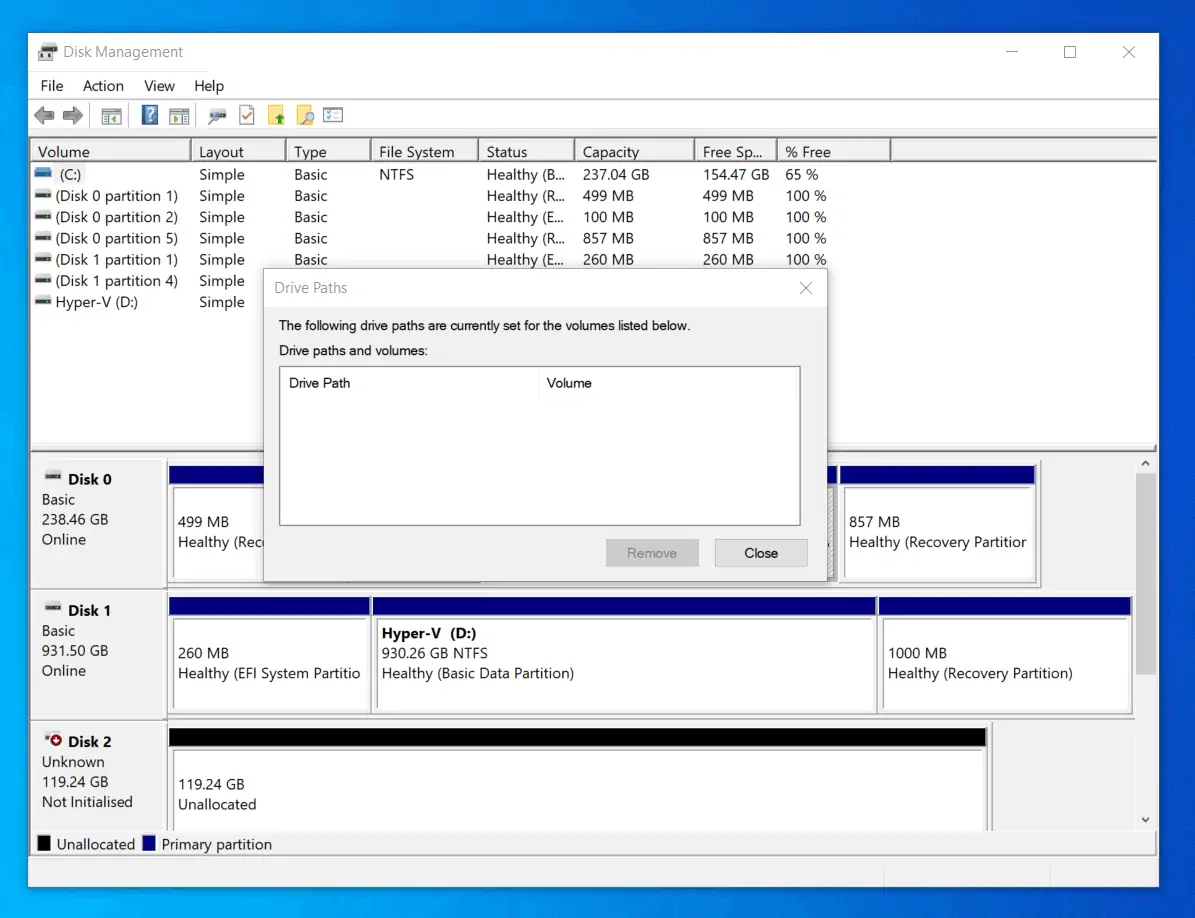
- Drive Paths… – this displays drive paths set for disk volumes. If you have not set any drive path for any volume, the Drive Path view will be empty.
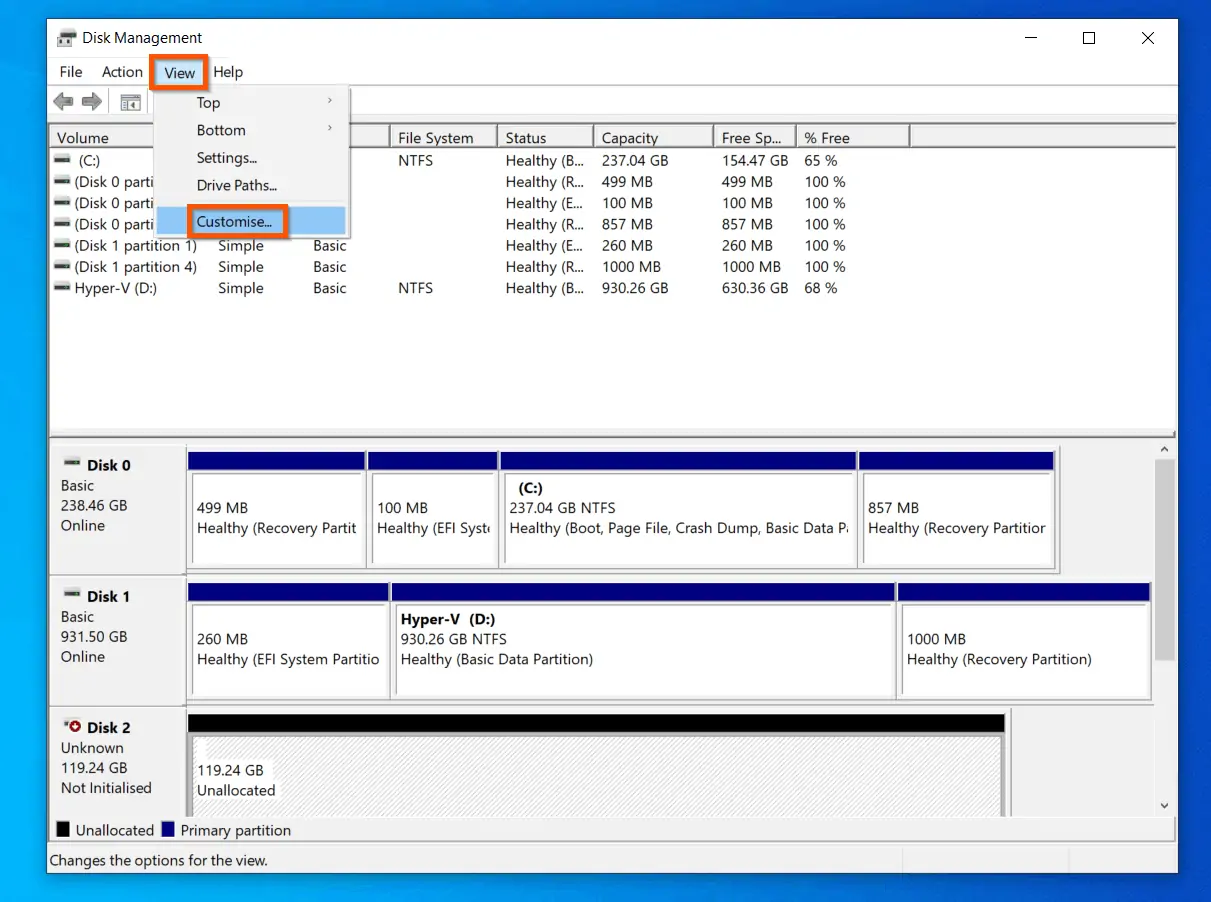
- Customize – this is the last sub-menu of the View menu. You can use Customize View to – you guesses it – customize how Disk Management interface looks. See the second screenshot below for available options.

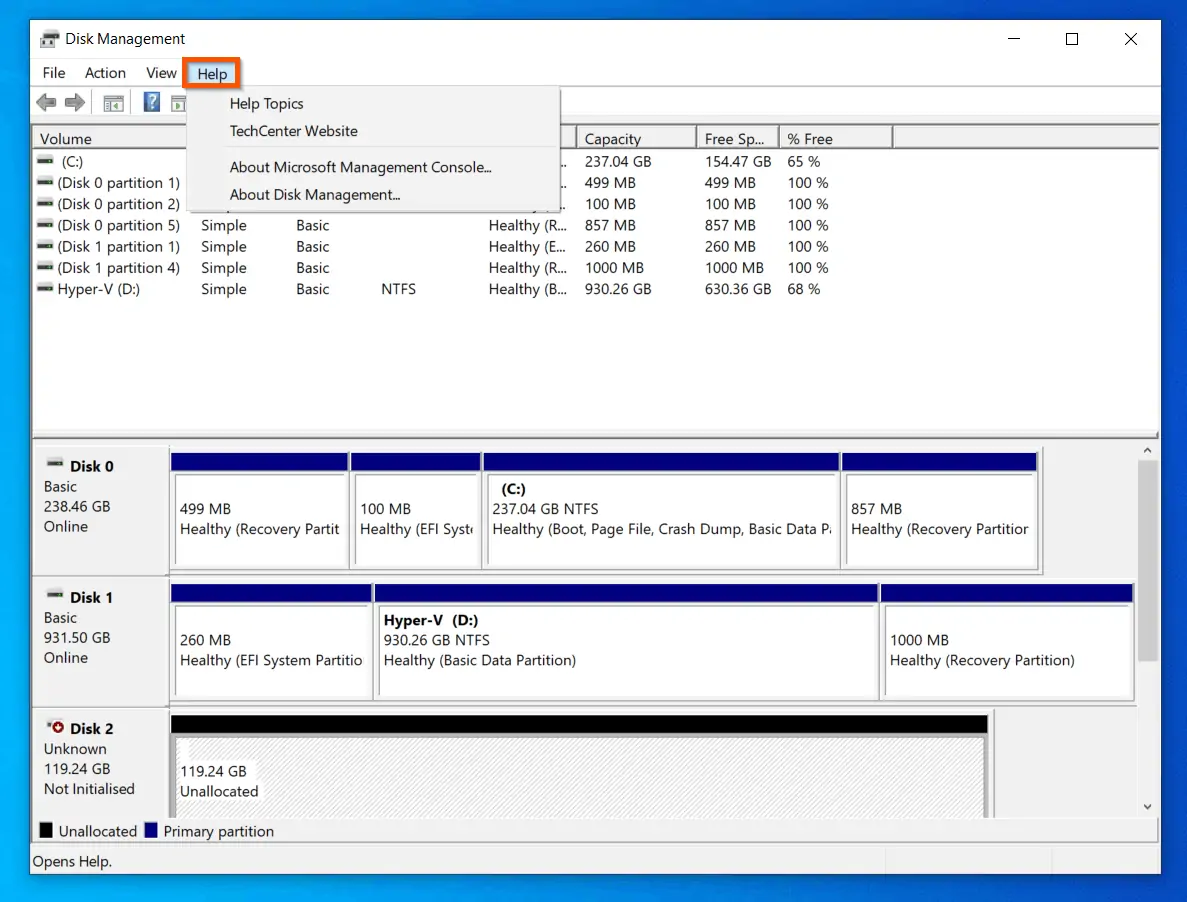
Help Menu
This is the last item in the Disk Management menu. The menu offers help options. I will not discuss details of the different sub-menu items in the Help menu.
You can explore the help topics by clicking each sub-menu item.
Disk Management Disks and Volumes Explained
So far in the “Windows 10 Disk Management Interface Explained” section, I have been discussing the Disk Management menu.
In this last sub-section, I will dive into the Top and the Bottom sections of the Disk Management interface.
The top section displays all available disk volumes in Disk Management. On the other hand, the bottom section displays all physical disks on the computer; and the volumes existing on the disks.
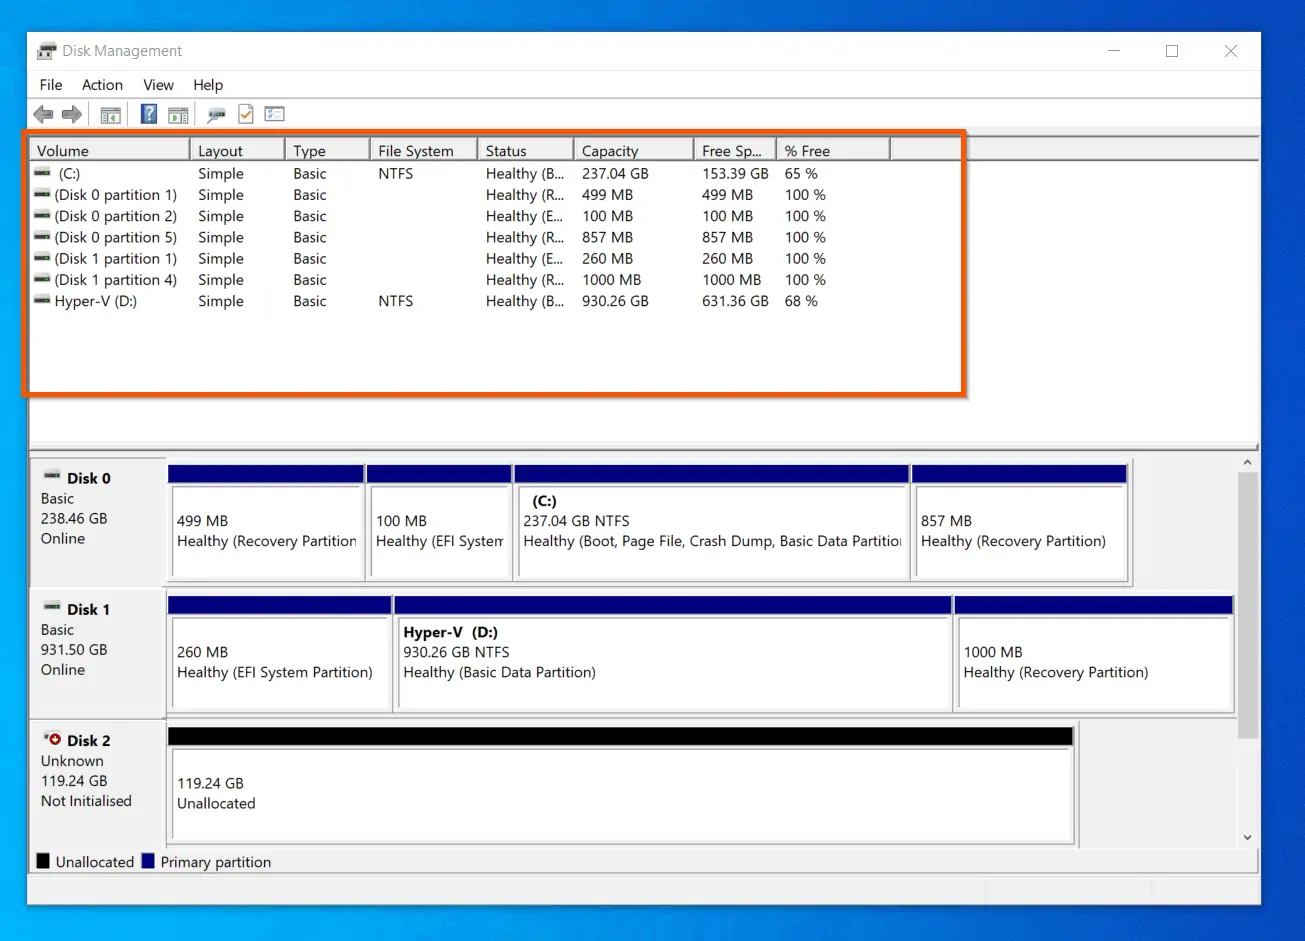
Top Section Of Disk Management – Default Volume List
As mentioned earlier in this guide, by default the top section of Disk Management displays volume lists. I also hinted that the view of this section can be modified from the View -> Top sub-menu.
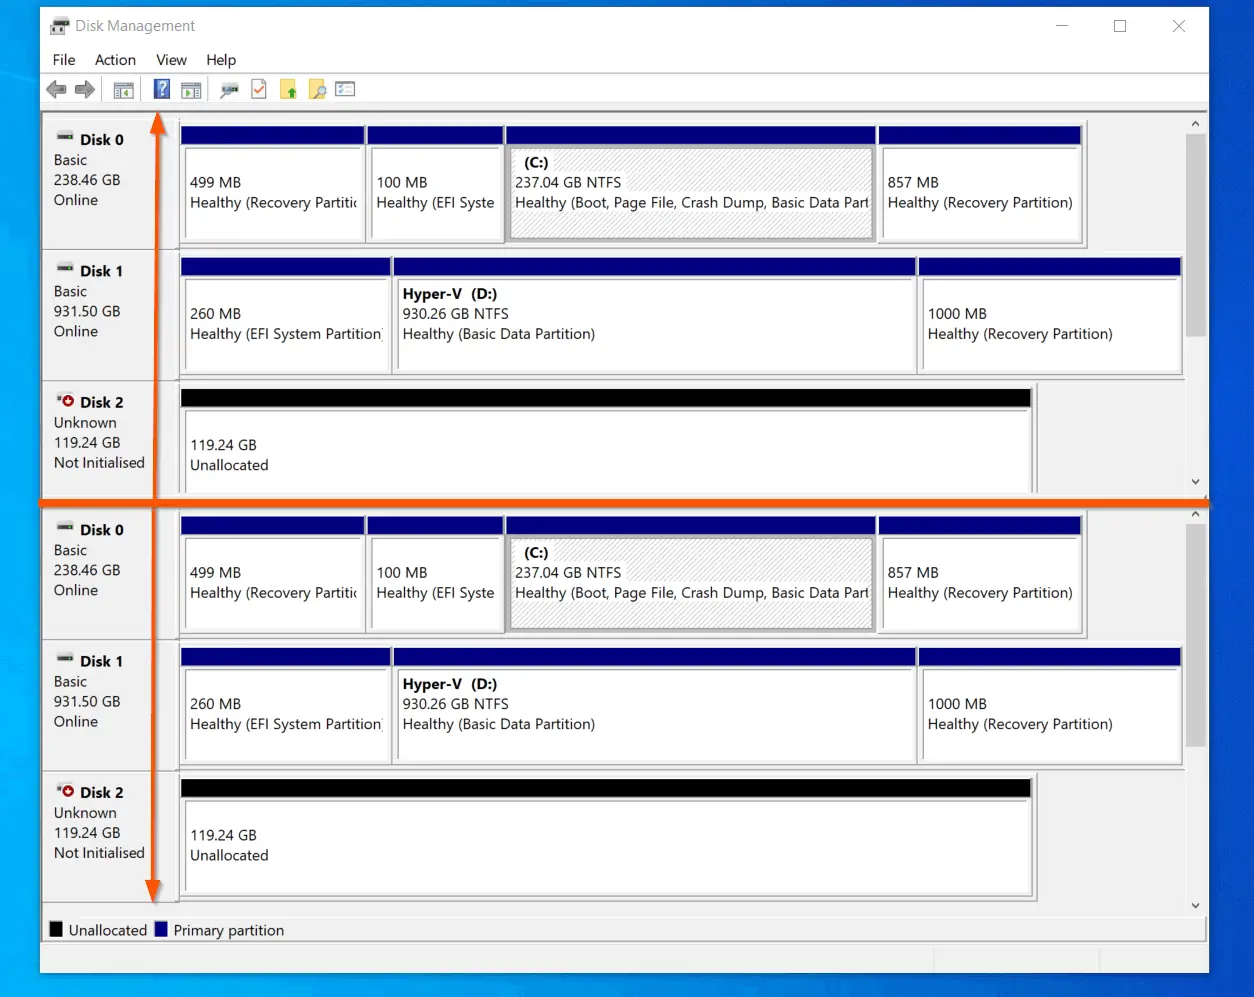
The first thing worthy of note here is that you can modify the view of this section to Graphical View – displaying Disks and their Volumes. When you do this, the top and bottom sections become the same.
You may then decide to hide the bottom view – more on this later.
Moving on, in the screenshot below, I have changed the top section back to Volume List view. From this view, you can perform a number of tasks. For example, you can right-click a volume for available options.
When you right-click a volume, you can Open or Explore the volume. Additionally, you can start the Change Drive Letter and Paths wizard, or Shrink the volume.
Finally, right-click a volume displays an option to view the volume’s Properties.

Furthermore, it may interest you to know that some of the options available for a volume when you right it are available at the top sub-menu when you left-click the volume.
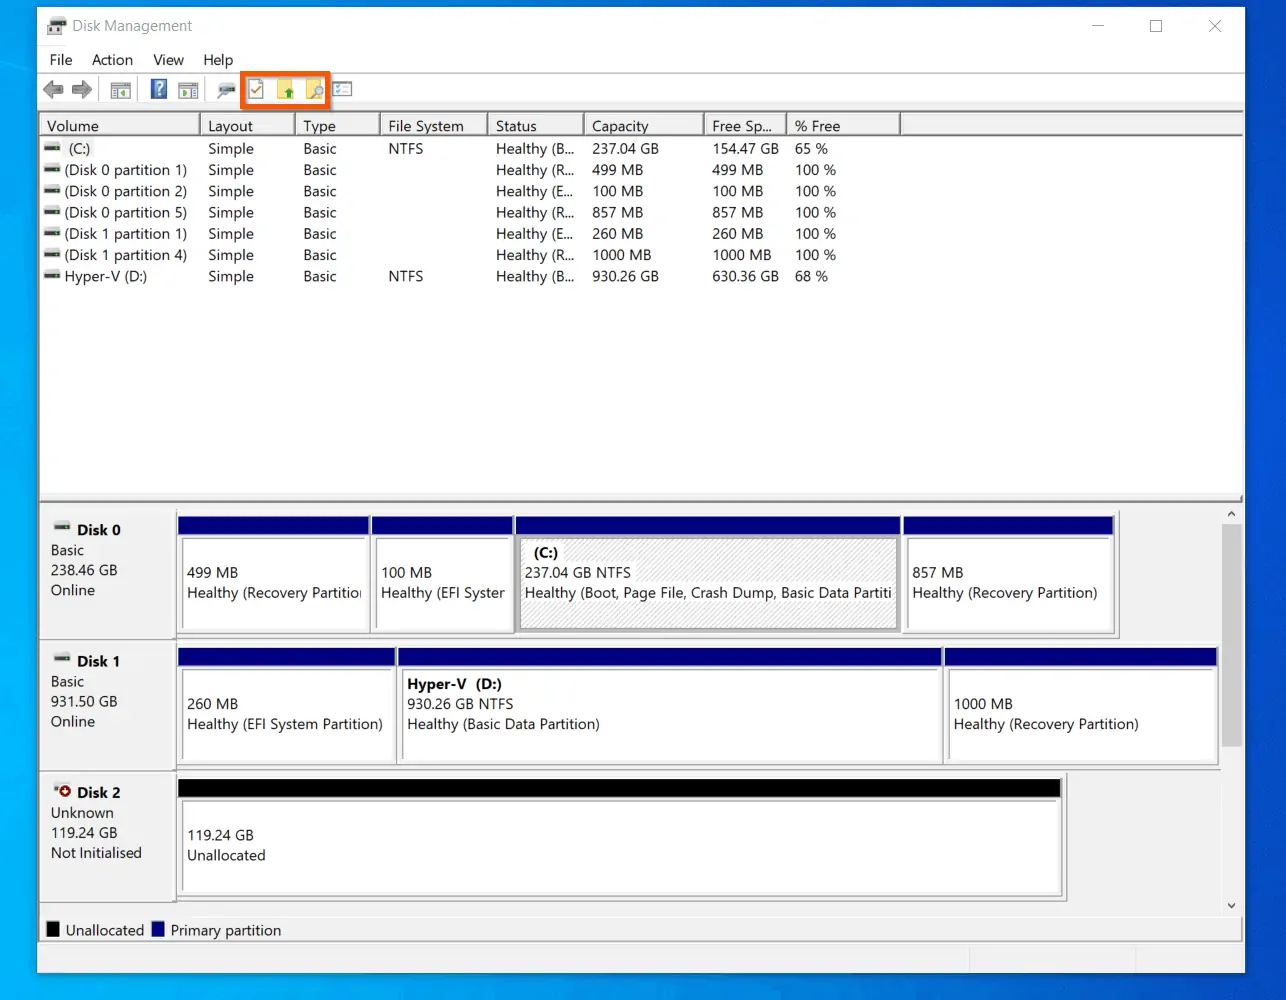
When you left-click a disk volume, use the icons highlighted in the screenshot below to (left to right) – view the volume’s Properties, Open or Explore the volume.
Bottom Section Of Disk Management – Default Graphical View
In various parts of this guide, I have hinted that the top and bottom sections of the Windows 10 Disk Management view are effectively, two options to display your disks and volumes.
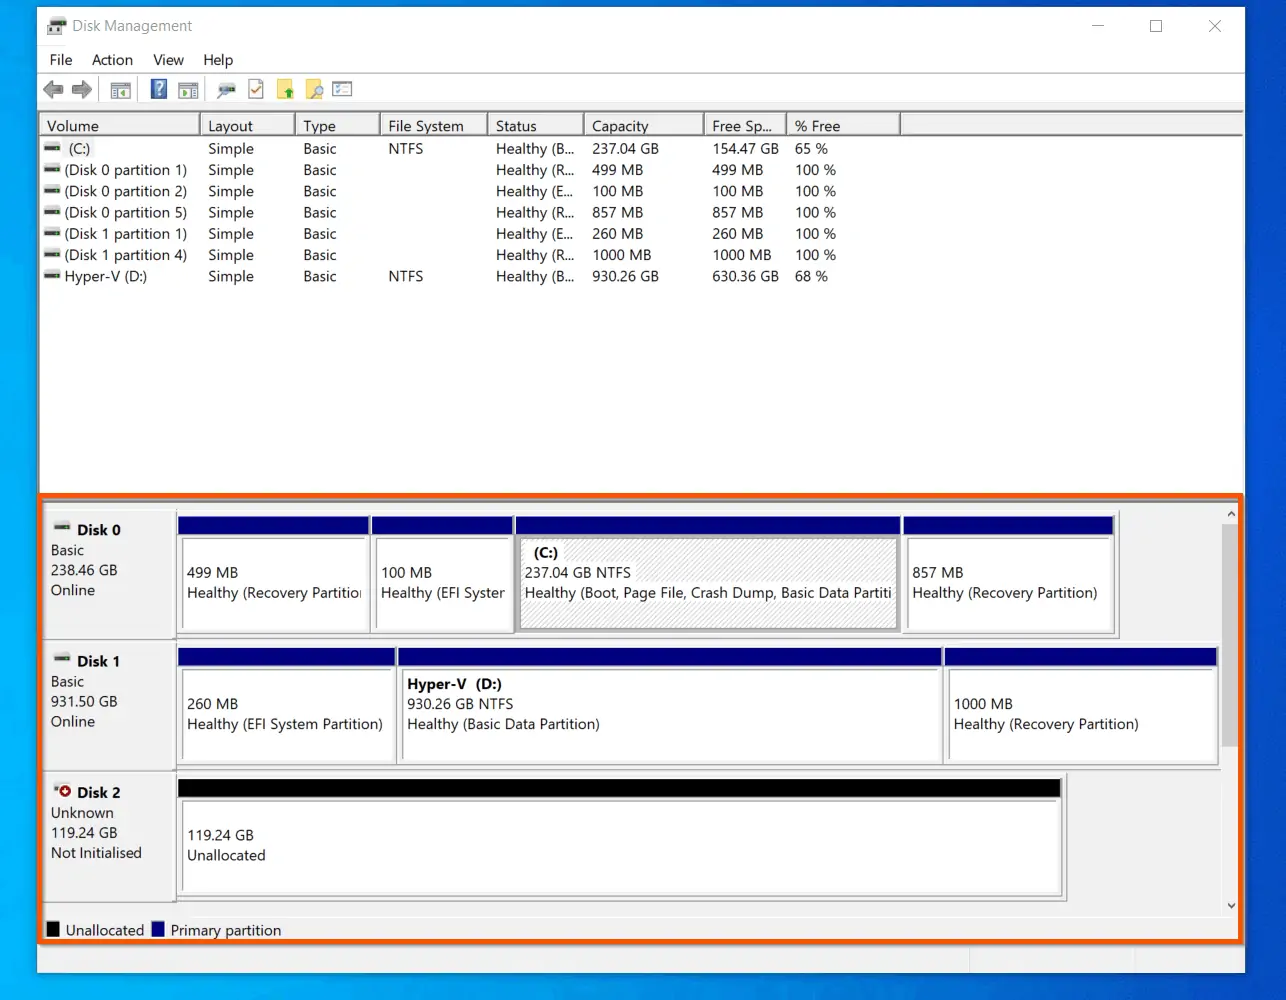
With this in mind, the only thing I will mention in this part of the guide is that you can change the top view to Graphical View – instead of its default Volume List view.
Then, hide the bottom view. The reason you want to hide the bottom view – after changing the top view to Graphical View – is that both views become the same.
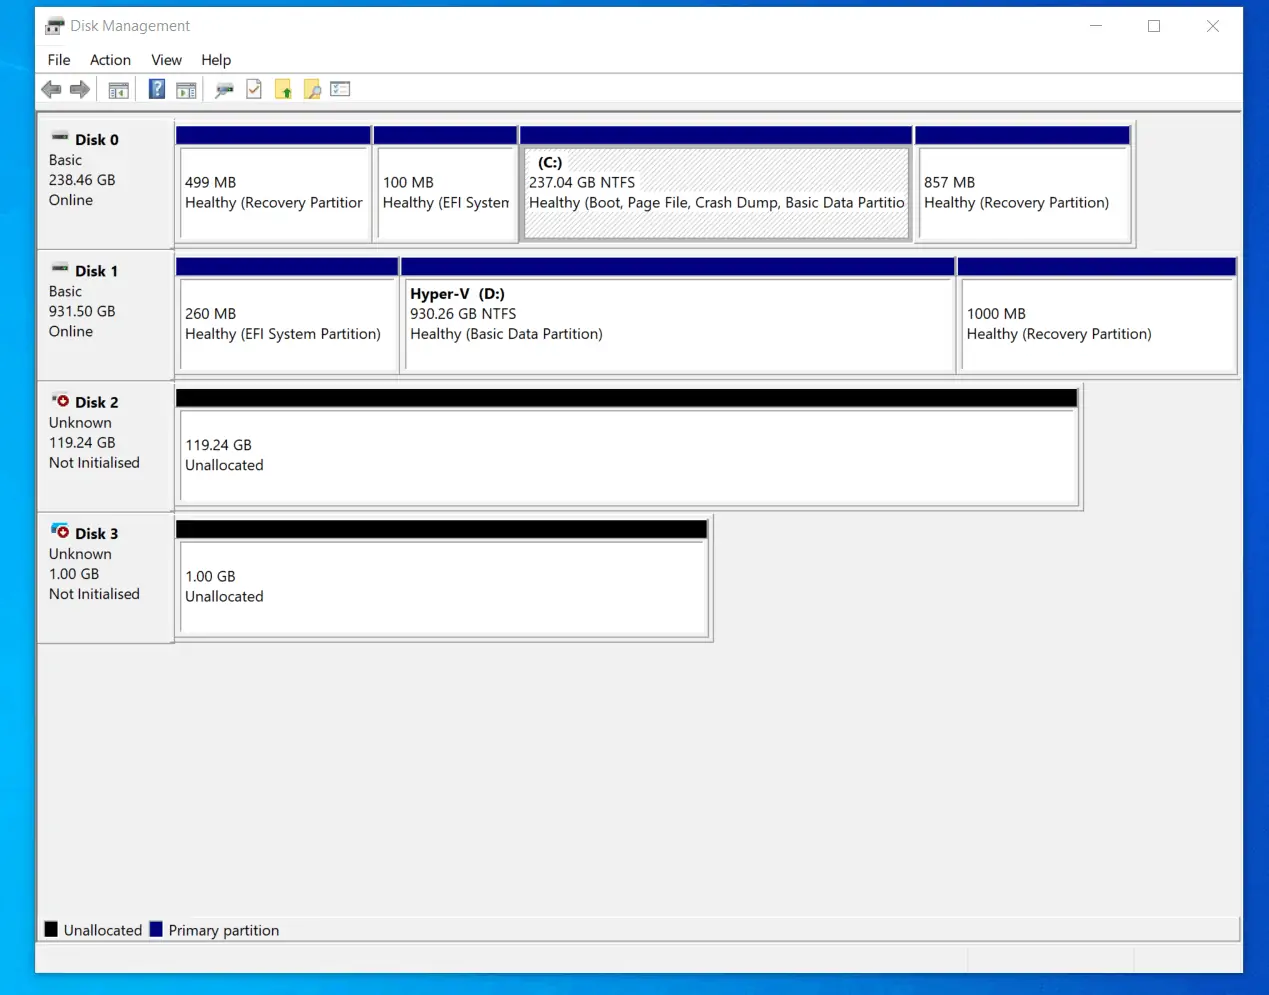
To hide the bottom section, click View -> Bottom -> Hidden. In the second screenshot below, the bottom section of the Windows 10 Disk Management interface is hidden.
Managing Disks with Disk Management MMC
We are now in the more fun part of this guide. In this section, you will learn how to initialize a new drive in Windows 10 Disk Management.
The section also covers how to Shrink, Extend and create new volumes. Furthermore, you will learn how to delete volumes, change drive letters and convert a basic disk to a dynamic disk.
Additionally, in this section, you will learn how to take a disk offline or online. Finally, the section ends with a sub-section on how to format a disk in Windows 10 Disk Management. Let’s roll!
Initialize a New Drive with Disk Management
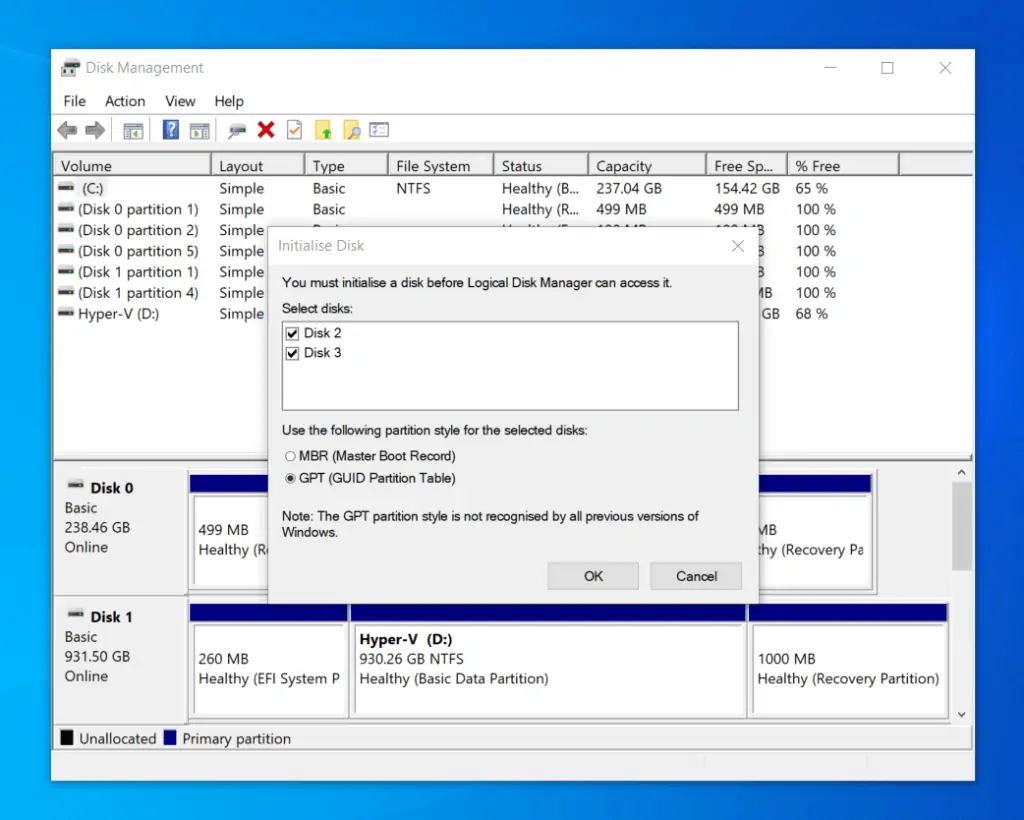
If you added a new disk to your computer, when you open disk management, you will be prompted to Initialize the disk. If you decide to Initialize the disk at this stage, select your partition style and click OK.

However, if you closed the new disk initialization prompt, you can initiate the process again by right-clicking the uninitialized disk and selecting Initialize Disk.
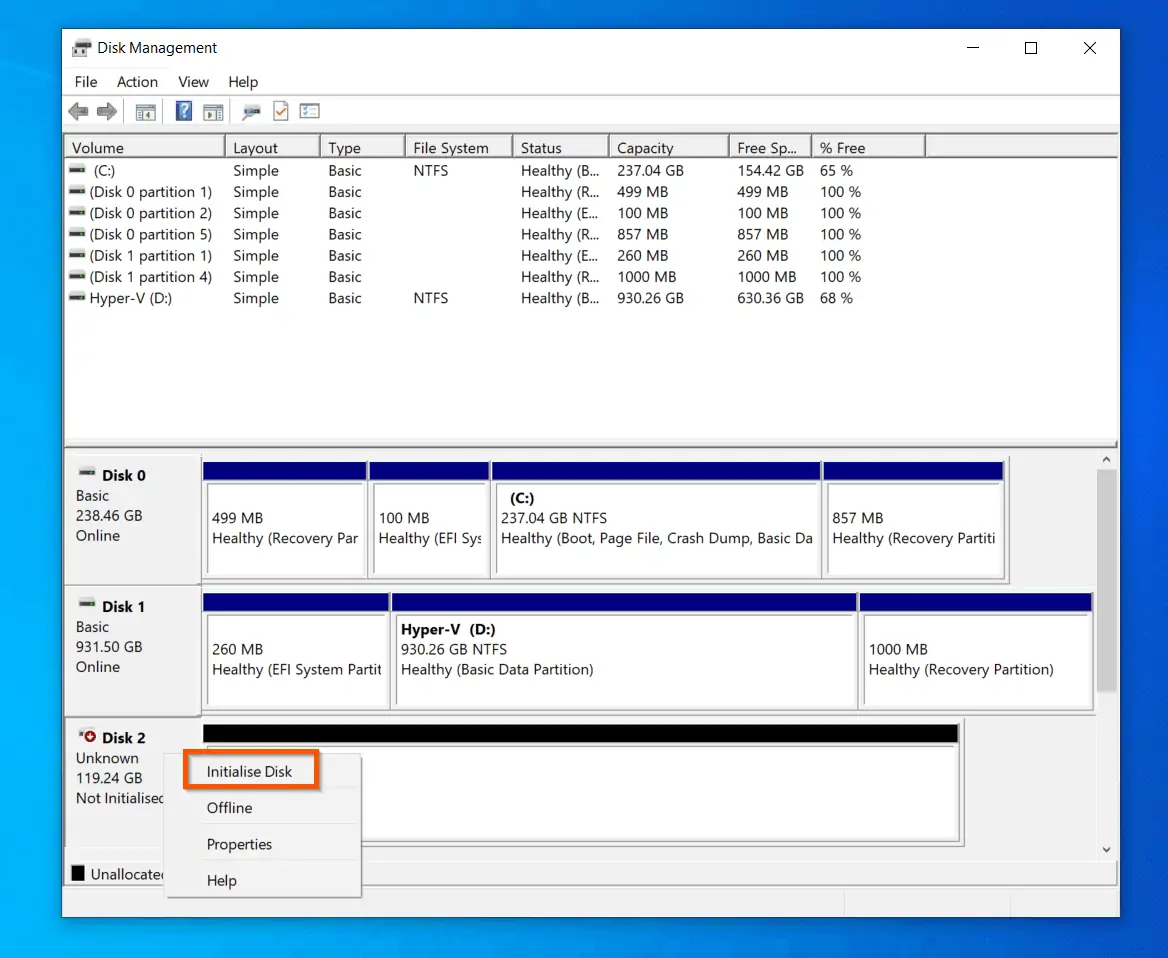
Then, on the Initialize Disk prompt, select your preferred partition style, and click OK.
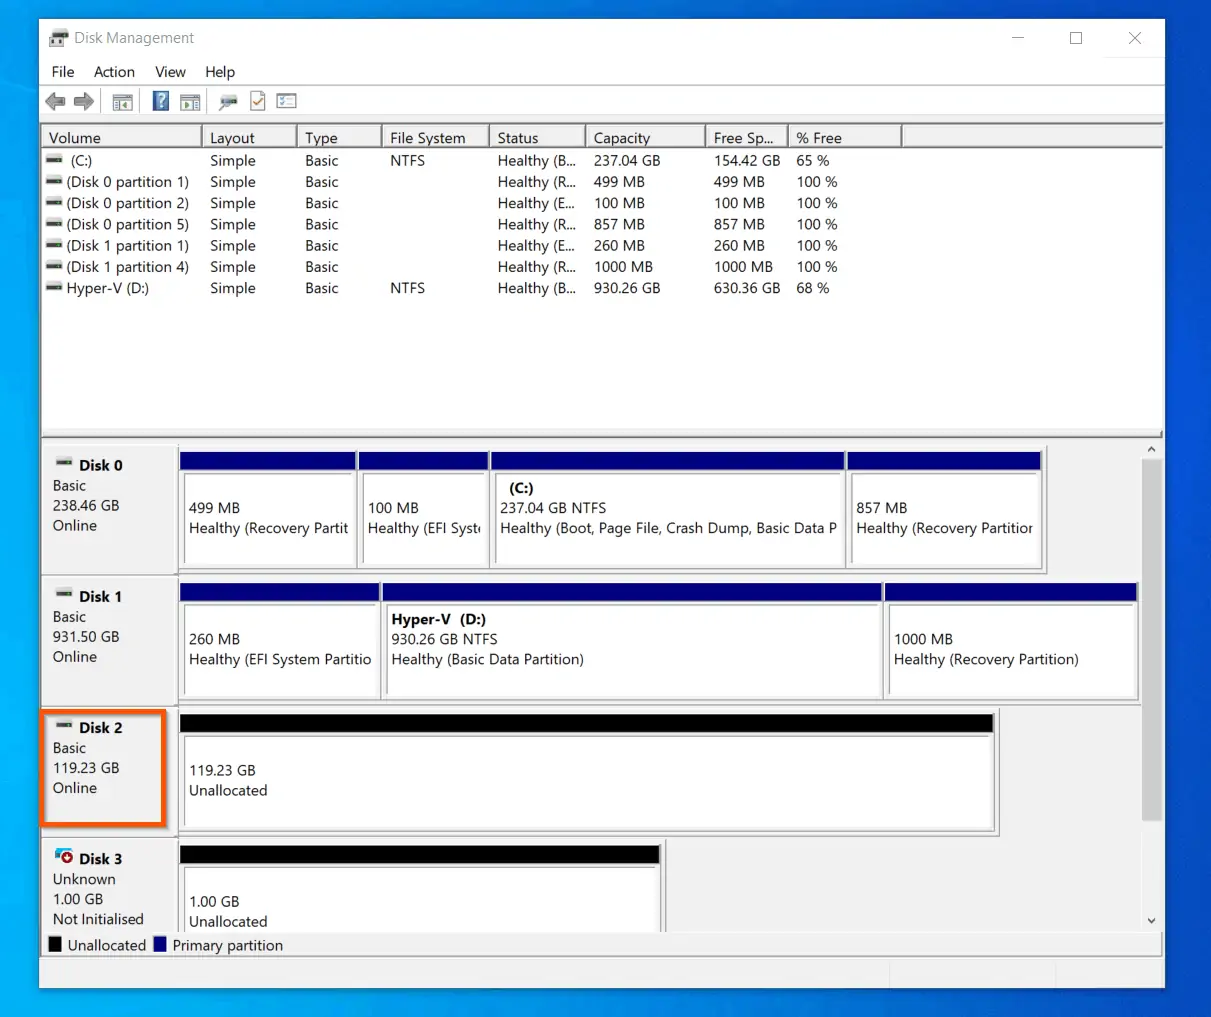
Once the disk is initialized, the red icon on its top left will no longer be displayed.
Shrink a Basic Volume with Disk Management
Another essential and common Windows 10 Disk Management task is shrinking volumes (link opens in a new browser tab).
Shrinking a disk volume allows you to free up “unallocated” space from an existing volume. When you shrink a volume, you decrease the space used by the primary partitions and logical drives.
One common scenario for shrinking disk volume is when you need to dual-boot Windows 10 with another operating system (link opens in a new browser tab).
In the example below, I will shrink the highlighted volume to free up 30 GB of unallocated space.

Follow the steps below to shrink a volume:
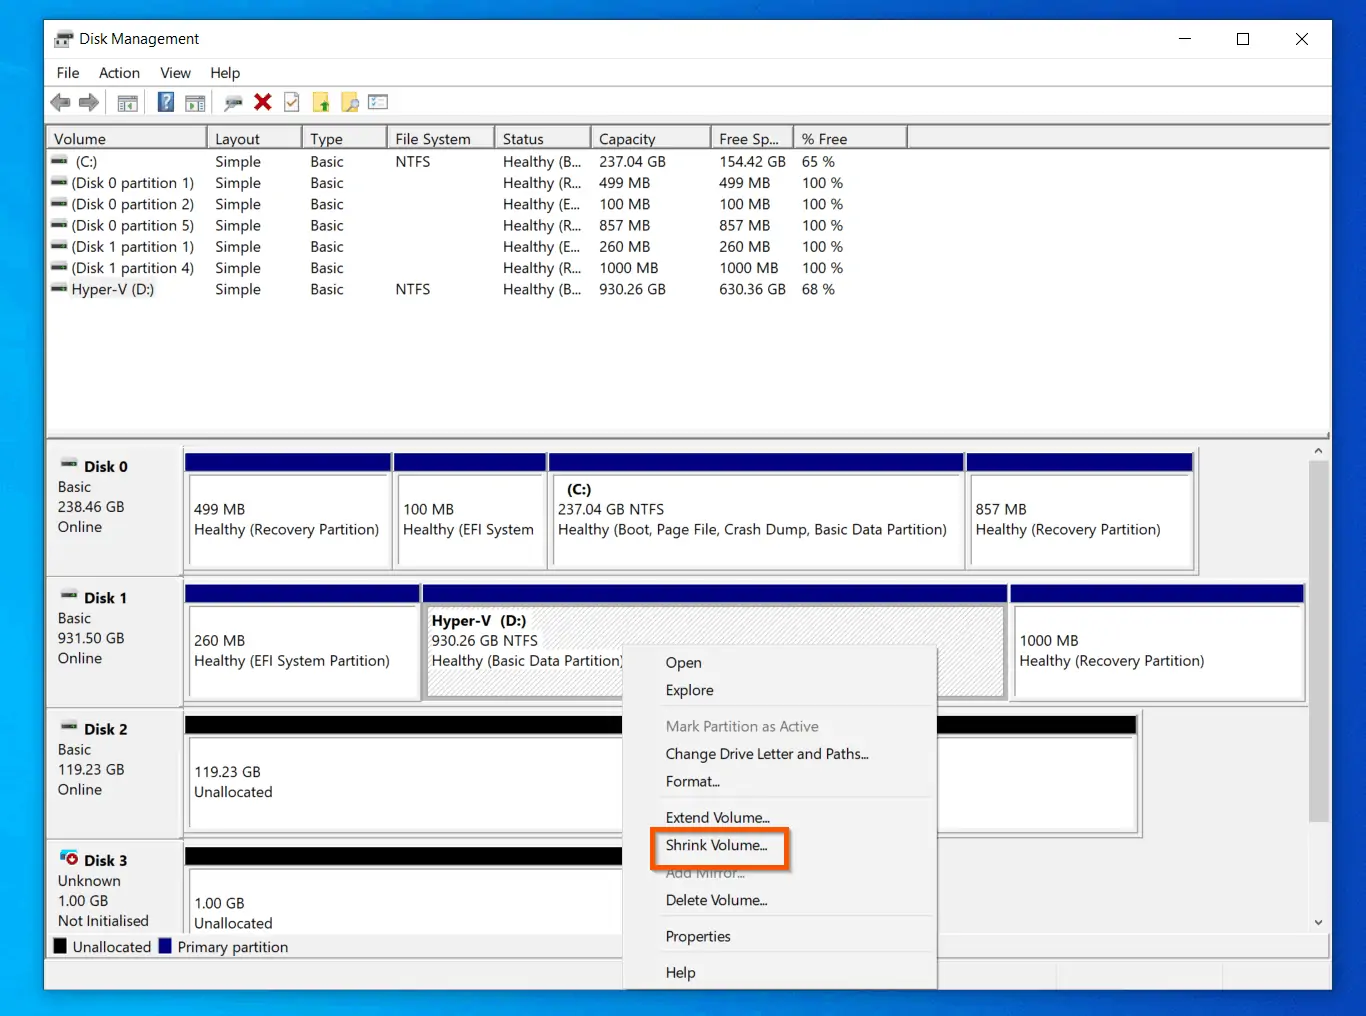
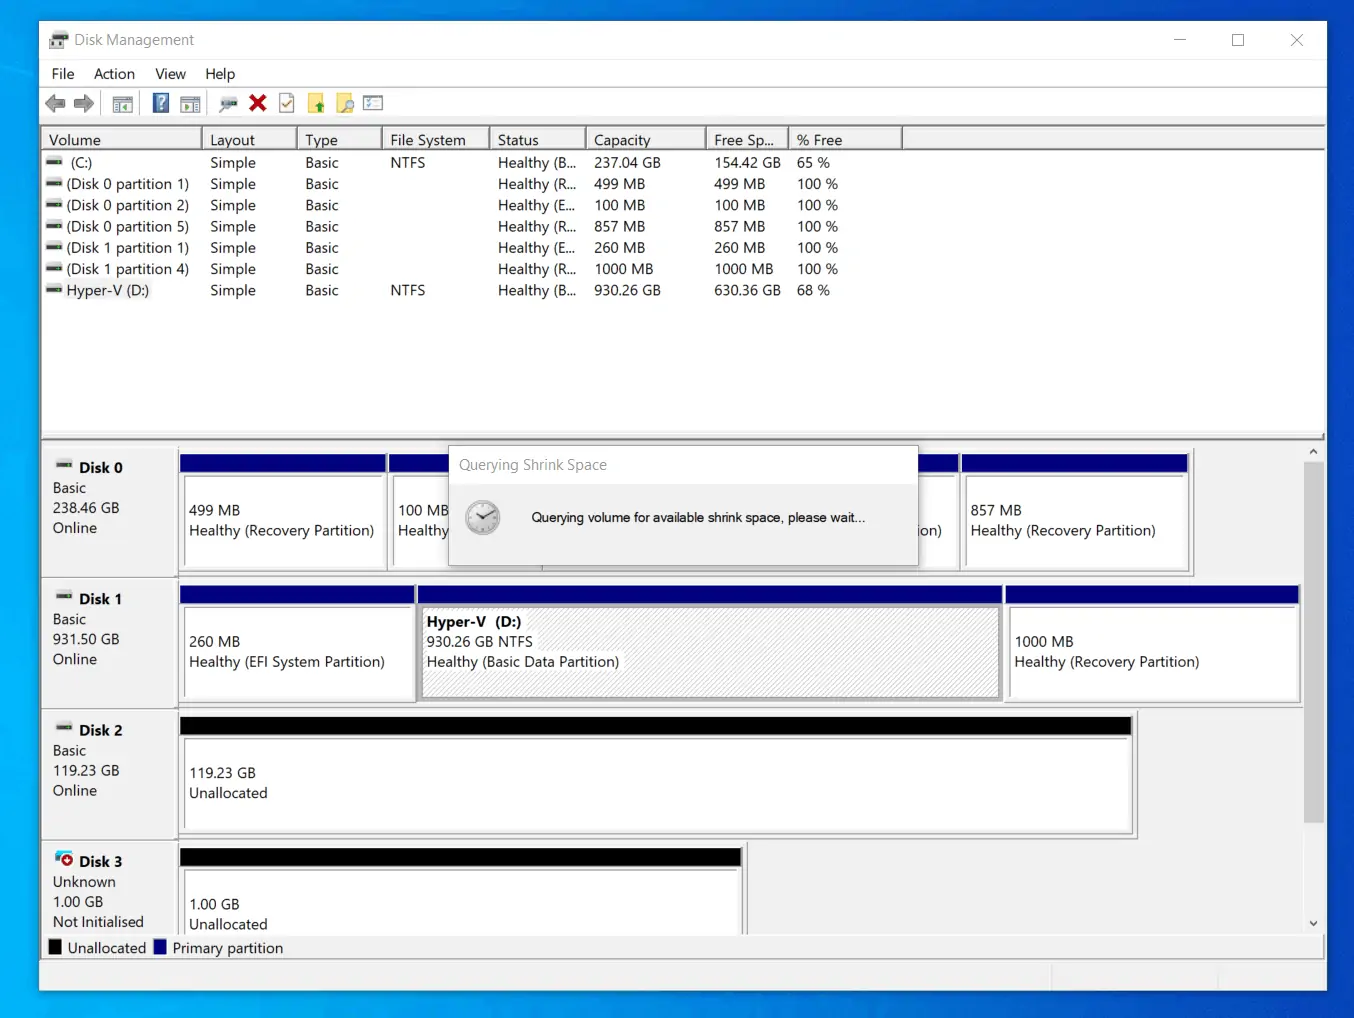
- Right-click the existing volume you want to free and select Shrink Volume. Then, wait for Windows 10 Disk Management to check the volume for available free space – see the second screenshot below.
Refer to the screenshot below. The total size of the disk is about 925 GB (925, 519 MB). Out of this total size, Disk Management determined that I can shrink up to 645 GB (645437 MB).
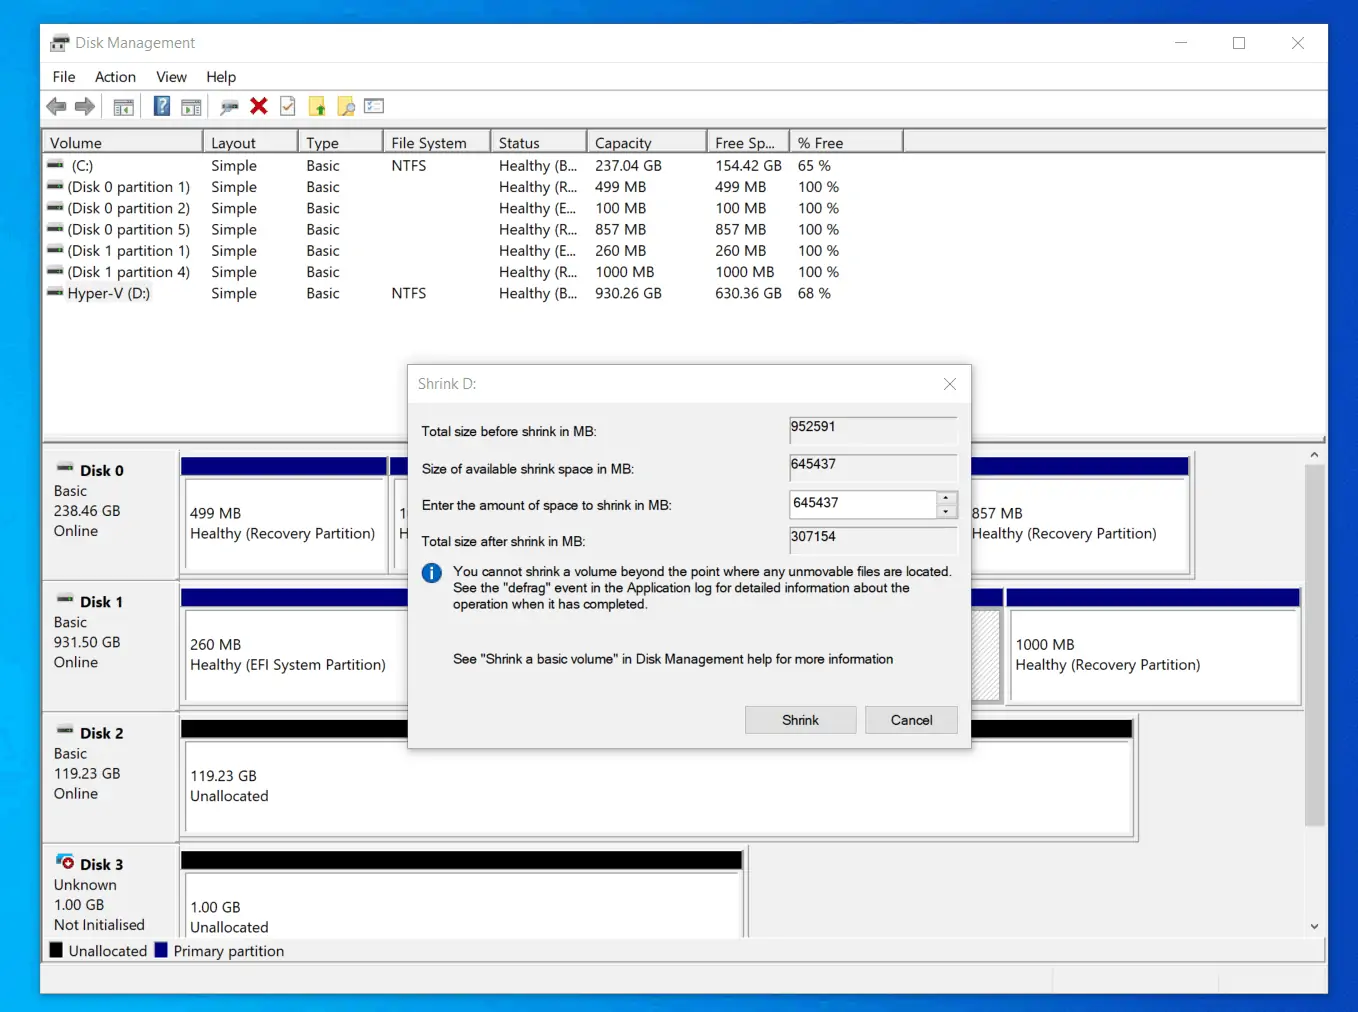
- Enter the value of the space you want to free up in the “Enter the amount of space to shrink in MB” field. Then, click Shrink. In this example, I want to shrink 30 GB, so I will enter 30000

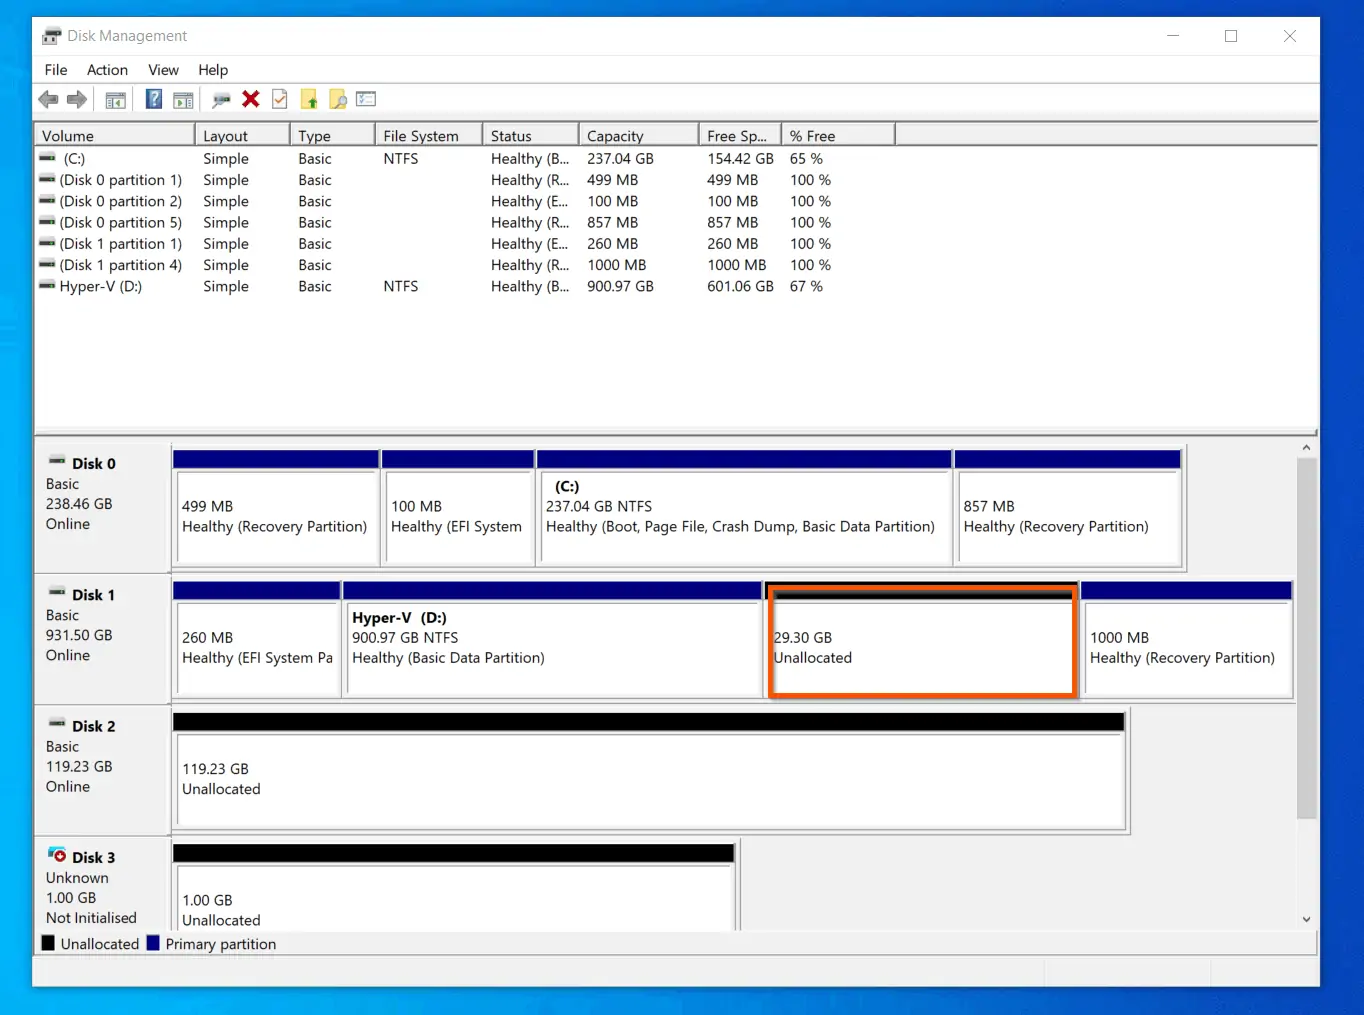
When the shrinking is completed, the free, unallocated space will be displayed to the right of the existing volume. You can create a new volume with this unallocated space – more on this later in this section.
Extend a Basic Volume with Disk Management
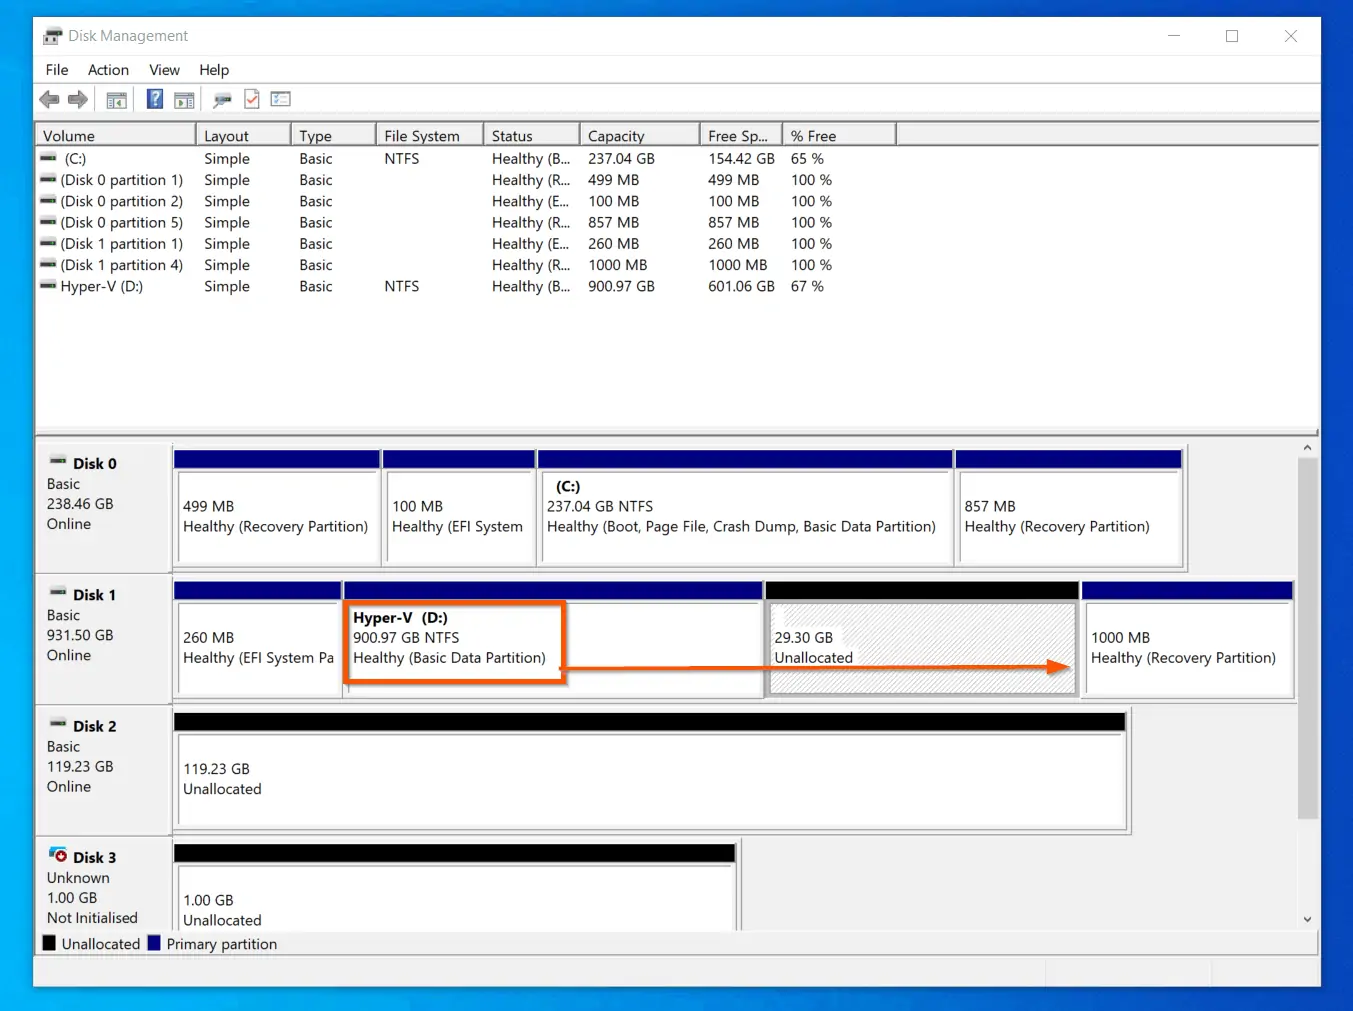
Extending a volume is the opposite of shrinking a volume. When you extend a volume, you add a free, unallocated adjacent, contiguous space on the same disk to an existing volume.
In this example, I will extend my drive D (currently about 900 GB) and add the unallocated 29.3 GB to the 900 GB).
Here are the steps to extend a volume in Windows 10 Disk Management:
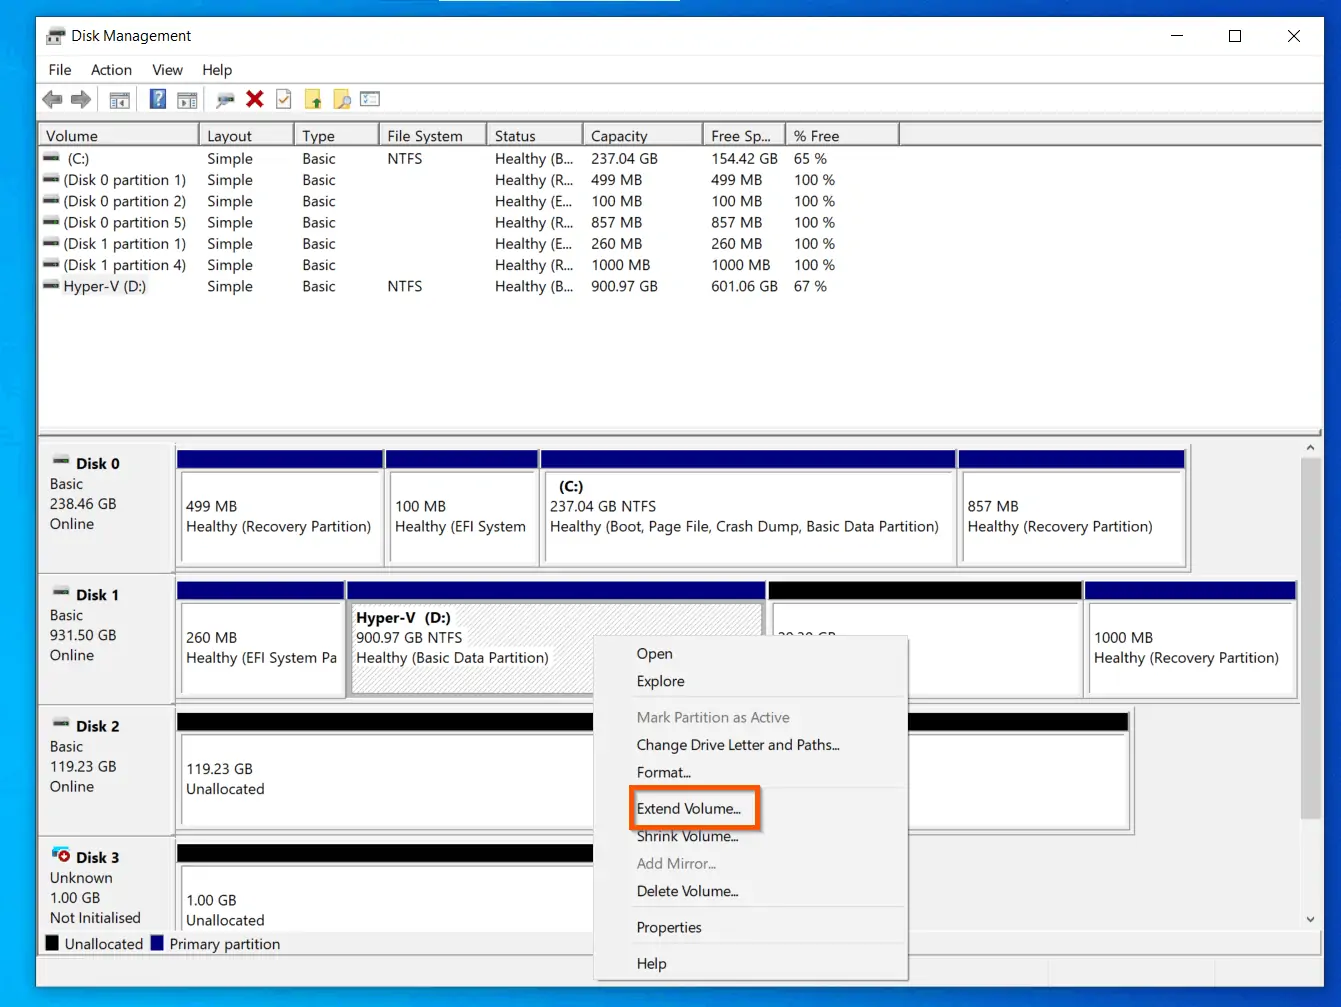
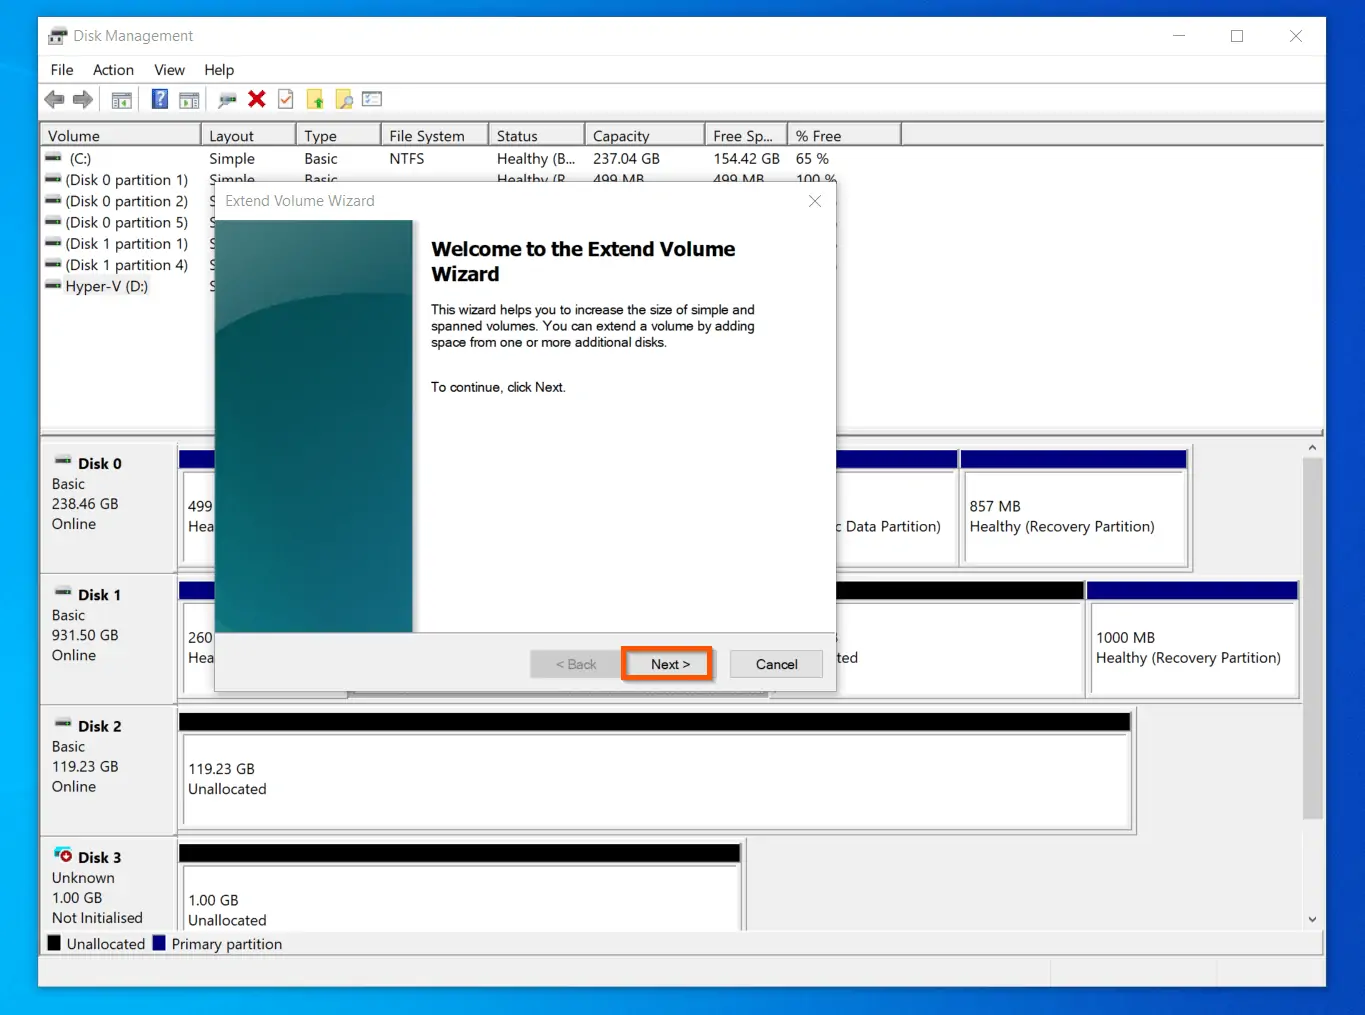
- Right-click the volume you want to extend (NOT the unallocated space). Then, select Extend Volume.
- Then, on then first screen of the Extend Volume wizard, click Next.
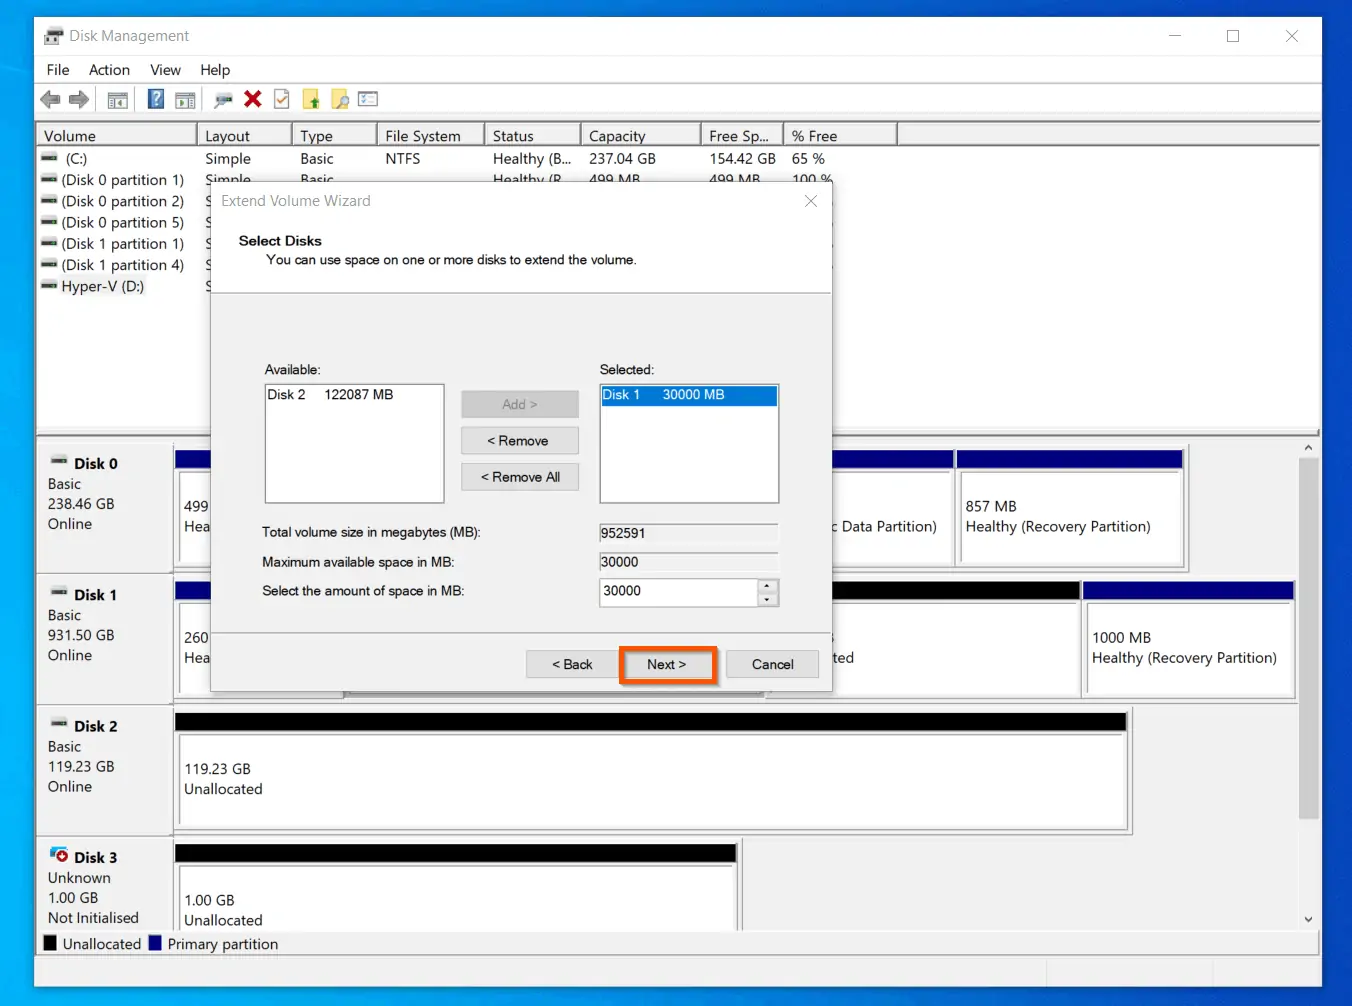
- On the Select Disk screen, the total unallocated space available to the right of the volume will be selected. If you want to add all the available unallocated space to the existing volume, click Next. Otherwise, adjust the size you want to add before clicking Next.
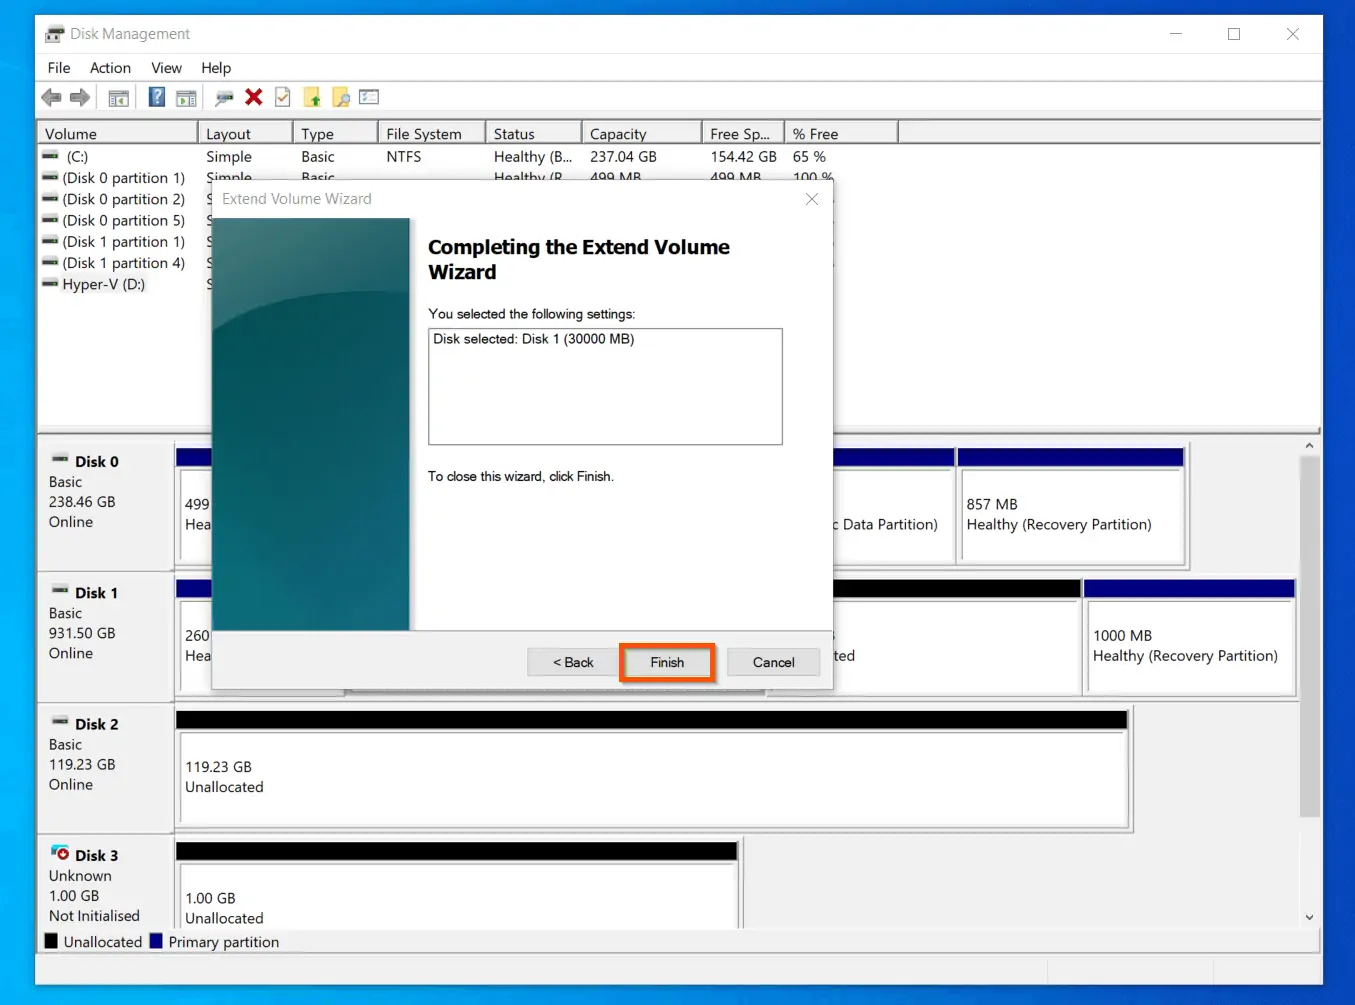
- Finally, on the last screen of the wizard, review the summary and click Finish.
Create a Volume with Disk Management
Before you can utilize a disk space to save files or install Operating System, you have to create a volume first. Then, format the volume.
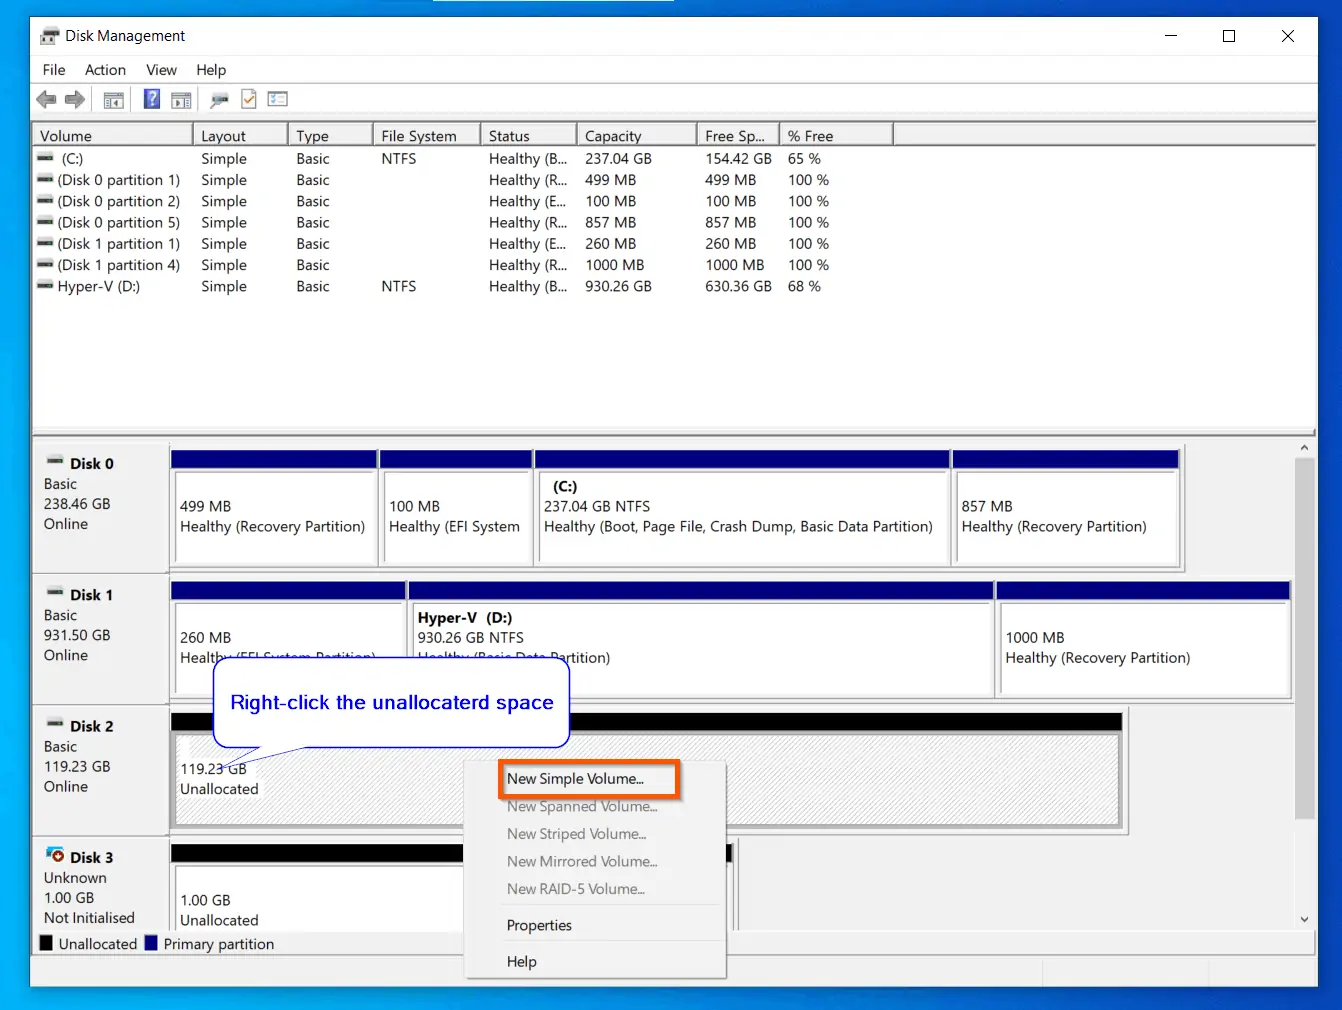
Follow the steps below to create a volume from a disk that has some unallocated space:
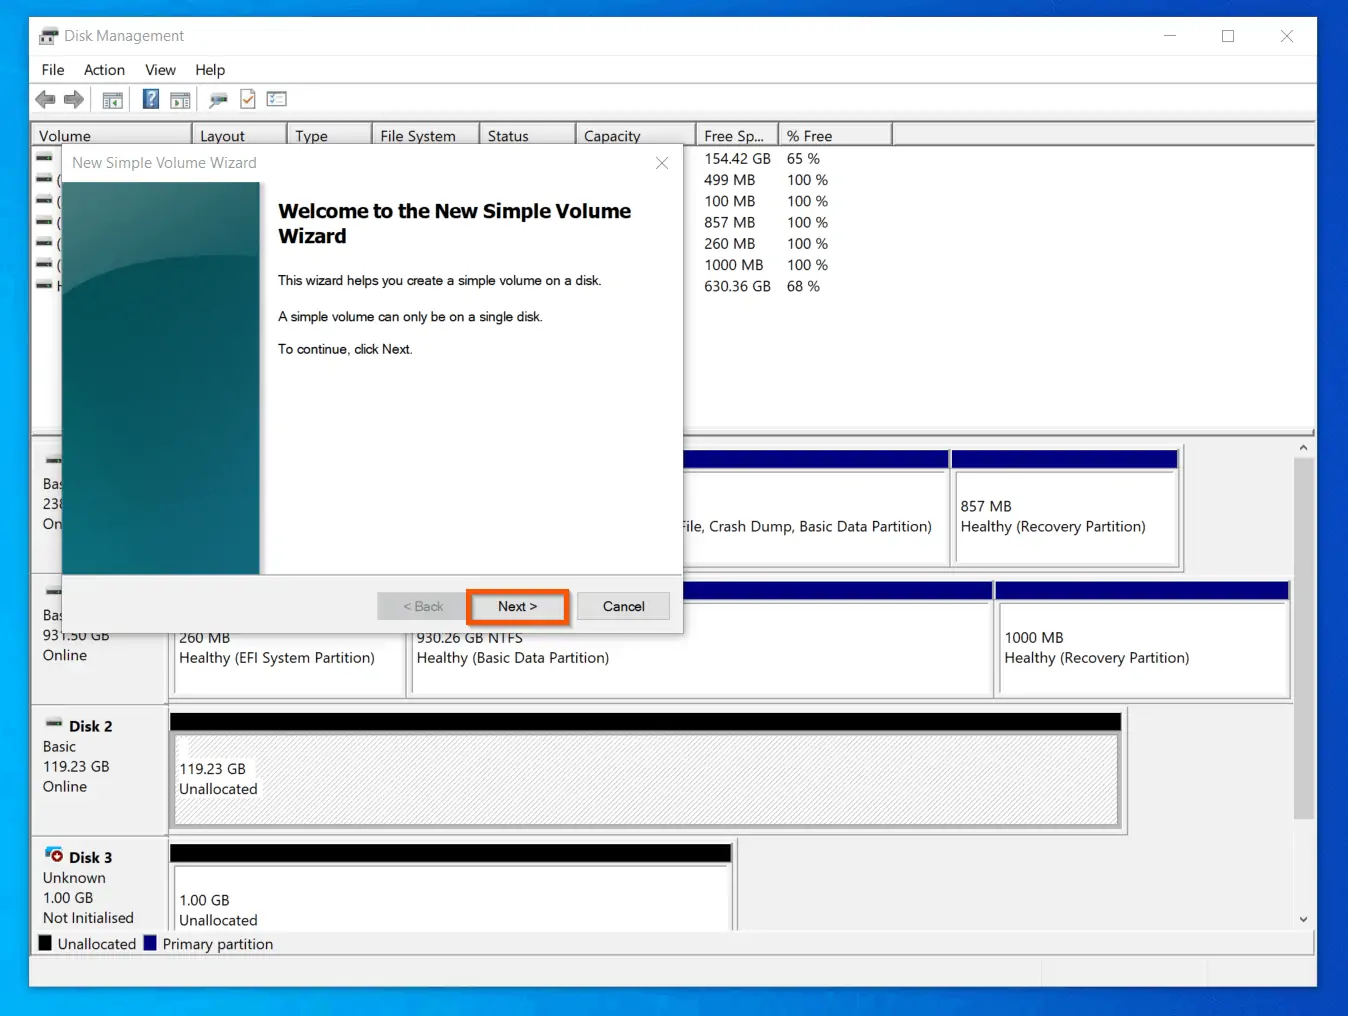
- Right-click unallocated disk space and select Simple Volume.
- Then, on the welcome screen of the New Simple Volume Wizard, click Next.
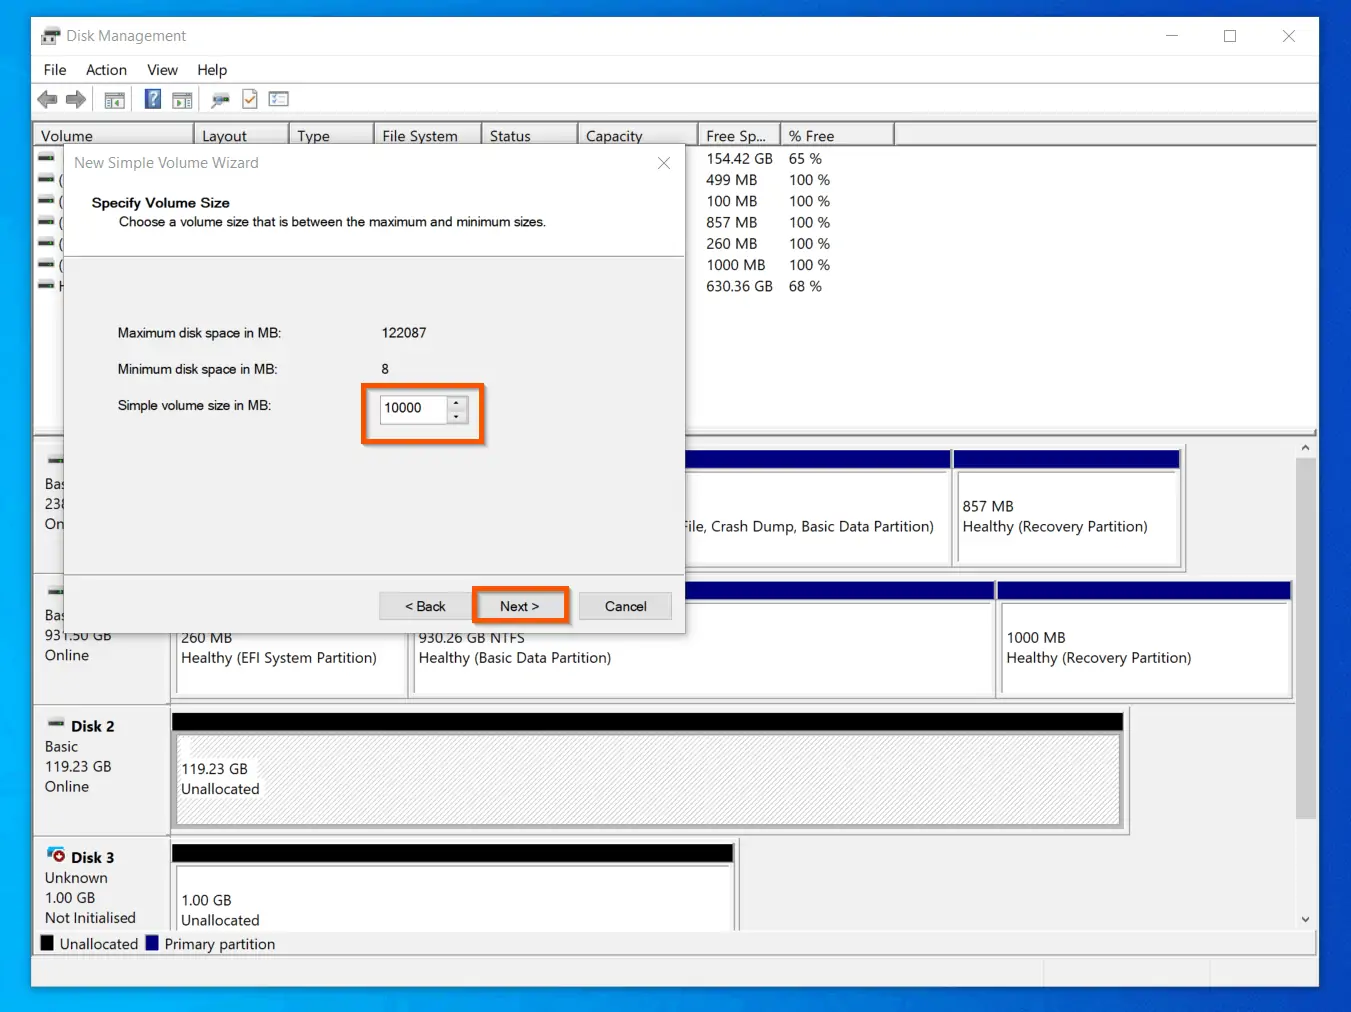
- On the Specify Volume Size screen, the whole available space are entered in the Simple volume size in MB field. If you want to create a volume with the entire space, click Next. Otherwise, enter the disk volume size you want to create before clicking Next.
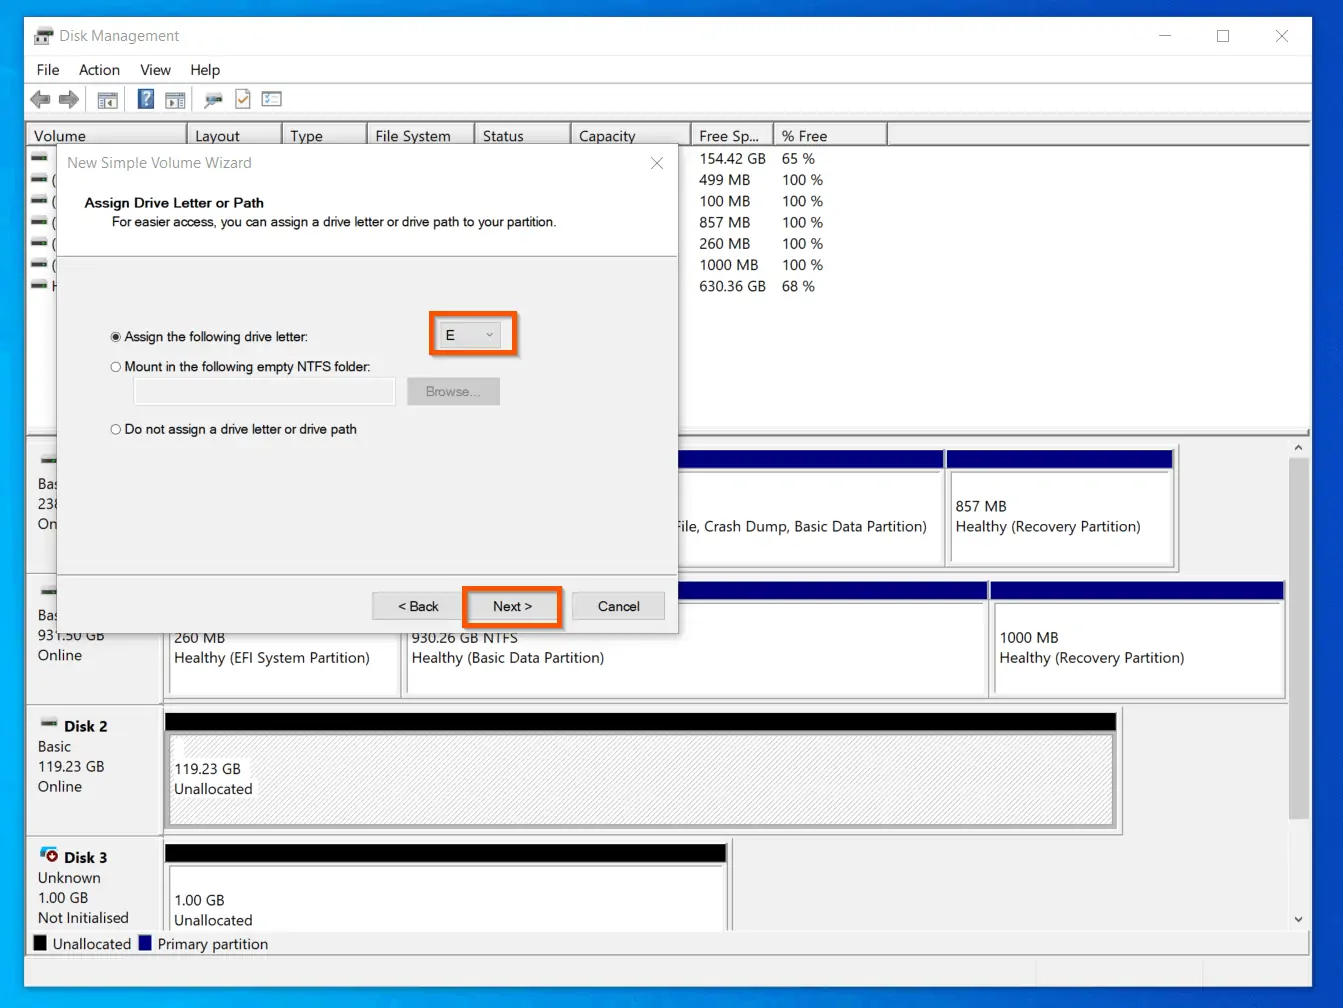
- Then, on the Assign Drive Letter or Path screen, if you want to assign a drive letter, with the Assign the following drive letter selected, click the drive letter drop-down. Alternatively, you can mount the drive in an empty folder created in an NTFS-formatted drive. Finally, you have the option not to assign a drive letter at this time. In this example, I will accept the assigned drive letter E.
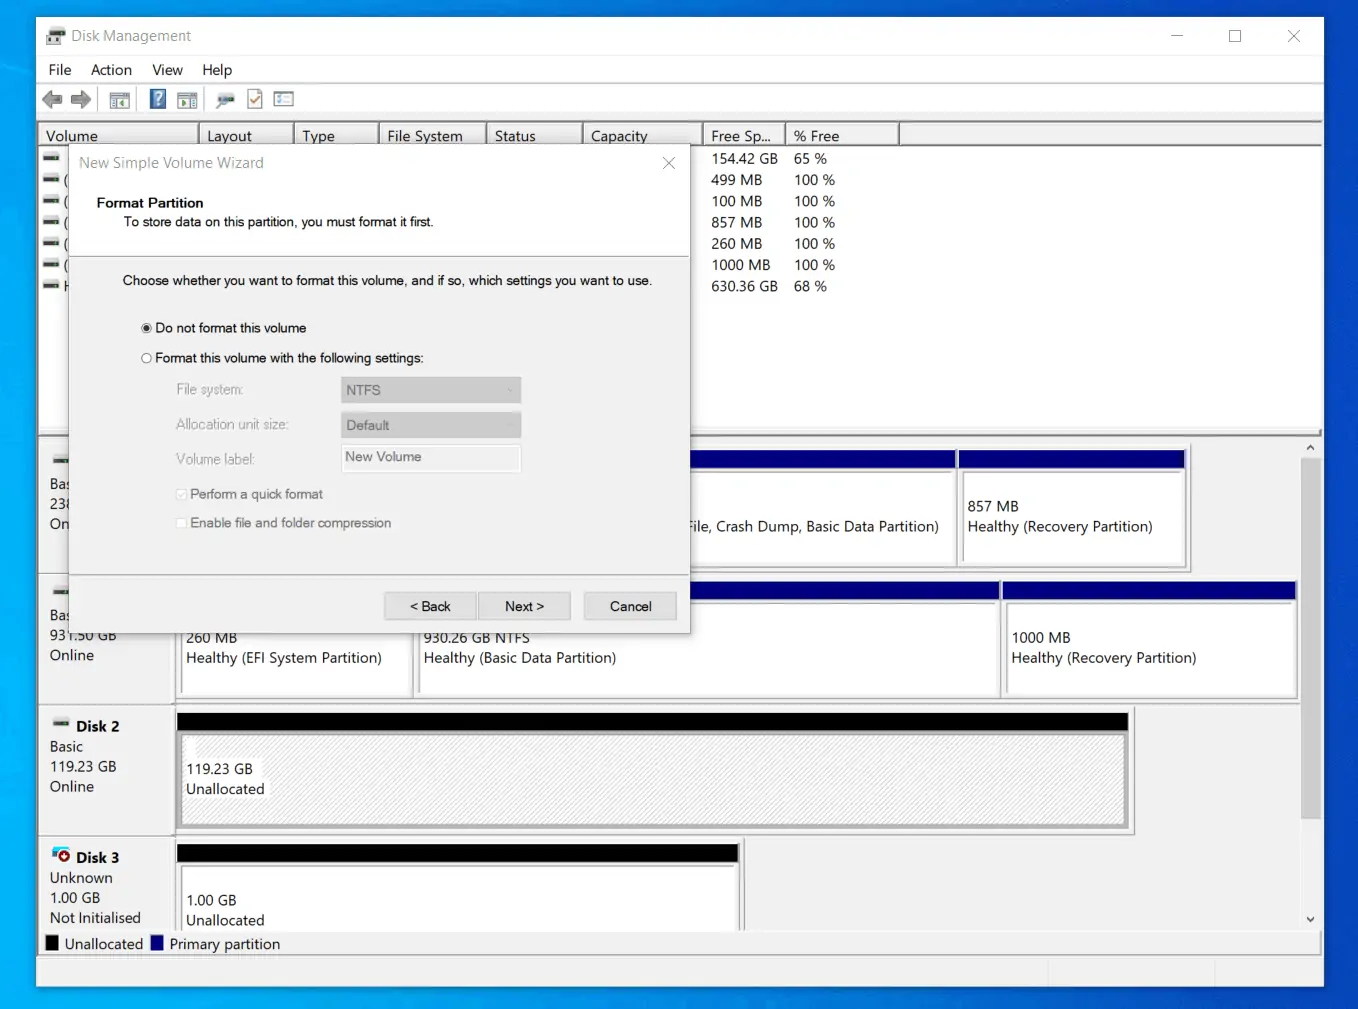
- On the Format Partition screen, select your format option and click Next.
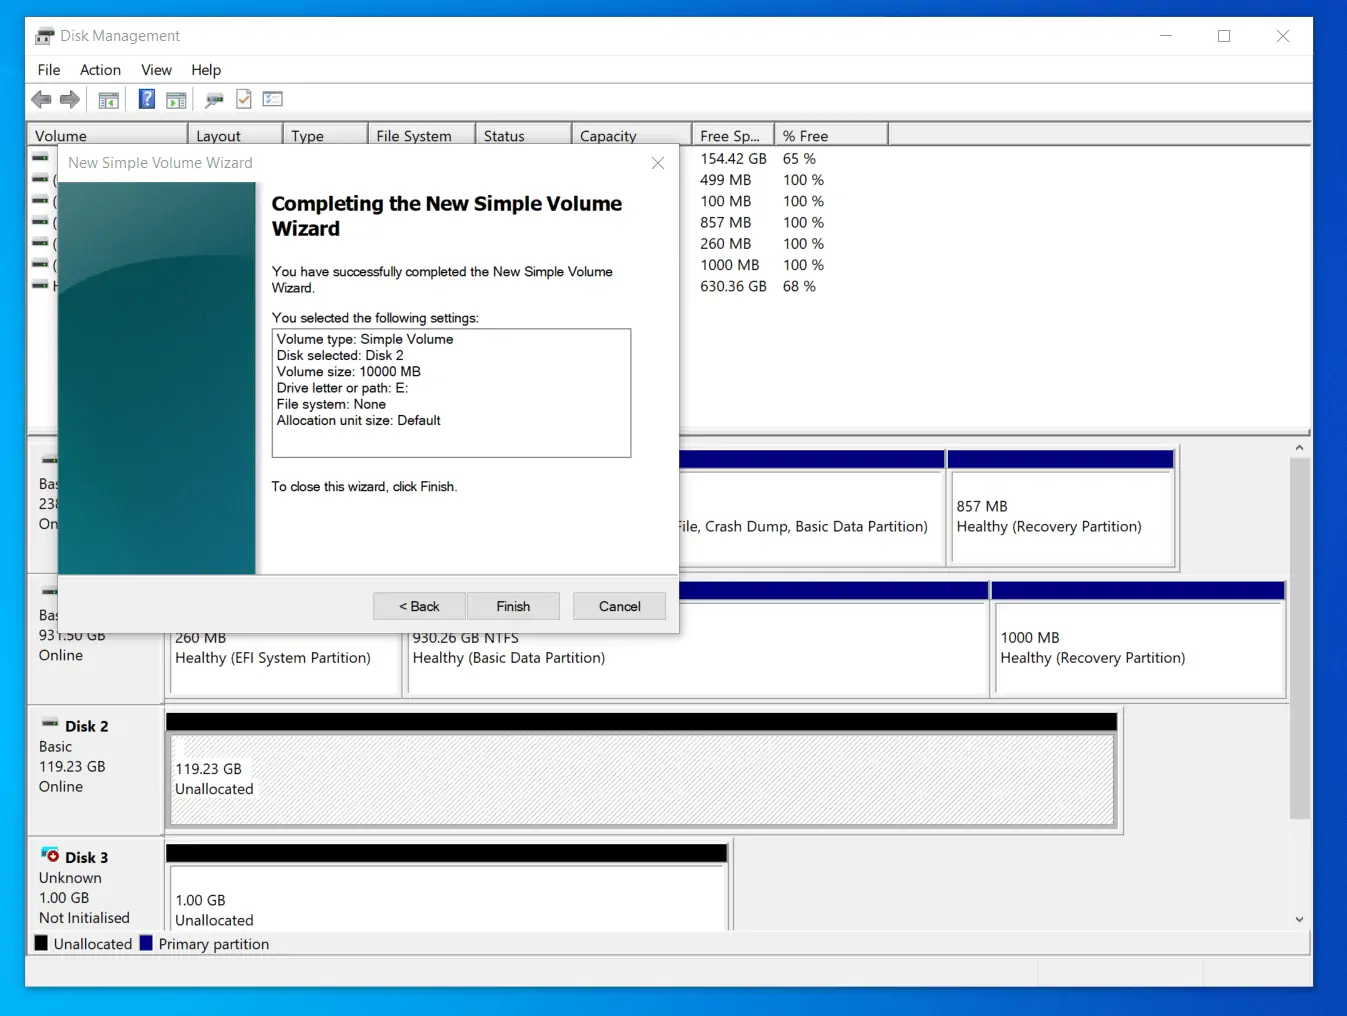
- Finally, review your selected options and click Finish.
Change a Drive Letter with Disk Management
In my experience, you wouldn’t need to change drive letters often. However, whenever you need to do so, follow these steps to change a drive letter in Windows 10 Disk Management:
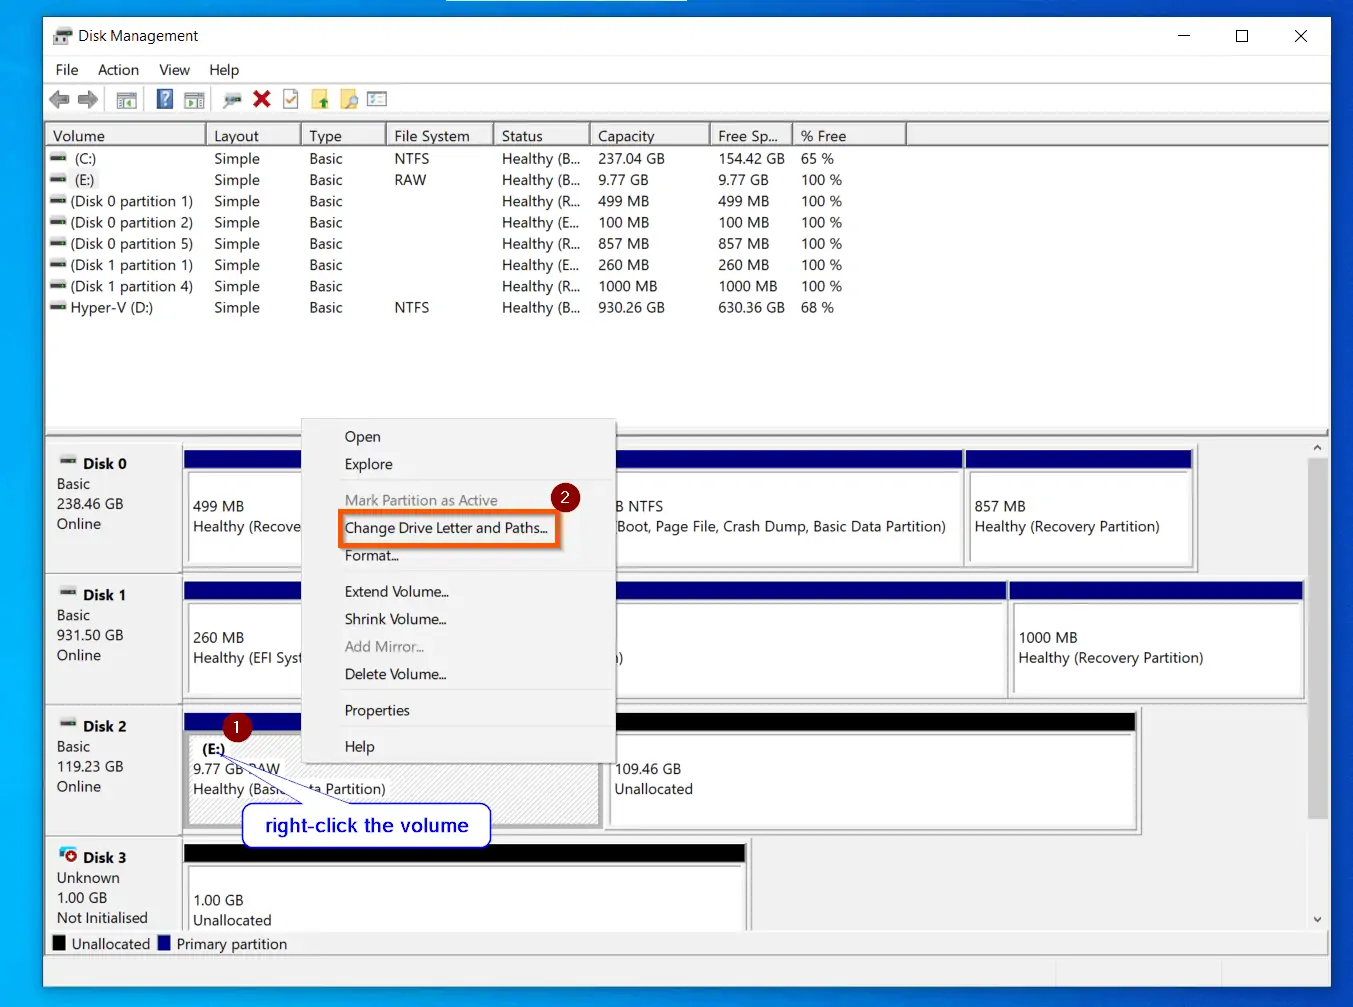
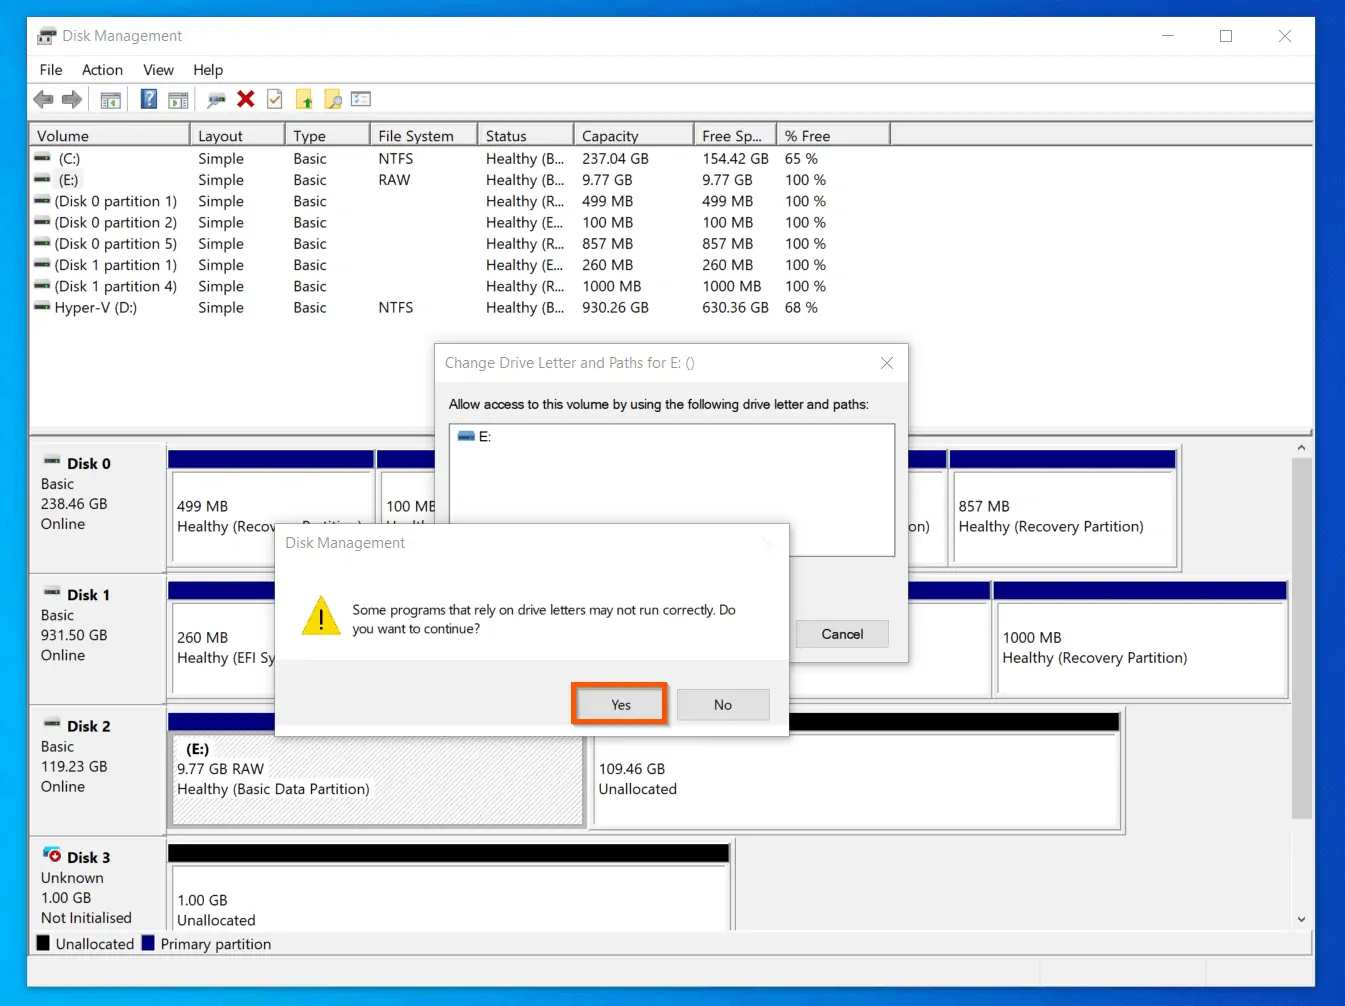
- Right-click the volume you want to change the drive letter; then select Change Drive Letter and Paths.
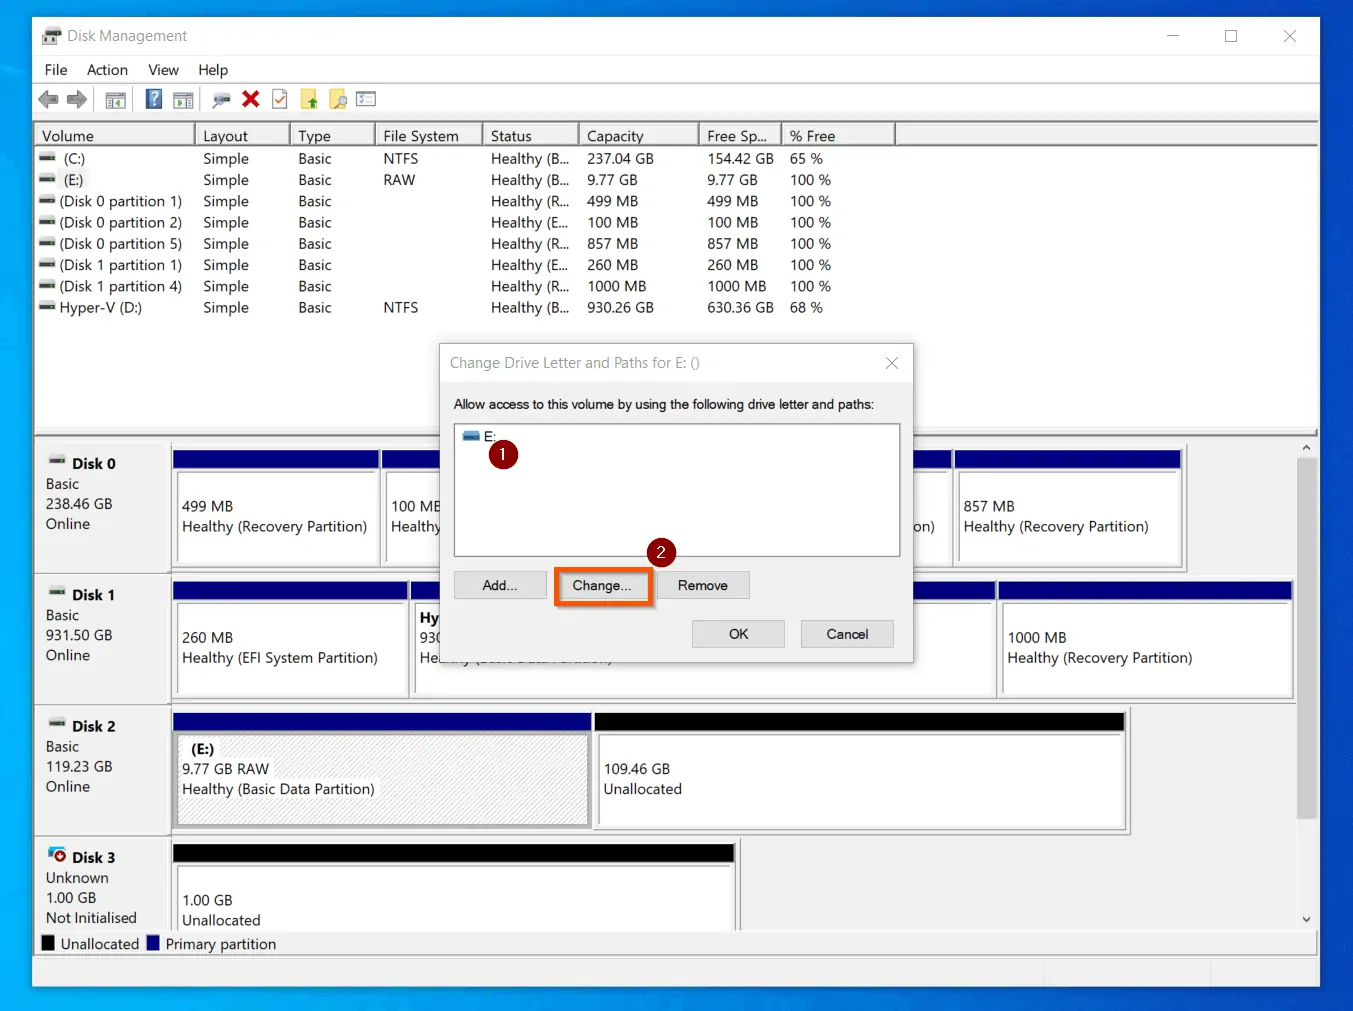
- On the Change Drive Letter and Paths pop-up, select the drive letter, then click Change.
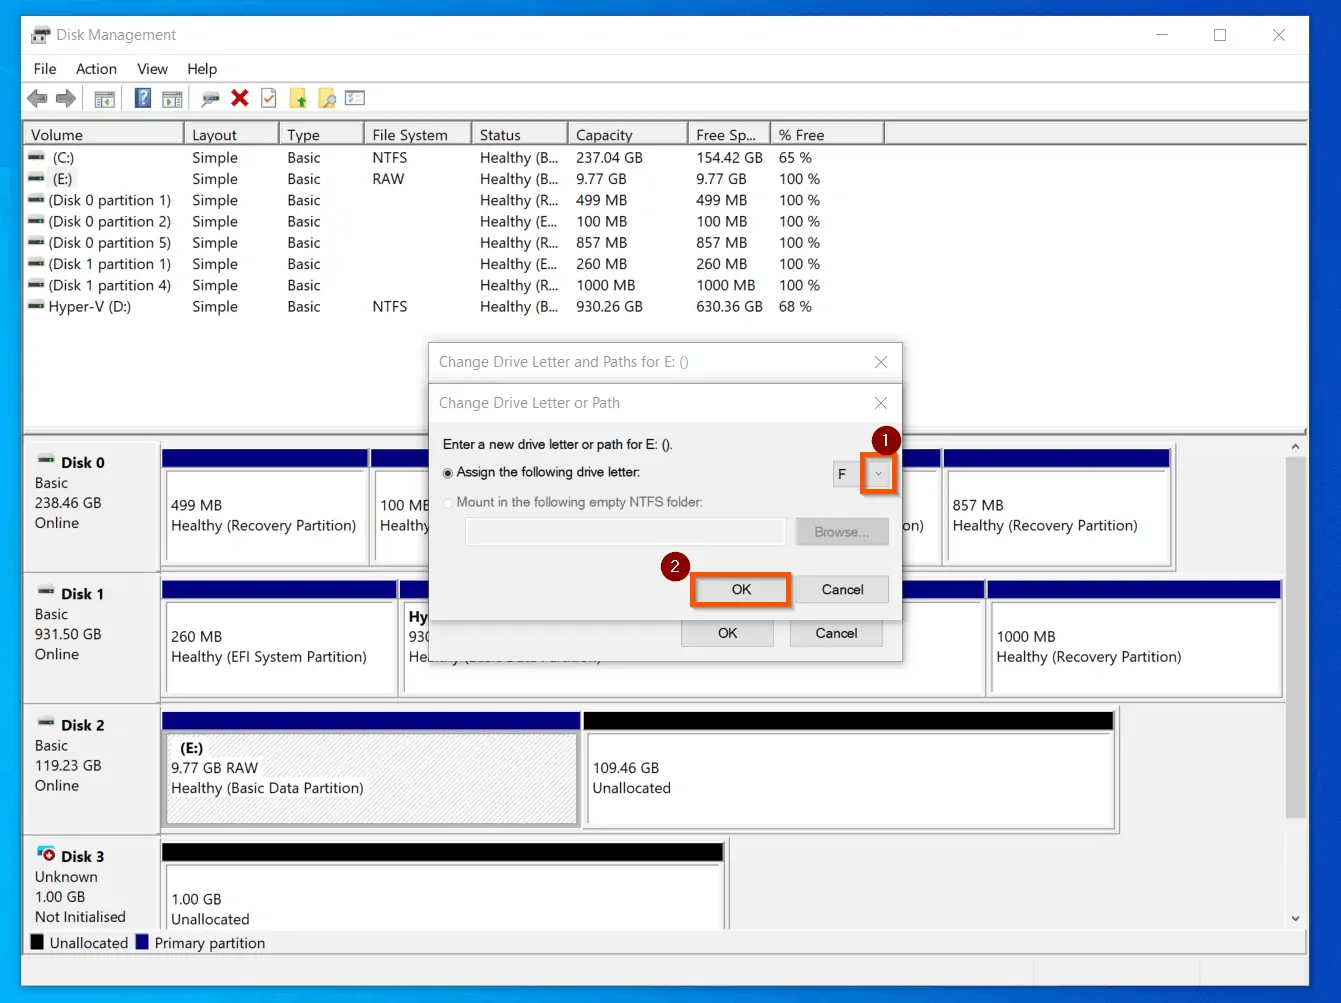
- Next, click the “Assign the following drive letter:” drop-down and select the next available drive letter. Then, click OK.
- Finally, review the warning in the pop-up window, and if you still want to change the drive letter for the volume, click Yes.
Convert a Basic Disk to a Dynamic Disk with Disk Management
If you need to create advanced disk volumes – Spanned, Striped, Mirrored, RAID-5, – you MUST convert the disk from a Basic disk to a Dynamic disk (Link explains Dynamic Disks – opens in a new browser tab).
Follow the steps below to convert a Basic disk to a Dynamic disk:
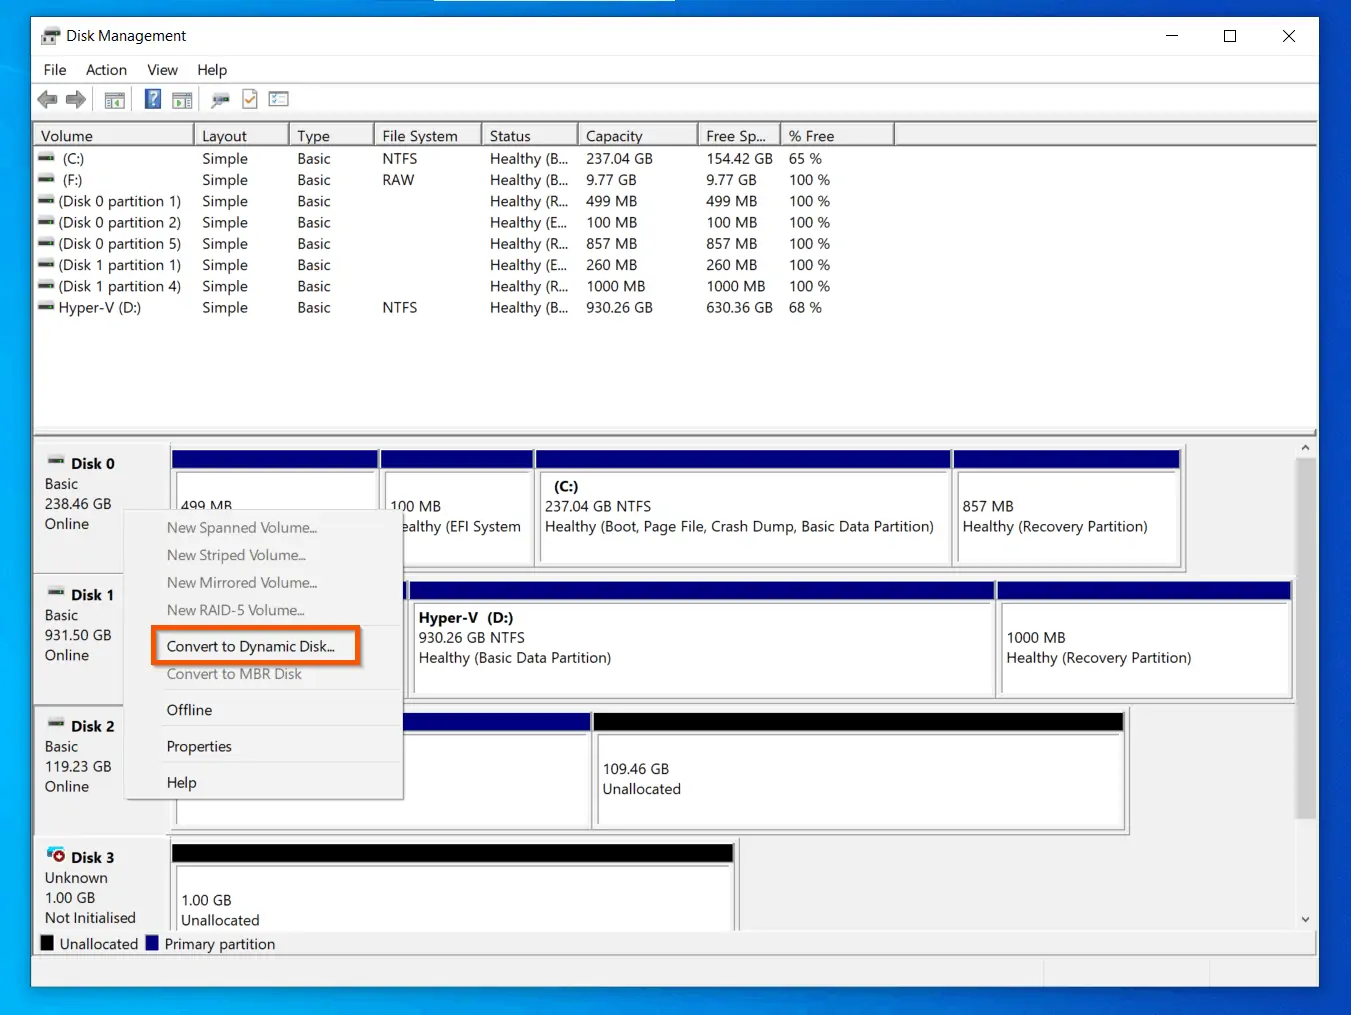
- Right-click the disk, NOT the volumes in the disk! Then, from the displayed options, select Convert to Dynamic Disk – see the second screenshot below.
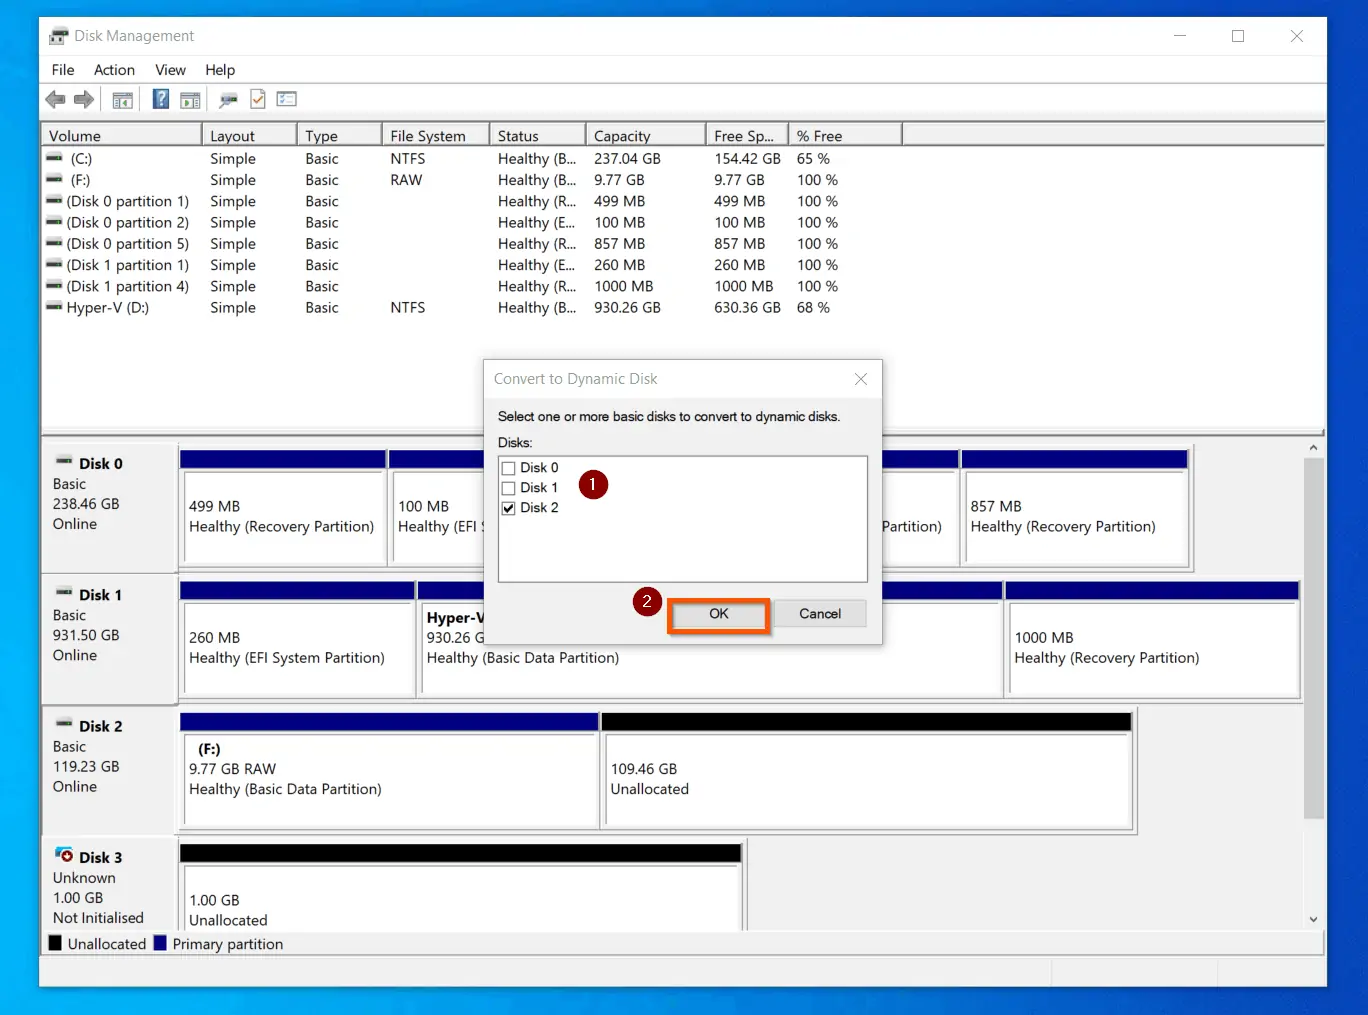
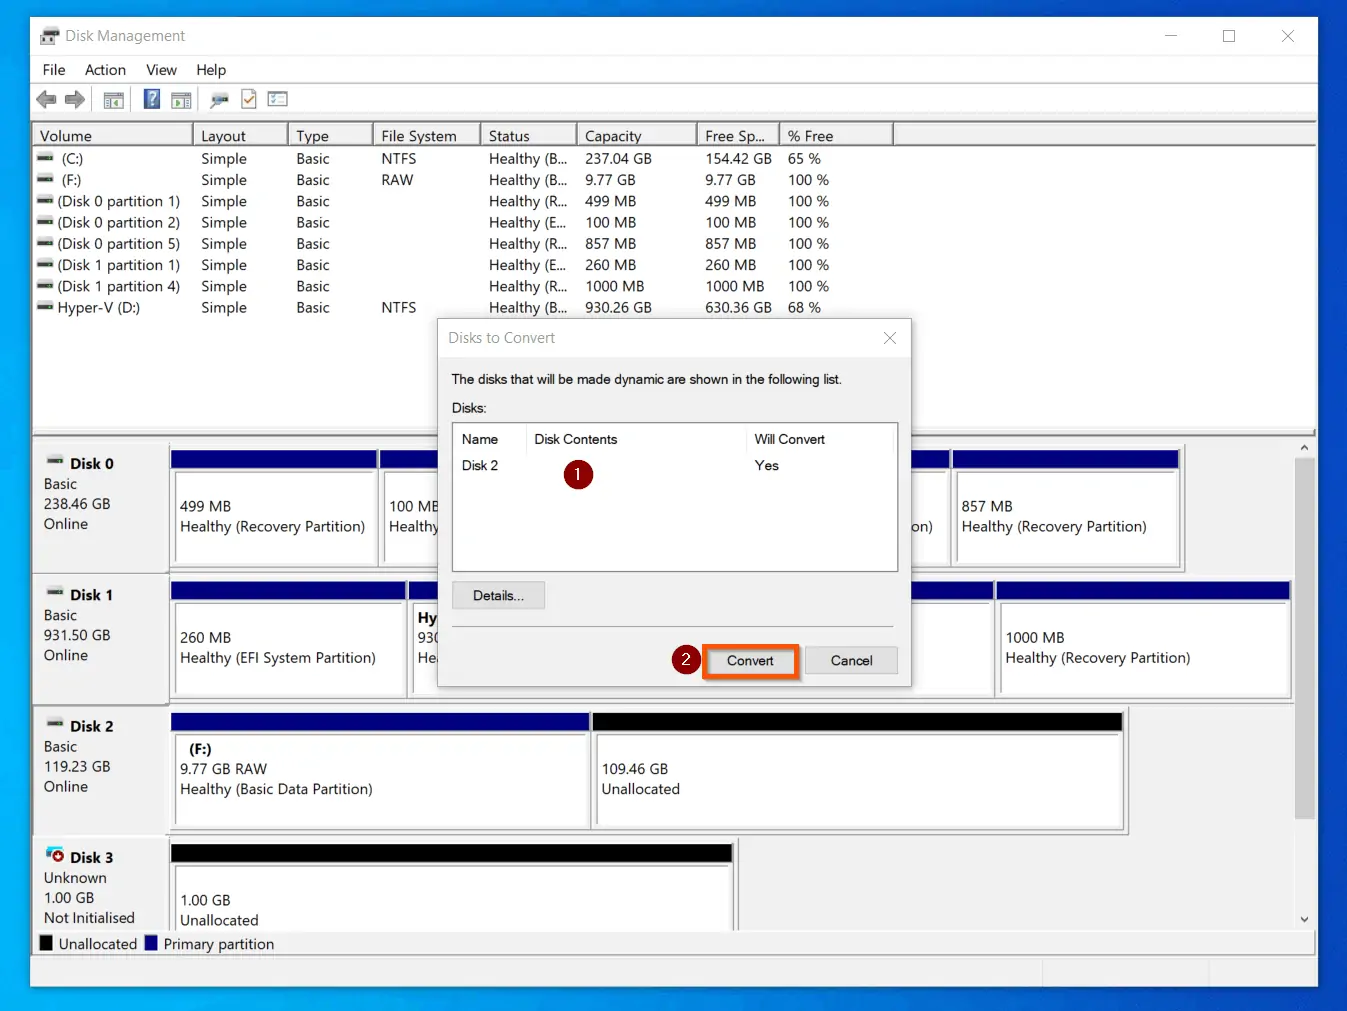
- At the Convert to Dynamic Disk pop-up, the disk you right-clicked will be checked. However, all Basic Disks in Disk Management will be listed as well – you can check any other disks you like to convert. When you finish checking all the disks you wish to convert, click OK.
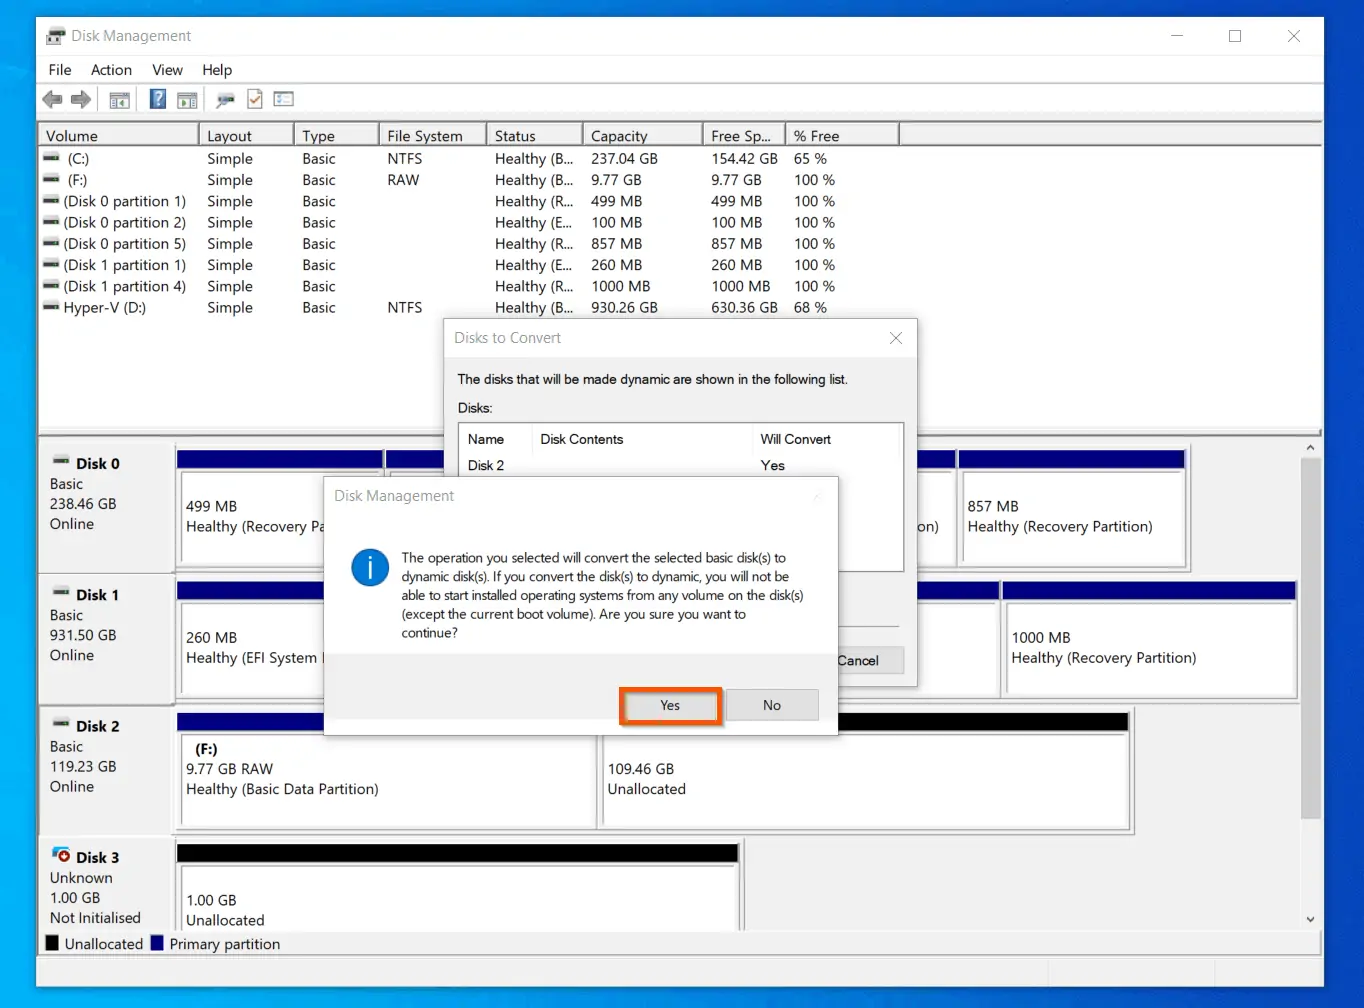
- Finally, review the disks that will be converted to Dynamic Disk and if you are happy to proceed, click Convert. You will receive a warning message – see the second screenshot below. If you still want to convert the disk, click Yes.
If the Operating System is installed on the disk, DO NOT convert it as you may NOT be able to boot the computer after you convert the disk to a Dynamic Disk.
Take a Disk Offline or Online with Disk Management
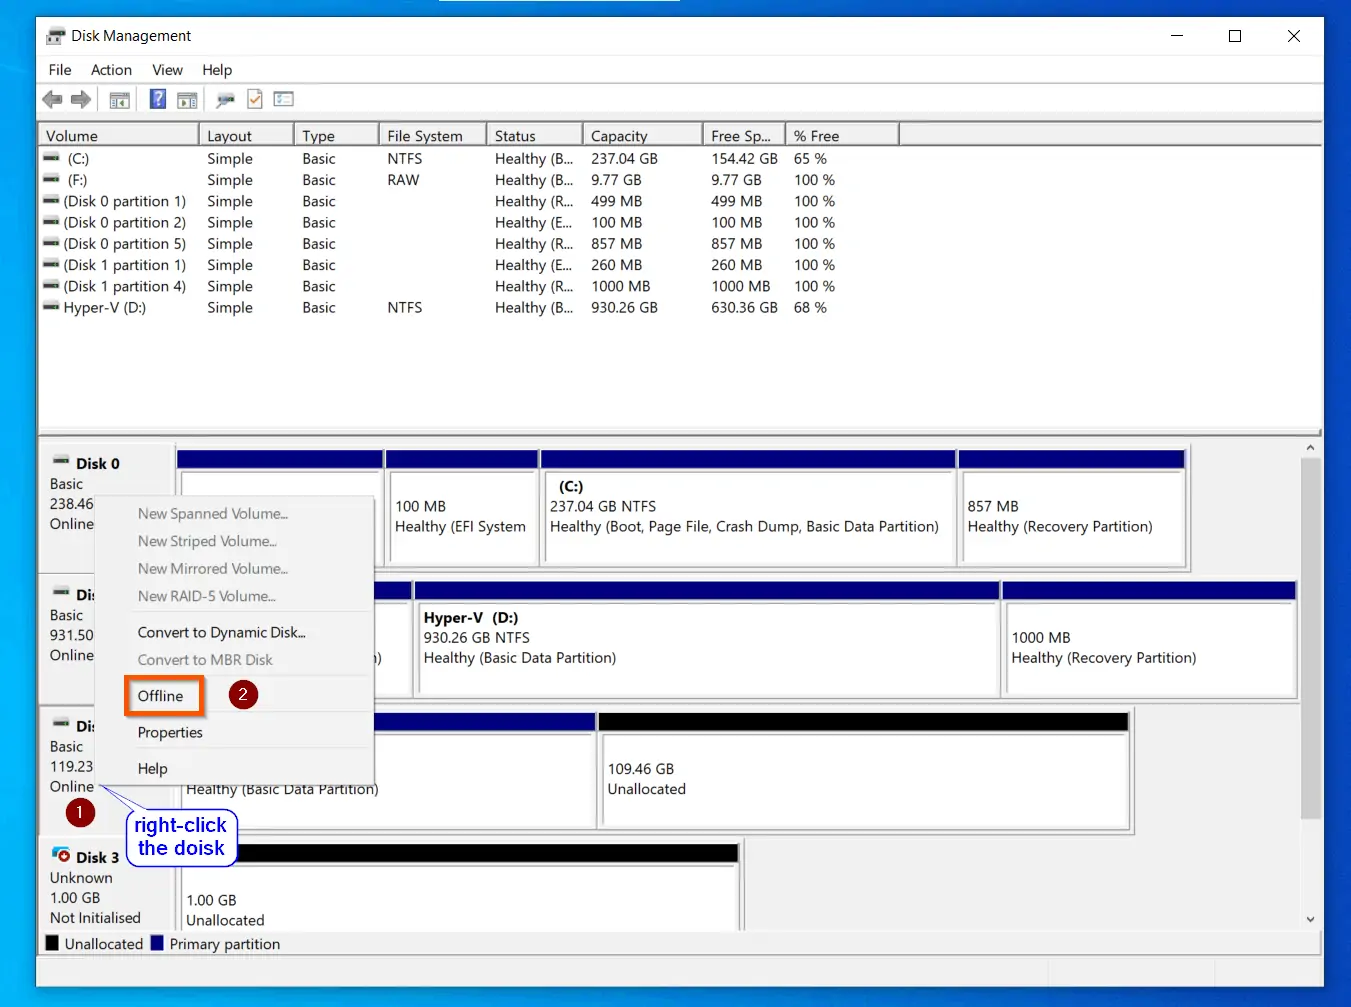
If a disk that is Online, Offline, the disk will no longer be available for use in Disk Management. I cannot think of any real-life scenario that you would need to take a disk offline.
However, if you need to take a disk offline, right-click the disk and select Offline. The disk goes offline immediately, without any further confirmation.
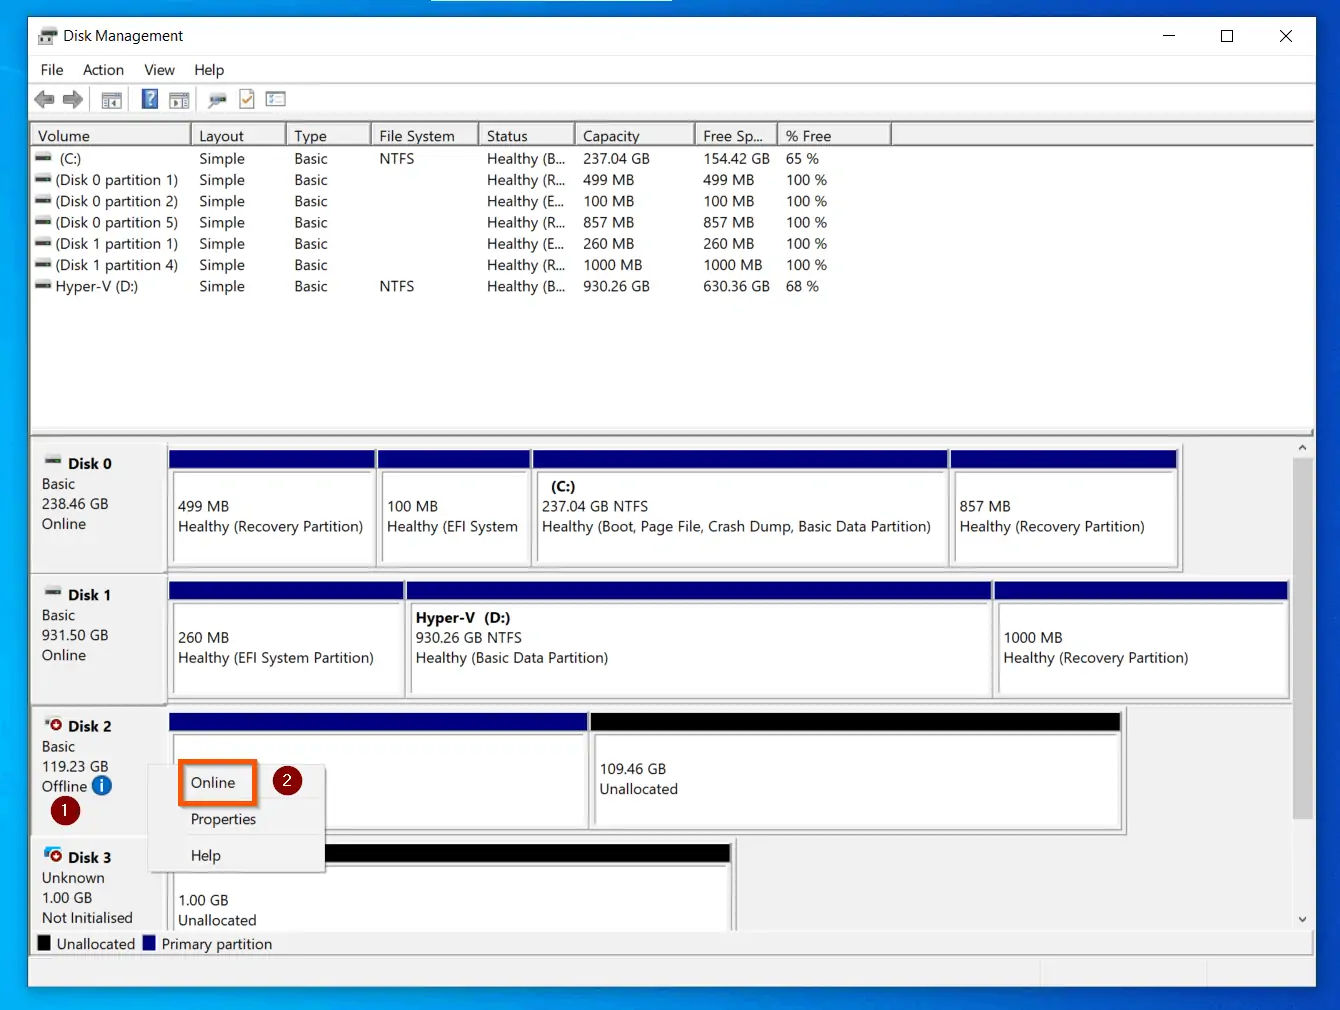
On the other hand, to bring the disk online, right-click it, then click Online. It comes back online immediately.
Format a Volume with Disk Management
After creating a volume, you MUST format it before you can use it to save files. When you create a volume, Disk Management offers you the option to format the volume.
If you did not format the volume when you created it, follow the steps below to format the volume:
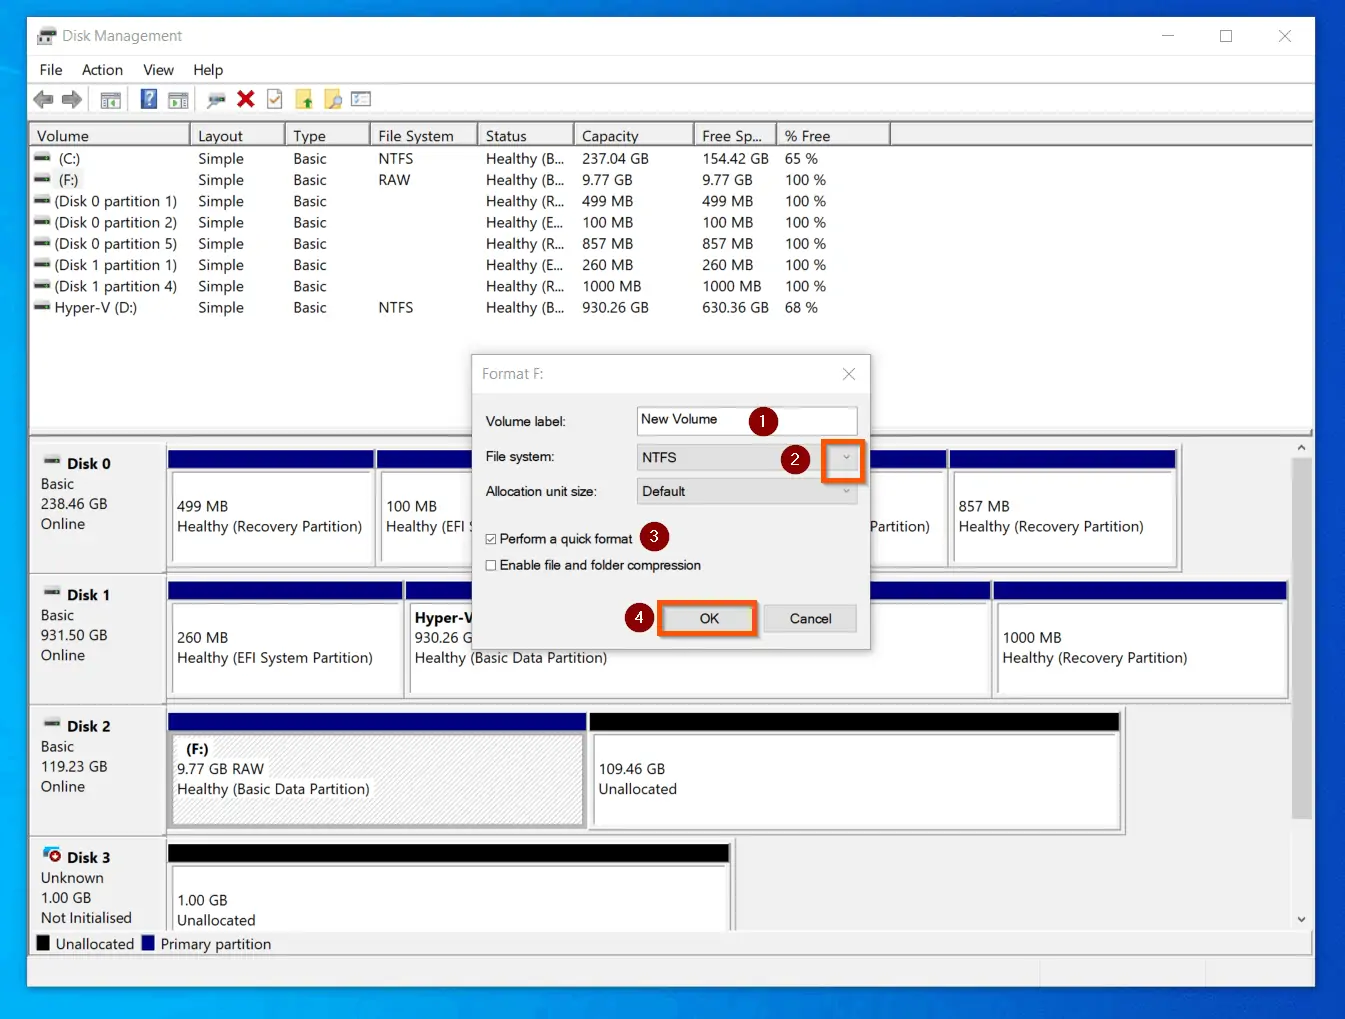
- Right-click the volume and select Format…
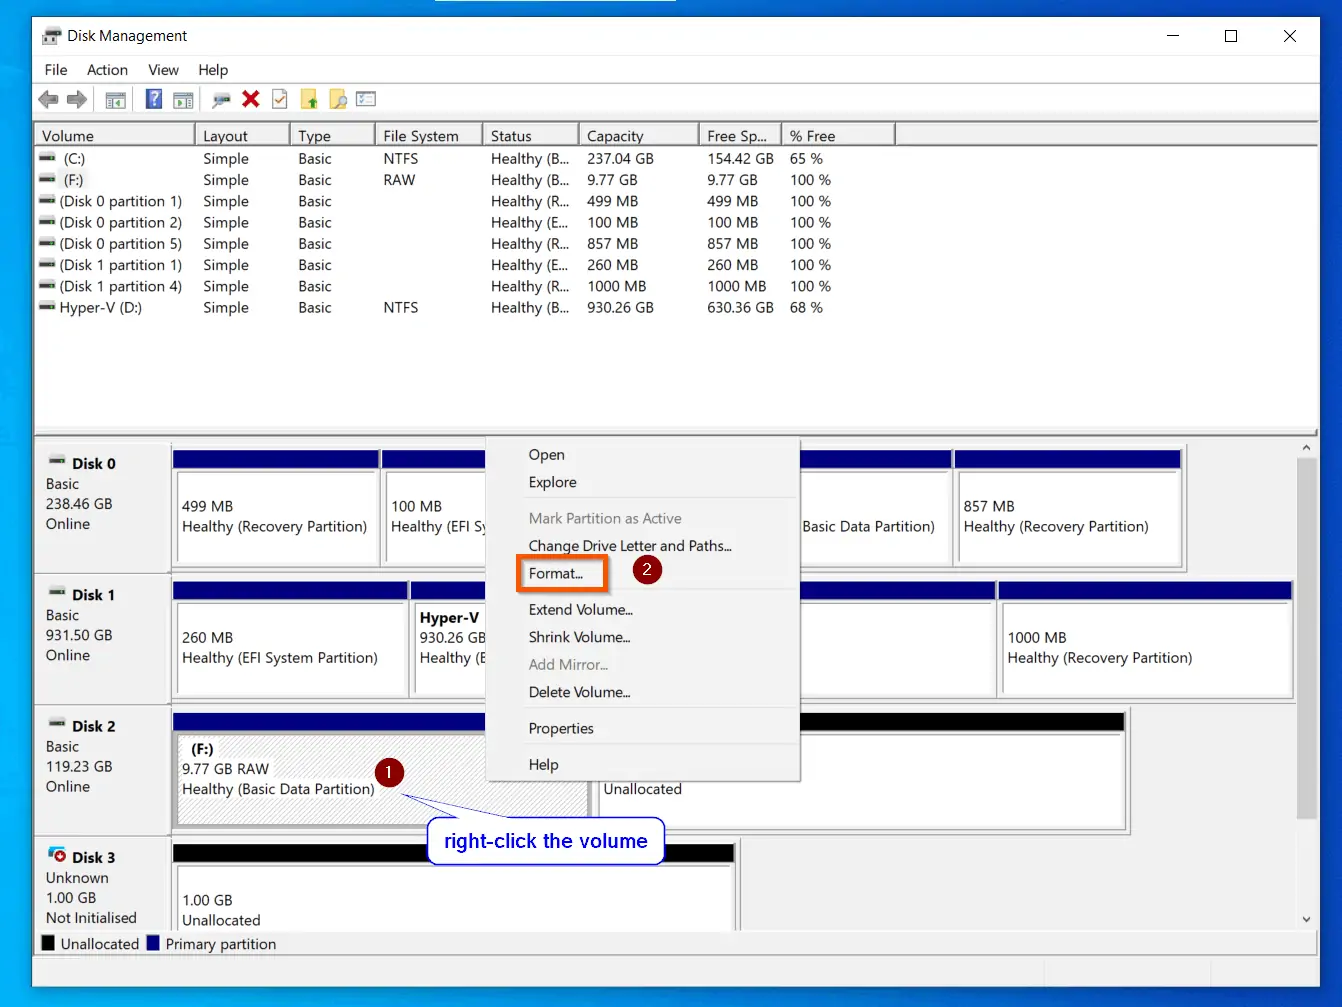
- Then, on the Format pop-up, (1) change volume name – optional; (2) click the File System drop-down, and select NTFS (recommended); (3) leave the Perform a quick format checkbox checked; (4) finally, click OK.
Managing Disks with DISKPART Command
This section will be more applicable to Windows tech enthusiasts. However, this does not mean that it will be useless to non-tech readers.
Every reader will still be able to follow the steps in this section because I simplified the commands with detailed step-by-step explanations.
Moving on, in this section, you will learn how to initialize a new drive with DISKPART (link explains the DISKPART command – opens in a new browser tab).
The section also covers how to Shrink, Extend and create new volumes with DISKPART. Furthermore, you will learn how to delete volumes, change drive letters and convert a basic disk to a dynamic disk – all with the DISKPART command.
Additionally, in this section, you will learn how to take a disk offline or online. Finally, the section ends with a sub-section on how to format a disk with DISKPART.
Un-Initialize a Disk wWith DISKPART
If you already Initialized a disk and want to UnInitialize the disk, you can perform this task with DISKPART. Unlike the remaining tasks in this section – which you can also perform in Disk Management MMC – you can only UnInitialize a disk with DISKPART or PowerShell.
When you unInitialize a disk, all volumes in the disk will be deleted. This means that ALL data in the disk will be lost and maybe unrecoverable. DO NOT perform the steps below UNLESS you are happy to lose the data on the disk!
If you are happy to lose the data in the disk, follow the steps below to unInitialize:
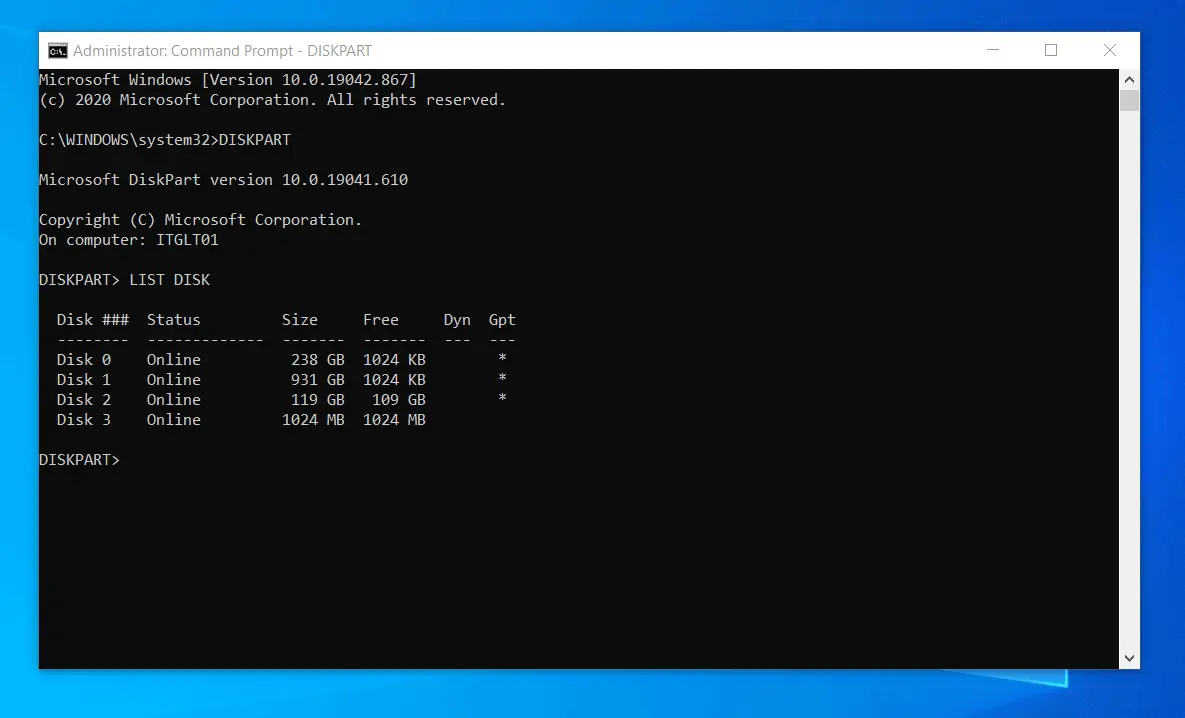
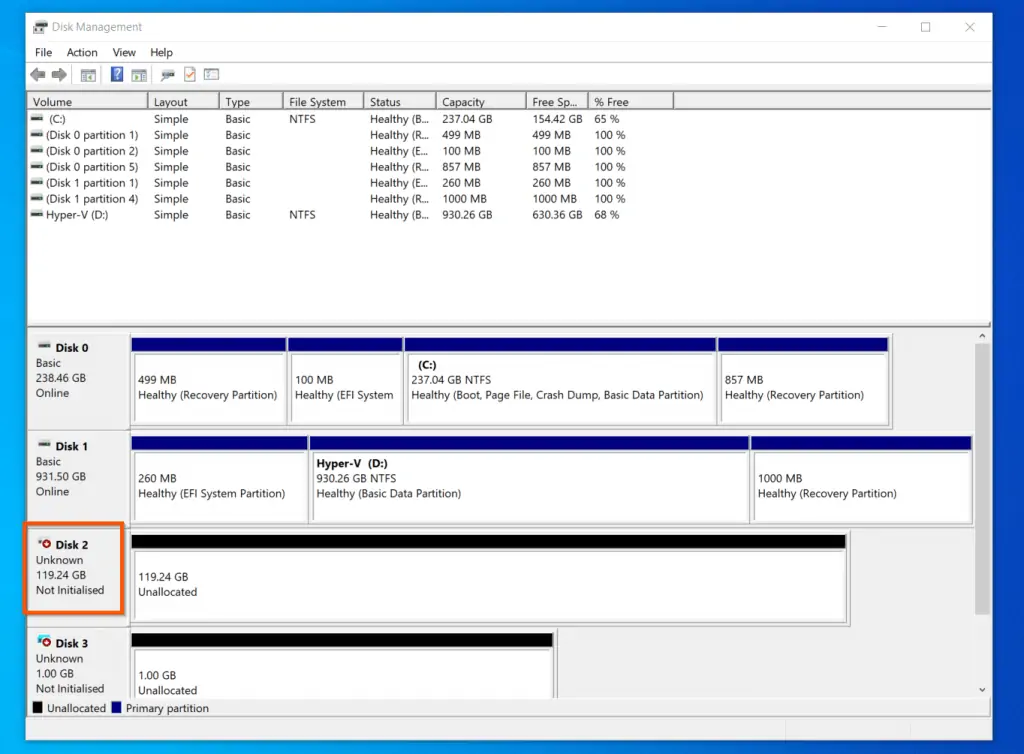
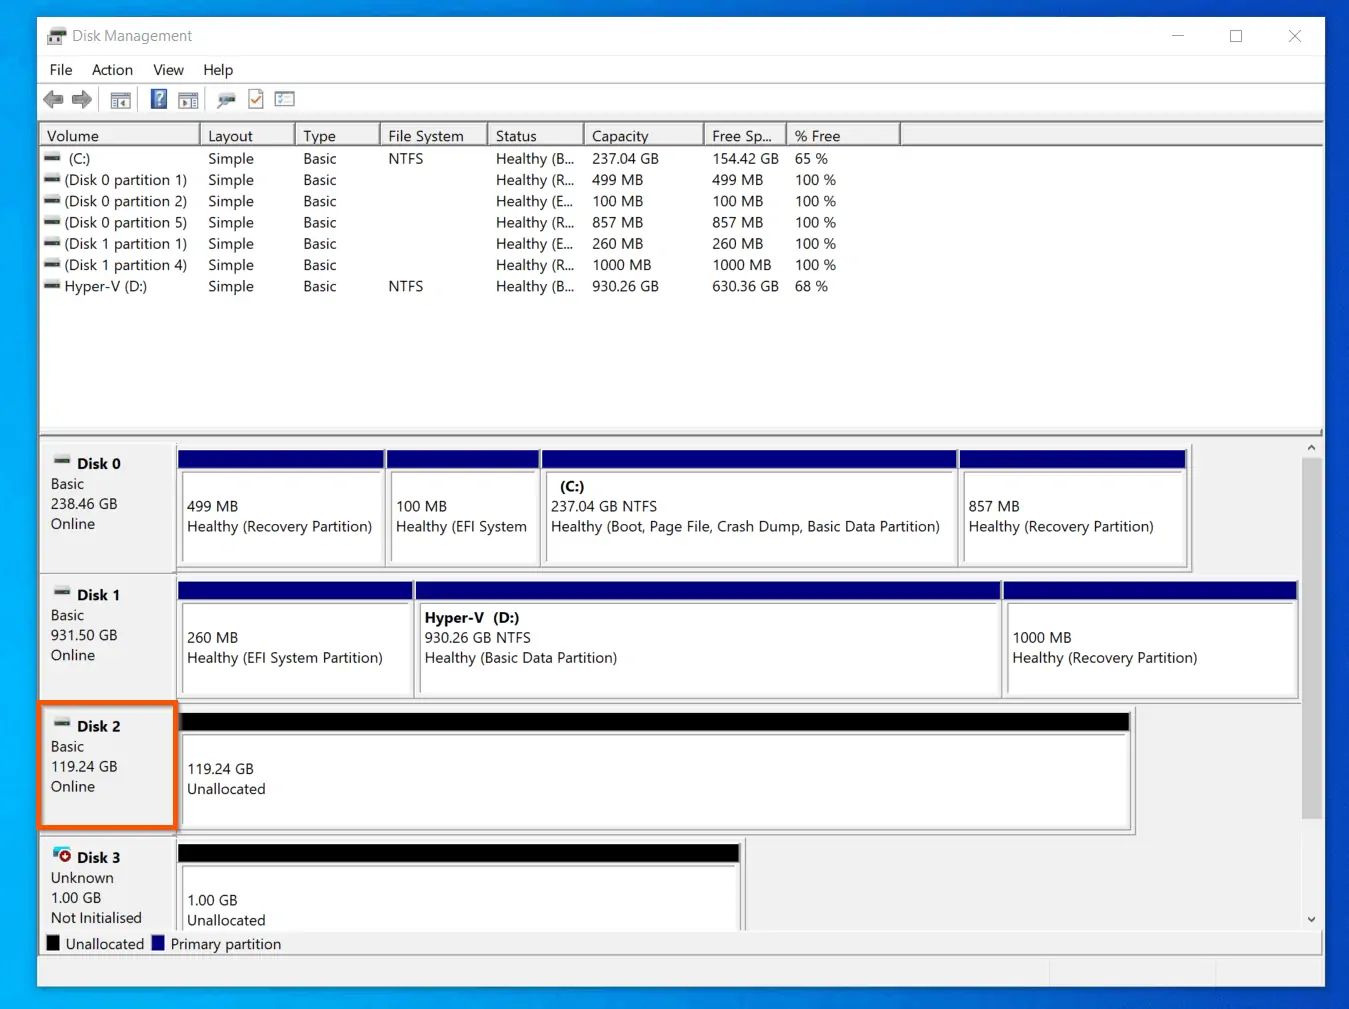
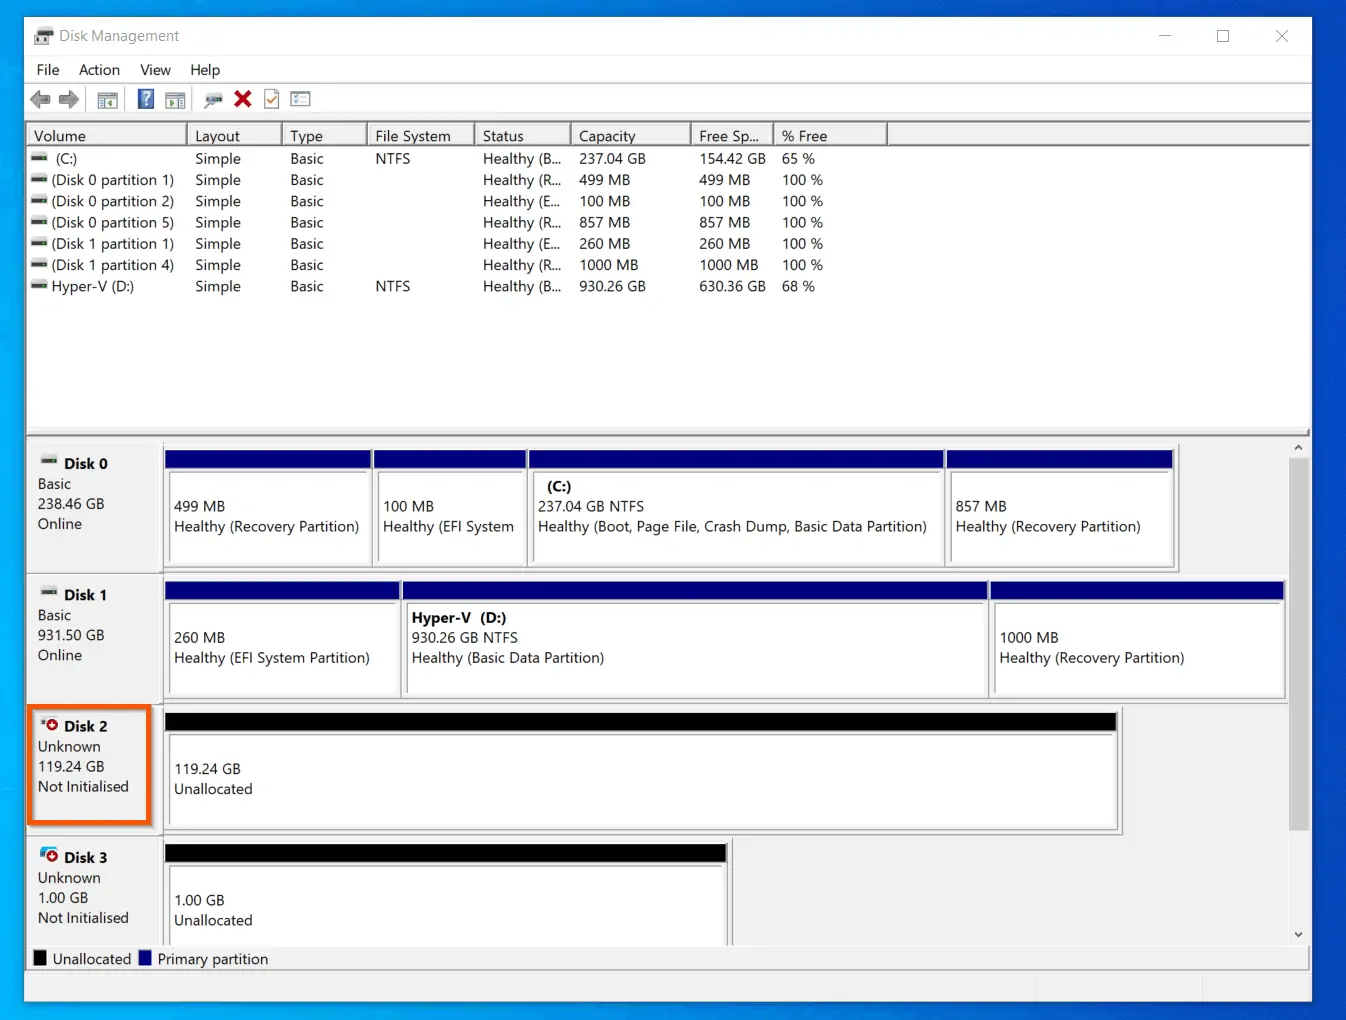
- Open Windows 10 Disk Management and get the disk number for the disk you wish to UnInitialize. In this example, I will unInitialize Disk 2.
- Next, enter cmd in the Windows 10 search box. Then, from the search results, right-click Command Prompt and select Run as administrator.

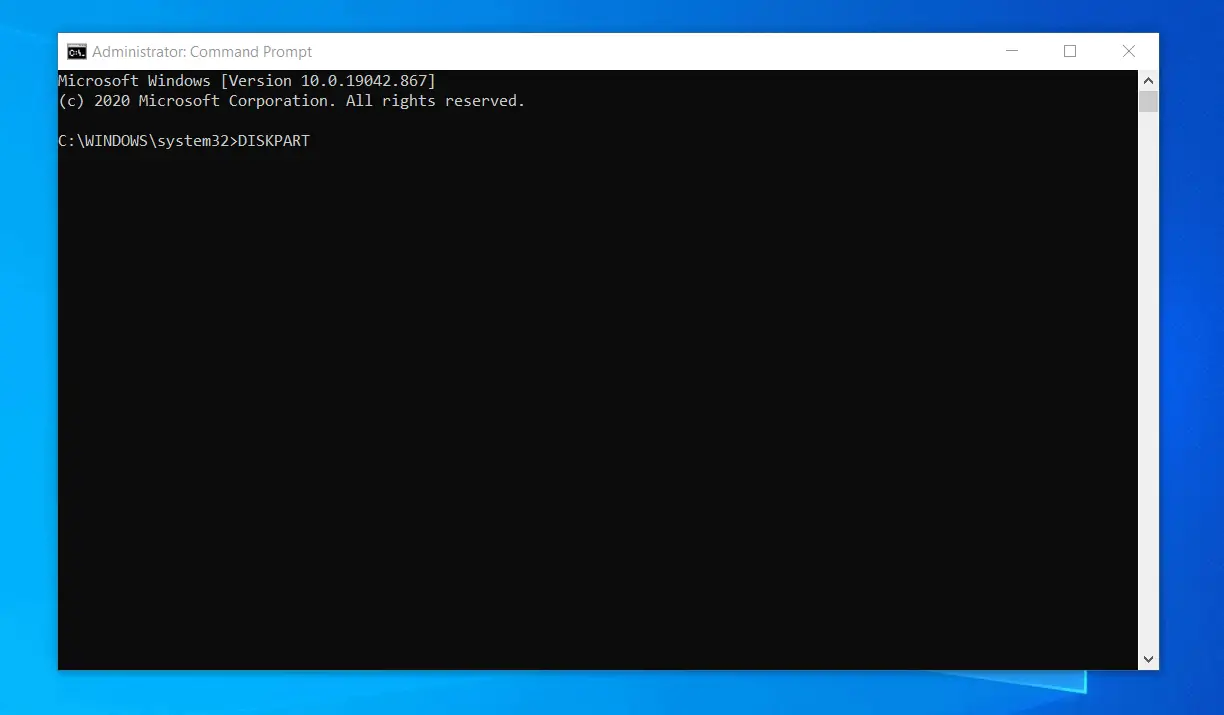
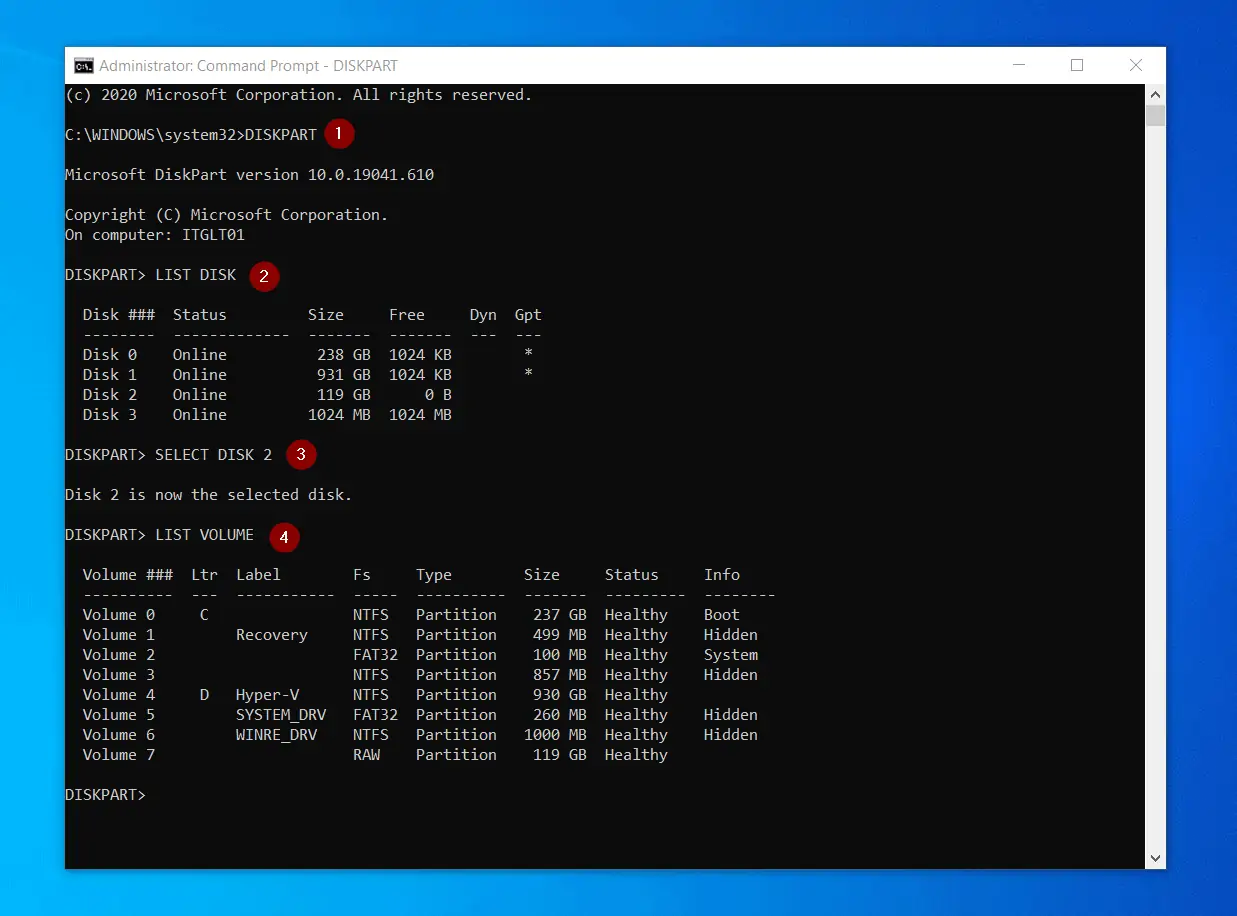
- On the command prompt, enter the command below and press the ENTER key on your keyboard. The DISKPART command interface will load within Command Prompt.
DISKPART
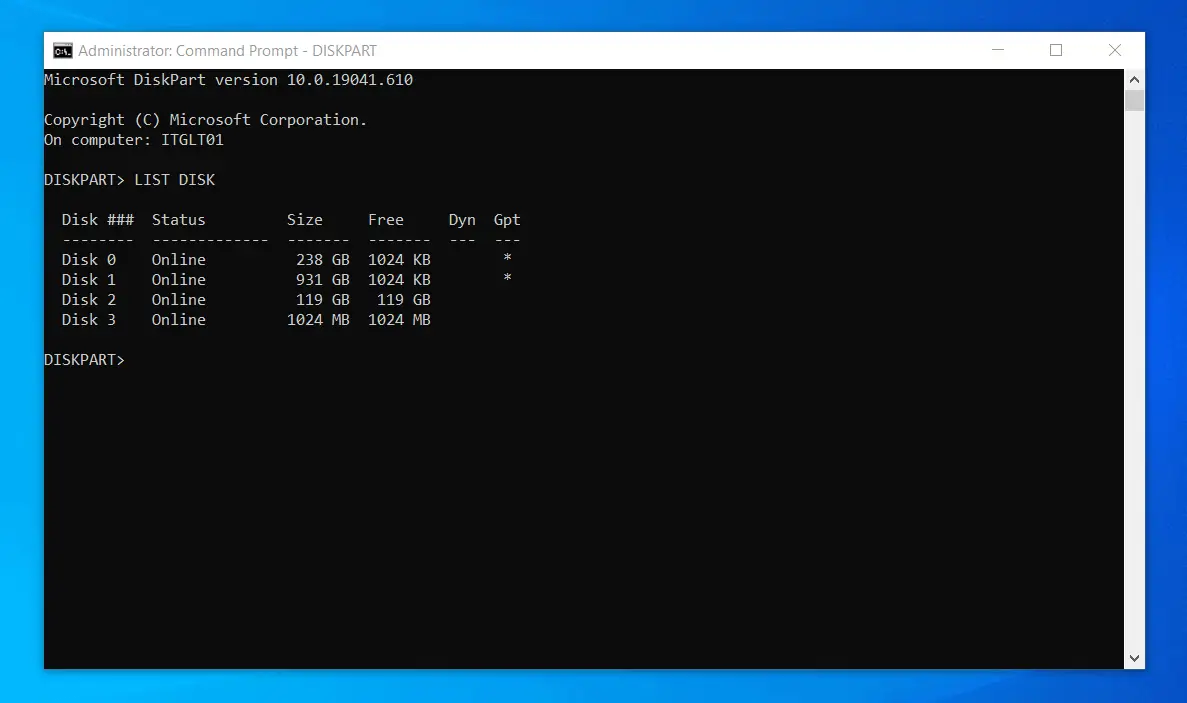
- Then, on the DISKPART prompt, enter the command below. Then, press enter key. This command lists all the disks on the computer. The next step is to select the disk you want to work on.
LIST DISK
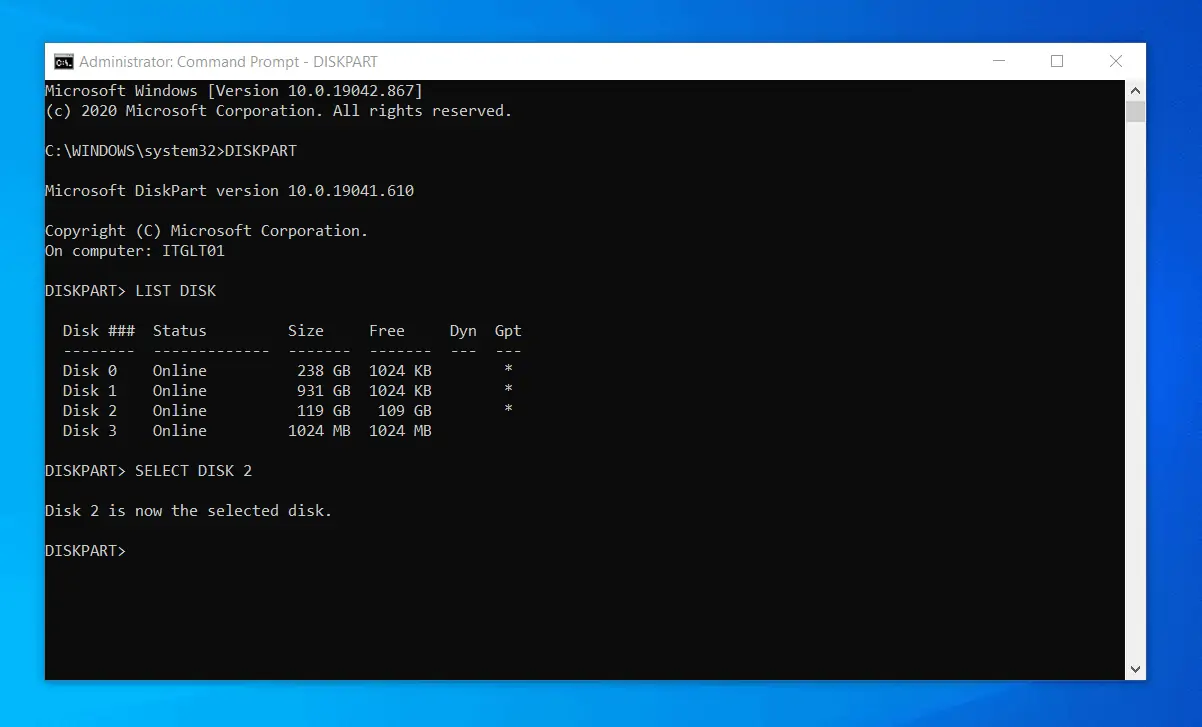
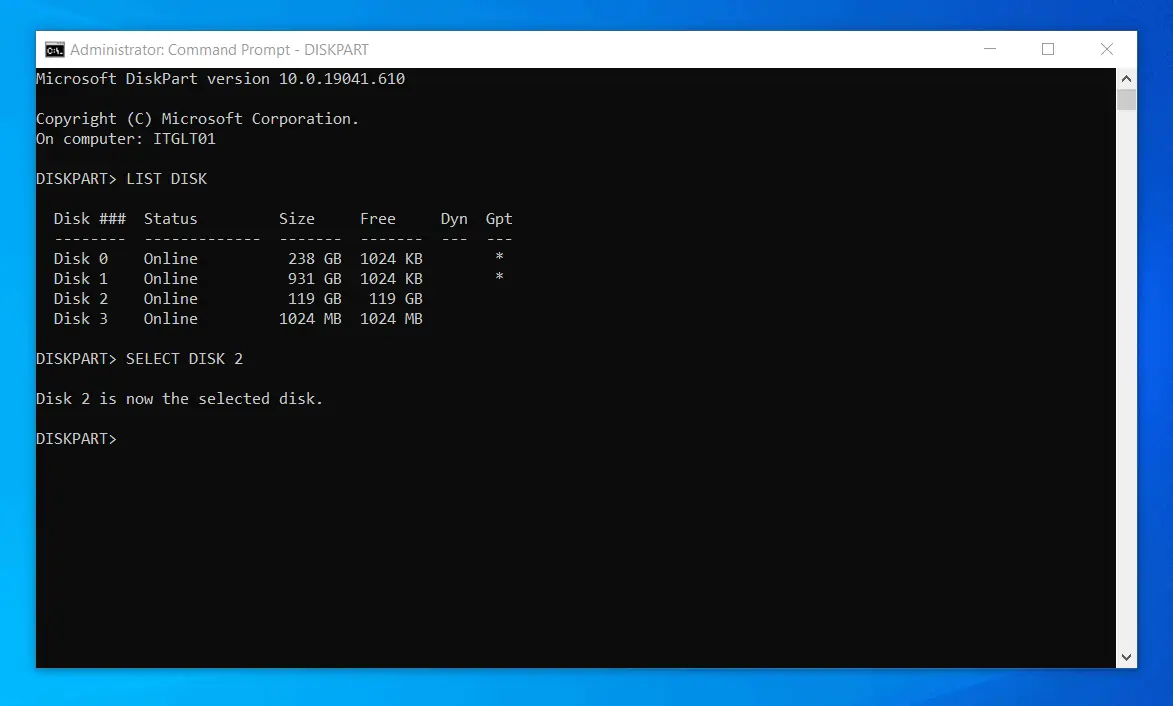
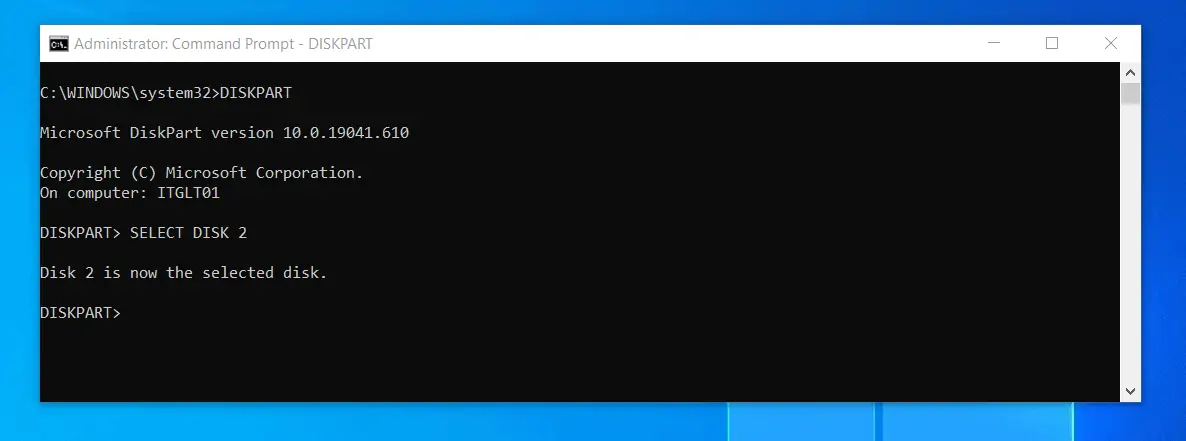
- To select a disk, enter the command below and press enter. Replace my disk number (2) with the disk number you noted in step 1 above.
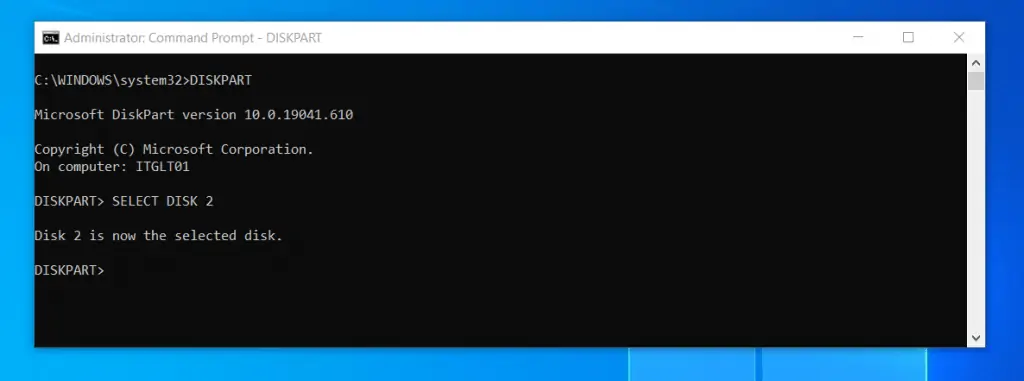
SELECT DISK 2
- Finally, to unInitialize the disk and destroy the data in the disk, enter this command into DISKPART prompt. Then, press the enter key on your keyboard.
CLEAN
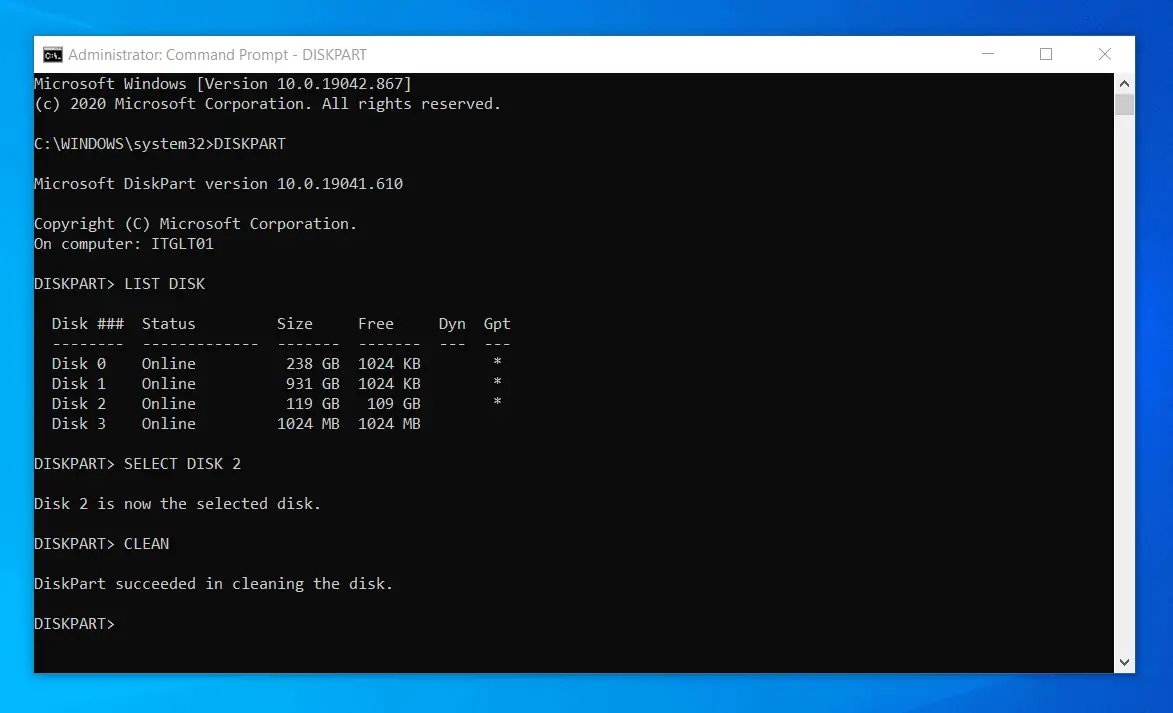
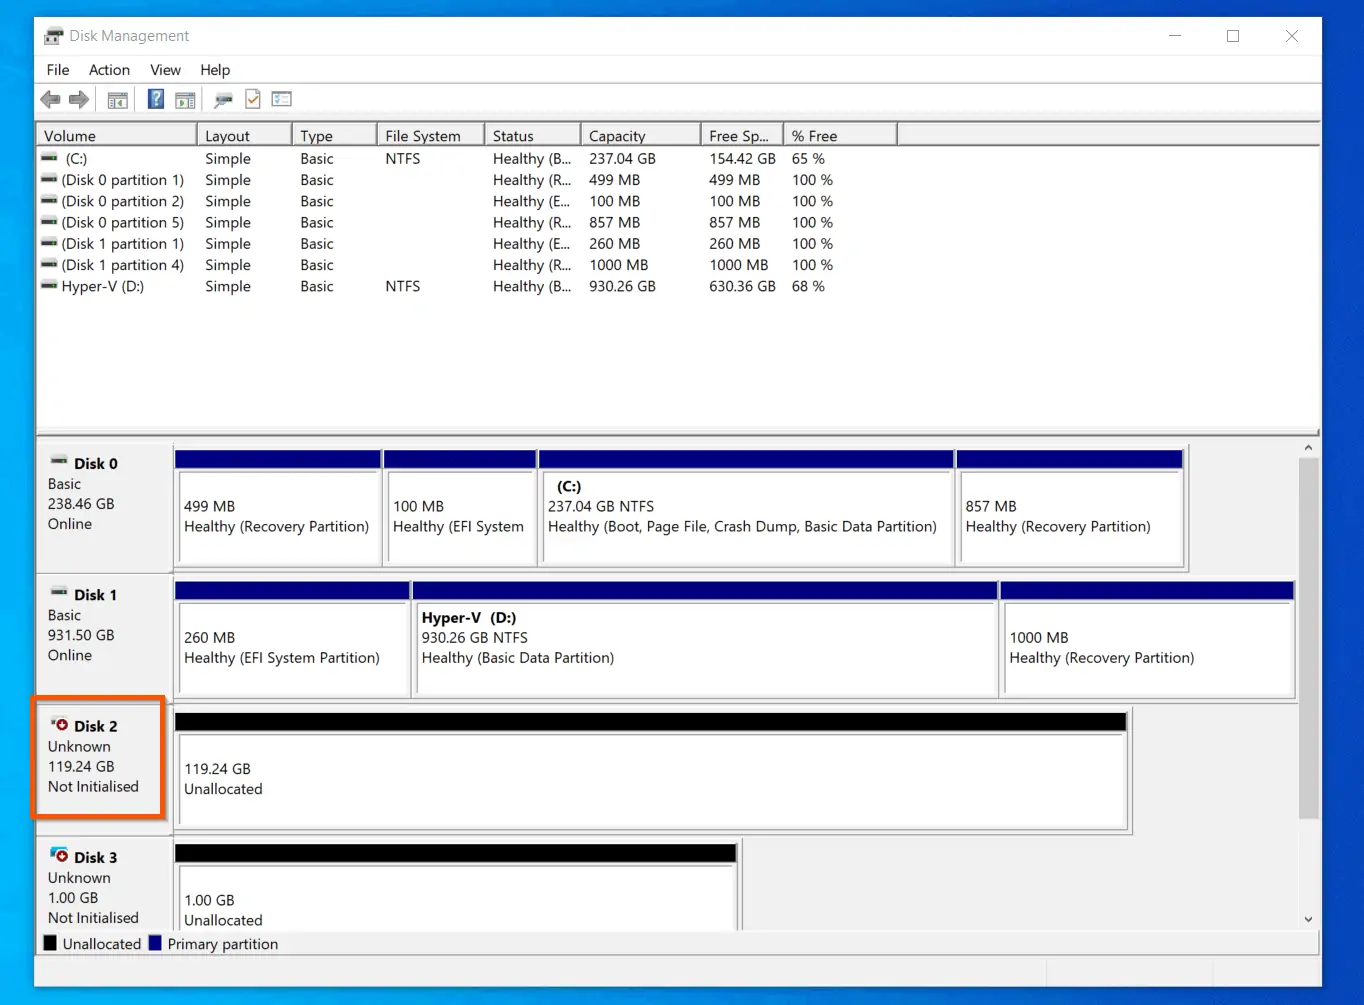
That simple command does the magic. Now, if you open Windows 10 Disk Management, the disk will be displayed as “Unknown, Not Initialized“!
Also, all volumes in the disk will be deleted and the whole space will now appear as “Unallocated“.
Initialize a New Drive with DISKPART
When you insert a new drive to your computer, Windows 10 Disk Management may display the disk as
When you insert a new drive to your computer, Windows 10 Disk Management may display the disk as “Unknown, Not Initialized“. The only way to change the “Unknown, Not Initialized” status is to Initialize the drive.
As we saw in the Managing Disks With Disk Management MMC section, you can initialize a disk with Disk Management MMC. However, in this section, I will teach you how to Initialize a new drive with DISKPART.
To initialize a disk and remove the “Unknown, Not Initialized” status, follow the steps below:
- Open Command Prompt as administrator and, enter the command below – then, press the enter key:
DISKPART
- Then, on the DISKPART prompt, enter the list disk command and press enter key. Note the disk number of the disk you want to initialize. In this example, I want to initialize Disk 2.
LIST DISK
- Next, to select the disk you want to initialize, enter the command below – change my disk number (2) to your disk number. Then, press enter key.
SELECT DISK 2
- The final command that initiliazes the disk is:
CONVERT MBR
Enter the above command into the DISKPART promt and press enter key.
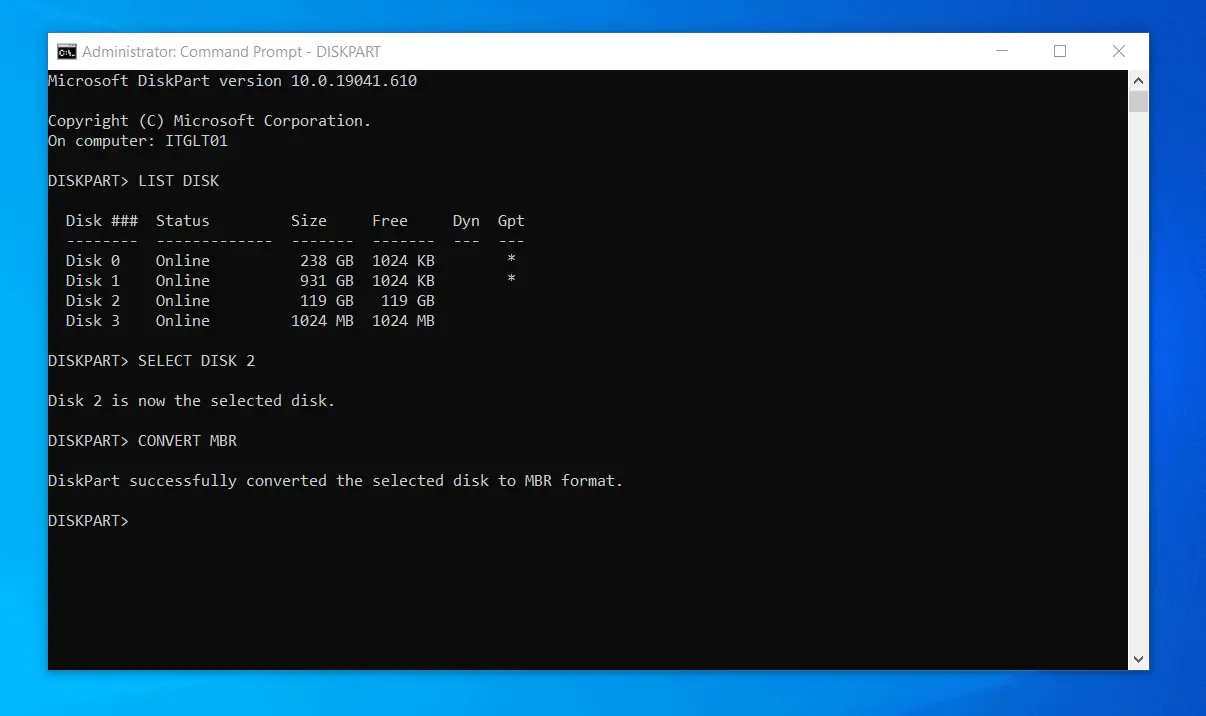
When the last command is completed, if you open Windows 10 Disk Management MMC, “Unknown, Not Initialized” will be gone – the disk is now initialized!
Create a Volume with DISKPART
To create a new volume in a disk with DISKPART, follow the steps below:
- Open command prompt as administrator. Then, enter DISKPART into the command prompt and press enter key on your keyboard.
- When DISKPART prompt opens, enter the following commands in order:
LIST DISK
SELECT DISK 2
The first command lists all disks on the computer. Then, the second command selects the disk specified by the number 2. Change 2 to the disk you want to create the volume on.
- Finally, to create a Simple volume using the whole available space on the drive, enter the command below. Then, press the enter key:
CREATE PARTITION PRIMARY
If you do not want to use the whole space available in the disk to create the volume, use the command format below:
CREATE PARTITION PRIMARY SIZE=[enter size here in MB]

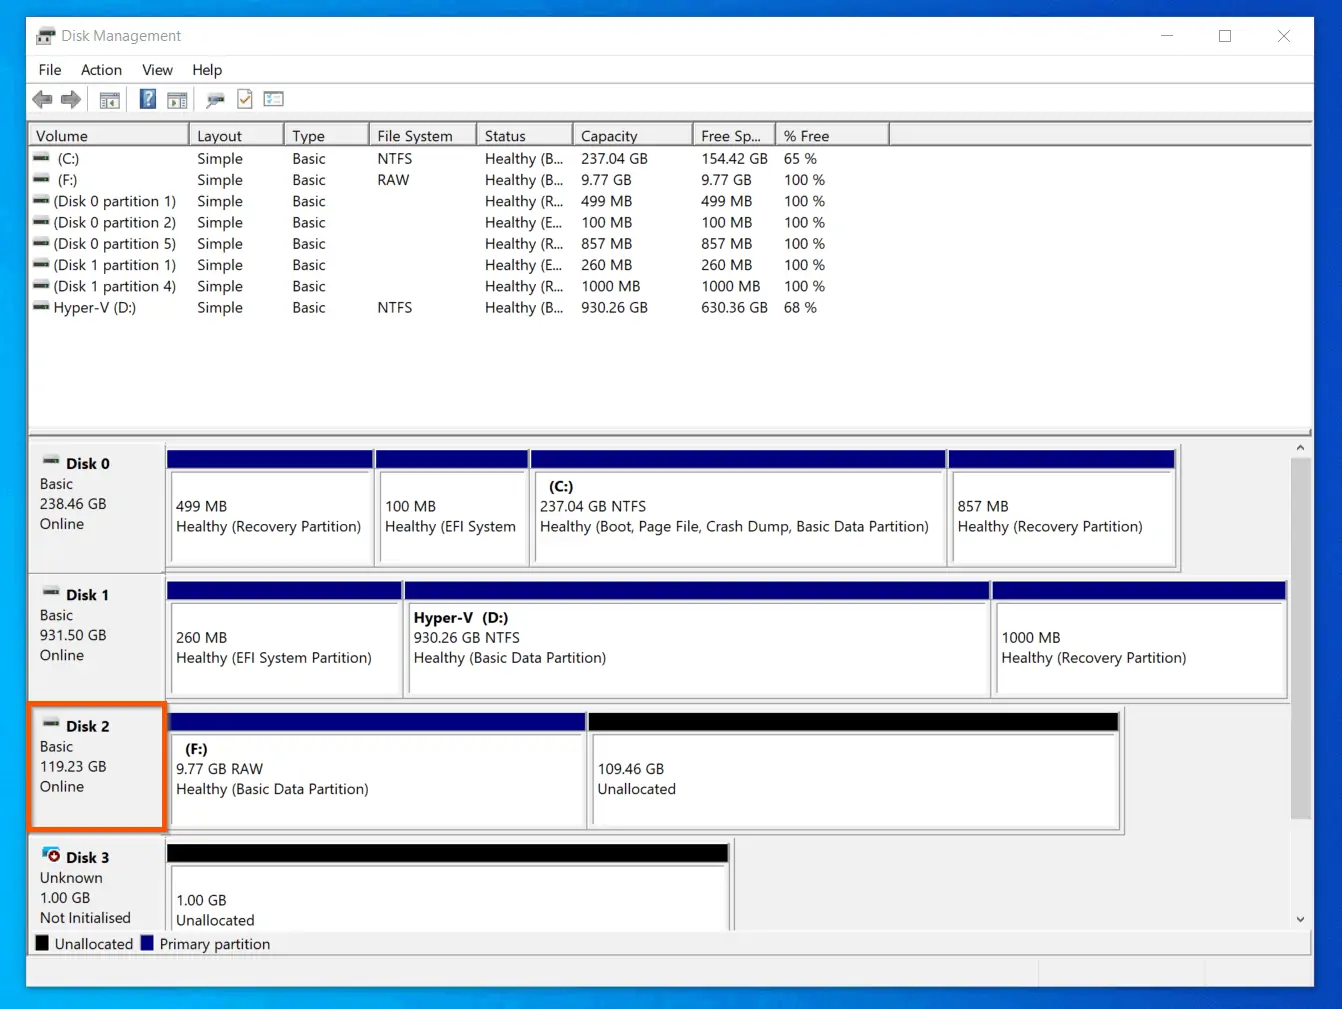
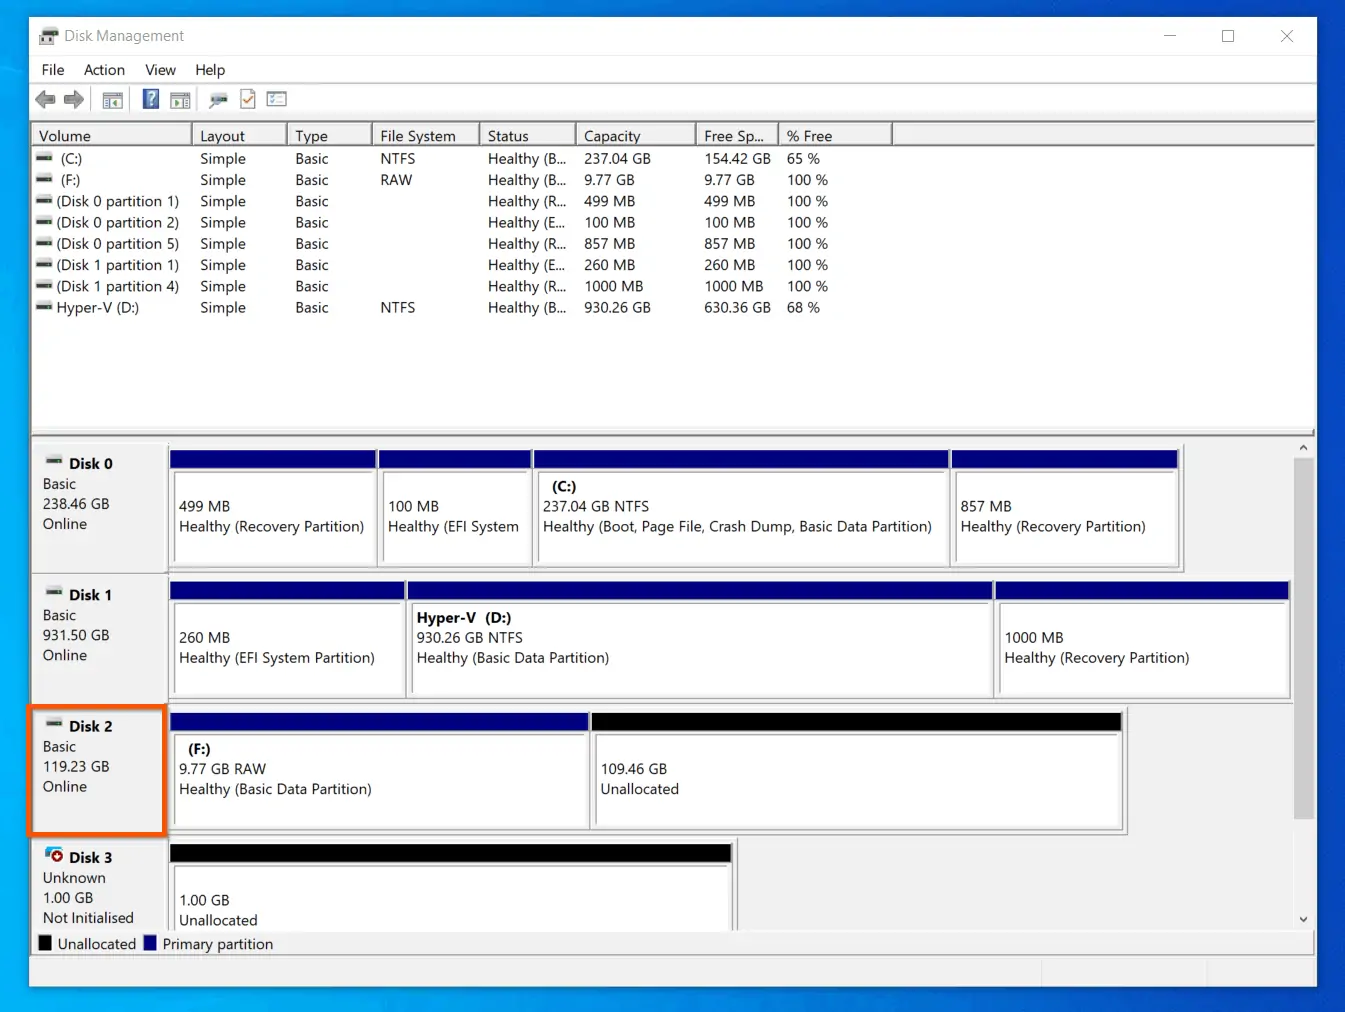
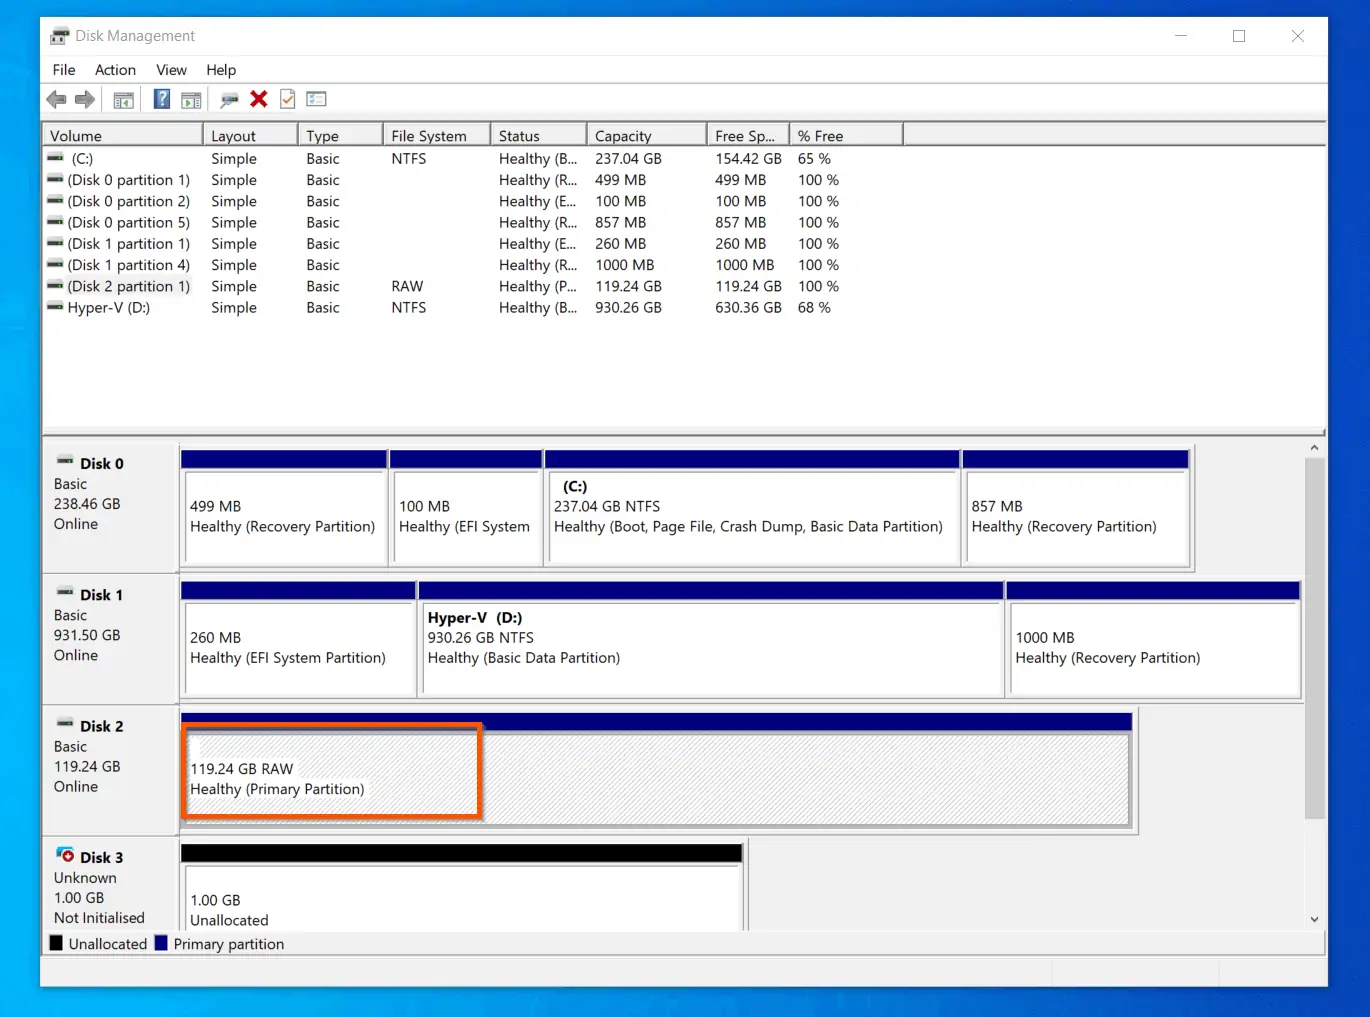
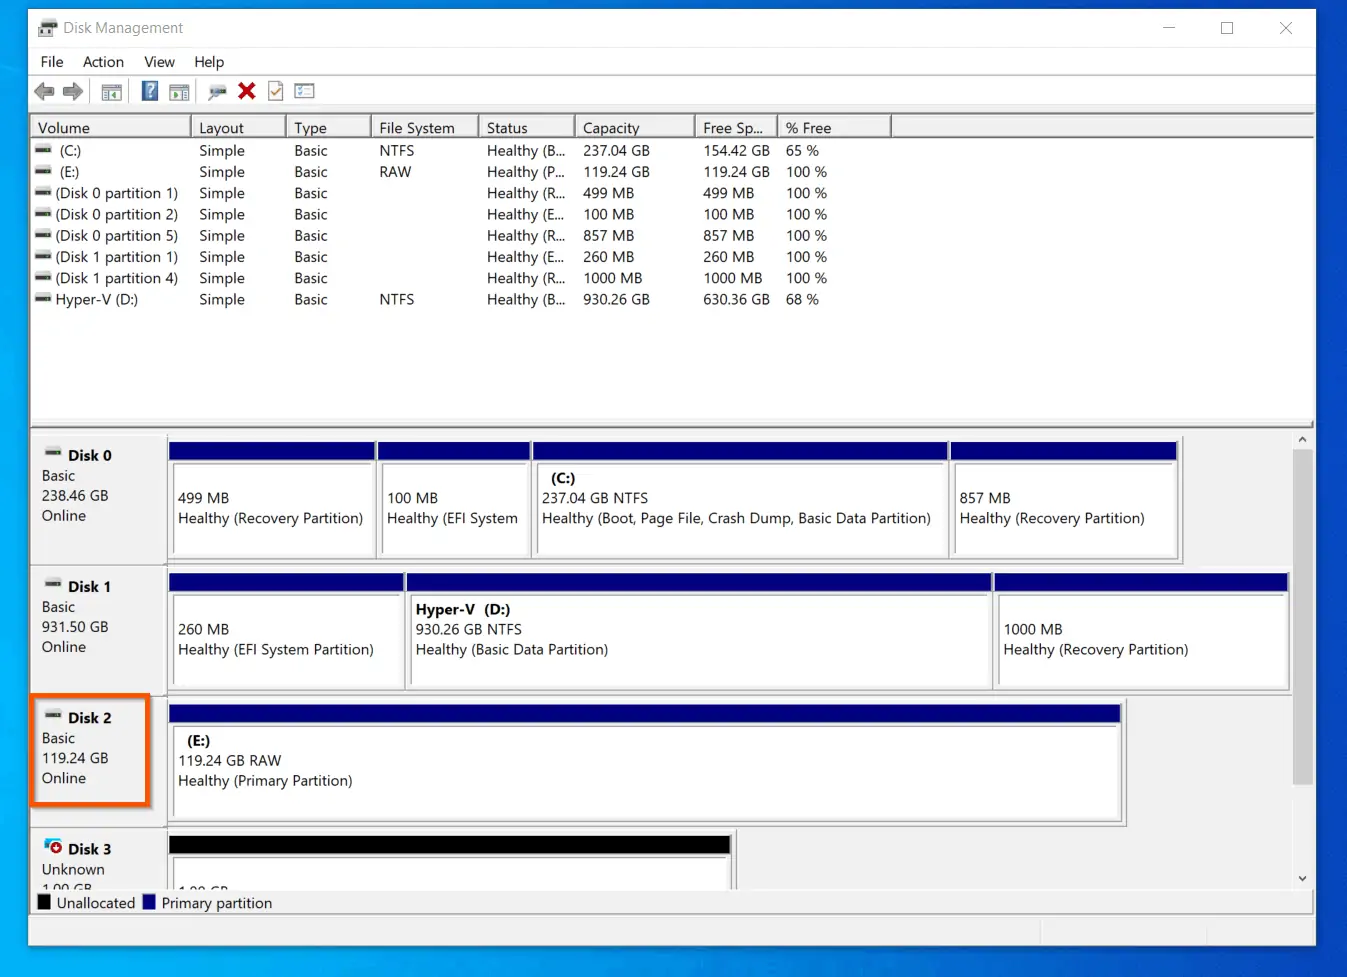
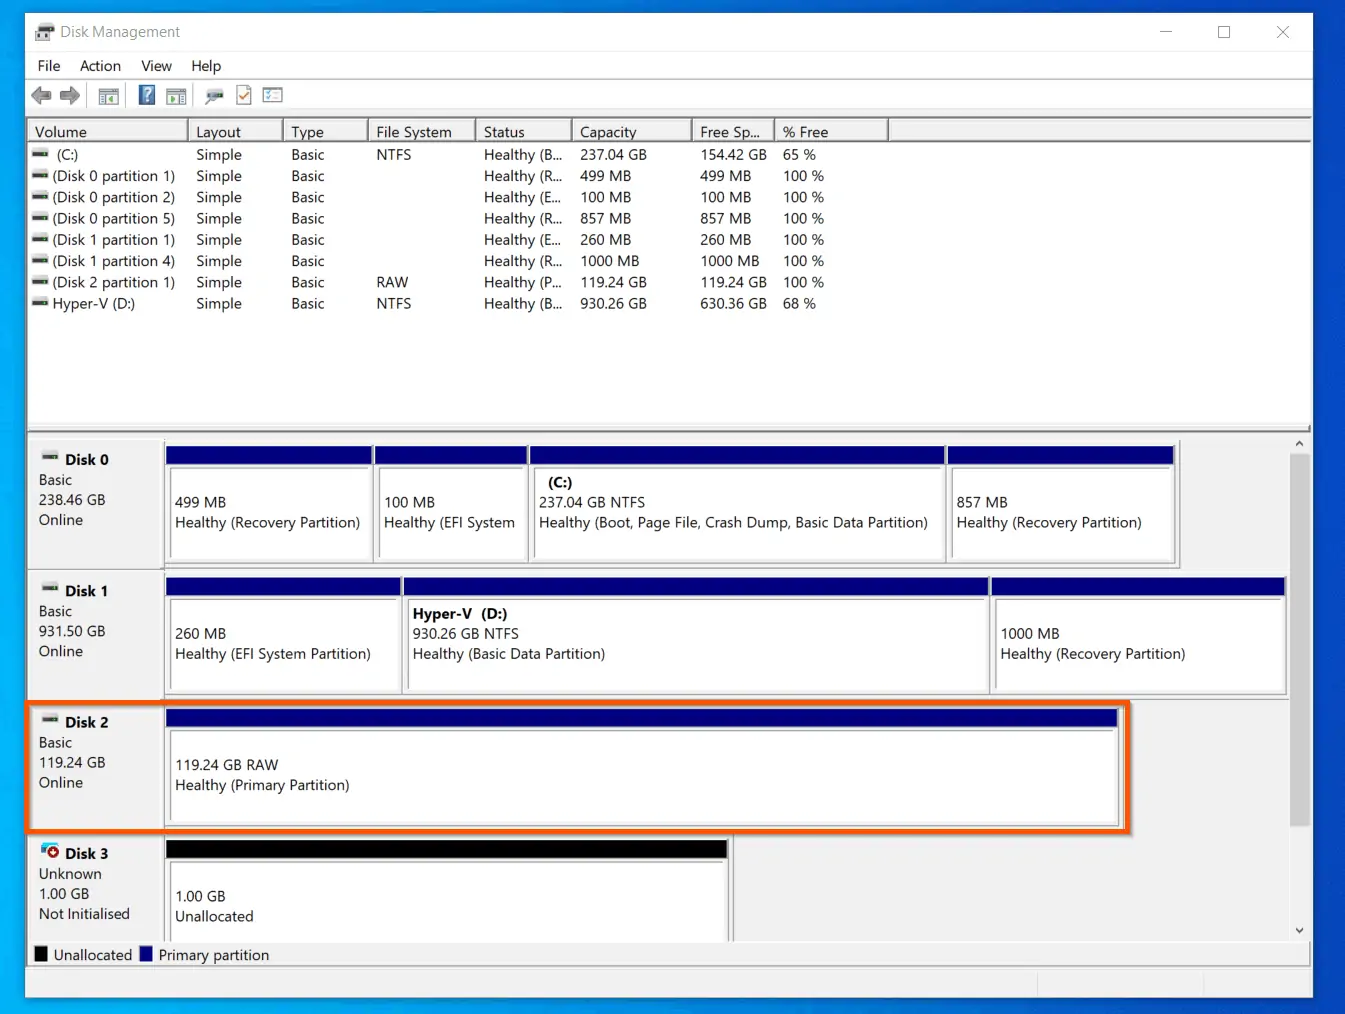
Open Disk Management to confirm that the volume was created. The drive is no longer displaying as “Unallocated” – see the highlighted portion of the screenshot below.
Shrink a Basic Volume with DISKPART
In the last sub-section, I created a volume with all the available spaces (119 GB) in the disk. In this sub-section, I will shrink the volume to free up 30 GB.
To shrink a volume in Windows 10 with DISKPART, follow the steps below:
- Open the command prompt as administrator. Then, type DISKPART and press the enter key on your keyboard.
- At the DISKPART command, type these commands and press enter – one command at a time. In the second command change 2 to your disk number.
LIST DISK
SELECT DISK 2
The first command lists available disks on the computer while the second command selects disk 2.
- Once you have selected the disk, the next step is to see all available volumes. To list all available volumes, enter this command and press enter.
LIST VOLUME
Note the volume you want to shrink. The size of the volume should help you. If you are not sure, check Windows 10 Disk Management (link opens the section on how to open DiskmManagemnet MMC – opens in a new browser tab).
In this example, I want to shrink Volume 7.
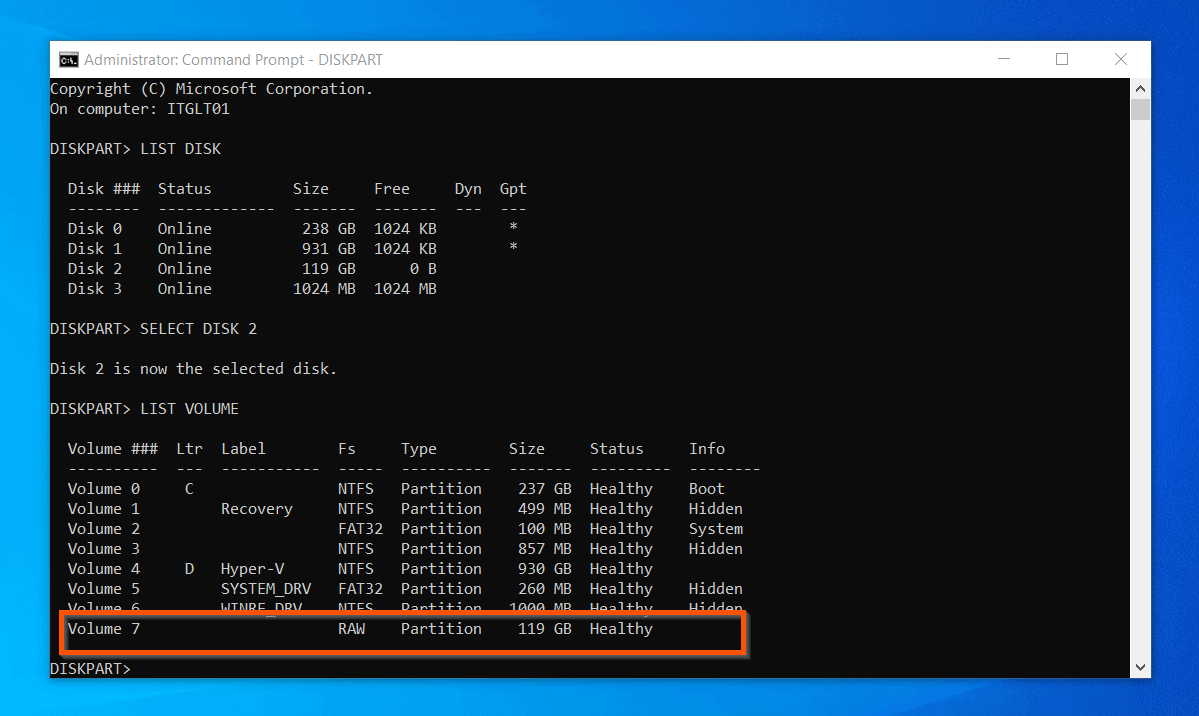
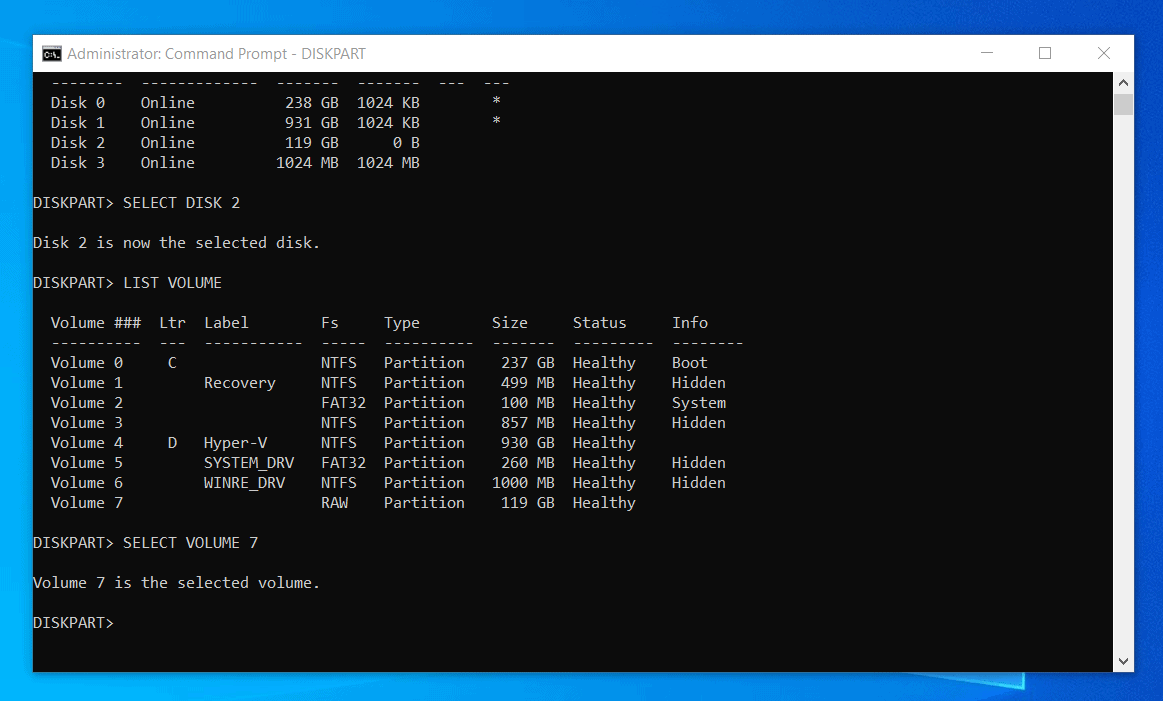
- Once your are sure of the volume you want to shrink, enter the command below, then press enter key. Change my volume number (7) to your volume number.
SELECT VOLUME 7
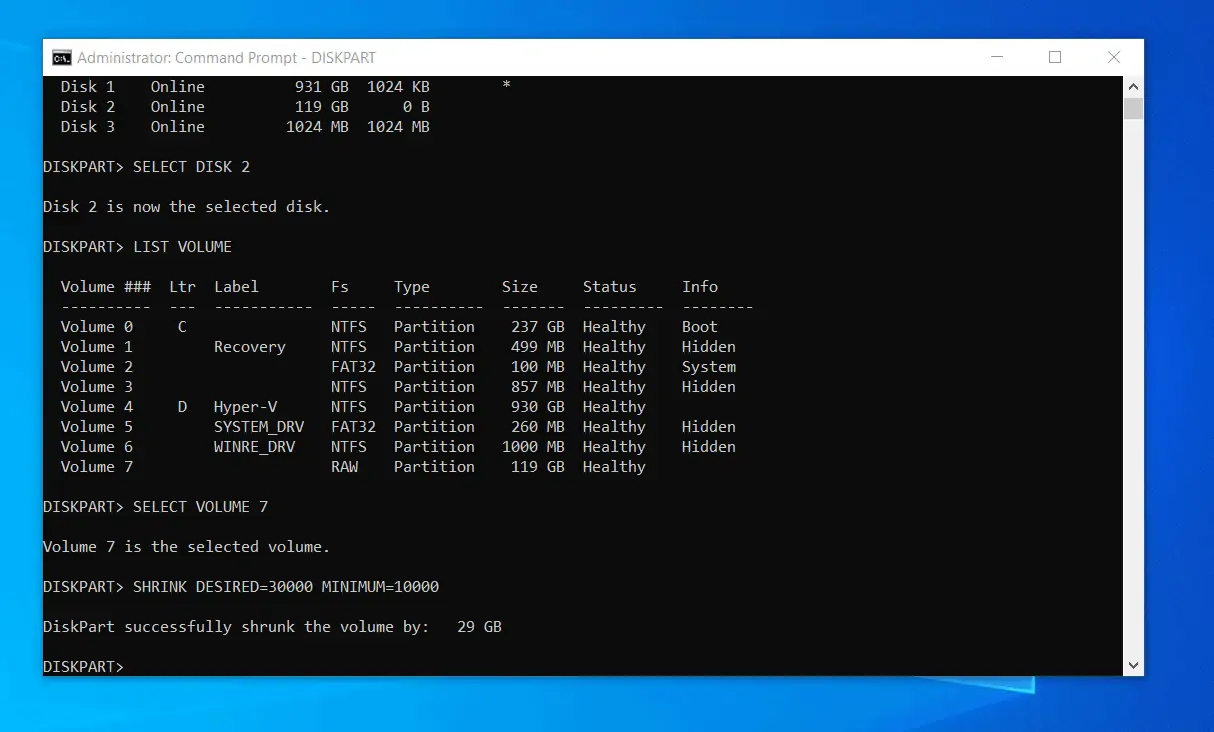
- Finally, to shrink the selected volume, enter the next command in this format and press enter.
SHRINK DESIRED=[size you want to free up in MB] MIMIMUM=[minimum size in MB, if desired is too large]
In this example, I want to shrink ye drive to free up 30 GB, so I will use the command below:
SHRINK DESIRED=30000 MINIMUM=10000
The command usually return results very quickly. You should see a confirmation “DiskPart successfully shrunk the volume by: xx GB”. Where xx is the size recovered in GB.
Extend a Basic Volume with DISKPART
In then last sub-section we shrunk a volume (recovered some free space from the volume). In this sub-section we will perform the opposite.
If you have some free, unallocated space to the right of a volume, you can add that unallocated space to extend the volume.
Follow the steps below to extend a volume With DISKPART:
- Open a command prompt as administrator. Then, enter these commands one after the other – to execute each command, press enter key.
DISKPART
LIST DISK
SELECT DISK 2
Change 2 to your disk number.
LIST VOLUME
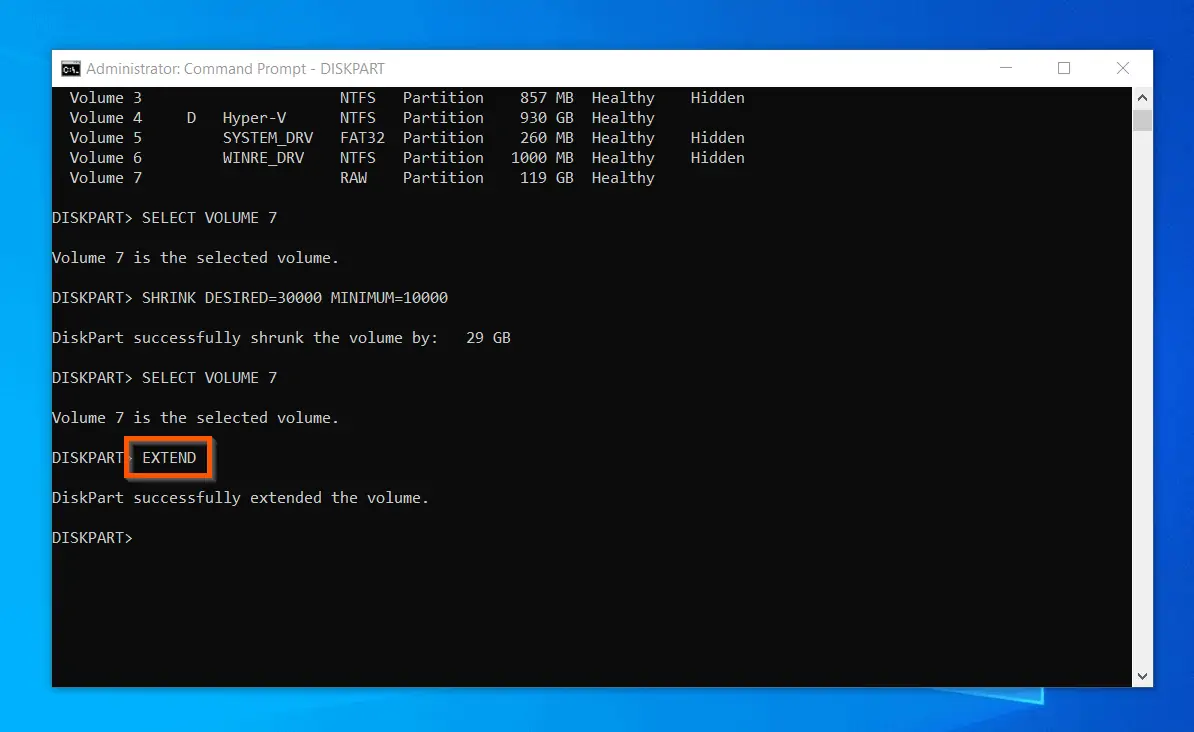
SELECT VOLUME 7
Change 7 to your volume number.
- Finally, to extend the volume, enter the command in the format below and press enter.
EXTEND SIZE=[size you want to extend the volume by in MB]
To extend the volume using all available, unallocated space to the right of the volume, use th
EXTEND
In this example, I will use the last command.
Change a Drive Letter with DISKPART
To assign a drive letter to a volume or change a drive letter, run the following commands, in order –
DISKPART
LIST DISK
SELECT DISK 2
Change 2 to your disk number.
LIST VOLUME
SELECT VOLUME 7
Change 7 to your volume number.
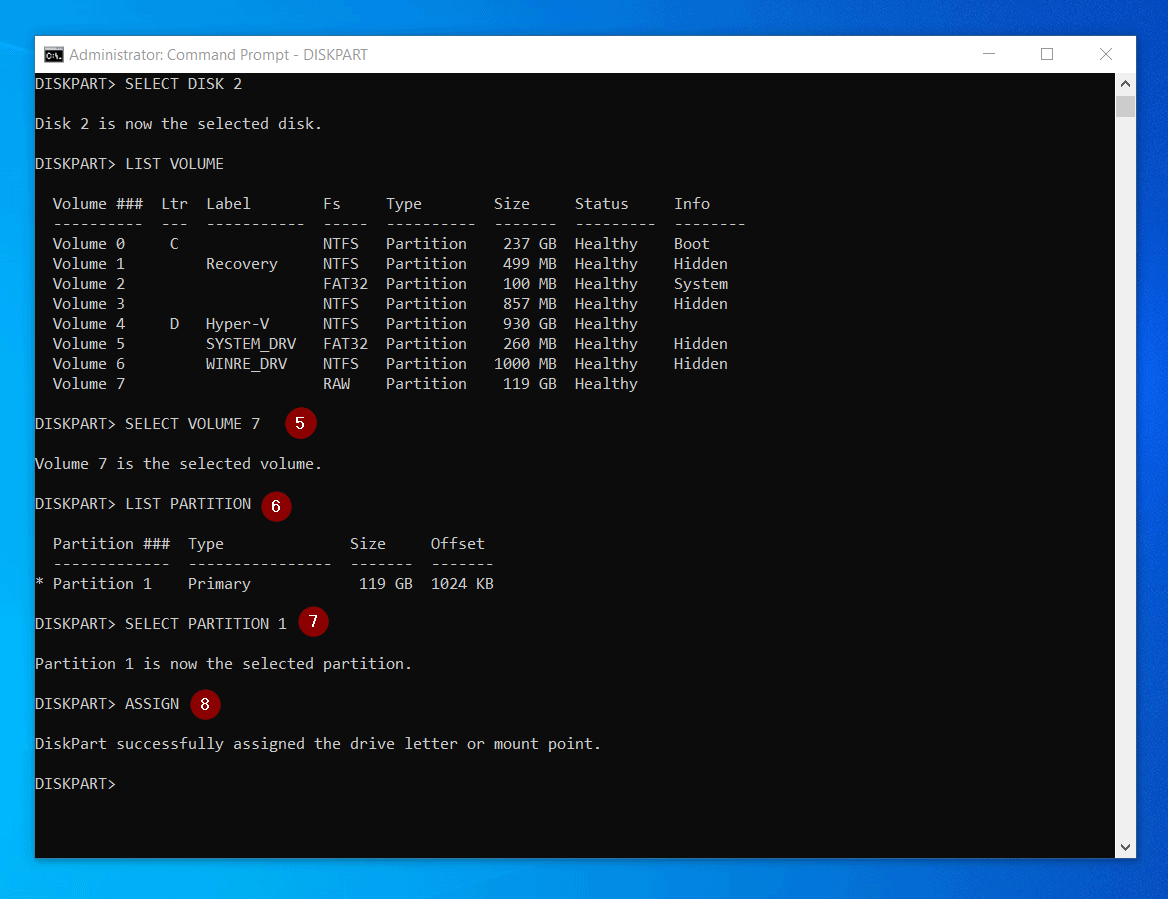
LIST PARTITION
SELECT PARTITION 1
Change 1 to your partition number.
ASSIGN
ASSIGN LETTER=N
Convert a Basic Disk to a Dynamic Disk with DISKPART
Converting a Basic Disk to a Dynamic Disk with DISKPART is a straightforward task.
Once you are sure that you wish to continue, on a command prompt opened as administrator, enter these commands and press enter to each…
DISKPART
LIST DISK
SELECT DISK 2
Change 2 to your disk number.
Finally, enter this command and press enter…
CONVERT DYNAMIC
Take a Disk Offline or Online with DISKPART
To take an online disk Offline, run all the commands listed in the last sub-section until you get to the SELECT DISK command. Then, to take an online disk offline, type the command below and press the enter key…
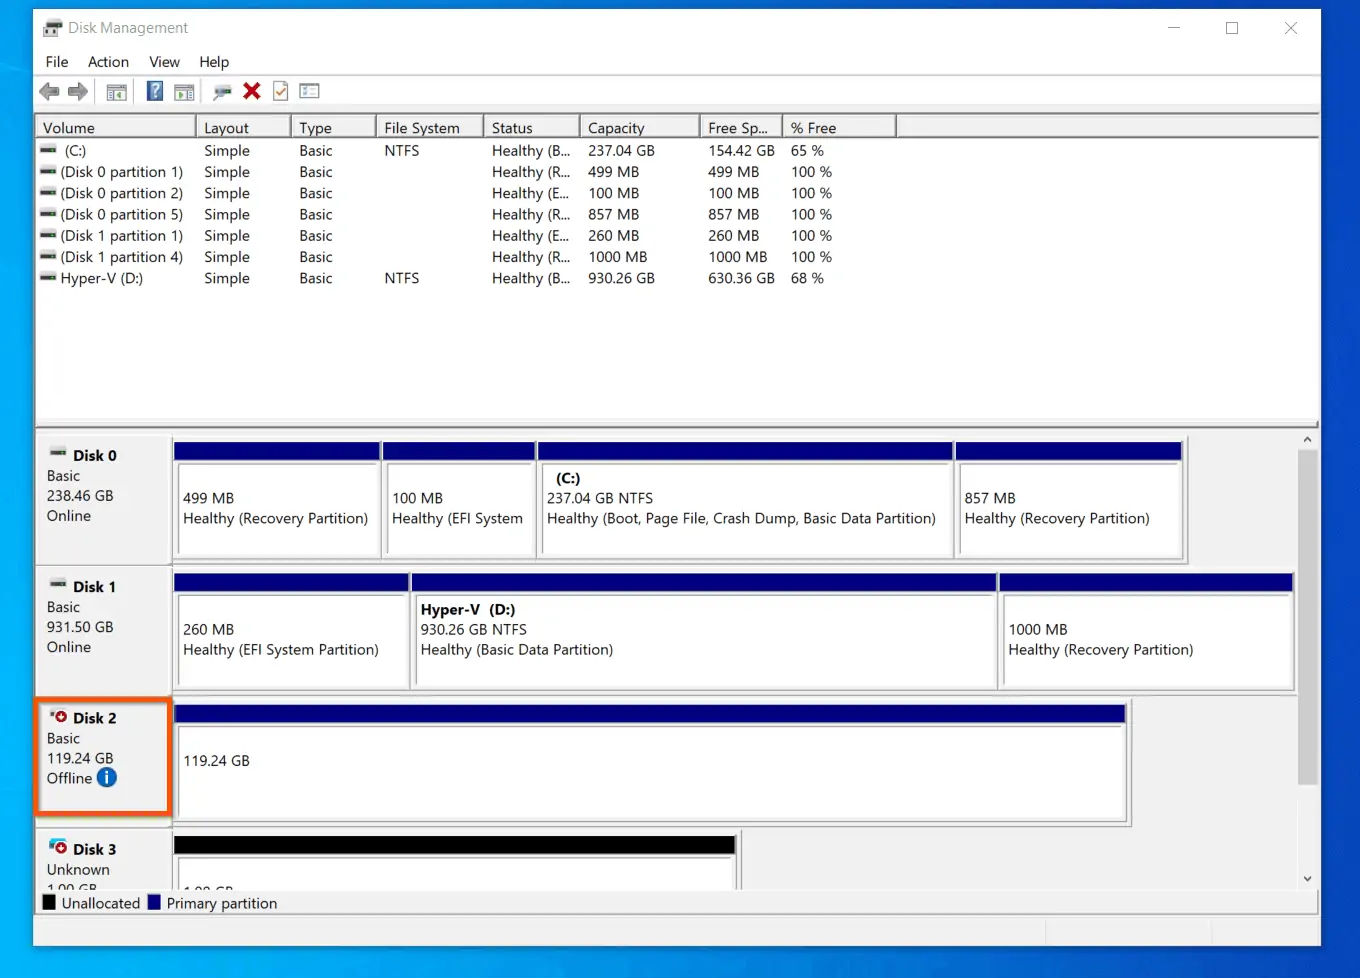
OFFLINE DISK
Once you run this command, the disk goes offline. Here is my Disk 2 in Windows 10 Disk Management.
On the other hand, if a disk is offline, bring it online with the command below…
ONLINE DISK
The disk is now online!
How To Format A Disk With DISKPART
We have another guide for this. For details, visit the link – How to Format a Partition with DISKPART (link opens in a new browser tab).
Managing Disks with PowerShell
If you are a Windows SysAdmin, having knowledge of Windows PowerShell is an essential skill.
In this section, you will learn how to initialize a new drive with PowerShell.
The section also covers how to Shrink, Extend and create new volumes with PowerShell. Furthermore, you will learn how to delete volumes, change drive letters and convert a basic disk to a dynamic disk – all with PowerShell.
Additionally, in this section, you will learn how to take a disk offline or online. Finally, the section ends with a sub-section on how to format a disk with PowerShell.
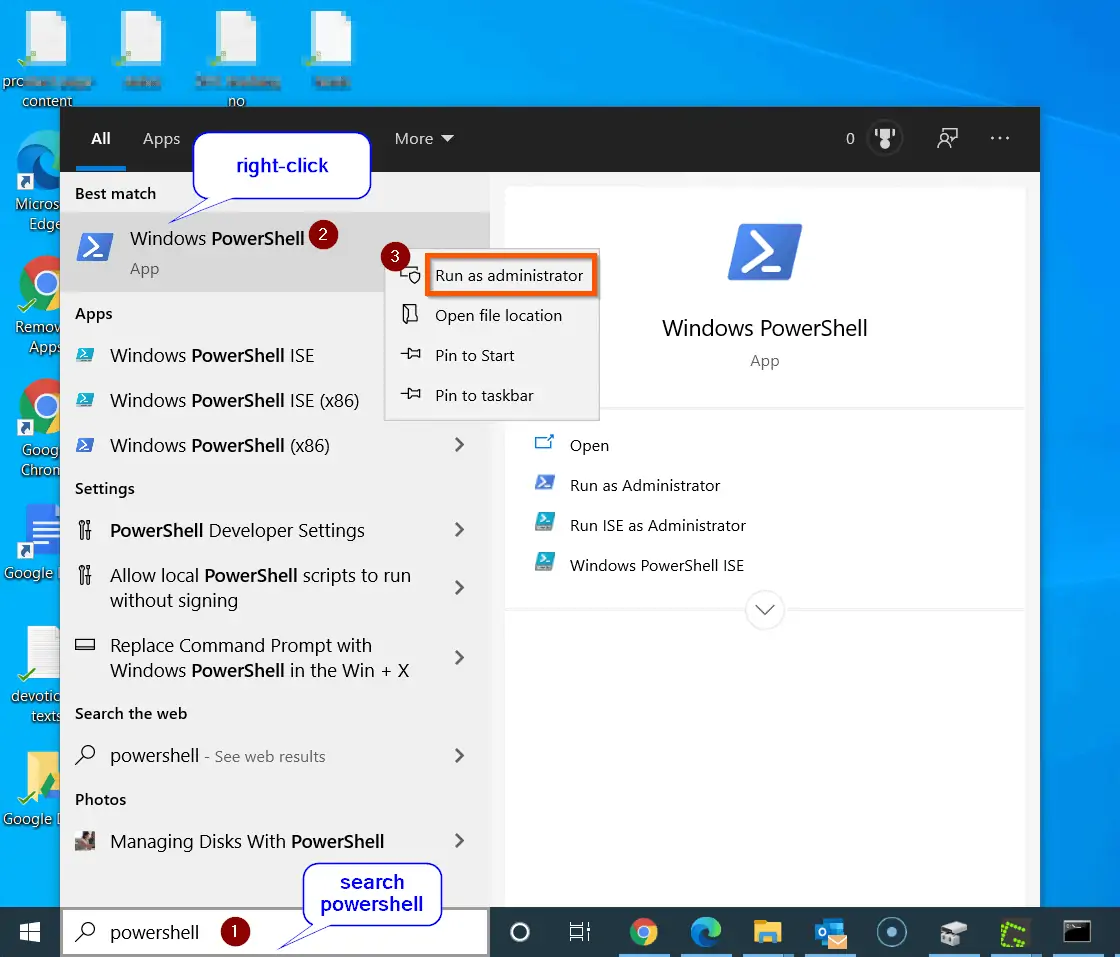
To perform the tasks in this section, you need to open PowerShell as administrator. To open PowerShell as administrator, enter powershell in the Windows 10 search box. Then, right-click Windows PowerShell and Run as administrator.
Un-Initialize A Drive with PowerShell
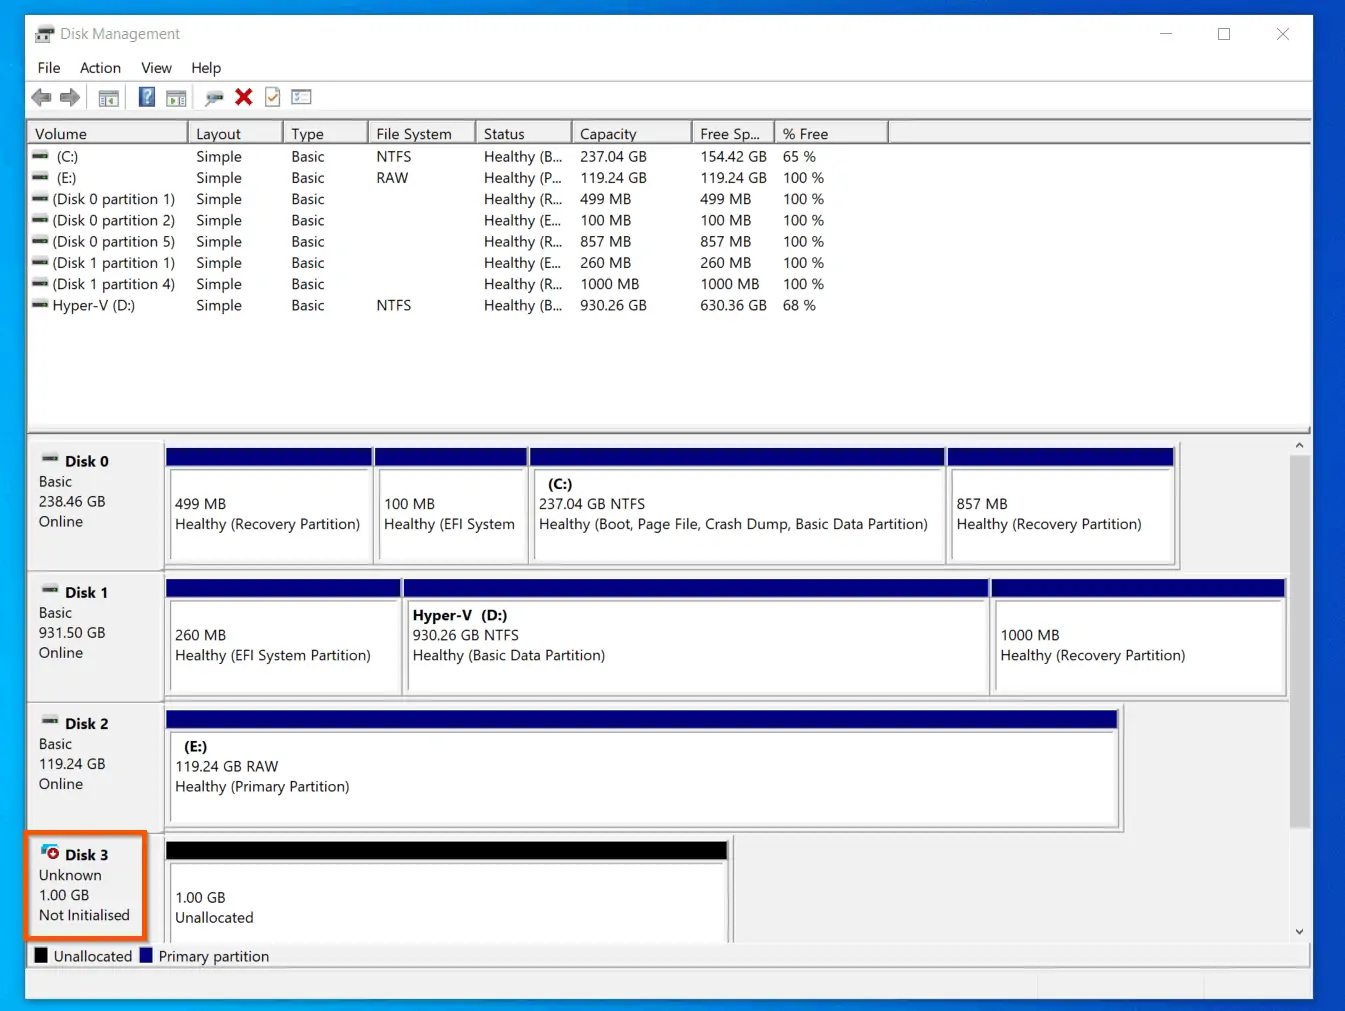
If a disk is not initialized, Windows 10 Disk Management will display the disk as “Unknown, Not Initialized” – see disk 3 in the screenshot below.
In some instances, you may need to un-initialize a Windows disk to remove all data and volumes in the disk. This action is usually useful if you need to use the disk in another operating system like macOS or Linux.
To un-initialize a disk with PowerShell, follow the steps below:
- Open PowerShell as administrator.
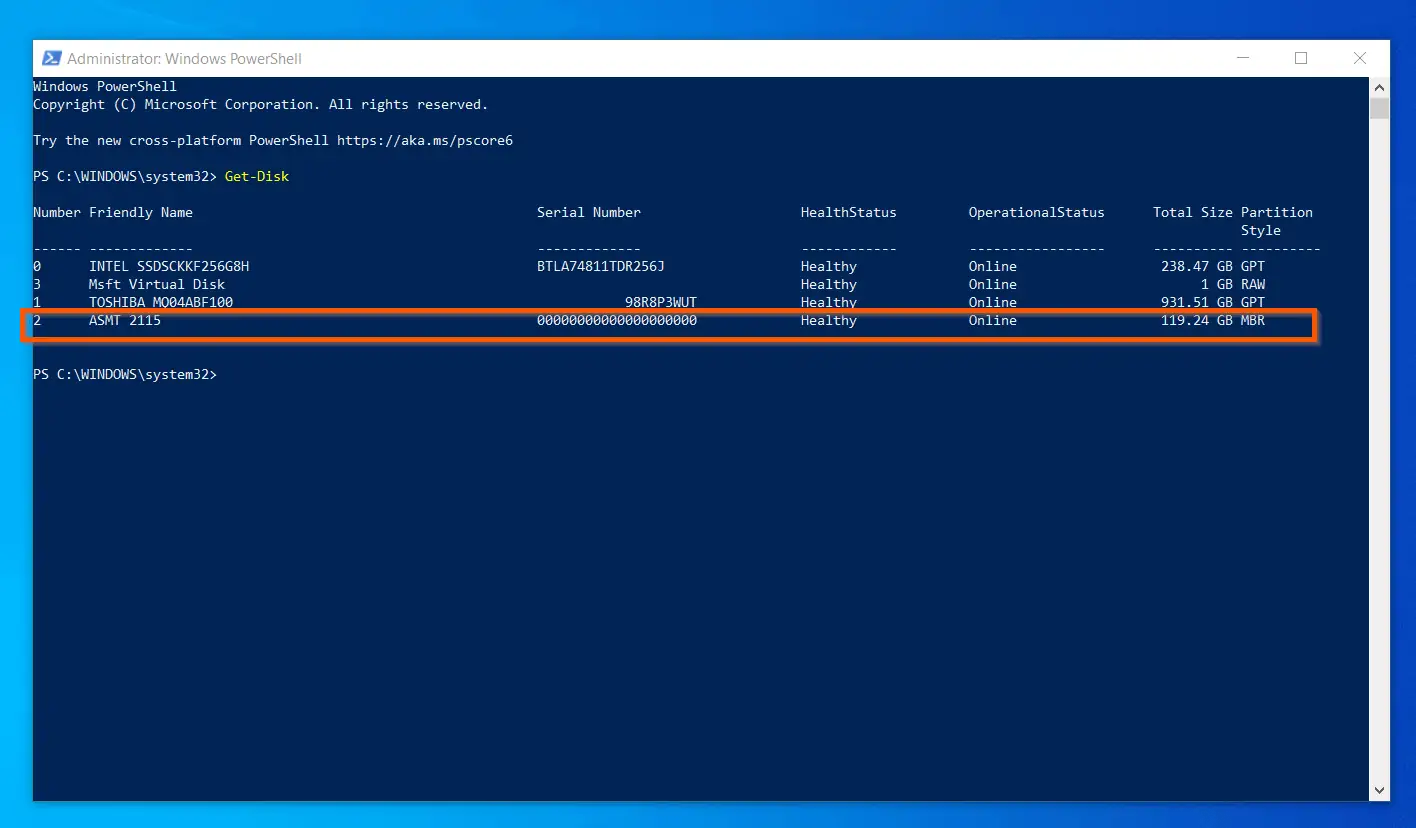
- Then, enter the command below and press the enter key – the command lists all the disks available on your Windows 10 PC. Note the disk number of the disk you want to un-initialize.
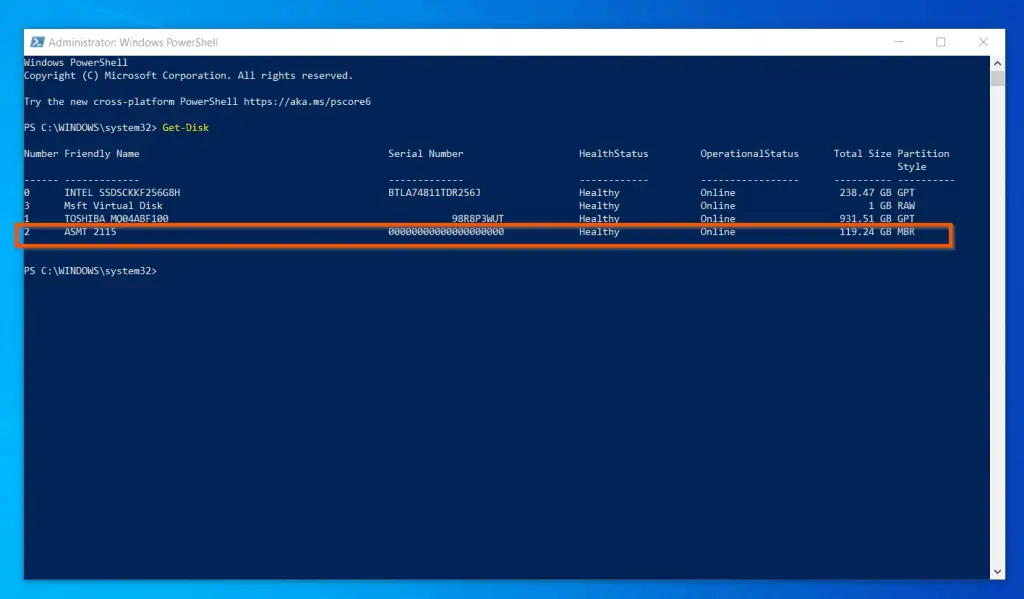
Get-Disk
The next command will wipe the data in the drive and may not be reversible. Execute this command if you are 100% sure you are happy to lose all data in the drive!
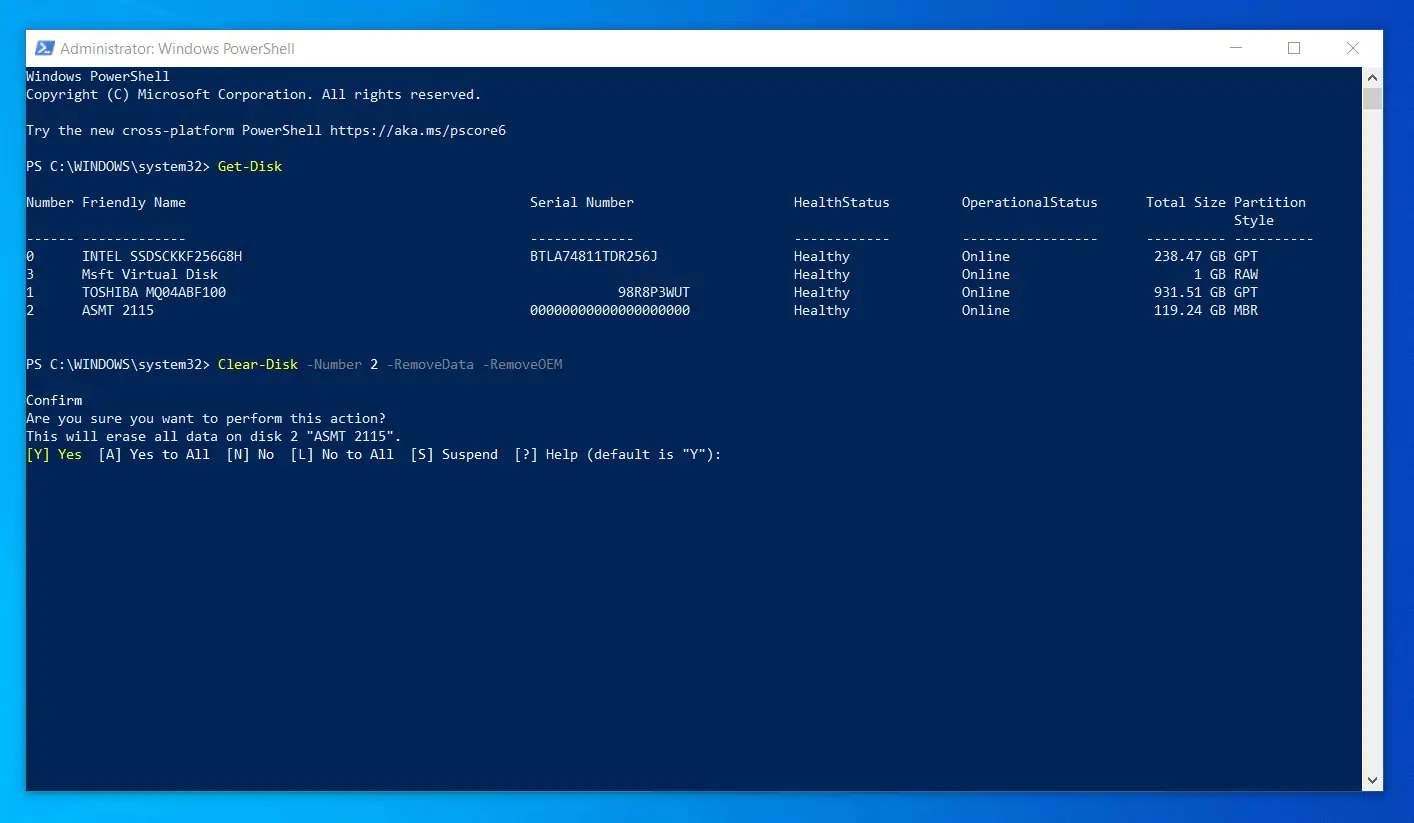
- Next, enter the command below in PowerShell and press the enter key on your keyboard. When you press enter key, PowerShell will display a prompt to confirm the action. To confirm, press the enter key again.
Clear-Disk -Number 2 -RemoveData -RemoveOEM
Once the last command executes, if you open Disk Management MMC, the disk will be displayed as “Unknown, Not Initialized”.
Initialize a New Drive with PowerShell
When you insert a new drive into your Windows 10 PC, Disk Management displays the disk as “Unknown, Not Initialized”. In this sub-section, you will learn how to Initialize a disk with PowerShell.
Follow the steps below to Initialize a disk with PowerShell:
- Open PowerShell as administrator.
- Then, enter the Get-Disk command in the PowerShell prompt – then press the enter key – to list all disks on your PC. Note the disk number. In this example, I will Initialize the highlighted disk with disk number 2.
Get-Disk
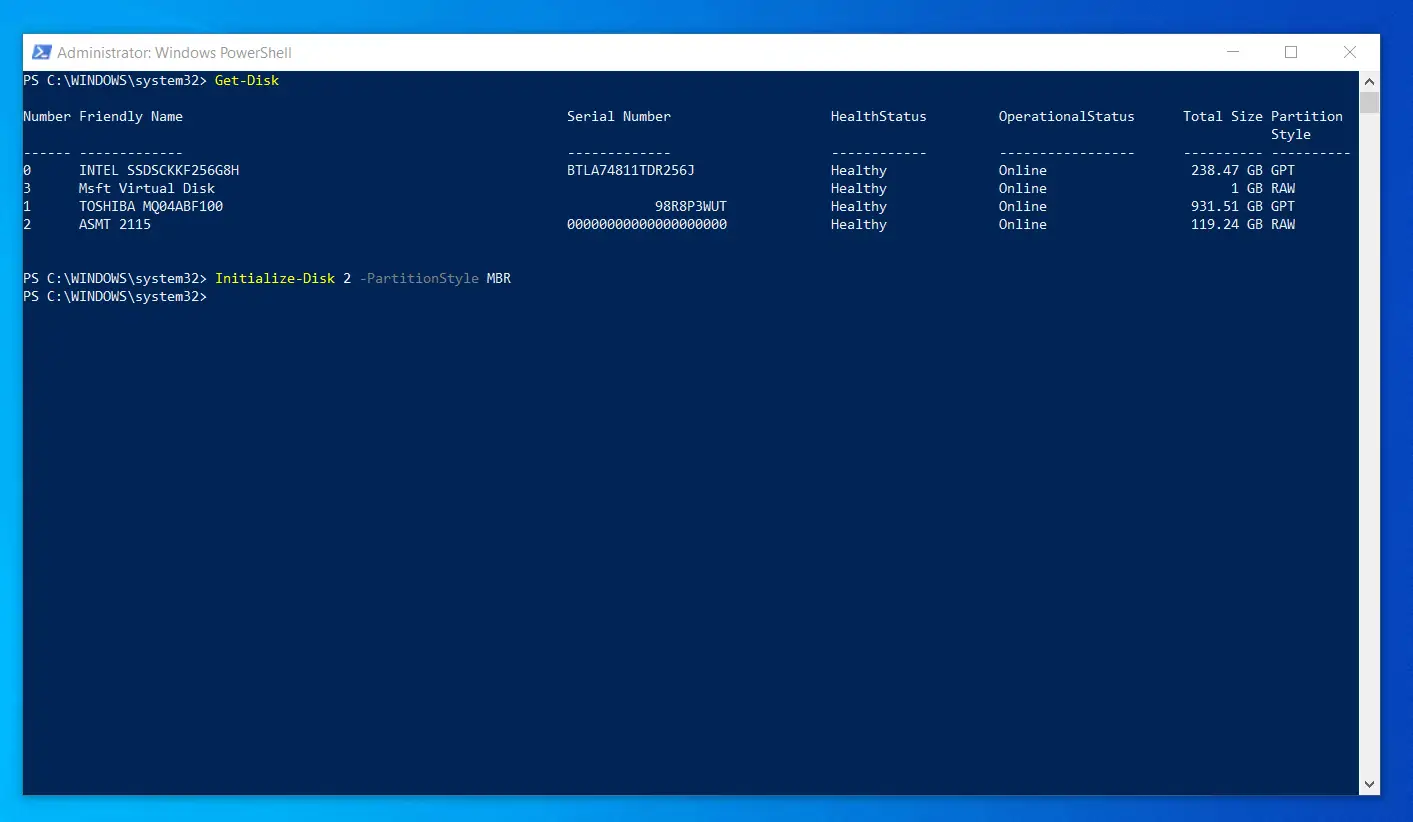
- Finally, enter the command below to Initialize the disk. Entering MBR at the end of the command initializes the disk using the MBR partitioning style. However, if you wish to use the GPT partitioning style, replace MBR with GPT.
Initialize-Disk 2 -PartitionStyle MBR
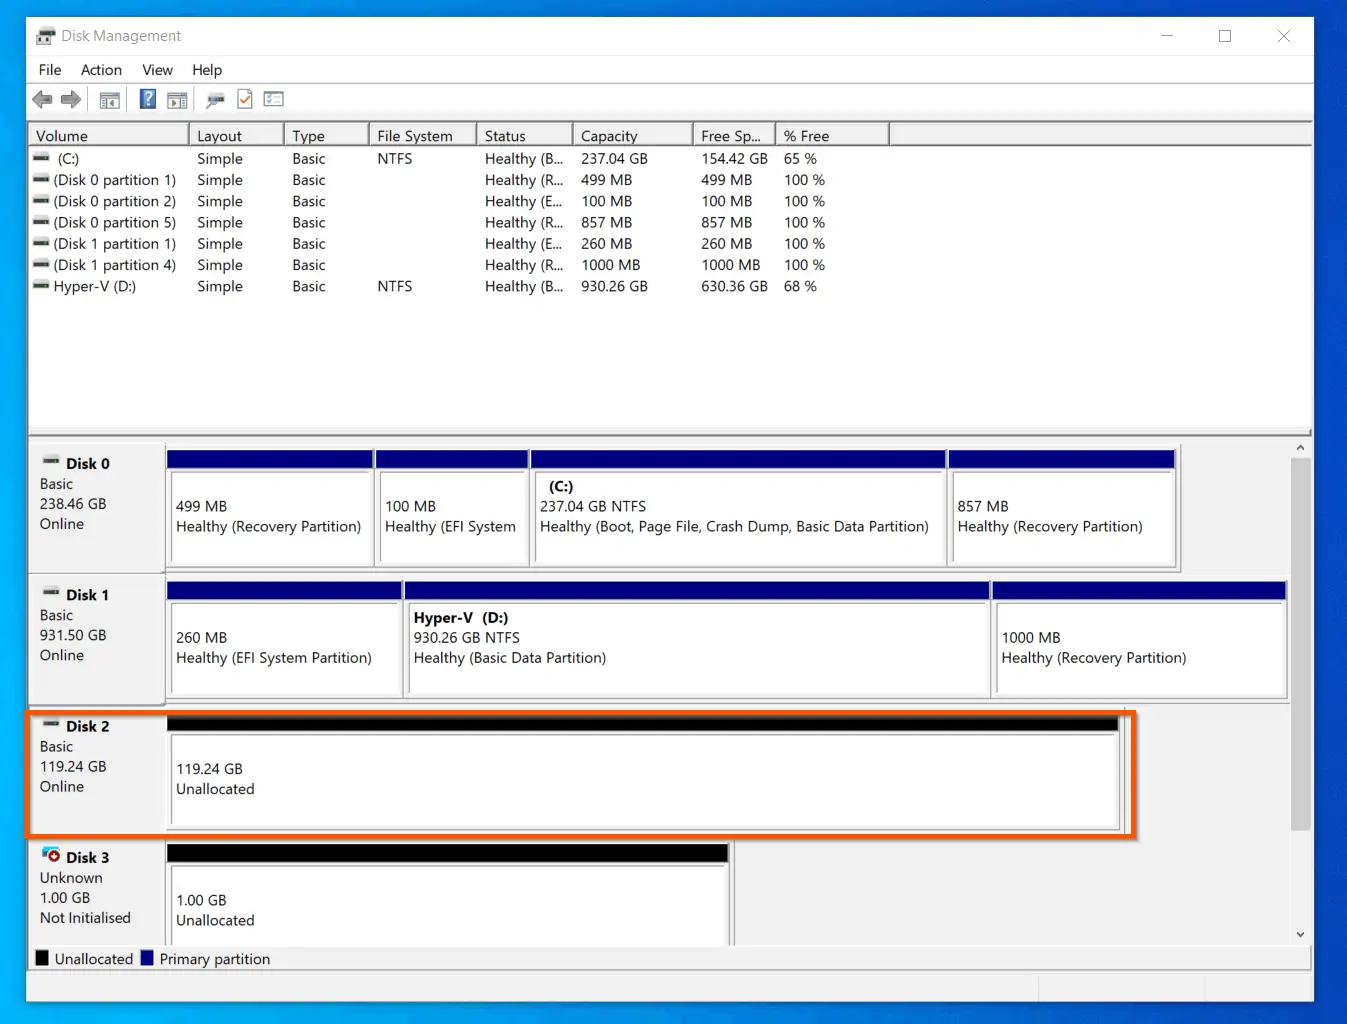
Once the command is completed – usually completes very quickly – Windows 10 Disk Management MMC will no longer show then drive as “Unknown, Not Initialized” – see the second screenshot below.

Create a Volume with PowerShell
After Initializing a disk, before you use the disk to save files, you need to create volumes. In this section, you will learn how to create a volume with PowerShell.
Follow the steps below to create a volume with PowerShell:
- Open PowerShell as administrator
- Then, use the Get-Disk command to list all disks on your computer. Enter the command in PowerShell and press the enter key on your keyboard.
Get-Disk
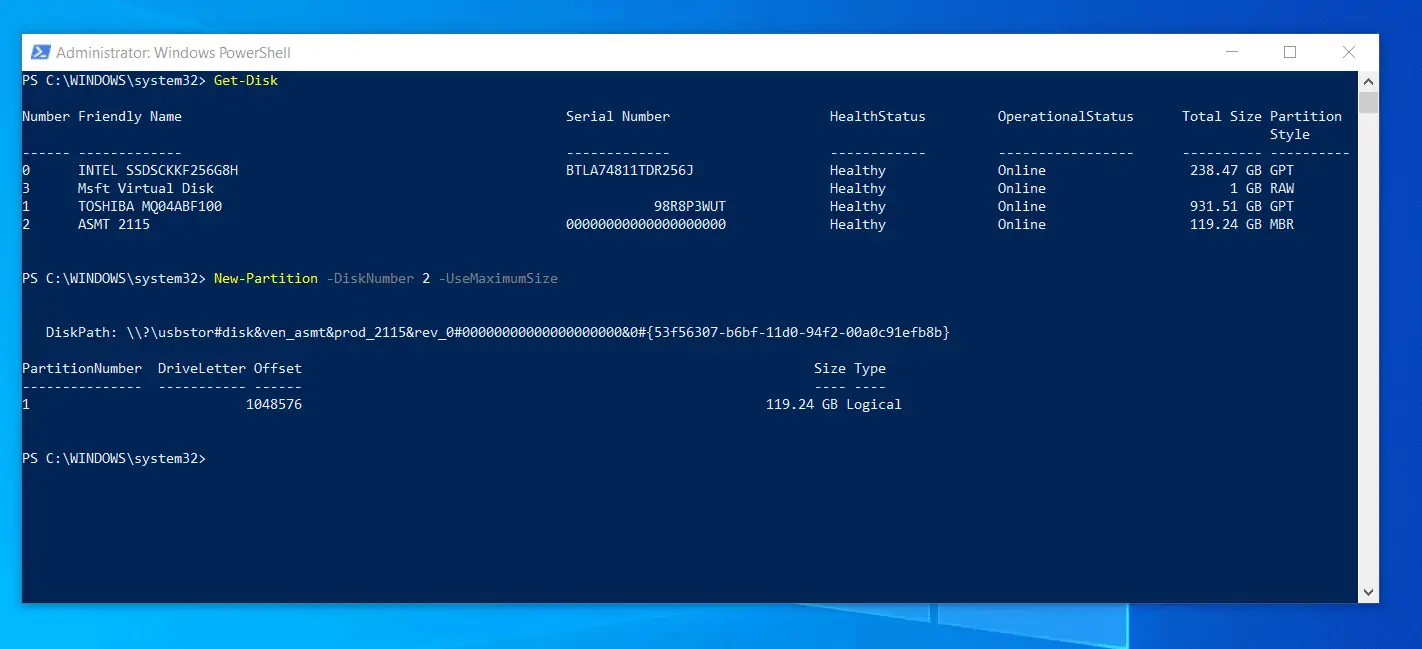
In this example, I want to create a partition in disk 2, using the whole disk size. The second screenshot below confirms that, at the moment, disk 2 has no volume – it is still displaying “Unallocated”.
- To create a volume in PowerShell, enter the command below, then press enter key on your keyboard.
New-Partition -DiskNumber 2 -UseMaximumSize
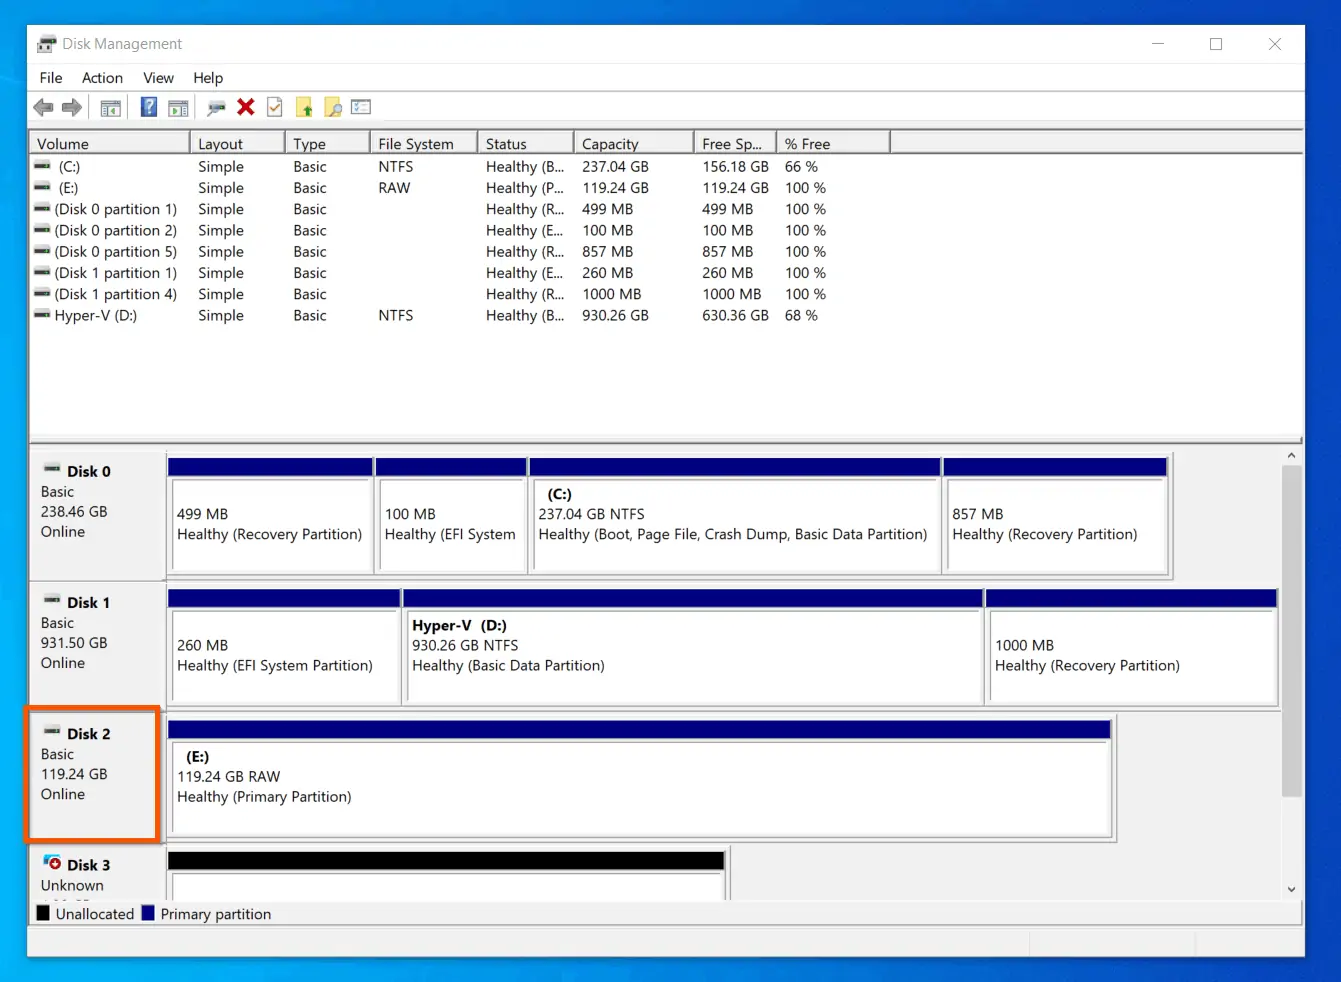
When the command completes, Windows 10 Disk Management will display the partition details in the disk – see the second screenshot below.
Shrink a Basic Volume with PowerShell
Sometimes you may need to free up some unallocated space from an existing volume. This is called shrinking the disk. Shrink a disk with PowerShell, follow the steps below:
- Open PowerShell as administrator.
- Then, enter the Get-Disk command to list all disks on your computer – enter the command, then press the enter key on your keyboard. Note the disk number and size of the disk you want to shrink.
Get-Disk
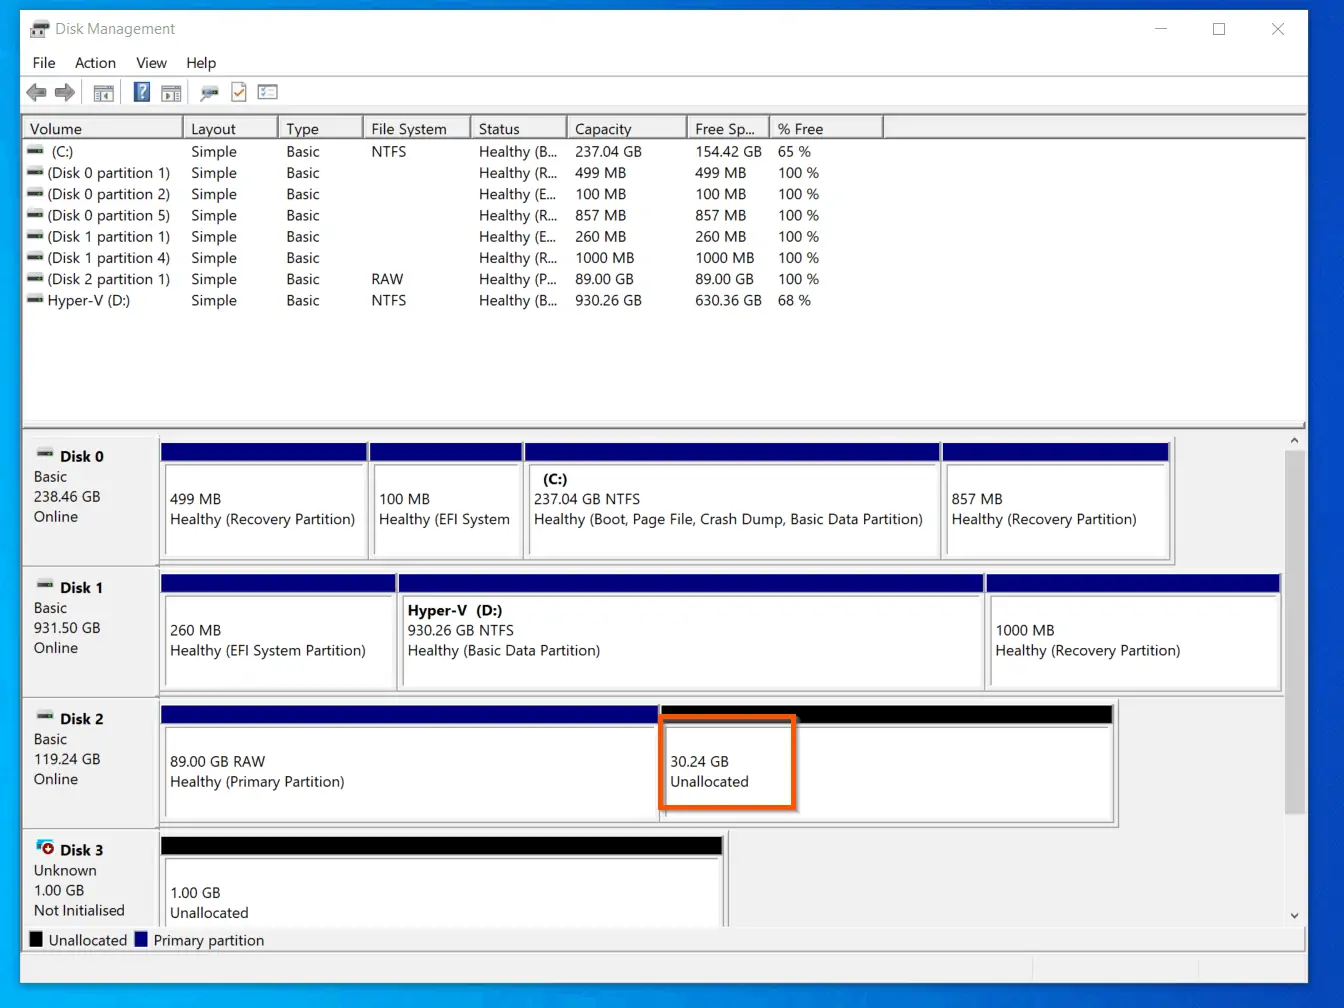
In this example, I want to shrink the 119 GB disk 2. I want to free up 30 GB. So I will resize the disk to 89 GB (119 GB minus 30 GB).
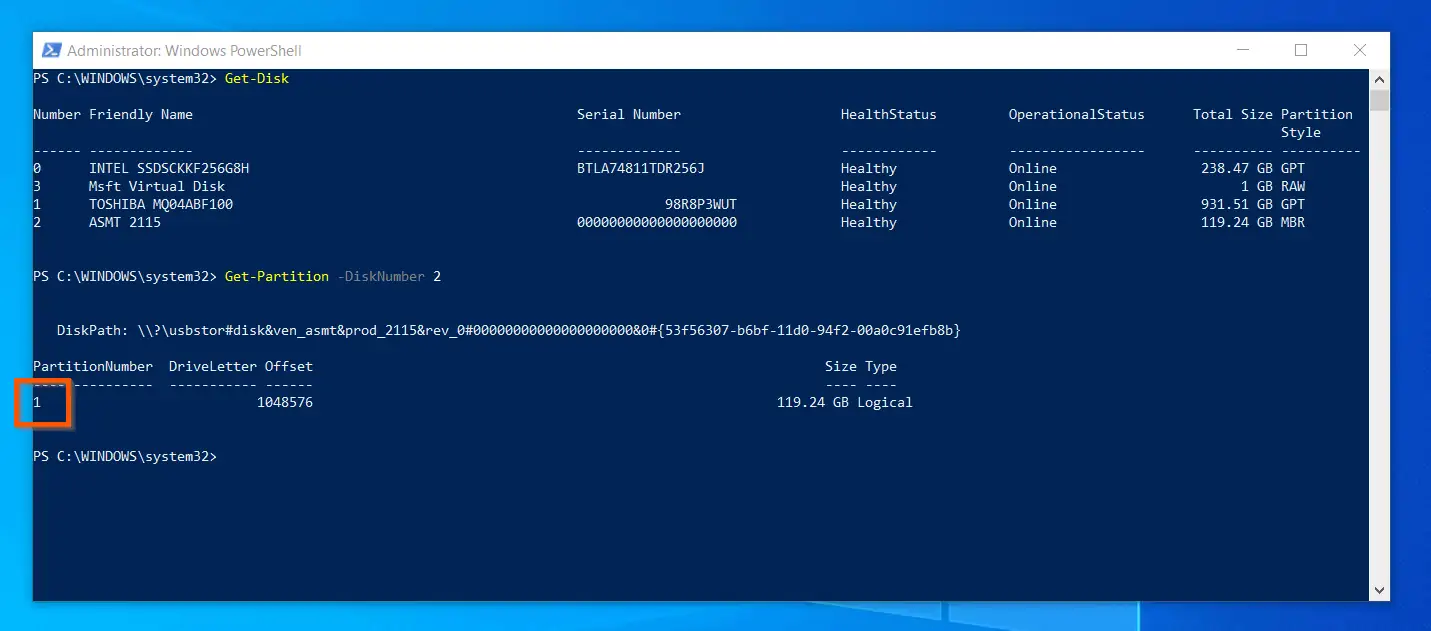
- Once you have the disk number, and the size, enter the command below to display the partitions in the disk.
Get-Partition -DiskNumber 2
The Get-Partition command confirms that disk 2 has just one partition. Therefore, because disk has just 1 partition, the partition number is 1 – see the highlighted portion of the screenshot below.
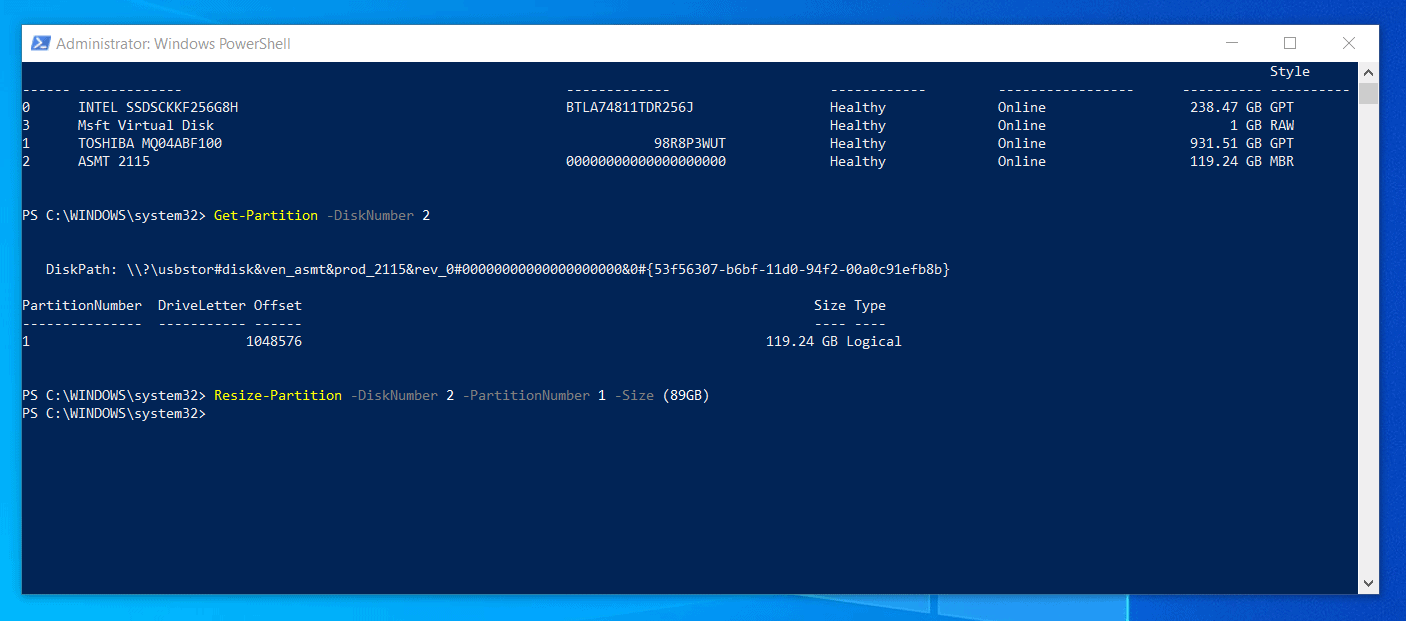
In the next command, you will shrink the partition to free up toms space. As a reminder, I want to shrink my 119 GB partition to 89 GB, so I can have 30 GB “Unallocated” space.
- Finally, to shrink a Basic Volume with PowerShell, enter the command below. Then, press the enter key.
Resize-Partition -DiskNumber 2 -PartitionNumber 1 -Size (89GB)
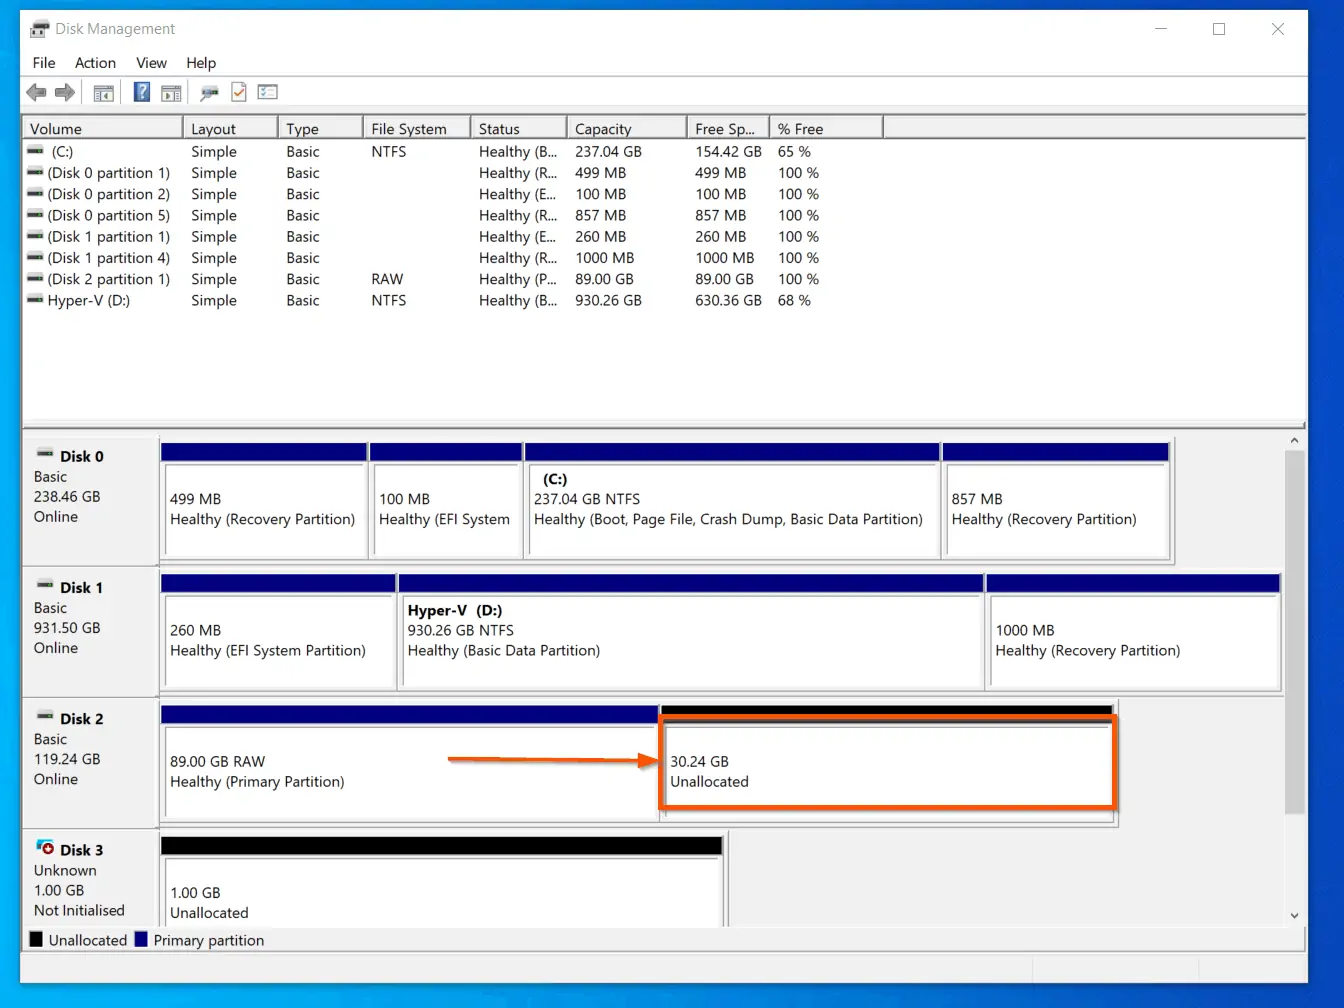
When the command completes, Windows 10 Disk Management MMC will now display an “Unallocated” space in the disk. In my case, I now have 30 GB “Unallocated” space in disk 2.
Extend a Basic Volume with PowerShell
Extending a volume performs the opposite of Shrinking the volume. In this example, I will teach you how to extend a volume with PowerShell.
Now that we have covered the basics, follow the steps below to extend a Basic Volume with PowerShell:
- Open PowerShell as administrator.
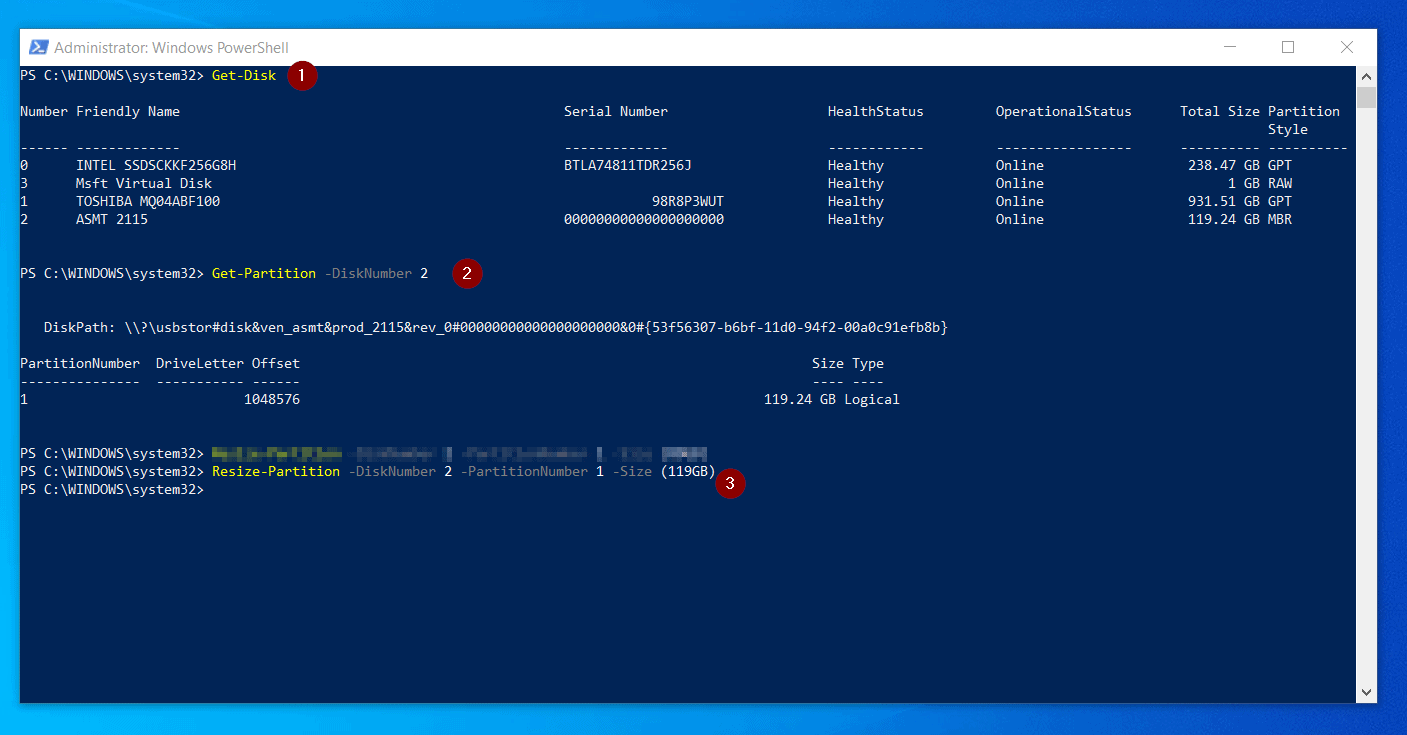
- Then, execute the following PowerShell commands
Get-Disk
Get-Partition -DiskNumber 2
Resize-Partition -DiskNumber 2 -PartitionNumber 1 -Size (119GB)
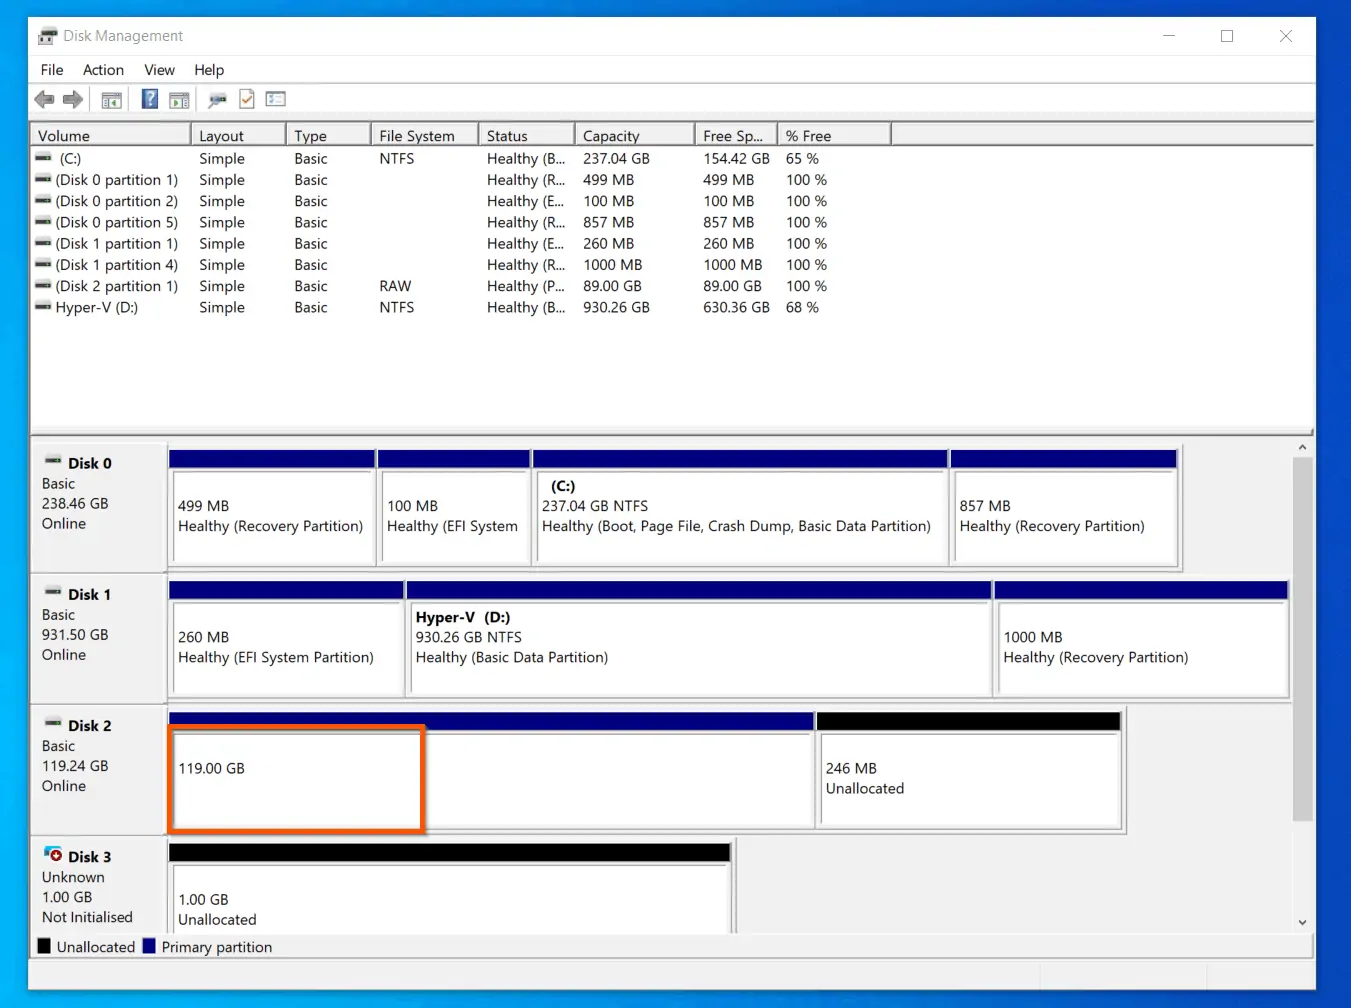
The first screenshot below shows the commands in PowerShell. Moreover, the second screnshot shows the extended disk in Disk Management MMC.
Delete a Volume with PowerShell
Follow the steps below to delete a volume with PowerShell:
- Open PowerShell as administrator.
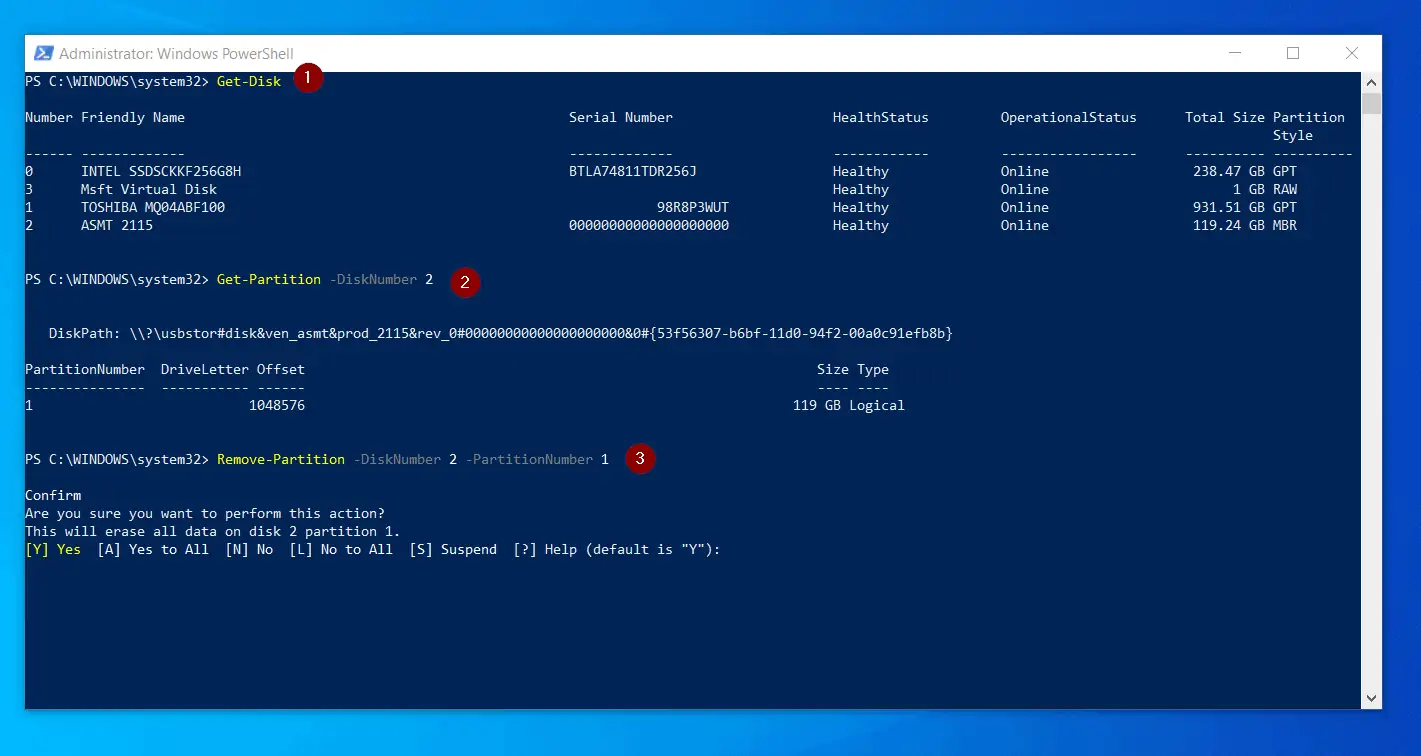
- Then, execute the following PowerShell commands
Get-Disk
Get-Partition -DiskNumber 2
Remove-Partition -DiskNumber 2 -PartitionNumber 1
- When you execute the Remove-Partition command, PowerShell will request a confirmation. To confirm the delete, press the enter key on your keyboard.
Change or Assign a Drive Letter with PowerShell
If you have a disk partition with a drive letter you want to change – or a partition that you have not assigned a drive letter, – use the steps below to assign a drive letter to an existing partition.
- Open PowerShell as administrator.
- Then, execute the following PowerShell commands
Get-Disk
Get-Partition -DiskNumber 2
Get-Partition -DiskNumber 2 -PartitionNumber 1 | Set-Partition -NewDriveLetter E

Take a Disk Offline or Online with PowerShell
If a disk is online, you can take it offline with a few PowerShell commands. Follow the steps below to take an online disk offline, with PowerShell:
- Open PowerShell as administrator.
- Then, execute the following PowerShell commands
Get-Disk
Set-Disk -Number 2 -IsOffline $TRUE
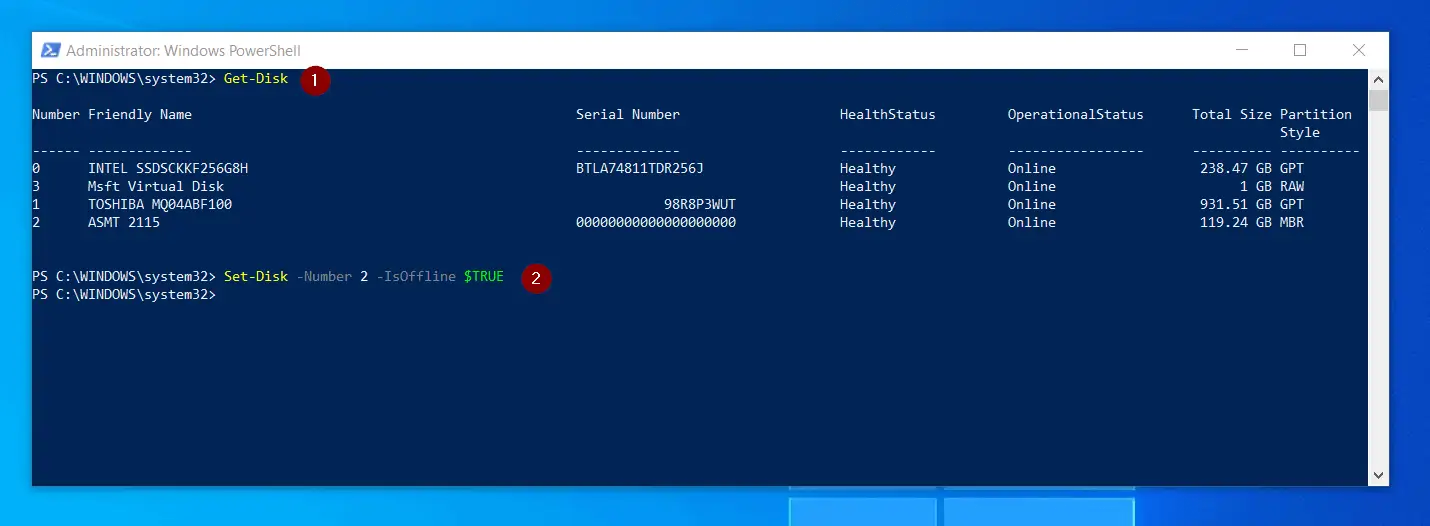
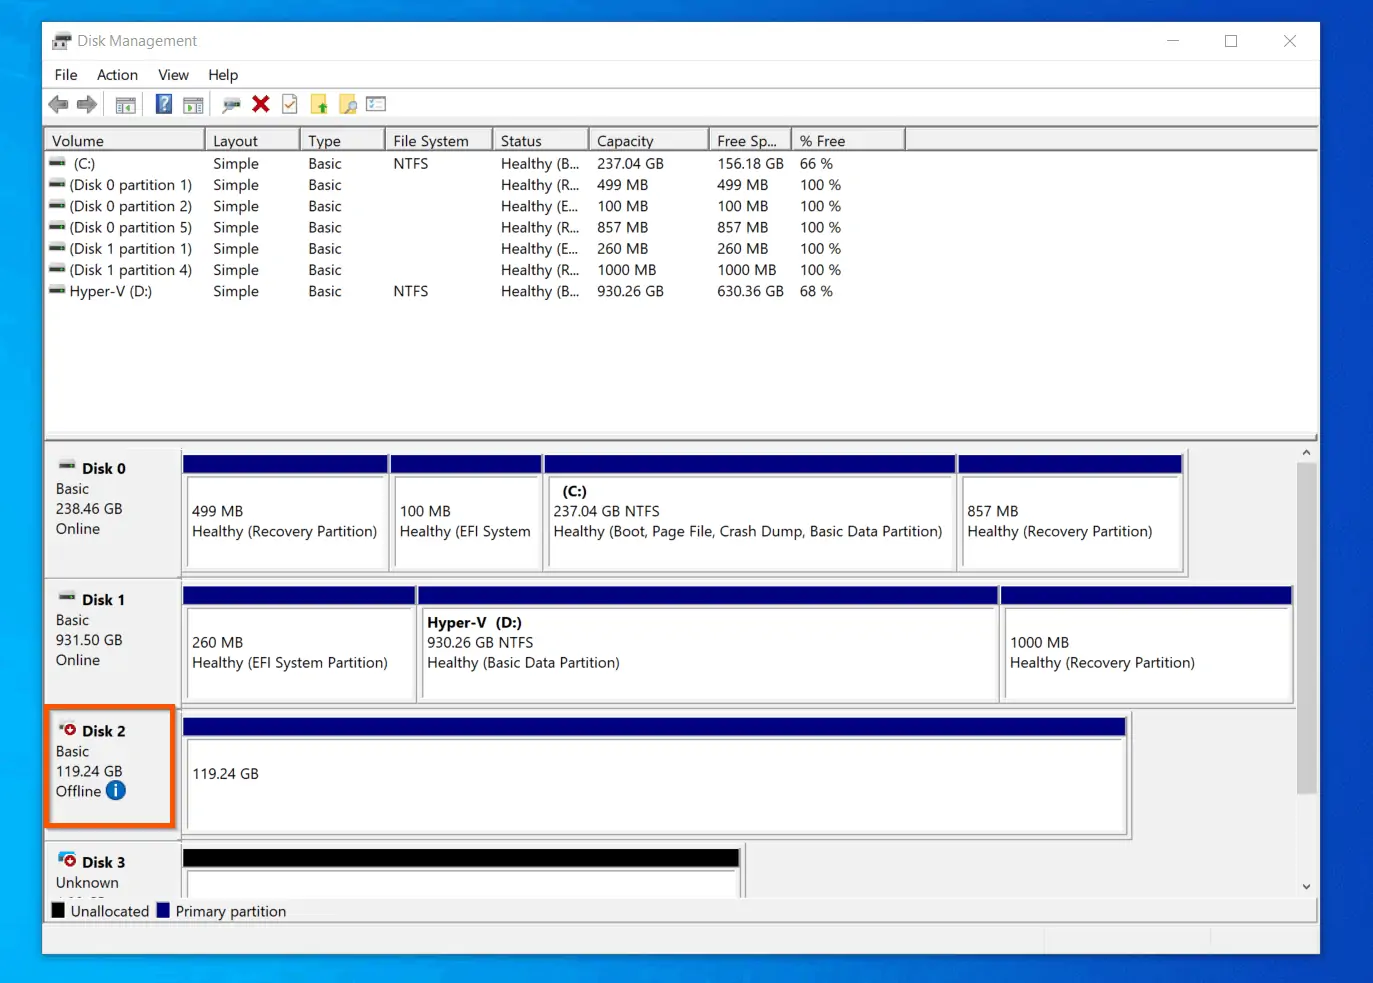
When the commands completes, Windows 10 Disk Management will display the disk as offline.
On the contrary, if you have a disk that is offline, you can make it online by changing the parameter $TRUE, in the last command to $FALSE. Here is the command:
Set-Disk -Number 2 -IsOffline $FALSE

If you now look at Disk Management, the disk will be displayed as Online!
Format a Volume or Partition with PowerShell
So far this guide has shown you how you can format a partition with Windows 10 Disk Management MMC. You have also seen how to format a volume with DISKPART.
In this section, you will learn how to format a partition with PowerShell. Follow the steps below to format a partition or volume with PowerShell:
- Open PowerShell as administrator.
- Then, execute the following PowerShell commands
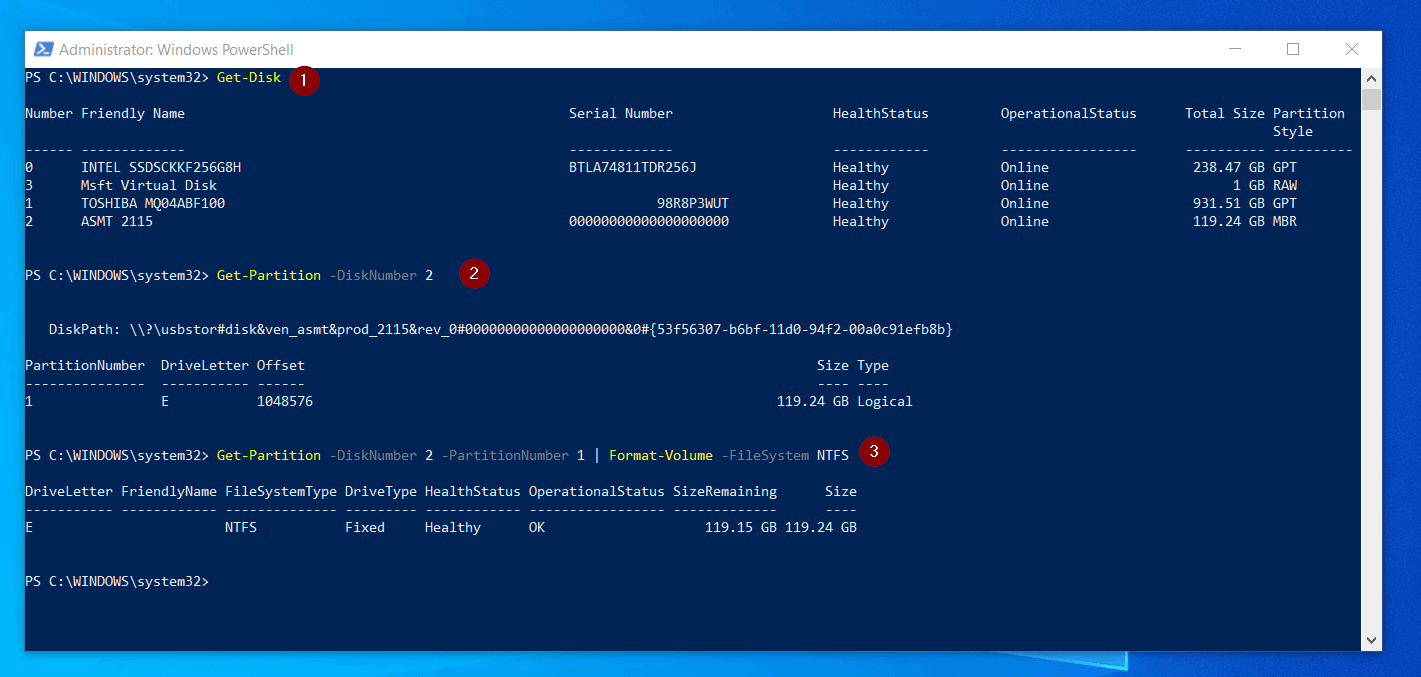
Get-Disk
Get-Partition -DiskNumber 2
Get-Partition -DiskNumber 2 -PartitionNumber 1 | Format-Volume -FileSystem NTFS
Conclusion
I hope you found this Windows 10 Disk Management guide helpful. If you did, kindly spare two minutes of your time to share your experience by responding to the “Was this page helpful?” question below.
Finally, for more Windows 10 Itechguides, visit our Windows 10 How-To page.


![How To Run Sysprep (Generalize) In Windows 10 [2 Methods]](https://www.itechguides.com/wp-content/uploads/2022/05/8-2.webp)