How to Run Sysprep (Generalize) in Windows 10 [2 Methods]

Photo of author

By Victor Ashiedu

Published

Do you want to create a Windows 10 image to deploy to new PCs? Then, you need to run Sysprep (Generalize) on an existing Windows 10 computer and this guide shows you how.

Overview of Sysprep (Generalize)

Why do you need to run Sysprep (Generalize) on a Windows 10 PC? What does the command do?

If you’re reading this, there is a chance that you will know why you need to run Sysprep. When you need to create an OS image for Windows 10, you need to run Sysprep first.

Running Sysprep removes all user customizations like keyboard and time zone. This returns Windows to boot to the point where a user can customize the OS.

In other words, when you run the Sysprep command in Windows 10 with the /generalize option, it removes individual details from your Windows installation.

Therefore, when you create a Windows image from the Windows installation, you can safely install it on another computer. It is important to mention that you still need to run Sysprep even if both computers have the same hardware.

In addition to using the /generalize option, Sysprep supports another option /oobe. When you include the /oobe option, Sysprep prepares Windows to restart into OOBE mode.

The OOBE mode allows a user to customize Windows 10. For example, when Windows 10 starts in OOBE mode, you can create a user account, rename the computer, and perform other customization tasks.

For a full list and explanation of the Sysprep command, see the Microsoft Sysprep documentation page – Sysprep Command-Line Options.

Option 1: Run Sysprep with GUI

You can run Sysprep by double-clicking Sysprep.exe located in the “%WINDIR%\system32\sysprep” directory. Here are the steps:

  1. Right-click the Windows Start menu and select Run.
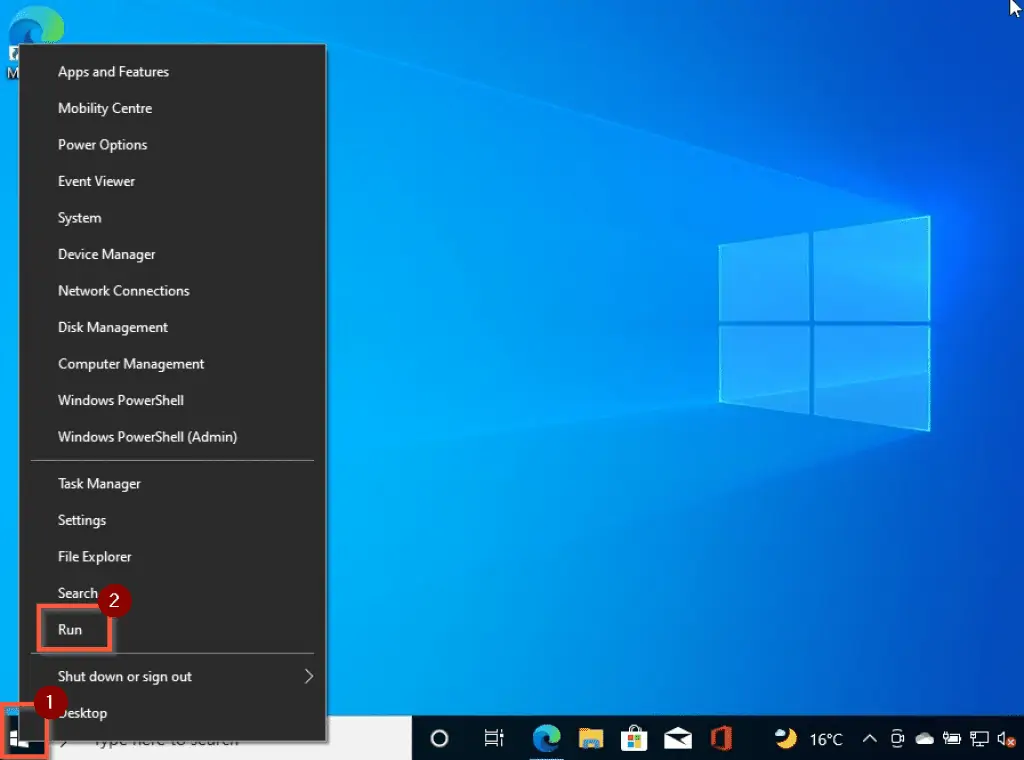
  1. Then, in the Run window, enter the command below and click OK…
%WINDIR%\system32\sysprep
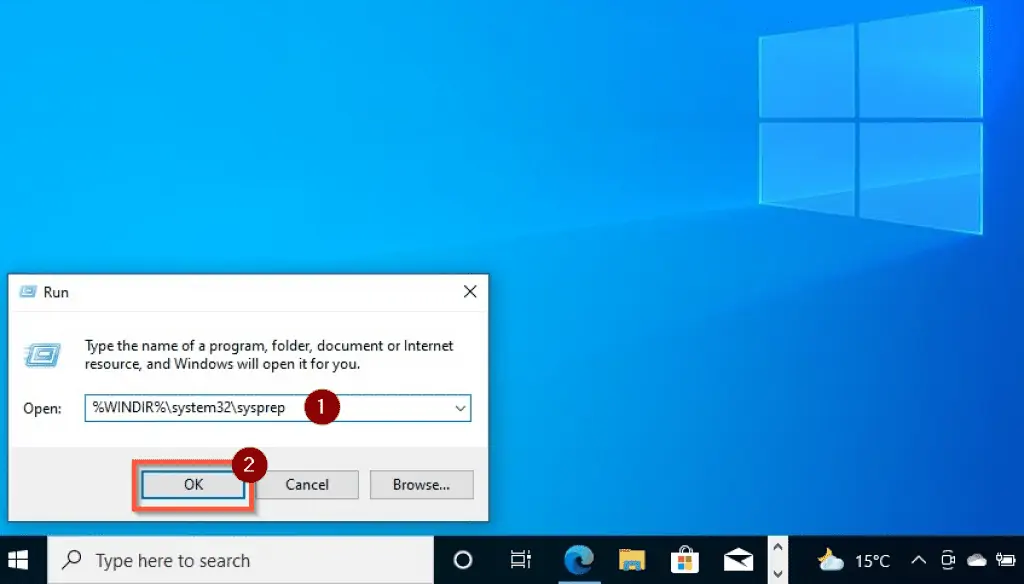
You can copy and paste the command to make it easier for you.
Options To Run Sysprep (Generalize) In Windows 10
  1. When the sysprep folder opens, double-click sysprep.exe. Double-clicking sysprep.exe opens the Sysprep program with OOB selected by default.
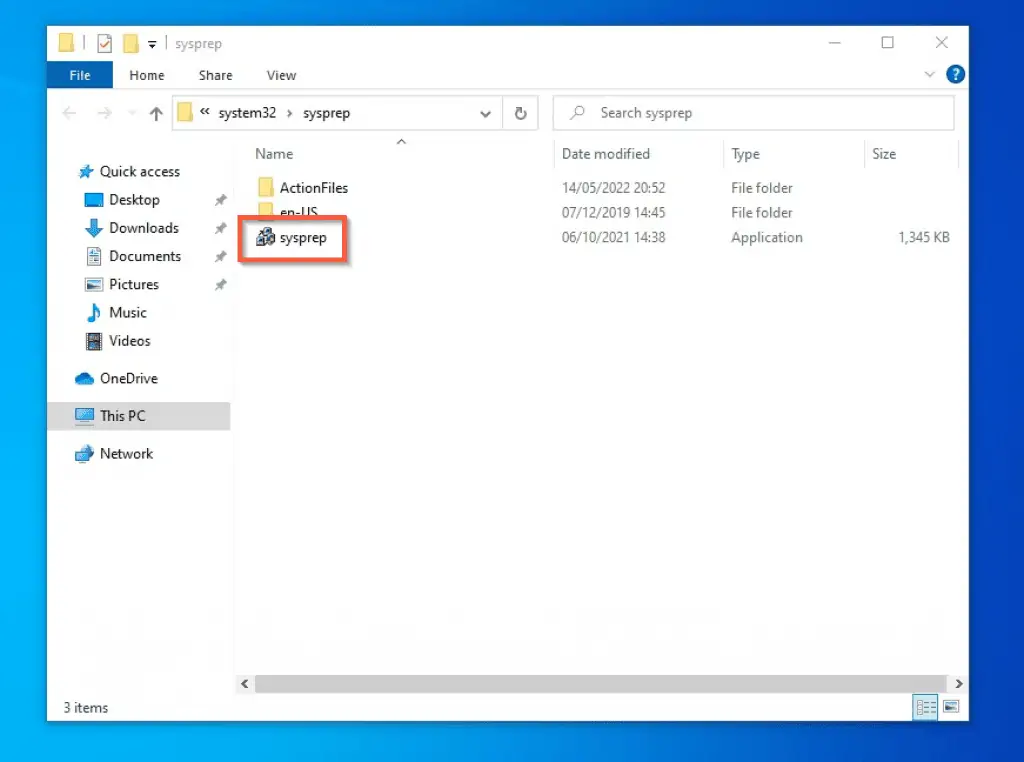
Options To Run Sysprep (Generalize) In Windows 10
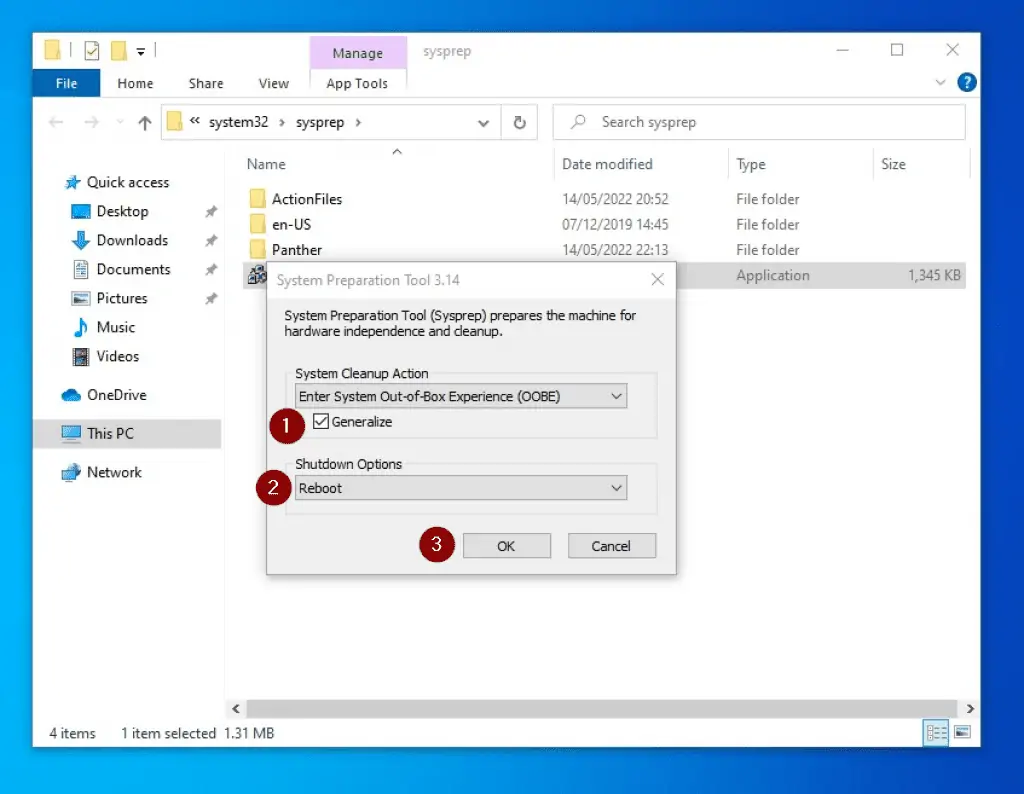
  1. Then, check the Generalize checkbox on the System Preparation Tool pop-up window. Next, select whether you want Sysprep to Restart or Shutdown Windows 10 when it completes running.

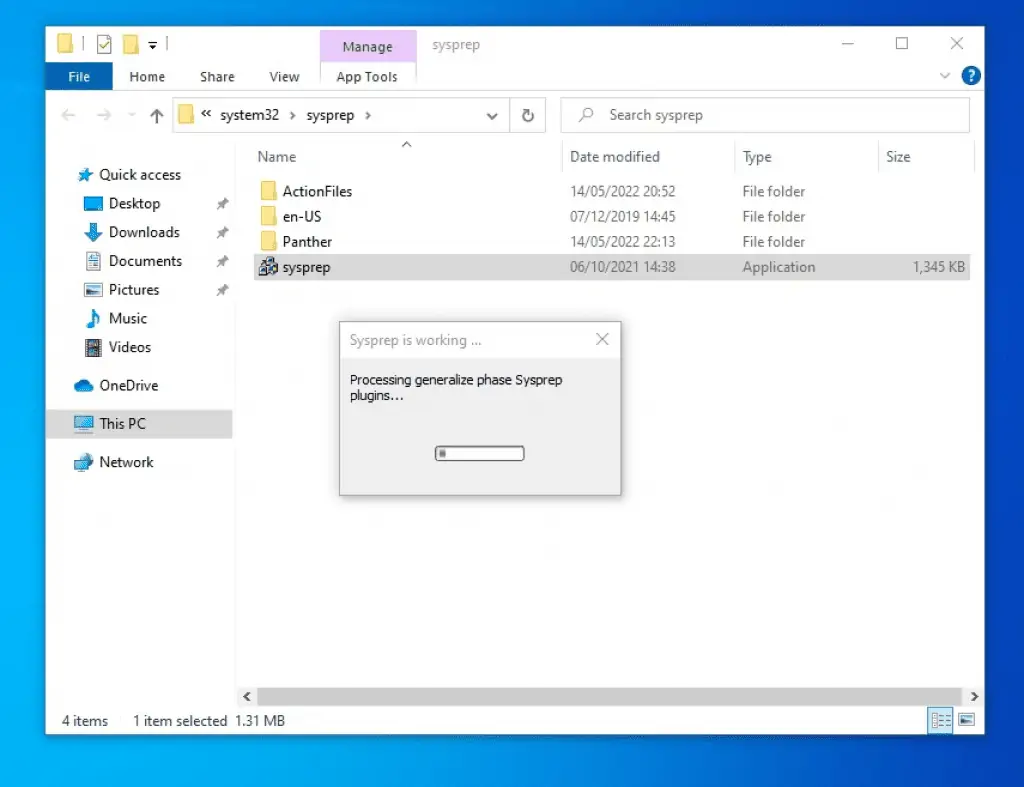
    Finally, click OK. Sysprep will take a while to run – see the second screenshot below.
  1. When Sysprep finishes preparing Windows 10 with the generalize and oobe options, it’ll either shut down or restart.

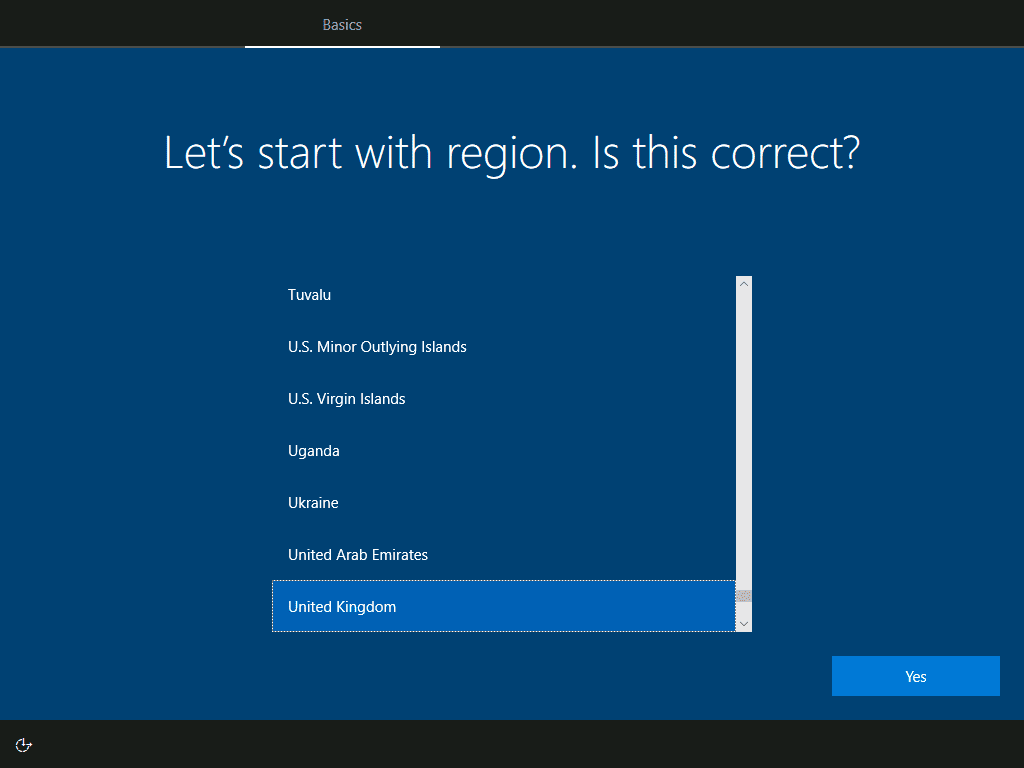
When you start Windows 10 after running Sysprep, the Operating System will boot into the OOBE mode. See the screenshot below for details.

In essence, if you create an OS image with the installation, the Windows 10 installed with the image will start from here.

Option 2: Execute Sysprep from CMD

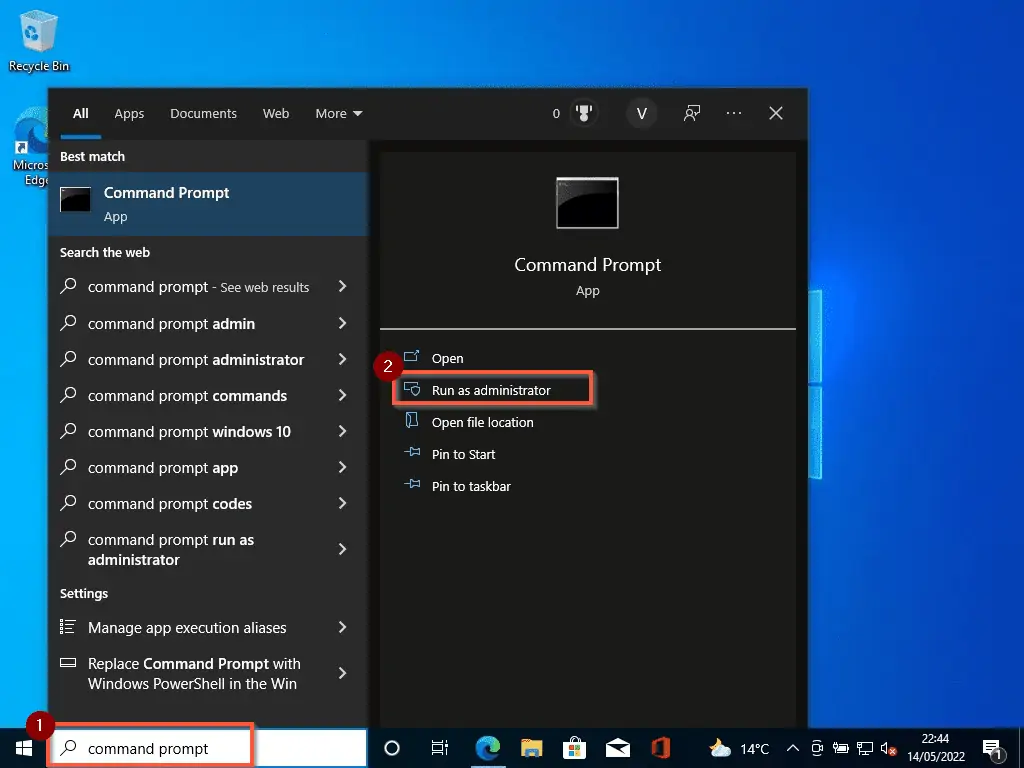
  1. Enter command prompt on the Windows 10 search box. Then, click Run as administrator on the details pane of the selected command prompt window.
How To Run Sysprep (Generalize) From Command Prompt
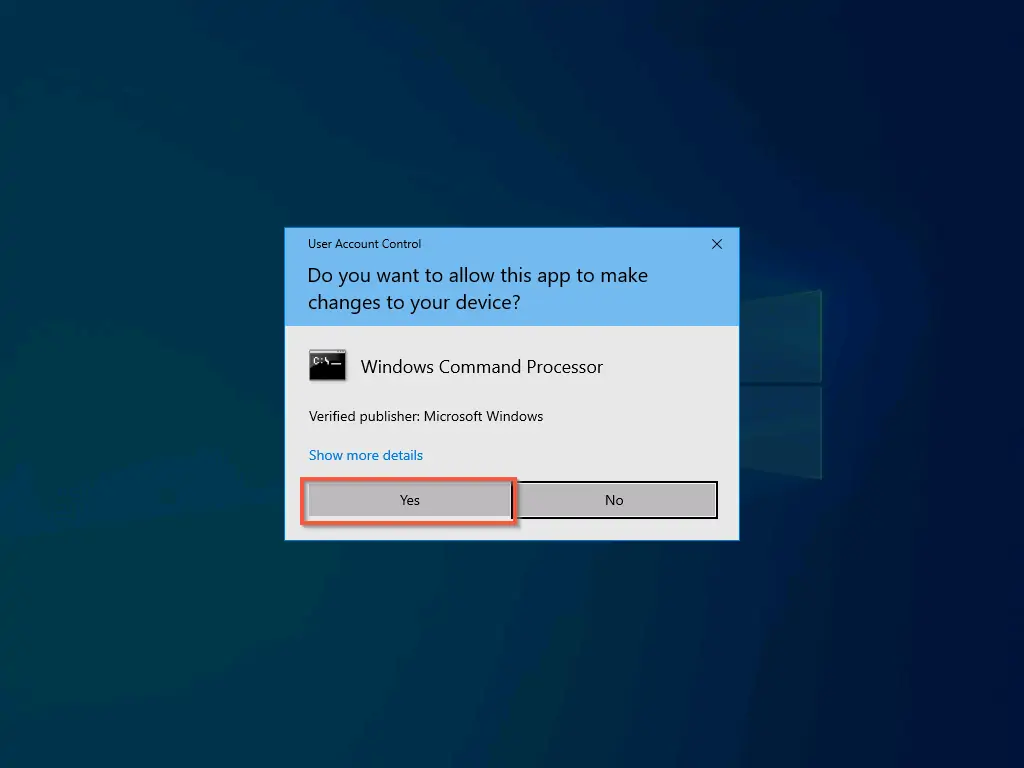
  1. Windows 10 will open the User Account Control window, requesting you to grant the program access. Click Yes.
  1. Then, when the command prompt opens, enter the commands below and press enter. Run the first command first, before the second command.
The first command changes the directory of the command prompt to the Sysprep directory. Then, the second command runs the Sysprep command.
To reduce the possibility of making a mistake with the command, I recommend that you copy it.
CD %WINDIR%\system32\sysprep
Sysprep /generalize /shutdown /oobe

When you run the Sysprep command, the tool will take some time to run. Then, when it finishes preparing Windows, it will shut down the computer.

Conclusion

If you want to safely deploy Windows 10 OS images to multiple computers, running Sysprep on the Windows 10 installation is recommended. Then, create an OS image from the Windows 10 installation.

When you run Sysprep, it removes unique configurations like computer names from the installation.

I hope you found this Itechguide helpful. If it was helpful please spare a few minutes to share your thoughts with the “Leave a Reply” form at the bottom of this page to express your thoughts.

Alternatively, you can respond to the “Was this page helpful?” question below.

Finally, for more Windows 10 Itechguides, visit our Windows 10 How-to page. You may also find our Windows 11 How-to page very informative.

About the Author

Photo of author

Victor Ashiedu

Victor is the founder of InfoPress Media, publishers of Ilifeguides and Itechguides. With 20+ years of experience in IT infrastructure, his expertise spans Windows, Linux, and DevOps. Explore his contributions on Itechguides.com for insightful how-to guides and product reviews.

Related Articles

Get in Touch

We're committed to writing accurate content that informs and educates. To learn more, read our Content Writing Policy, Content Review Policy, Anti-plagiarism Policy, and About Us.

However, if this content does not meet your expectations, kindly reach out to us through one of the following means:

  1. Respond to "Was this page helpful?" above
  2. Leave a comment with the "Leave a Comment" form below
  3. Email us at [email protected] or via the Contact Us page.

How to Run Sysprep (Generalize) in Windows 10 [2 Methods]

Photo of author

By Victor Ashiedu

Published

Do you want to create a Windows 10 image to deploy to new PCs? Then, you need to run Sysprep (Generalize) on an existing Windows 10 computer and this guide shows you how.

Overview of Sysprep (Generalize)

Why do you need to run Sysprep (Generalize) on a Windows 10 PC? What does the command do?

If you’re reading this, there is a chance that you will know why you need to run Sysprep. When you need to create an OS image for Windows 10, you need to run Sysprep first.

Running Sysprep removes all user customizations like keyboard and time zone. This returns Windows to boot to the point where a user can customize the OS.

In other words, when you run the Sysprep command in Windows 10 with the /generalize option, it removes individual details from your Windows installation.

Therefore, when you create a Windows image from the Windows installation, you can safely install it on another computer. It is important to mention that you still need to run Sysprep even if both computers have the same hardware.

In addition to using the /generalize option, Sysprep supports another option /oobe. When you include the /oobe option, Sysprep prepares Windows to restart into OOBE mode.

The OOBE mode allows a user to customize Windows 10. For example, when Windows 10 starts in OOBE mode, you can create a user account, rename the computer, and perform other customization tasks.

For a full list and explanation of the Sysprep command, see the Microsoft Sysprep documentation page – Sysprep Command-Line Options.

Option 1: Run Sysprep with GUI

You can run Sysprep by double-clicking Sysprep.exe located in the “%WINDIR%\system32\sysprep” directory. Here are the steps:

  1. Right-click the Windows Start menu and select Run.
  1. Then, in the Run window, enter the command below and click OK…
%WINDIR%\system32\sysprep
You can copy and paste the command to make it easier for you.
Options To Run Sysprep (Generalize) In Windows 10
  1. When the sysprep folder opens, double-click sysprep.exe. Double-clicking sysprep.exe opens the Sysprep program with OOB selected by default.
Options To Run Sysprep (Generalize) In Windows 10
  1. Then, check the Generalize checkbox on the System Preparation Tool pop-up window. Next, select whether you want Sysprep to Restart or Shutdown Windows 10 when it completes running.

    Finally, click OK. Sysprep will take a while to run – see the second screenshot below.
  1. When Sysprep finishes preparing Windows 10 with the generalize and oobe options, it’ll either shut down or restart.

When you start Windows 10 after running Sysprep, the Operating System will boot into the OOBE mode. See the screenshot below for details.
In essence, if you create an OS image with the installation, the Windows 10 installed with the image will start from here.

Option 2: Execute Sysprep from CMD

  1. Enter command prompt on the Windows 10 search box. Then, click Run as administrator on the details pane of the selected command prompt window.
How To Run Sysprep (Generalize) From Command Prompt
  1. Windows 10 will open the User Account Control window, requesting you to grant the program access. Click Yes.
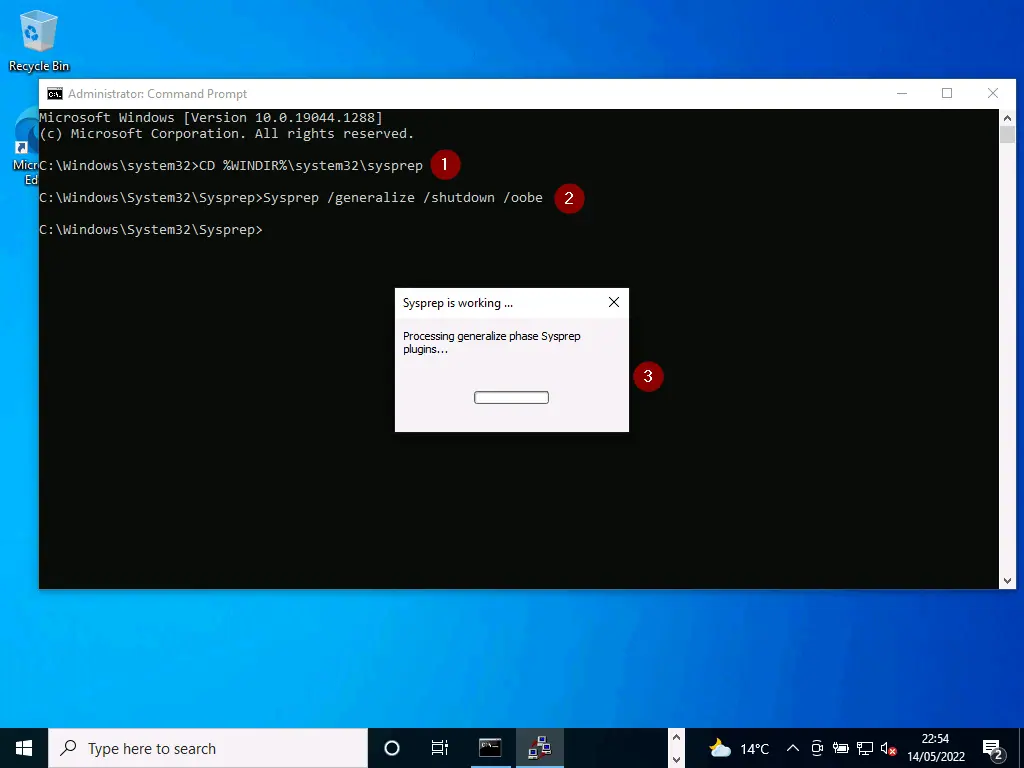
  1. Then, when the command prompt opens, enter the commands below and press enter. Run the first command first, before the second command.
The first command changes the directory of the command prompt to the Sysprep directory. Then, the second command runs the Sysprep command.
To reduce the possibility of making a mistake with the command, I recommend that you copy it.
CD %WINDIR%\system32\sysprep
Sysprep /generalize /shutdown /oobe

When you run the Sysprep command, the tool will take some time to run. Then, when it finishes preparing Windows, it will shut down the computer.
Conclusion

If you want to safely deploy Windows 10 OS images to multiple computers, running Sysprep on the Windows 10 installation is recommended. Then, create an OS image from the Windows 10 installation.

When you run Sysprep, it removes unique configurations like computer names from the installation.

I hope you found this Itechguide helpful. If it was helpful please spare a few minutes to share your thoughts with the “Leave a Reply” form at the bottom of this page to express your thoughts.

Alternatively, you can respond to the “Was this page helpful?” question below.

Finally, for more Windows 10 Itechguides, visit our Windows 10 How-to page. You may also find our Windows 11 How-to page very informative.

About the Author

Photo of author

Victor Ashiedu

Victor is the founder of InfoPress Media, publishers of Ilifeguides and Itechguides. With 20+ years of experience in IT infrastructure, his expertise spans Windows, Linux, and DevOps. Explore his contributions on Itechguides.com for insightful how-to guides and product reviews.

Related Articles

Get in Touch

We're committed to writing accurate content that informs and educates. To learn more, read our Content Writing Policy, Content Review Policy, Anti-plagiarism Policy, and About Us.

However, if this content does not meet your expectations, kindly reach out to us through one of the following means:

  1. Respond to "Was this page helpful?" above
  2. Leave a comment with the "Leave a Comment" form below
  3. Email us at [email protected] or via the Contact Us page.

Leave a comment

Send this to a friend