Do you want to learn all there is to know about the Windows Boot Manager? This guide is a deep dive into Microsoft’s latest Windows boot loading architecture.
Overview
The Windows Boot Manager is a UEFI (Unified Extensible Firmware Interface) application provided by Microsoft. If you’re wondering what a UEFI application is, in its basic form, it is an application that connects a computer’s firmware to its Operating System.
Ok, I just used the word “firmware” while explaining “UEFI application.” A firmware is a computer program that is written into the computer’s ROM (Read-only Memory).
Now, it is getting all confusing since I just used another tech term, “ROM,” but I will now stop explaining. Without confusing our non-tech readers further, firmware is software that manages the various hardware in a computer.
The firmware then works with the Operating System (OS) to interact with the various hardware components on your computer. So, as you send and receive information to and from your computer, the OS interacts with you.
Then, on a different layer, the OS interacts with the firmware in the process.
With all this in mind, I’ll now define the Windows Boot Manager (BOOTMGR) as Microsoft’s UEFI application that interacts with your computer when it is starting up. Then, when the computer starts up, the BOOTMGR hands over control to the Operating System, for example, Windows 11.
Rather than trying to explain with more tech terms, I believe that this will make it easier to understand…
When you start your Windows 10 (or 11) PC, the BOOTMGR is responsible for making sure that your Windows gets to the login screen.
How Windows BOOTMGR Works
So, how does BOOTMGR actually work, and why should you care?
Let me start by explaining why you should care to learn how the Windows Boot Manager works.
If you have been using Microsoft Windows for a long time (who hasn’t!), then you would have experienced situations where your computer refuses to get to the login screen (again, who hasn’t!).
If you understand how the BOOTMGR works and how to configure it, you’ll be able to fix most of those Windows boot problems. This is especially important if you’re a SysAdmin but also for normal Windows users.
So, now let’s get to the “how it works” part.
So far, I have talked a bit about the Windows boot manager. However, I have not mentioned that, before the BOOTMGR, some other UEFI applications run first.
After these other UEFI applications launch Windows Boot Manager, the boot manager determines which boot applications to run.
Not only that the boot manager determine which applications to run, but it also determines in which order to run them. The boot manager performs these two functions by initializing boot libraries and reading the boot configuration database.
When the boot manager determines the boot applications to run and the order to run them, it launches the applications sequentially. When the boot manager launches an application, the application executes.
Then, when the boot application finishes, it exits back to the Boot Manager. The Boot Manager then launches the next boot application in the boot configuration database.
Furthermore, when you start your computer, you may have pressed some keyboard button combinations at start-up.
After the Boot Manager completes the first boot phase I explained earlier, it then captures any keyboard button combinations you may have pressed at your computer start-up.
Then, the Boot Manager runs a boot application called mobilestartup.efi. When the Boot Manager launches mobilestartup.efi, mobilestartup.efi then runs several boot libraries.
Some of the boot libraries that mobilestartup.efi execute run only on the first boot (for example, provisioning the secure boot policy). Then, mobilestartup.efi runs the library that implements UEFI battery charging.
This is why your laptop is able to charge its battery while your computer is still booting (even before Windows starts). The benefit of running the library that charges the laptop’s battery is to ensure that the laptop has enough power to boot fully.
After running the UEFI battery charging library, the mobilestartup.efi then runs the last boot last set of libraries. These libraries implement flashing the devices with a new image, device reset, and updates.
These last set of libraries determine whether the computer should boot to bios flashing (update), or device reset mode. In addition, the libraries also determine whether to continue updating the Operating System or boot to the main Operating System.
Finally, if the mobilestartup.efi does not boot to any of these other boot options, the Windows Boot Manager boots the computer into the Main Operating System or updating Operating System.
Features of the Windows Boot Manager
In the first section of this guide, I gave an overview of the Windows Boot Manager. Then, I discussed how the Boot Manager works in the second section.
I will take you further into this Windows boot technology by highlighting its main features in this section.
The BOOTMGR Runs After Other UEFI Applications Have Completed
Earlier I mentioned that when you start your computer, the computer first runs some other UEFI applications. These UEFI applications display the flash screen that shows the brand and make of your computer.
Specifically, the following UEFI applications run before handing over to the Windows Boot Manager:
- The Firmware boot loaders
- The UEFI (Unified Extensible Firmware Interface) environment
When these manufacturer-specific UEFI applications completes, they hand over to the BOOTMGR. Then, the Boot Manager completes the boot process as detailed in the last section of this guide.
It is Part of the Boot Loading Architecture
BOOTMGR is part of the new Windows Boot Loading Architecture (BLA). The BLA is made of three components.
- Bootmgr.exe (Windows Boot Manager). As described in detail earlier, this is the first executable running when Windows Boot Manager takes over a PC’s boot process.
- Winload.exe (Windows operating system loader). When Bootmgr.exe completes the initial boot phase, it starts Winload.exe or Winresume.exe.
If Windows is not resuming from hibernation mode, Bootmgr.exe will call Winload.exe.
The Winload.exe loads essential device drivers that the Operating System requires to start. In addition to loading core device drivers, Winload.exe also loads ntoskrnl.exe, a core part of the Windows OS. - Winresume.exe (Windows resume loader). Earlier, I mentioned that Bootmgr.exe either loads Winload.exe or Winresume.exe.
As I already mentioned in point 2 above, Bootmgr.exe will load Winload.exe is booting normally (that is, not resuming from hibernation). However, if Windows is resuming from hibernation, Bootmgr.exe calls Winresume.exe instead.
The job of Winresume.exe is to help the computer resume from hibernation.
It is important to mention that the Winload.exe and the Winresume.exe are located in the subfolders of %WinDir%\System32. Most times, Windows has the %WinDir% in C:\Windows.
However, if you installed Windows 10 in another drive, for example, D:\ the %WinDir% will be D:\Windows. To determine the %WinDir% for your computer, enter %WinDir% in the Windows search.
BOOTMGR Charges the Devices Battery Before Boot
One of the features/functions of the Windows Boot Manager is to charge the PC’s battery before it resumes booting the PC.
This is to ensure that the PC has enough power before it resumes booting. This part of the Boot Manager process is executed by the mobilestartup.efi which runs the libraries that implement UEFI battery charging.
If your device’s battery is not charged and you did not connect the device to power, your PC will throw an error. Specifically, this is the stage where your laptop will display information that your laptop is not charged and booting cannot continue.
Windows Boot Manager Captures and Saves Offline Crash Dumps
This is an important feature of the Boot Manager.
If you need to troubleshoot Windows boot problems, the crash dump file contains essential information that will help you determine the cause of Windows boot failures.
BOOTMGR Handles Flashing, Resetting, or Updating the Device With a New OS Image
I have hinted at these features/functions in the “how it works” section of this guide. The Windows Boot Manager is responsible for deciding whether to install a new OS image on the computer.
It may also update the OS on the computer or boot normally to the Windows Operating System.
Benefits of the Windows Boot Manager
Can Manage Windows and Non-Windows Operating Systems
If you have multiple Operating Systems on your PC, you can use the Windows Boot Manager to manage which OS your PC loads.
Furthermore, the multiple OS can be Windows or non-Windows OS, like Linux.
It Can Boot from Secondary Storage
If you insert a Windows 11 installation USB into your computer and select the USB as the first boot device, the BOOTMGR manages the boot process and initiates the installation of your OS from the installation device.
Provides Automatic OS Selection in Dual-boot Scenario
In the last subsection, I mentioned that BOOTMGR could manage both Windows and non-Windows Operating Systems.
In practice, if you have multiple Operating Systems on your PC, the WBM displays a screen at start-up and offers you the option to select which OS to load.
This may contribute to the slow-down of your PC boot process. If you do not use the other Operating Systems regularly, you may configure Boot Manager to boot a default OS after the time-out expires.
More on this in the “How To Configure Windows Boot Manager” section.
GUI and Command Line Management Options
Another important advantage of the BOOTMGR is that Microsoft offers you multiple options to manage it.
You can manage the Boot Manager from Advanced System Properties, System Configuration (MSConfig.exe) tool, or Windows command Prompt (BCDEdit command).
BOOTMGR provides useful information for troubleshooting and resolving Windows boot errors. In the last section, I mentioned that during the boot process, the WBM creates crash dump (also known as memory dump) files.
SysAdmins can read these files (with special dump file viewers) to determine the reason for Windows boot failures.
Limitations of the BOOTMGR
May Slow Down Windows Boot-up
This is one of the major drawbacks of the WBM. However, you can modify the Boot Manager configuration to improve your Windows boot process.
More on how you can do those later in this guide.
Sometimes Throws a “BootMgr is Missing” Error
This is a common error most Windows 10 users have reported. However, you can fix this error 9 out of 10 times by Rebuilding the Boot Configuration Data (BCD).
The Crash Dump File is Not Easily Readable
The crash dump file (located in %SystemRoot%\MEMORY.DMP) generated by the Boot Manager is not easily readable. You need the special dum file viewer to view the crash dump files BOOTMGR generates.
This is a major limitation, especially for non-techy Windows users.
How to Configure Windows Boot Manager with GUI Tools
As I mentioned earlier in this guide, you can use three tools to configure the Windows Boot Manager. Firstly, you can configure BOOTMGR via the advanced System Properties.
Alternatively, you can use the System Configuration (MSConfig.exe) tool or the BCDEdit command. In the following subsections, you can use these methods to configure the Boot Manager.
How to Configure Windows Boot Manager Via Advanced System Properties
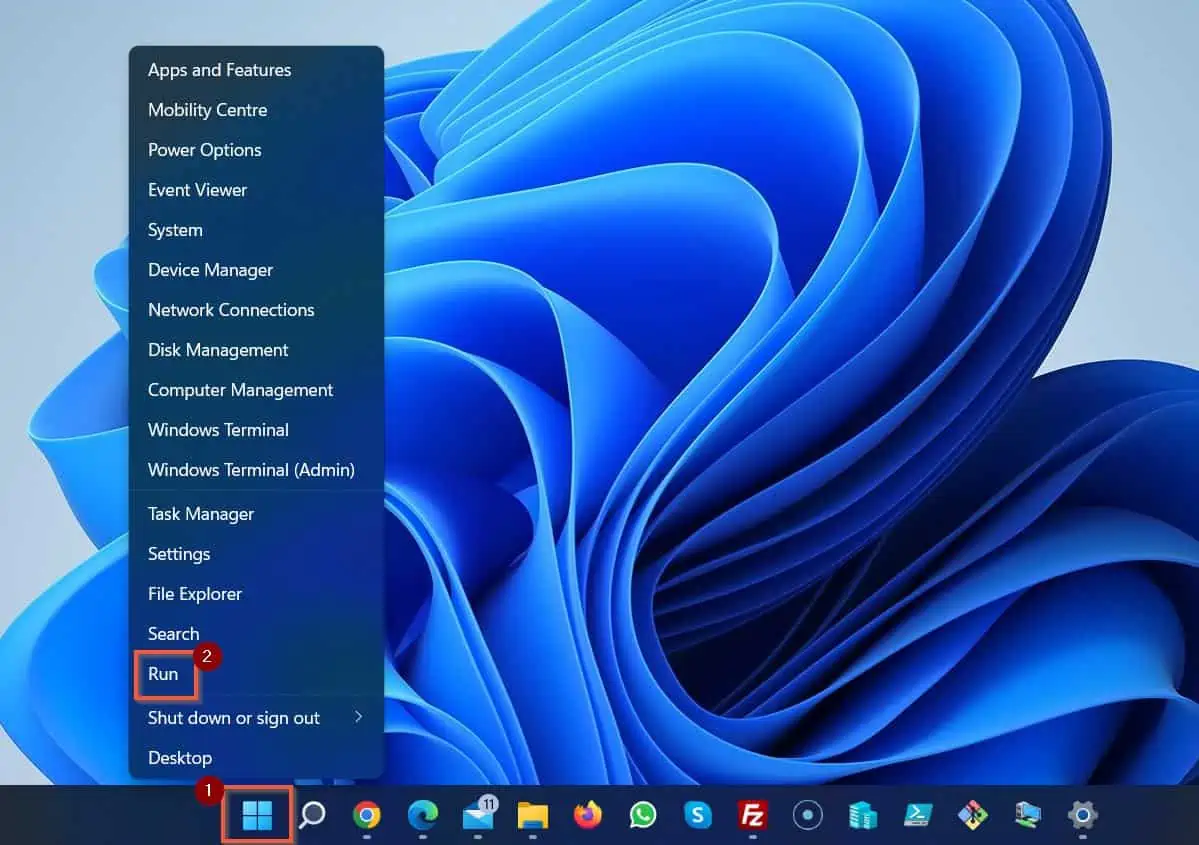
- Right-click the Windows Start Ment and select Run.
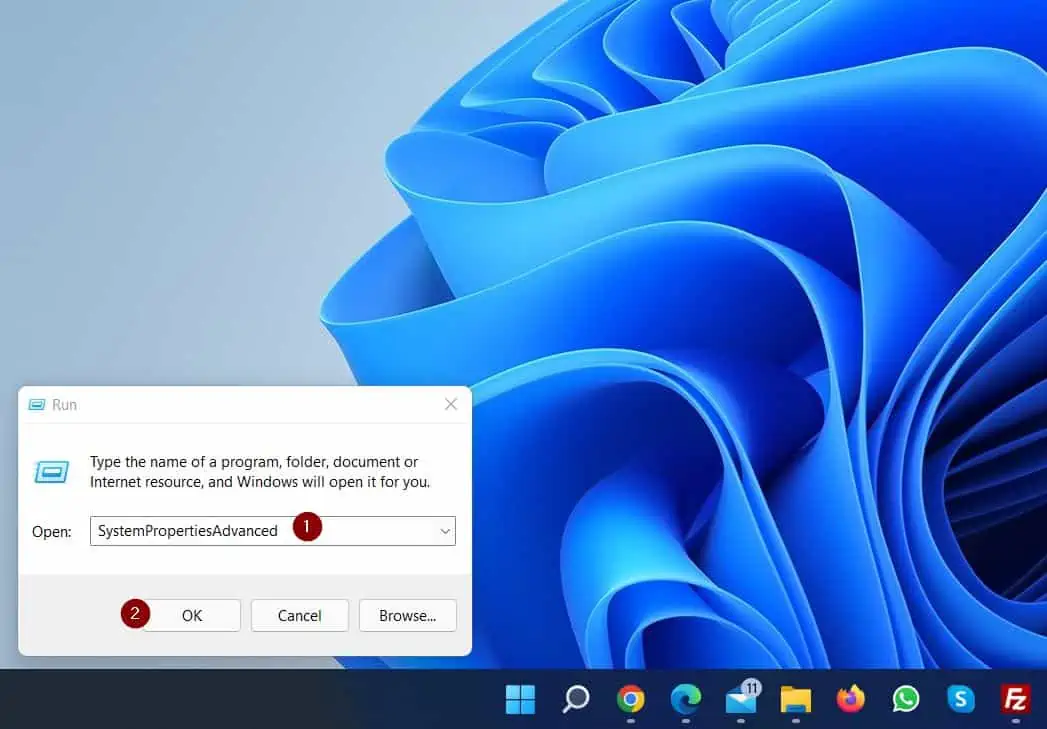
- Then, when the Run window opens, type the following and click OK.
SystemPropertiesAdvanced
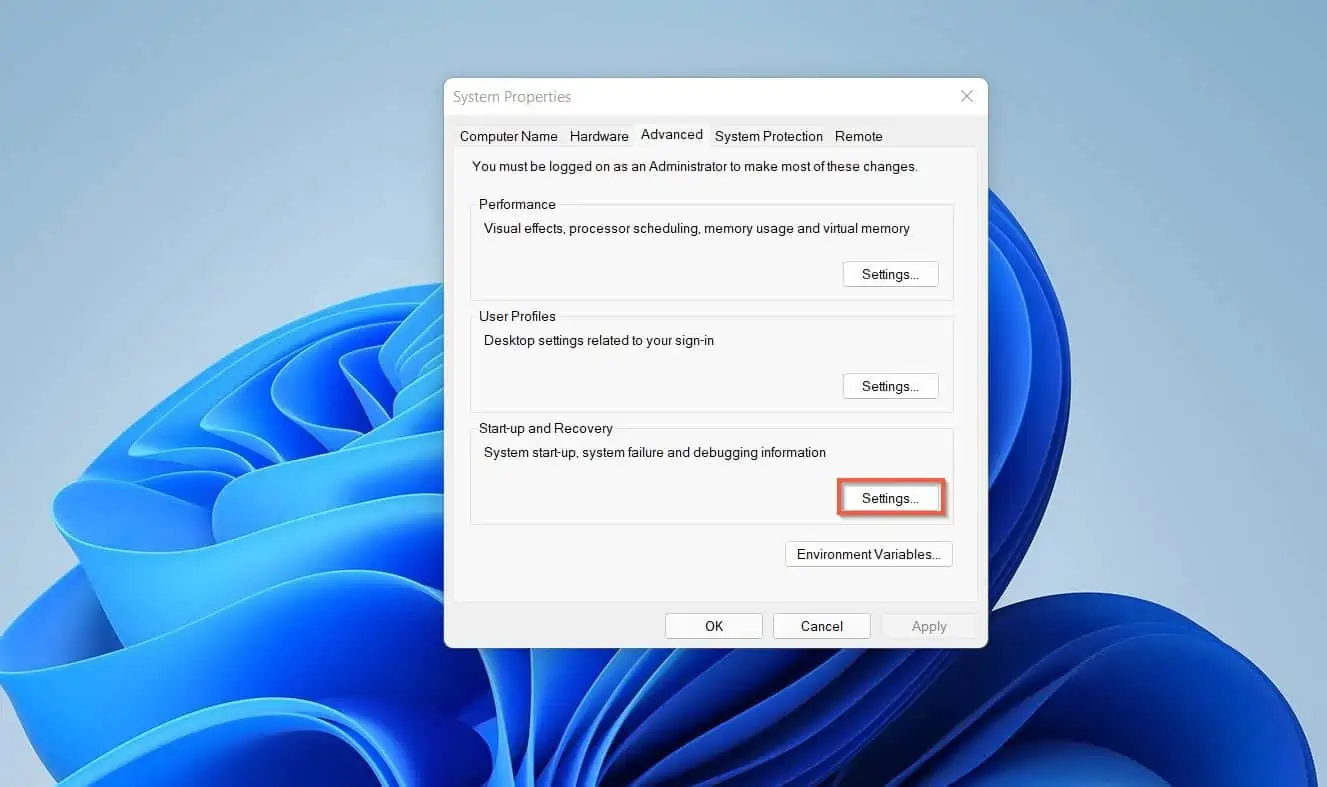
- Click Settings on the “Start-up and Recovery” section of the Advanced tab.
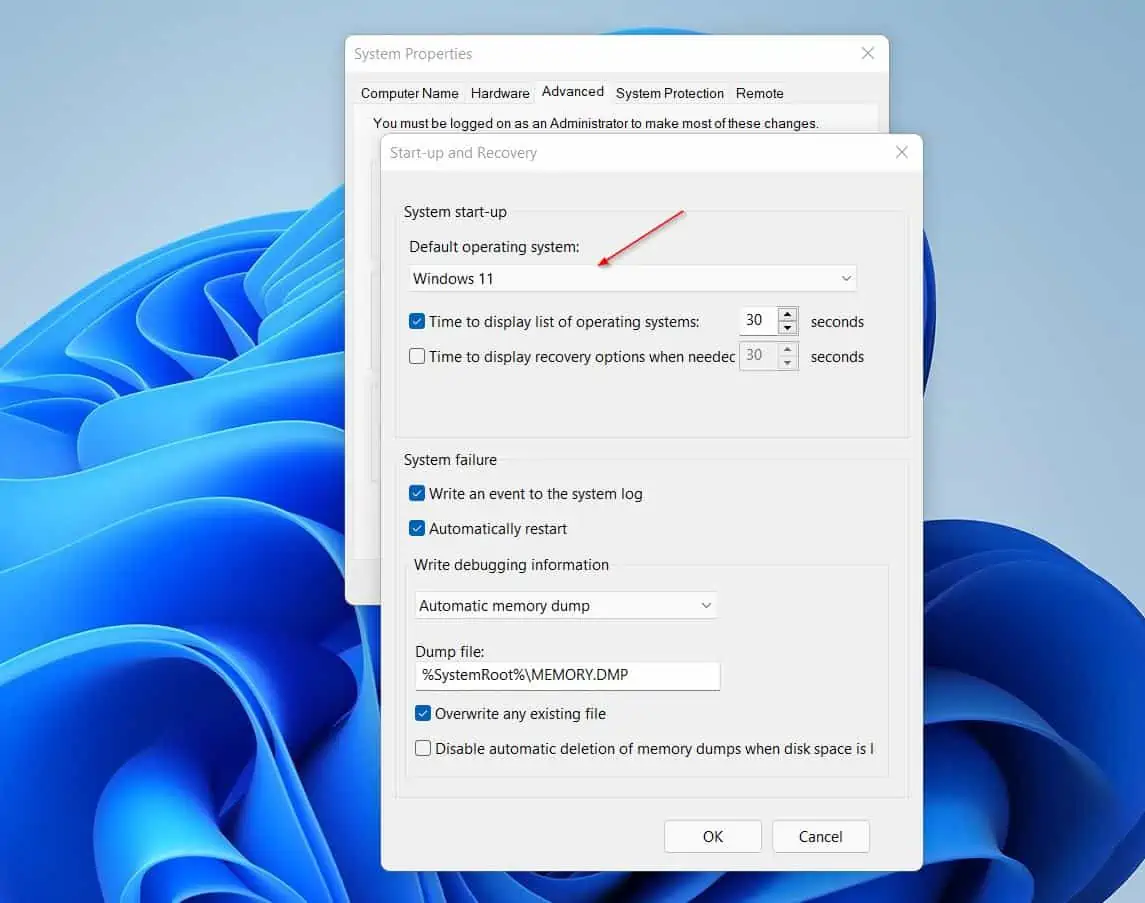
- When the “Start-up and Recovery” configuration page opens, you can perform the following actions:
i) Change the default Operating System (if you’re dual-booting multiple OSs) [1]
ii) Determine whether to add a delay to the OS selection page that WBM displays at start-up. Alternatively, you may modify how long BOOTMGR delays the OS selection screen [2]
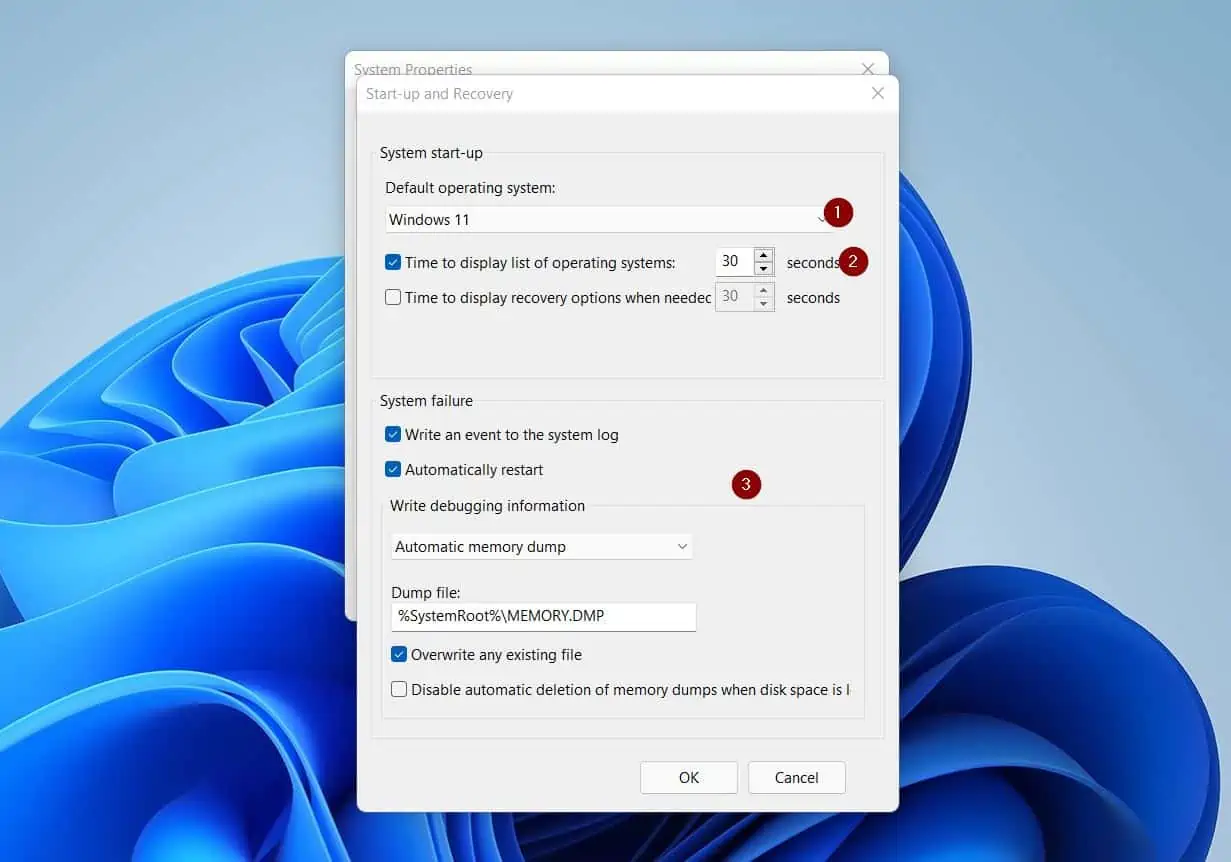
iii) Finally, you can configure how Windows Boot Manager saves and manages the Crash Dump file [3]
How to Configure Windows Boot Manager With The System Configuration (MSConfig.exe) Tool
- Enter MSConfig.exe in the Windows search. Then, from the search results, click System Configuration.
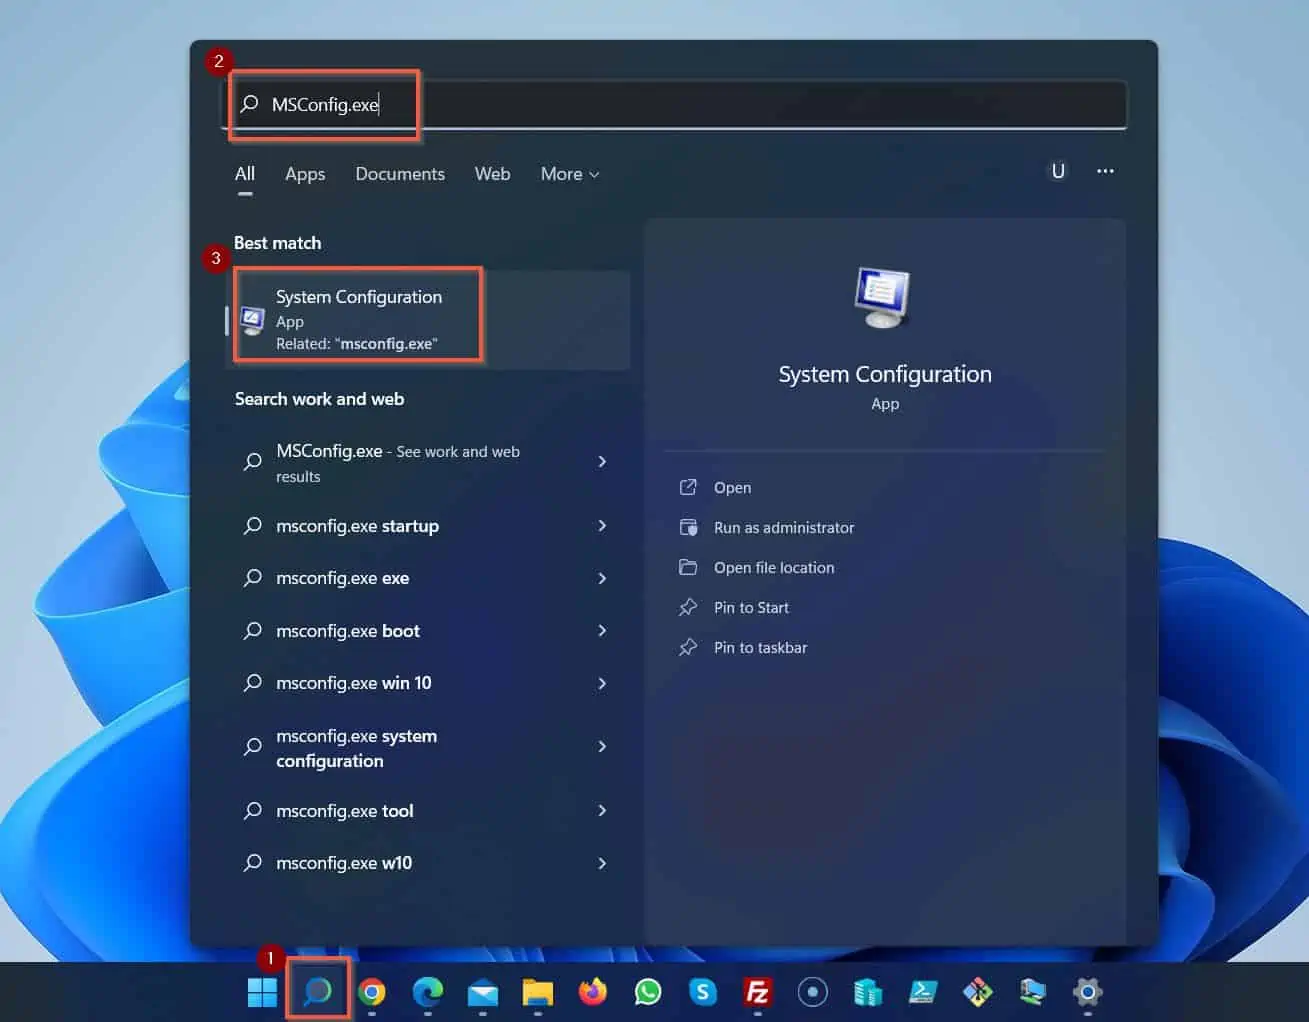
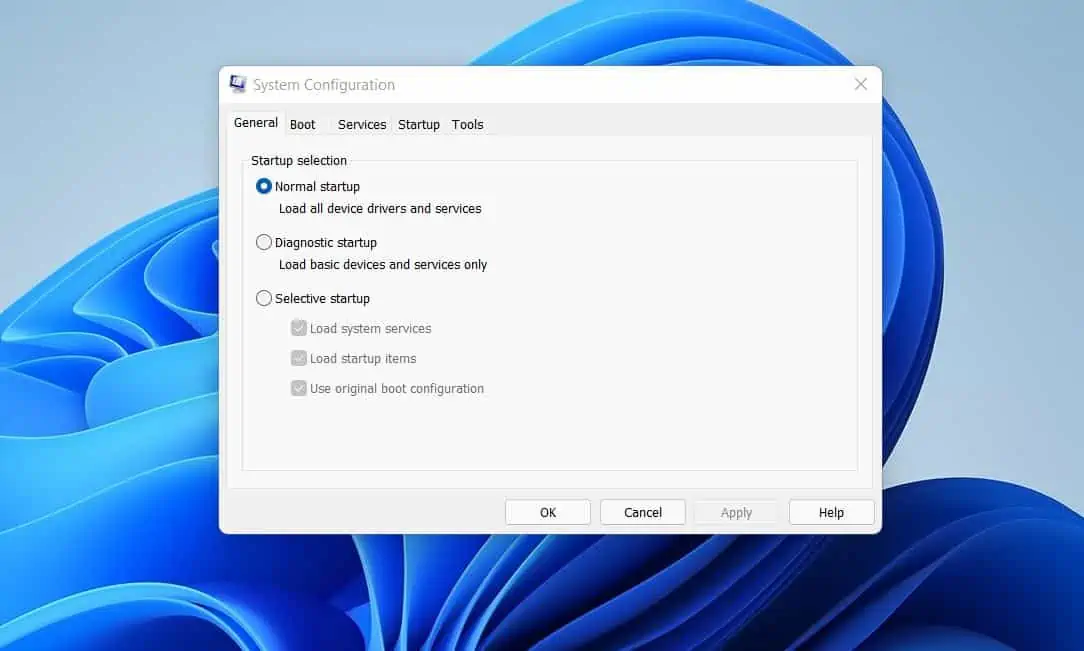
- When the System Configuration tool opens, it opens on the “General” tab.
On the General tab, you can select the second or third options if you’re having some Windows boot problems.
For example, you select “Diagnostic startup” if your Windows PC is having problems, and you want to decide whether a recently installed device is causing the problem.
Alternatively, you may select “Selective startup” for more granular control of the Windows startup process.
- Then, click the “Boot” tab to configure additional Boot Manager options. As you can see, the “Boot” tab of the System Configuration tool is similar to the Advanced System Properties in the last subsection.
However, the System Configuration tool gives you better control to tweak the Windows Boot Manager behavior.
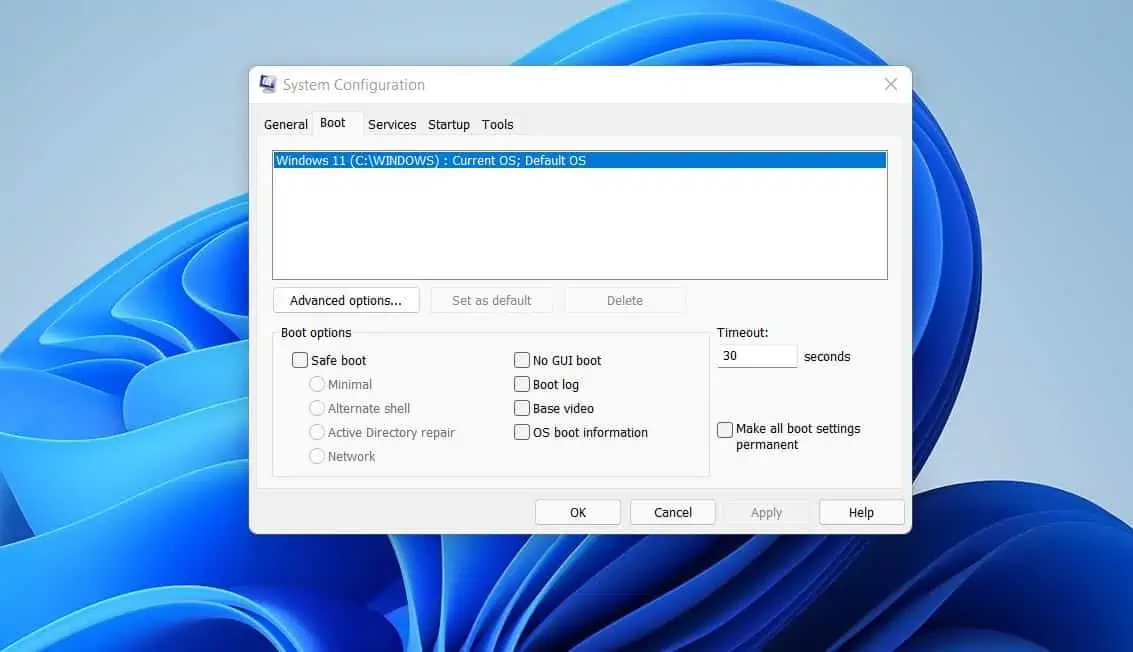
For example, apart from setting the default Operating System, you can also modify the boot behavior in the “Boot options” section.
How to Configure Windows Boot Manager with the BCDEdit Command Tool
In the last section, I showed you how to use Windows GUI tools to configure the Windows Boot Manager.
This section will show you how to use the BCDEdit command-line tool to configure the Windows Boot Manager.
This BCDEdit command tool is particularly useful if you cannot start your computer normally. A typical example is when your computer fails to boot with the “BOOTMGR missing” error message.
If you experience this error or any other boot-related error message, follow the steps below to start Windows 10 (or Windows 11) in recovery mode.
Then, use the BCDEdit command to repair your PC’s boot configuration database or any other related errors.
- Boot Windows 10 To The Recovery Mode
- Then, navigate to “See advanced repair options -> Troubleshoot -> Advanced options -> Command Prompt”
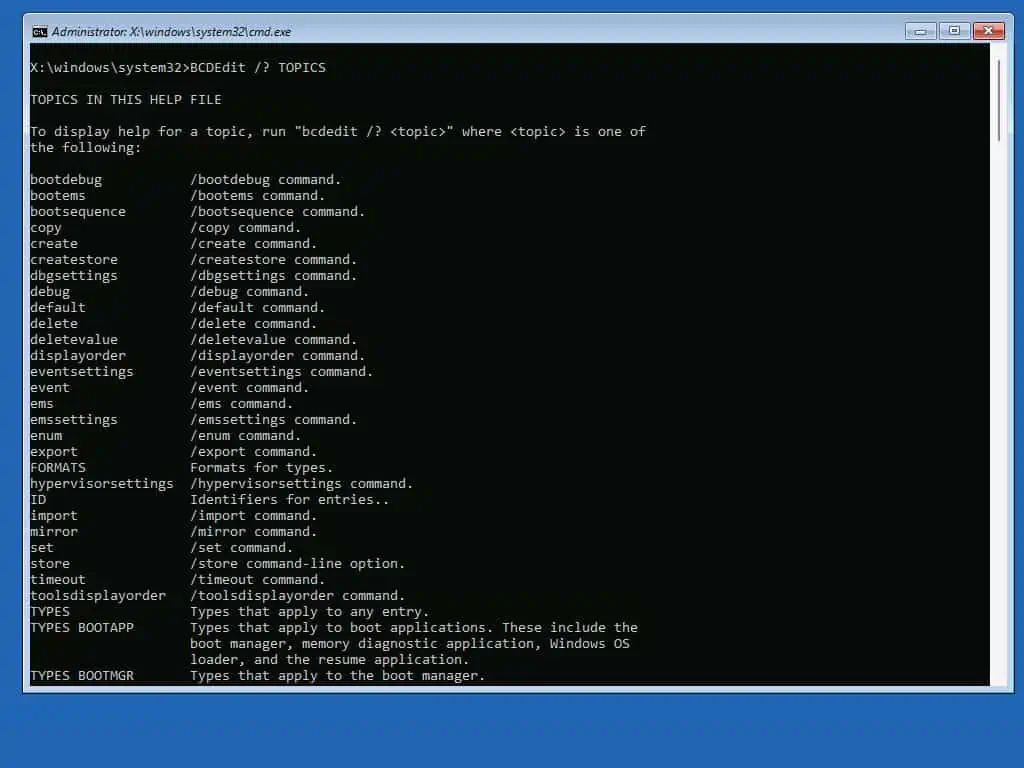
- When the Command Prompt opens, to list the BCDEdit command switches in alphabetical order, type the command below; then, press the enter key on your keyboard.
BCDEdit /? TOPICS
- Then, to learn how to use a BCDEdit command topic, enter
BCDEdit /? <TOPIC>
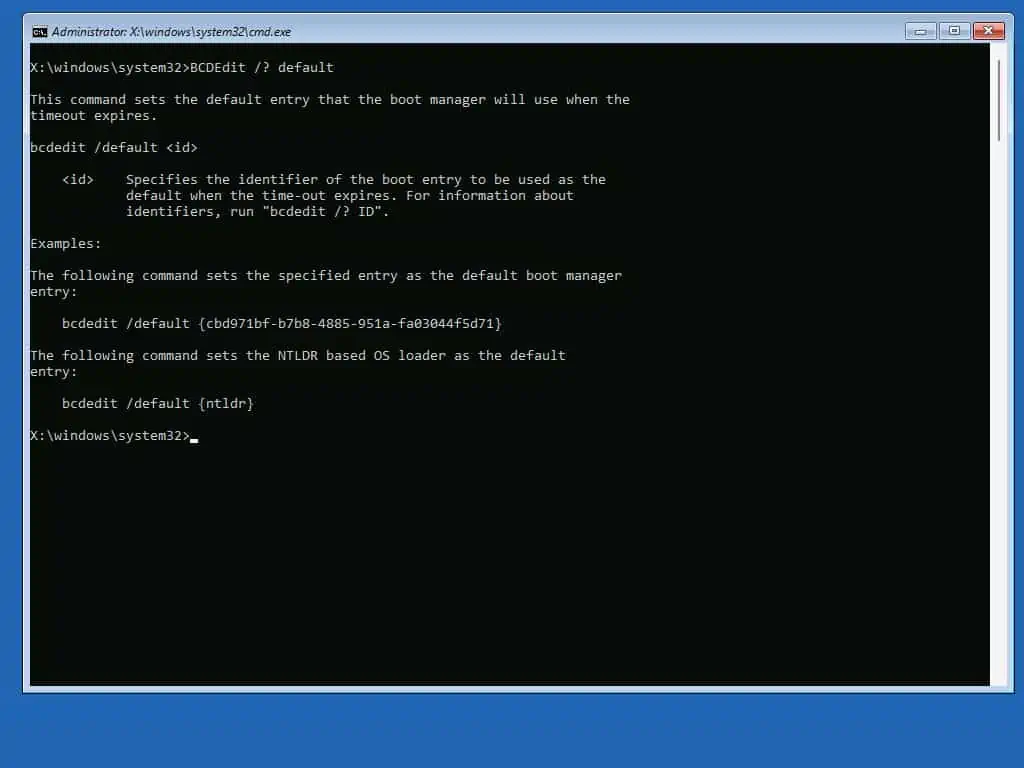
As an example, type the command below to determine how to set the default Operating system in Boot Manager. Then press Enter.
BCDEdit /? default
The command above displays information about the “default” topic of the BCDEdit command. In addition to that, the command also displays how to run the command.
How to Use BCDEdit to Set Default OS in Windows Boot Manager
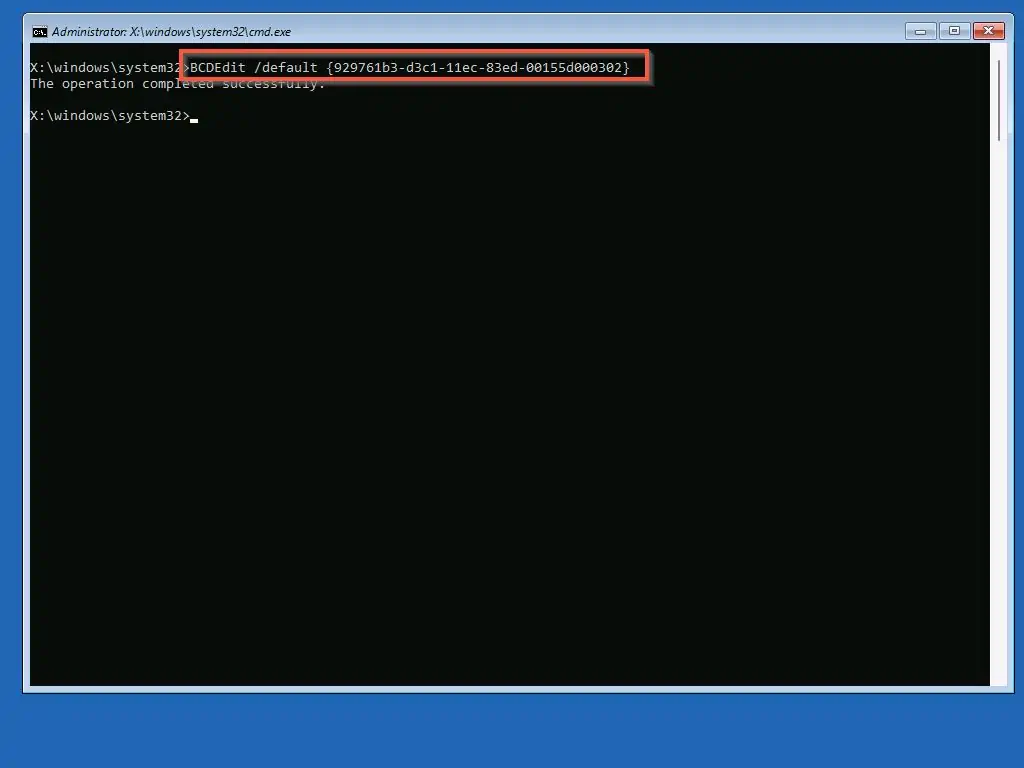
Based on the information displayed by the previous command, to set the default OS that the Windows Boot Manager loads when the time-out expires, run the command below:
BCDEdit /default <id>
“<id>” is the id of the OS you want to make the default. Obviously, you need to get the OS’s ID before running this command.
So, to display all Operating Systems (including their IDs) in the Boot Manager, run the command below.
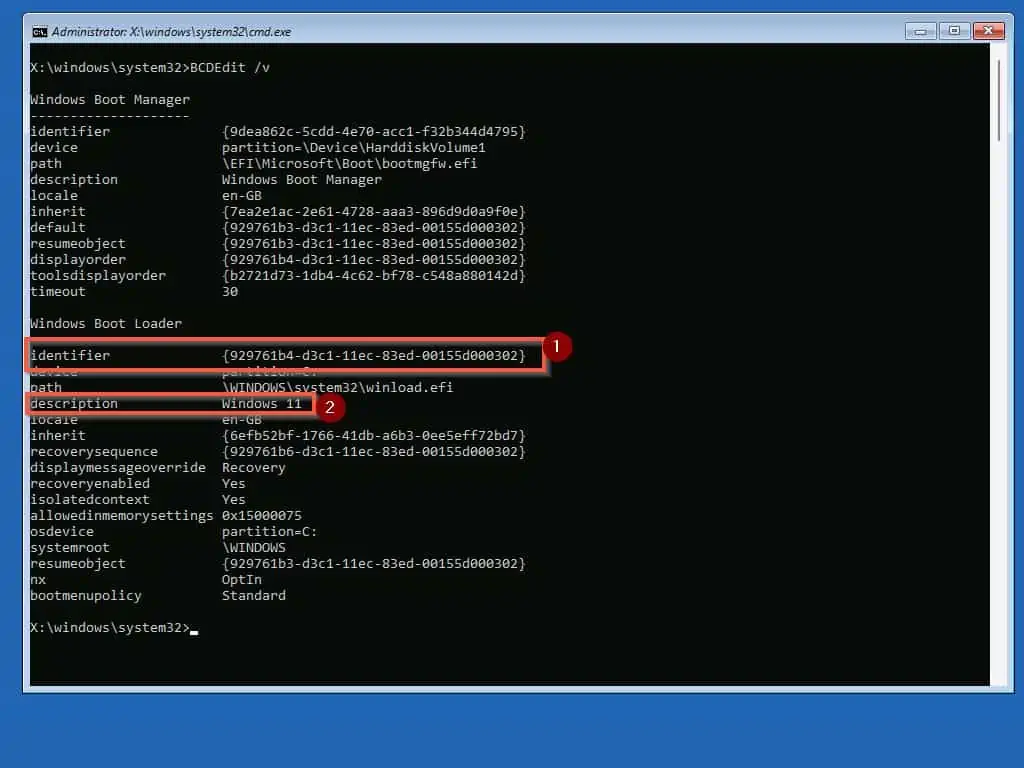
BCDEdit /v
The command returns all existing entries in the BCD store. In my example below, the command displays only one entry since I have just one OS on my PC.
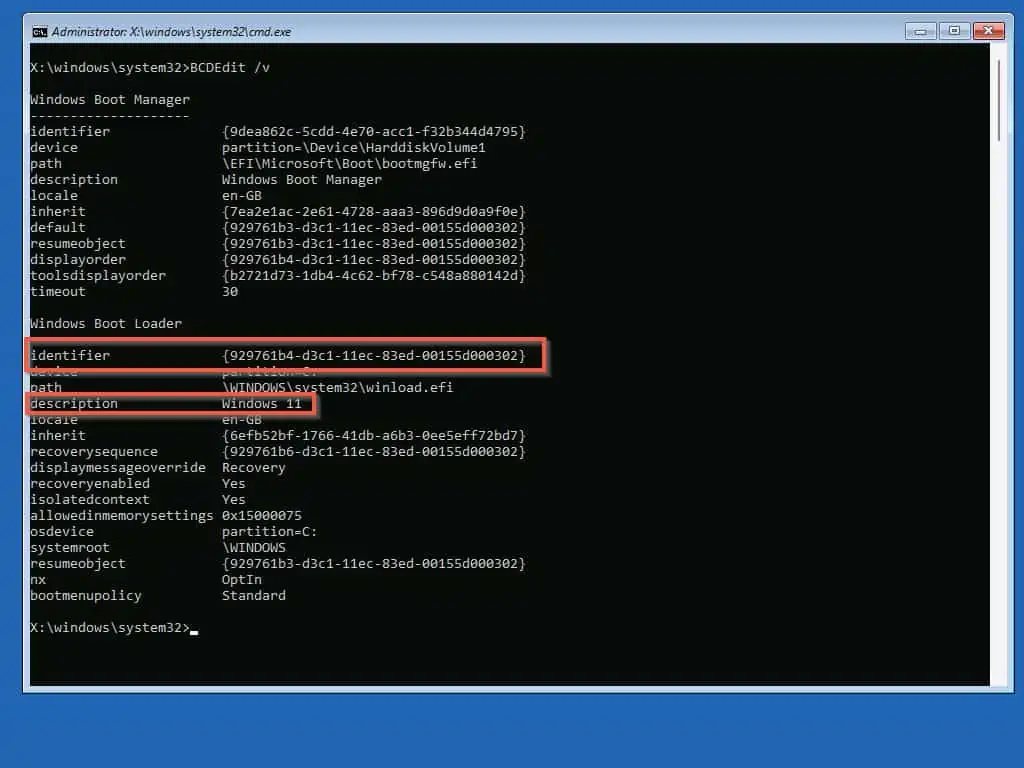
If I had more than one operating system in my BOOTMGR and wanted to set Windows 11 as the default OS, I would run the command highlighted in the screenshot below.
How to Change OS Entry Name in Windows Boot Manager Using BCDEdit
Moving on, another important action you can perform with the BCDEdit command is changing the OS entry’s name. To do that, you must first get the ID of the entry using the command.
BCDEdit /v
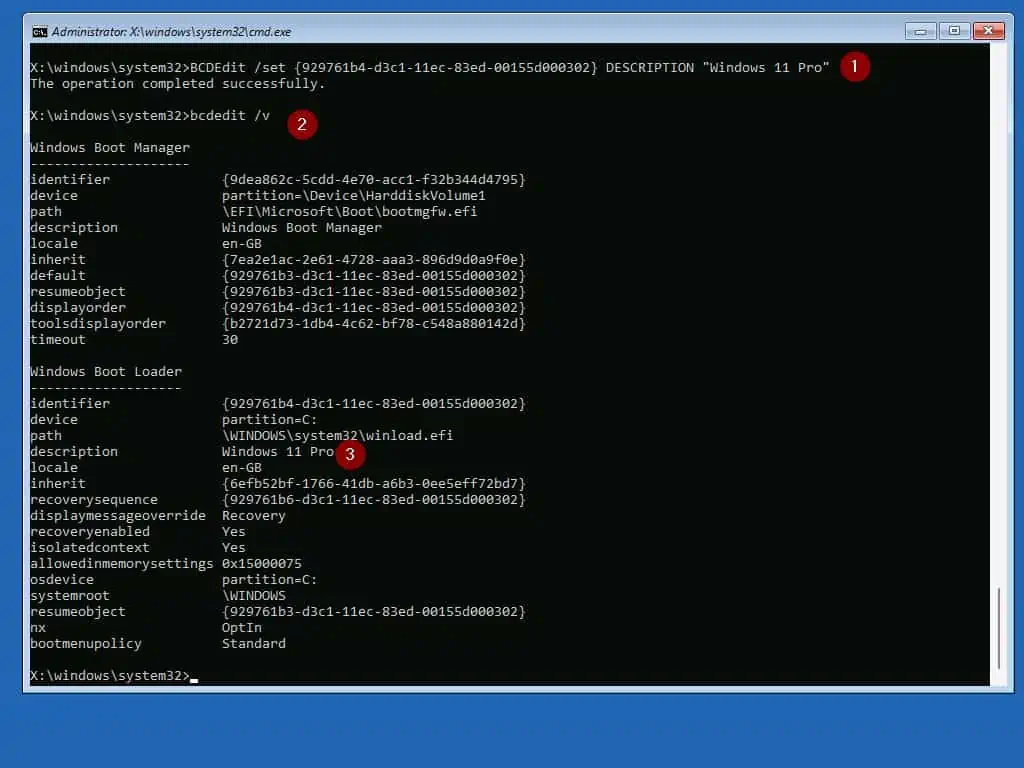
Then, to change the name of the OS entry, use the /Set topic of the BCDEdit command as shown below.
BCDEdit /set <ID> description "New OS description"
For example, to change the entry from “Windows 11” to “Windows 11 Pro”, I will use the command beneath this screenshot…
BCDEdit /set {92971b3-d3c1-11ec-83ed-00155d000302} description "Windows 11 Pro"After I ran the above command, I also ran the “BCDEdit /v” command to confirm that the above command changed the name of the OS entry.
How to Backup and Restore Windows Boot Manager with BCDEdit
You can backup the Windows Boot Manager using BCDEdit. Here is a sample command you can use to backup the BOOTMGR entries.
bcdedit /export <path>
On the opposite side of the coin, to restore the Boot Manager entries use the command below.
bcdedit /import <full-path-to-BCD-filename> [/clean]
Fix Common Windows BOOTMGR Errors
One of the limitations of the Windows Boot Manager I mentioned in the “Pros and Cons” section is that it may return “BOOTMGR missing” error message.
When your PC displays this error message, it will not start. So, your only option is to use the steps in the last section to boot your PC to Windows recovery mode.
Then, navigate to “See advanced repair options -> Troubleshoot -> Advanced options -> Command Prompt”. When Command Prompt opens, use the command described in each subsection below to fix the error identified in that subsection.
How to Fix “Boot Configuration Data (BCD) Missing or Corrupted”
If you receive the “Boot Configuration Data (BCD) missing or corrupted” error message, to fix this error, run the following commands from the Windows recovery mode command prompt.
BOOTREC /ScanOS
When the command completes, reboot your computer to see if the boot problem is resolved. If the problem is not resolved, boot your PC to the Windows recovery mode command prompt.
Then, try the command below.
BOOTREC /RebuildBCD
When the Command Prompt completes the above command, restart your computer and see if your PC starts successfully.
How to Fix Error Code “Inaccessible Boot Device (Stop error 0x7b)”
As usual with all Windows Boot Manager errors, when your PC displays this error message, it will not boot. Specifically, your PC will display this error message – “Error code INACCESSIBLE_BOOT_DEVICE (STOP 0x7B)”.
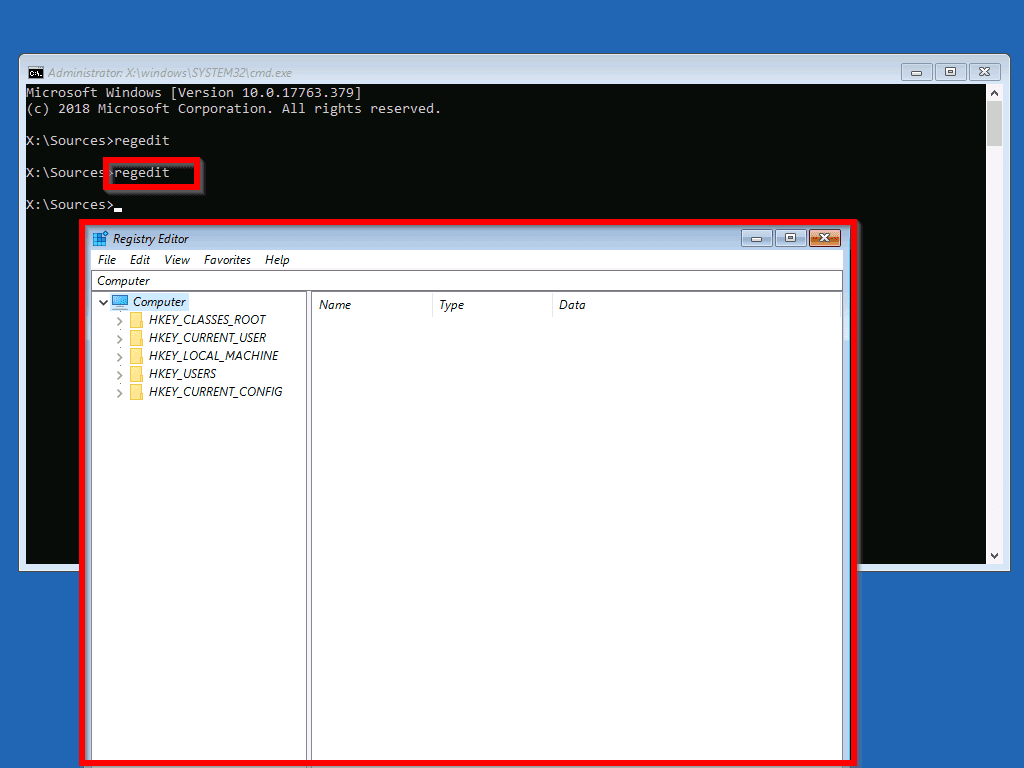
To fix the problem, boot your PC to the Windows recovery mode command prompt.
- Then, on the Command Prompt, enter regedit and press Enter. The registry editor will load.
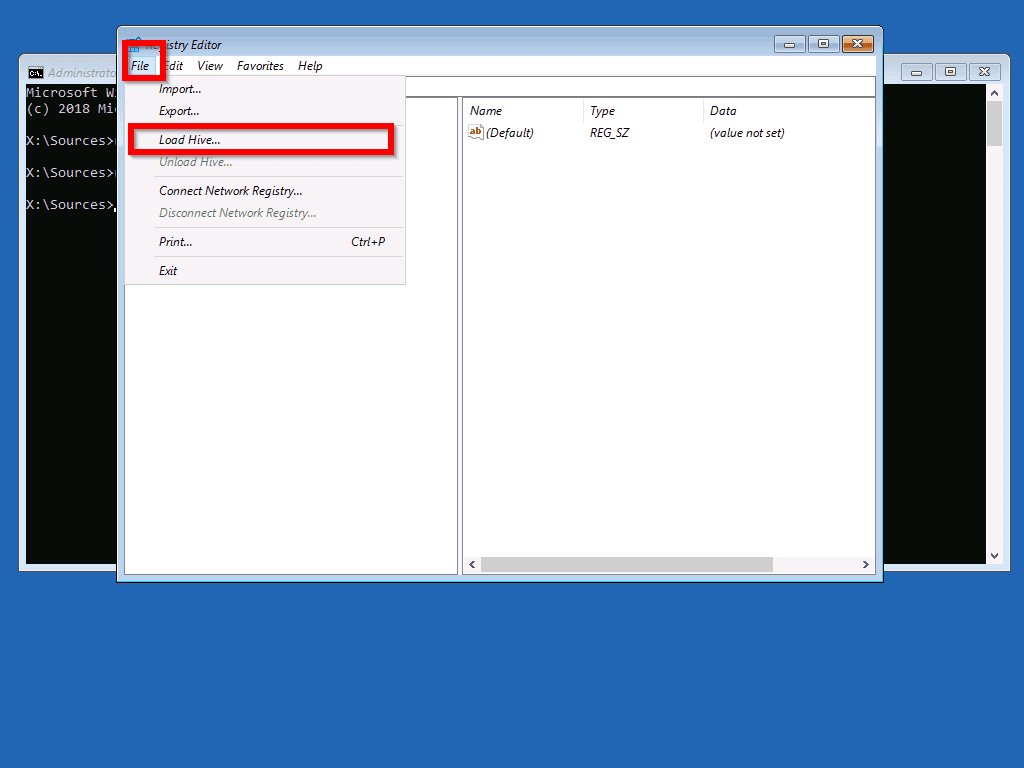
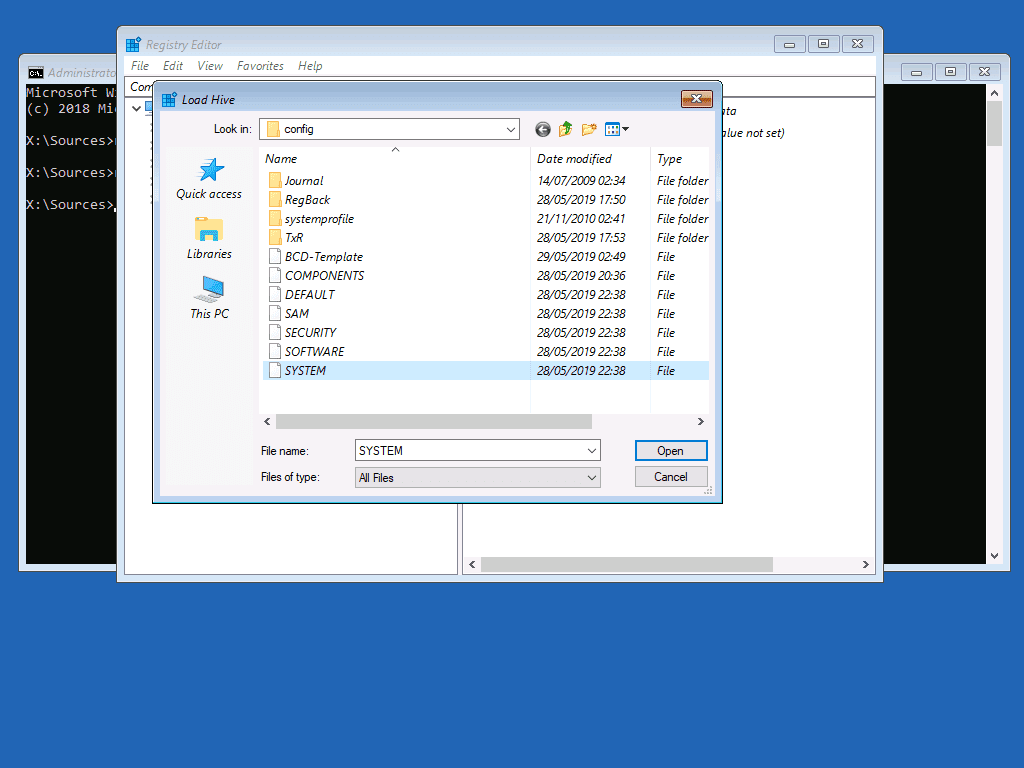
- In the registry editor, Select HKEY_LOCAL_MACHINE. Then select File -> Load Hive from the dropdown menu.
- Navigate to %windir%/system32/config. Then select SYSTEM and click Open.
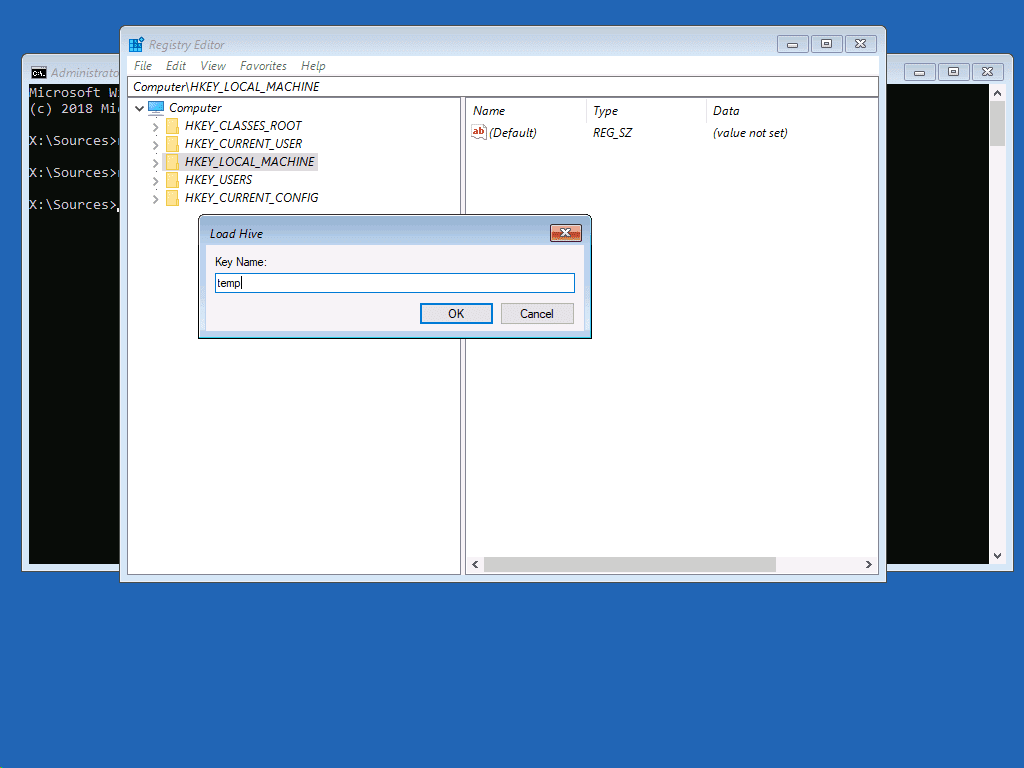
- Enter the name of the hive as temp. Then click Ok.
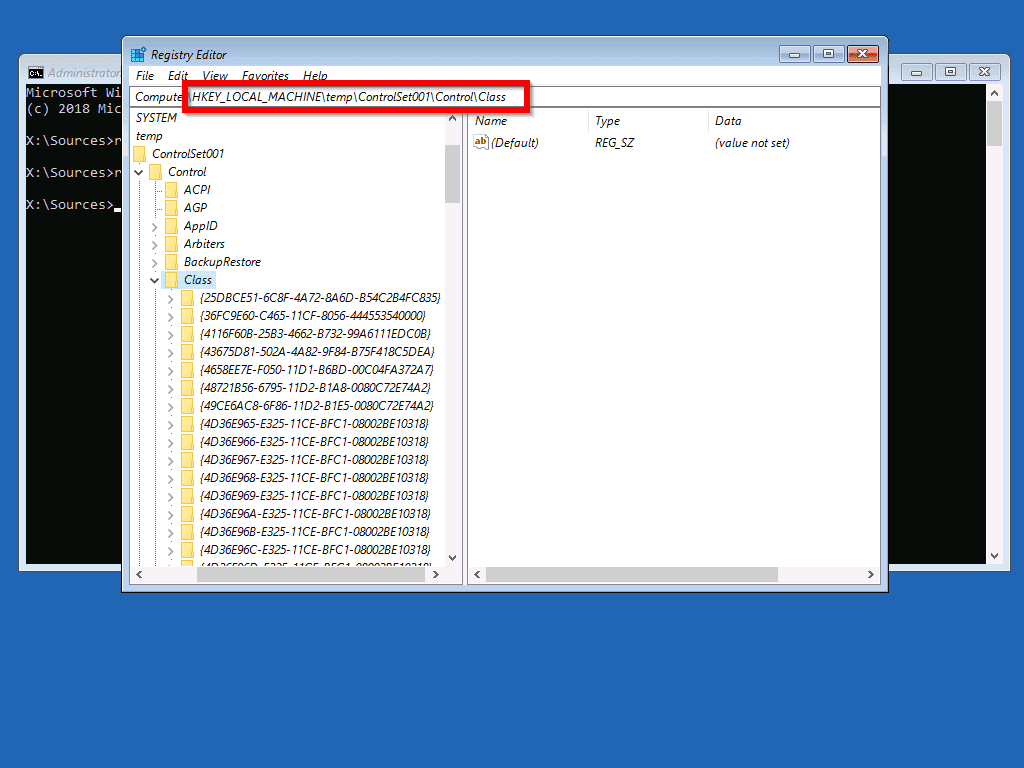
- Open HKEY_LOCAL_MACHINE\temp\ControlSet001\Control\Class.
- In the path, check for Non-Microsoft Drivers: Click the GUID of the driver [1]. If it is a Non-Microsoft Driver with a UpperFilters and/or LowerFilters [3], double-click the UpperFilters or LowerFilters key. Then delete the value data if it exists. See the second image below.
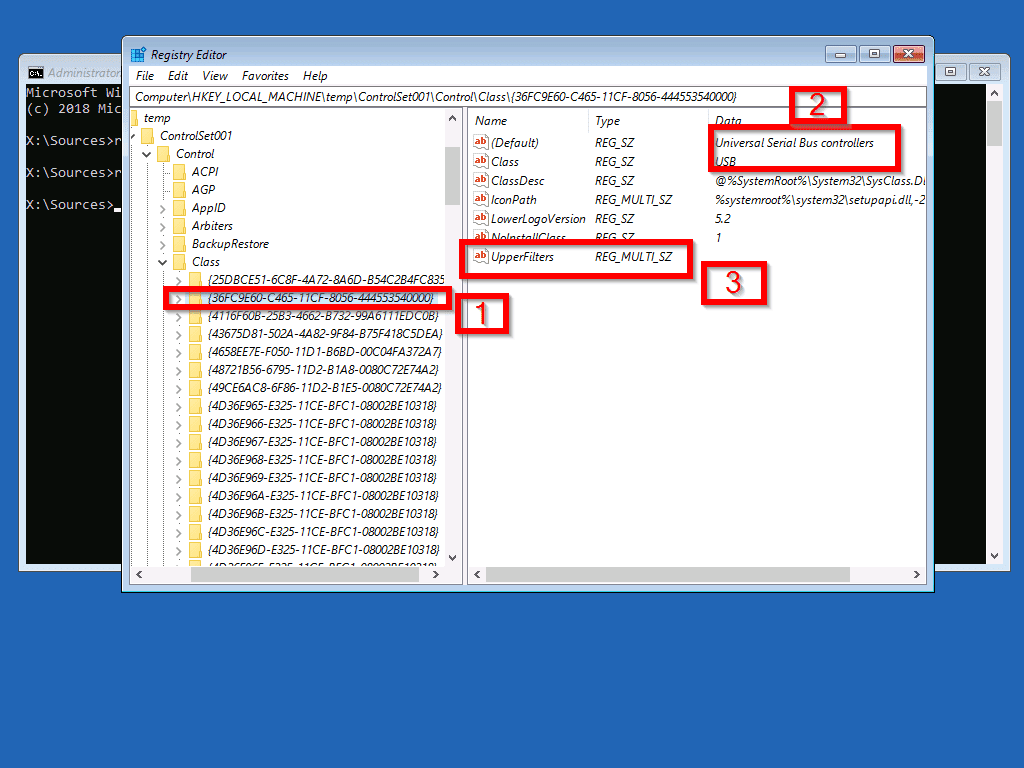
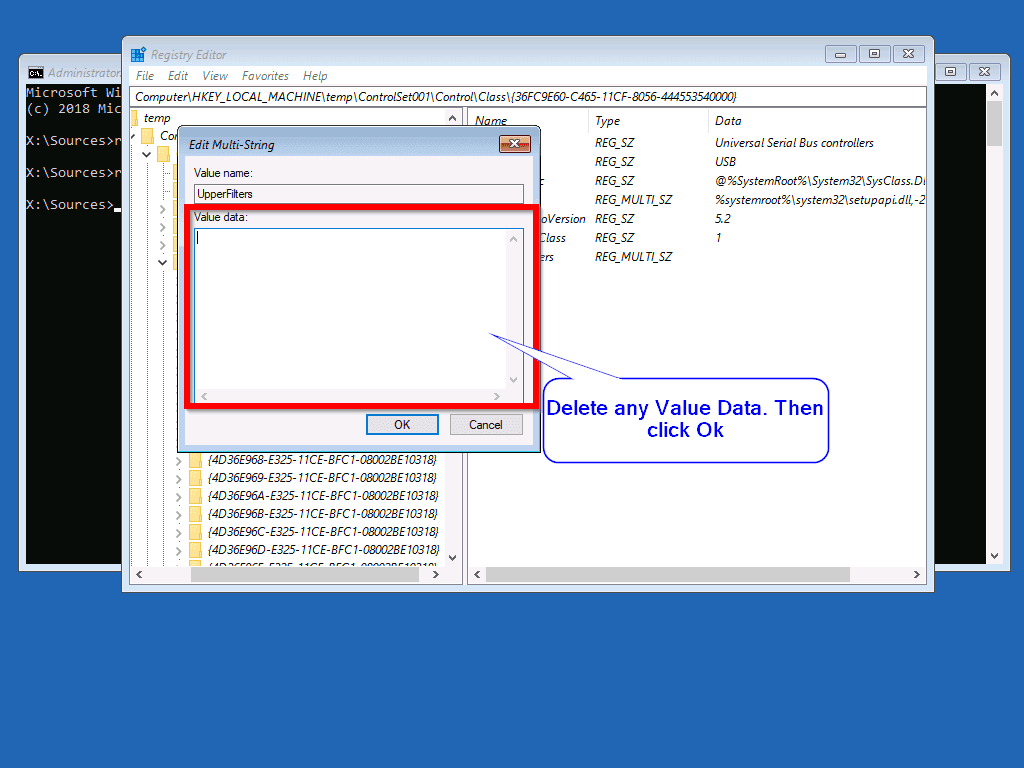
- When you finish deleting Value data for all third-party (non-Microsoft drivers), reboot your computer in normal mode.
Frequently Asked Questions
The Windows Boot Manager (BOOTMGR) is the Windows tool that starts Windows Operating Systems (OS). If there are multiple Windows OS, the Boot Manager displays the list for selection. Then, it hands over boot parameters to the boot loader.
If your Windows 10 PC displays a boot problem, follow the steps below to fix it:
1. Boot Windows 10 to recovery mode. Then, click Advanced options -> Troubleshoot -> Advanced options -> Command Prompt. When the command prompt opens, type the following commands, one at a time, and press enter:
BOOTREC /FIXMBR
BOOTREC /FIXBOOT
BOOTREC /ScanOS
BOOTREC /rebuildbcd
Yes, absolutely! Without the Windows Boot Manager, Windows will not be able to display a list of Operating Systems for selection. Most importantly, the OS will not be able to initiate boot because the boot loader will not load.
You cannot disable Windows Boot Manager. However, you can delete an entry in the boot manager OS list. To do that, while logged in to Windows 10, search MSCONFIG and open System Configuration. Finally, click the Boot tab, select the OS entry you like to remove, and click Delete.
No, you should not disable Secure Boot. Secure Boot is a feature of UEFI that protects your PC from boot sector viruses. However, if you need to dual-boot Windows 10 and Linux, you should disable Secure Boot to allow the installation of Linux. Otherwise, the Linux installation will fail.
Conclusion
The Windows Boot Manager (BOOTMGR) is a very important tool for managing the Windows 10 boot menu. It also comes in handy when your computer runs into boot problems.
In this guide, I discussed how BOOTMGR works. In addition to that, I also discussed the features, pros, and cons of the Windows Boot Manager.
Not only that, but the guide also covers how to edit the Windows Boot Manager GUI tools – Advanced System Properties and System Configuration.
I also showed you how to use the BCDEdit Command Tool to fix most Windows boot errors.
I hope you found this Itechguide helpful. Feel free to share your thoughts by utilizing the “Leave a Reply” form located at the bottom of this page.
Alternatively, you can respond to the “Was this page helpful?” question below.


Install win11 screw up non system drives and boot manger is on not on target install drive screwing my Ventoy drive ? MS is full of shit and crap !
**** another 5 star rating from a visitor ****
I installed a SSD and cloned my old HHD to it. I want to make my SSD the boot drive and my old HHD a storage drive. My SSD is installed on the mother board of my Dell XPS 8930 computer. Can anyone help me resolve this problem.
Hi Ralph,
When you said you “cloned” the old HHD to the SSD drive” do you mean you cloned the Operating System (OS) files from the old HDD to the SSD and and you’re trying to now boot from the cloned OS files in the SSD?
Another thing I like to clarify: you said “My SSD is installed on the mother board..”. How is the old HDD connected to your computer?
Also, when you boot to your computer’s BIOS, can you see the SSD drive?
Once I receive answers to these 3 questions, I will be able to tell you how to boot from your SSD.
Victor