Have you seen PowerShell on your Windows 10 or Windows 11 PC and wondered what it is? This guide teaches you all you need to know about PowerShell in Windows 10 and Windows 11.
Overview
Windows PowerShell is a command line tool users use to automate Windows tasks. This robust automation tool was introduced in Windows XP SP2.
Since then, Microsoft has included PowerShell in all Windows Operating Systems. So, Microsoft installs the PowerShell app in Windows 10 and Windows 11 by default.
In essence, the version of the PowerShell app that Microsoft installs in Windows 10 and Windows 11 is a “systems” app. This means that you cannot uninstall it from Apps & features settings.
Regarding versions, Microsoft installs PowerShell version 5.1 in Windows 10 and 11. However, you can install the latest version of PowerShell.
I’ll show you how to install the latest version of PowerShell in section 3 of this guide. Before that, let me show you different ways to open PowerShell in Windows.
Various Methods to Open PowerShell in Windows
Before you can use PowerShell, you need to open the app. This section discusses various methods you can use to open PowerShell.
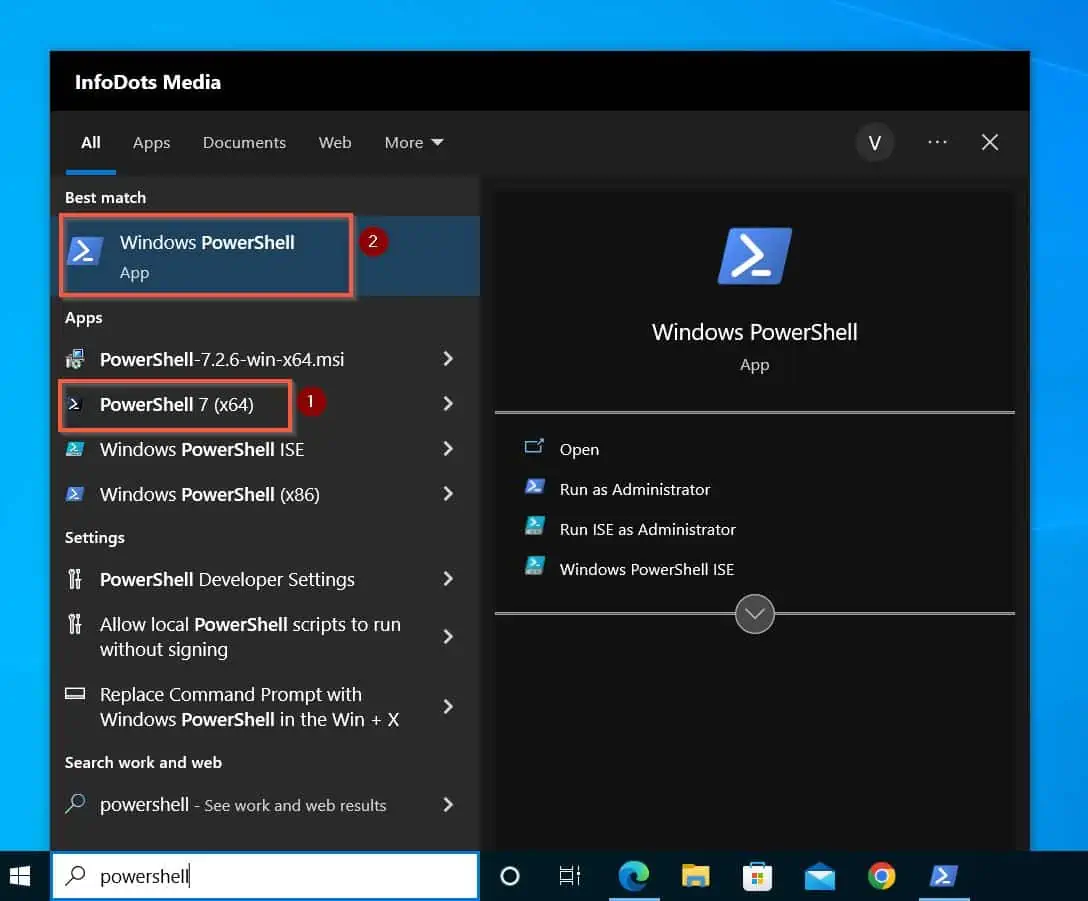
Open PowerShell From Search
To open PowerShell from Windows search, click the Windows 11 search button on the Taskbar. Then, enter powershell in the search box.
Finally, from the search results, click Windows PowerShell.
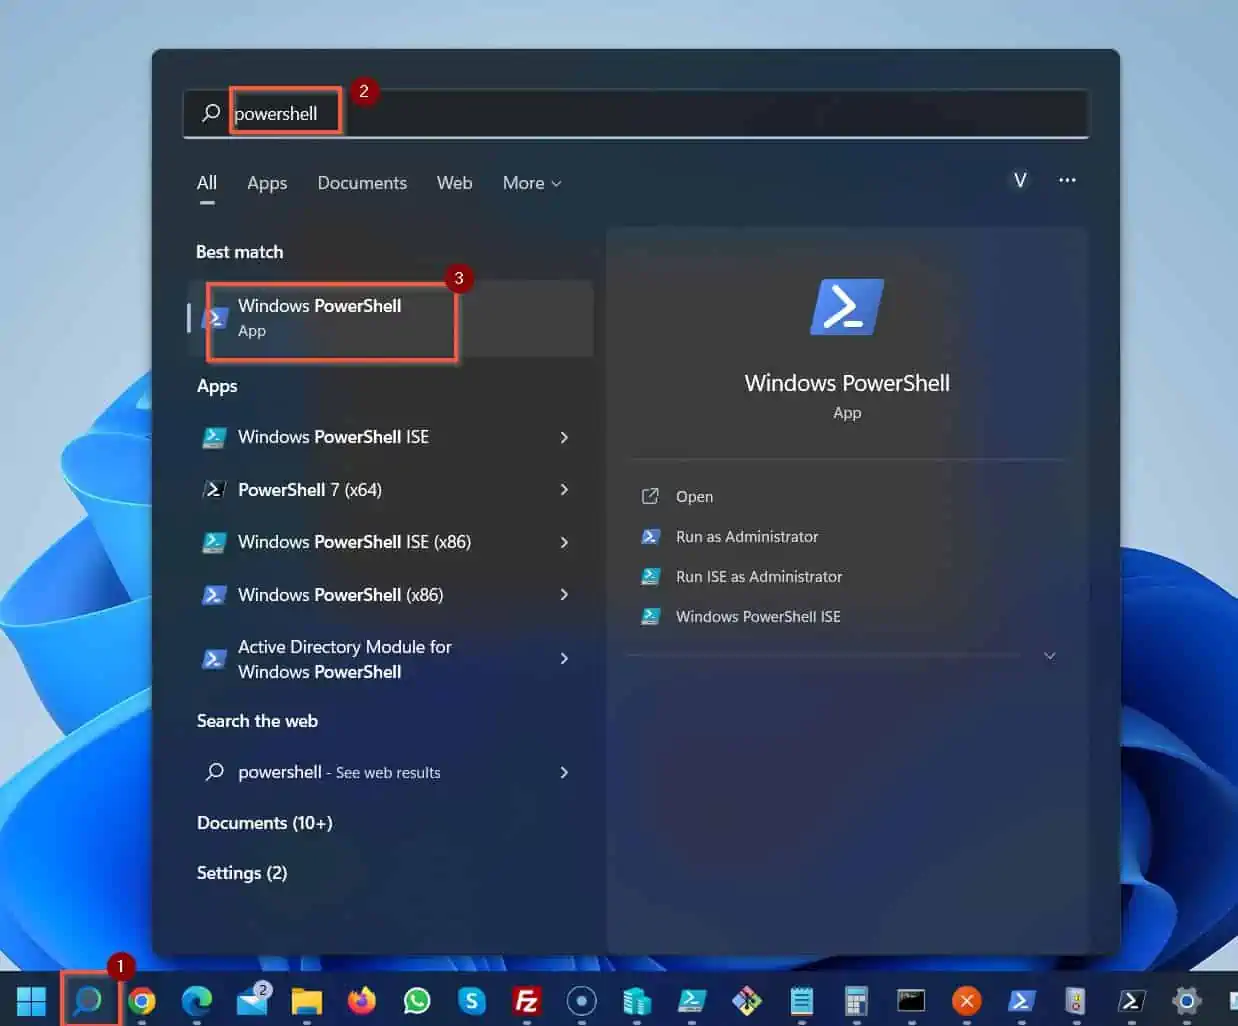
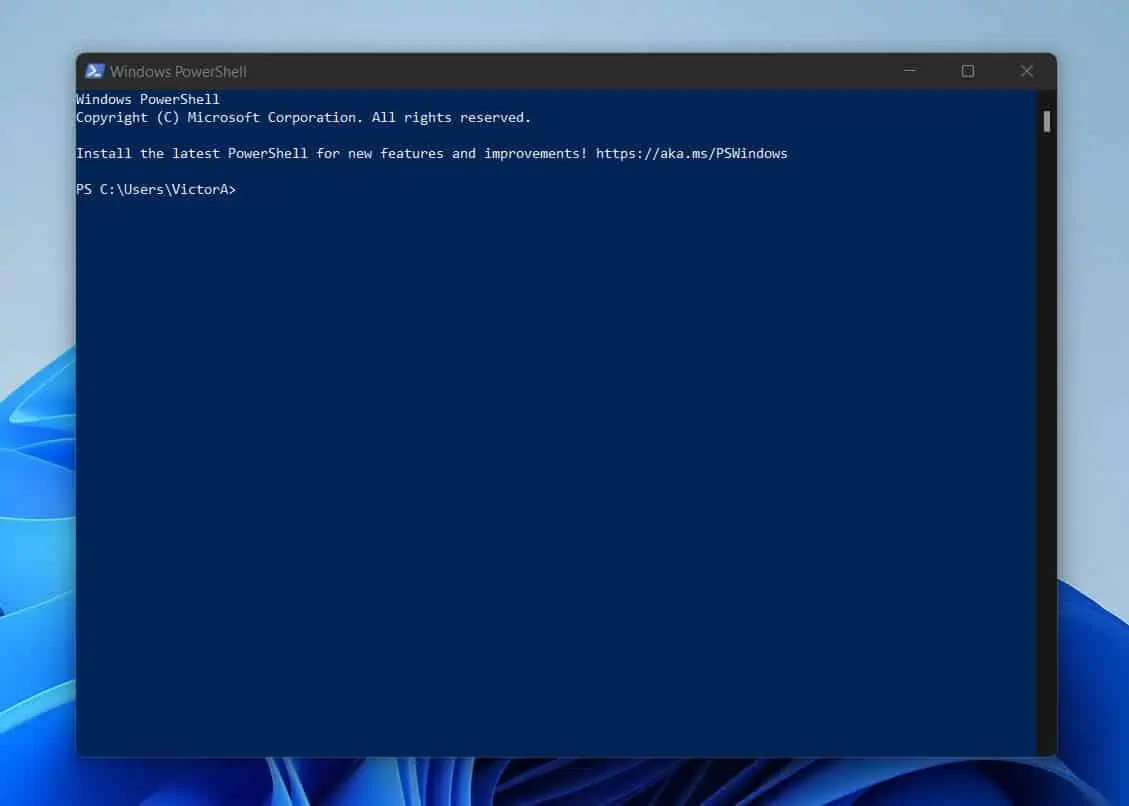
Windows PowerShell opens with a blue background. If you’ve worked with Windows Command Prompt, you can see that Windows PowerShell in Windows 10 and Windows 11 looks like Command Prompt.
Earlier, I said that PowerShell looks like Command Prompt. Although the two Windows shells may look alike, there is a big difference between them.
To learn the difference between PowerShell and Command Prompt, read my article Windows PowerShell vs CMD: Why PowerShell Is Better.
Open PowerShell From Command Prompt (CMD)
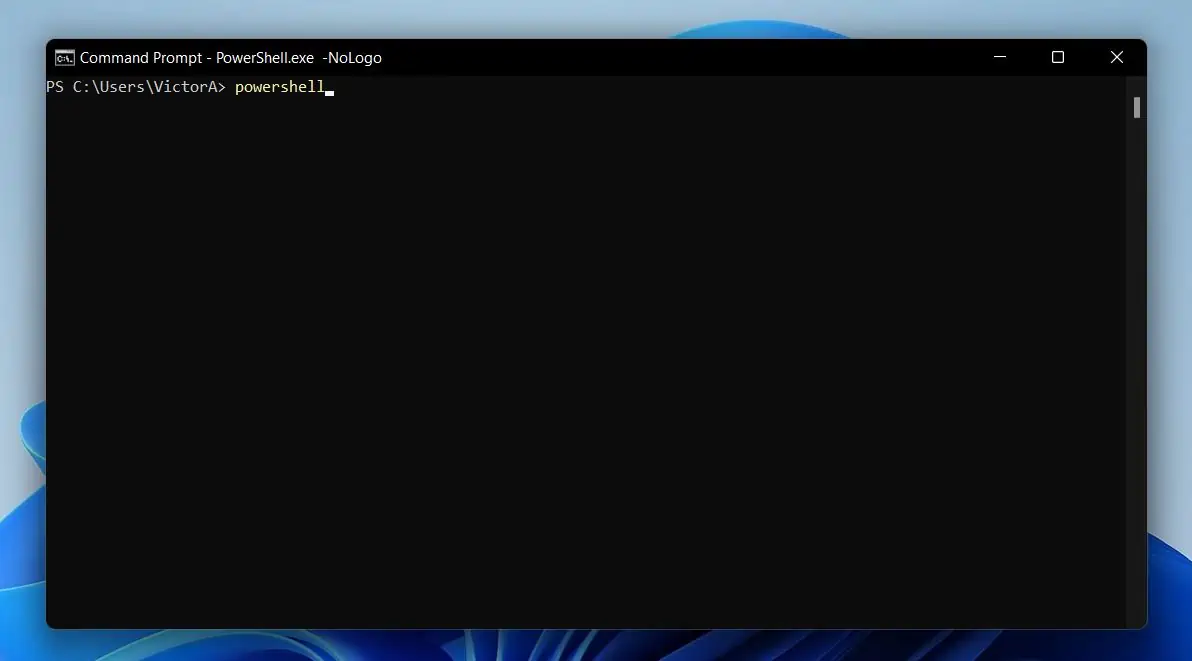
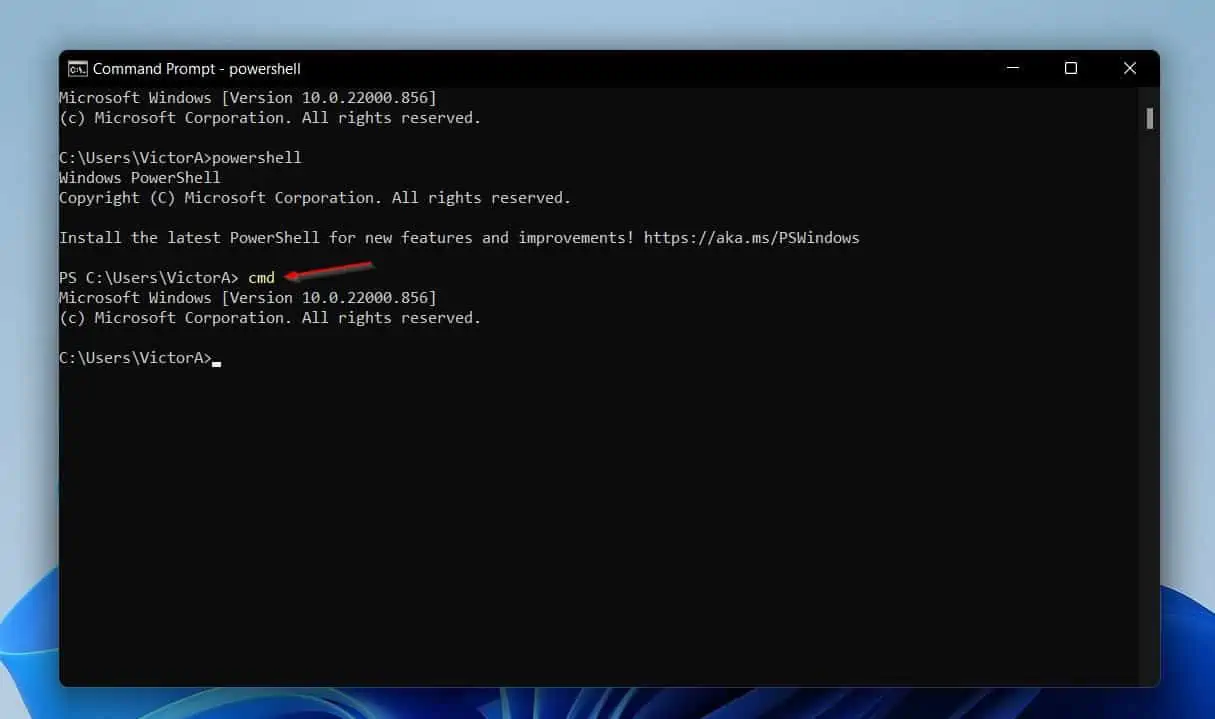
If you have already opened Command Prompt, you can open Windows PowerShell from Command Prompt.
To open Windows PowerShell from within CMD, type powershell. Then, press the Enter key on your keyboard.
PowerShell will open within Command Prompt – See the second screenshot below.

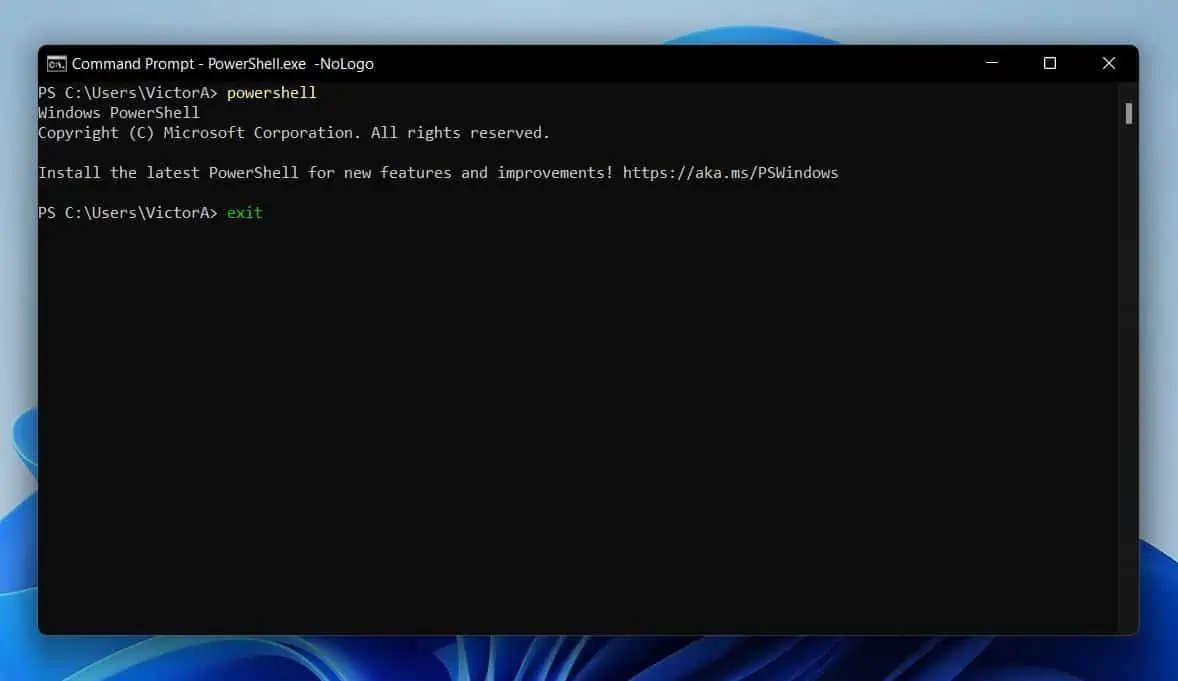
When you finish running PowerShell commands, you can return to Command Prompt. To exit PowerShell and return to Command Prompt, type the cmd command.
cmd
Then, press the Enter key on your keyboard. See the second screenshot below.
Open PowerShell From the Run Command
You can also open PowerShell from the Run command menu. Follow the steps below to learn how to do that.
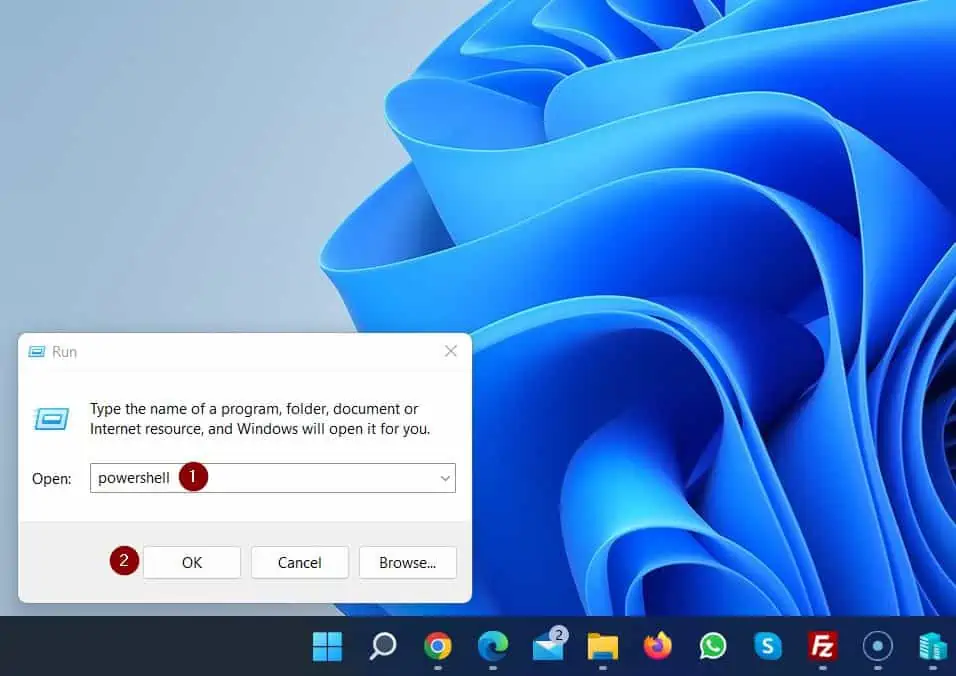
- Right-click the Start menu, then click Run.
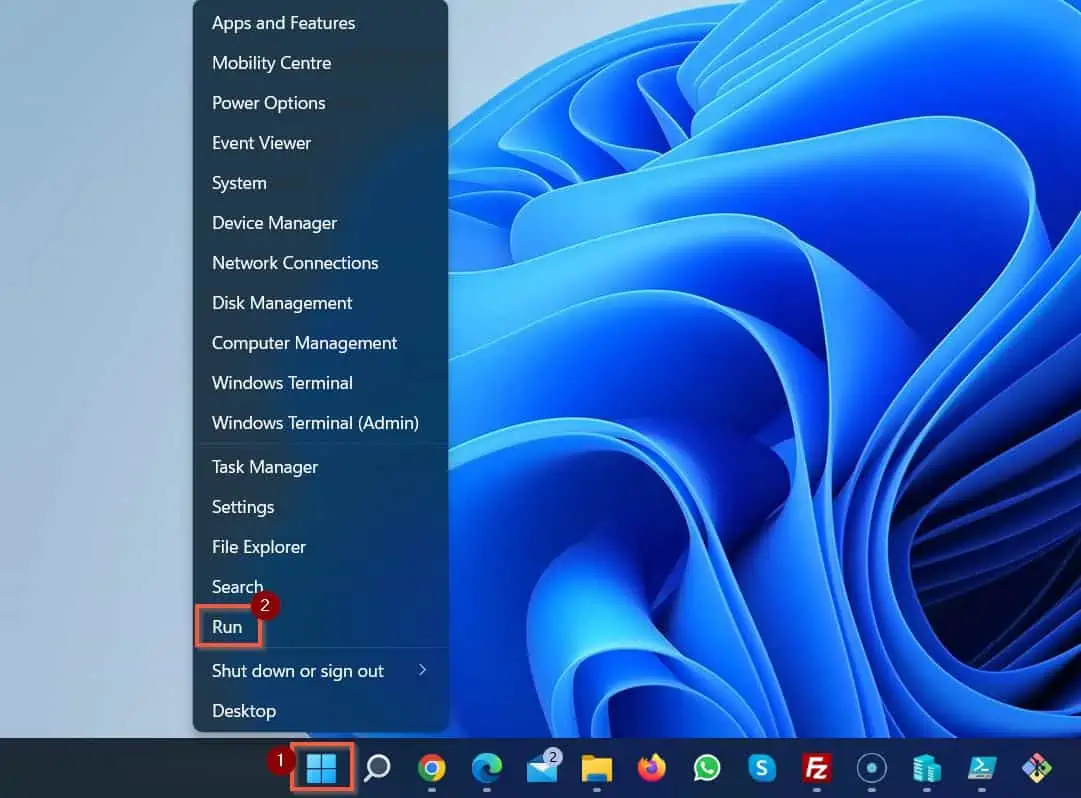
- When the Run window opens, enter powershell in the field. Then, click the OK button.
Open PowerShell from the Start Menu
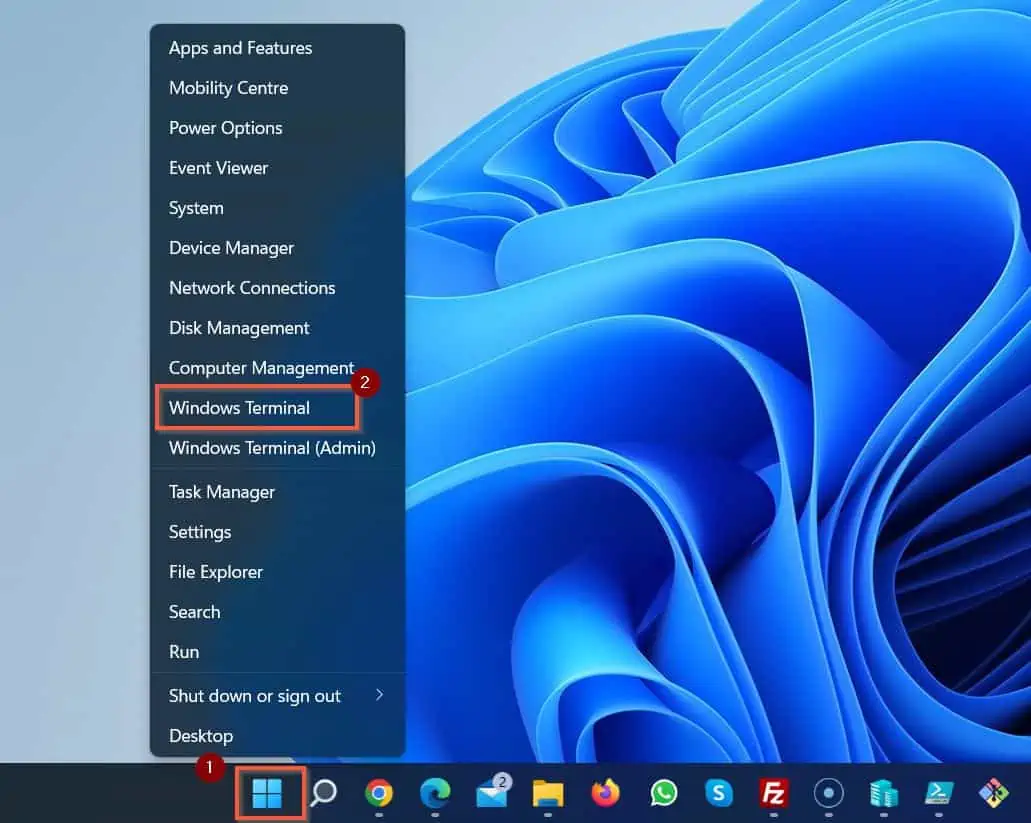
As you may have guessed, like most apps in Windows, you can open PowerShell from the Start menu.
To open PowerShell from the Start menu, left-click the Windows Start menu. Then, if you’re using Windows 11, click Windows Terminal.
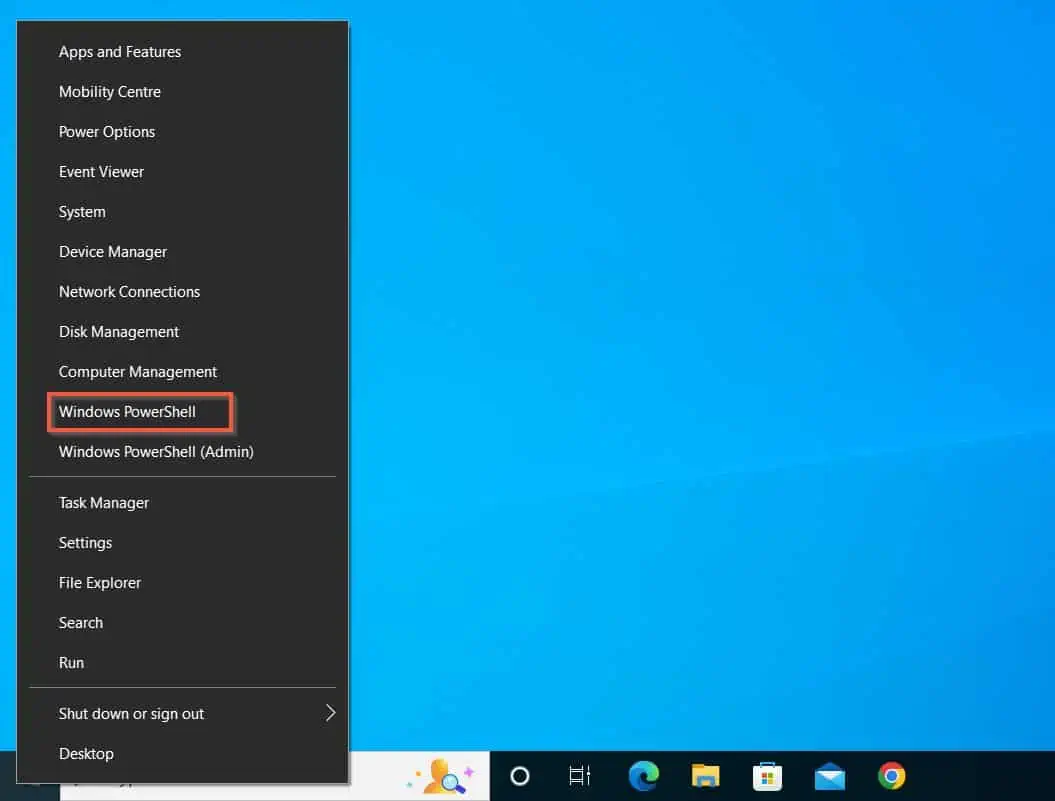
If you right-click the Start menu on a Windows 10 computer, it displays Windows PowerShell and Windows PowerShell (Admin).
Open PowerShell as Administrator From Search
There are some PowerShell commands that require administrator privileges. To run those commands, you MUST run PowerShell as administrator.
In the last section, you saw that when you right-click Windows 10 or Windows 11 Start menu, it displays Windows PowerShell and Windows PowerShell (Admin).
The shell will open with administrator privileges if you open Windows PowerShell (Admin) or Windows Terminal (Admin). However, you can open PowerShell as an administrator using other methods.
To open PowerShell in Windows 10 as administrator, search powershell. The Windows search will highlight Windows PowerShell.
There are two ways you can open the app as an administrator.
- Right-click Windows PowerShell; then click Run as administrator (2, 3)
- Alternatively, just click Run as administrator (4)

Open PowerShell as Administrator from a PowerShell Console
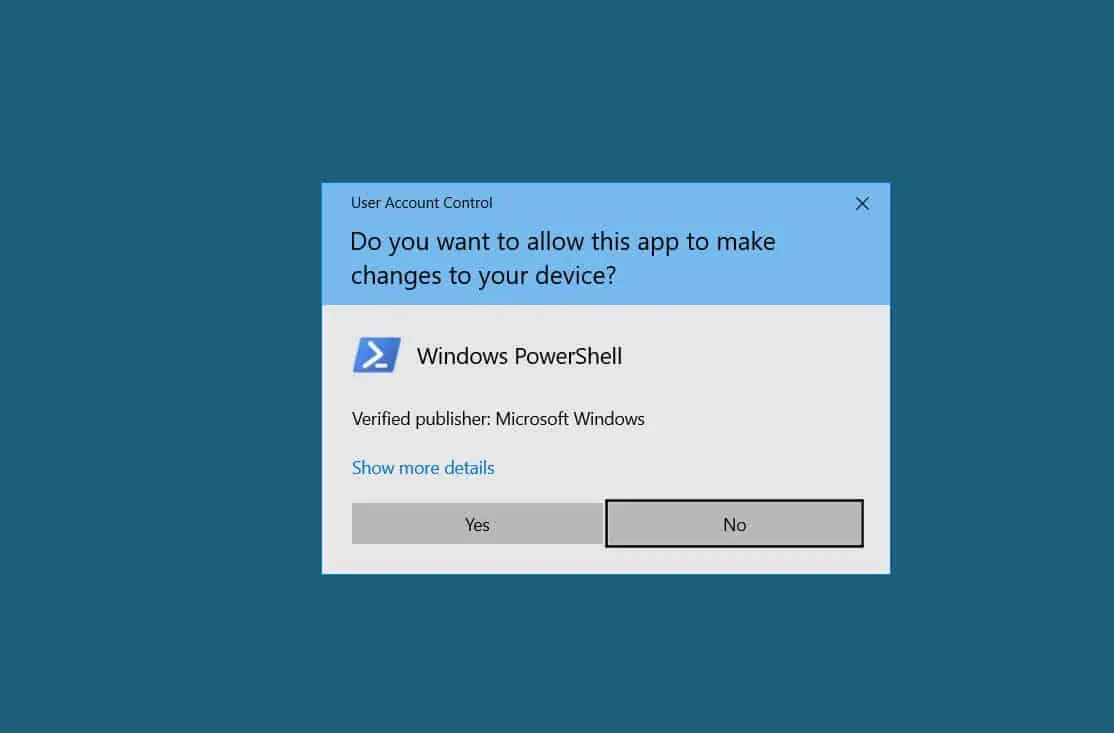
If you have already opened a PowerShell console, you can open a new console as administrator by running the command below.
Start-Process powershell -Verb runas
When you run the above command by pressing the Enter key on your keyboard, Windows will display a User Account Control. To allow Windows to open the app with administrator privileges, click Yes.
How to Install the Latest Version of PowerShell
I mentioned earlier that Microsoft installed PowerShell version 5.1 in Windows 10 and 11 by default. However, Microsoft has released newer versions of PowerShell.
You can install the latest version of PowerShell in your Windows 10 or Windows 11 PC. However, when you do this, the process DOES NOT upgrade version 5.1 on your computer.
Rather, when you install the newer version of Windows PowerShell, it runs side-by-side with the existing version 5.1. Follow the steps below to install the latest version of Windows PowerShell on your Windows 10 or Windows 11 PC:
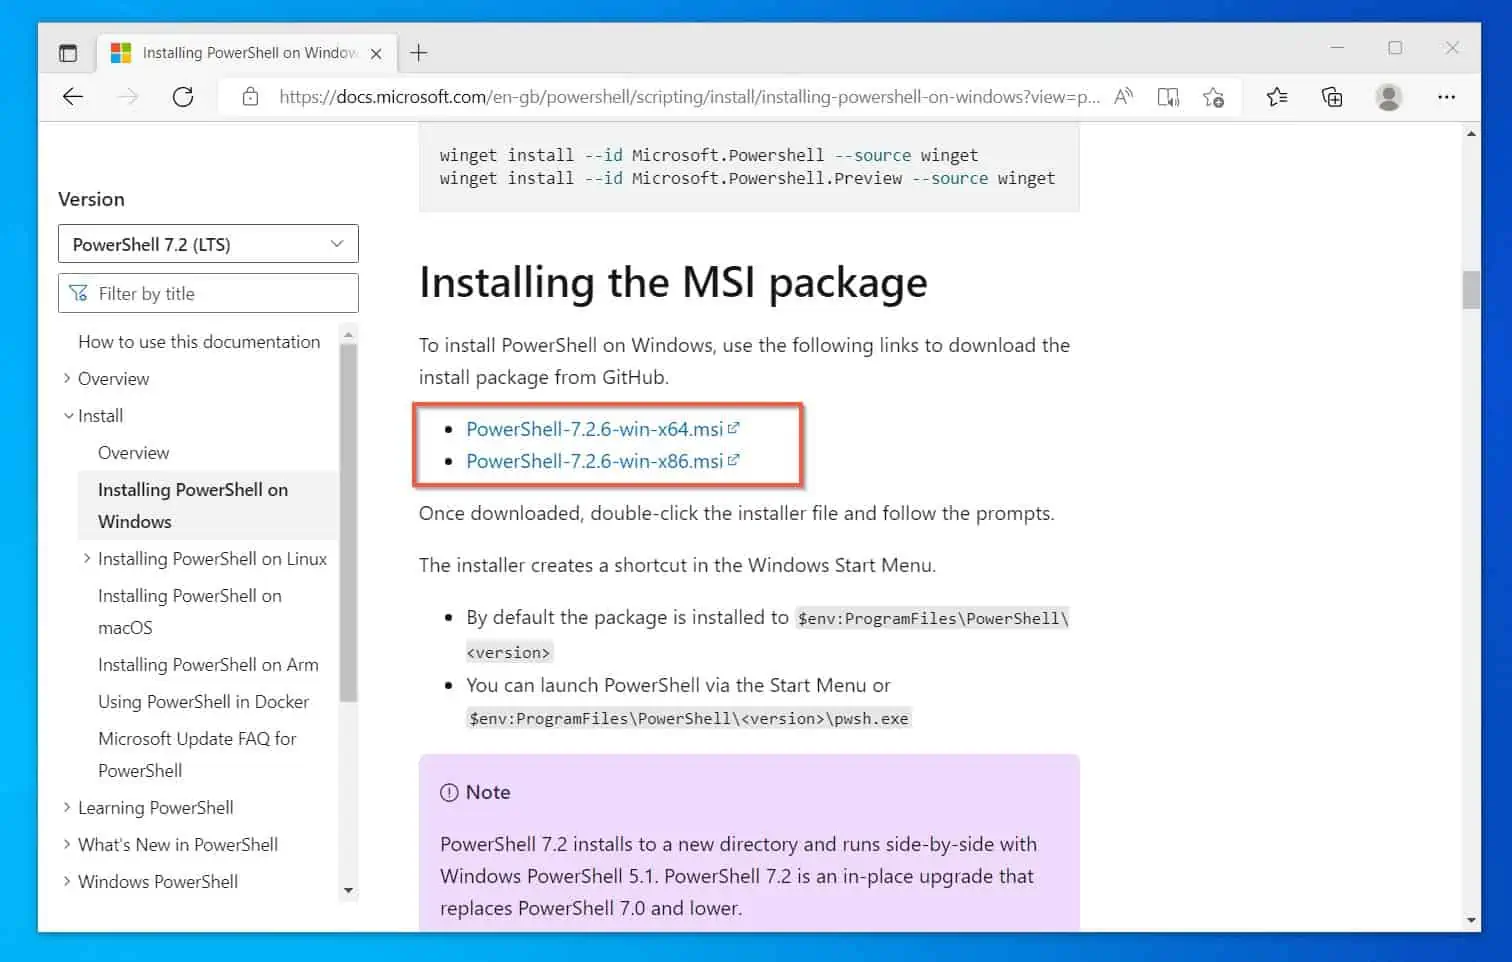
- Click this link to open the PowerShell installation page – Installing PowerShell on Windows – PowerShell | Microsoft Docs.
- Then, scroll down to the “Installing the MSI package” section of the page and click the MSI package for your Windows Architecture.
systeminfo | find "System Type"
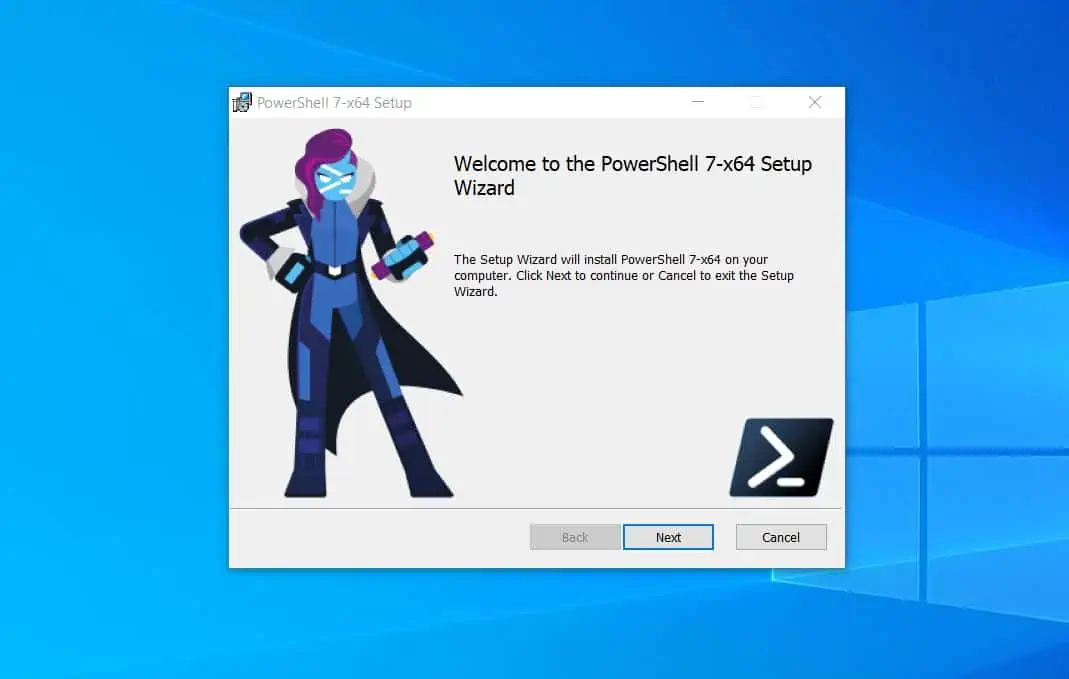
- After downloading the MSI package of the latest version of PowerShell, double-click it. Then, follow the simple wizard to install it.
- When the installation is completed, search powershell. Then, open the newer version.
Common Tasks You Can Perform with PowerShell
Now that I have introduced you to PowerShell and showed you various ways to open the app, you may be keen to see the shell in action.
In this section, I’ll show you how to use PowerShell to perform some of the tasks you already perform with your mouse.
Shutdown or Restart Windows
One of the tasks you likely perform daily is to shut down or restart your computer. You can perform this task with PowerShell, too!
Here is how…
Open PowerShell using one of the methods I discussed earlier. Then, enter the command below and press enter to shut down your computer.
Stop-Computer
Alternatively, if you wish to restart your computer, enter the command below, then press the Enter key on your keyboard.
Restart-Computer
Create a File or Folder
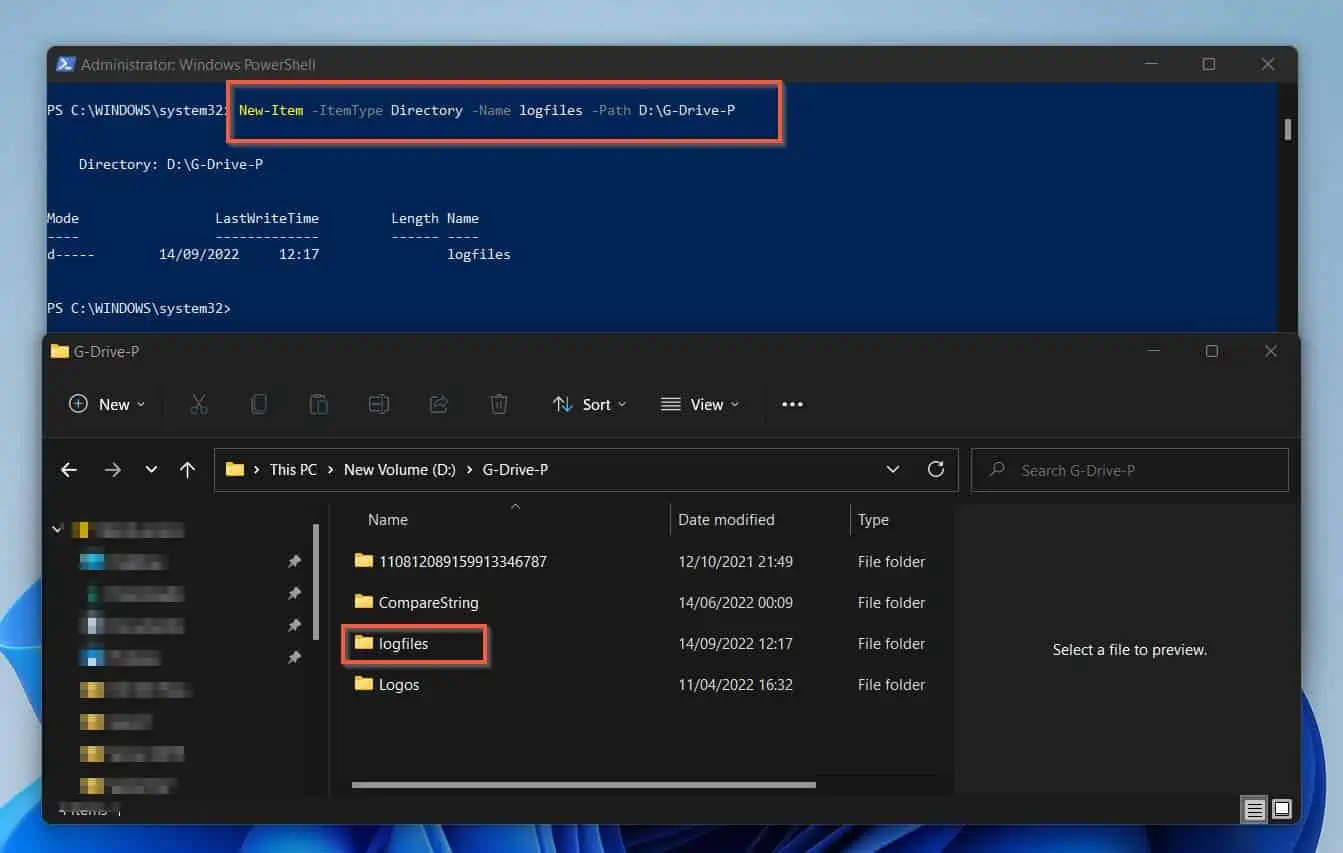
Another common task most users perform on a computer is creating a folder or file. Surprise, surprise, PowerShell can do those too!
To create a folder or file on your computer, use the New-Item PowerShell command. For example, to create a folder called logfiles in D:\G-Drive-P, I’ll run the command below:
New-Item -ItemType Directory -Name logfiles -Path D:\G-Drive-P
To run the command, copy it to a PowerShell console, then press the enter key on your keyboard. In the screenshot below, I have the command in PowerShell and the folder I created with it.
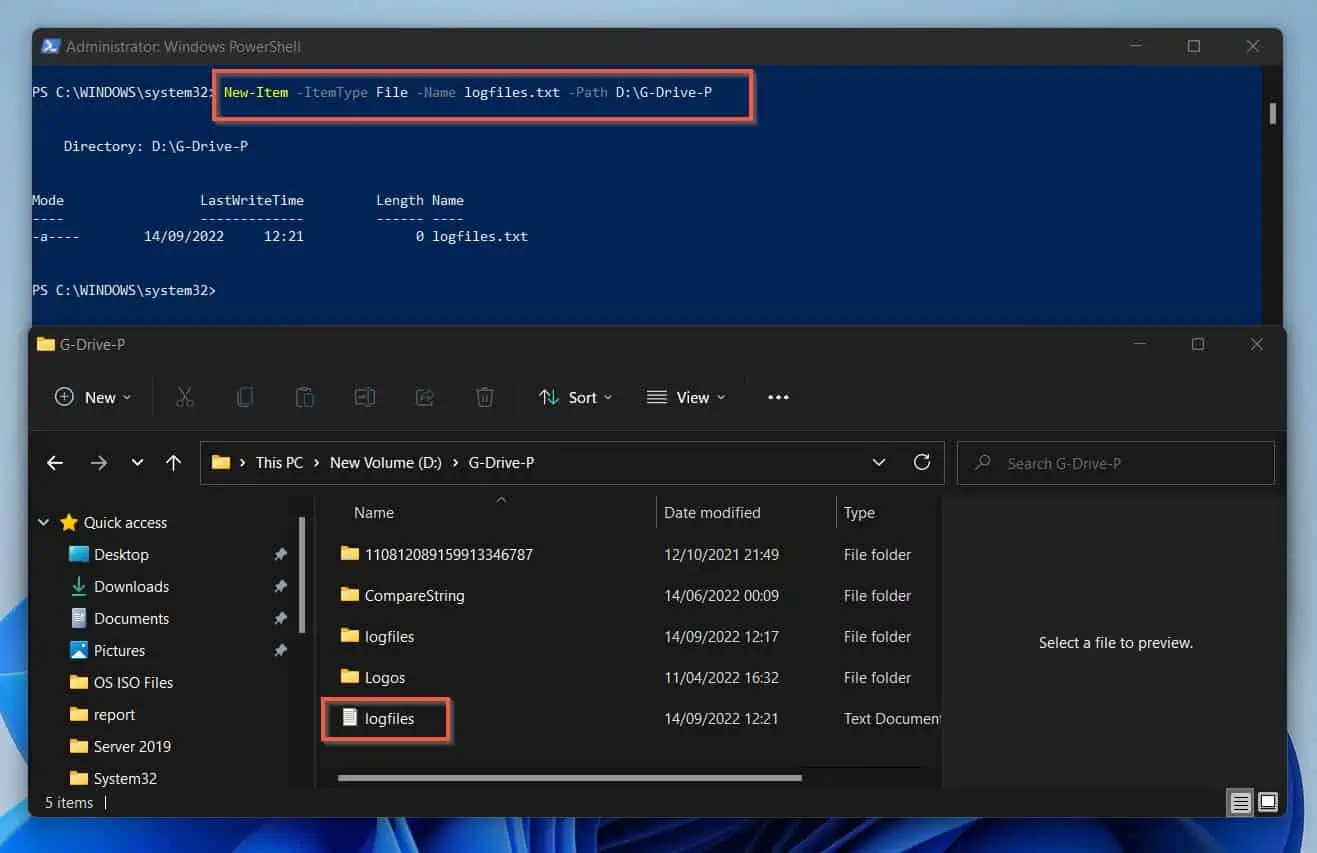
In the last example, I showed you how to create a folder. To create a file, change the command as shown below.
New-Item -ItemType File -Name logfiles.txt -Path D:\G-Drive-P
There are two differences between this command and the one I used to create a folder. Firstly, instead of using Directory as the ItemType, I used File.
Secondly, I specified the file type extension in the name of the item (file) I wanted to create. The screenshot below shows the command and the result of the command.
Rename a File or Folder
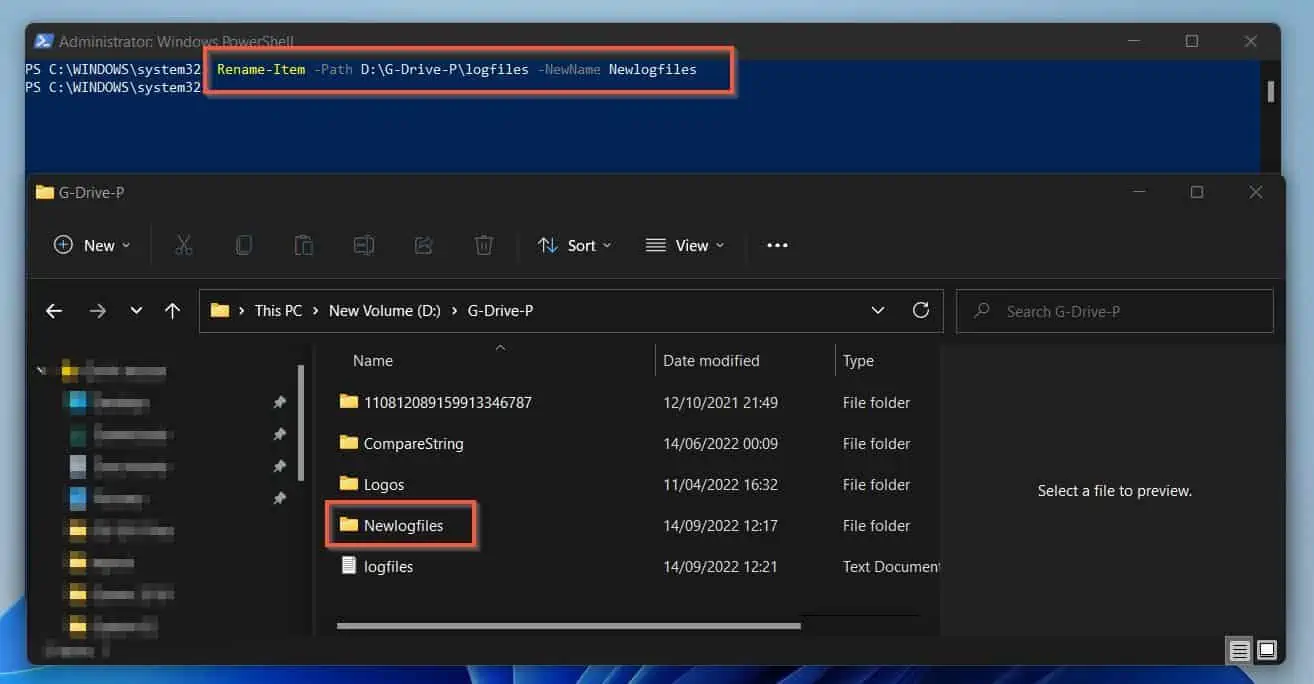
Use the Rename-Item command to rename an item (folder or file) on your computer. For example, I will run the command below to rename the folder logfiles – that I created with the last example – to Newlogfiles.
Rename-Item -Path D:\G-Drive-P\logfiles -NewName Newlogfiles
When you run the command, it will look like nothing has happened. However, if you look at the location of the folder, its name has changed!
List Items in a Folder
In addition to shutting down your computer and creating new folders and files, you also often need to list the content of a folder. To use PowerShell to list the content of a folder, use the Get-ChildItem command.
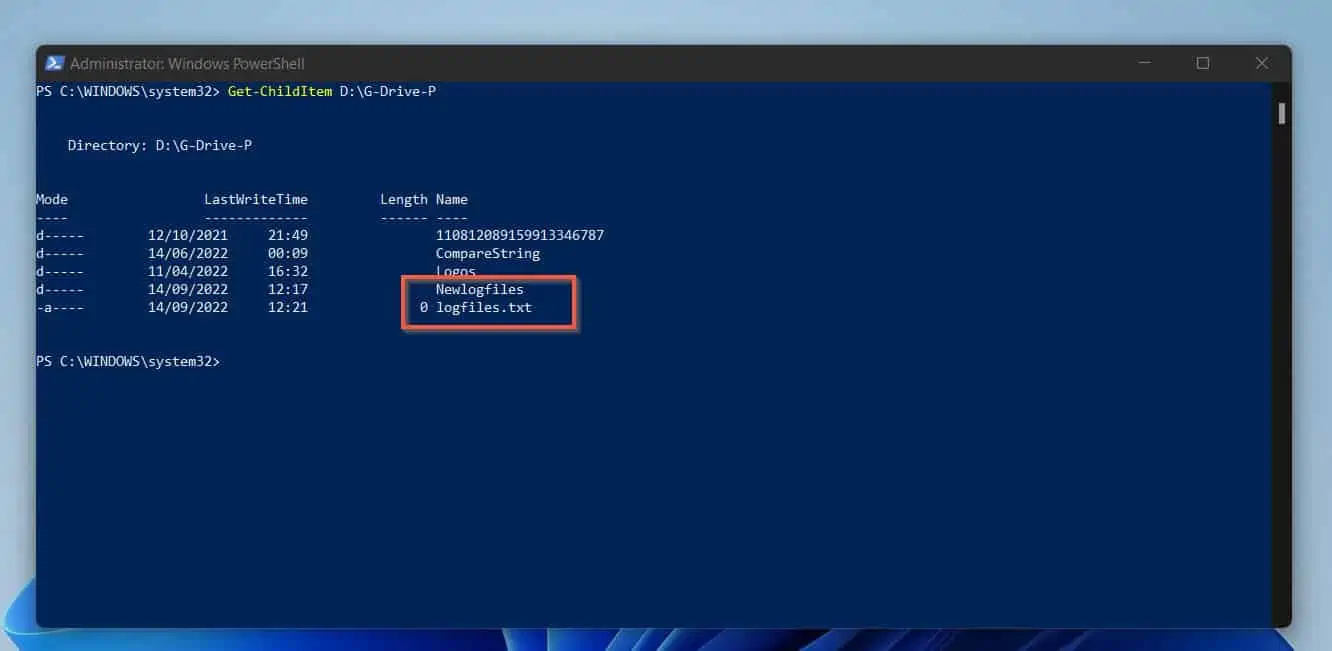
Continuing with my last examples, I’ll list the items in D:\G-Drive-P\ with the command below.
Get-ChildItem D:\G-Drive-P
Here is the screenshot of the result in PowerShell. I have highlighted the two items I created or renamed with the previous examples in this guide.
Open Task Manager
Finally, I bet that you would have opened Windows Task Manager at least once. Whether you’ve opened Windows Task Manager with your mouse or not, you can use the PowerShell command below to perform the task.
Start-Process taskmgr
How to Uninstall PowerShell from Windows
This section details the steps to remove the default PowerShell app (version 5.1) that ships with Windows 10 and 11.
In addition to that, I will also show you the steps to uninstall (remove) the latest PowerShell version (if you install it)
Uninstall PowerShell Version 5.1
Earlier, I mentioned that Microsoft installs PowerShell version 5.1 as a system app in Windows 10 and 11. I also mentioned that you could not uninstall (remove) this app from Apps & features settings.
From the feedback received from many readers, Windows users want to remove PowerShell 5.1 because it sometimes opens when Windows starts.
The easiest way to remove PowerShell from your Windows 10 or 11 computer is to use the DISM command below. Open Command Prompt as administrator, copy the command into command prompt and press the enter key on your keyboard.
Dism /online /Disable-Feature /FeatureName:"MicrosoftWindowsPowerShellV2Root"
When the command completes, PowerShell will ask you if you want to restart your computer. To restart your computer and remove PowerShell, type Y in the command prompt.

After removing Windows PowerShell 5.1, if you change your mind and want to reinstall the app, download and install Windows Management Framework 5.1.
Uninstall the Latest PowerShell Version
If you installed the latest version of PowerShell, uninstall (remove) it from your Windows 10 or Windows 11 computer with the steps below:
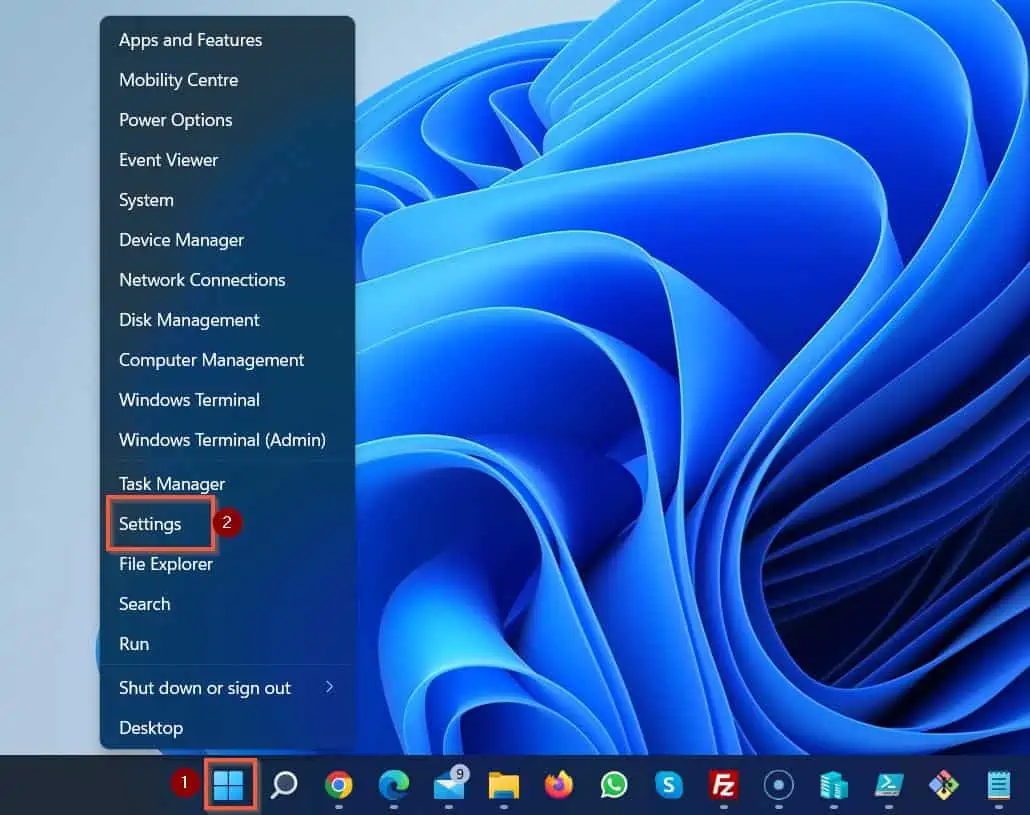
- Right-click the Windows Start menu and select Settings.
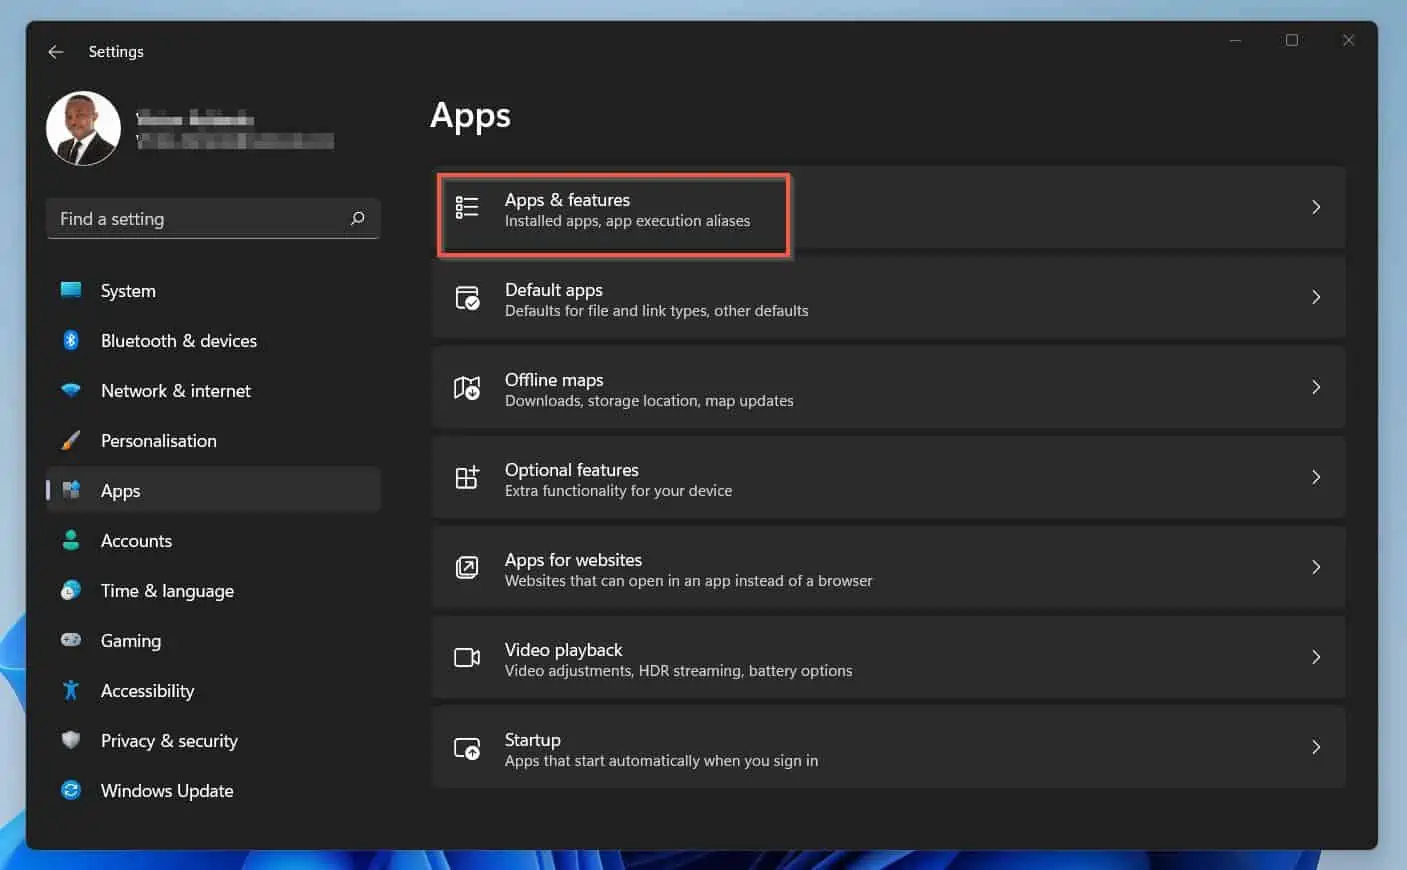
- Then, on the Windows Settings, click Apps. The first screenshot below is from Windows 11, while the second one is from Windows 10.
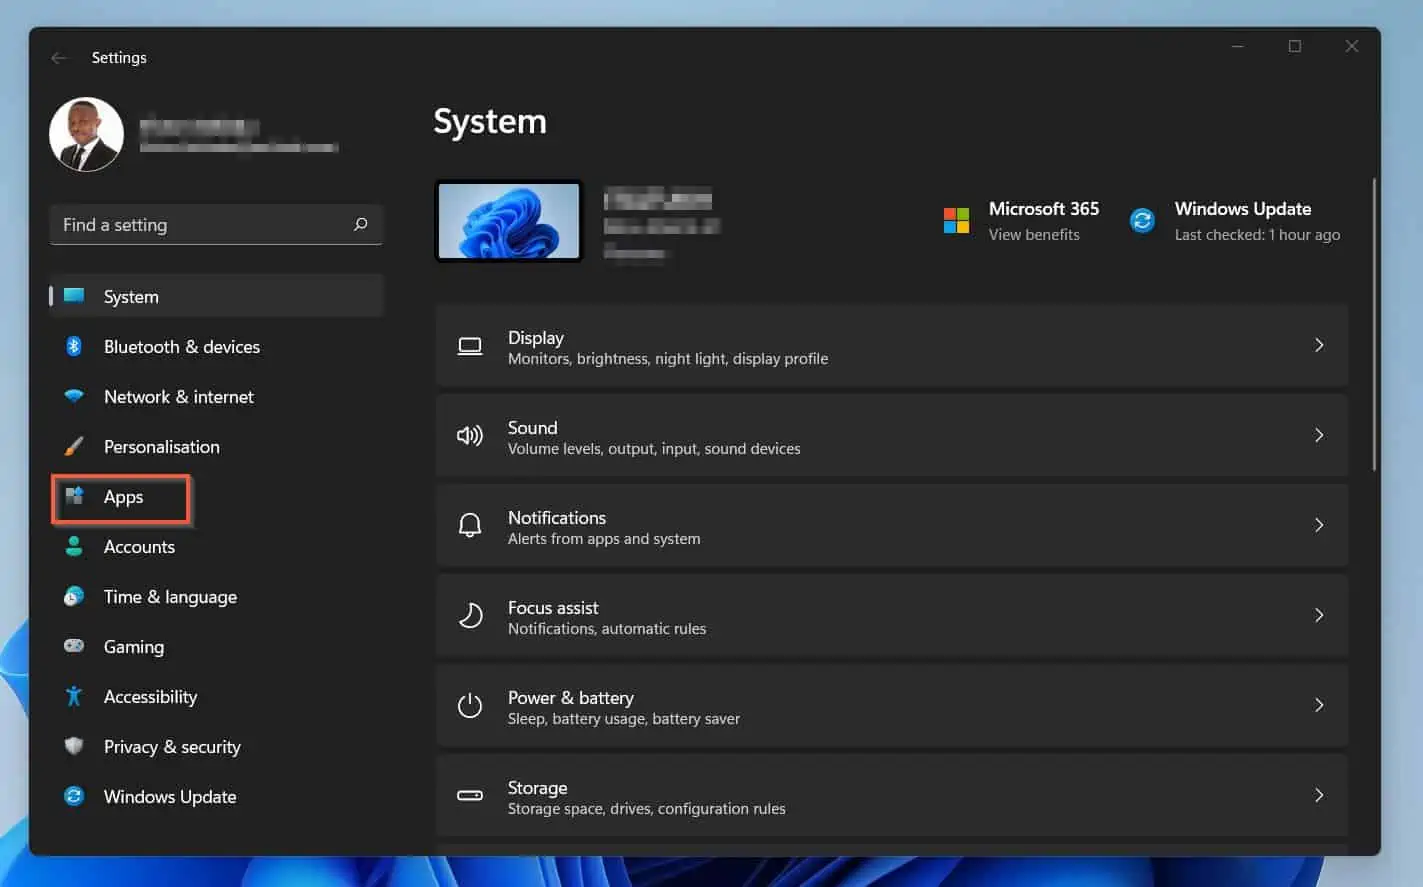
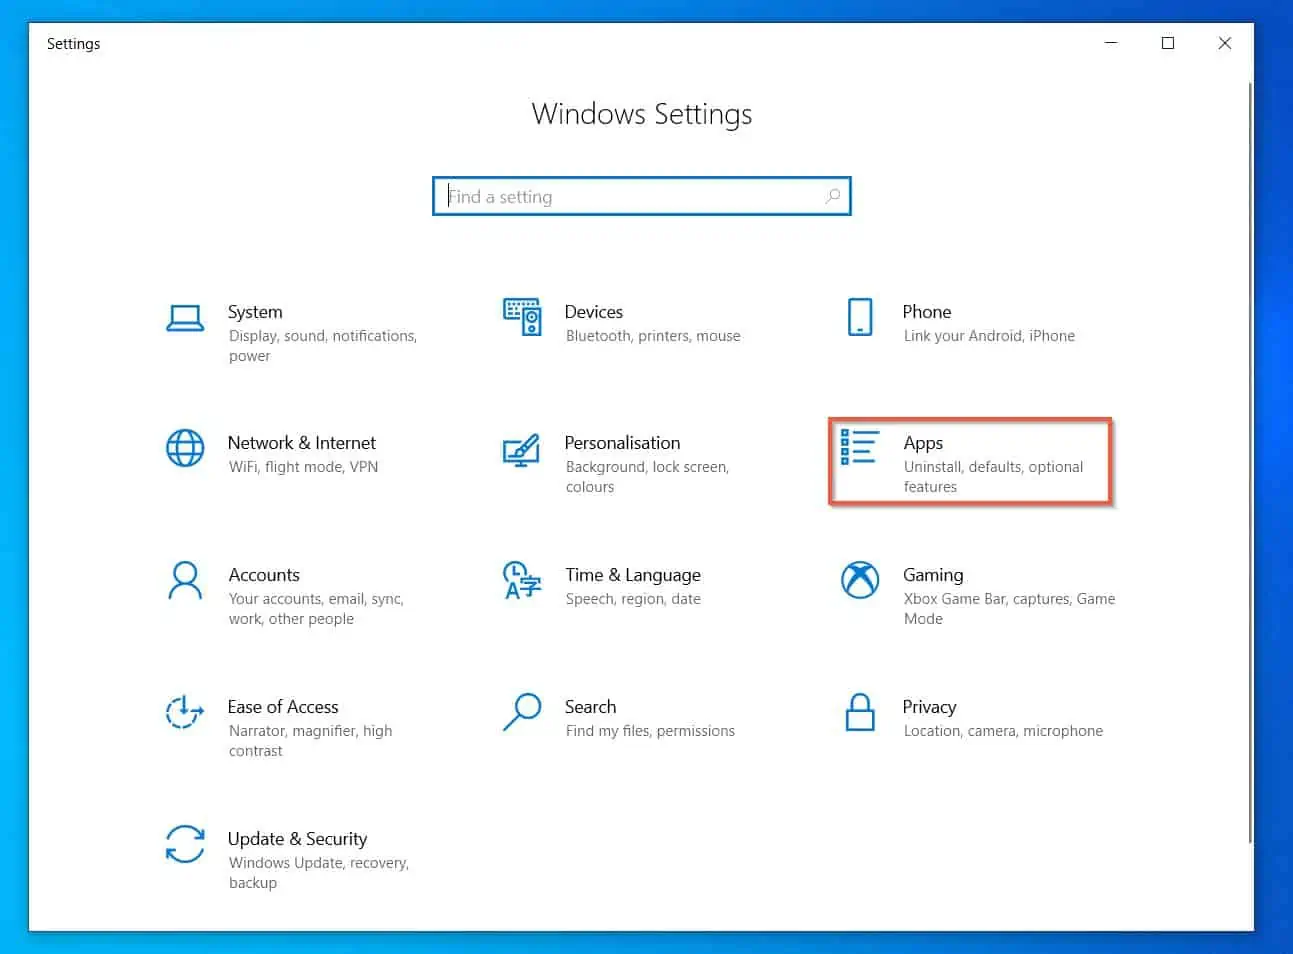
- Next, click Apps & features.
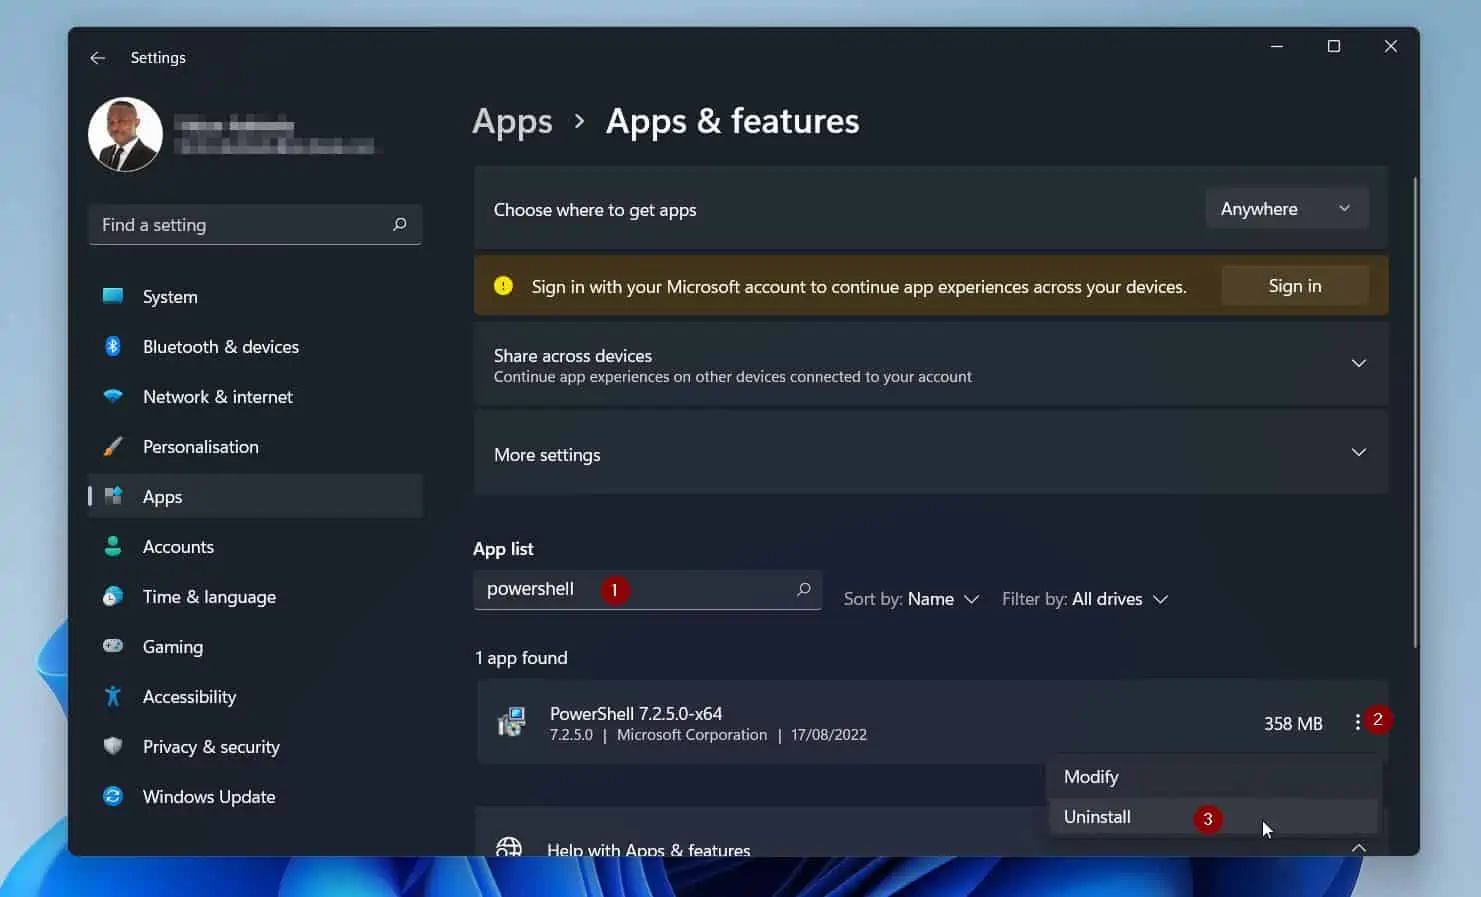
- Next, on the App list, search PowerShell (1). Finally, click the three dots to the right of the latest PowerShell version you installed earlier (2) and select Uninstall (3).
Frequently Asked Questions
Windows PowerShell in Windows 10 and Windows 11 is a Microsoft command line tool you can use to perform tasks you normally perform with your mouse.
So, for example, you will run the Stop-Computer command in PowerShell instead of shutting down your computer by clicking the start menu.
The answer is a resounding, Yes, Windows 10 includes PowerShell. From Windows XP SP2, when Microsoft introduced PowerShell, Microsoft has included PowerShell in all its Windows Operating Systems.
The fastest method to launch PowerShell is to search for it using the Windows search tool. The search tool is pinned to the taskbar.
No, while Microsoft built PowerShell using the .Net framework, it built CMD as a Win Win32 console application.
To learn the difference between PowerShell and CMD, read our article Windows PowerShell vs CMD: Why PowerShell Is Better.
The default PowerShell Microsoft installs in Windows 10, and Windows 11 installs in %SystemRoot%\SysWOW64\WindowsPowerShell\v1.0\powershell.exe (32-bits) or %SystemRoot%\system32\WindowsPowerShell\v1.0\powershell.exe (the 64-bits version)
Conclusion
This guide attempted to explain PowerShell in Windows 10 and Windows 11. It is an introductory article for those wondering what this strange app is doing on their PC.
In this guide, I introduced you to PowerShell. Then I walked you through different methods to open the app on your Windows PC.
Not only that, but I also showed you how to install the latest version of Windows PowerShell. The guide also covered some common tasks you can perform with PowerShell.
I hope that with all these, I have successfully explained Windows PowerShell! If I made your day, kindly spare 2 minutes to share your thoughts by responding to the “Was this page helpful?” question below.
Finally, if you’re keen to learn PowerShell in-depth, you will love our Windows PowerShell Explained page.