This guide walks you through the steps to configure the required prerequisites to use Windows 10 Alarms & Clock correctly.
Prerequisite for Using Alarms in Windows 10
As I mentioned in the introduction, to ensure that Windows 10 Alarms work correctly, you need to sort out 2 prerequisites.
In the 2 sub-sections in this section, I will show you how to check that you set the correct Time Zone, Date and Time. You will also learn how to disable sleep in Windows 10.
Set Time Zone, Date/Time Correctly
The first prerequisite to using alarms correctly is to check that your PC has the correct Time Zone. You also need to check that the Date and Time are set correctly.
Follow the steps below to complete this task:
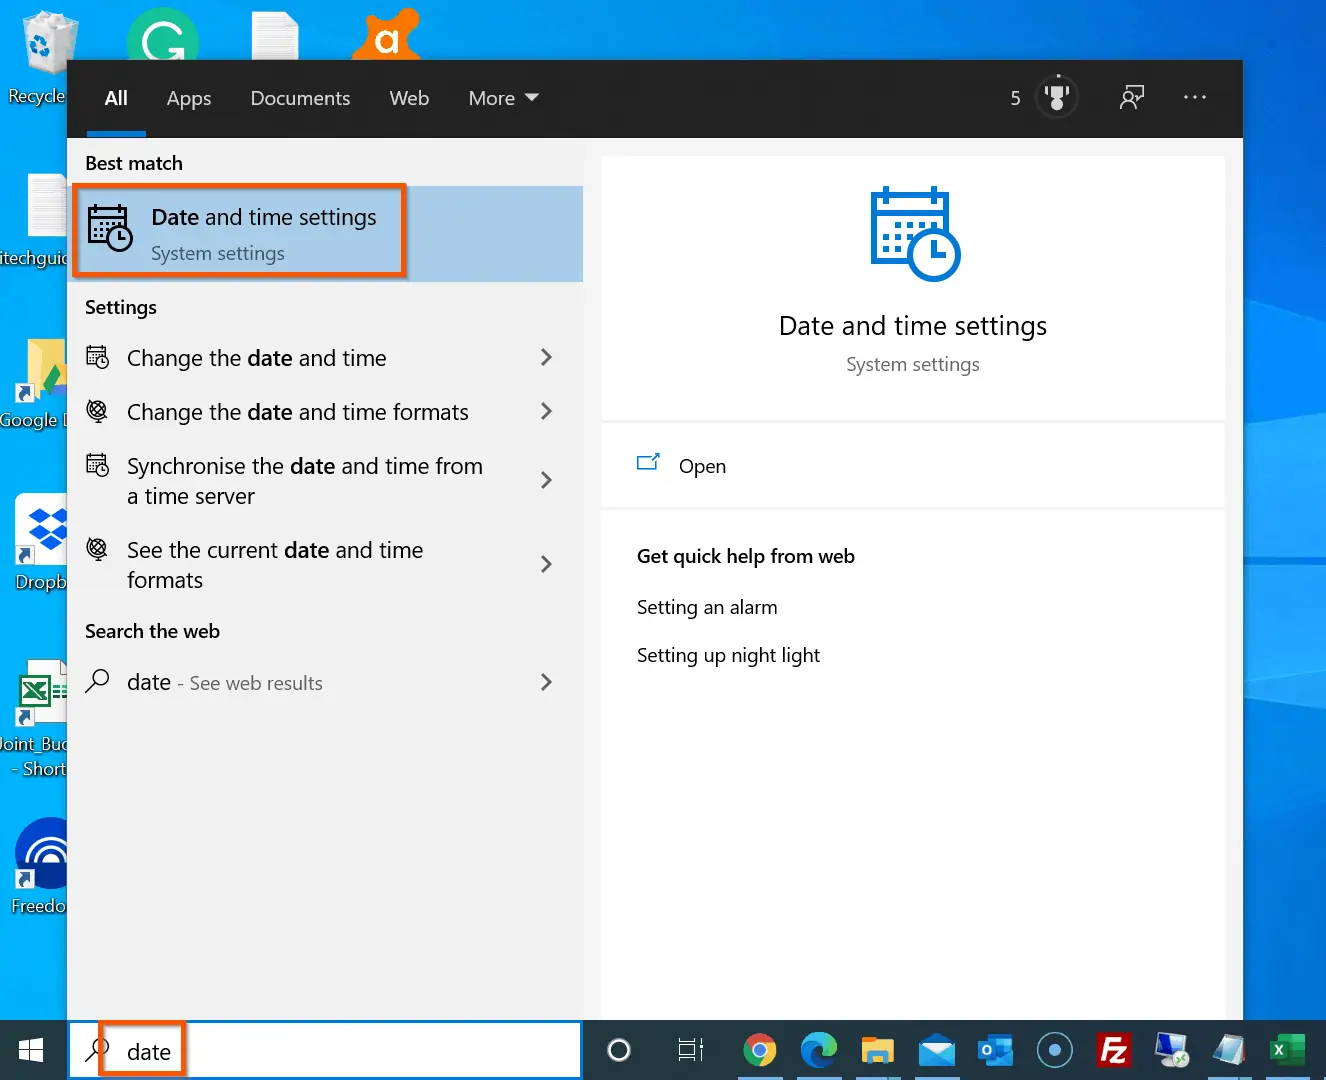
- Search date – then, open Date and time settings.
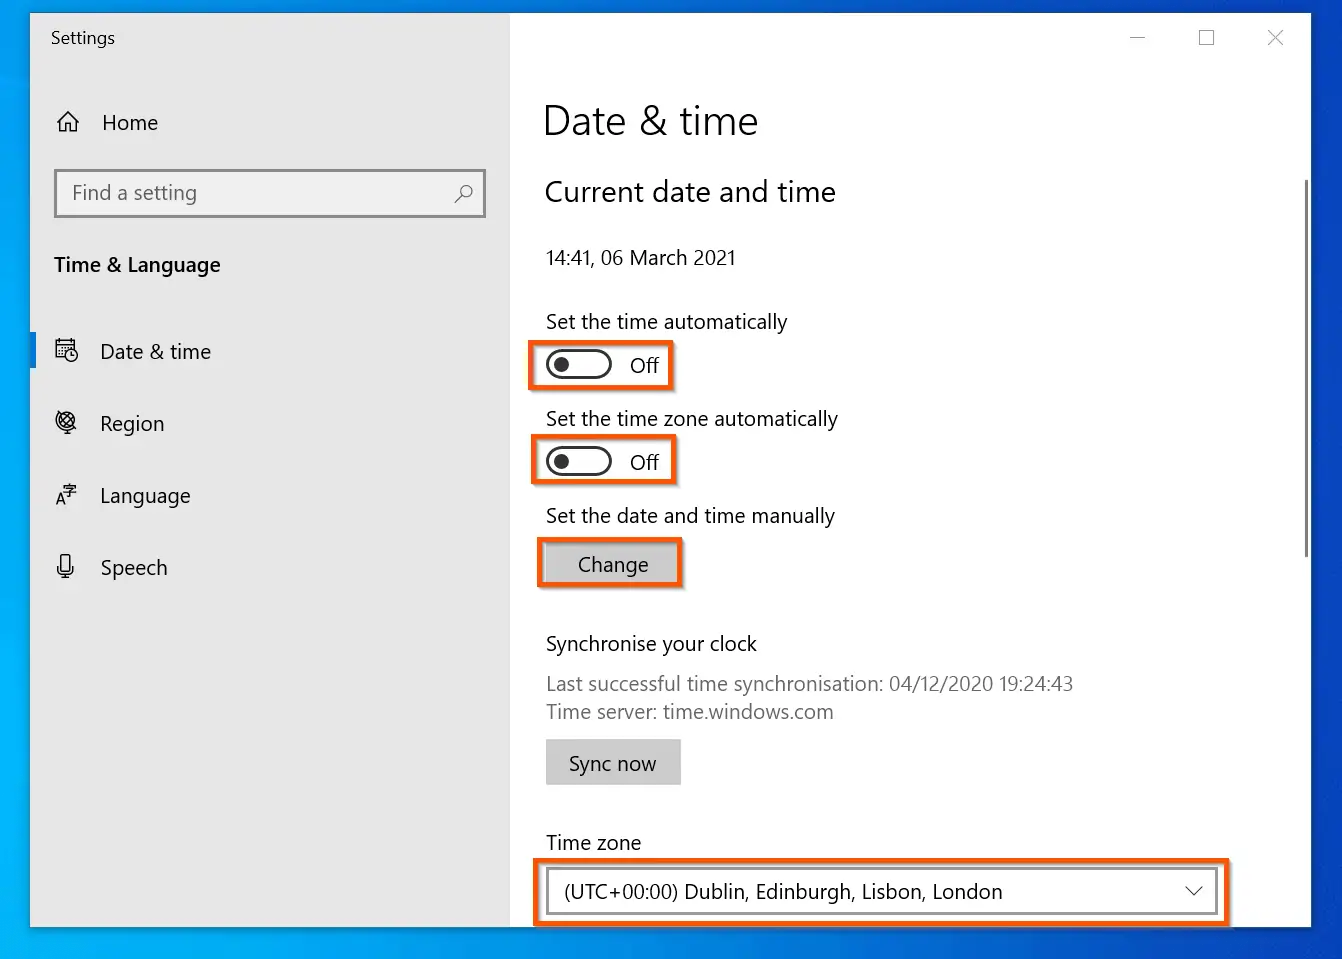
- Finally, when the Date and time setup screen opens, ensure that Set the time automatically is OFF. Also, check that Set Time Zone automatically is turned OFF.
- Next, scroll down to Time Zone, click the drop-down and select your correct Time Zone
- Finally, scroll back up to Set the date and time manually and click Change – set the correct time and date.
Disable Sleep Settings
For Windows 10 alarm notifications to display all the time, you need to disable sleep. Follow the steps below to stop Windows 10 from going to “sleep”.
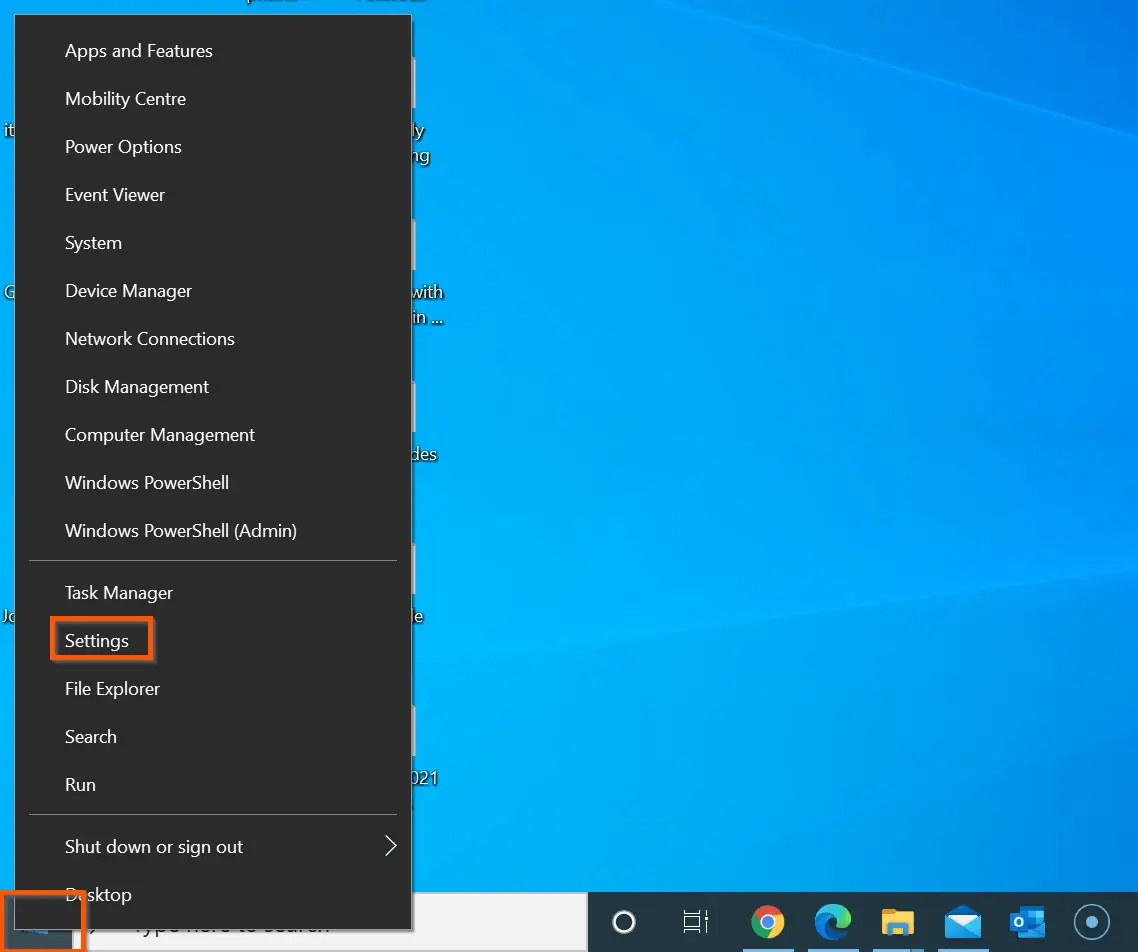
- Right-click Start menu and select Settings.
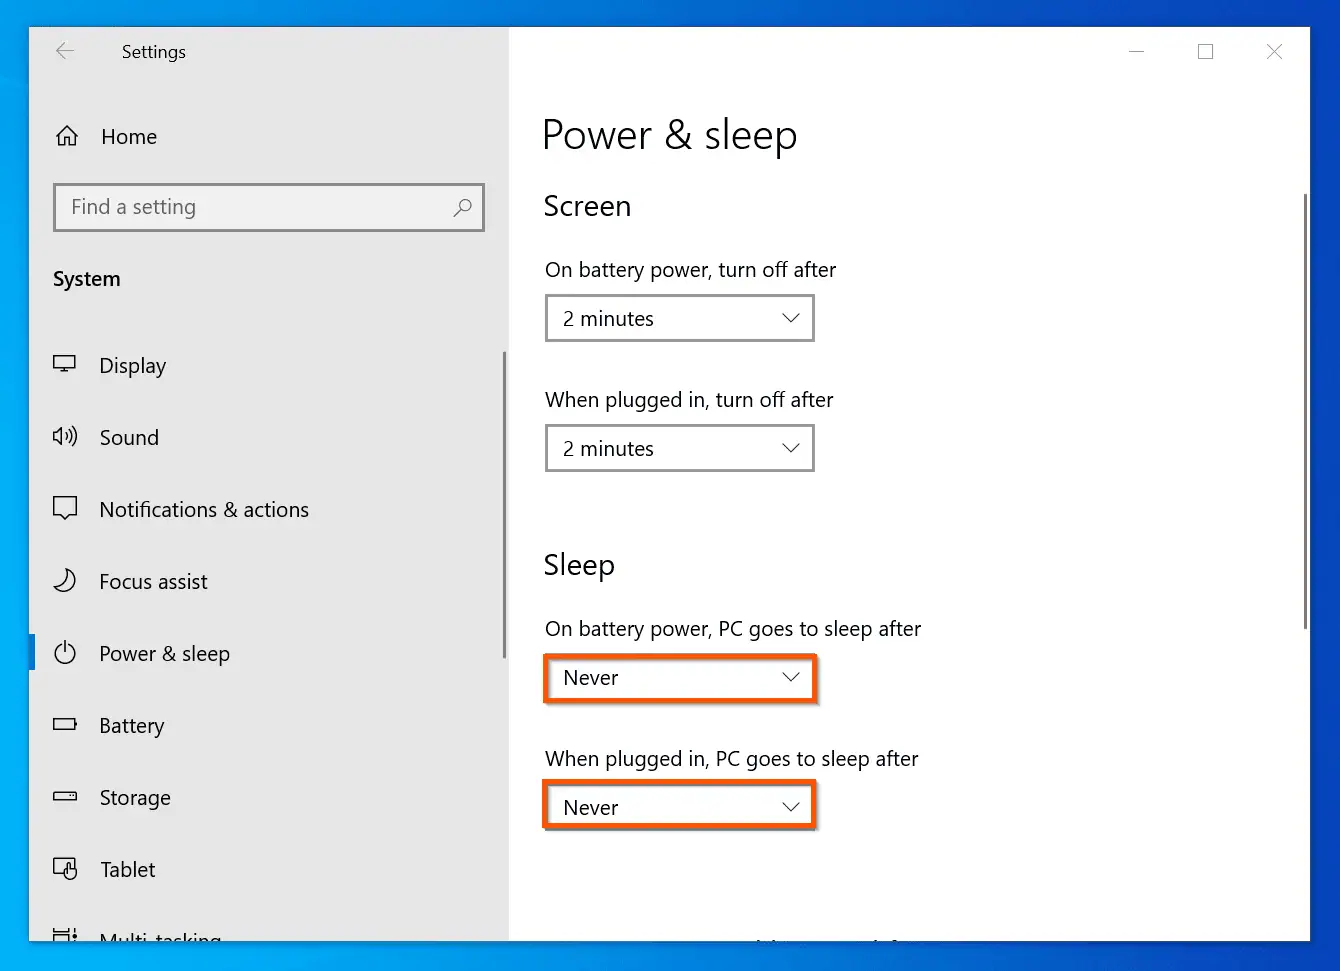
- When Windows Settings open, click System -> Power & sleep. Finally, check that the Sleep section is set to Never on both while the laptop is on battery and while plugged into power.
Now that you have sorted out the 2 prerequisites, open alarms by searching alarms and opening the app.
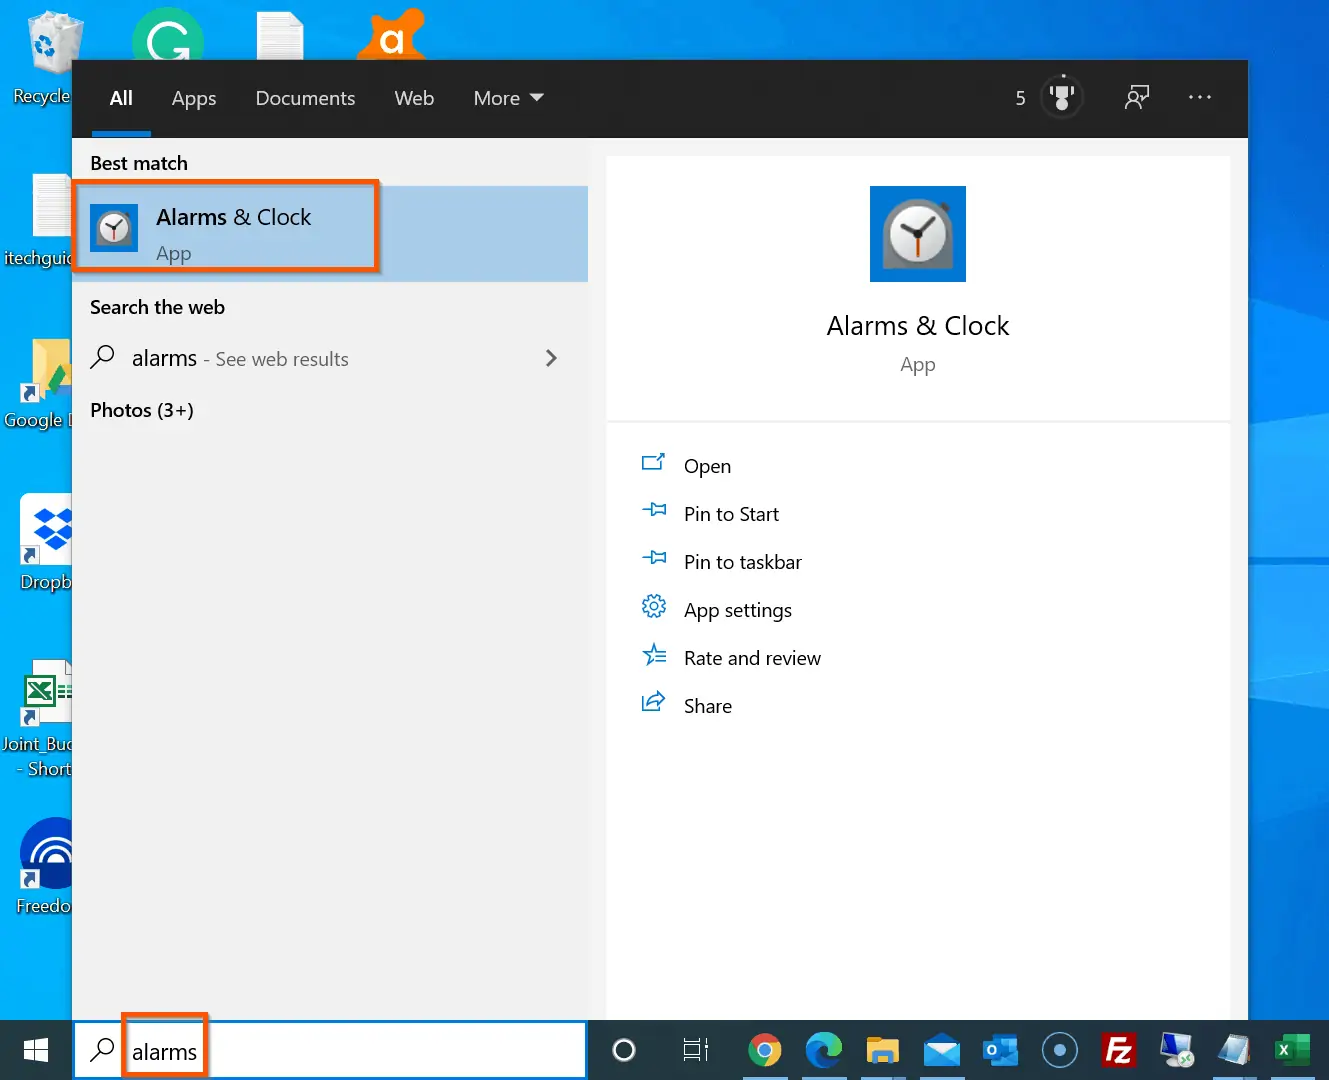
In the subsequent sections, I have discussed the various things you can do with Alarms & Clocks in Windows 10.
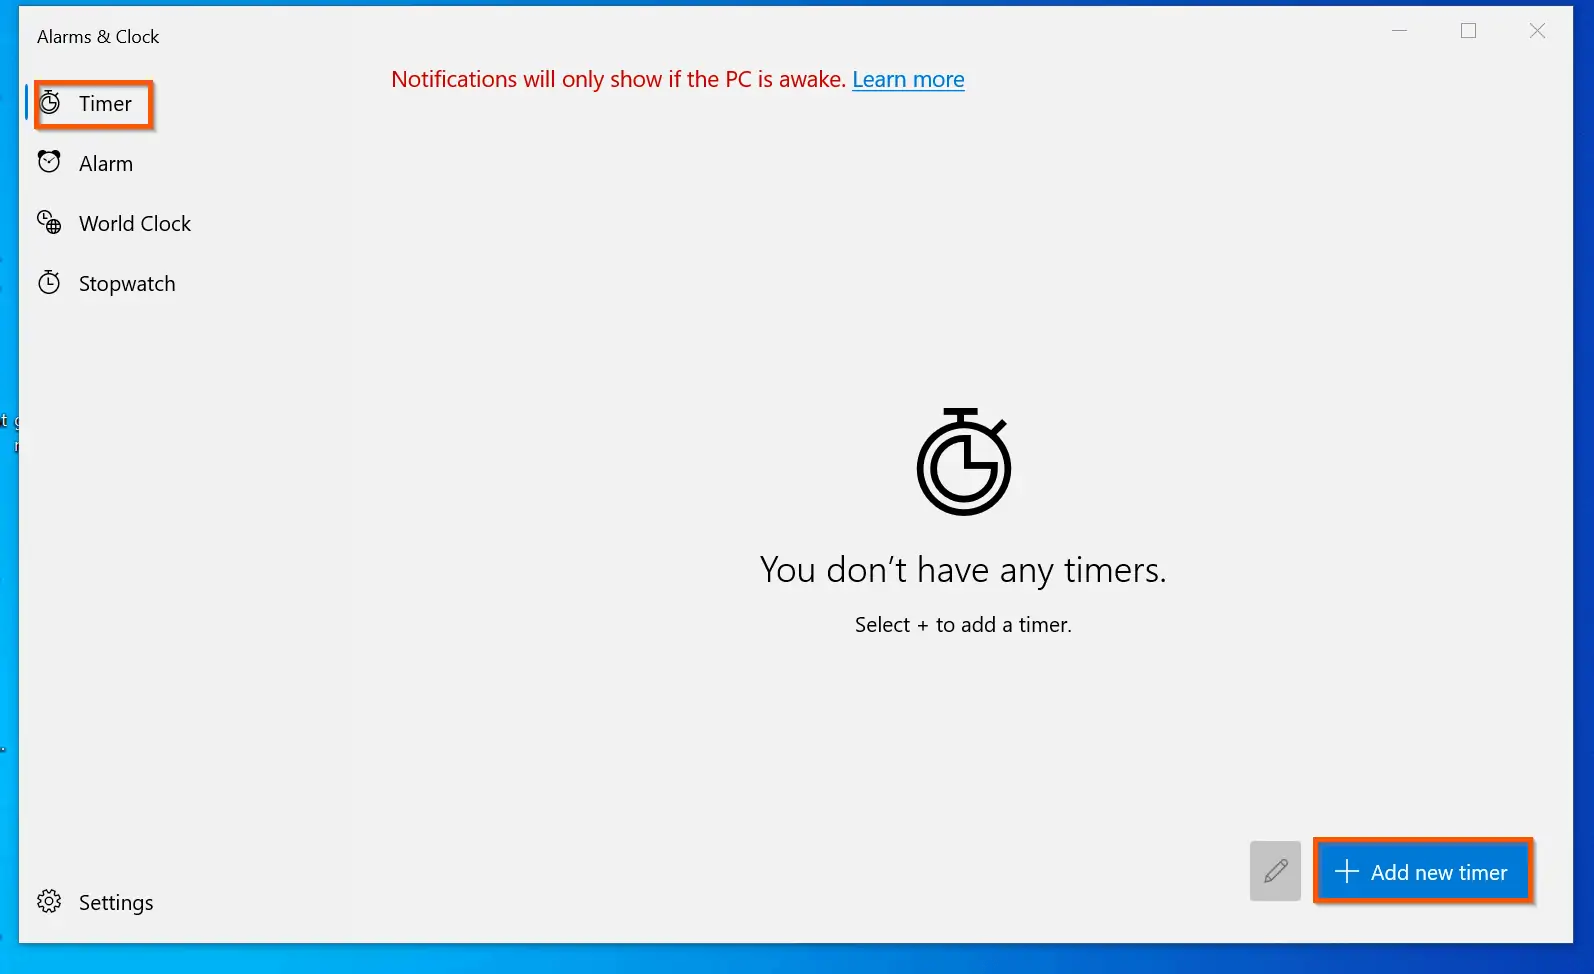
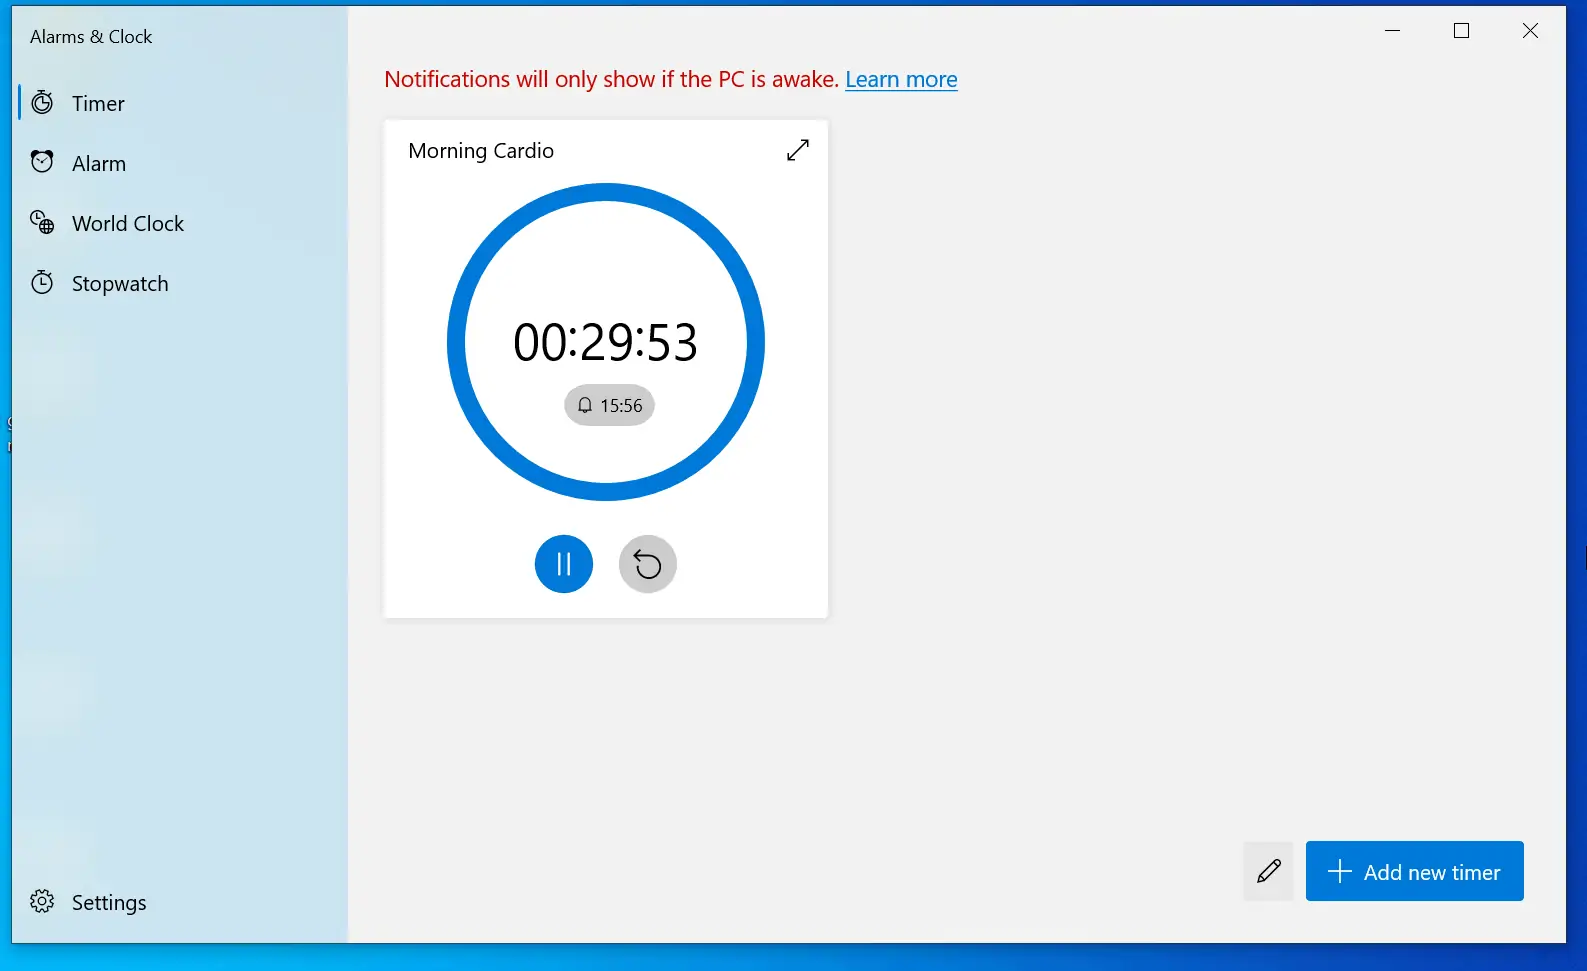
How to Use Countdown Timer
The first feature of Windows 10 Alarms & Clock is Countdown Timer. This tool is useful if you wish to time yourself while you perform a specific activity.
For example, you may want to complete an exercise routine in a set time.
To Set Countdown Timer, follow the steps below:
- When Alarms & Clock opens, it opens in the Timer tab by default.
- To add a timer, on the bottom right, click Add new timer.
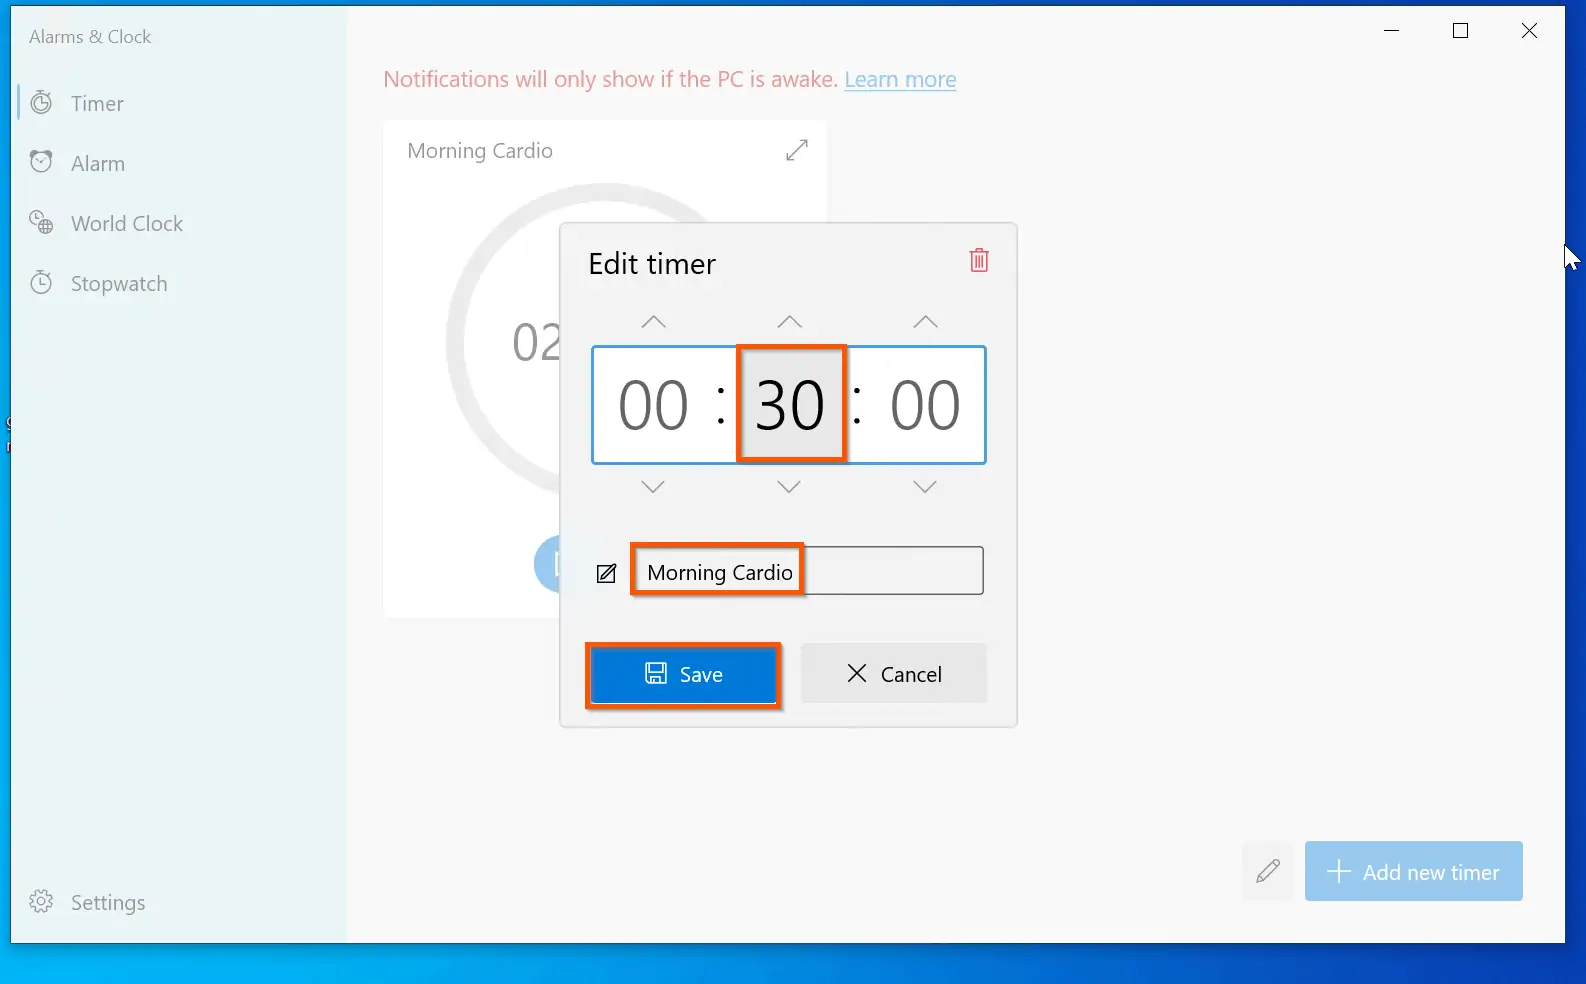
- Finally, on the add new timer window, set the count down. Then, give the timer a name and click Save.
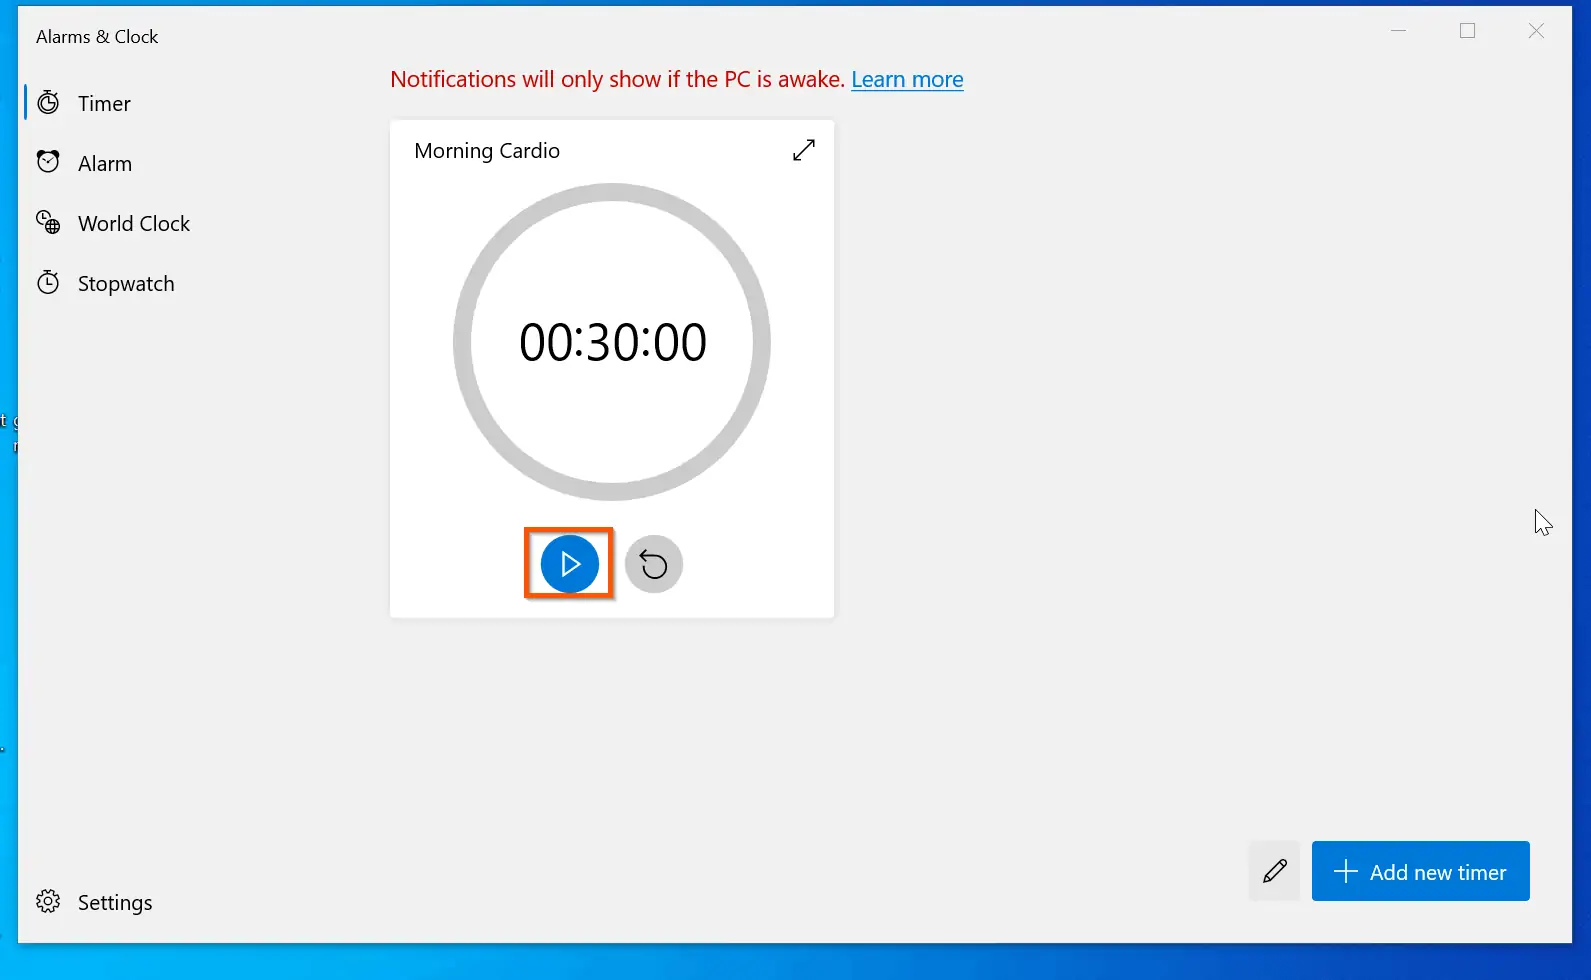
- When you are ready to start your morning cardio exercise (in this example), hit the start button beneath the timer. The countdown timer will start counting down to zero – see the second screenshot below. When the timer gets to zero, it will alarm.
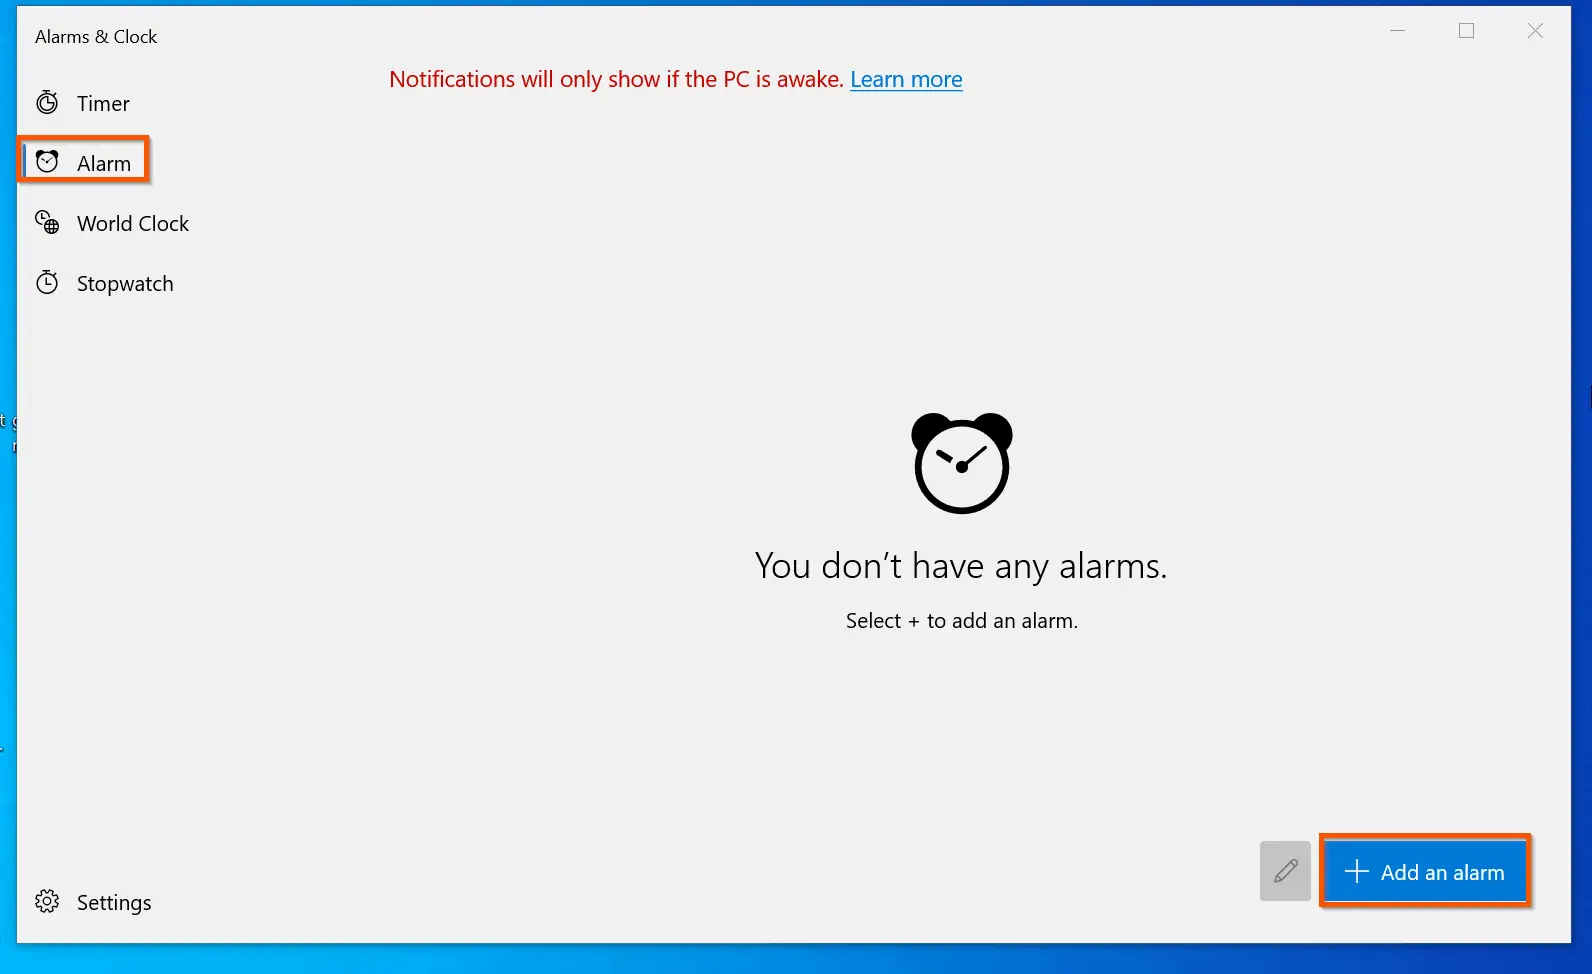
How to Set Alarms
Another great feature of Windows 10 Alarms & Clock is the actual alarm feature. To set alarm in Windows 10, follow the steps below:
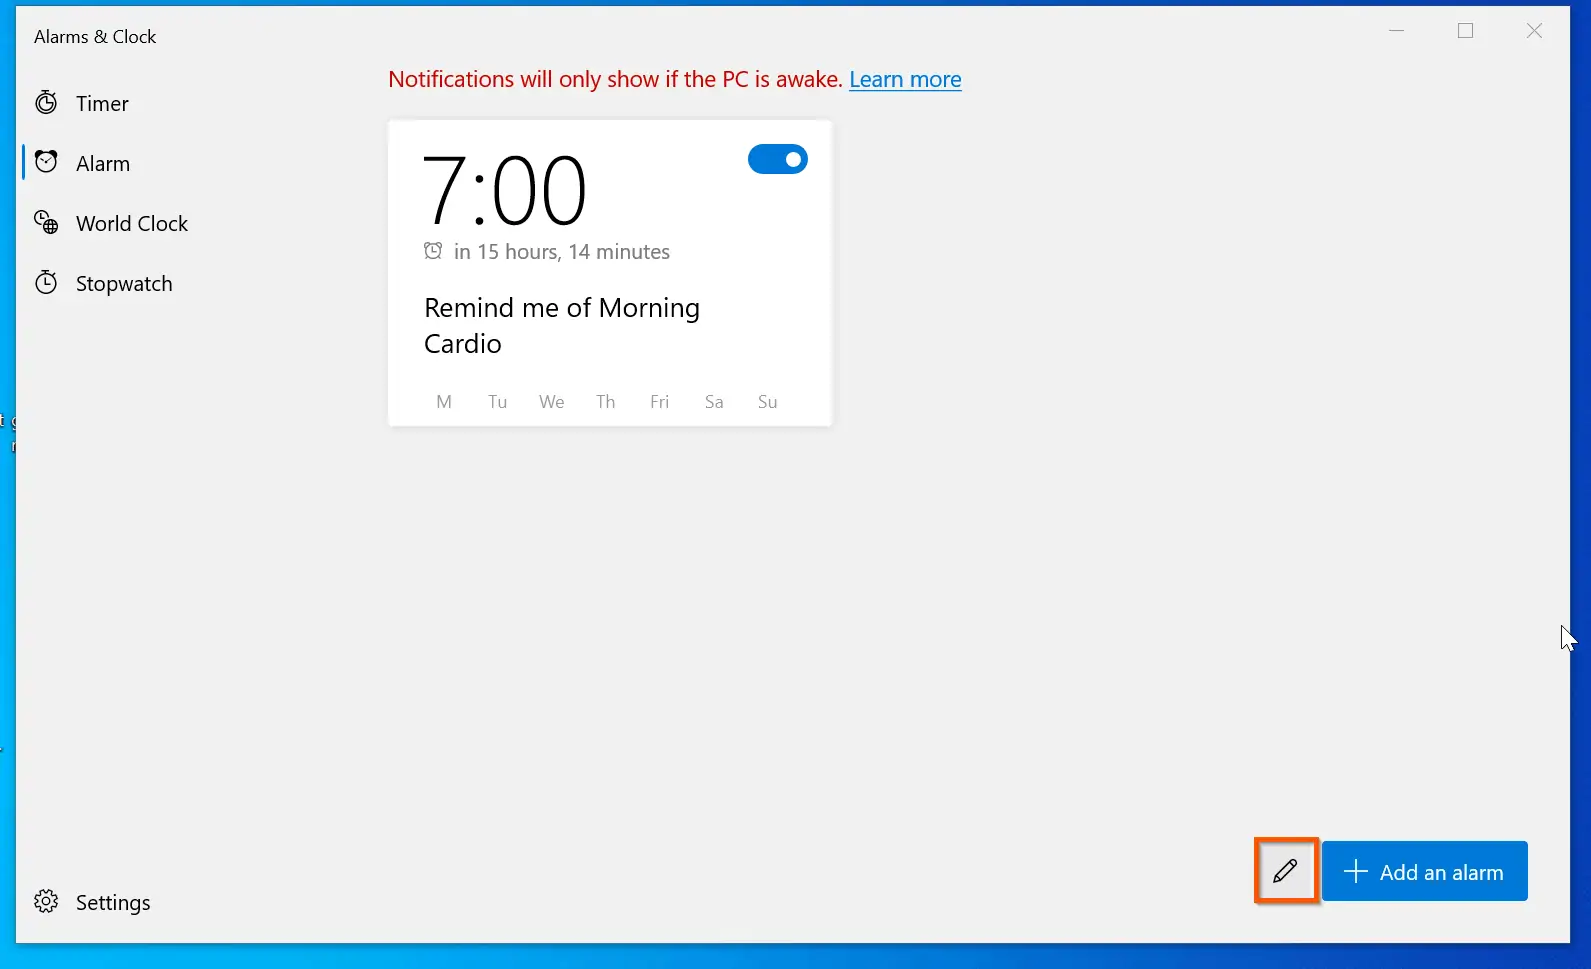
1. Click the Alarms tab. Then, on the bottom right, click Add an alarm.
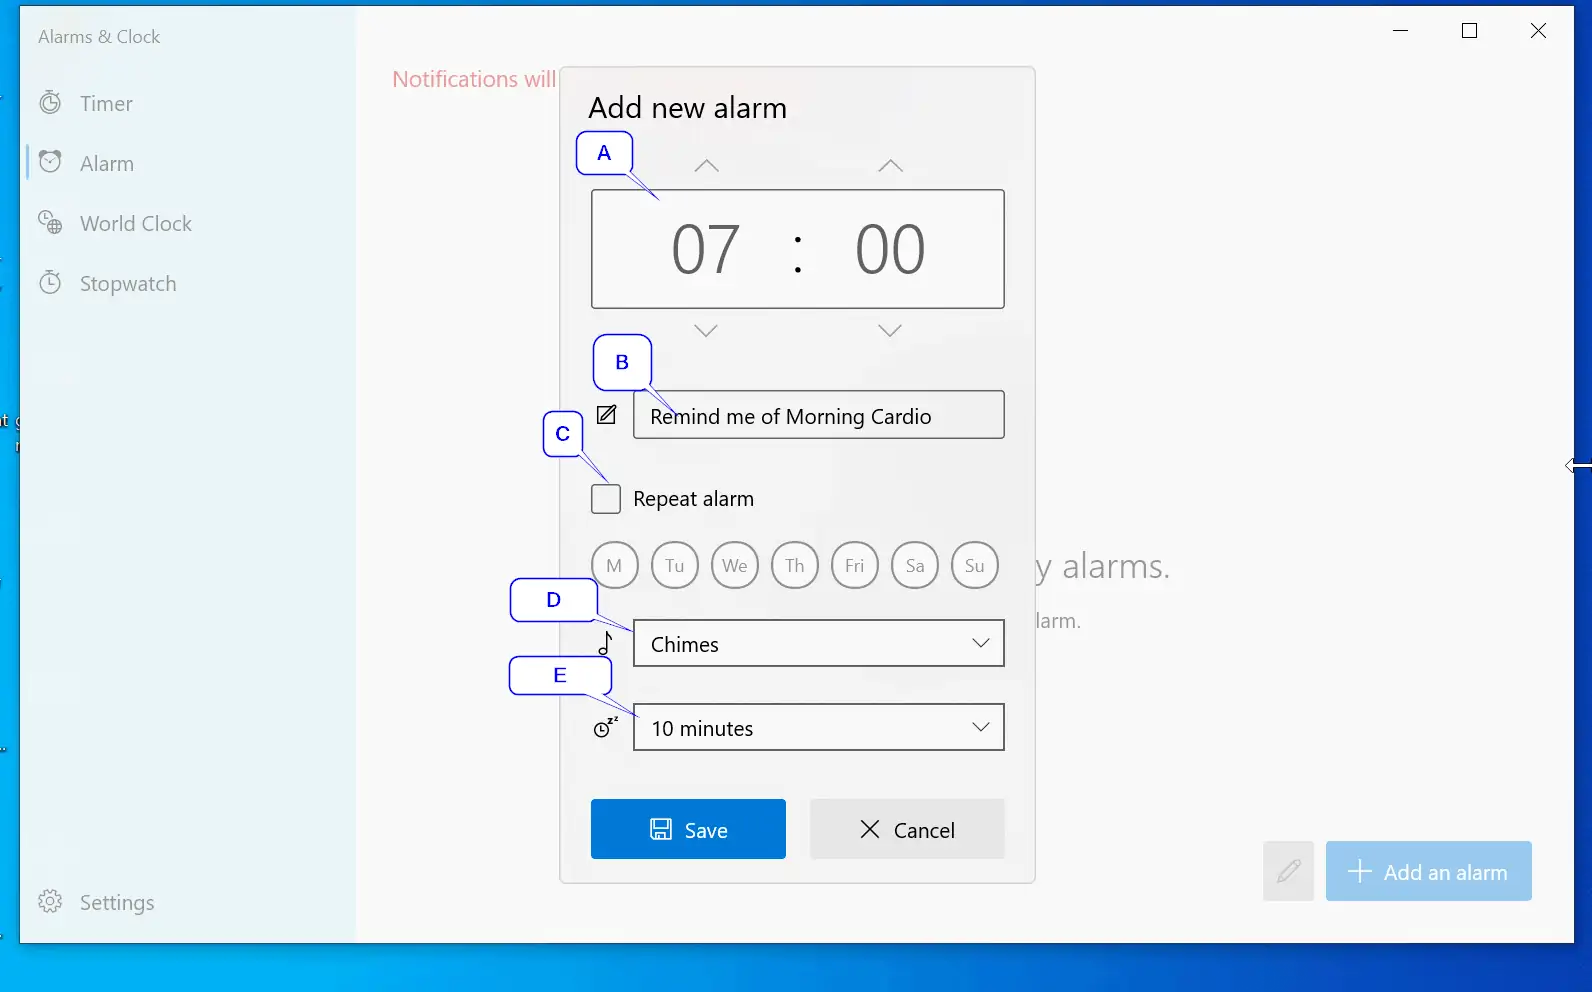
- Finally, on the Add new alarm pop up, set the following – see the letters in the screenshot below:
A – Alarm time – when you want the alarm to ring – the first 2 numbers are hours, the second set are minutes
B – Alarm name – the name that will be displayed when the alarm rings – this helps to remind you what the alarm is about.
C – If you want the alarm to ring once, do not check the Repeat checkbox. However, to set the alarm to repeat, check this checkbox. Then, click on the days of the week you want the alarm to ring.
D – Use this drop-down to select the alarm’s ring tone.
E – Use this drop-down to set how many minutes you can snooze the alarm (default is 10 minutes). - Finally, after updating the alarm settings, click Save. The saved alarm will be displayed as shown in the second screenshot below.
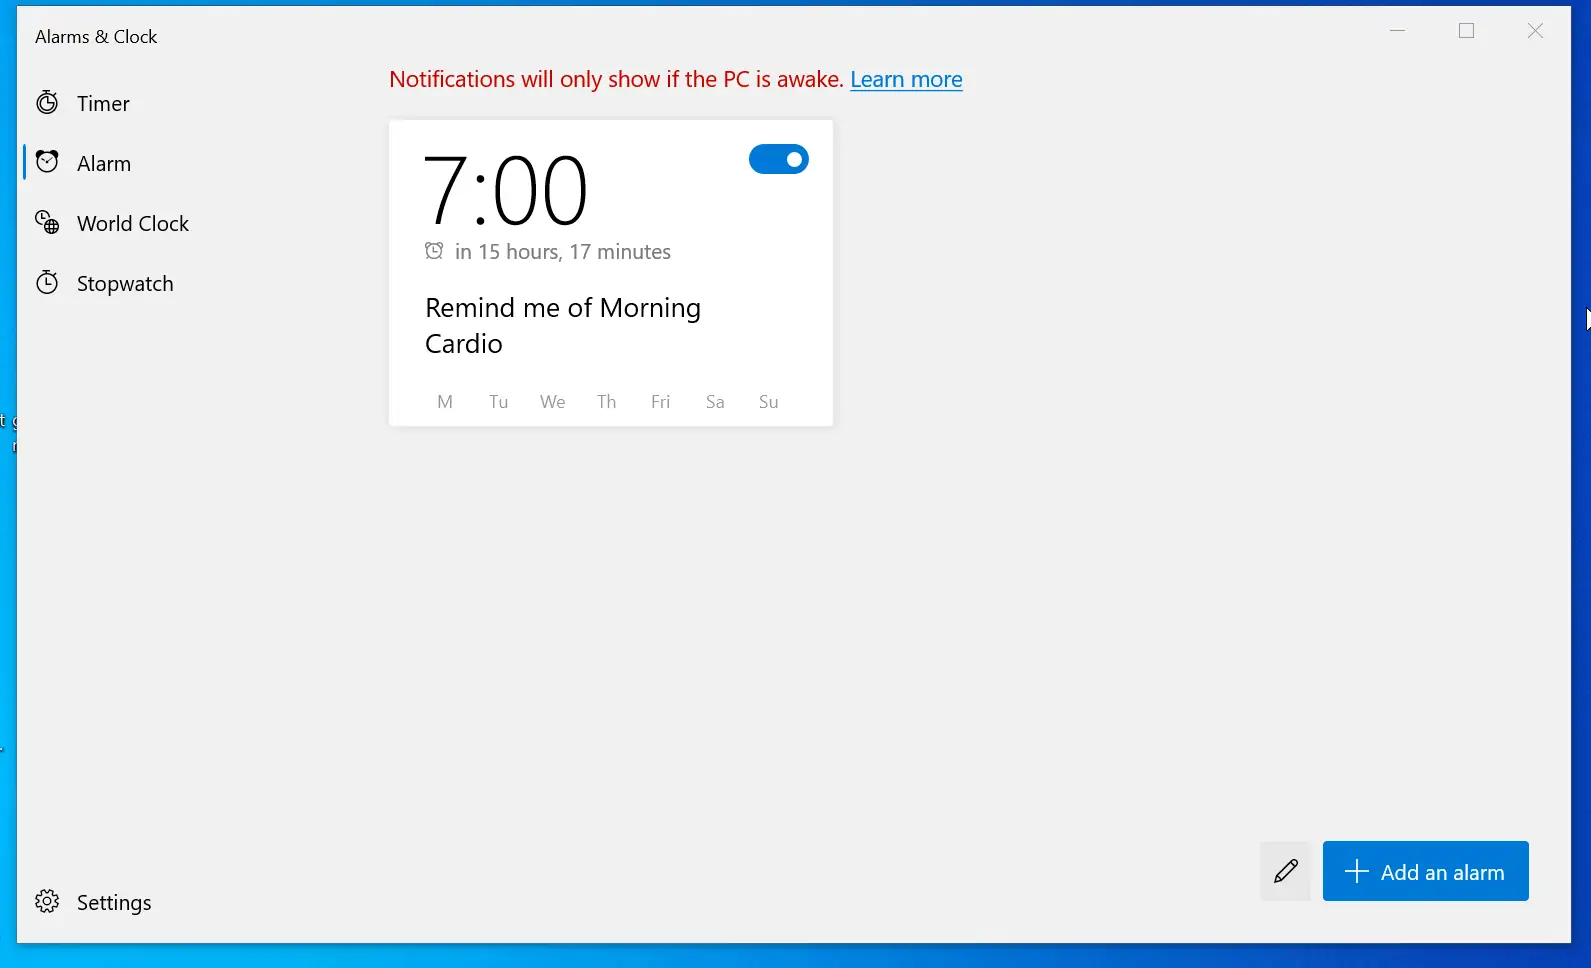
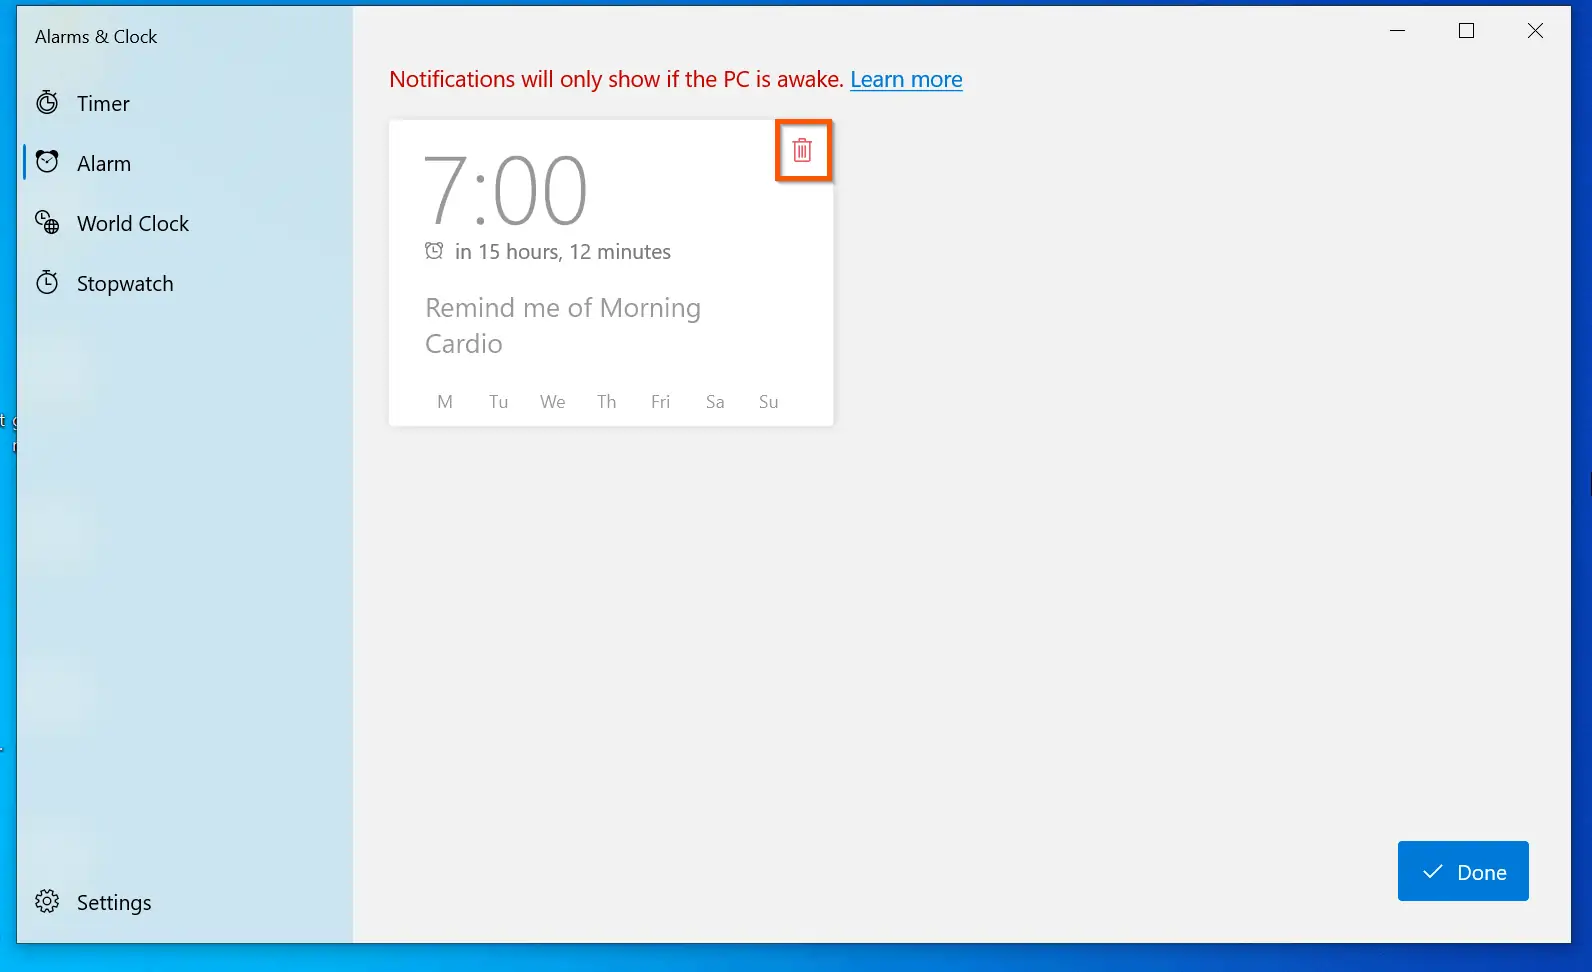
To delete an existing Windows 10 alarm from the list, at the button right of the Alarm tab, click the pencil icon – all existing alarms will display the delete icon on their top right.
To delete an alarm, click the delete icon on the top right of an alarm – see the second screenshot below.
How to Add Additional World Clocks
If you want Windows 10 to display additional clocks, you can do this in the World Clock tab of Alarms & Clock. To add additional clocks to Windows 10:
- Click the World Clock tab. Then, on the bottom right, click Add new city. When you click Add new city, a search box will be displayed on top of the map.

- Start typing the name of a city – Windows 10 Alarms & Clock will display a list of cities. Click on the City you want to add the clock. In this example, I want to add New York, USA.
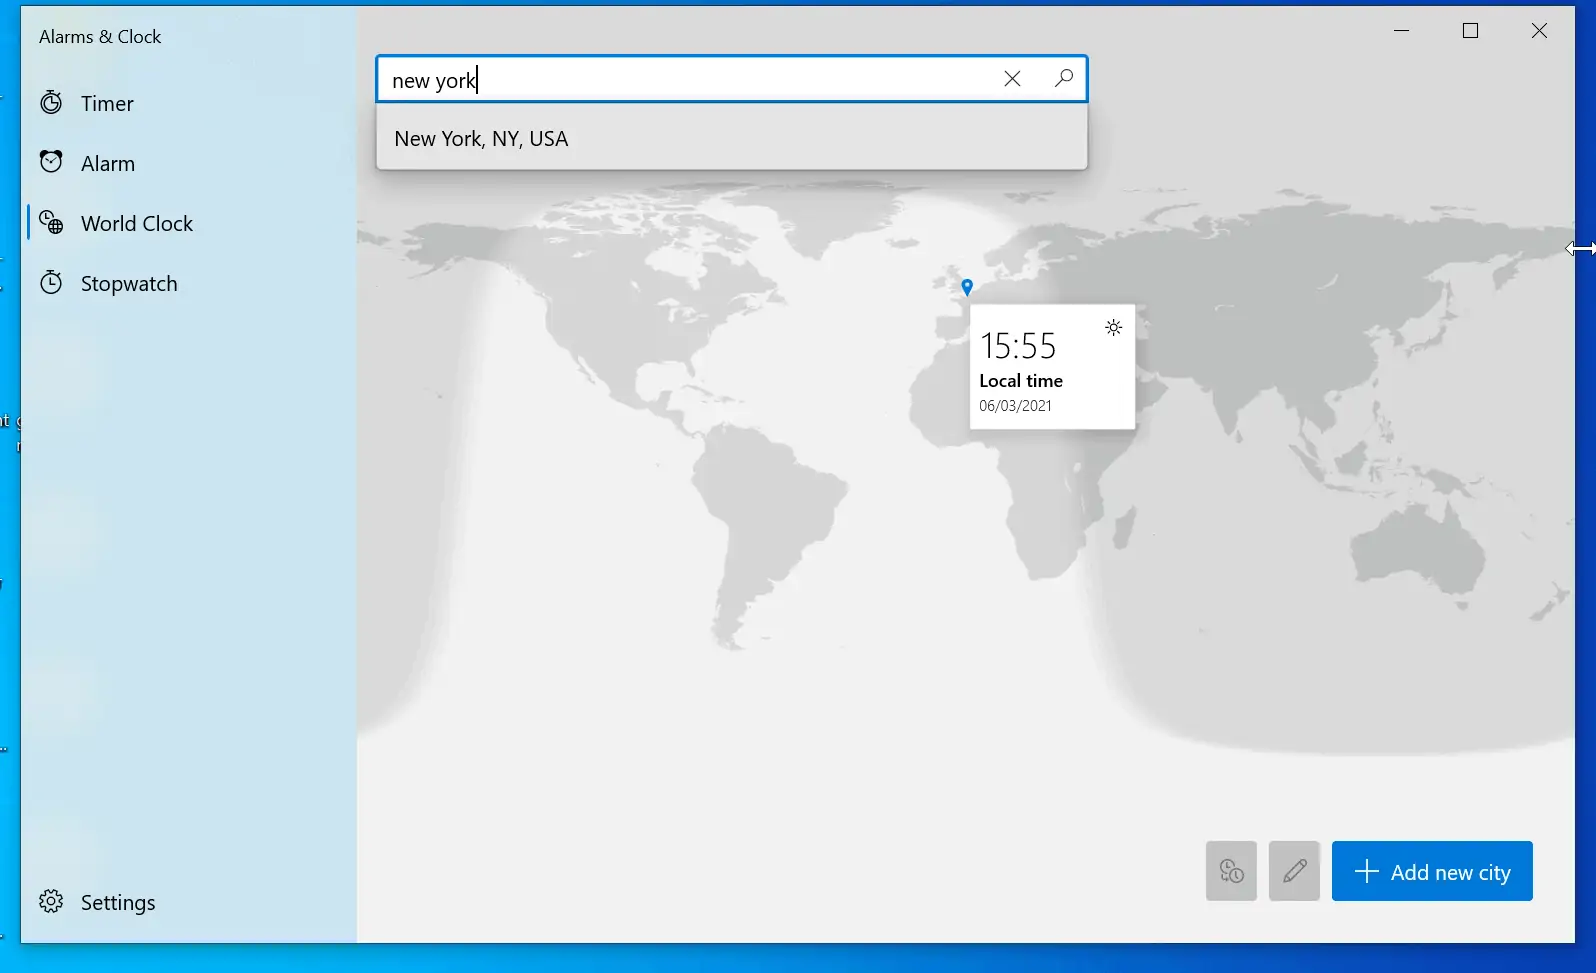
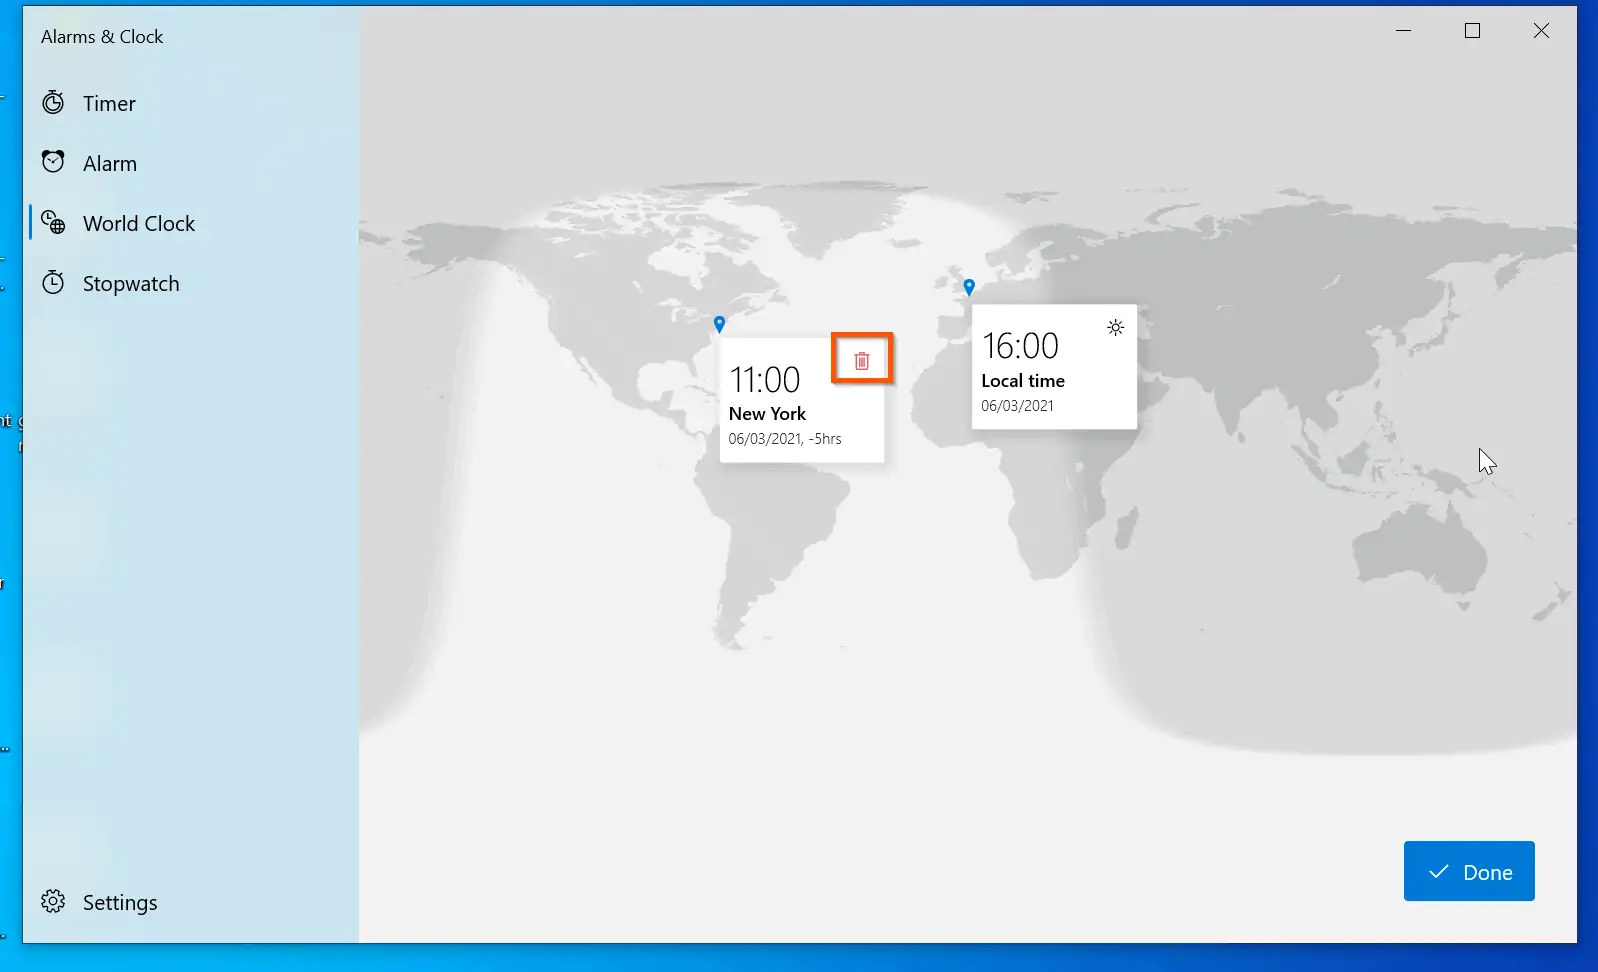
- Once you click the city, the clock for that city will be displayed on the map.
- To delete additional clocks, on the bottom right, click the pencil icon. Then click the delete icon on top of the clock – see the second screenshot below.

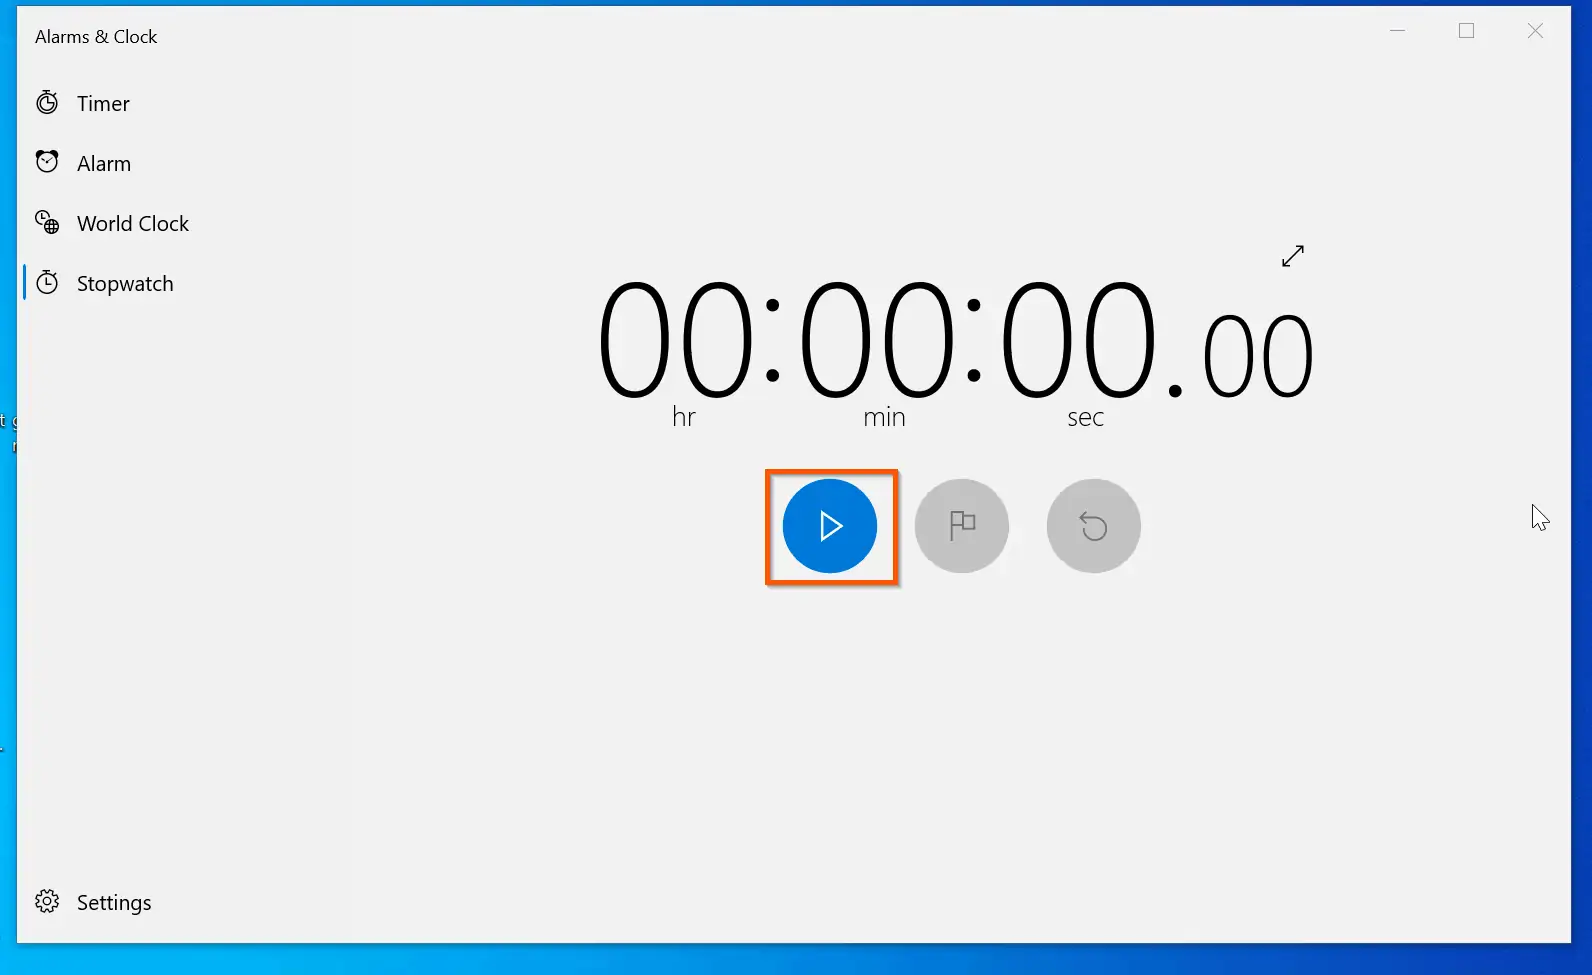
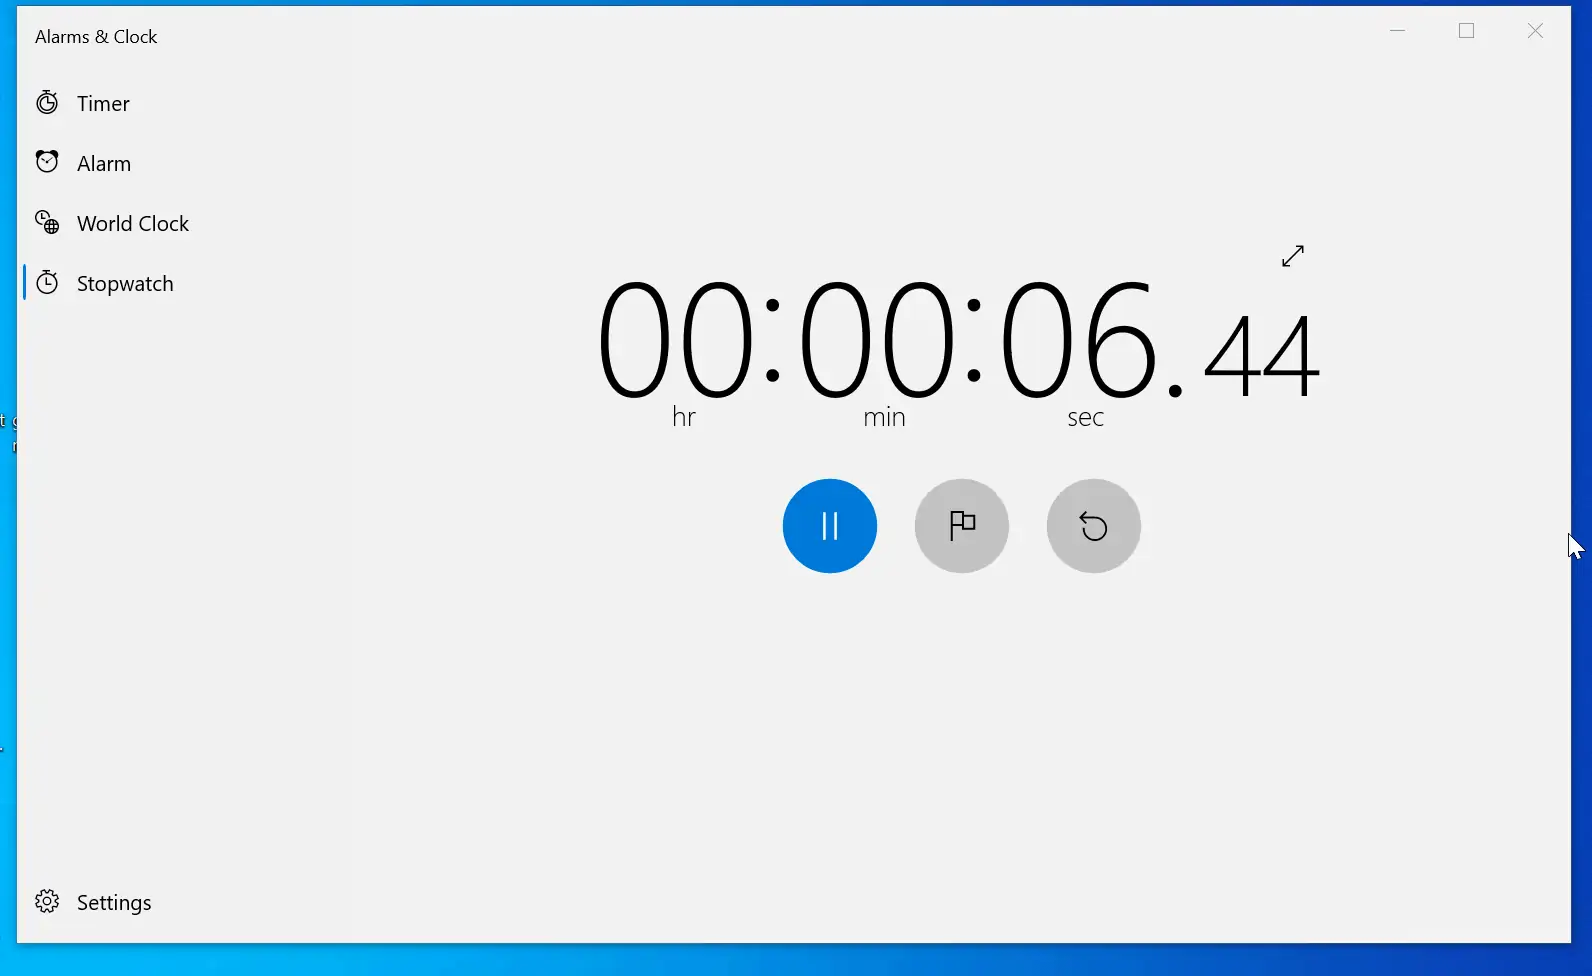
How to Use a Stopwatch
The stopwatch is the opposite of the Countdown timer. While the Count down timer counts down from a higher time to zero, the Stopwatch counts from zero upwards until you stop it.
To use the Stopwatch feature in Windows 10 Alarms & Clock, click the Stopwatch tab. When you are ready to use the stopwatch, click the start button.
The stopwatch will start clocking the time, and continue clocking until you click the Pause button.
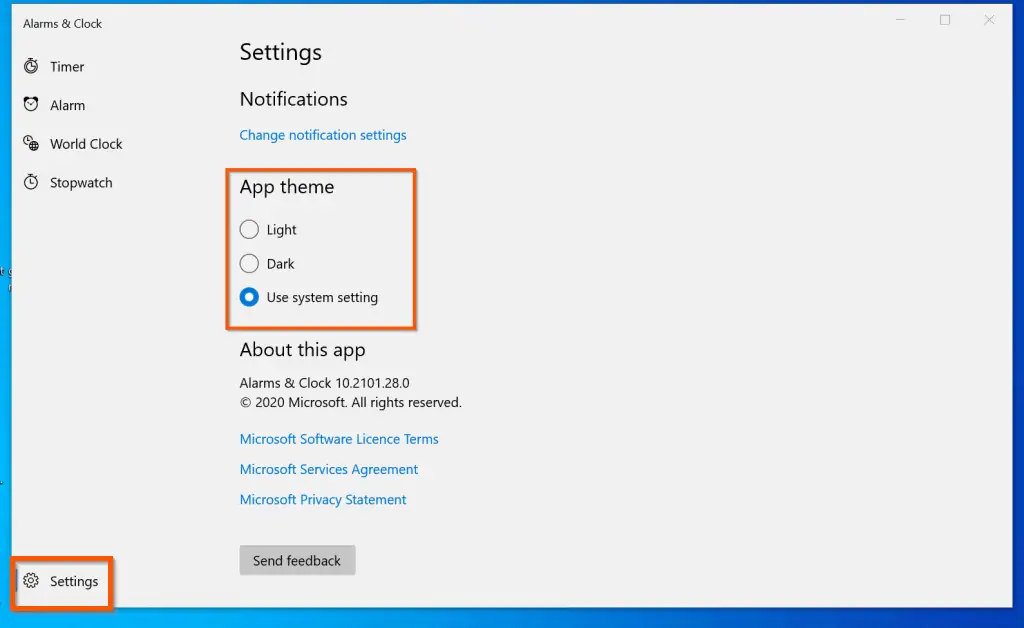
How to Change Alarms & Clock Settings
To adjust the Alarm & Clock Settings, on the bottom left of the left pane, click Settings. There is just one setting you can change here – the app theme.
If you love dark theme, you an change your Alarms to display in Dark mode. The default is to use system setting.
I hope you found this Windows 10 guide helpful. If you did, kindly spare two minutes of your time to let us know by responding to the “Was this page helpful?” question below.
Finally, for more Windows 10 guides, visit our Windows 10 How-To page.


![How To Run Sysprep (Generalize) In Windows 10 [2 Methods]](https://www.itechguides.com/wp-content/uploads/2022/05/8-2.webp)