Is your Windows 11 computer encountering the driver power state failure BSOD error? Not to worry, this guide offers multiple potential fixes for this error.
Solution 1: Update Device Drivers
Outdated device drivers are most likely the cause of this BSOD error. Hence, updating the outdated device drivers on your Windows 11 computer should be able to fix the error.
The subsequent procedures demonstrate how to update device drivers in Windows 11 through the Windows update.
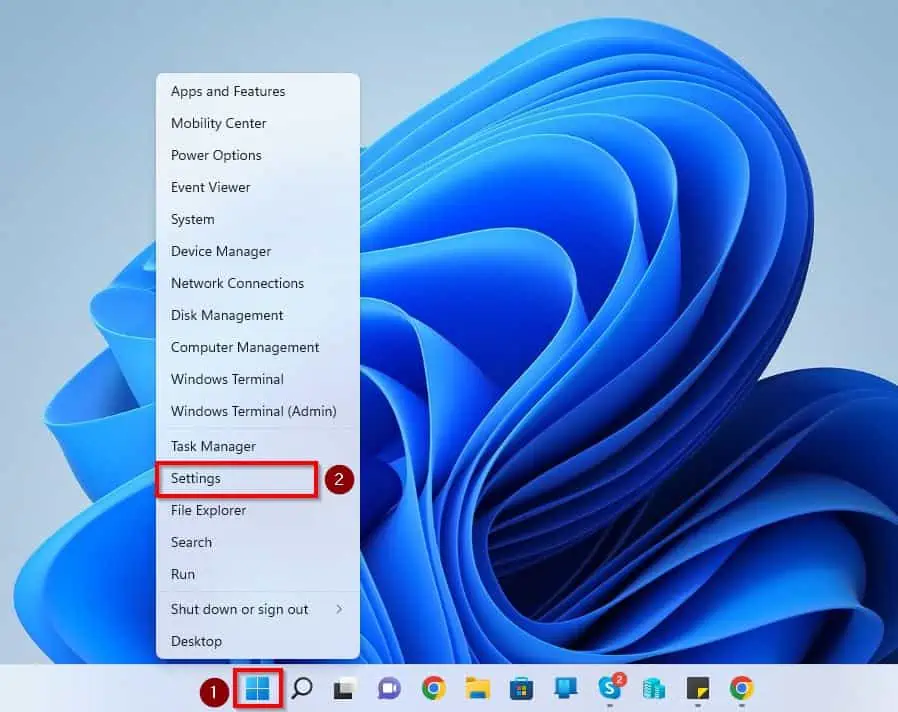
- Right-click the Start menu button on your Windows 11 taskbar and select Settings from the options that pop up. Alternatively, you can make use of the Windows key + I shortcut to access Settings in Windows 11.
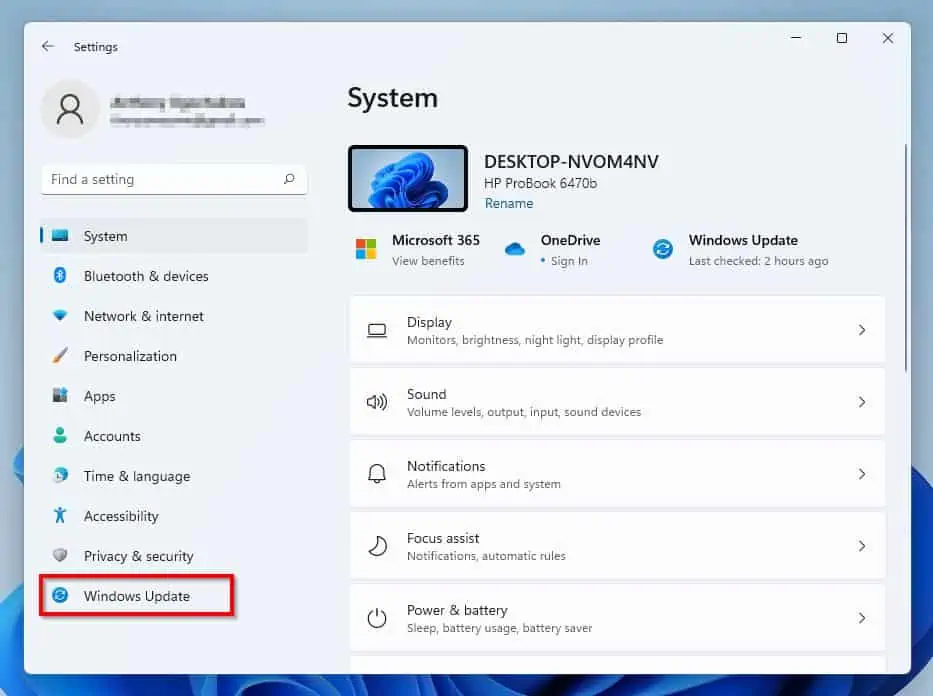
- When Settings opens, select Windows Update on the left pane.
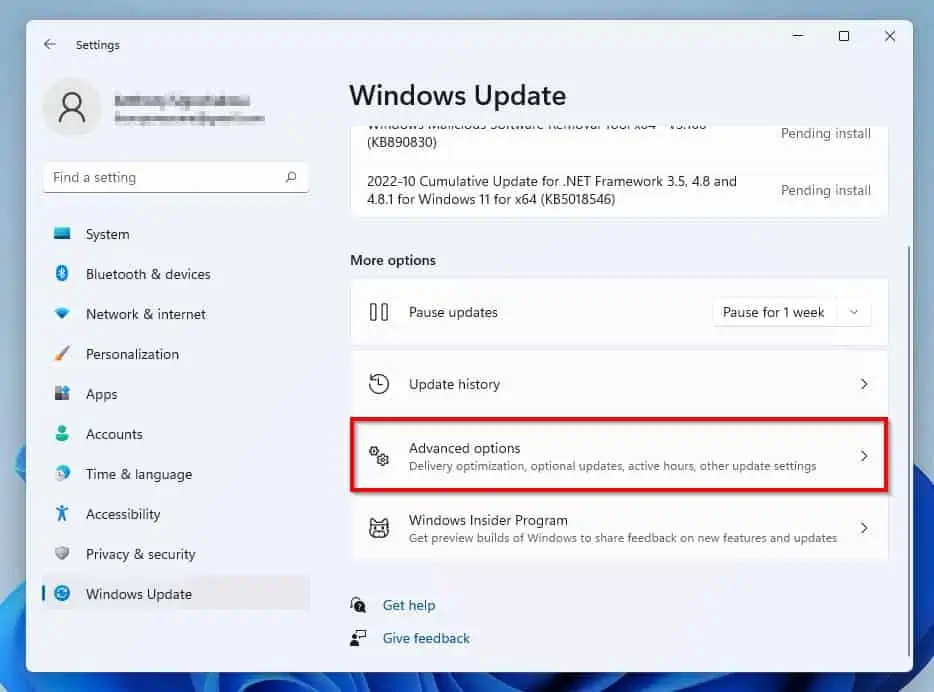
- Following that, select Advanced options on the right pane of the Settings window.
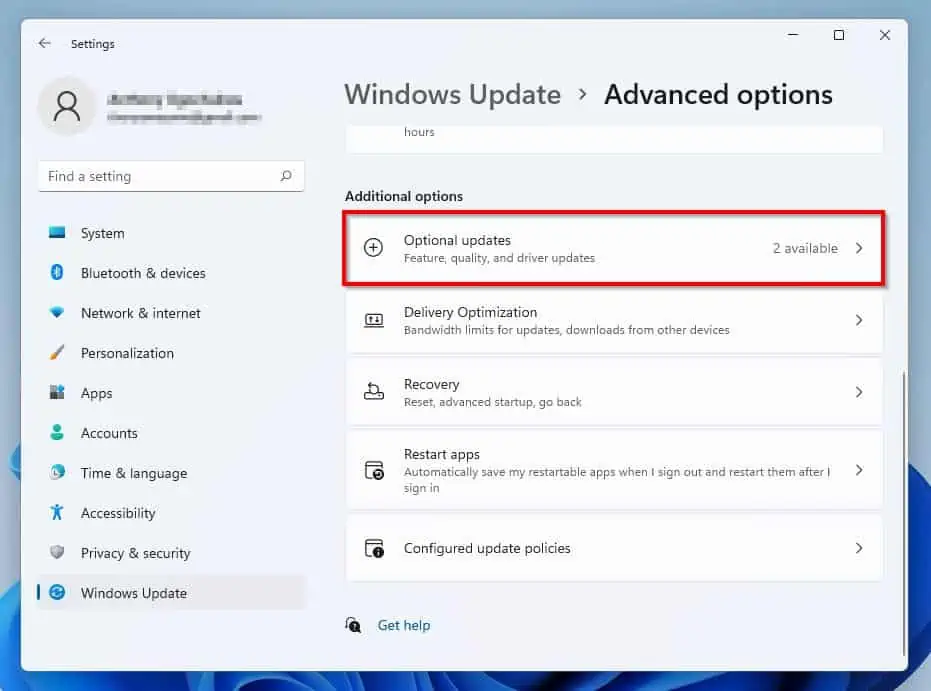
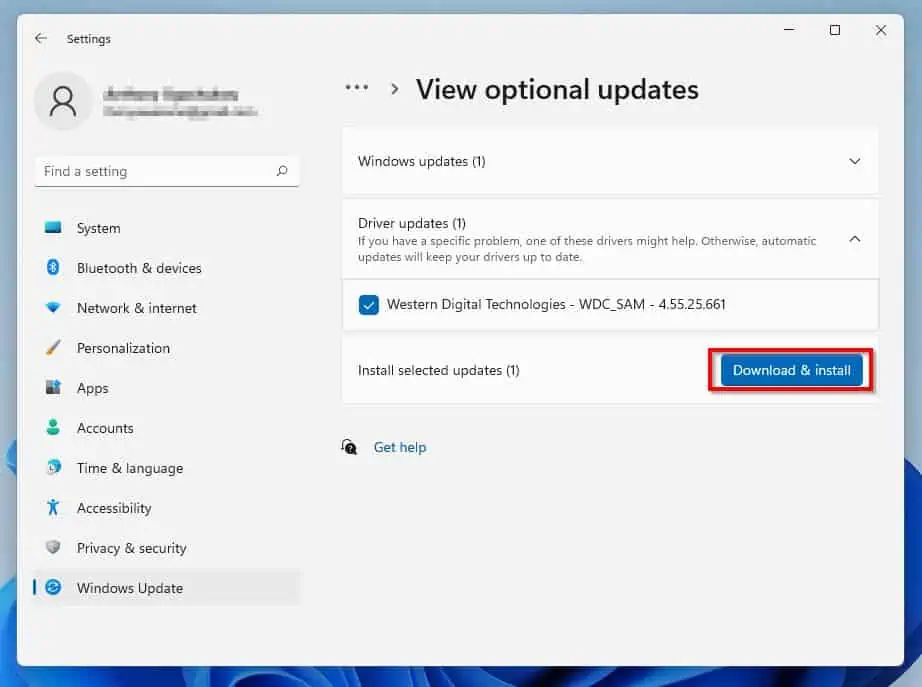
- Under Additional options, click Optional updates.
- Then, select Driver updates and check the box of any available update under it.

- Finally, click the blue Download & install button. Hence, Windows will begin to download the driver update from the internet and automatically install it on your PC.
- After downloading and installing the driver update, restart your Windows 11 computer. Hopefully, this BSOD error shouldn’t appear on your Windows 11 computer anymore.
If you are still encountering the error, try the other solutions below.
Solution 2: Disable Fast Startup
Fast startup is a Windows feature that limits boot time by not completely shutting down a computer. However, it’s known to cause compatibility issues that may lead to driver power state failure BSOD error.
Hence, disabling the feature on your Windows 11 computer is a potential solution to fix the error. The steps below illustrate how to disable the fast startup feature in Windows 11.
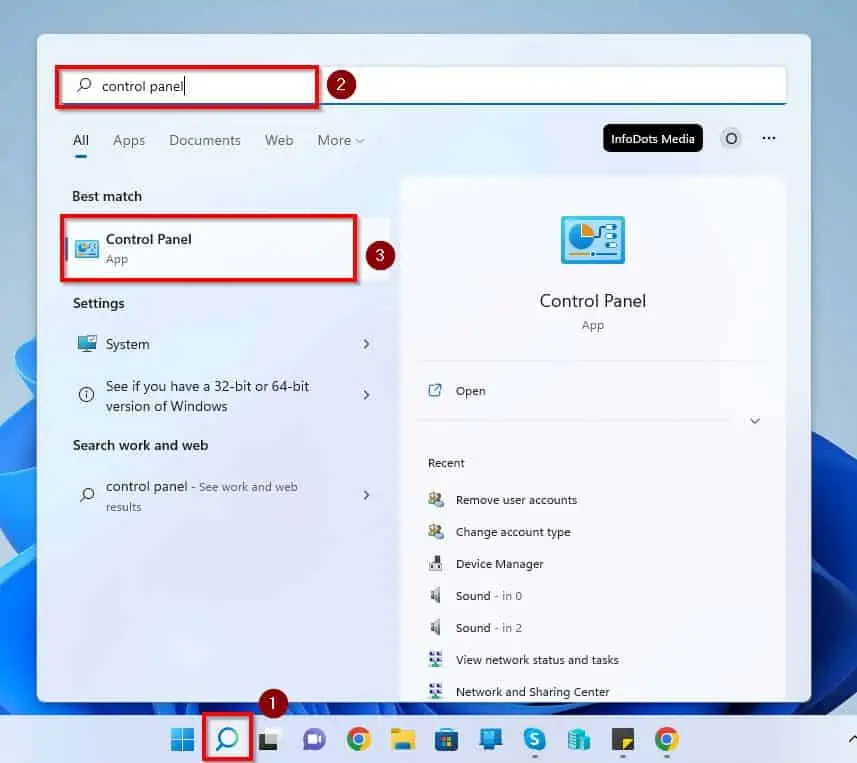
- Click the Search button (magnifying glass icon) on the Windows 11 taskbar. Next, type “control panel” (without the quotes) in the search box and select Control Panel under Best match.
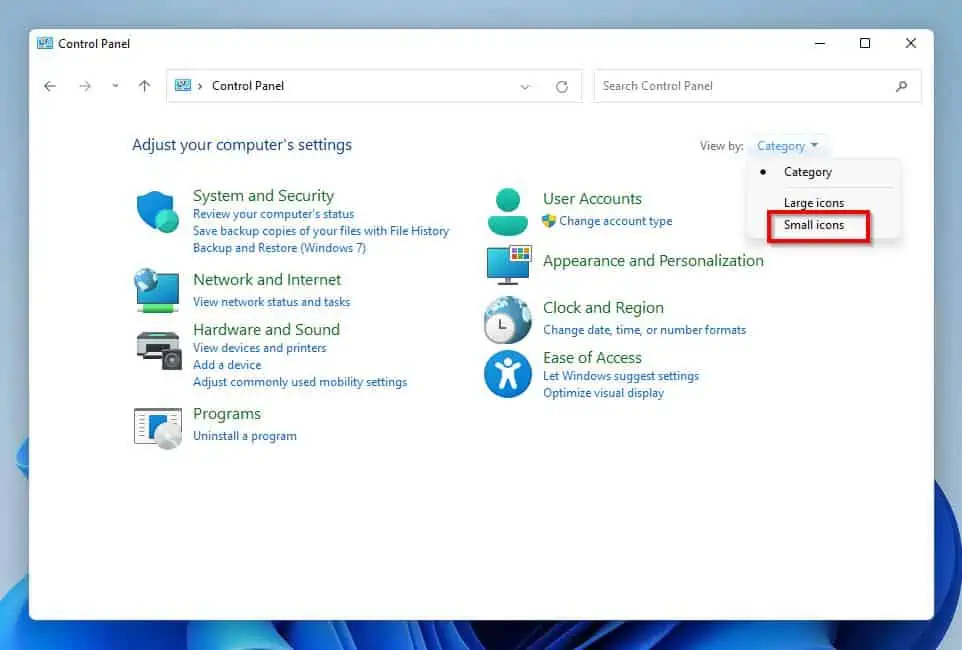
- On the Control Panel window, click the View by drop-down at the top right and select Small icons.
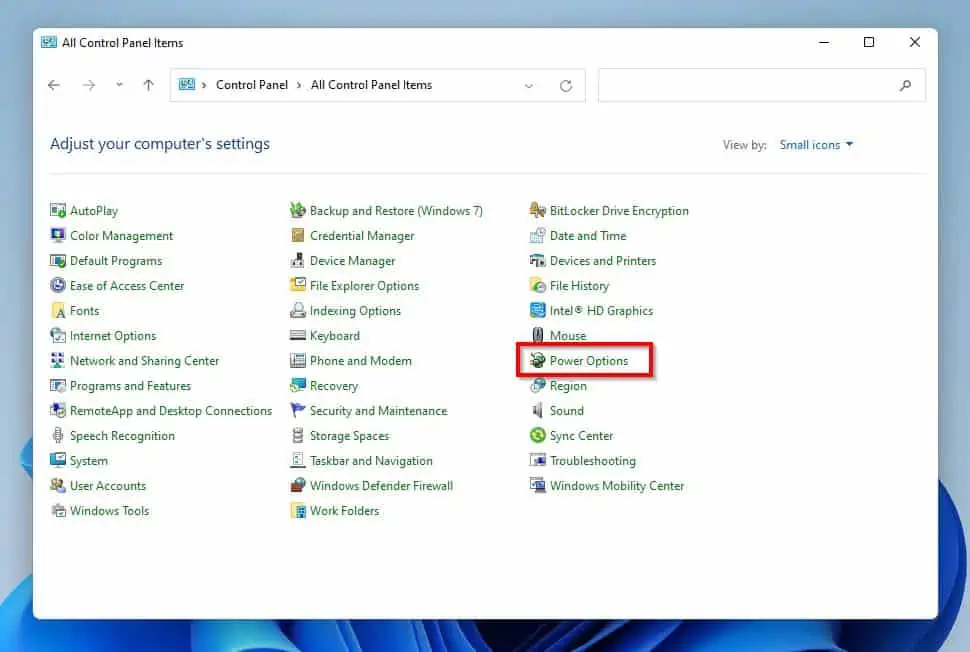
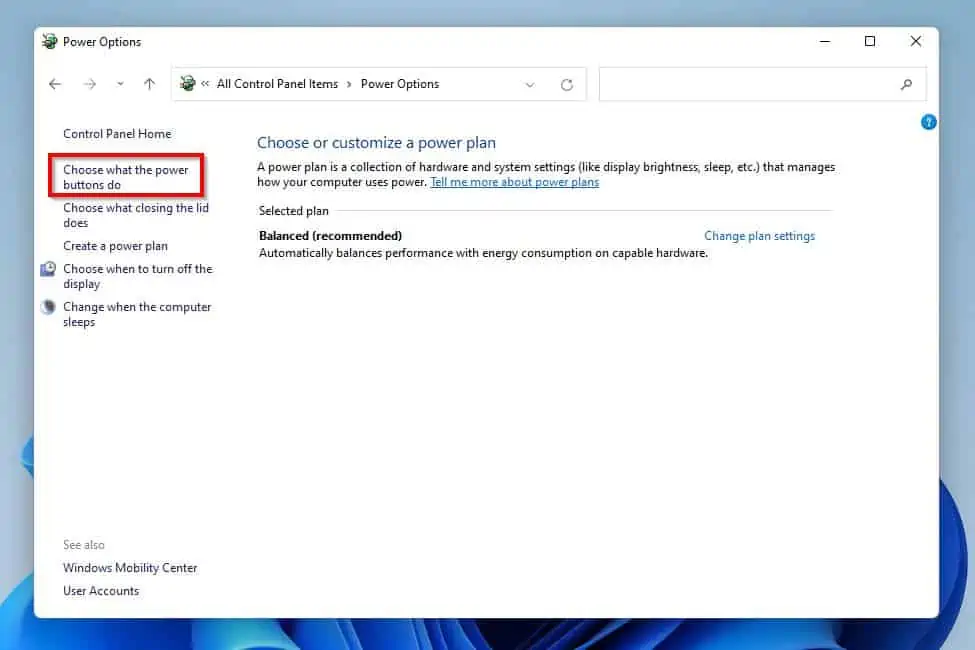
- Thereafter, select Power Options.
- Following that, click Choose what the power buttons do on the window’s left pane.
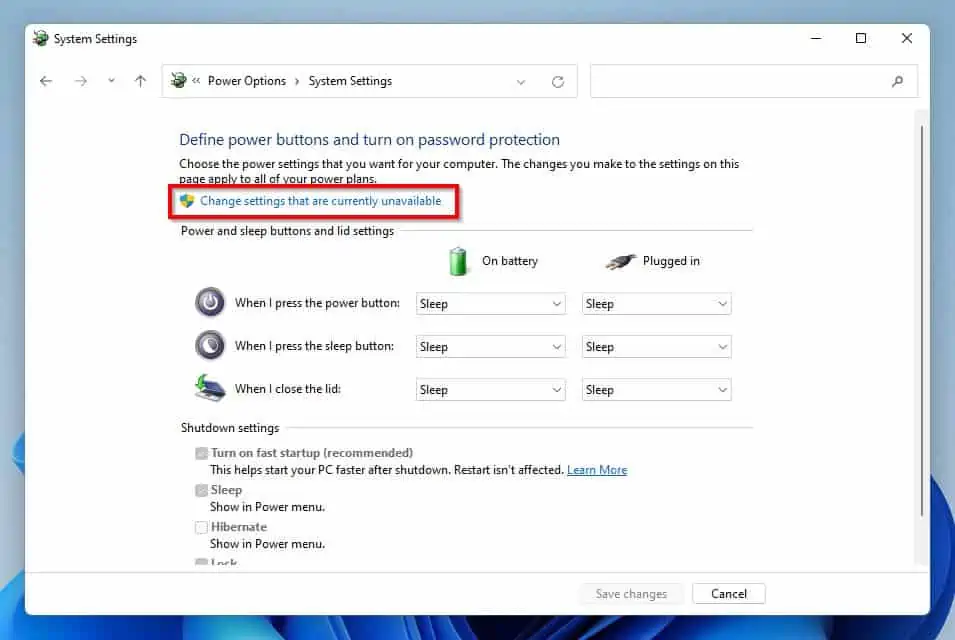
- After that, click Change settings that are currently unavailable.
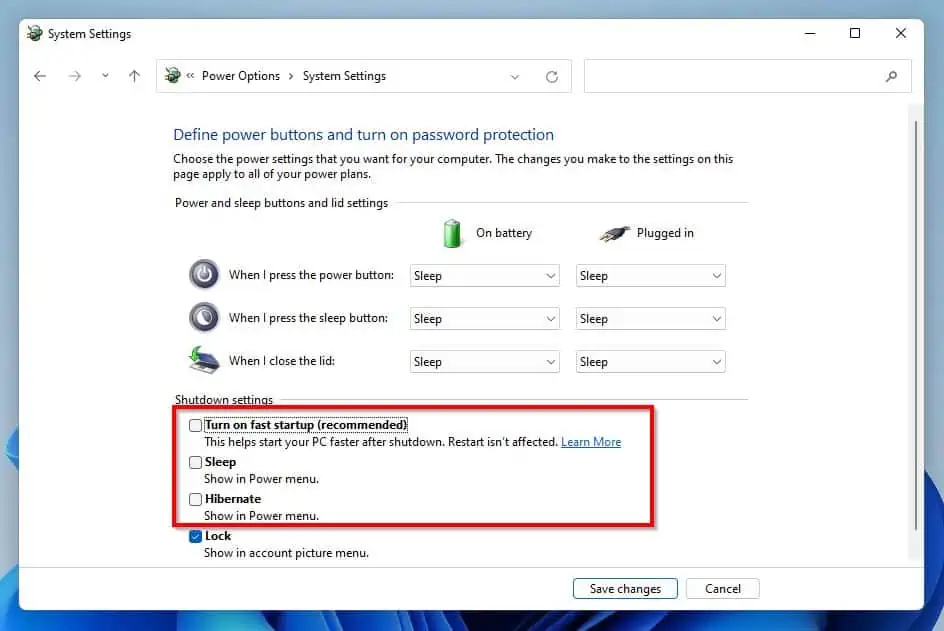
- In the Shutdown settings section, uncheck the Turn on fast startup (recommended), Sleep, and Hibernate boxes.
- After doing that, click the Save changes button to save the changes.
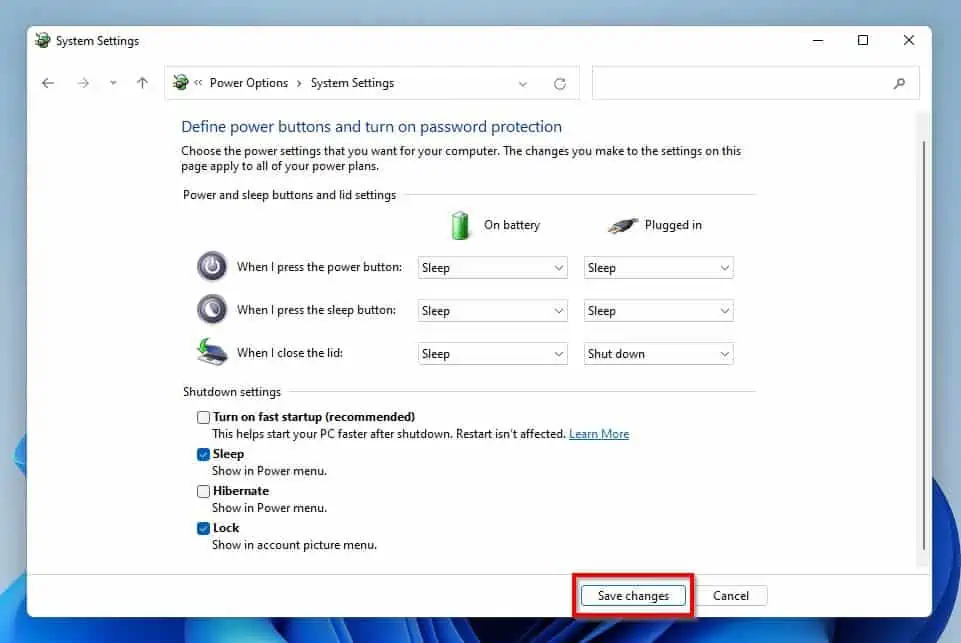
- Finally, restart your Windows 11 computer to effect the changes. Hence, this BSOD error affecting your PC should be fixed.
If it isn’t, check out the other solutions in the sub-sections below.
Solution 3: Modify Power Plan Settings
Another way to fix this error on your Windows 11 computer is to modify the power plan settings. To achieve that, carefully follow the steps below.
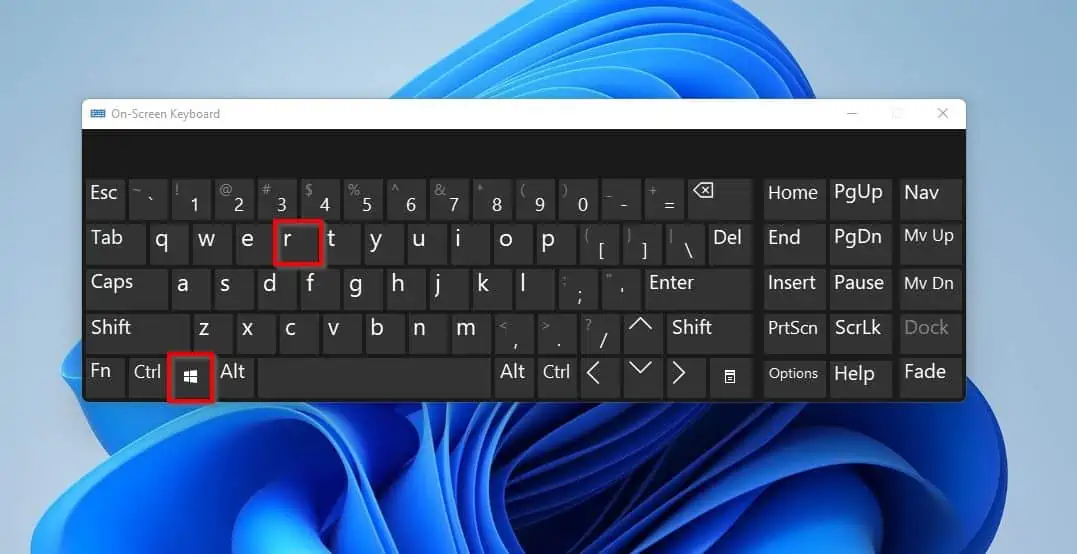
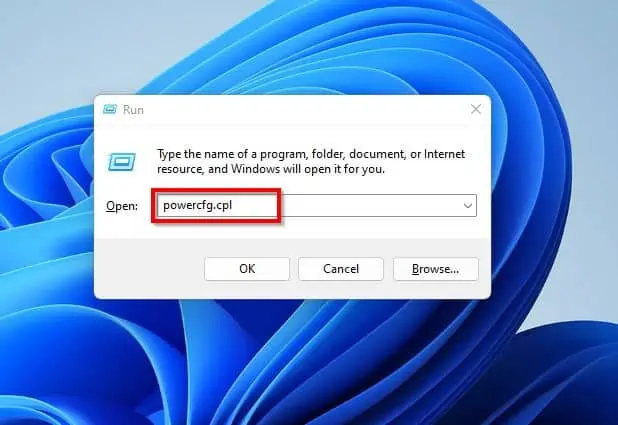
- Use the Windows key + R shortcut to open the Run dialog.
- Following that, input “powercfg.cpl” (without the quotes) in the Run input field and press the enter key on your keyboard.
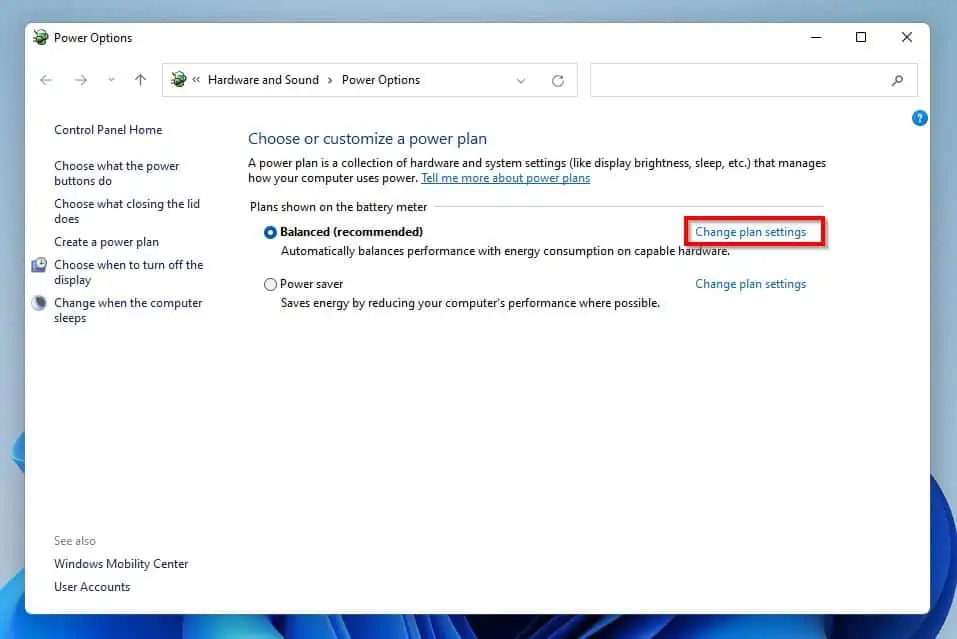
- Then, click Change plan settings opposite the current power plan of your computer.
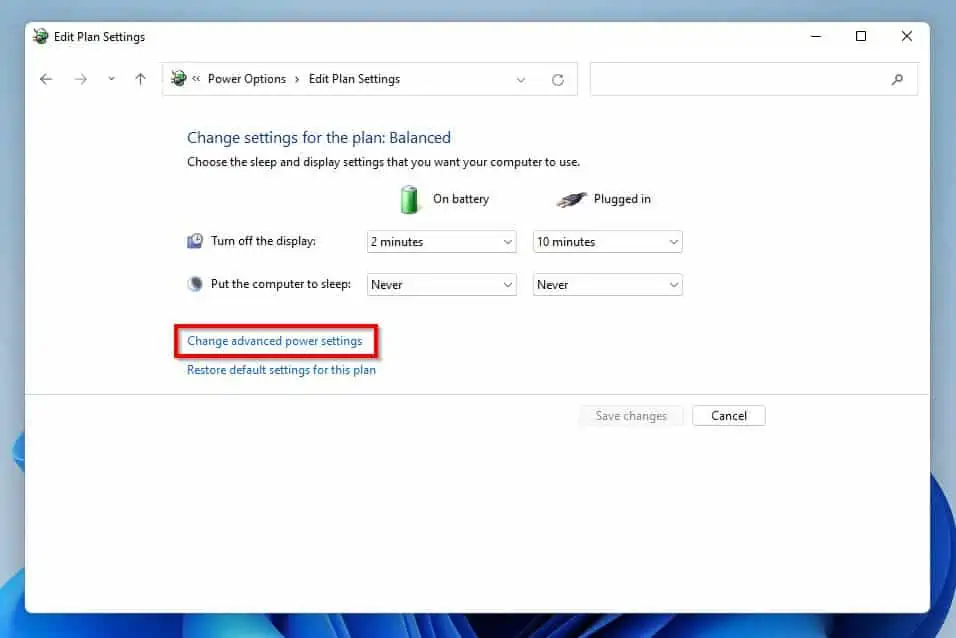
- Afterward, select Change advanced power settings.
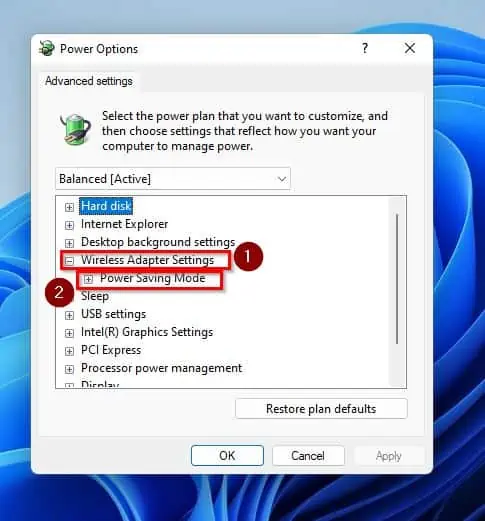
- Then, double-click Wireless Adapter Settings to expand it. Also, expand Power Saving Mode under Wireless Adapter Settings by double-clicking it.
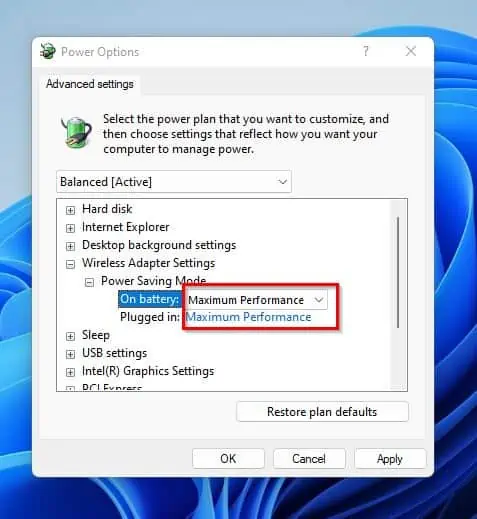
- Under Power Saving Mode, ensure that On battery and Plugged in are set to Maximum Performance.
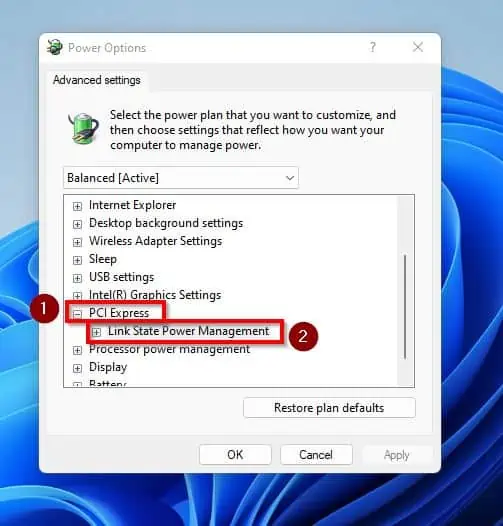
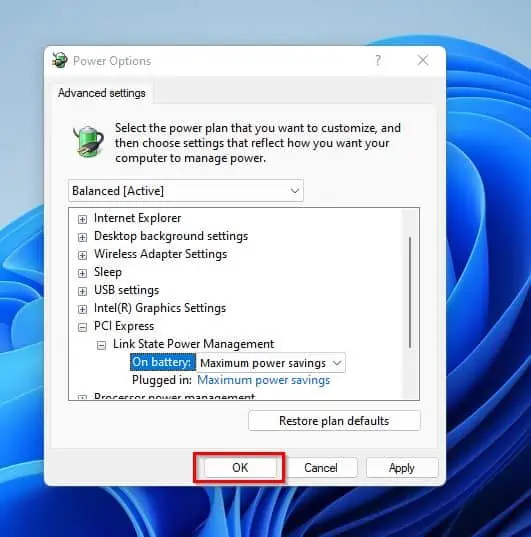
- After that, scroll down and double-click PCI Express to expand it. Also, under PCI Express, double-click Link State Power Management to expand it.
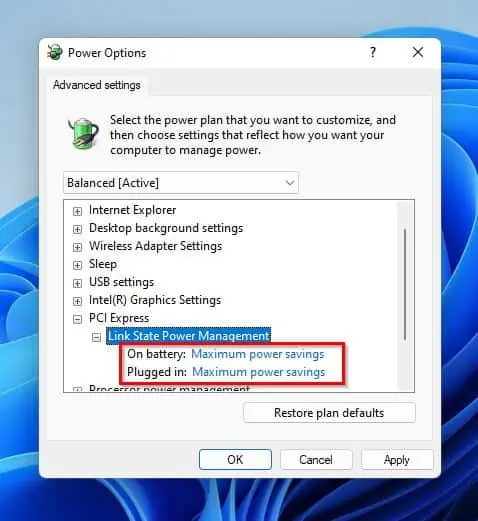
- Thereafter, ensure that On battery and Plugged in are set to Maximum Performance under Link State Power Management.
- Finally, click OK to save the changes. Now, restart your Windows 11 computer, and the error should be fixed.
However, if the error isn’t resolved after carrying out this solution, try the final solution below.
Solution 4: Run System File Checker (SFC)
You can also fix this problem by running the system file checker on your Windows 11 computer. The SFC will scan for any corrupted system file that leads to this error and fix it.
To execute the system file checker on your Windows 11 computer, follow the procedures below.
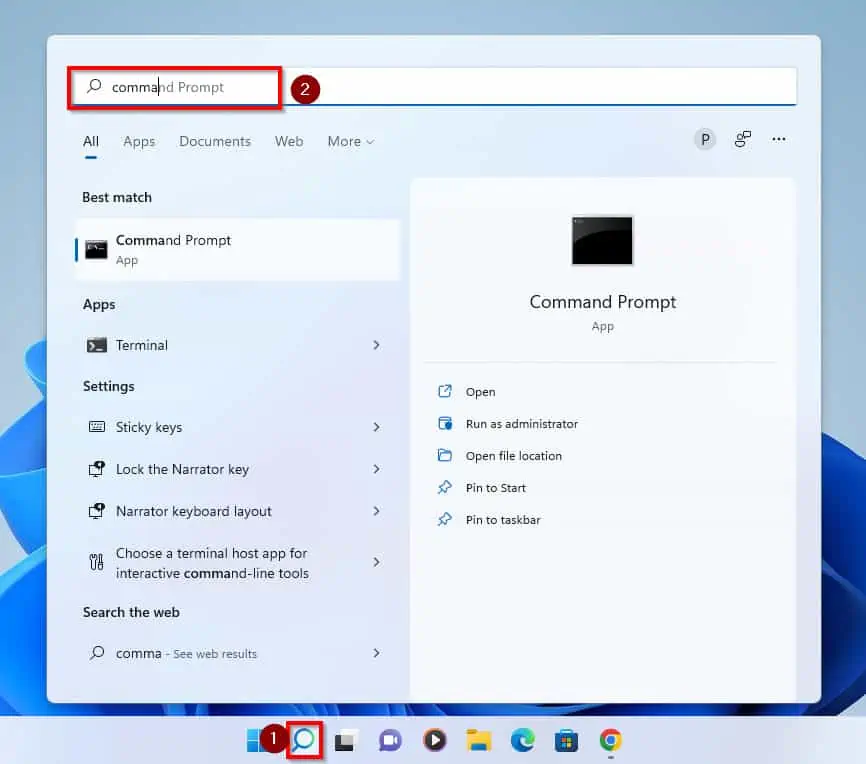
- Click the Search button next to the Start menu button on your Windows 11 taskbar. Then, type “command prompt” (without the quotes) in the search field.
- Under the Best match result from your search, right-click the Command Prompt application and select Run as administrator.
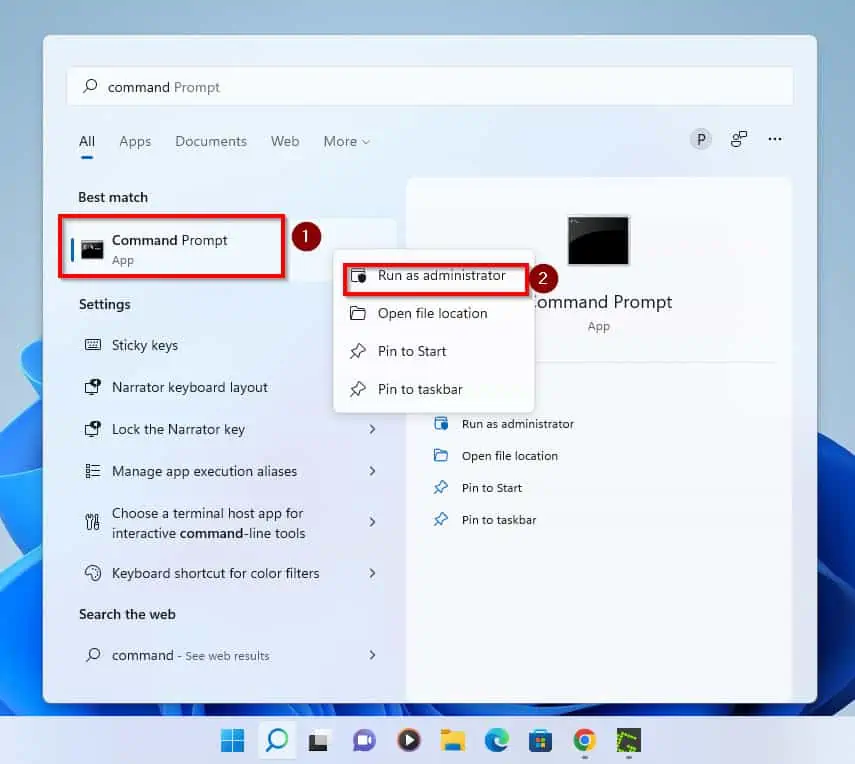
- Consequently, you should receive a User Account Control (UAC) prompt asking if you want to permit the program to make changes to your device. Click Yes to continue.
- When Command Prompt opens, type the following command line and press the enter key on your keyboard.
sfc /scannow
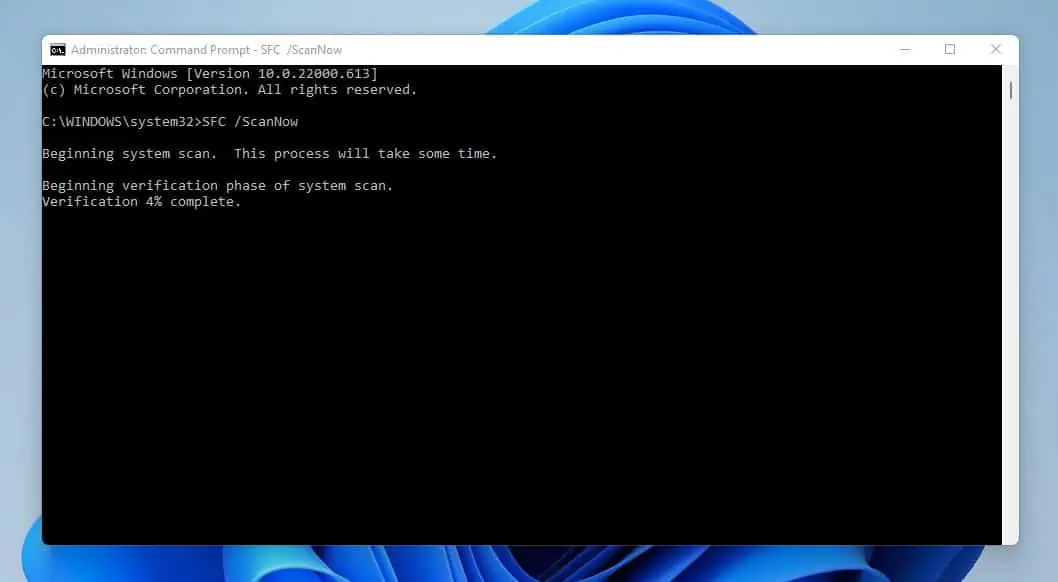
- After the scan has been completed, reboot your PC. Optimistically, this BSOD error should be resolved.
Frequently Asked Questions
This error is mostly caused by outdated device drivers. Other reasons include corrupt system files, faulty hardware, or misconfigured settings, amongst other reasons.
If you keep getting a blue screen of death error on your Windows PC, that means your PC has driver software issues or issues with hardware.
There are some BSOD errors that appear due to the fact that your computer is infected with a virus or malware. So, yes, a blue screen of death can mean virus infection.
Yes, it is highly probable that a damaged or overheated GPU will cause a blue screen of death error.
Yes, the driver power state failure error is a BSOD error.
Conclusion
The driver power state failure error is a common BSOD error that most Windows 11 users have encountered. Thankfully, with this guide, you don’t have to face this error on your Windows 11 computer anymore.
Specifically, this guide taught us how to fix this error by updating device drivers and disabling the fast startup feature. We also learned how to solve the issue by adjusting the power plan settings and running the system file checker.
I hope the procedures provided in this guide were able to resolve this BSOD error on your Windows 11 PC. If they were, click on “Yes” beside the “Was this page helpful” question below.
You may also express your thoughts and opinions by using the “Leave a Comment” form at the bottom of this page.
Lastly, visit our Windows 11 Fix Guides page for more guides like this.