As a Windows user (and admin), you will work with File Explorer. This article is a comprehensive guide covering every aspect of this important Windows tool.
To make it easy to find the specific File Explorer help you need, expand “Browse Post Topics” below. Then, click on the Windows 10 File Explorer help topic you require.
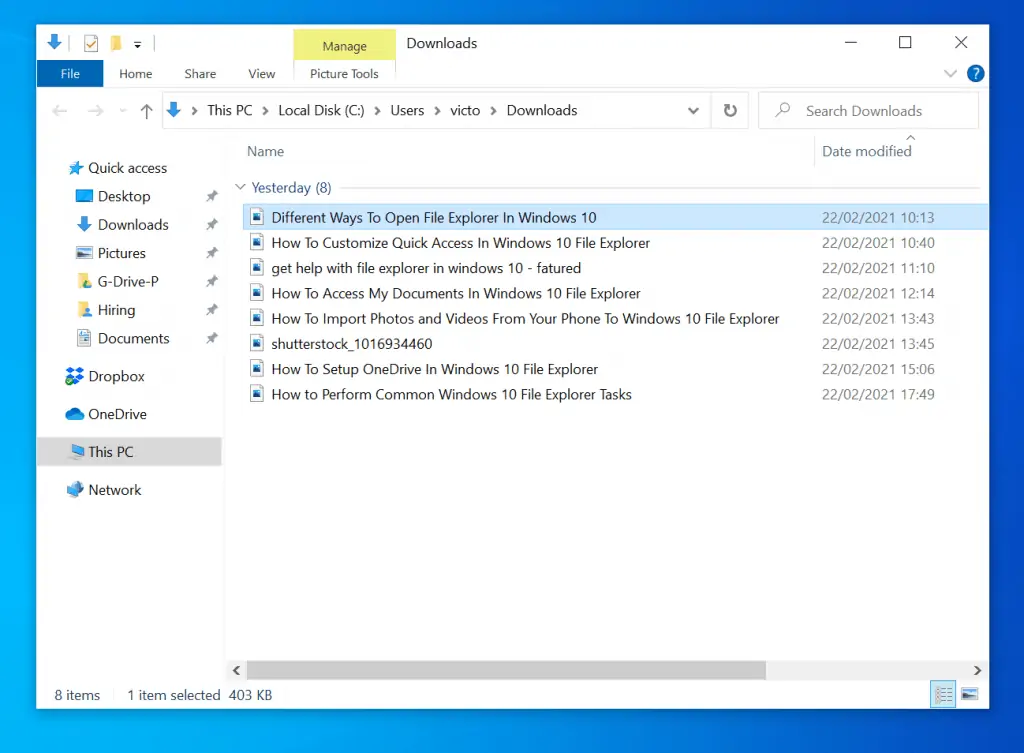
How to Open File Explorer (2 Methods)
The most logical topic to start our how to get help with File Explorer in Windows 10 is to show you different methods to open File Explorer.
Below are 2 different common methods to open File Explorer:
Option 1: Via Search
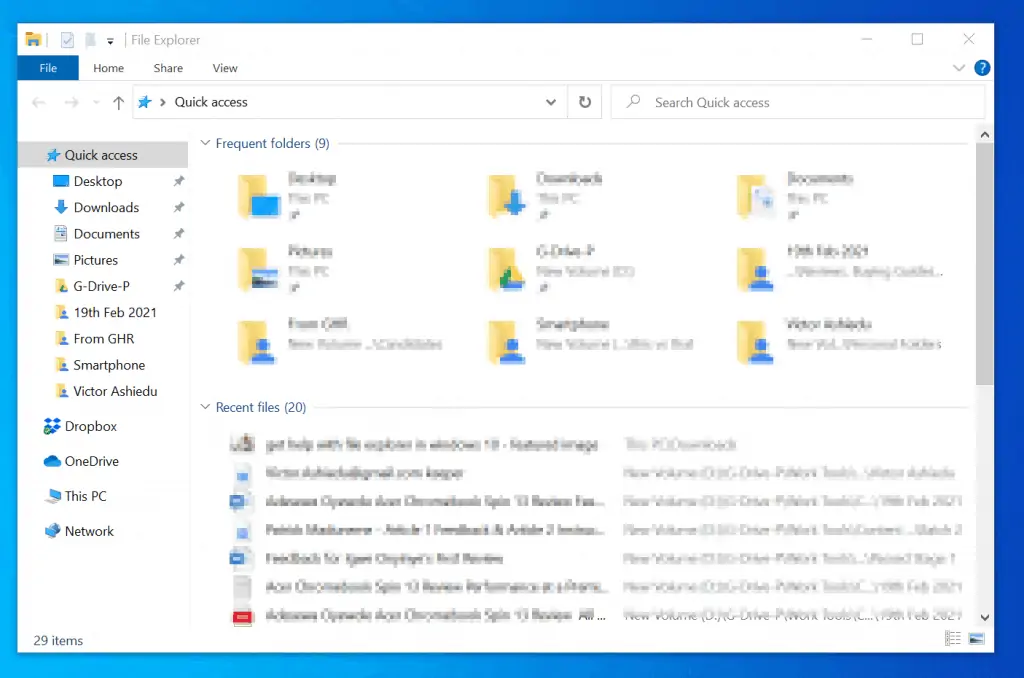
Enter File Explorer in the search box at the bottom left of the Windows 10 Taskbar. Then, from the search results, open the File Explorer App.

By default, File Explorer will open in Quick Access. On the explorer pane, it will display your “Frequent Folders” and “Recent Files”.
Option 2: Open By Right-clicking Start Menu
Right-click the Start Menu at the bottom left of your Windows 10 Taskbar. Then, from the displayed options, click

File Explorer Ribbons Explained
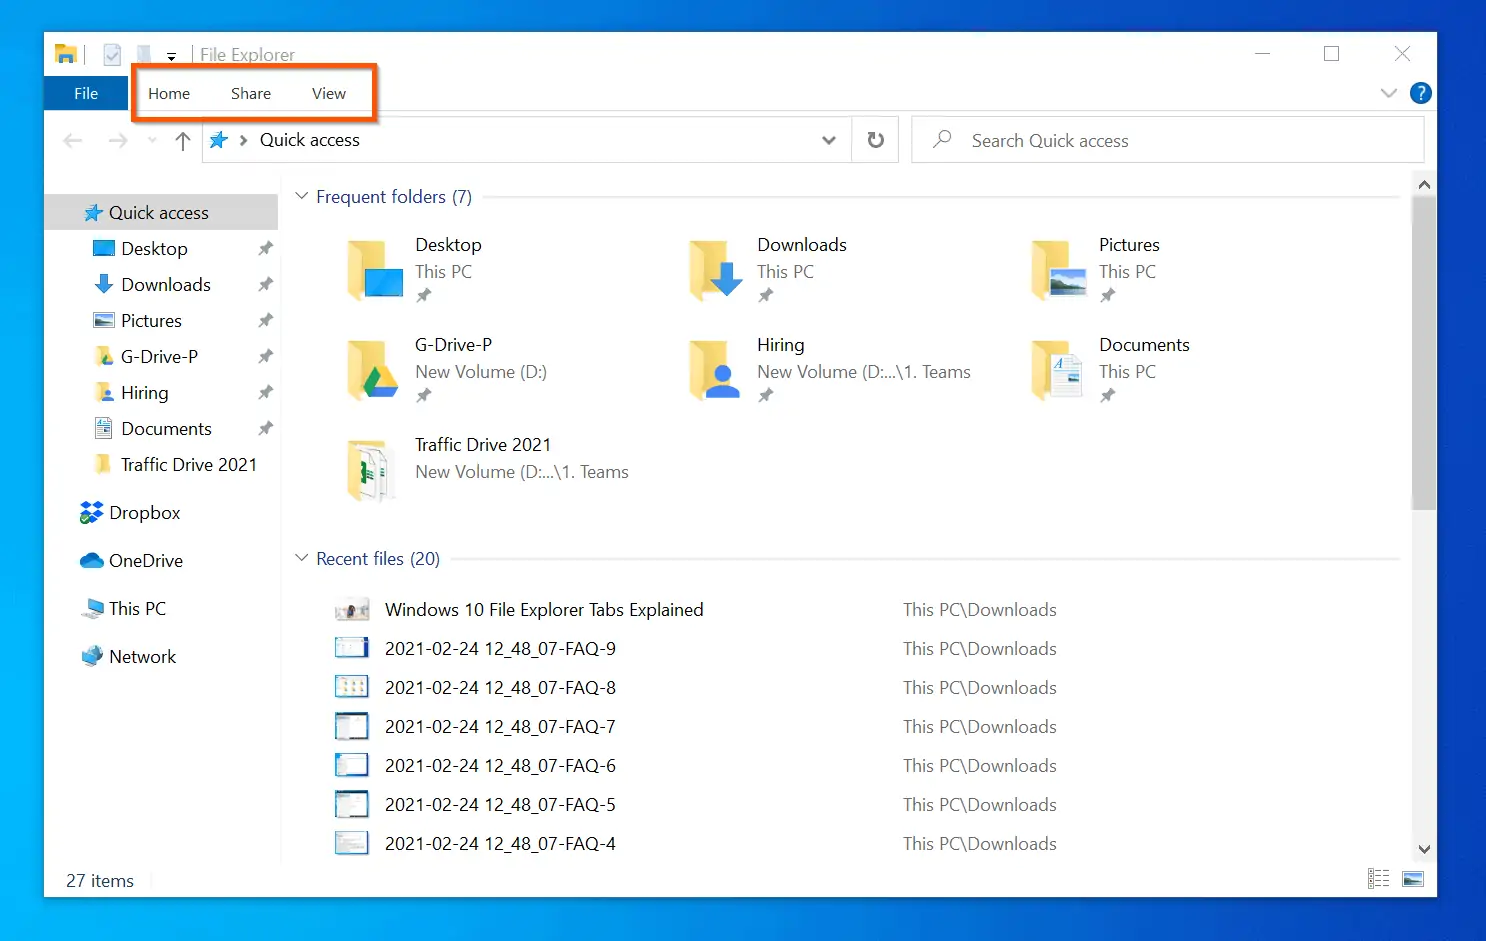
A number of Windows 10 users want to get help with File Explorer Ribbons. This section explains the 3 Ribbons in Windows 10 File Explorer and how to use them.
Each sub-section in this section focuses on the File Explorer Ribbons – Home, Share and View.
File Explorer “Home” Ribbon Explained
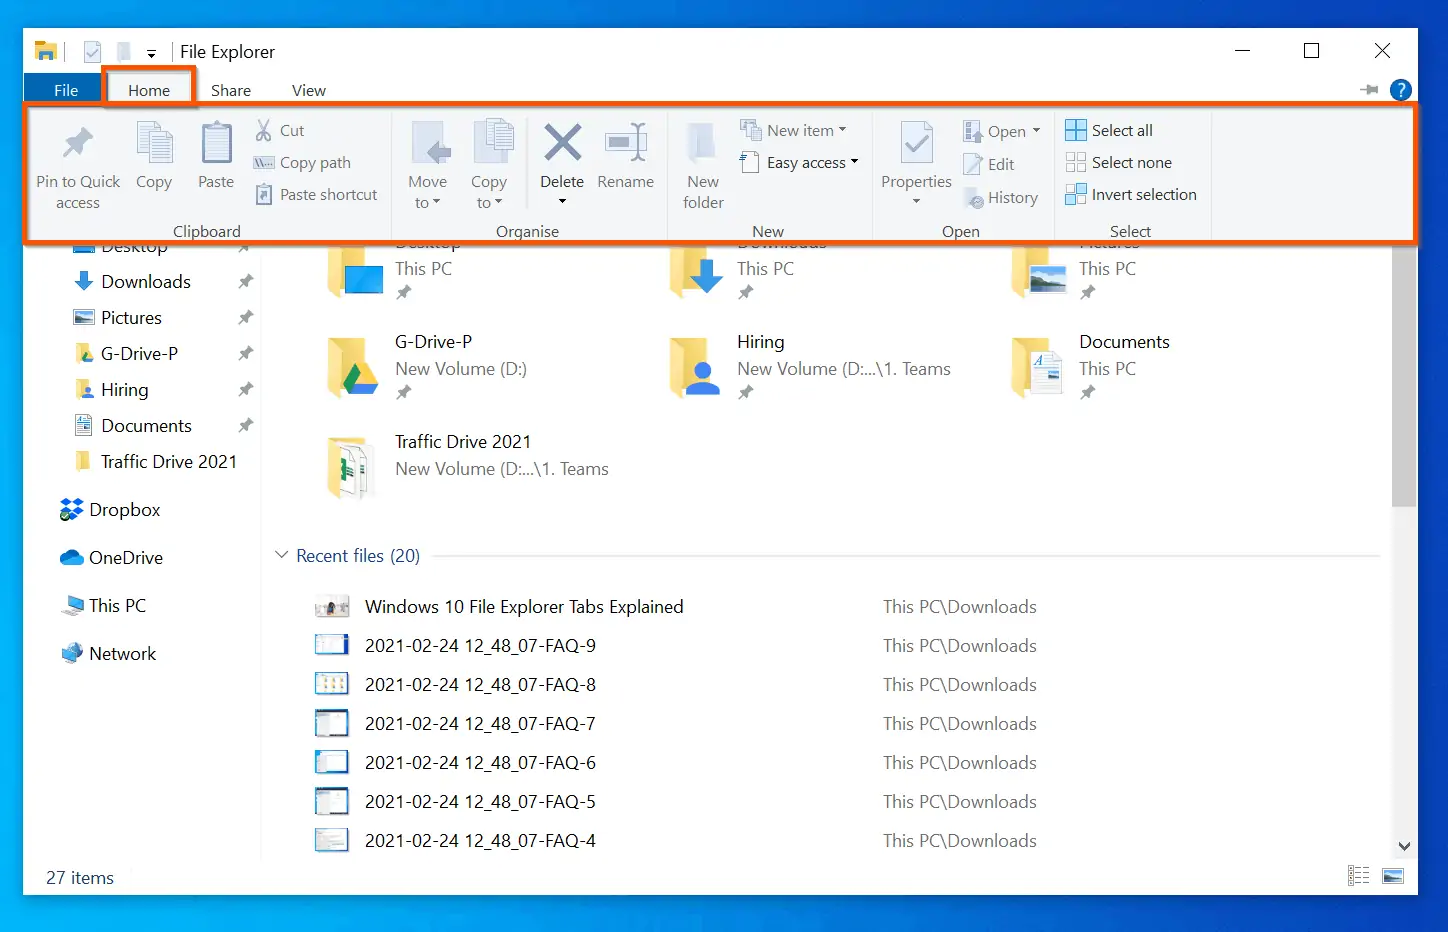
The “Home” Ribbon of File Explorer has 5 sections – Clipboard, Organise, New, Open, and Select. The table below explains what you can do in each section:
| S/N | Home Ribbon Section | Actions You Can Perform |
|---|---|---|
| 1 | Clipboard | You can pin selected items to Quick access. You can also Copy, Paste, Cut, Copy shortcut and Copy path of selected items. |
| 2 | Organise | This section gives options to Move to, Copy to, Delete or Rename a selected item. |
| 3 | New | Here, you can create a new folder, shortcut, or a new file. You can also map the current folder as a network drive or make the folder available offline if shared. |
| 4 | Open | The Open section gives options to view the properties of the selected item. You can also open a folder from this section. Finally, you can open a selected file for editing. |
| 5 | Select | In this section, you can do the following: Select all, Select none, and Inverse select. Inverse select deselects a selected item and selects all other items in the folder. |
File Explorer “Share” Ribbon Explained
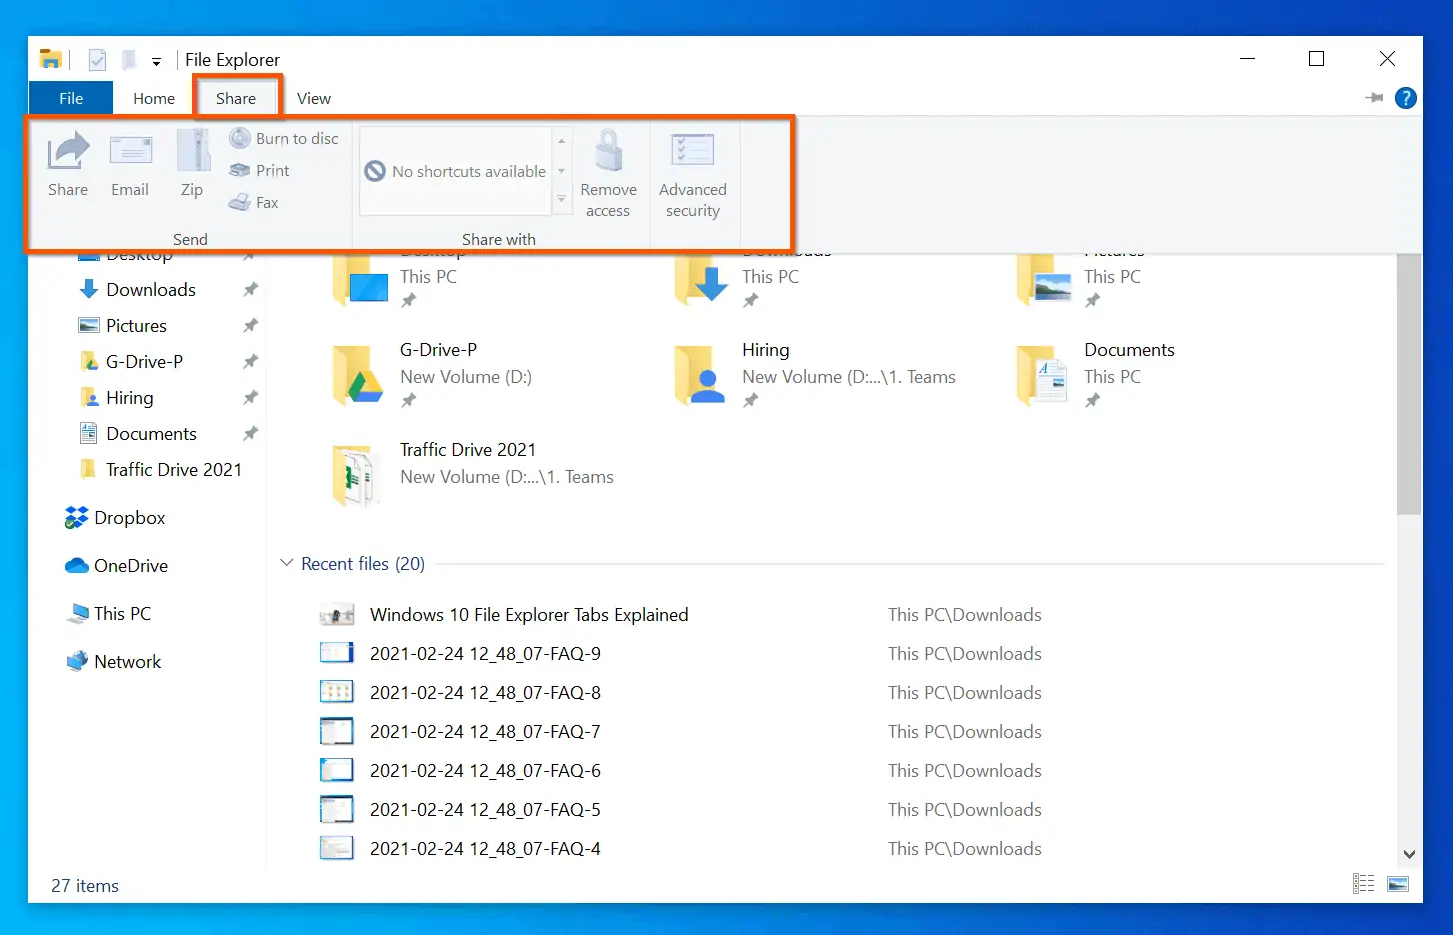
The ribbon “Share” Ribbon has two sections: Send and Share with. Here are the things you can do in each section:
| S/N | Share Ribbon Section | Actions You Can Perform |
|---|---|---|
| 1 | Send | In this section, you can share a file with an app or Zip a set of files or folders. You can also Email, Burn to disk, Print, or Fax a file. |
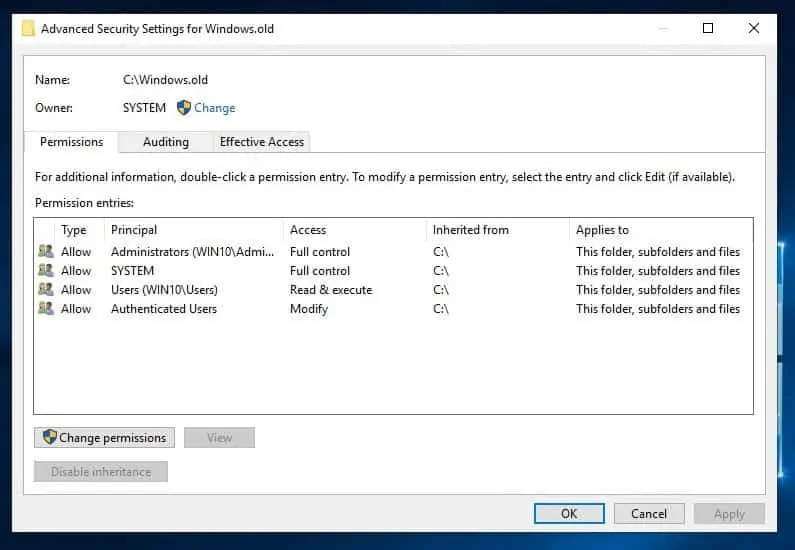
| 2 | Share with | In the “Share with” section, you can also share folders with specific people on the computer, Remove access to a shared folder or open the Advanced security settings of a folder. |
The image below shows the advanced security settings of a folder opened by clicking Advanced security directly from File Explorer Share tab, Share with section.
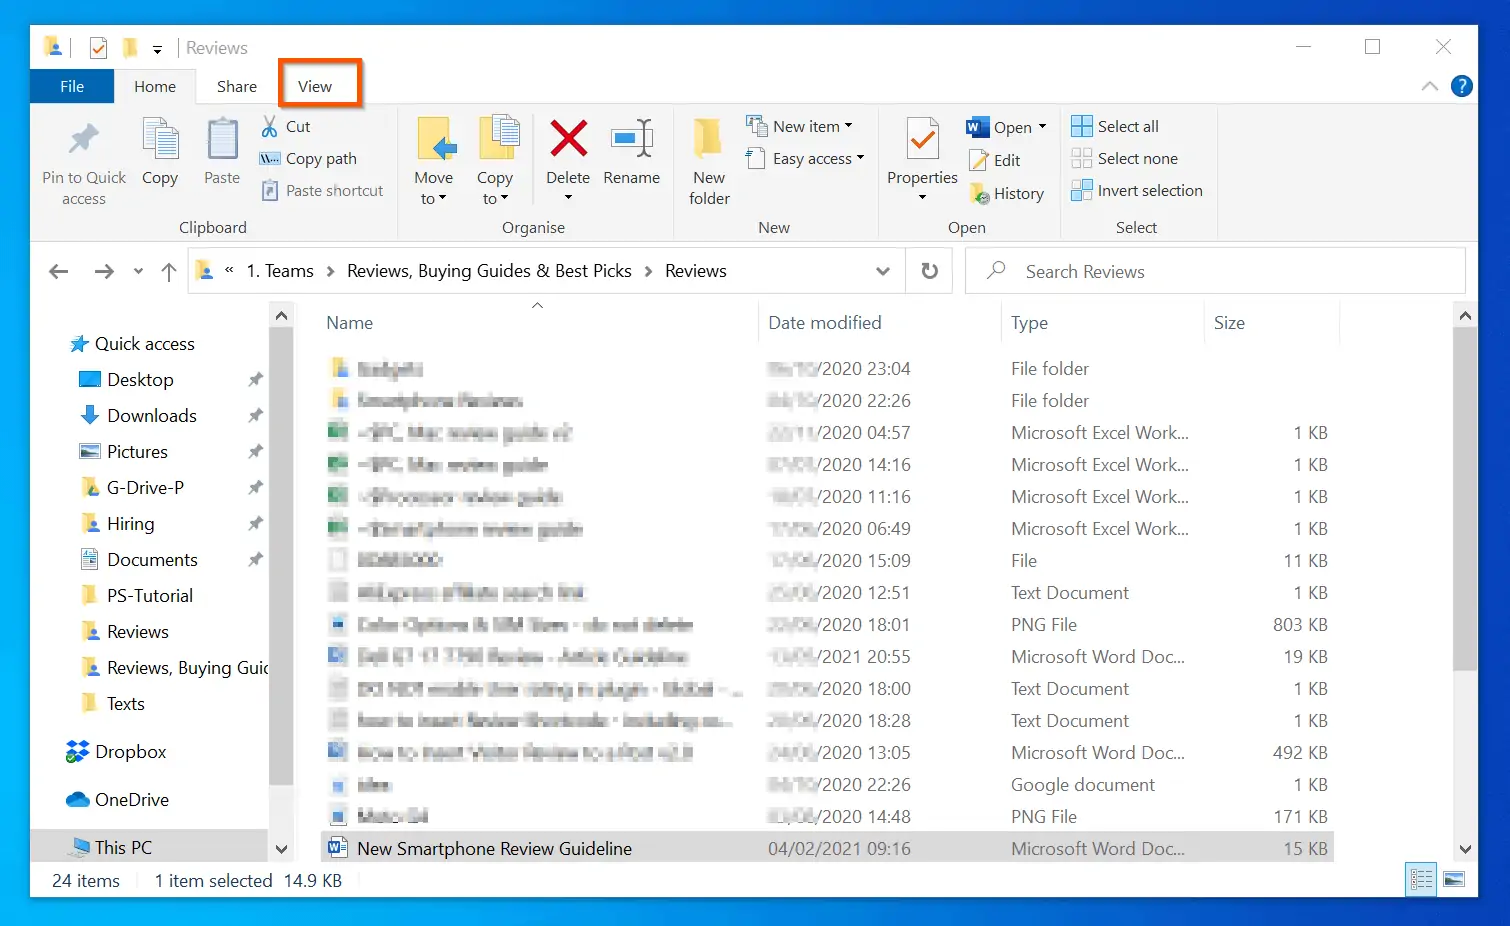
File Explorer “View” Ribbon Explained
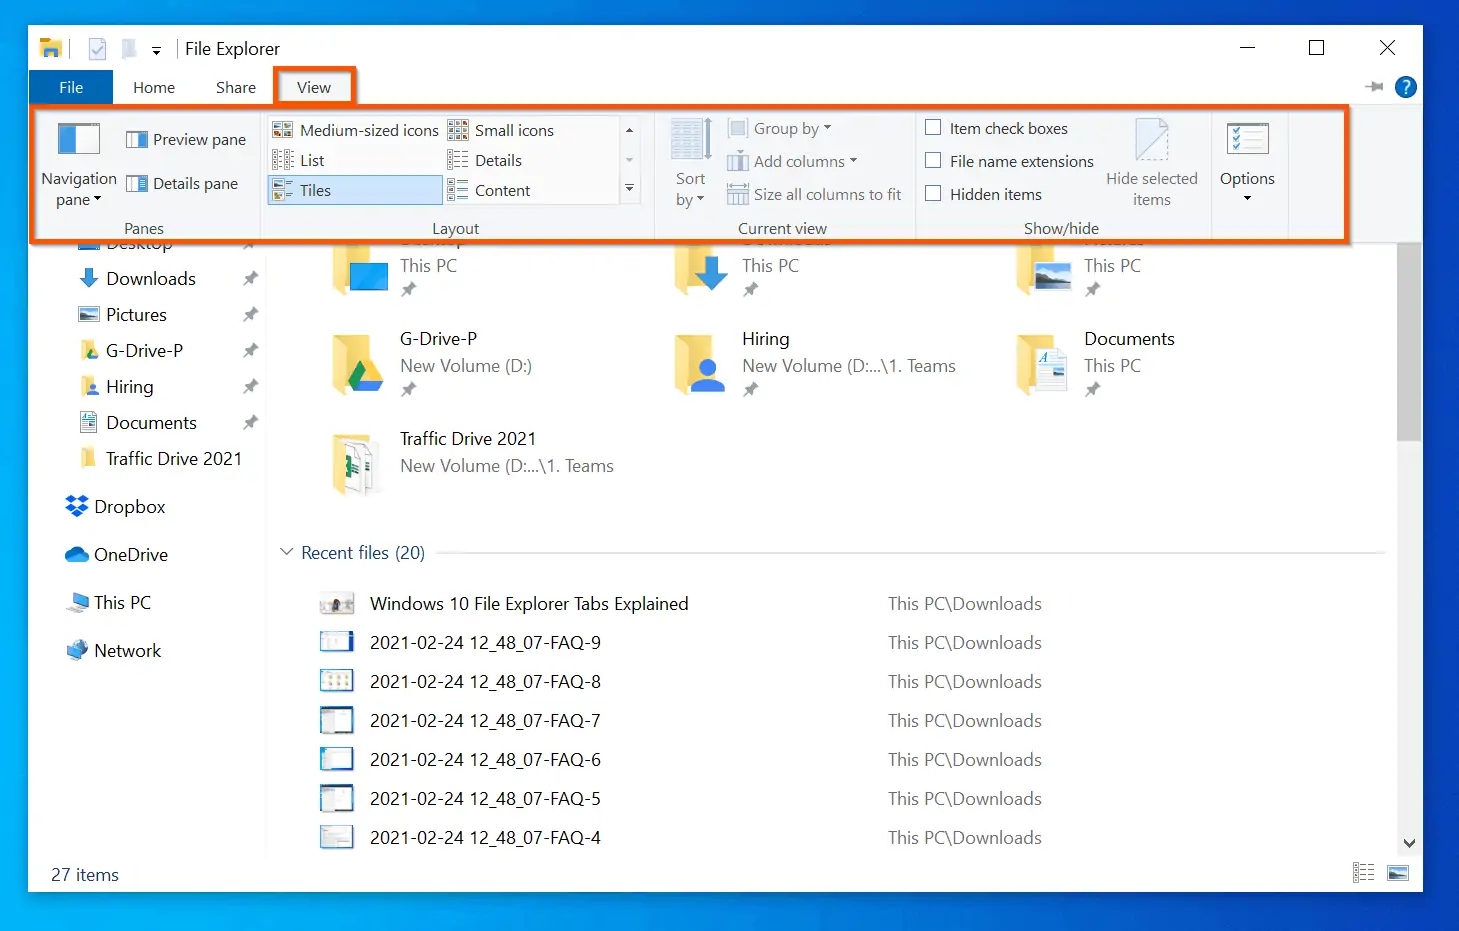
Like the 2 Ribbons already covered, the “View” Ribbon has section. The 5 sections in the Windows 10 File Explorer “View” Ribbon are explained in the table below.
| S/N | View Ribbon Section | Actions You Can Perform |
|---|---|---|
| 1 | Panes | This section allows you to modify the navigation pane. To access the options, click the Navigate pane drop-down. To remove the navigation pane (just below the highlighted box, uncheck Navigate pane. You can also Click Show all folders to show all folders in the Navigation pane. |
| 2 | Layout | The “Layout” Section gives you the option to configure how your File Explorer looks. You can make your icons Extra Large, Medium sized or even use the List, or Details view. You also have the option to make your icons Large, Small, or show the Detailed view. |
| 3 | Current View | This section has some interesting options. You can determine the way your files and folders are sorted. To sort, click the Sort by drop-down. |
| 4 | Show/hide | The Show/hide section provides quick access to Show or Remove Item Check boxes: If you check the box beside Item Check boxes, a check box shows left of the Name column. You can then check the box on top to check all items. The Show/hide section also provides option to Hide selected items. Finally, on Options in the View tab, you can configure folder options. To do this, click the Options drop-down and select Change folder, and search options. This will open Folder Options. |
File Explorer Keyboard Shortcuts
File Explorer keyboard shortcuts is yet another hot topic a lot of users want to get help. The table below details the available keyboard shortcuts and what you achieve with them.
To use a keyboard shortcut, press the keys simultaneously. I recommend you open File Explorer and try each of the keyboard short to see them in action!
| S/N | File Explorer Keyboard Shortcut | Actions Performed by the Keyboard Shortcut |
|---|---|---|
| 1 | Ctrl + W | Close the active window. The active window is the window you are currently viewing |
| 2 | Ctrl + N | Open a new window. If you use this shortcut with a folder open, another window of the folder will open. However, if you press the shortcut with a file active – say notepad – a new file will open |
| 3 | Ctrl + F | Opens the File Explorer search box. This shortcut opens the search box for the open application. For example, if you are on a webpage when you press this shortcut, it opens a search box on the top right of the webpage. |
| 4 | Ctrl + E | Similar to Ctrl + F – opens the search box. |
| 5 | Alt + D | Select the address bar. If you are on File Explorer, it selects the address bar of File Explorer. However, if you are on a webpage, it selects the address bar of the webpage. |
| 6 | Ctrl + mouse scroll wheel | Change the size and appearance of file and folder icons. |
| 7 | Ctrl + Shift + E | Display all folders above the selected folder. |
| 8 | Ctrl + Shift + N | This keyboard shortcut creates a new folder. This can be very helpful. Instead of going through 3 steps to create a new folder, you can do it in a single step! |
| 9 | Num Lock + asterisk (*) | Display all subfolders under the selected folder. |
| 10 | Alt + Left arrow | Used to view the previous folder. |
| 11 | Alt + Up arrow | View the folder that the current folder was in. |
| 12 | Alt + Right arrow | View the next folder. |
| 13 | Alt + Enter | Open the Properties dialog box for the selected item. This works for Folders or Files. |
| 14 | Alt + P | This shortcut displays the preview panel on the right pane of File Explorer. Note that some items may not have a preview. |
| 15 | Num Lock + minus (-) | Collapse the selected folder. |
| 16 | Num Lock + plus (+) | Display the contents of the selected folder. |
| 17 | F11 key | Maximize or minimize the open window. |
| 18 | Home key | Display the top of the open window. |
| 19 | End key | Display the bottom of the open window. |
| 20 | Left arrow key | If the current selection is expanded, it collapses it, or, it selects the folder the current folder is in. |
| 21 | Right arrow key | If the current selection is collapsed, it expands it, or, it selects the first subfolder. |
| 22 | Backspace key | View the previous folder. |
Customize “Quick access” in File Explorer
Now that you know how to open File Explorer in Windows 10, the next important topic you need to get help for in File Explorer is “Quick access” customization.
As explained in the last section, by default when you open File Explorer in Windows 10, it opens in “Quick access”.
How to “Pin” File Explorer Items to “Quick access”
Want to become more productive? One way is to set up Windows 10 File Explorer to display commonly used items in “Quick access”.
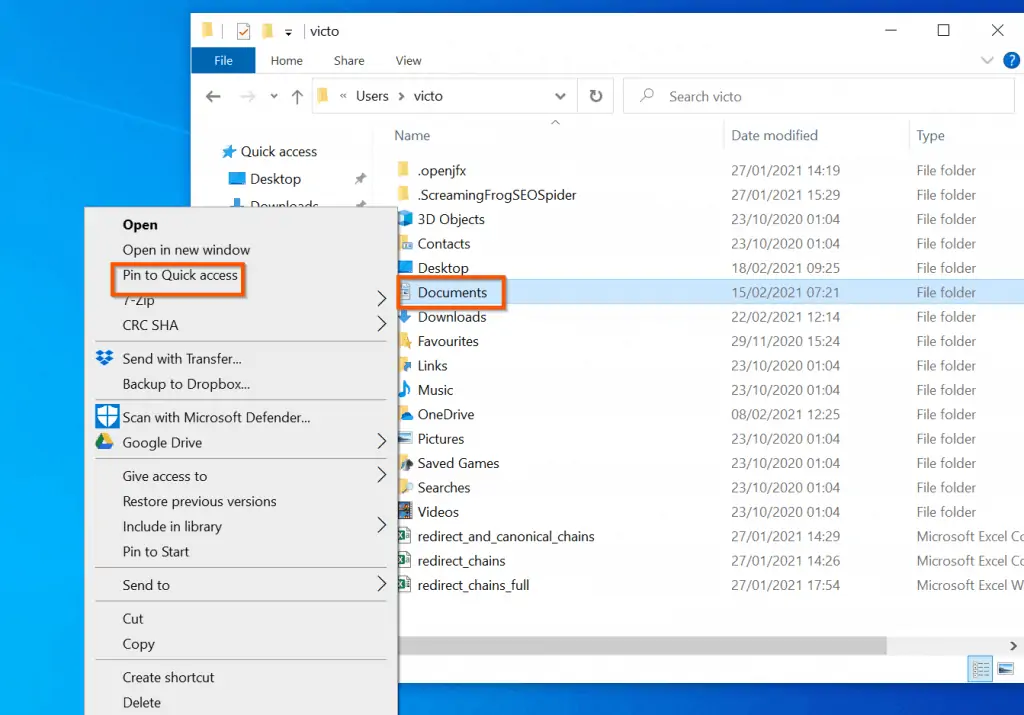
For instance, if you open a folder often, you can “Pin” it to “Quick access” to make it easy to find.
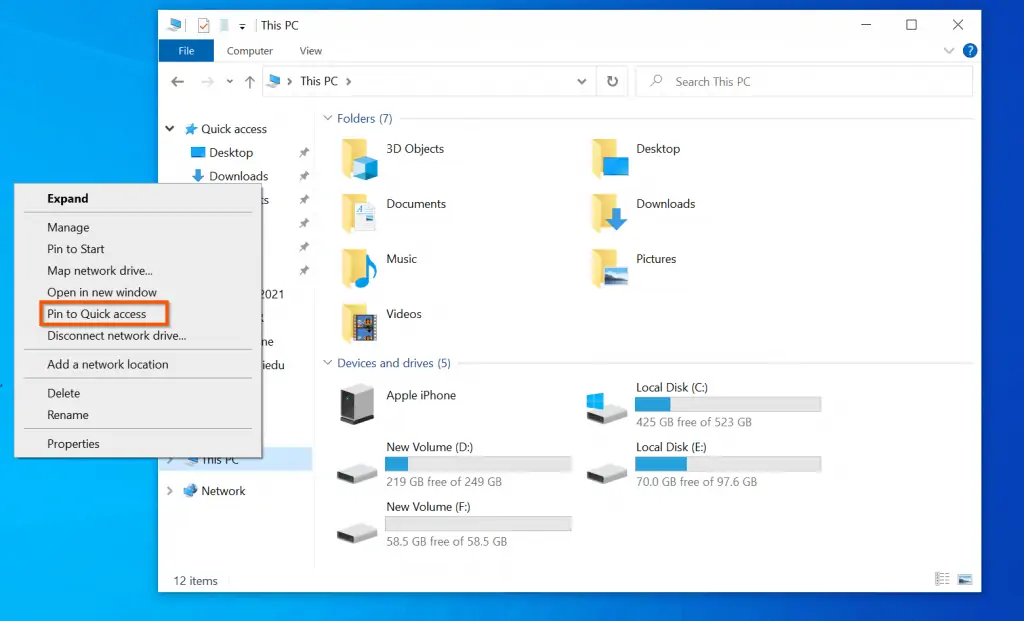
To pin a folder to “Quick access”, right-click the folder and select Pin to Quick access. The folder will appear beneath Quick access immediately – see the second screenshot below.
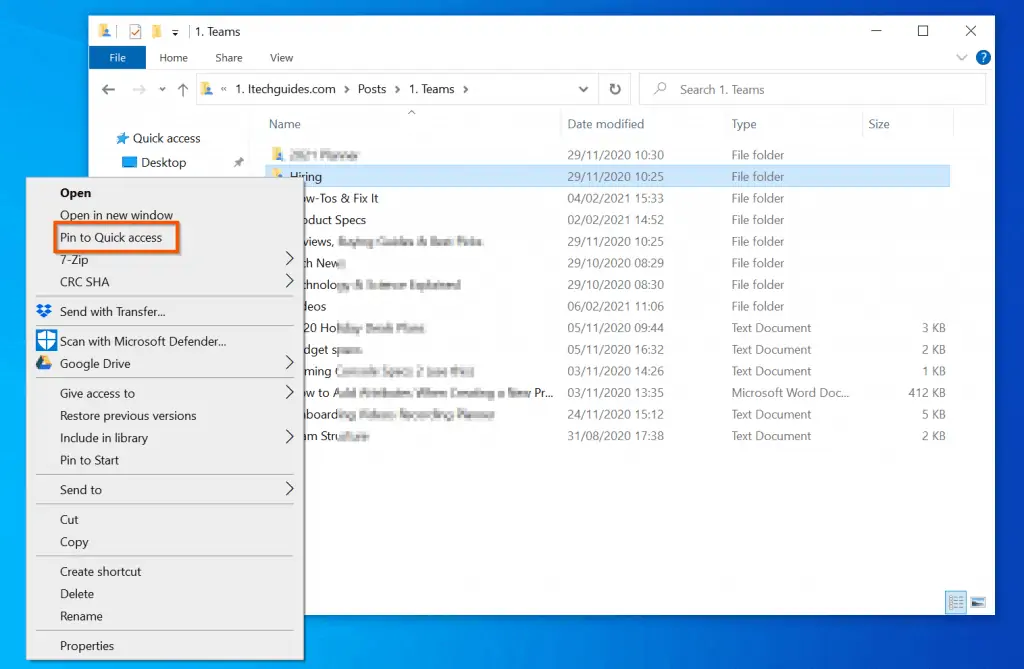
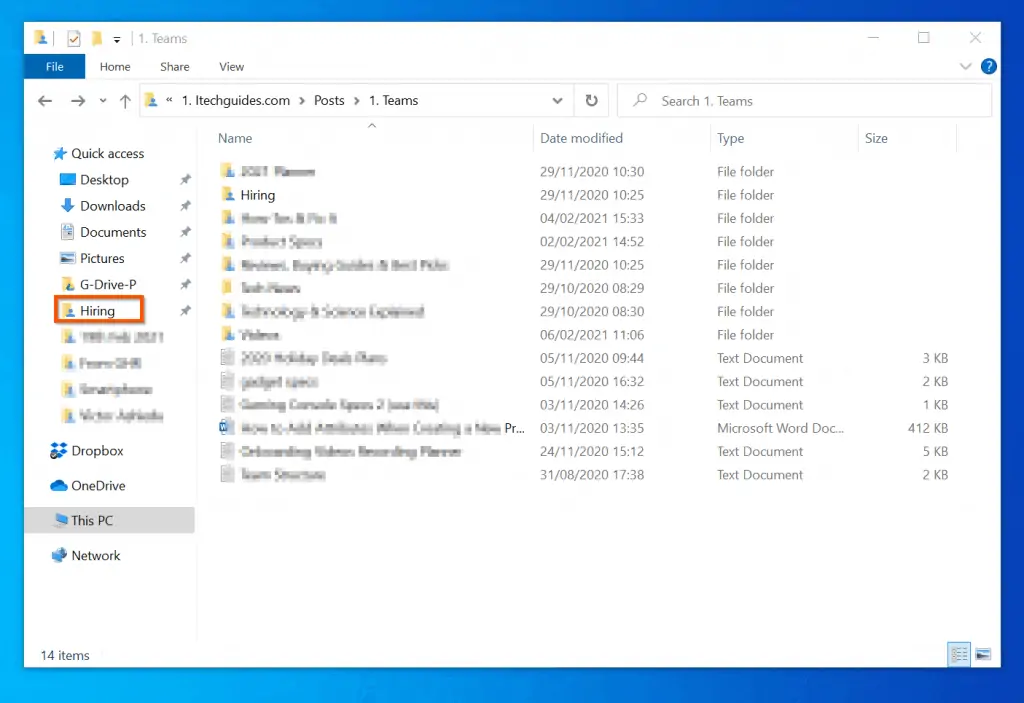
Other important File Explorer items you can “Pin” to Quick access are “This PC”, and “Network”. Like a folder, to “Pin” any of these items, right-click the item and select Pin to Quick access.
See the images below.
How to “Unpin” File Explorer Items from “Quick access”
Another important task in our get help with File Explorer in Windows 10 guide is to show you how to “Unpin” File Explorer Items To “Quick access”. Our work changes, so do the File Explorer items we access often.
If you want to remove an item from Quick access, follow the steps below:
- Right-click Start Menu and select File Explorer.

- When File Explorer opens in Quick access, right-click the item you want to “Unpin” from “Quick access”. Then, from the displayed options, select Unpin from Quick access.

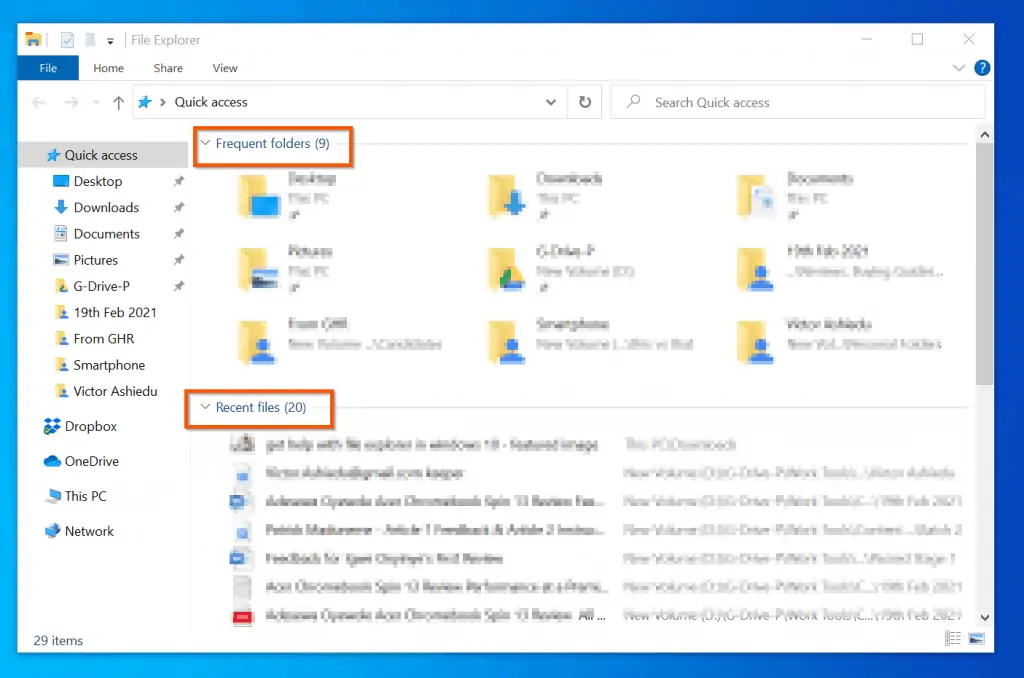
How to Remove “Frequent Folders” and/or “Recent Files” from “Quick access”
Another important Windows 10 File Explorer feature you may need to get help for is the File Explorer Privacy settings. This setting allows you to remove “Frequent Folders” and/or “Recent Files” From “Quick access”.
These 2 features are highlighted in the screenshot below.
To stop Quick access displaying “Frequent Folders” and/or “Recent Files”, follow the steps below:
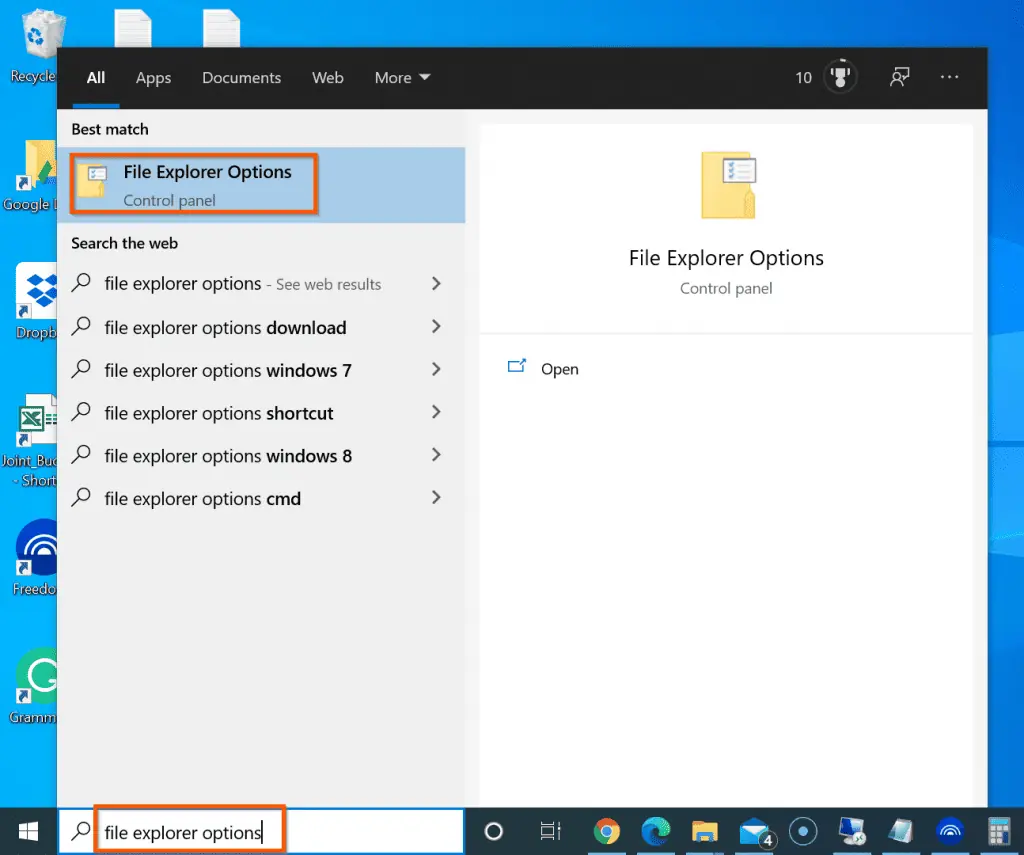
- On the search box, type file explorer options. Then, from the search result, select File Explorer Options.
- When File Explorer Options opens, locate the Privacy section. Then, uncheck Show recently used files in Quick access and/or Show frequently used folders in Quick access.
- Once you have competed the actions, to save your changes, click OK.
Now if you open File Explorer Quick access, Recent Files and Frequent Folders will no longer be displayed.
Access “My Documents” in File Explorer
Most users also want to get help with File Explorer in Windows 10 by learning how to open “My Documents”. In Windows 10, “My Documents” has changed to “Documents”.
There are 2 ways you can access this important File Explorer item.
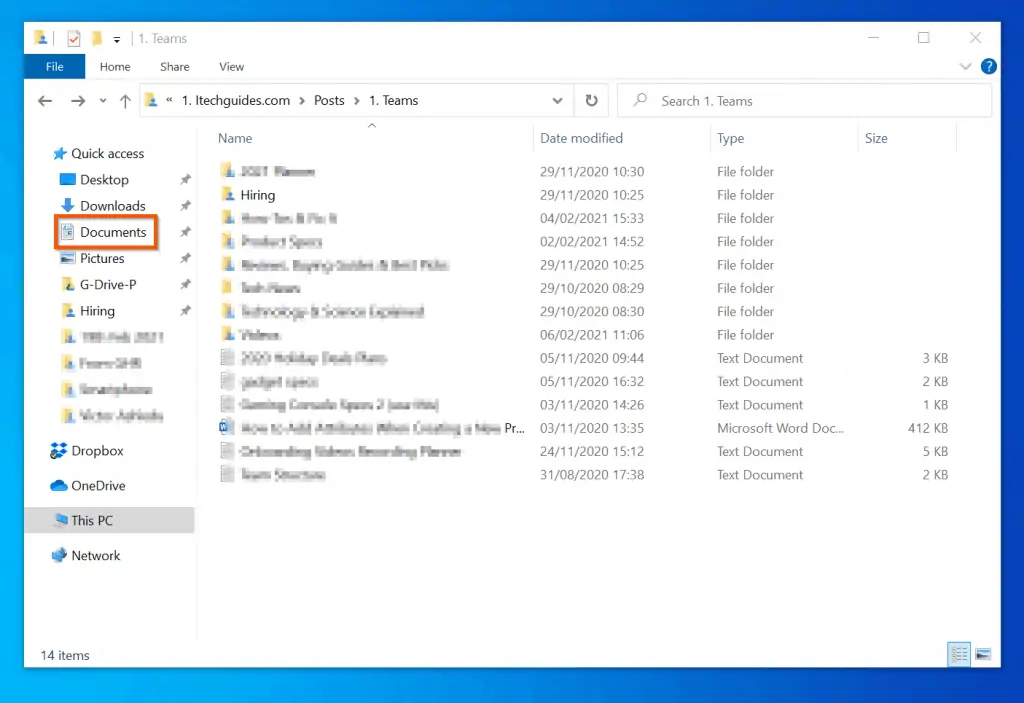
From File Explorer Quick access: by default, “Documents” is pinned to Quick access. If you open File Explorer in Quick access (default), you can access Documents beneath Quick access.
However, if you previously unpinned “Documents” from Quick access, follow the steps below to open “Documents”:
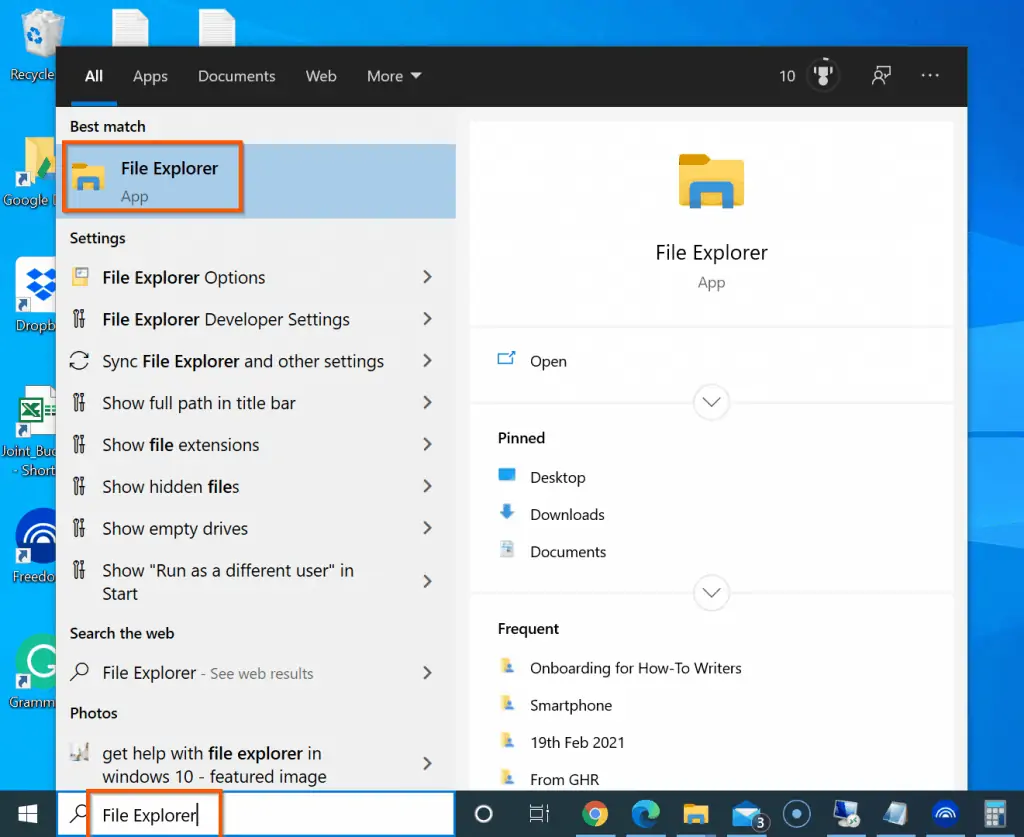
- Open File Explorer: right-click Start Menu and click it.

- When File Explorer opens, on the left pane, click This PC (In Windows 7, this was called My Computer).
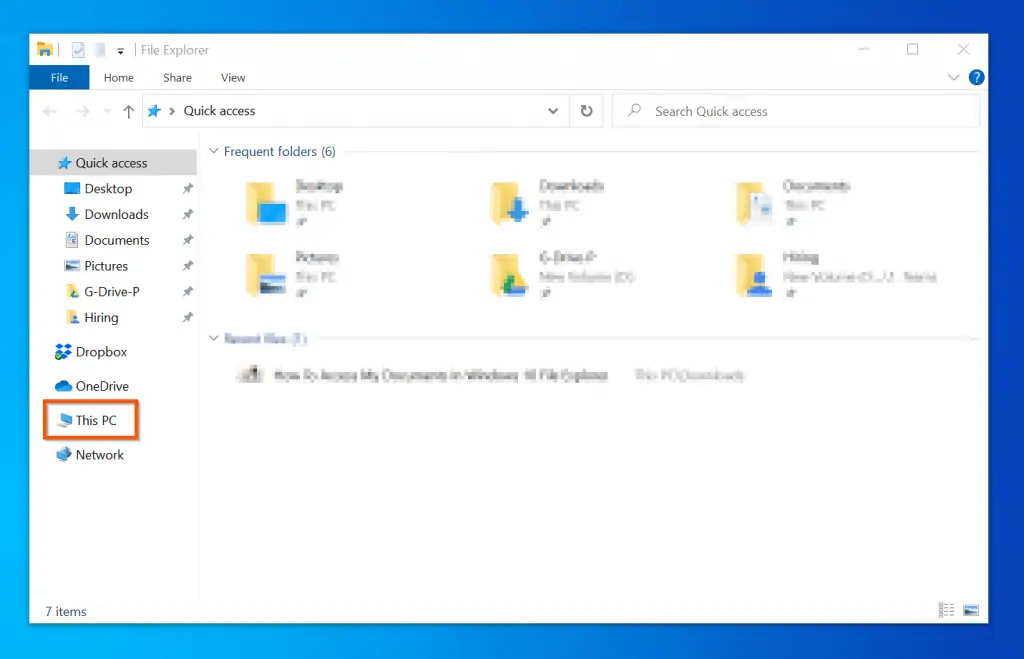
- Then, on This PC, click open your drive C or the drive your Windows 10 is installed.
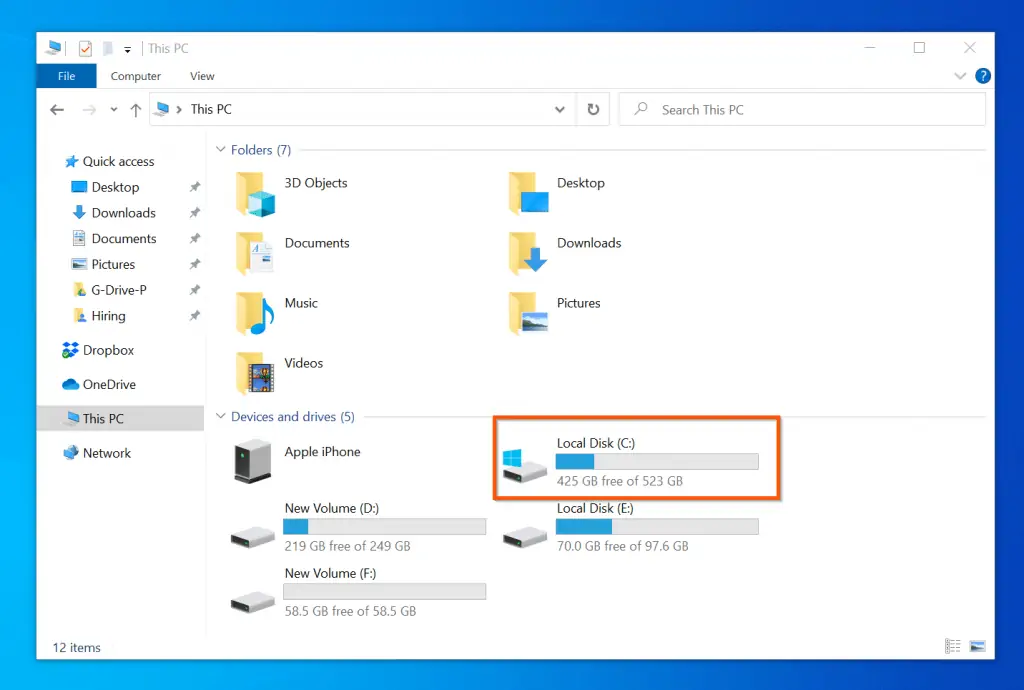
- Finally, open the Users folder, then, open the folder with your Windows 10 login name – your “Documents will be located in that folder.
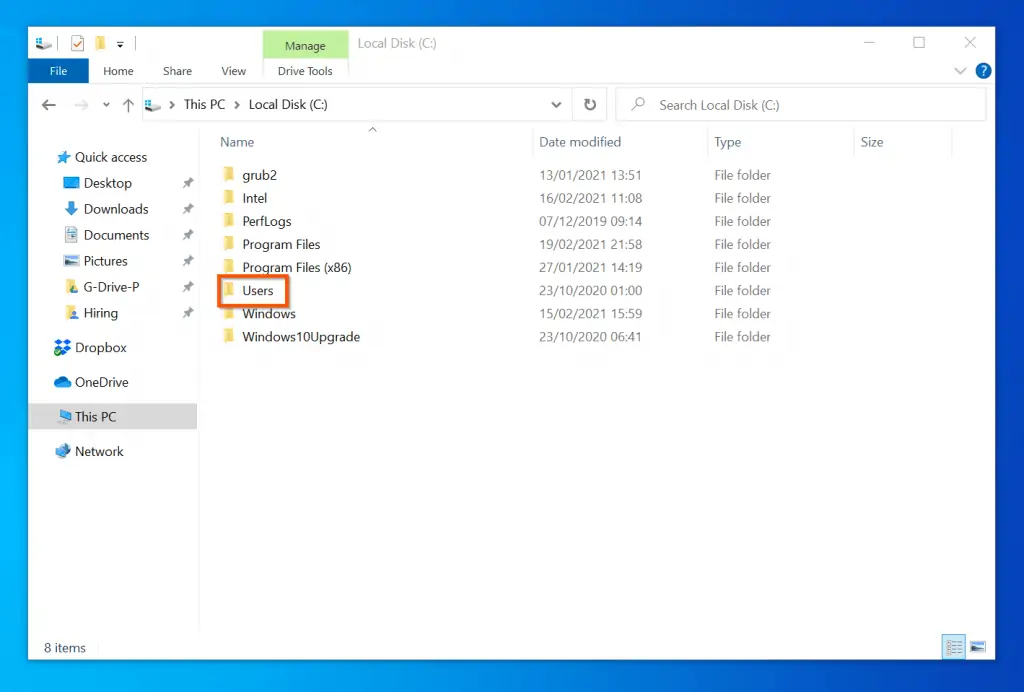
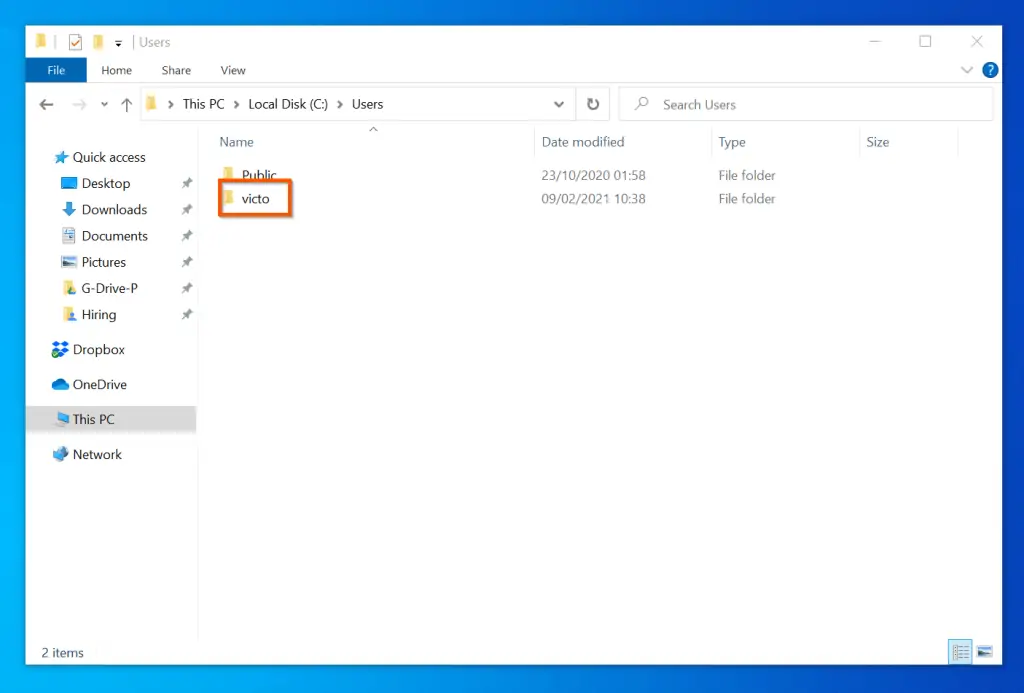

- To make it easier to open Documents next time, right-click it and select Pin to Quick access.
Import Photos and Videos from a Phone to File Explorer
This is yet another area users want to get help with File Explorer in Windows 10. In this section, I will show you how to import photos and videos from an Android phone or iPhone.
How to Connect Your Android or iPhone to Your PC
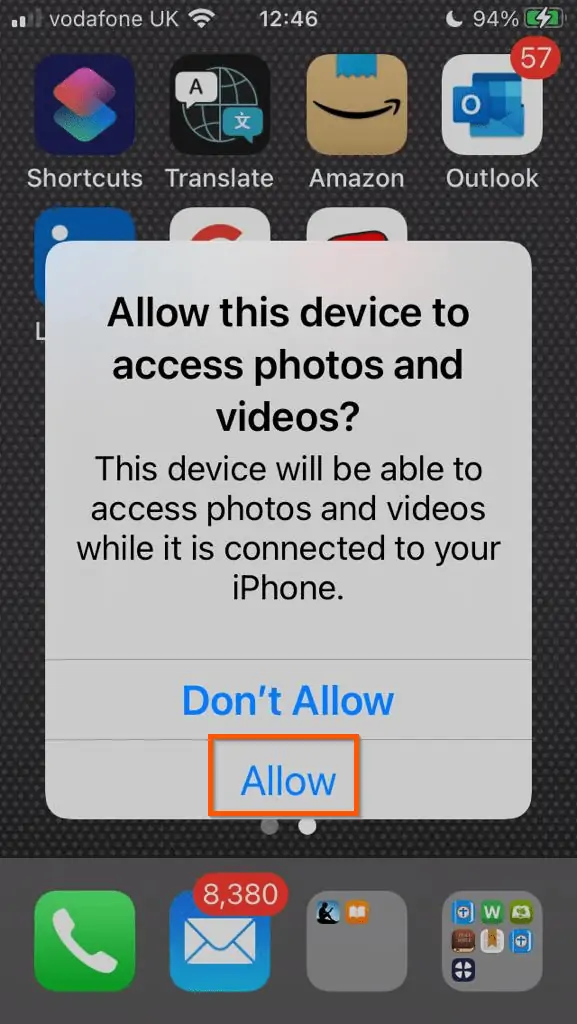
- Connect your phone to your computer with the USB cable that came with the phone – or any other compatible USB cable.
- Whether you connect an iPhone or Android phone to your Windows 10 PC, unlock your phone.
- Then, for an iPhone, a pop-up will be displayed asking you to “Allow this device to access photos and videos”. Tap Allow.
- For an Android phone, after unlocking the phone, swipe down (top to the button) to display notifications.

- When the notifications window opens, scroll down to Android System USB Charging.

- Finally, beneath USB Charging, tap Tap for other USB options. Then, select the options shown in the second screenshot below.
How to Import Photos or Videos from Your Phone
Before you proceed with the steps in this section, ensure that you have completed the steps in the previous sub-section – How To Connect Your Android or iPhone To Your PC.
- Search file explorer and open it.
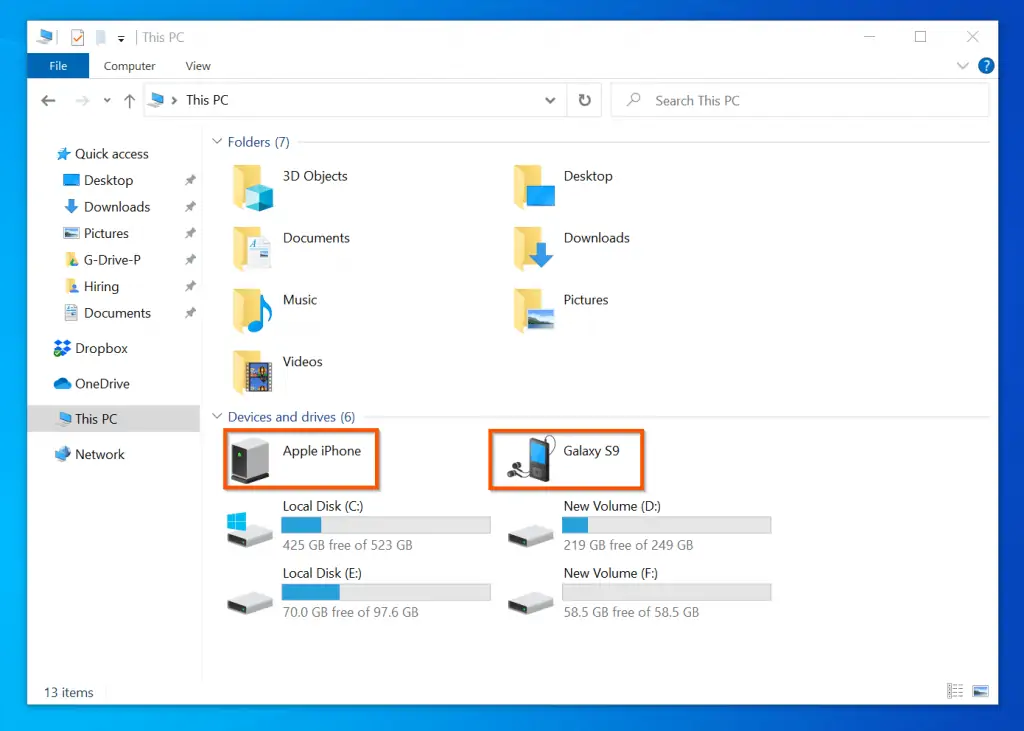
- Then, on the left pane of File Explorer, click This PC.

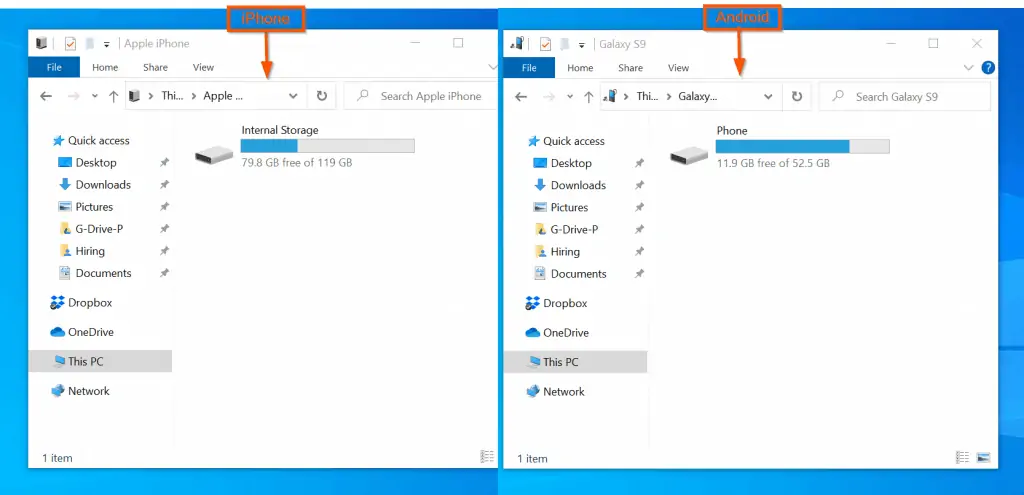
- Moving on, when This PC opens, your phone will be displayed. To access the files on your phone, double-click the phone’s storage icon.
- When you open the phones, they will be displayed as shown below. Double-click the phone storage.
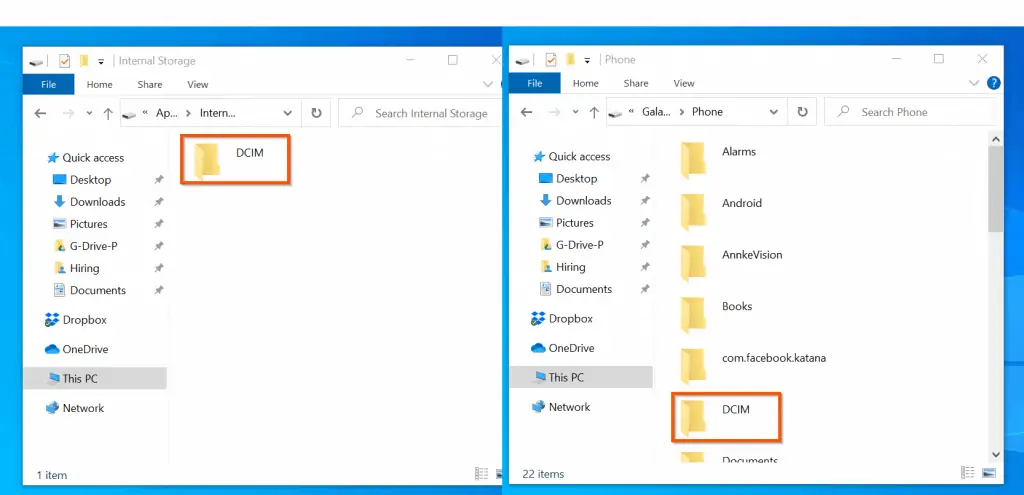
- For iPhone, the next window will display the DCIM folder (see the left part of the screenshot). However, for an Android phone, it displays other folders, including the DCIM folder. Click the DCIM folder.
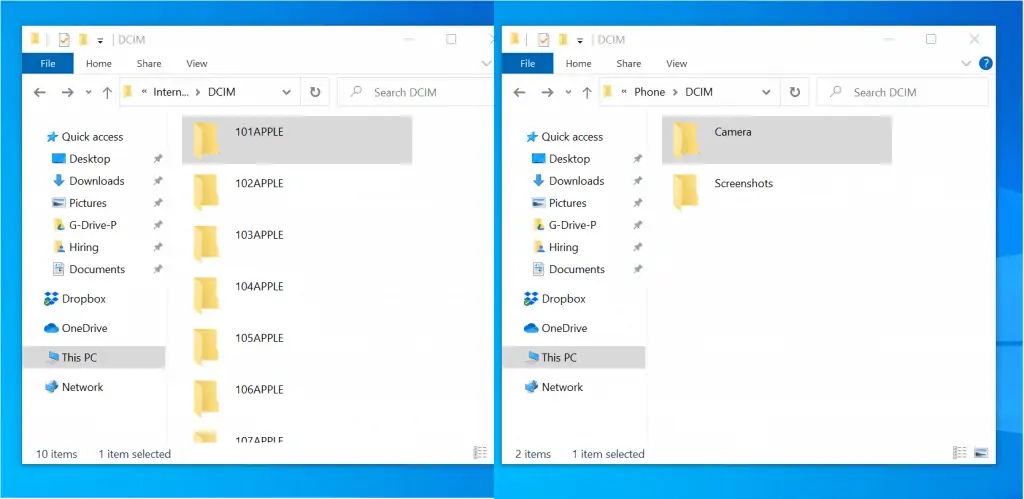
- Finally, on the left pane of the image below, your iPhone will display the photo folders. To view and copy the photos, open any of the folders.
However, for your Android phone, the photos folder is displayed as Cameras. To view and copy the photos, open the Camera folder.
There! You have your help with importing photos to Windows 10 with File Explorer! To learn how to import photos to Windows 10 photos App, read our guide – How To Import Photos From A Phone To Windows 10 Photos App.
Setup and Sync OneDrive in File Explorer
Another File Explorer feature users want to get help with, in Windows 10 is setting up OneDrive. This section offers step by step guide to set up OneDrive.
Here are the steps to setup OneDrive in Windows 10.
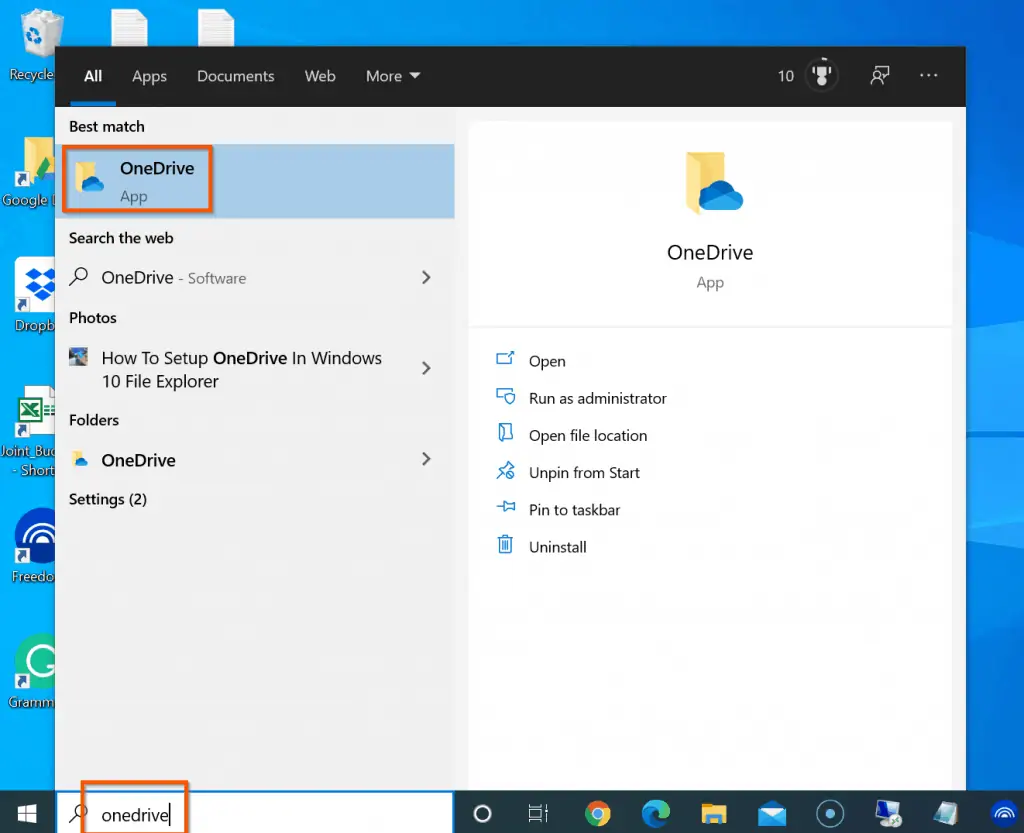
- On the search box of your Windows 10, enter onedrive. Then, select the app from the search results.
- Then, on the first setup screen, enter your email address and click Sign in. If you do not have a Microsoft account, enter your email address and click Create account.

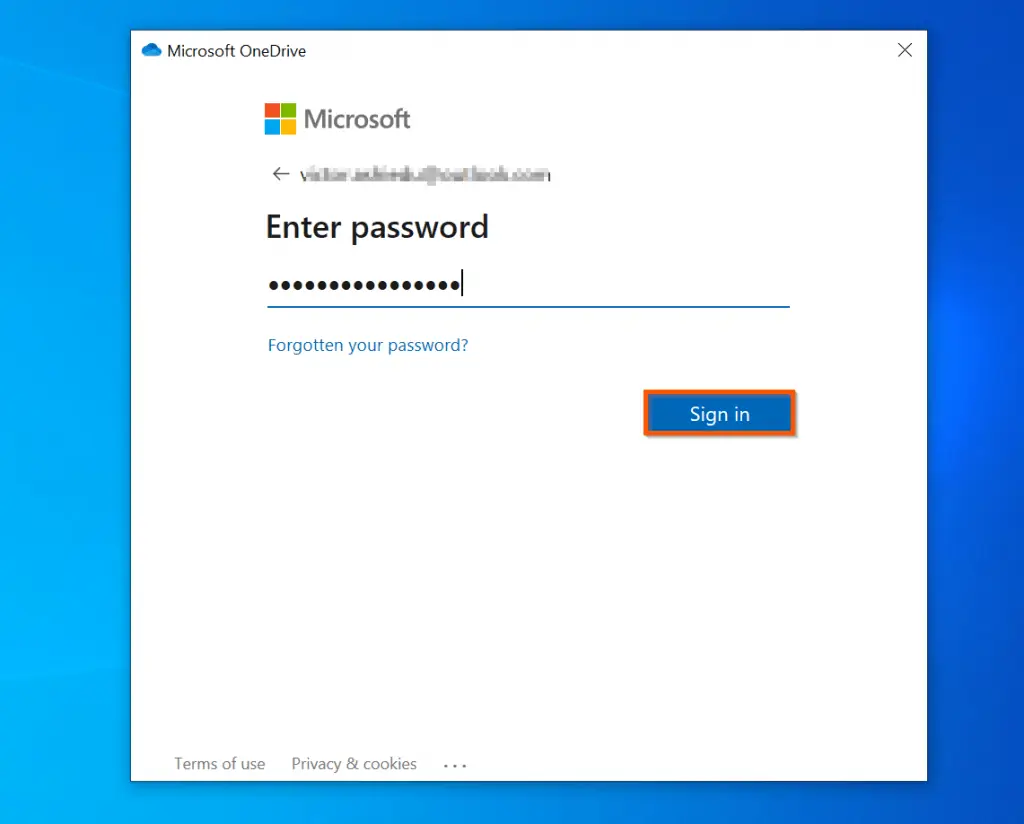
- On the Enter Password page, enter the password to the Microsoft account. Then, click Sign in. Then, wait for the sign-in to complete and load the next page.
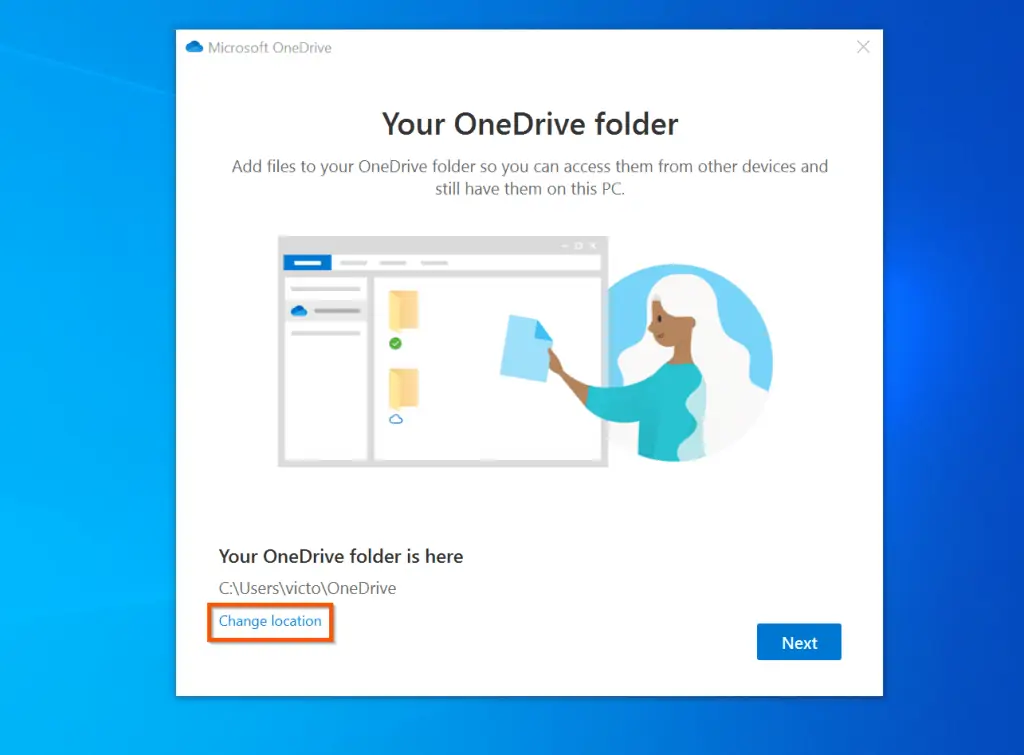
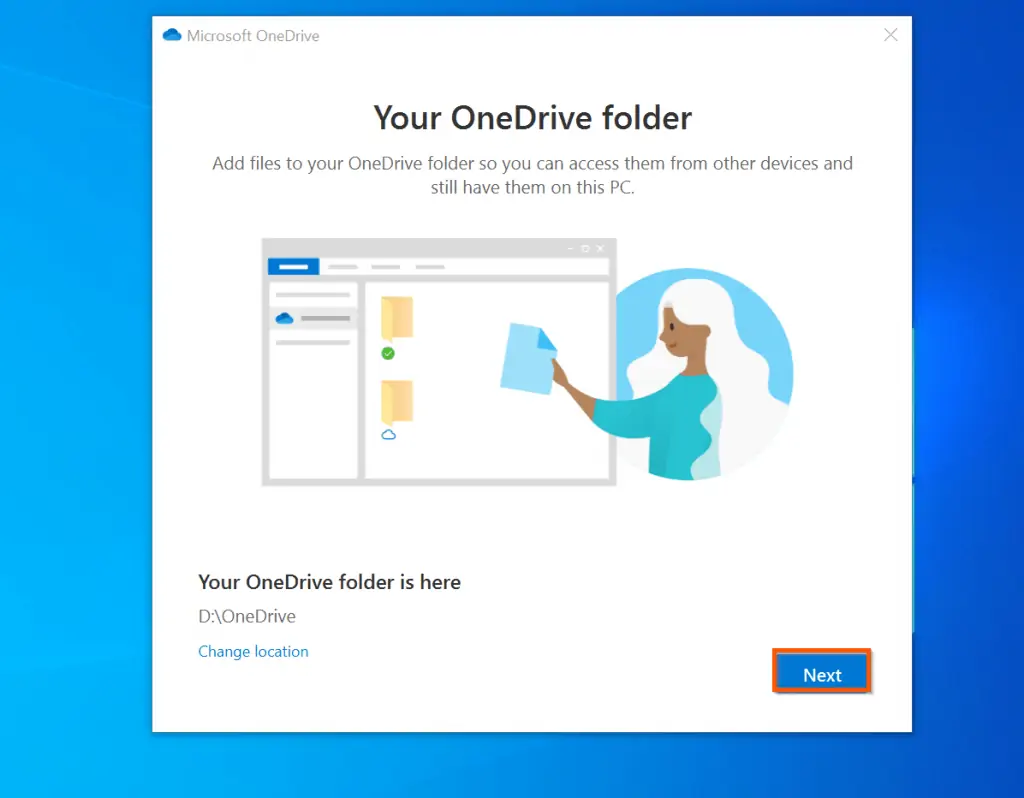
- If you created an OneDrive folder as I recommended at the beginning of this section, at the bottom of the screen, click Change location and select the folder you created earlier. Otherwise, to use the default location, click Next.
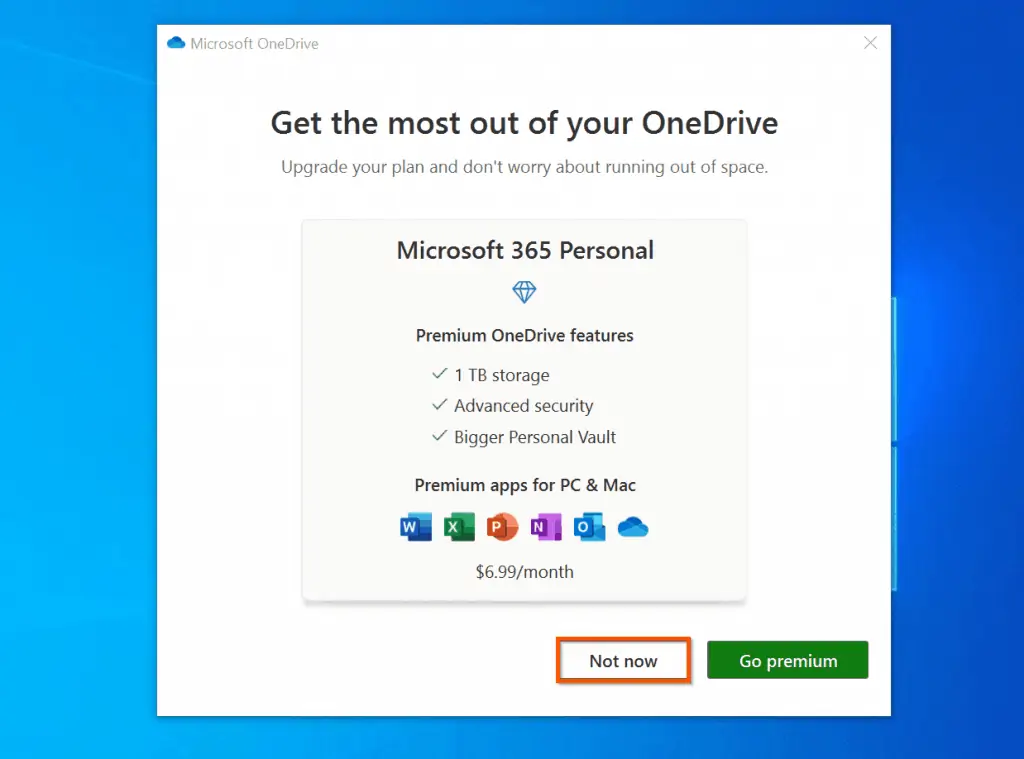
- On the next page, Microsoft may try to sell you Office 365 as part of the OneDrive Premium upgrade. If you wish to upgrade, click Go premium. Otherwise, click Now now.
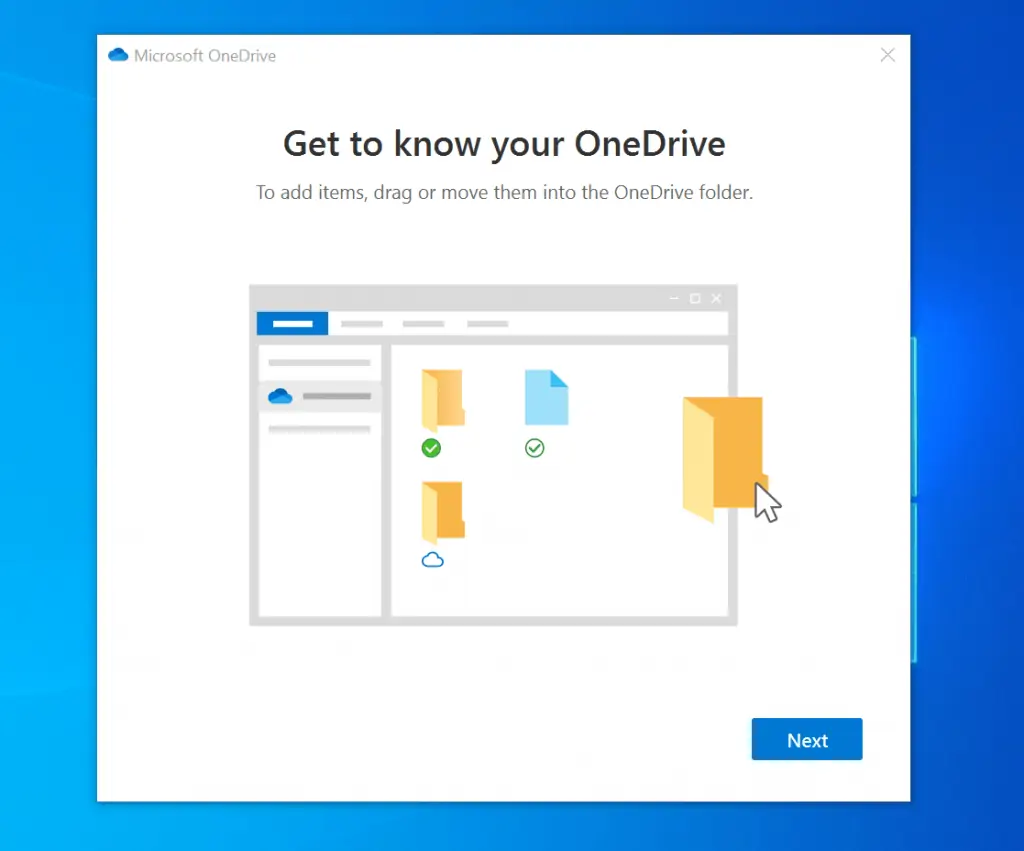
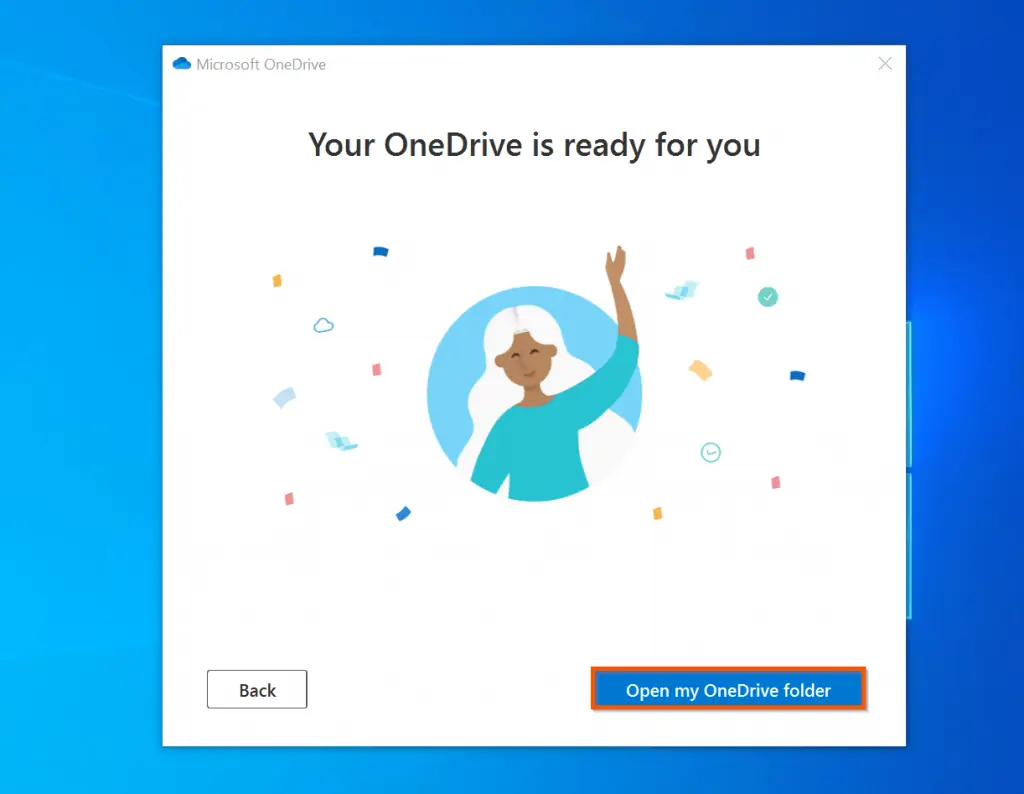
From this point, click Next several times until you get to the option to Open my OneDrove folder.
Perform Common File Explorer Tasks
The tasks covered in this section are based on questions asked by our readers in the first version of get help with file explorer in Windows 10 article.
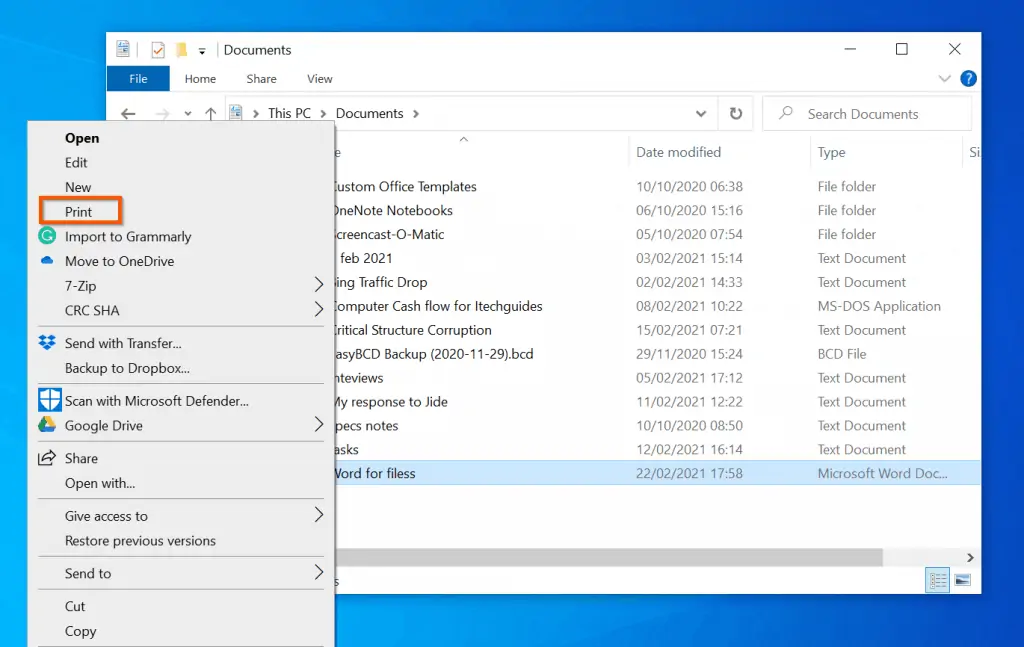
How to Print a Document or File in File Explorer
If you are in File Explorer and want to print a document or file, right-click the file or document. Then, from the displayed options, select Print.
Alternatively, you can print multiple files or documents. To print more than one document or file, select the first file by left-clicking on it.
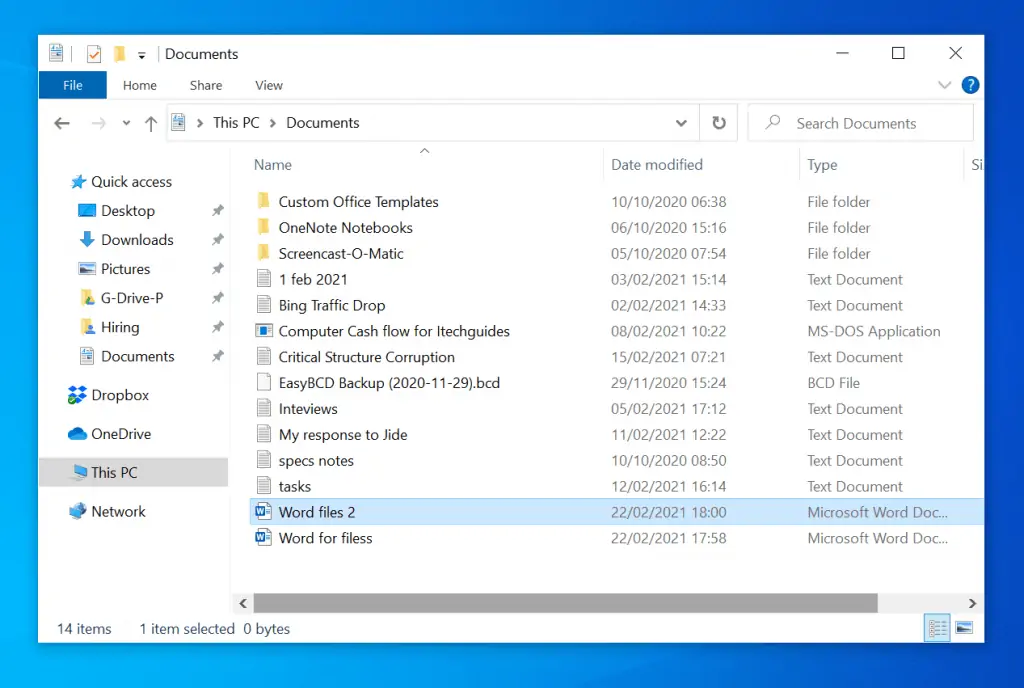
With the first document selected, press the Ctrl key on your keyboard. Then, click all documents you want to print together – to select them.
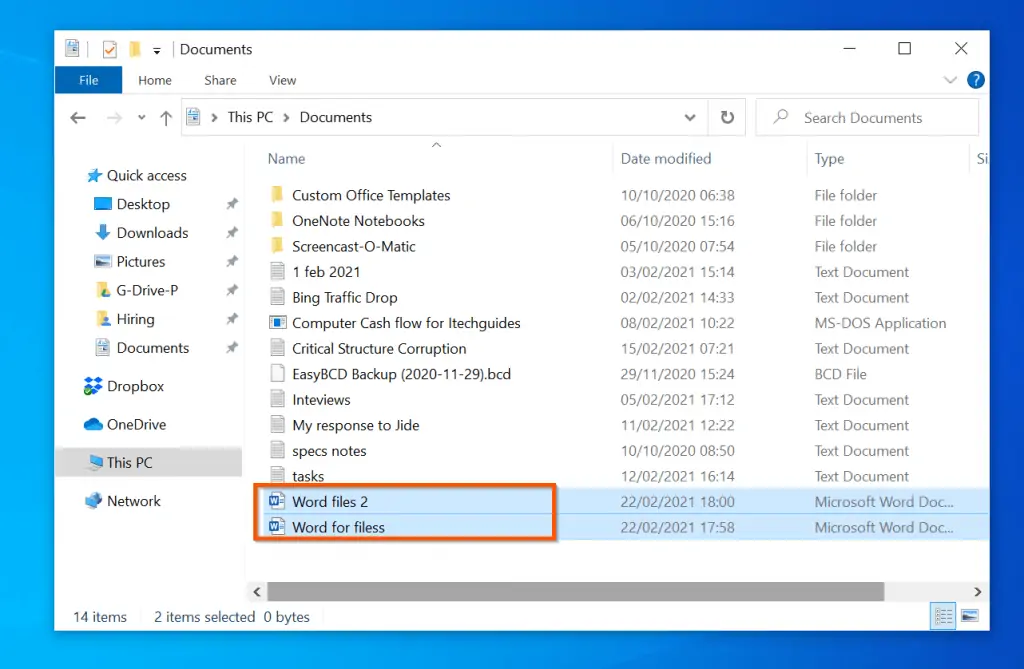
Finally, right-click one of the selected documents and select Print.
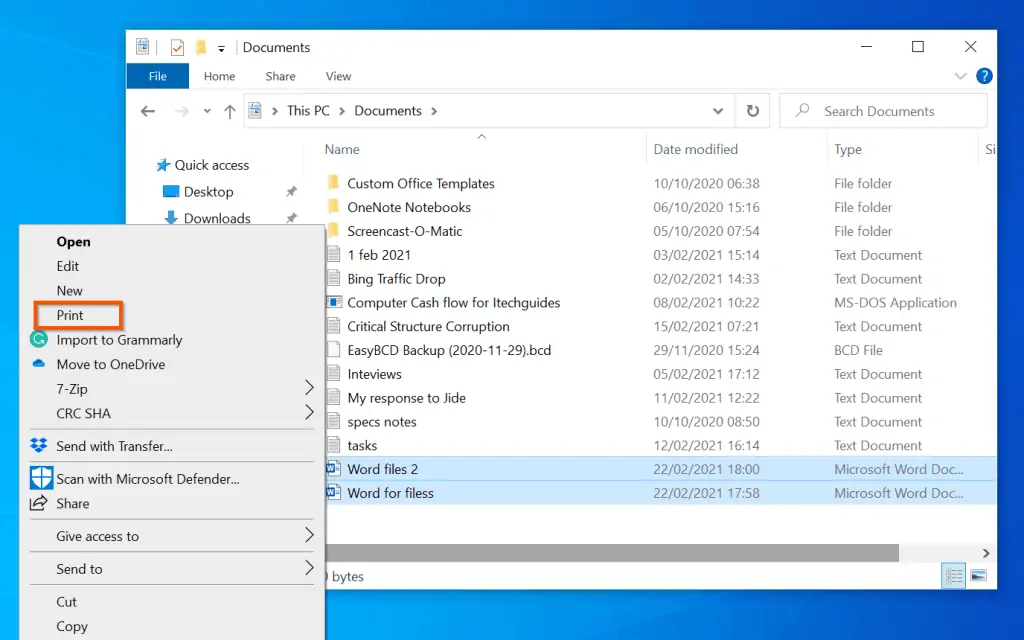
Once you click Print, the documents will print to your default printer.
How to Resize Images in File Explorer
Windows 10 File Explorer does not have a photo/image resize options. However, the Windows 10 Photos App has a resize option.
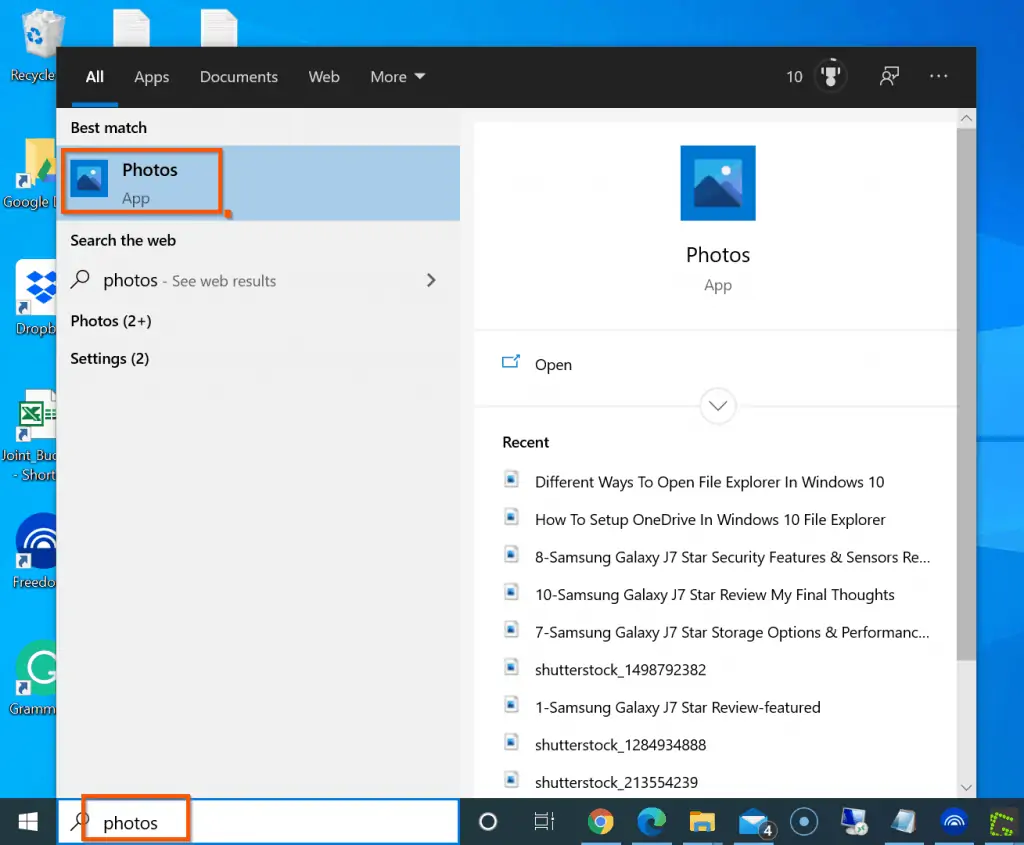
- To open the Photos App, type photos in Windows 10 search. Then click the app from the search results.
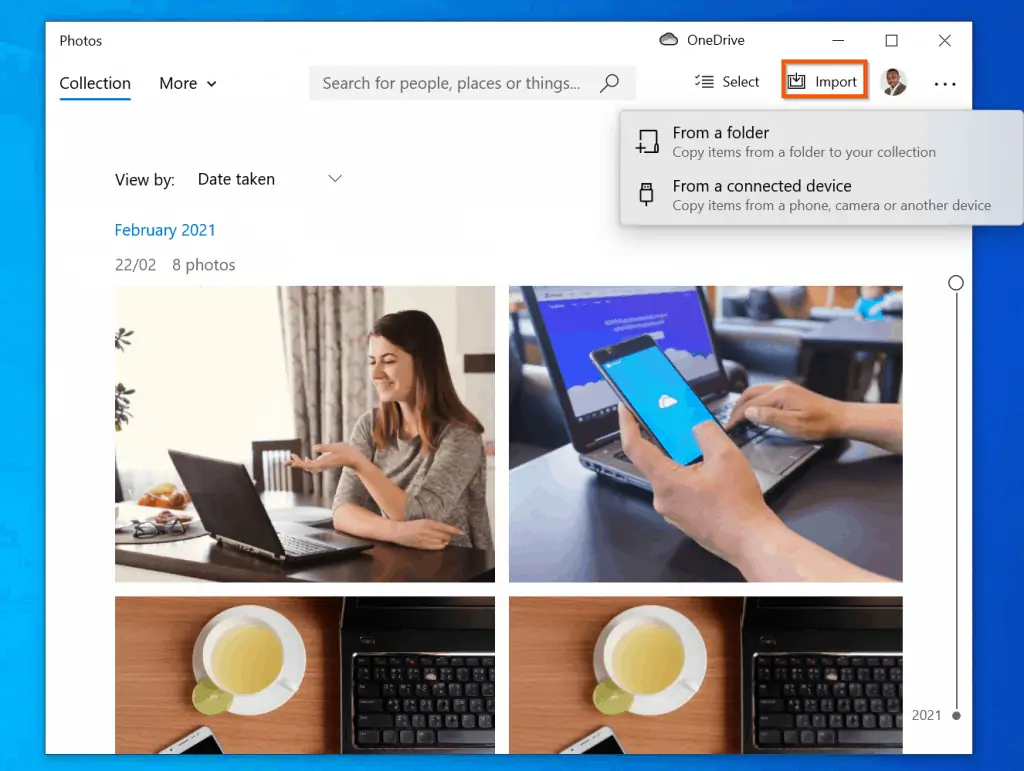
- Next, you need to import the photo you want to resize. To import the photo, on the top right of the Photos app, click Import.
- Then, select where your photo is located and complete the import.
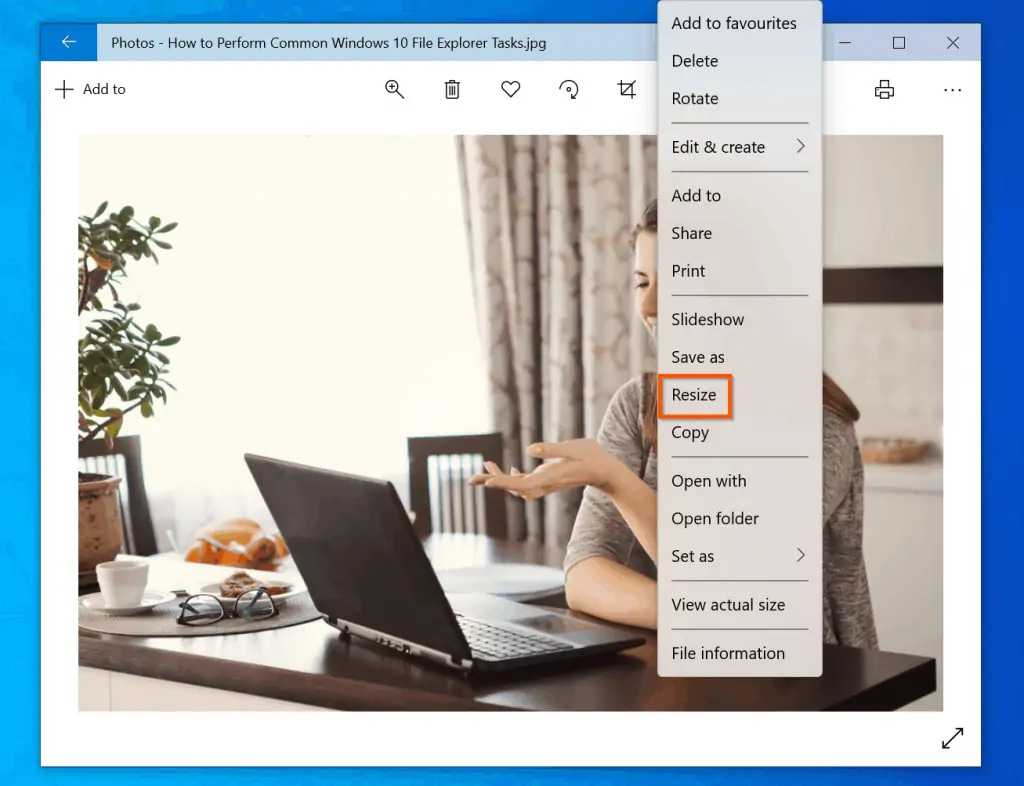
- The next step is to resize the photo. First, click on the photo to open it.
- Then, right-click the photo and select Resize.
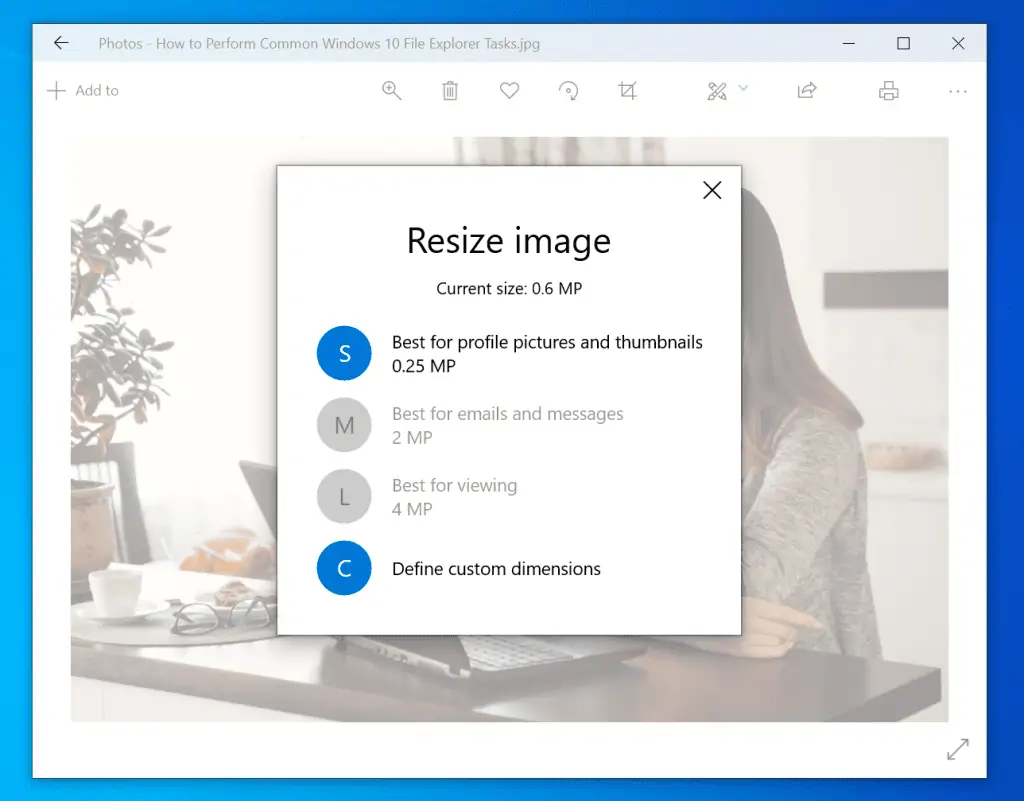
- Finally, if available, select a pre-defined size – S, M, or L. Alternatively, click Define custom dimensions.
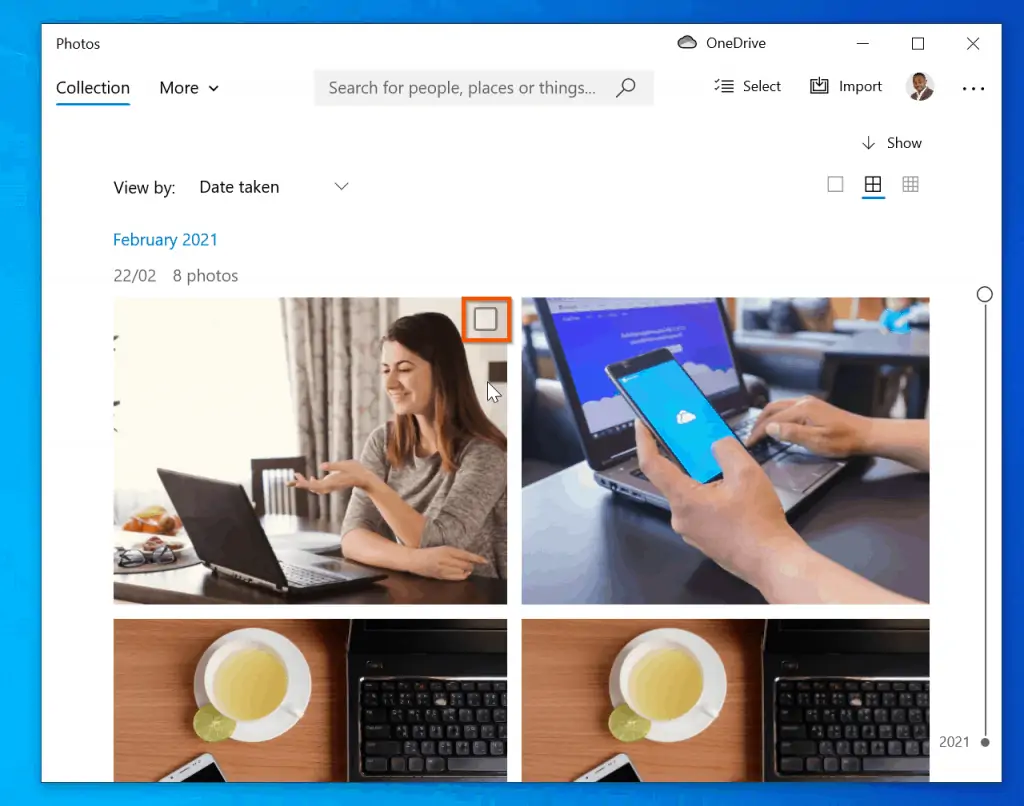
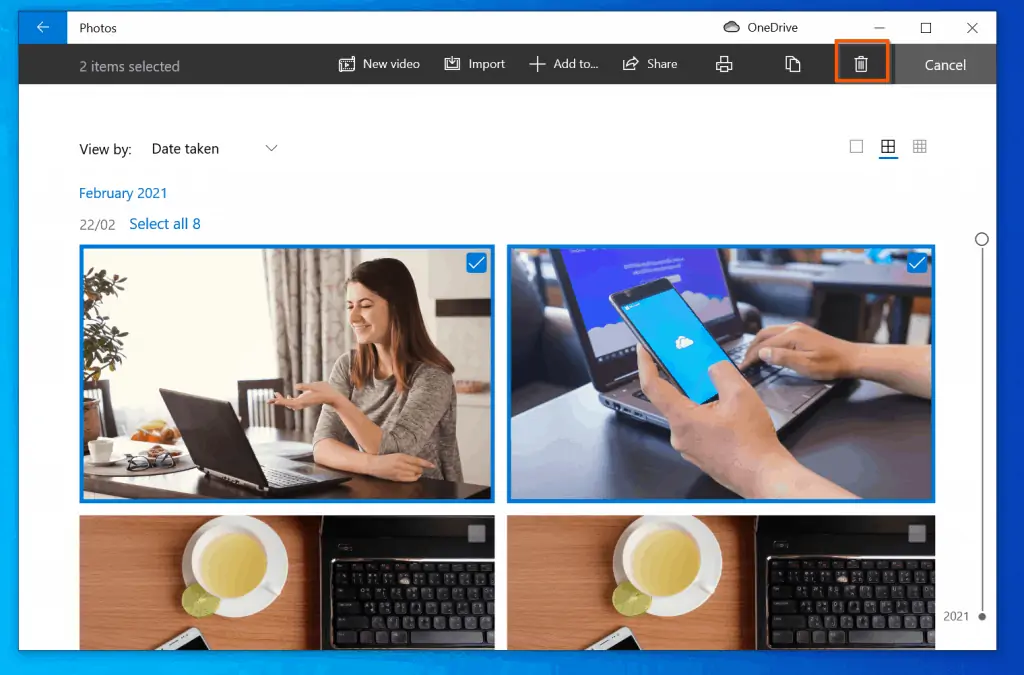
How to Delete Photos in File Explorer or Photos App
This is another feature some of our readers wants to get help with in windows 10 File Explorer.
There are 2 ways to delete a photo in File Explorer – right-click the photo and select delete.
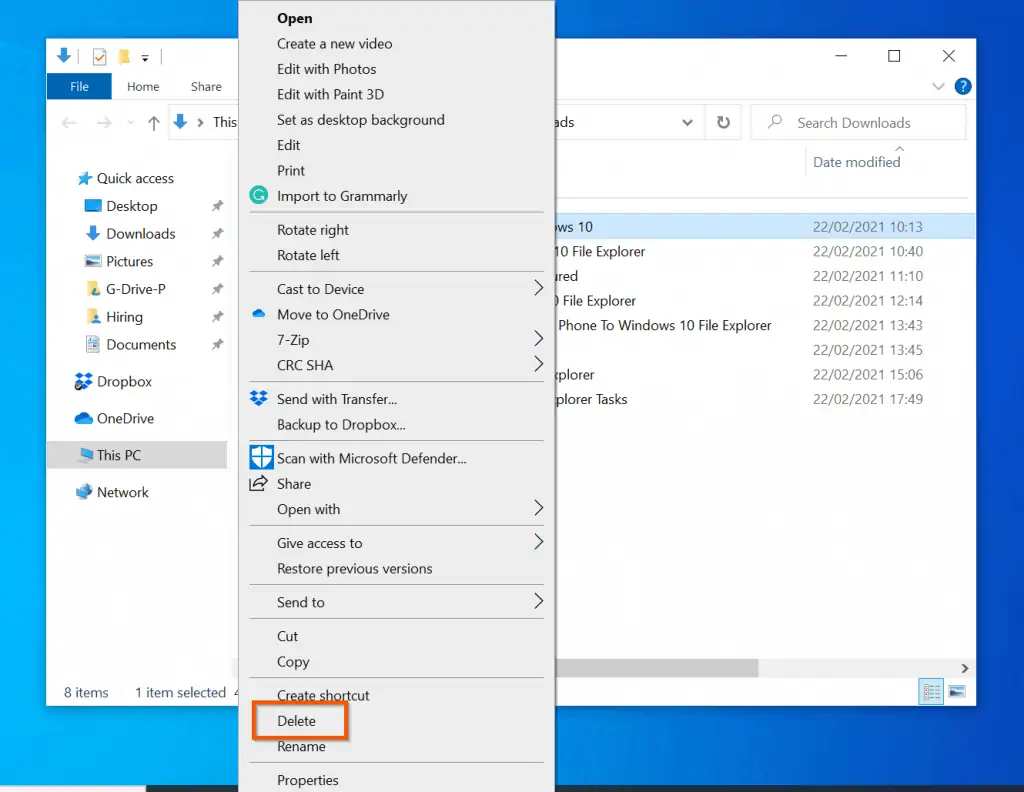
Alternatively, you can select the photo – by left-clicking it. Then, on your keyboard, press the Ctrl and D keys simultaneously.
Additionally, if you wish to delete a photo from the Photos App:
- Hover over the photo you wish to delete from the Photos app – then, check the square box displayed on the top right of the photo.
- If you want to delete multiple photos, repeat step 1 for all the photos you wish to delete.
- With all the photos selected, on the top right of the photos app, click the delete icon. You will receive a pop-up requesting you to confirm the delete.
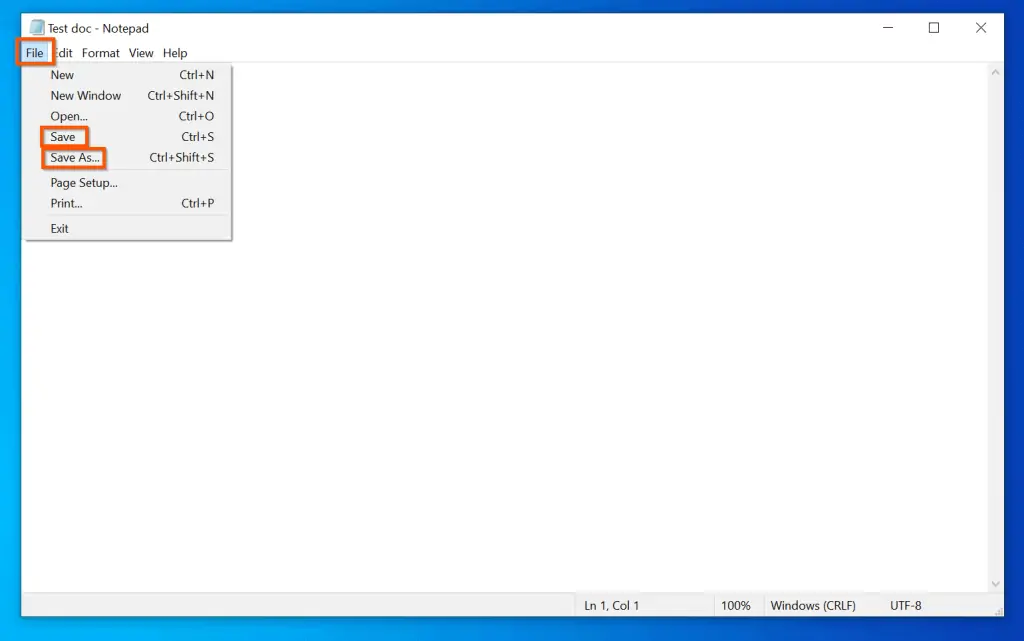
How to Save a File In File Explorer
To save any file in Windows 10 – Word, Excel, Text file – on the top left of the file, click File.
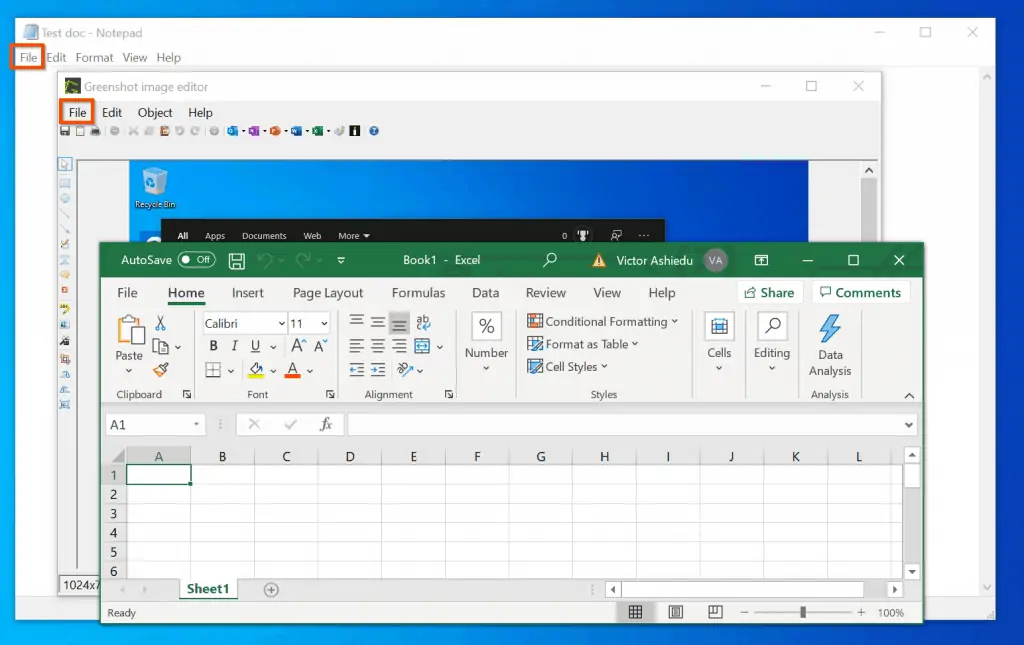
- Then, from the displayed options, select Save or Save As.
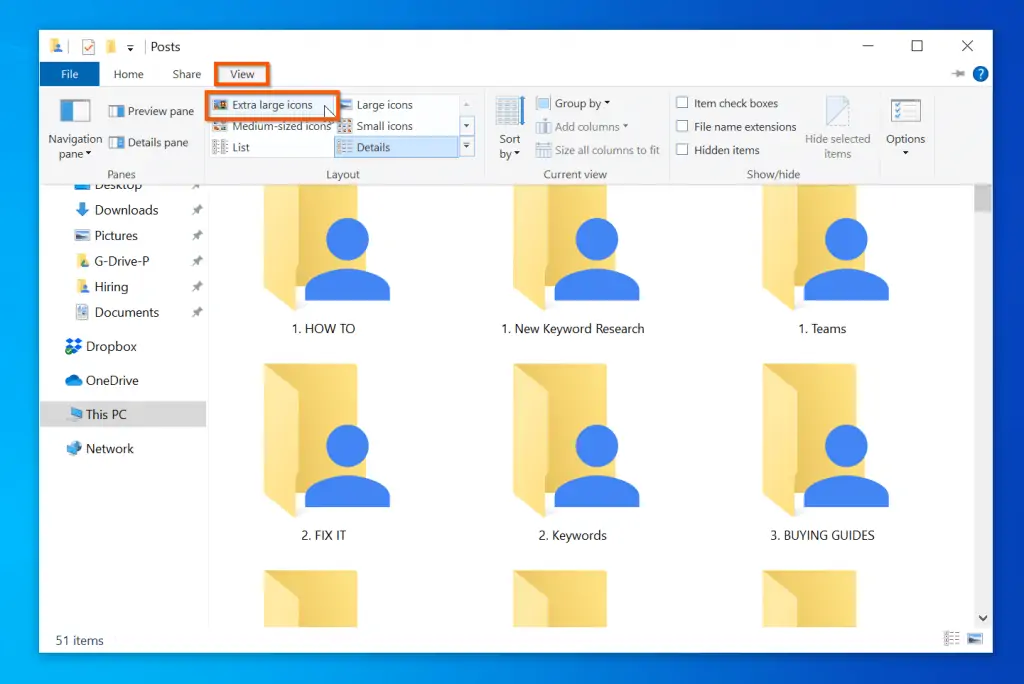
How to Change File Explorer to Thumbnail View
Some of our readers also complained that when they open File Explorer, it displays the names of the files. These readers want to get help setting up Windows 10 File Explorer to display folders in Thumbnail View.
Follow the steps below to change your File Explorer view to thumbnail.
- On the menu of File Explorer, click the View tab.
- Finally, on the Layout section of the File Explorer View tab, select either Large icons, or Extra Large icons.

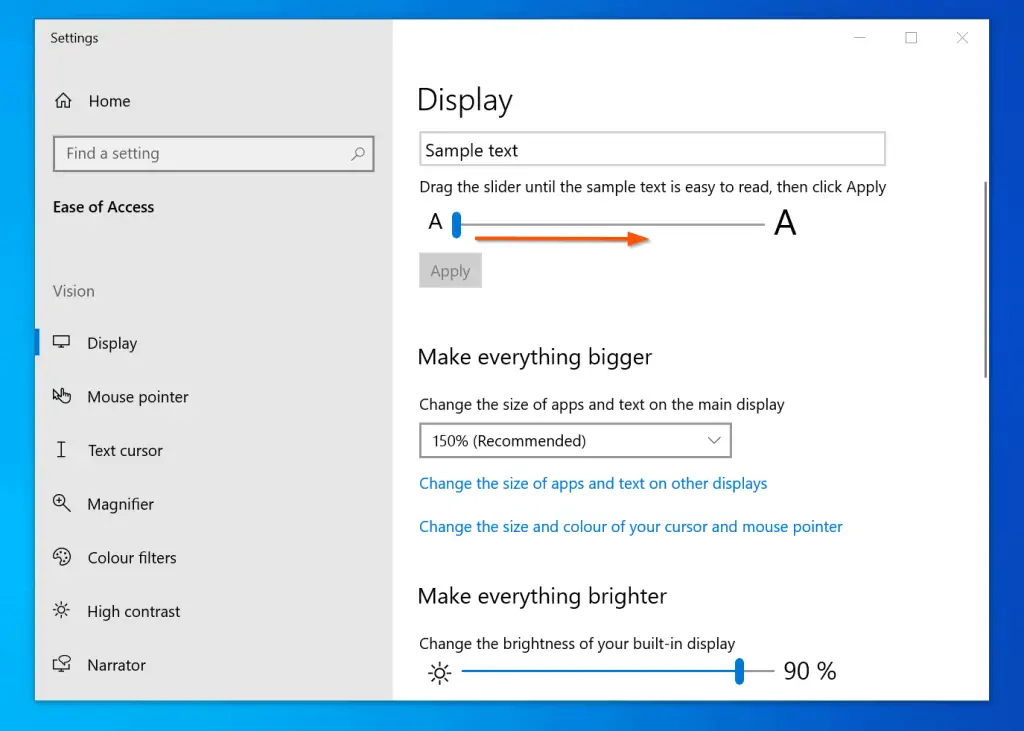
How to Increase File Explorer Text Size
One quick way to increase the text of File Explorer texts is to change the view to thumbnail – click the View tab, then select Extra Large icons. However, this changes the view.
If you want to increase just the text size, see the steps below this screenshot.
Earlier version of Windows 10 has a display setting “Advanced sizing of text and other items”. Unfortunately, this feature has been removed.
The good news is that we can still use the ” Ease of Access” feature to make the text in File Explorer bigger. The only downside is that it makes the text in every other part of Windows 10 bigger as well.
Follow the steps below to increase the text size of the names of items in File Explorer.
- Search ease of access. Then, select Ease of Access brightness setting.

- Finally, drag the slider beneath Sample text and click Apply.
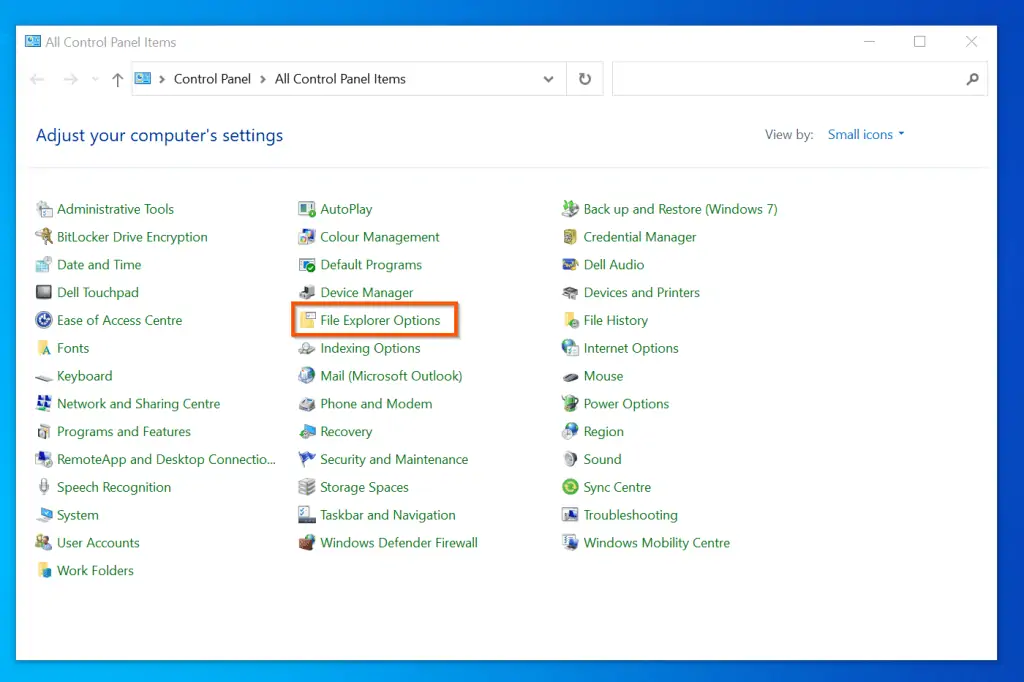
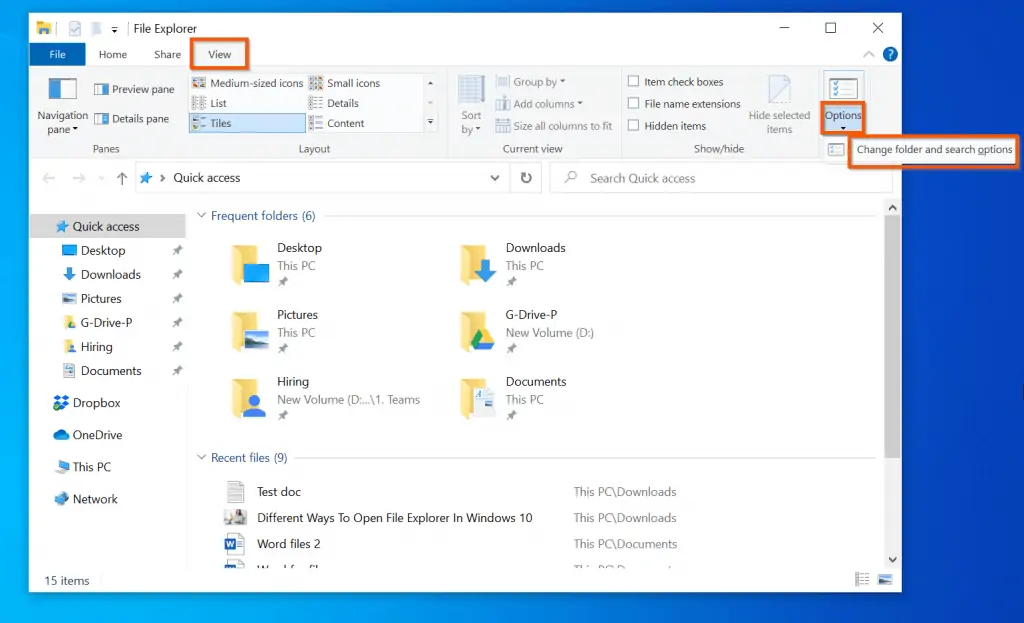
How to Open File Explorer Options
This is yet another popular Windows 10 File Explorer topic users want to get help with. The fastest way to open File Explorer Options is to search File Explorer Options.
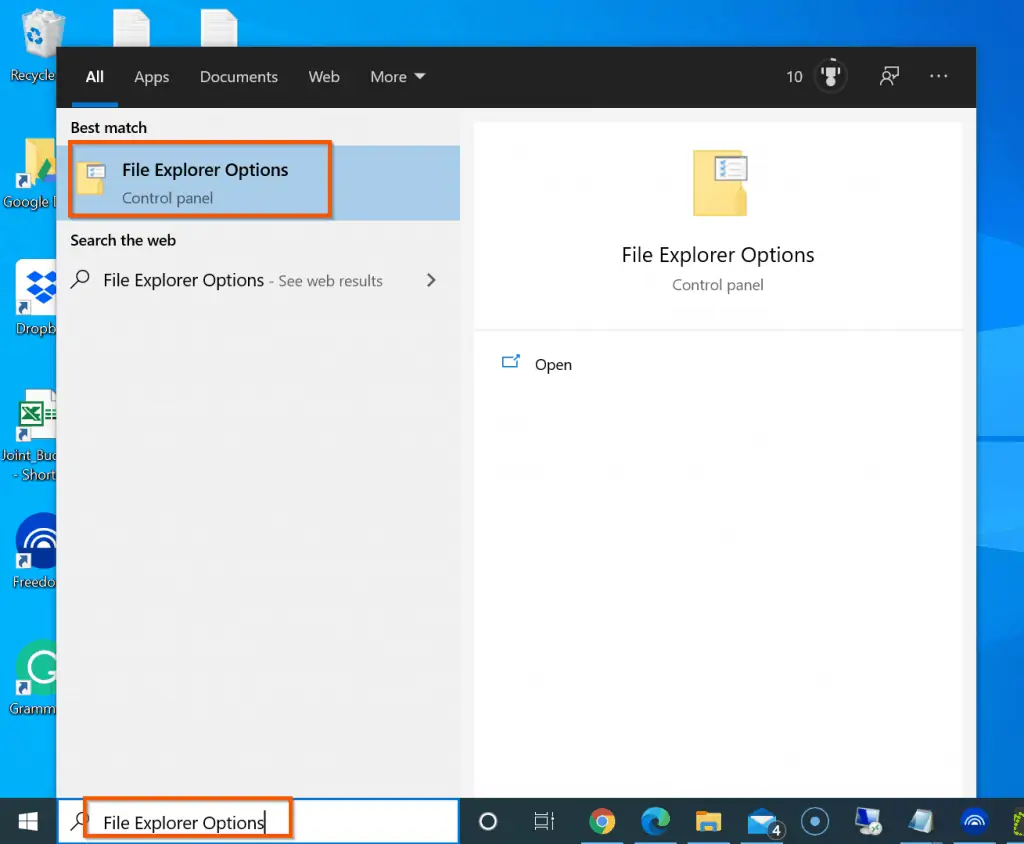
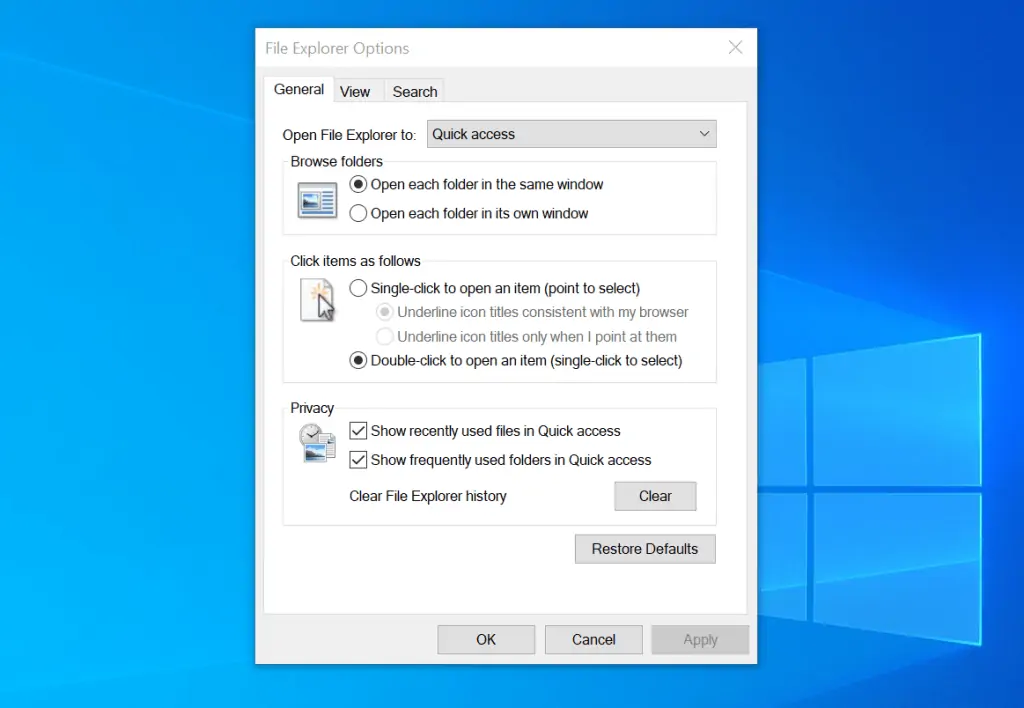
You can also open File Explorer Options from:
Control Panel (View by: Small icons)-> File Explorer Options.
From File Explorer View tab -> Options -> Change folder and search options.
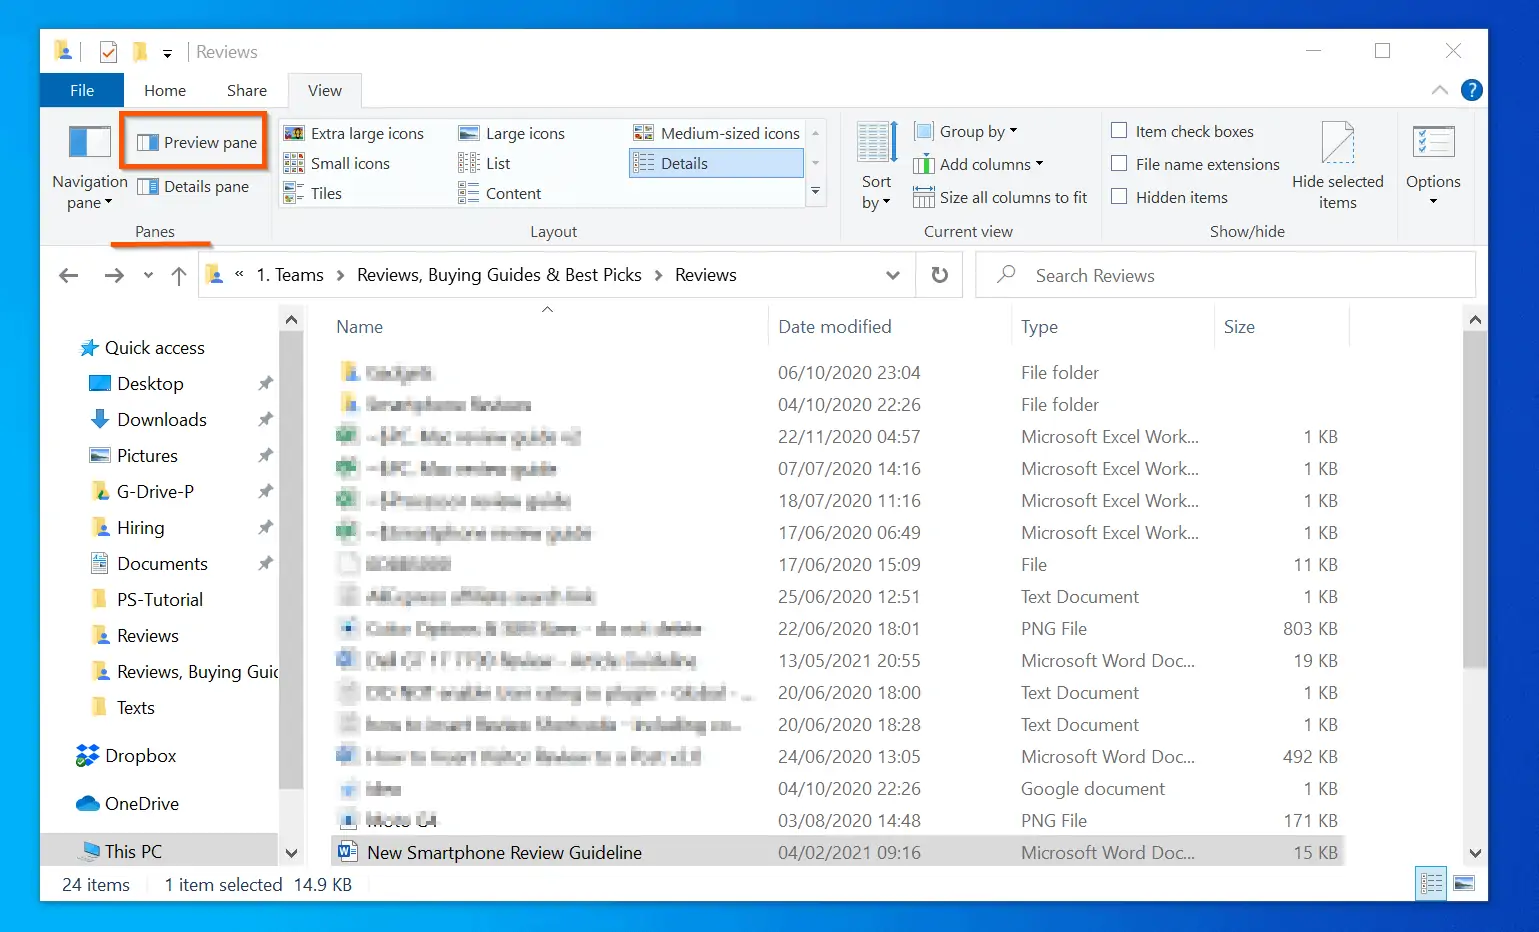
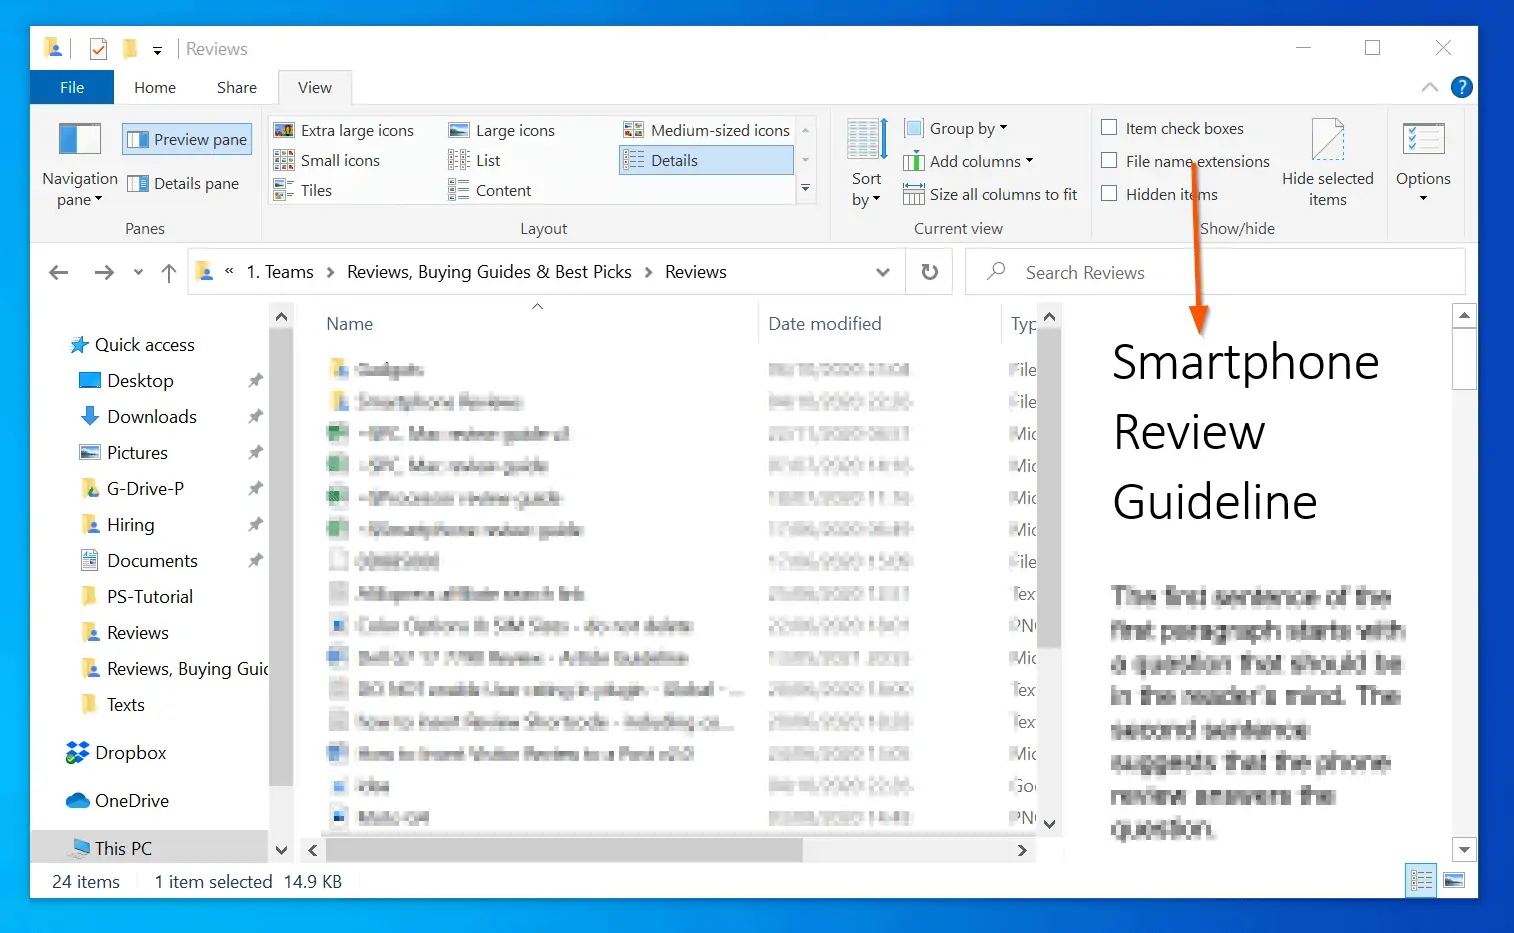
How to Enable File Explorer Preview Pane
Windows 10 File Explorer has a preview pane. If enabled, when you click on a document, the preview pane displays a preview of the content of the document.
Follow the steps to enable File Explorer Preview Pane:
- Open any folder on your computer. Then, on the top right of the folder, click the arrow pointing downwards.
- Next, click the View tab.
- Finally, to enable the File Explorer preview pane in Windows 10, on the Panes section of the View tab, click Preview pane.
Once you enable Preview pane, if you click a document, File Explorer will display a preview of the document.
Frequently Asked Question
The most likely reason files you used to view in File Explorer may now be missing is likely that the files/folders are hidden. Furthermore, you may have changed the hidden files view setting in Folder Options.
To display all files – hidden and unhidden, click the View tab in File Explorer. Then, click Options -> Change folder and search options. On Folder Options, click the View tab. Finally, select Show hidden files, folders and drives and click OK. 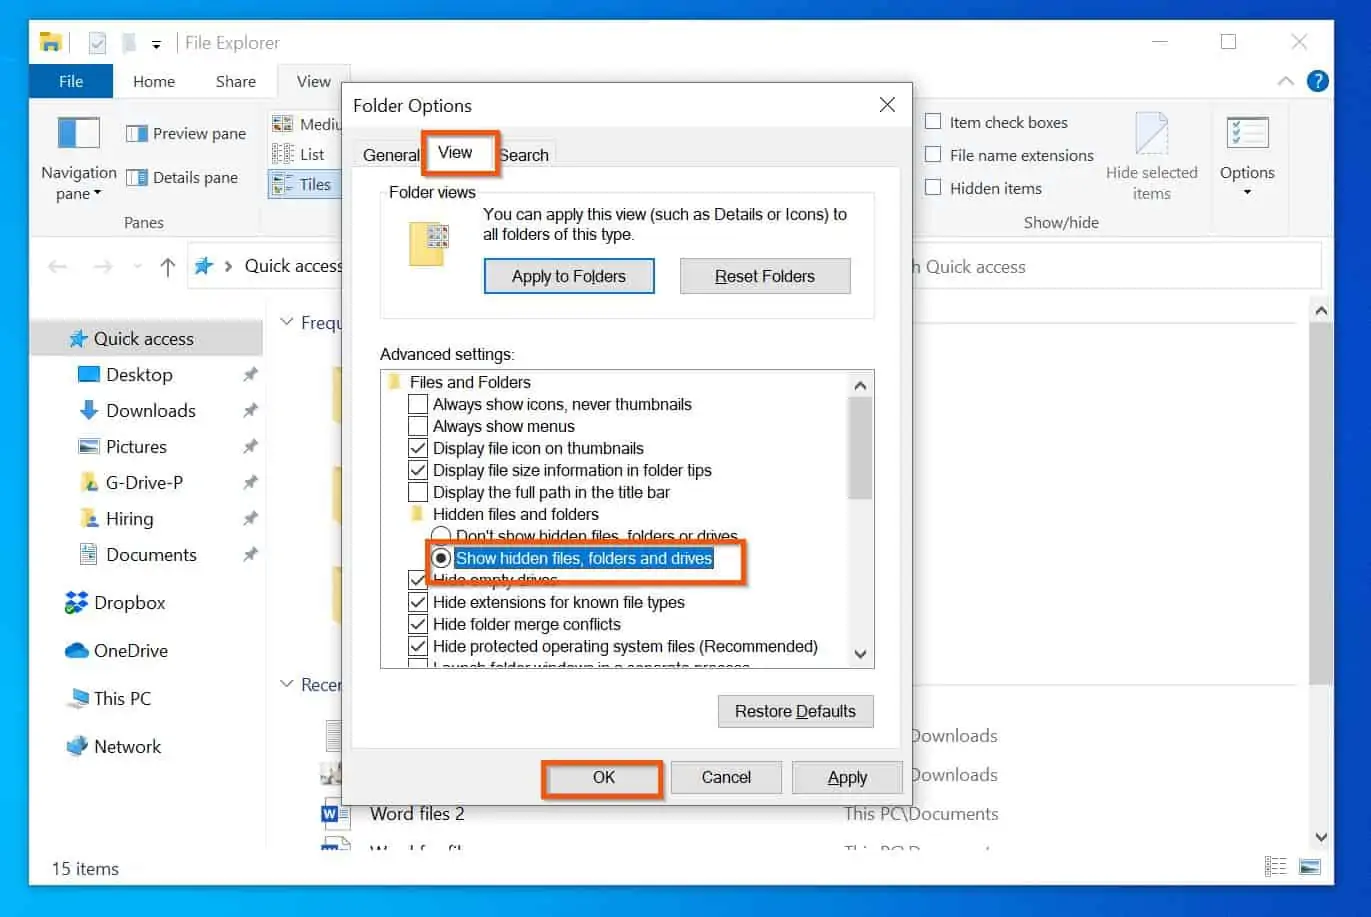
Click the View tab of File Explorer. Then, on the Layout section of the View tab, click Extra Large icons, or Large icons. 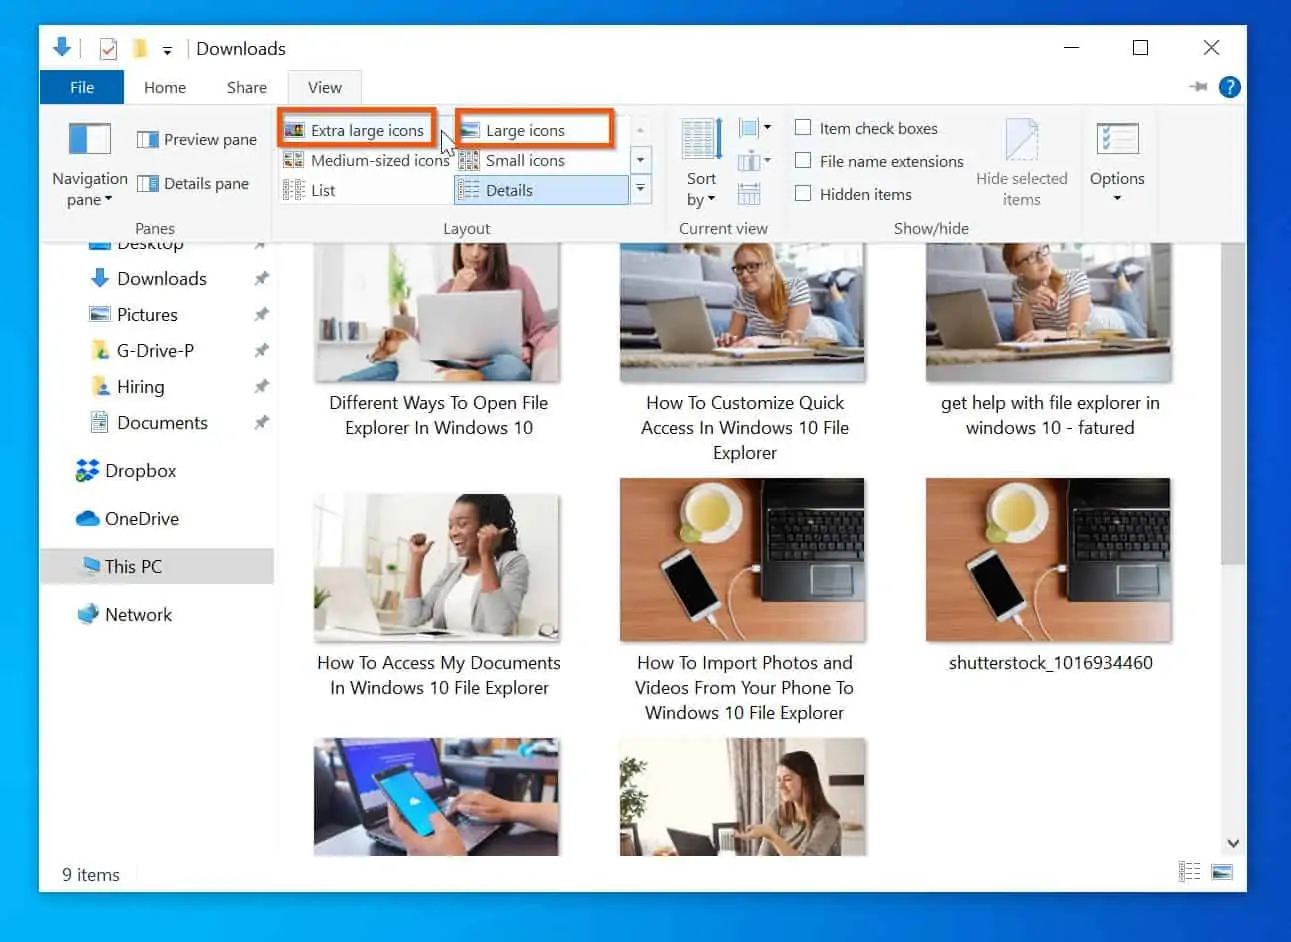
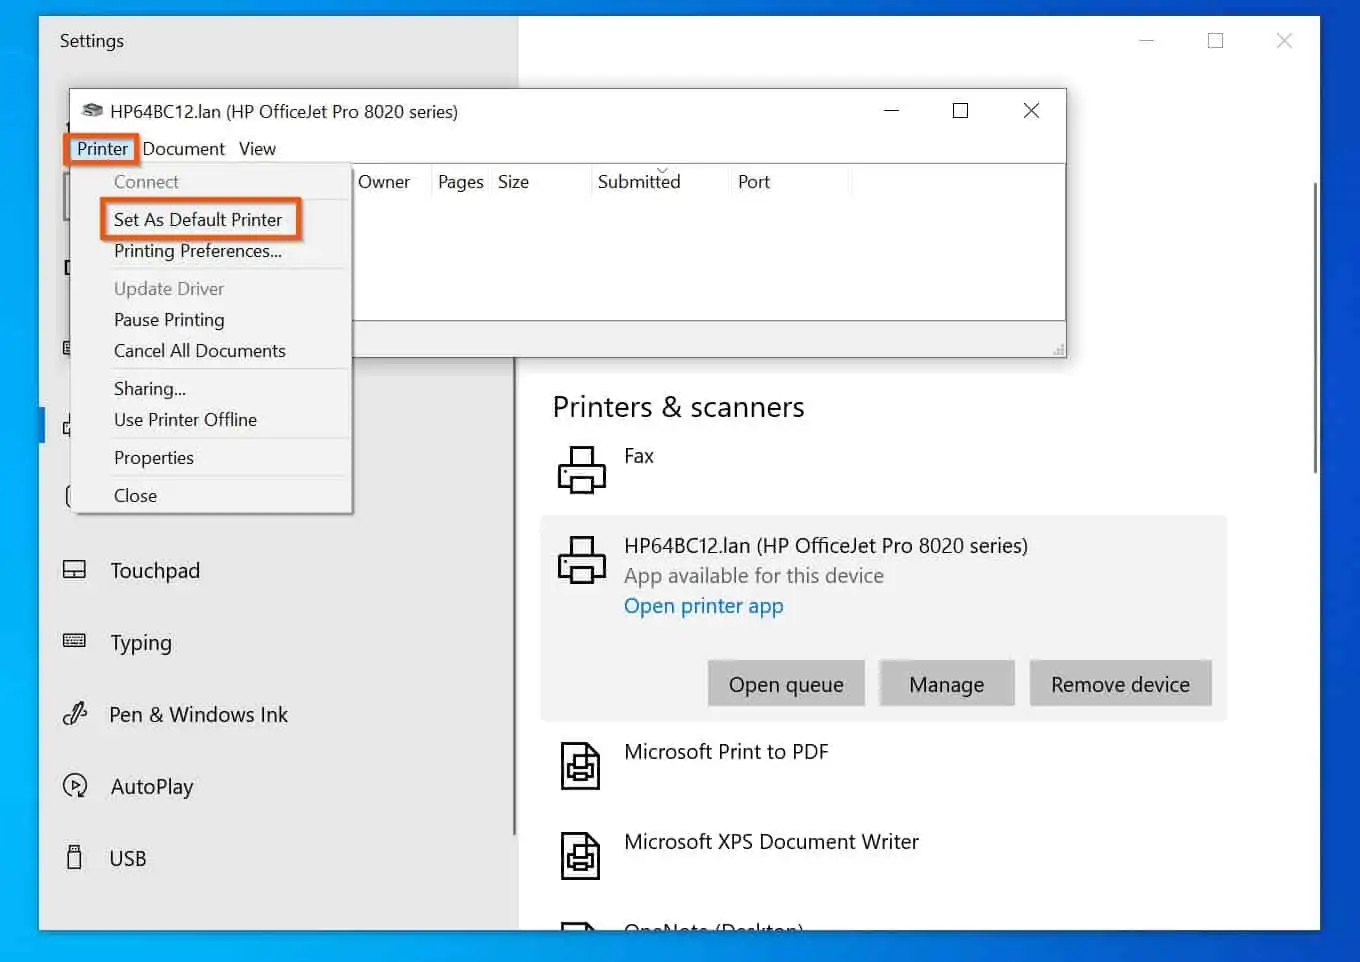
The reason you get ‘Save Print Output As’ instead of printing to your printer is because your default printer is set to Microsoft Print to PDF, instead of an actual printer.
To change your default printer to a printer, search printers. Then select Printers & scanners. Then, from the list of printers, click on the printer you want to make default and select Open queue. Finally, on the printer queue, click Printer and select Set As Default Printer. Now, if you print, it will print to your printer. 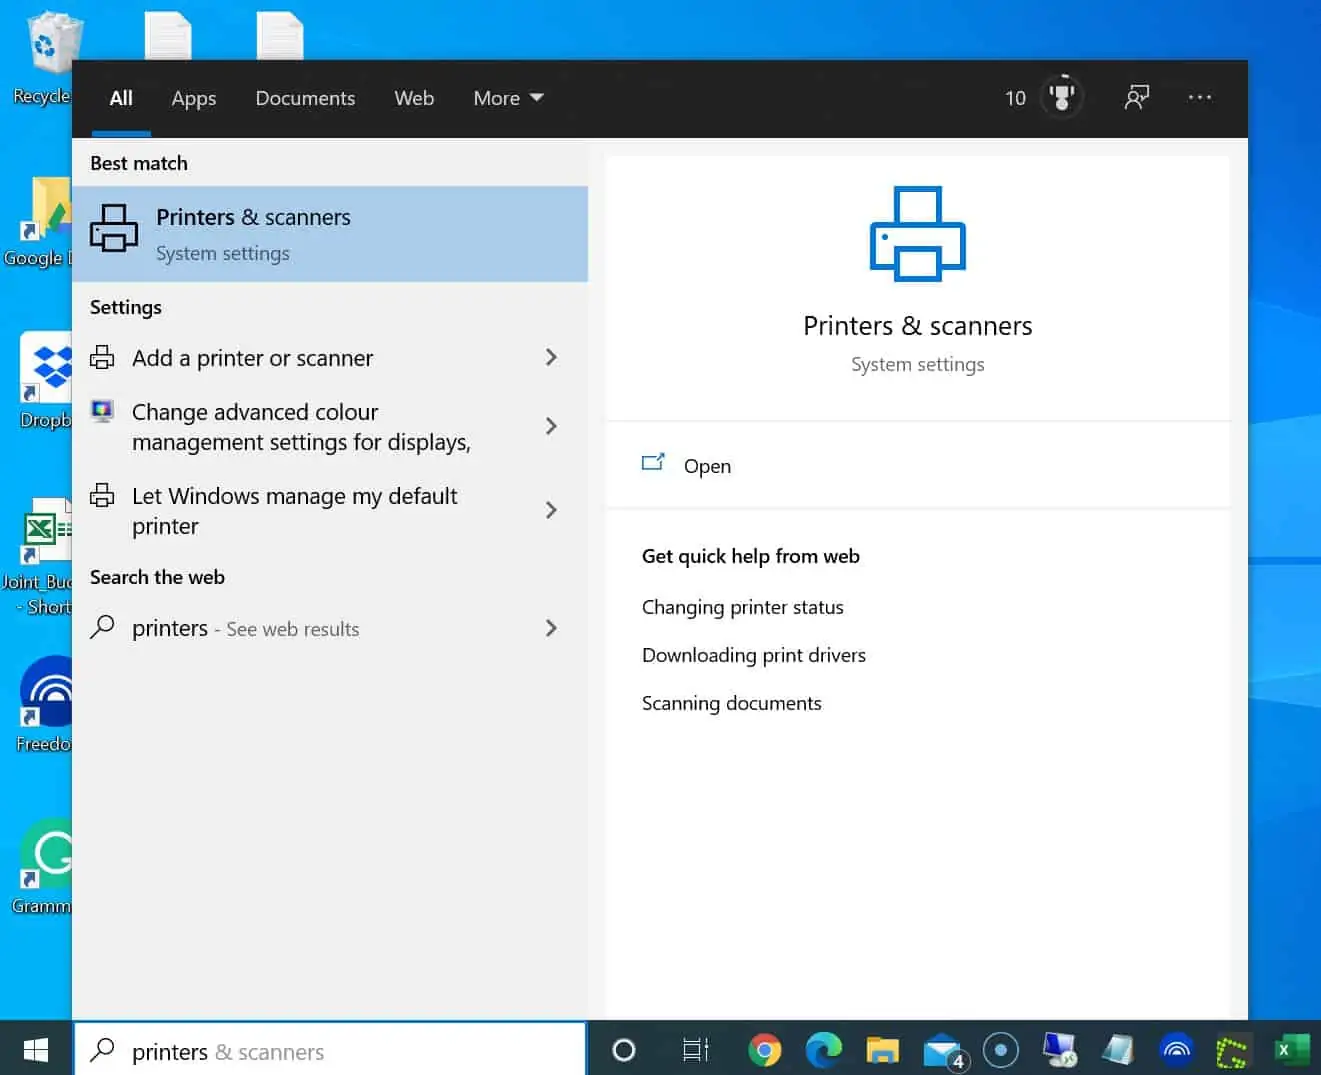
Search %AppData% and open the folder. Then from the AppData folder navigate to Local\Microsoft\Windows\Burn. Finally, right-click the Temporary Burn Folder and select delete. Restart your computer and try writing files to your DVD or CD. 

Fix 1: Search Microsoft Store and open it. Then, on the top right of the Microsoft Store app, click the 3 dots and select Downloads and updates. Finally, click Get updates – when the updates are downloaded, see whether there is an update for the Photos app and update it.
Fix 2: If updating the photos app does not work or there is no update, check for Windows 10 update: Right-click Start Menu and select Settings. Then open Update & Security -> Check for updates
Fix 3: Open the command prompt as administrator (link opens in a new browser tab). Then, type these commands and press the enter key – wait for the first command to complete before executing the second command:
SFC /scannow
DISM.exe /Online /Cleanup-Image /Restorehealth
When both commands are complete, restart your computer. Then check whether the print option is back on the Photos app.
Enter File Explorer Options in the Windows 10 search box. Then, open File Explorer Options. 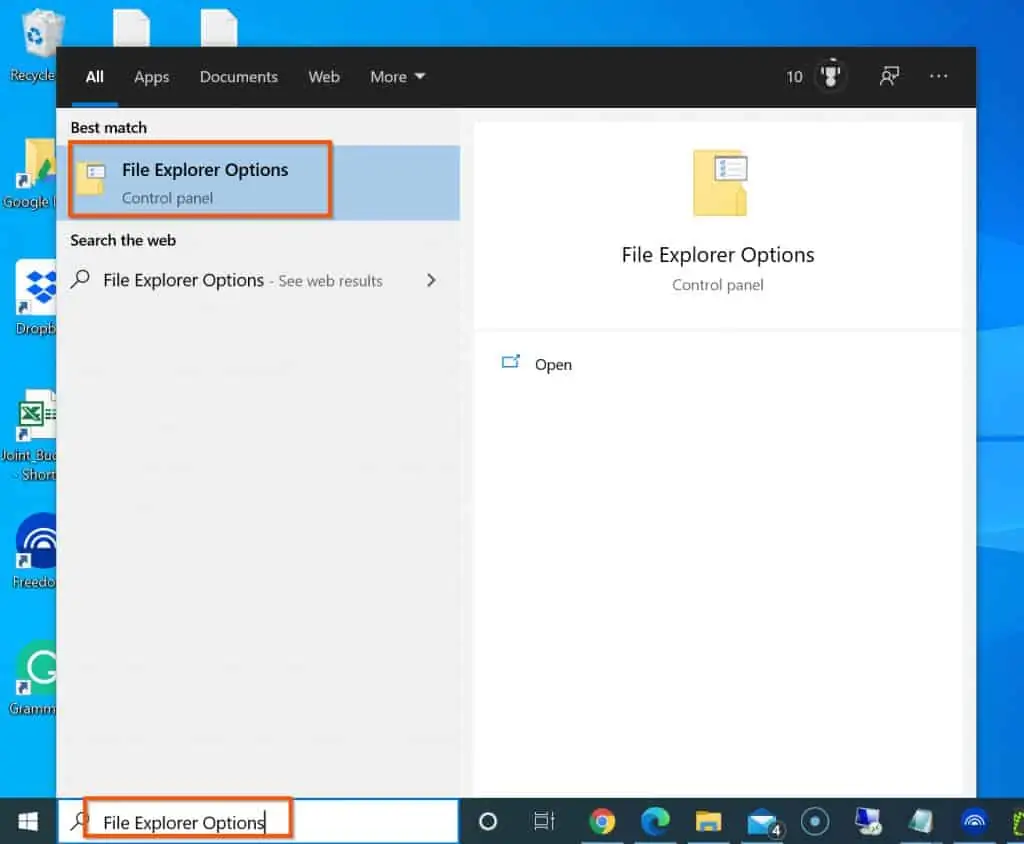
On the File Explorer menu, click the View tab. Then, on the Layout section of the View tab, select the new File Explorer appearance – Extra Large icons, Large icons, Medium-Sized icons, Small icons, List, or, Details. 
From File Explorer View tab -> Options -> Change folder and search options. Then, on the General tab, click Restore Defaults. Also, click the View tab and click Restore Defaults. Finally, click the Search tab and click Restore Defaults. 
Microsoft explained that File Explorer was removed from Xbox One consoles due to “limited usage.”
File Explorer (replaced Windows 7 Windows Explorer) is an app that allows you to browse files and folders in Windows 10. It gives you access to access files saved on your computer.
Conclusion
I hope you were able to get help with File Explorer in Windows 10 – with this long guide? I also hope you found the guide helpful.
If you found this Windows 10 guide helpful, kindly spare 2 minutes to share your experience with our community using the comments form (“Leave a Reply”) at the bottom of this page.
Alternatively, you can respond to the “Was this page helpful?” question below.
Finally, for more Windows 10 Itechguides, visit our Windows 10 How-To page. You may also find our other File Explorer guides helpful.


![How To Run Sysprep (Generalize) In Windows 10 [2 Methods]](https://www.itechguides.com/wp-content/uploads/2022/05/8-2.webp)
WHAT THE HECK! I sign off, turn off computer last night, open up tonight and EVERYTHING is different. WHAT THE HECK?????????? For pete’s sake, you should ASK before you change everything! I had files on my desktop, had most-visited sites on the taskbar…..now, I can’t even GET to email or anything else. WHAT NONSENSE!
Can you provide more information please. I may be able to help if you provide more information about what happened.
my photos on one drive have been marked X and not opening. The same photos on my PC are also marked X and not opening.
Please guide as to how to remove the X so that photos are visible again
I am using WINDOWS 10
You may need to log out of OneDrive and log back in.
I don’t know if you can help me. But on my previous computer I was able to search in folders and as I typed the file, the file would appear in the pane below where I typed. The windows 10 that I am using does not let me use this function, any ideas?
Just to be sure I understand you: this happens when you open file explorer (right-click Windows logo, and select File Explorer). Then, type on the File explorer search box – it should display all results.
Questions:
1. Did this problem just start? That is, since you started using Windows 10, have you been able to search and display results or did it just stat?
2. Are you saying that when you search in File explorer, the results are NOT displayed?
3. If 1, is true, have you confirmed that the file/folder you are searching for exists in the folder you are searching?
help, how do I get rid of header format?
very comprehensive and it will take me a while to get all that I need. Question: how can I quickly get to the Control Panel to see what is happening with the printer and how to stop printing if I get caught in the middle of a task?
Type Control Panel in the search and click it from the result. Then, from Control Panel search printer and click Devices and printers. When Devices and Printers page opens, click on the printer you want to take a look at…