Have you been looking for a detailed guide that compares the DISM /Online vs /Image command line switches? Come with me as I explore the DISM /Online vs /Image command-line options.
Overview
DISM is a command line tool you can use to service and prepare Windows Operating System images. Talking about “Windows Operating System images,” this includes online and offline images.
Offline Windows images include full-flash utility (.FFU) files, Windows image (.wim) files, or virtual hard disk (.vhd or .vhdx). You can use the DISM command to mount these offline images for servicing.
Contrary to an “offline” Windows image, you can also use DISM to manage “online” Windows Operating Systems. By “online,” I mean a running Operating System like Windows 10 or Windows 11.
When you boot your Windows 10 or Windows 11 computer and sign into the computer, you’ve signed on to an “online” Windows Operating System image.
So, how do all these relate to DISM /Online vs /Image? Here is how…
When you want to use DISM to service the operating system you’re signed in to, use the /Online switch of the DISM command. On the opposite side of the coin, when you need to service an offline image – like a (.wim) file, an (.FFU) file, or a (.vhd or .vhdx) image files – use the /Image switch of the DISM command.
In the next section, I’ll show you the syntaxes of both DISM commands. Following that, I’ll explain all the syntaxes/parameters that make up the syntaxes of the DISM command.
Syntaxes Compared
DISM (Deployment Image Servicing and Management) is a very versatile tool. So, it has numerous command-line switches.
However, for this guide, I will focus on its /Online and /Image switches and all their sub-switches.
The basic syntax of the /Online switch of the DISM command is…
DISM.exe /Online {servicing_command} [<servicing_arguments>] [dism_options]
However, when you want to service an offline Windows image, here is the syntax…
DISM.exe /Image:<path_to_offline_image> {Imaging_command} [<Imaging_arguments> [dism_options]
The servicing_command and Imaging_command are DISM /Online and /Image sub-switches. Additionally, the servicing_arguments and Imaging_arguments are arguments of the sub-switches.
There is a third bit of the syntax, dism_options. dism_options are standard DISM switches you can use in any DISM command.
In the next section, I’ll explain the servicing_command and Imaging_command switches, the servicing_arguments and Imaging_arguments arguments, and the dism_options switches.
Before then, I believe you will benefit from a quick example explaining the above syntaxes of the DISM commands. I’ll explain with a common DISM /Online example below.
DISM.exe /Online /Cleanup-Image /Restorehealth
In the above command, the /Online switch means that DISM will be servicing the running Operating System. Next to that is the /Cleanup-Image sub-switch.
The /Cleanup-Image sub-switch represents the servicing_command and Imaging_command switches. Next to the /Cleanup-Image sub-switch is the /Restorehealth argument – an argument of the /Cleanup-Image sub-switch.
The /Restorehealth represents the servicing_arguments and Imaging_arguments arguments in the DISM syntaxes.
My command example – DISM.exe /Online /Cleanup-Image /Restorehealth – does not include any dism_options switches.
Now that you have read an overview of the DISM /Online vs /Image command and understand its syntaxes to some extent, let’s dive deep into these switches and augments in the subsequent sections.
Command Sub-switches Explained
In this section of the DISM /Online vs /Image comparison guide, I’ll explain the command-line sub-switches of the /Online and /Image switches.
To kick off this section, let’s revisit the syntaxes of the DISM /Online vs /Image commands. Here they are…
DISM.exe /Online {servicing_command} [<servicing_arguments>] [dism_options]
DISM.exe /Image:<path_to_offline_image> {Imaging_command} [<Imaging_arguments> [dism_options]
This section discusses the sub-switches that make up the servicing_command and Imaging_command sub-switches. Then, in the next section, I’ll discuss the servicing_arguments and Imaging_arguments arguments of the sub-switches.
As I mentioned earlier, DISM is a very versatile command-line tool with many applications. So, I will break down this section into subsections.
Each subsection will explain a category of the command sub-switches of the DISM /Online vs /Image sub-switches.
By the way, to list all the sub-switches, I discuss in the following subsections, run any of the commands below:
DISM.exe /Online /?
DISM.exe /Image:D:\WindowsMountDir\Windows_11_PowerShell /?
Operating System Uninstall Servicing Command-Line Sub-switches
The following DISM command line sub-switches are common to both the /Online and /Image switches of the DISM command. Additionally, you can use these sub-switches to change and manage roll-back time after upgrading a Windows Operating System.
To add more context, when you upgrade a Windows Operating System, you have a certain number of days to uninstall the new Operating System and roll back to the previous Operating System.
You can use the DISM /Online and /Image command sub-switches described in the table below to change these roll-back number of days and more.
| DISM /Online vs /Image Sub-switch | Meaning/Notes |
|---|---|
| */Set-OSUninstallWindow | Use this sub-switch to set the number of days after upgrade, during which OS uninstall can be performed. |
| /Get-OSUninstallWindow | When you run DISM /Online or /Image command with the /Get-OSUninstallWindow sub-switch, DISM displays the number of days after an upgrade during which OS uninstall can be performed. |
| /Remove-OSUninstall | The /Remove-OSUninstall removes the ability to roll back the computer to the previous version |
| /Initiate-OSUninstall | If you want to initiate the OS uninstall to take you back to the previous version of windows, run DISM /Online or /Image with the /Initiate-OSUninstall sub-switch |
App Package (.appx or .appxbundle) Servicing Command-Line Sub-switches
An .appx or .appxbundle is a collection of resources and app packages you can use to enrich the app experience of a PC.
The app package servicing commands explained in this subsection offers the ability to add, remove, and list provisioned app packages (.appx or .appxbundle) in a Windows image.
| DISM /Online vs /Image Sub-switch | Meaning/Notes |
|---|---|
| /Get-NonRemovableAppPolicy | Use the /Get-NonRemovableAppPolicy sub-switch to list the package families that you cannot remove due to an Enterprise nonremovable policy. |
| */Set-NonRemovableAppPolicy | Use this sub-switch to set a policy that prevents users from removing app packages that belong to a given package family. Before you use the /Set-NonRemovableAppPolicy sub-switch, use the /Get-NonRemovableAppPolicy to get the package family name of the app. Then, use the command syntax below to /Set-NonRemovableAppPolicy – /Set-NonRemovableAppPolicy /PackageFamily: /NonRemovable:<0|1> If you use a NonRemovable argument of 1, you make the package family nonremovable. However, setting a NonRemovable argument of 0 make the package family removable. |
| /Optimize-ProvisionedAppxPackages | Optimizes a Windows image’s total file size of provisioned packages by replacing identical files with hardlinks. The DISM /Online switch does not support this command. |
| */Set-ProvisionedAppxDataFile | You can use this sub-switch to place custom data into the specified app package (.appx or .appxbundle). The specified application package must already be in the image. |
| /Remove-ProvisionedAppxPackage | Removes app packages (.appx or .appxbundle) from a Windows Online or offline image. App packages will not be installed when new user accounts are created. |
| */Add-ProvisionedAppxPackage | Adds app packages (.appx or .appxbundle) to a Windows image and sets them to install for each new user. |
| /Get-ProvisionedAppxPackages | Displays information about app packages (.appx or .appxbundle) in a Windows image that is set to install for each new user. |
Capabilities Package Servicing Command-Line Sub-switches
The DISM sub-switches explained in this subsection apply to Windows 10 and Windows 11 desktop editions (Home, Pro, Enterprise, and Education) only. You can use these DISM /Online or /Image sub-switches to add or remove capabilities, features, and packages.
Windows Capabilities are optional features like the different RSAT optional features. On the other hand, Packages are updates, security updates, and OnDemand Packs.
Finally, Features are add-on apps like Hyper-V and TelnetClient.
Use the command-line sub-switches of the DISM /Online and /Image command to manage an image’s Capabilities, Packages, and Features.
| DISM /Online vs /Image Sub-switch | Meaning/Notes |
|---|---|
| */Add-Package | This DISM sub-switch adds one or more packages to an image. The /PackagePath argument can point to either a .cab file, a .msu file, or a folder. |
| */Remove-Package | The /Remove-Package sub-switch does the opposite of the /Add-Package sub-switch. You can use /Remove-Package to remove one or more packages unless there are online, unprocessed pending actions. If online actions are pending, the resources remain in the image, and the package state is set to Uninstall Requested. You must boot the image to process pending actions before removing the package. You cannot use this command to remove .msu files. |
| */Enable-Feature | Enables a specific feature in a Windows image. |
| */Disable-Feature | Disables a specific feature in a Windows image. |
| */Get-Packages | Displays information about all packages in a Windows image. |
| */Get-PackageInfo | After listing all packages with the /Get-Packages sub-switch, you can use the /Get-PackageInfo sub-switch to display information about a specific package. |
| */Get-Features | Displays information about all features found in a specific package. |
| */Get-FeatureInfo | After displaying information about all features found in a specific package with /Get-Features, you can display information about a specific feature with /Get-FeatureInfo. |
| */Cleanup-Image | Performs cleanup and recovery operations on a Windows image image |
| */Export-Source | Export a set of capabilities into a new repository. |
| */Add-Capability | Adds one or more capabilities to a Windows image. |
| */Remove-Capability | Removes a capability from a Windows image. Use the /Get-Capabilities sub-switch to list the capabilities in an image |
| */Get-Capabilities | List all capabilities in a Windows image. |
| /Get-ReservedStorageState | Gets the current state of reserved storage. You cannot use this sub-switch in an offline image. This means that you cannot use /Get-ReservedStorageState with DISM /Image switch. |
| */Set-ReservedStorageState | Sets the state of reserved storage. Like the /Get-ReservedStorageState, you cannot use this sub-switch in an offline Windows image. So, it does not support the DISM /Image switch. |
Offline Image General Command-Line Sub-switch
This subsection has a single DISM sub-switch that you can use for an offline image.
| DISM /Online sub-switch | Meaning/Notes |
|---|---|
| */Optimize-Image | Performs specified configurations to an offline image. |
Driver Servicing Command-Line Sub-switches
It may surprise you to know that you can also use the DISM command to service drivers in a Windows image.
The table below explains all the DISM /Online and /Image sub-switches that you can use to manage drivers in an online or offline Windows image.
| DISM /Online vs /Image Sub-switch | Meaning/Notes |
|---|---|
| */Remove-Driver | Removes the specified out-of-box driver from a Windows image |
| */Add-Driver | Adds driver packages to an offline image. |
| */Get-Drivers | Displays information about drivers in a Windows image. |
| */Get-DriverInfo | The /Get-DriverInfo sub-switch displays information about an INF file installed in the image, or one that is not yet installed. Use /Get-Drivers to list all drivers. Then, from the list, display the information about a specific driver with /Get-DriverInfo. |
| */Export-Driver | Exports all third-party driver packages from a Windows image to a specified destination path. |
Application Servicing Command-Line Sub-switches
The Application command-line sub-switches in this subsection only applies to offline images. So, you can only use the command-line sub-switches in the table below with DISM /Image command.
| DISM /Online vs /Image Sub-switch | Meaning/Notes |
|---|---|
| */Get-Apps | The /Get-Apps sub-switch displays information about all MSI applications in the offline image. |
| /Get-AppInfo | From the apps listed /Get-Apps, you can use /Get-AppInfo to displays detailed information about a specific installed Windows Installer (MSI) application |
| /Get-AppPatches | Displays information about all applied MSP patches for all applications installed on the offline image. |
| */Get-AppPatchInfo | /Get-AppPatchInfo displays information about installed MSP patches. |
| */Check-AppPatch | Displays information if the MSP patches are applicable to the offline image |
Default Associations Servicing Command-Line Sub-switches
You can use the DISM sub-switches in this section to manage default app associations in an offline image or a running Operating System.
| DISM /Online vs /Image Sub-switch | Meaning/Notes |
|---|---|
| /Get-DefaultAppAssociations | Displays the list of default application associations that have been set in a specified Windows image. |
| /Remove-DefaultAppAssociations | The /Remove-DefaultAppAssociations sub-switch removes the default application associations from the specified Windows image. |
| /Import-DefaultAppAssociations | Imports a set of default application associations to a specified Windows image from an .xml file. After importing the default application associations, they will be applied for each user during their first logon. |
| /Export-DefaultAppAssociations | Exports the default application associations from a running operating system to an .xml file. |
International Servicing Command-Line Sub-switches
Use these DISM /Online or /Image sub-switches to manage Windows international settings like time zones, locals, etc.
| DISM /Online vs /Image Sub-switch | Meaning/Notes |
|---|---|
| /Get-Intl | Displays information about international settings and languages. |
| */Set-SetupUILang | /Set-SetupUILang defines the default language that Windows will use during setup. If the language set cannot be used, Windows setup will fall back to English. |
| /Gen-LangIni | You can use the /Gen-LangIni sub-switch to generate a new lang.ini file which Windows setup uses to define the language packs inside the image and outside in the distribution. It also defines the default UI language for setup. DISM adds the new Lang.ini file to the sources folder of the Windows distribution. This command is not supported against an online image. |
| /Set-SKUIntlDefaults | /Set-SKUIntlDefaults sets the default system UI language, the language for non-Unicode programs, the “standards and formats” language and the input locales, keyboard layouts and time zone values in a mounted offline image to the Windows default value specified by. This command is not supported against an online image. |
| /Set-AllIntl | /Set-AllIntl sets the default system UI language, the language for non-Unicode programs, the “standards and formats” language and the input locales and keyboard layouts to the specified language in the mounted offline image. |
| /Set-TimeZone | Sets the default time zone in a Windows image. Before setting the time zone, DISM verifies that the specified time zone string is valid for the image. This command is not supported against an online image. |
| /Set-InputLocale | The /Set-InputLocale sub-switch sets the input locales and keyboard layouts to use in the mounted offline image. This command is not supported against an online image. |
| /Set-SysLocale | /Set-SysLocale sets the language for non-Unicode programs (also called system locale) and font settings in the mounted offline image. This command is not supported against an online image. |
| /Set-UserLocale | Sets the “standards and formats” language (also called user locale) in the mounted offline image. The “Standards and formats” language is a per-user setting that determines the default sort order and the default settings for formatting dates, times, currency, and numbers. This command is not supported against an online image. |
| /Set-UILangFallback | Sets the fallback default language for the system UI in the mounted offline image. This setting is used only when the language specified by the /Set-UILang option is a partially localized language. This command is not supported against an online image. |
| /Set-UILang | Sets the default system user interface (UI) language that is used in the mounted offline image. If the language is not installed in the Windows image, the command will fail. This command is not supported against an online image. |
| /Set-LayeredDriver | Sets the keyboard layered driver, with possible values of 1 to 6** |
| /Set-SysUILang | Sets the system user interface (UI) language that is used in the mounted offline image. If the language is not installed in the Windows image, the command will fail. This command is not supported against an online image. |
**/Set-LayeredDriver keyboard layered driver values:
1: PC/AT Enhanced Keyboard (101/102-Key).
2: Korean PC/AT 101-Key Compatible Keyboard/MS Natural Keyboard (Type 1).
3: Korean PC/AT 101-Key Compatible Keyboard/MS Natural Keyboard (Type 2).
4: Korean PC/AT 101-Key Compatible Keyboard/MS Natural Keyboard (Type 3).
5: Korean Keyboard (103/106 Key).
6: Japanese Keyboard (106/109 Key).
Unattended Servicing Command-Line Sub-switch
| DISM /Online sub-switch | Meaning/Notes |
|---|---|
| /Apply-Unattend | Applies an unattend.xml file to an offline image or a running operating system. |
Edge Servicing Command-Line Sub-switches
| DISM /Online vs /Image Sub-switch | Meaning/Notes |
|---|---|
| */Add-Edge | Adds Edge to a Windows image |
| */Add-EdgeBrowser | Adds Edge browser to a Windows image |
| */Add-EdgeWebView | Adds Edge WebView to a Windows image |
Provisioning Package Servicing Command-Line Sub-switches
| DISM /Online vs /Image Sub-switch | Meaning/Notes |
|---|---|
| */Get-ProvisioningPackageInfo | Get the information of provisioning package (.ppkg) |
| */Add-ProvisioningPackage | Adds applicable payload of provisioning package to the specified image |
Windows Edition Servicing Command-Line Sub-switches
| DISM /Online vs /Image Sub-switch | Meaning/Notes |
|---|---|
| /Get-CurrentEdition | Displays the edition of the current Windows image. |
| /Get-TargetEditions | /Get-TargetEditions displays a list of Windows editions that you can upgrade a Windows image to. |
| */Set-Edition | Use the /Set-Edition option to change an offline Windows image to a higher edition. You can also use /Set-Edition to change an online Windows Server operating system to a higher edition. The /ProductKey and /AcceptEula arguments are required for an online Windows Server operating system but cannot be used in any other scenario. Use the /AcceptEula argument to agree to the license terms for the higher edition. |
| /Set-ProductKey | Sets the product key of the offline image |
Command-Line Sub-switches that Differentiate /Online vs /Image
In the previous subsections, I added notes indicating the sub-switches only supported by DISM /Online or DISM /Image. The table below summarises these distinguishing sub-switches.
| Distinguishing DISM /Online vs /Image Sub-switch | Supported By DISM /Image | Supported By DISM /Online |
|---|---|---|
| /Optimize-ProvisionedAppxPackages | ✔ | ✘ |
| /Get-ReservedStorageState | ✘ | ✔ |
| /Set-ReservedStorageState | ✘ | ✔ |
| /Optimize-Image | ✔ | ✘ |
| /Add-Driver | ✔ | ✘ |
| /Set-SetupUILang | ✔ | ✘ |
| /Set-SetupUILang | ✔ | ✘ |
| /Set-SKUIntlDefaults | ✔ | ✘ |
| /Set-TimeZone | ✔ | ✘ |
| /Set-InputLocale | ✔ | ✘ |
| /Set-SysLocale | ✔ | ✘ |
| /Set-UserLocale | ✔ | ✘ |
| /Set-UILangFallback | ✔ | ✘ |
| /Set-UILangFallback | ✔ | ✘ |
| /Set-SysUILang | ✔ | ✘ |
| /Gen-LangIni | ✔ | ✘ |
| /Add-Edge | ✔ | ✘ |
| /Add-EdgeBrowser | ✔ | ✘ |
| /Add-EdgeWebView | ✔ | ✘ |
| /Get-ProvisioningPackageInfo | ✔ | ✔ |
| /Add-ProvisioningPackage | ✔ | ✔ |
| /Set-ProductKey | ✔ | ✘ |
Command Sub-switches with Arguments
Some of the DISM /Online and /Image switches sub-switches I explained in the last section have arguments. In this section, I have listed all the sub-switches of the /Online and /Image switches with arguments.
Then, I will explain what each argument does. To list the arguments of a DISM /Online or /Image sub-switch, run a command similar to the command below.
DISm /online <sub-switch> /?
The command displays all arguments of the DISM sub-switch, /Cleanup-Image and explains them.
In the following subsections, I have explained all the DISM /Online vs /Image sub-switches that have arguments. Additionally, I also explain each argument and how to use them.
“DISM /Online” or “DISM /Image ” command.
Set-OSUninstallWindow Arguments
You can use the /Set-OSUninstallWindow to set the number of days after upgrading, during which OS uninstall can be performed. The syntax of the /Set-OSUninstallWindow sub-switch is…
/Set-OSUninstallWindow /Value:<days>
This sub-switch has only one argument.
| DISM /Online vs /Image /Set-OSUninstallWindow Arguments | Meaning/Notes |
|---|---|
| /Value | Use this argument to specify the number of days. Enter a number. |
Set-NonRemovableAppPolicy Arguments
Set-NonRemovableAppPolicy sets a policy that prevents users from removing app packages that belong to a given package family. The syntax of the /Set-NonRemovableAppPolicy sub-switch is…
/Set-NonRemovableAppPolicy /PackageFamily:<PackageFamilyName> /NonRemovable:<0|1>
This DISM sub-switch has two arguments.
| DISM /Online vs /Image /Set-NonRemovableAppPolicy Arguments | Meaning/Notes |
|---|---|
| /PackageFamily | Use this argument to specify the package family of the app packages you want to prevent users from removing. |
| /NonRemovable | The /NonRemovable argument is a numerical value that determines the policy that the /Set-NonRemovableAppPolicy sets. Using a NonRemovable argument of 1 makes the package family nonremovable; an argument of 0 removes the policy. |
Set-ProvisionedAppxDataFile Arguments
Use the Set-ProvisionedAppxDataFile sub-switch to place custom data into the specified app package (.appx or .appxbundle). The specified application package must already be in the Windows image.
The syntax of the /Set-ProvisionedAppxDataFile sub-switch is…
/Set-ProvisionedAppxDataFile /CustomDataPath:<custom data path> /PackageName:<PackageName>
This DISM sub-switch has two arguments.
| DISM /Online vs /Image /Set-ProvisionedAppxDataFile Arguments | Meaning/Notes |
|---|---|
| /CustomDataPath | Use the /CustomDataPath argument to specify the custom data for the app package (.appx or .appxbundle). |
| /PackageName | Use the /PackageName argument to specify the Package Full Name of the app package (.appx or .appxbundle) to modify. |
Add-ProvisionedAppxPackage Arguments
Use the /Add-ProvisionedAppxPackage sub-switch to add one or more packages to a Windows image. The /Add-ProvisionedAppxPackage sub-switch has two syntaxes.
/Add-ProvisionedAppxPackage /FolderPath:<AppX_folder_path> [/SkipLicense] [/CustomDataPath:<custom data path>]
/Add-ProvisionedAppxPackage /PackagePath:<main_package_path>
  [/DependencyPackagePath:<dependency_package_path>]
  [/OptionalPackagePath:<optional_package_path>]
  {[/LicensePath:<license_file_path>] | [/SkipLicense]}
  [/CustomDataPath:<custom data path>]
  [/Region:<regions>]
  [/StubPackageOption:<InstallFull | InstallStub>
This DISM sub-switch has nine arguments.
| DISM /Online vs /Image /Add-ProvisionedAppxPackage Arguments | Meaning/Notes |
|---|---|
| /FolderPath | Use /FolderPath to specify a folder of unpacked package files containing a main app package (.appx), any dependency packages, and the license file. |
| /PackagePath | Use /PackagePath to specify an .appx or .appxbundle file. You can use /PackagePath when provisioning a line-of-business app online. |
| /SkipLicense | Only use /SkipLicense with apps that do not require a license on a sideloading-enabled computer. Using /SkipLicense in other scenarios may compromise an image. |
| /CustomDataPath | Use /CustomDataPath to specify the OEM custom data for the application. |
| /DependencyPackagePath | Use /DependencyPackagePath to specify the package(s) that the apps you specify in /PackagePath depend on. If the package has dependencies that are architecture-specific, you must install all of the application architectures for the dependency on the target image. For example, on an x64 target image, include a path to both the x86 and x64 dependency packages |
| /OptionalPackagePath | Use /OptionalPackagePath to specify optional .appx or .appxbundle file package paths. |
| /LicensePath | Use /LicensePath with the /PackagePath option to specify the location of the .xml file containing your application license. |
| /Region | Use /Region when you want the package to be provisioned only in specific regions. |
| /StubPackageOption | Use /StubPackageOption to define the stub behavior for an app package that is being added. You can define either InstallFull or InstallStub. |
Add-Package Arguments
Use the /Add-Package sub-switch to define the package you want to add to an image. The syntax of the /Add-Package sub-switch is…
/Add-Package /PackagePath:<path_to_package> [/IgnoreCheck] [/PreventPending]
This DISM sub-switch has three arguments.
| DISM /Online vs /Image /Add-Package Arguments | Meaning/Notes |
|---|---|
| /PackagePath | Use the /PackagePath argument to point to either a .cab file, a .msu file, or a folder. |
| /IgnoreCheck | Use the /IgnoreCheck argument to skip installation of the package if the applicability checks fail. |
| /PreventPending | Use the /PreventPending argument to skip the installation of the package if the package or Windows image has pending online actions. |
Remove-Package Arguments
Use the /Remove-Package sub-switch to remove one or more packages unless there are online, unprocessed pending actions. If online actions are pending, the resources remain in the image, and the package state is set to “Uninstall Requested.”
You must boot the image to process pending actions before the package can be removed. The /Remove-Package sub-switch has two syntaxes…
/Remove-Package {/PackagePath:<path_to_package> }
/Remove-Package {/PackageName:<name_in_image>}
This DISM sub-switch has two arguments.
| DISM /Online vs /Image /Remove-Package Arguments | Meaning/Notes |
|---|---|
| /PackagePath | Use /PackagePath to specify the path to the package .cab file you want to remove. |
| /PackageName | Use /PackageName to define the full name of the package you want to remove. |
Enable-Feature Arguments
Use the /Enable-Feature sub-switch to enable the feature specified by the /FeatureName command argument.
Here is the syntax of the /Enable-Feature sub-switch…
/Enable-Feature /FeatureName:<name_in_image> [/PackageName:<name_in_image>] [/Source:<source>] [/LimitAccess] [/All]
This DISM sub-switch has five arguments.
| DISM /Online vs /Image /Enable-Feature Arguments | Meaning/Notes |
|---|---|
| /FeatureName | Use /FeatureName to specify the feature you want to enable in the Windows image. You can specify multiple /FeatureName arguments if the features are components in the same parent package. |
| /PackageName | Use /PackageName to specify the parent package of the feature. You do not have to specify the /PackageName if it is the Windows Foundation Package. |
| /Source | You can restore and enable a feature that has previously been removed from the image. Use the /Source argument to specify the location of the files needed to restore the feature. |
| /LimitAccess | Use /LimitAccess to prevent DISM from contacting WU (Windows Update) or WSUS (Windows Server Update Service). |
| /All | Use /All to enable all parent features of the specified feature. |
Disable-Feature Arguments
The /Disable-Feature sub-switch disables the feature specified by the /FeatureName command argument.
Here is the syntax of the /Disable-Feature sub-switch…
/Disable-Feature /FeatureName:<name_in_image> [/PackageName:<name_in_image>] [/Remove]
This DISM sub-switch has three arguments.
| DISM /Online vs /Image /Disable-Feature Arguments | Meaning/Notes |
|---|---|
| /FeatureName | Use /FeatureName to specify the feature you want to disable in the Windows image. You can specify multiple /FeatureName arguments if the features are components in the same parent package. |
| /PackageName | Use /PackageName to specify the parent package of the feature. You do not have to specify the /PackageName if it is the Windows Foundation Package. |
| /Remove | Use /Remove to remove a feature without removing the feature’s manifest from the image. If you remove a feature without removing its manifest, the feature will be listed as ‘Disabled with Payload Removed’ when using /Get-FeatureInfo and can be restored and enabled using /Enable-Feature with the /Source option. |
Get-Packages Arguments
Displays information about all packages in a Windows image. Here is the syntax of the /Get-Packages sub-switch…
/Get-Packages [/Format:<output_format>]
This DISM sub-switch has one argument.
| DISM /Online vs /Image /Get-Packages Arguments | Meaning/Notes |
|---|---|
| /Format | Use the /Format argument to specify a table or list format for the output. If /Format is not specified, the output is formatted as a list. |
Get-PackageInfo Arguments
Displays information about a specific package. Use the package the /Get-Packages sub-switch to get the name (Package Identity) of the package you want to get additional information about.
Here are the two syntaxes of the /Get-PackageInfo sub-switch…
/Get-PackageInfo {/PackagePath:<path_to_package>}
/Get-PackageInfo {/PackageName:<name_in_image>}
This DISM sub-switch has two arguments.
| DISM /Online vs /Image /Get-PackageInfo Arguments | Meaning/Notes |
|---|---|
| /PackagePath | /PackagePath can point to either a .cab file or a folder. The path to the .cab file should point to the package’s original source, not where the file is installed on the image. |
| /PackageName | The name (Package Identity) of the package displayed by /Get-Packages |
Get-Features Arguments
Displays information about all features found in a specific package. If you do not specify a package name or path, all features in the image will be listed.
Here are the two syntaxes of the /Get-Features sub-switch…
/Get-Features [/PackagePath:<path_to_package>] [/Format:<output_format>]
/Get-Features [/PackageName:<name_in_image>] [/Format:<output_format>]
This DISM sub-switch has three arguments.
| DISM /Online vs /Image /Get-Features Arguments | Meaning/Notes |
|---|---|
| /PackagePath | /PackagePath can point to either a .cab file or a folder. |
| /PackageName | The name (Package Identity) of the package displayed by /Get-Packages |
| /Format | Use the /Format option to specify a table or list format for the output. If /Format is not specified, the option is formatted as a list. |
Get-FeatureInfo Arguments
The /Get-FeatureInf sub-switch displays information about a specific feature. Use /Get-Features to find the name of the feature in the image.
Feature names are case-sensitive. /PackageName and /PackagePath can be used to find a specific feature in a package.
Here is the syntaxe of the /Get-FeatureInfo sub-switch…
/Get-FeatureInfo /FeatureName:<name_in_image> [/PackagePath:<path_to_package>] [/PackageName:<name_in_image>]
This DISM sub-switch has three arguments.
| DISM /Online vs /Image /Get-FeatureInfo Arguments | Meaning/Notes |
|---|---|
| /FeatureName | Name of the feature in the Windows image. |
| /PackagePath | /PackagePath can point to either a .cab file or a folder. |
| /PackageName | The name (Package Identity) of the package displayed by /Get-Packages |
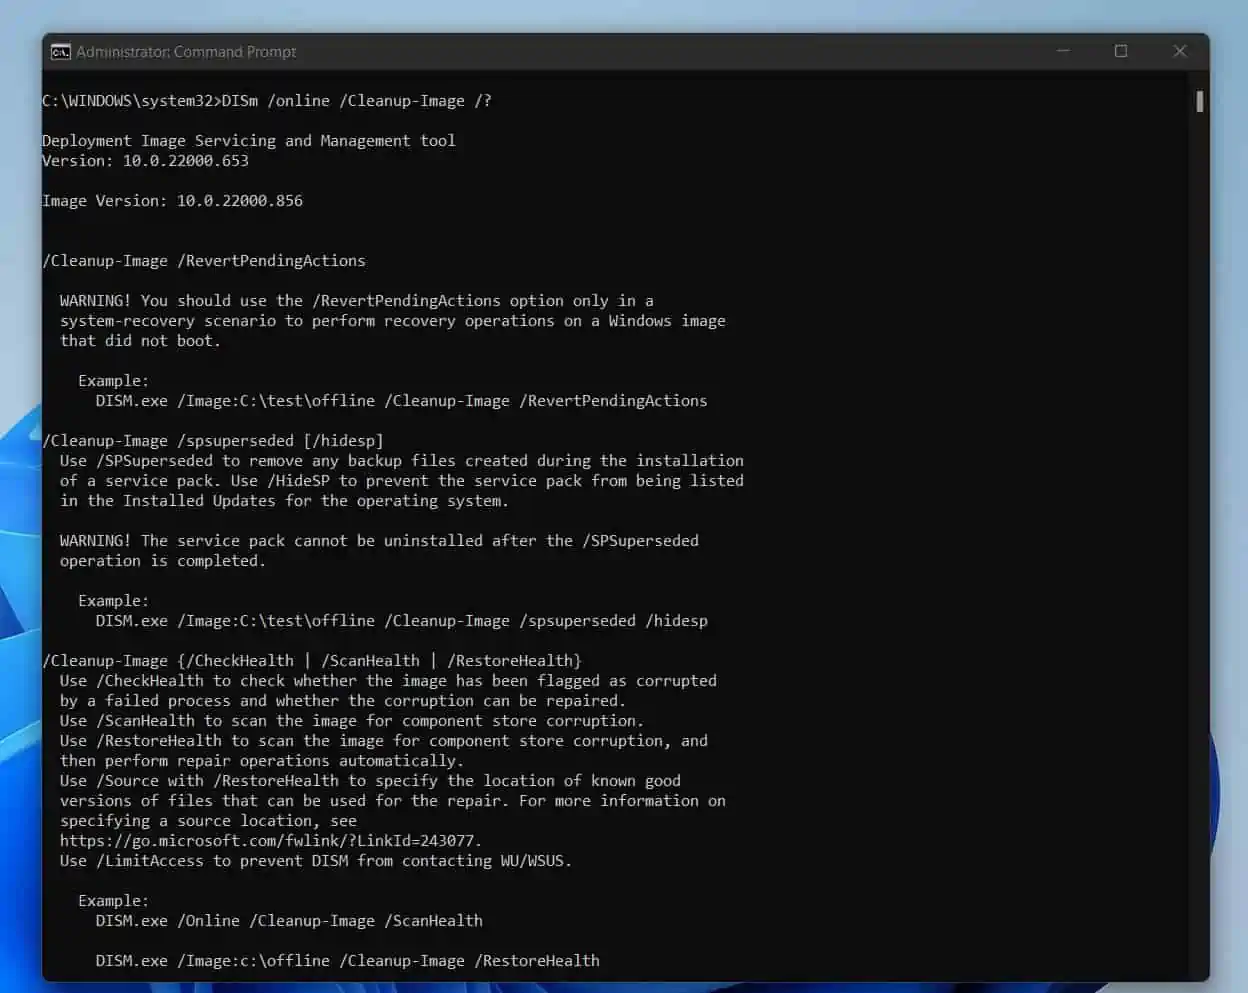
Cleanup-Image Arguments
Use the /Cleanup-Image sub-switch to perform cleanup and recovery operations on a Windows image.
Here are the seven syntaxes of the /Cleanup-Image sub-switch…
/Cleanup-Image /RevertPendingActions [/LimitAccess]
/Cleanup-Image /SPSuperseded [/HideSP] [/LimitAccess]
/Cleanup-Image /CheckHealth [/LimitAccess]
/Cleanup-Image /ScanHealth [/LimitAccess]
/Cleanup-Image /RestoreHealth [/Source] [/LimitAccess]
/Cleanup-Image /StartComponentCleanup [/ResetBase [/Defer]] [/LimitAccess]
/Cleanup-Image /AnalyzeComponentStore [/LimitAccess]
This DISM sub-switch has twelve arguments.
| DISM /Online vs /Image /Cleanup-Image Arguments | Meaning/Notes |
|---|---|
| /RevertPendingActions | You should use the /RevertPendingActions option only in a system-recovery scenario to perform recovery operations on a Windows image that did not boot. |
| /SPSuperseded | Use /SPSuperseded to remove any backup files created during the installation of a service pack. |
| /HideSP | Use /HideSP to prevent the service pack from being listed in the Installed Updates for the operating system. |
| /CheckHealth | Use /CheckHealth to check whether the image has been flagged as corrupted by a failed process and whether the corruption can be repaired. |
| /ScanHealth | Use /ScanHealth to scan the image for component store corruption. |
| /RestoreHealth | Use /RestoreHealth to scan the image for component store corruption and then perform repair operations automatically. |
| /Source | Use /Source with /RestoreHealth to specify the location of known good versions of files that can be used for the repair. Specify the path to a WIM file in /Source argument |
| /StartComponentCleanup | Use /StartComponentCleanup to clean up the superseded components and reduce the component store size. |
| /ResetBase | Use /ResetBase to reset the base of superseded components, reducing the component store size further. |
| /Defer | Use /Defer with /ResetBase to defer long-running cleanup operations to the next automatic maintenance. |
| /AnalyzeComponentStore | Use /AnalyzeComponentStore to create a report of the WinSxS component store. |
| /LimitAccess | Use /LimitAccess to prevent DISM from contacting WU (Windows Update) or WSUS |
Export-Source Arguments
Use the /Export-Source to export a set of capabilities into a new repository. Here are the two syntaxes of the /Export-Source sub-switch…
/Export-Source {/CapabilityName:<name_in_image> /Source:<source> /Target:<target> [/IncludeImageCapabilities]
/Export-Source {/Recipe:<path_to_recipe_file>} /Source:<source> /Target:<target> [/IncludeImageCapabilities]
This DISM sub-switch has five arguments.
| DISM /Online vs /Image /Export-Source Arguments | Meaning/Notes |
|---|---|
| /CapabilityName | Use the /CapabilityName to specify the capability you would like to export. You can specify multiple /CapabilityName arguments. |
| /Recipe | You can use /Recipe instead of /CapabilityName to specify multiple capabilities at a time. |
| /Source | Use the /Source argument to specify the location of the source repository. |
| /Target | Use the /Target to specify the location of the new repository. |
| /IncludeImageCapabilities | Use the /IncludeImageCapabilities to export image capabilities into the new repository. |
Add-Capability Arguments
Use /Add-Capability to add one or more capabilities to an image. Here is the syntax of the /Add-Capability sub-switch…
/Add-Capability /CapabilityName:<name_in_image> [/Source:<source>] [/LimitAccess]
This DISM sub-switch has three arguments.
| DISM /Online vs /Image /Add-Capability Arguments | Meaning/Notes |
|---|---|
| /CapabilityName | Use the /CapabilityName to specify the capability you would like to add. You can use multiple /CapabilityName arguments. |
| /Source | Use the /Source argument to specify the location of the files needed to add the capability. You can use multiple /Source arguments. |
| /LimitAccess | Use /LimitAccess to prevent DISM from contacting WU (Windows Update) or WSUS |
Remove-Capability Arguments
The /Remove-Capability sub-switch removes a capability from one image. Here is the syntax of the xx sub-switch…
/Remove-Capability /CapabilityName:<name_in_image>
This DISM sub-switch has one argument.
| DISM /Online vs /Image /Remove-Capability Arguments | Meaning/Notes |
|---|---|
| /CapabilityName | Use this argument to specify the name of the capability you want to remove from a Windows image. |
Get-Capabilities Arguments
The /Get-Capabilities sub-switch gets the capabilities in an image. Here is the syntax of the /Get-Capabilities sub-switch…
/Get-Capabilities [/Source:<source>] [/LimitAccess]
This DISM sub-switch has two arguments.
| DISM /Online vs /Image /Get-Capabilities Arguments | Meaning/Notes |
|---|---|
| /Source | Use the /Source argument to specify the location of the files needed to get the capabilities. You can use multiple /Source arguments. |
| /LimitAccess | Use /LimitAccess to prevent DISM from contacting WU (Windows Update) or WSUS. |
Set-ReservedStorageState Arguments
The /Set-ReservedStorageState sub-switch sets the state of reserved storage in an image. Here is the syntax of the /Set-ReservedStorageState sub-switch…
/Set-ReservedStorageState /State:<state>
This DISM sub-switch has one argument.
| DISM /Online /Set-ReservedStorageState Arguments | Meaning/Notes |
|---|---|
| /State | Use /State to set the Reserved Storage State of an online image. Enabled means Reserved Storage is enabled, while Disabled disables the feature. |
Optimize-Image Arguments
Performs specified configurations to an offline image. Here are the syntaxes of the /Optimize-Image sub-switch…
/Optimize-Image {/WimBoot}
/Optimize-Image {/Boot}
This DISM sub-switch has two arguments.
| DISM /Image /Optimize-Image Arguments | Meaning/Notes |
|---|---|
| /WIMBoot | Use the /WIMBoot argument to configure an offline image for installing on a WIMBoot system. |
| /Boot | Use /Boot argument to try and reduce the online configuration time that the OS spends during boot. Note that this optimization may be rendered invalid if any servicing operations are performed on the image after optimizing it. |
Remove-Driver Arguments
Removes the specified out-of-box driver from the image. This command is not supported against an online image.
Here is the syntax of the /Remove-Driver sub-switch…
/Remove-Driver /Driver:<path_to_driver.inf>
This DISM sub-switch has one argument.
| DISM /Image /Remove-Driver Arguments | Meaning/Notes |
|---|---|
| /Driver | Use the /Driver argument to specify the path to the .inf file of the driver you want to remove from the image. Removing a boot-critical driver package can make the offline Windows image unbootable. |
Add-Driver Arguments
Adds drivers to an offline image. This command is not supported against an online image.
Here is the syntax of the /Add-Driver sub-switch…
/Add-Driver {/Driver:<folder_containing_INF>} [/recurse] [/ForceUnsigned]
/Add-Driver {/Driver:<path_to_driver.inf>} [/ForceUnsigned]
This DISM sub-switch has three arguments.
| DISM /Image /Add-Driver Arguments | Meaning/Notes |
|---|---|
| /Driver | Use the /Driver argument to specify the path to a folder containing the drivers you want to install in the offline image. You can also specify the path to the .inf file of the driver you want to add to the image. |
| /recurse | If you specify the path to a folder in the /Driver argument, use /recurse to query all subfolders for drivers. |
| /ForceUnsigned | Use /ForceUnsigned to add unsigned drivers to x64-based images. |
Get-Drivers Arguments
Displays information about drivers in an image. Here is the syntax of the /Get-Drivers sub-switch…
/Get-Drivers [/Format:<output_format>] [/all]
This DISM sub-switch has two arguments.
| DISM /Online vs /Image /Get-Drivers Arguments | Meaning/Notes |
|---|---|
| /Format | Use the /Format option to specify a table or list format for the output. If /Format is not specified, the output is formatted as a list. |
| /all | The /Get-Drivers command only shows out-of-box drivers by default. Use /all switch to show all drivers in the image. |
Get-DriverInfo Arguments
Displays information about an INF file installed in the image or one that is not yet installed. Installed 3rd party drivers will be named OEM1.inf, OEM2.inf, and so on.
Use the Published Name from the /Get-Drivers list to view information on installed drivers.
Here is the syntax of the /Get-DriverInfo sub-switch…
/Get-DriverInfo /Driver:<path_to_driver.inf>
This DISM sub-switch has one argument.
| DISM /Online vs /Image /Get-DriverInfo Arguments | Meaning/Notes |
|---|---|
| /Driver | Use the /Driver argument to specify the name/path to the driver in the image. You can use the driver name in the “Published Name” column of the “/Get-Drivers /all /Format:Table” command. See the examples section. |
Export-Driver Arguments
Export all third-party driver packages from a Windows image to a destination path. Here is the syntax of the /Export-Driver sub-switch…
/Export-Driver /Destination:<path_to_destination_folder>
This DISM sub-switch has one argument.
| DISM /Online vs /Image /Export-Driver Arguments | Meaning/Notes |
|---|---|
| /Destination | Specify a folder to export the drivers in a Windows image to. If you want to add the exported drivers to another Windows image, use the “/Add-Driver {/Driver:<folder_containing_INF>}” command. |
Get-Apps Arguments
Displays information about all MSI applications in the offline image. Here is the syntax of the /Get-Apps sub-switch…
/Get-Apps [/Format:<output_format>]
This DISM sub-switch has one argument.
| DISM /Image /Get-Apps Arguments | Meaning/Notes |
|---|---|
| /Format | Use Use the /Format option to specify a table or list format for the output. The output is formatted as a list if you do not specify the /Format argument. This command is not supported against an online image. |
Get-AppPatchInfo Arguments
Displays information about installed MSP patches. This command is not supported against an online image.
Here is the syntax of the /Get-AppPatchInfo sub-switch…
/Get-AppPatchInfo [/Format:<output_format>] [/PatchCode:<patch_code_GUID>] [/ProductCode:<product_code_GUID>]
This DISM sub-switch has three arguments.
| DISM /Image /Get-AppPatchInfo Arguments | Meaning/Notes |
|---|---|
| /PatchCode | If /PatchCode is specified, information is displayed for all MSI applications that the patch is applied to. |
| /ProductCode | If /ProductCode is specified, information is displayed about all patches in the specified application. If both are specified, information is displayed only if the patch is applied to the specified application. |
| /Format | Use the /Format option to specify a table or list format for the output. If the command does not include the /Format argument, DISM will format the output as a list. |
Check-AppPatch Arguments
Displays information if the MSP patches are applicable to the offline image. You can specify multiple patch files.
This command is not supported against an online image.
Here is the syntax of the /Check-AppPatch sub-switch…
/Check-AppPatch /PatchLocation:<path_to_patch.msp> [/Format:<output_format>]
This DISM sub-switch has two arguments.
| DISM /Image /Check-AppPatch Arguments | Meaning/Notes |
|---|---|
| /PatchLocation | Use /PatchLocation to specify the path to the .msp patch file you want to check the patches in an image against. |
| /Format | Use the /Format option to specify a table or list format for the output. If /Format is not specified, the output is formatted as a list. This command is not supported against an online image. |
Set-SetupUILang Arguments
Defines the default language that will be used by setup. If Windows setup cannot use the specified language, it will fall back to English.
This command is not supported against an online image.
Here is the syntax of the /Set-SetupUILang sub-switch…
/Set-SetupUILang:<language_name> /Distribution:<path to a distribution folder>
This DISM sub-switch has one argument.
| DISM /Image /Set-SetupUILang Arguments | Meaning/Notes |
|---|---|
| /Distribution | Defines a distribution path. This is a required argument. When you use /Set-SetupUILang with the /Distribution argument, information about international settings and languages in the distribution is displayed. |
Add-Edge Arguments
Adds Edge to a Windows image. This command is not supported against an online image.
Here is the syntax of the /Add-Edge sub-switch…
/Add-Edge [/SupportPath:<path-to-directory>]
This DISM sub-switch has one argument.
| DISM /Image /Add-Edge Arguments | Meaning/Notes |
|---|---|
| /SupportPath | Use /SupportPath to specify a support path folder. The support path folder must exist. Otherwise, DISM will throw error Error: 87 – The parameter is incorrect. |
Add-EdgeBrowser Arguments
Adds Edge Browser to a Windows image. This command is not supported against an online image.
Here is the syntax of the /Add-EdgeBrowser sub-switch…
/Add-EdgeBrowser [/SupportPath:<path-to-directory>]
This DISM sub-switch has one argument.
| DISM /Image /Add-EdgeBrowser Arguments | Meaning/Notes |
|---|---|
| /SupportPath | Use /SupportPath to specify a support path folder. The support path folder must exist. Otherwise, DISM will throw error Error: 87 – The parameter is incorrect. |
Add-EdgeWebView Arguments
Adds Edge WebView to a Windows image. This command is not supported against an online image.
Here is the syntax of the /Add-EdgeWebView sub-switch…
/Add-EdgeWebView [/SupportPath:<path-to-directory>]
This DISM sub-switch has one argument.
| DISM /Image /Add-EdgeWebView Arguments | Meaning/Notes |
|---|---|
| /SupportPath | Use /SupportPath to specify a support path folder. The support path folder must exist. Otherwise, DISM will throw error Error: 87 – The parameter is incorrect. |
Get-ProvisioningPackageInfo Arguments
Get the information on a provisioning package. This command is not supported against an online image.
Here is the syntax of the /Get-ProvisioningPackageInfo sub-switch…
/Get-ProvisioningPackageInfo /PackagePath:<packge_path>
This DISM sub-switch has one argument.
| DISM /Online vs /Image /Get-ProvisioningPackageInfo Arguments | Meaning/Notes |
|---|---|
| /PackagePath | Use the /PackagePath argument to specify the path to the .ppkg provisioning package file. |
Add-ProvisioningPackage Arguments
Adds applicable payload of provisioning package to the specified image. Here is the syntax of the /Add-ProvisioningPackage sub-switch…
/Add-ProvisioningPackage /PackagePath:<packge_path> [/CatalogPath:<path>]
This DISM sub-switch has two arguments.
| DISM /Online vs /Image /Add-ProvisioningPackage Arguments | Meaning/Notes |
|---|---|
| /PackagePath | Use /PackagePath to specify the path to a .ppkg package file |
| /CatalogPath | Use /CatalogPath to specify the catalog path |
Set-Edition Arguments
Use the /Set-Edition sub-switch to change an offline Windows image to a higher edition.
You can also use /Set-Edition to change an online Windows Server operating system to a higher edition.
Here is the syntax of the /Set-Edition sub-switch…
/Set-Edition:<edition_ID> [/ProductKey:<product_key>] [/AcceptEula | /GetEula:<path>]
This DISM sub-switch has three arguments.
| DISM /Online vs /Image /Set-Edition Arguments | Meaning/Notes |
|---|---|
| /ProductKey | Use the /ProductKey argument to specify the product key for the higher Windows edition |
| /AcceptEula | Use the /AcceptEula argument to agree to the license terms for the higher edition. |
| /GetEula | Use the /GetEula: argument to choose a location to save the Eula so that you can review it. |
DISM /Online vs /Image Command Examples
This detailed guide that compares DISM /Online vs /Image command line options has covered a lot of grounds. With all you’ve learned so far, you should be ready to dive into some real examples.
List All Drivers in a Windows Image
To list all the drivers in an offline mounted Windows image, run the command below.
dism /image:C:\MountWin11 /Get-Drivers /all /Format:Table
Alternatively, you can run the command against a running Windows Operating System using the /Online switch instead of the /Image switch.
dism /online /Get-Drivers /all /Format:Table
To save the drivers in a text file, run the report below.
dism /image:C:\MountWin11 /Get-Drivers /all /Format:Table > d:\report\drivers.txt
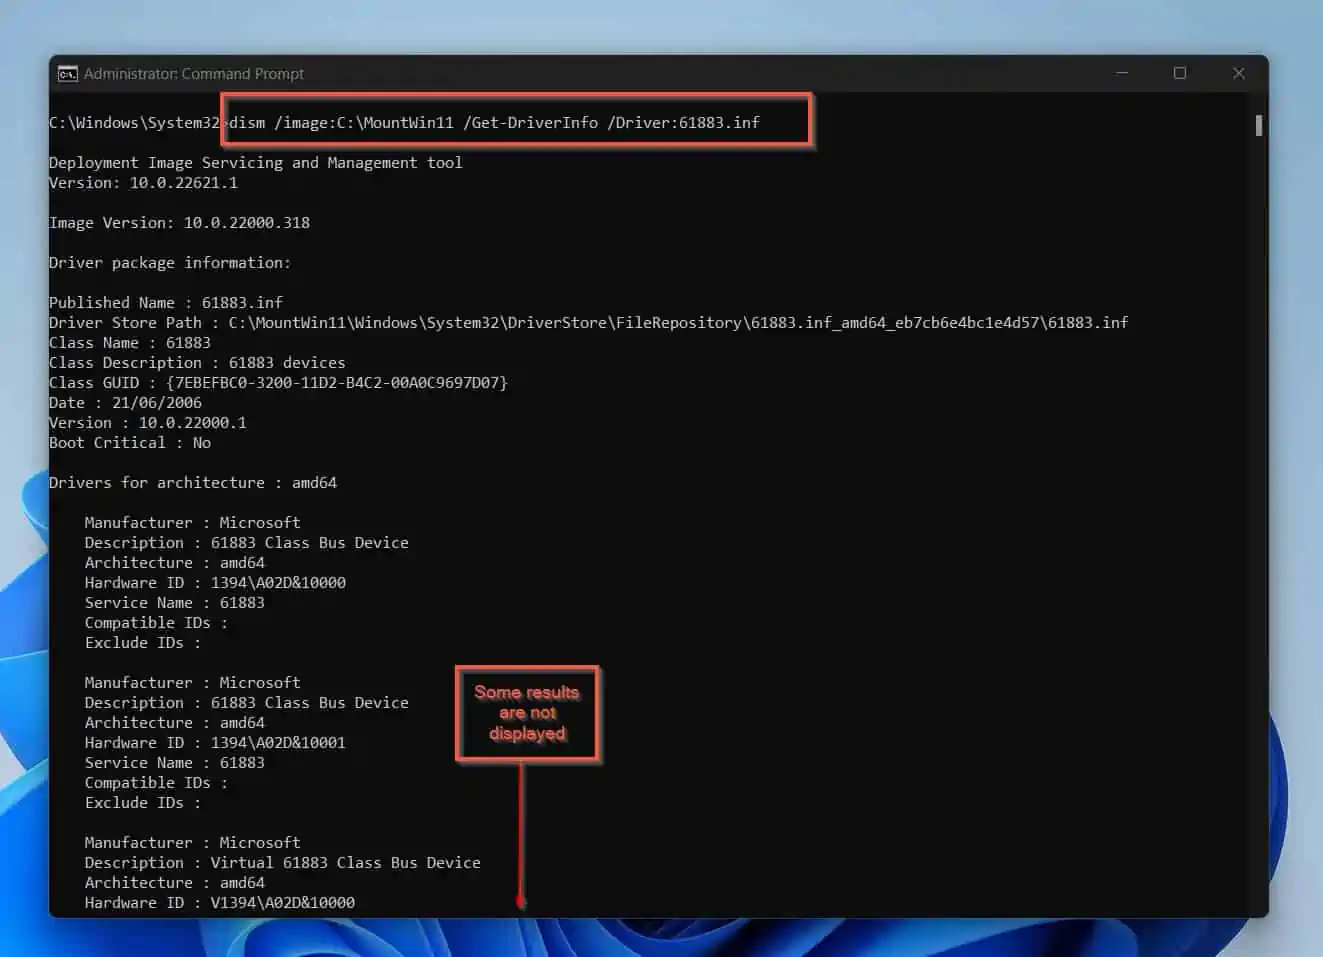
Get Information About a Driver in a Windows Image
In the last example, I showed you how to list all drivers installed in a Windows image. The first column of the result of the command in that example is called “Published Name”.
Note the .inf driver name in the “Published Name” column of the /Get-Drivers DISM command. Then, display the details of the driver with the command below:
dism /image:C:\MountWin11 /Get-DriverInfo /Driver:61883.inf
The last command displayed the information in the screenshot below.
Display Information About All MSI Applications in an Offline Windows Image
DISM.exe /Image:C:\MountWin11 /Get-Apps
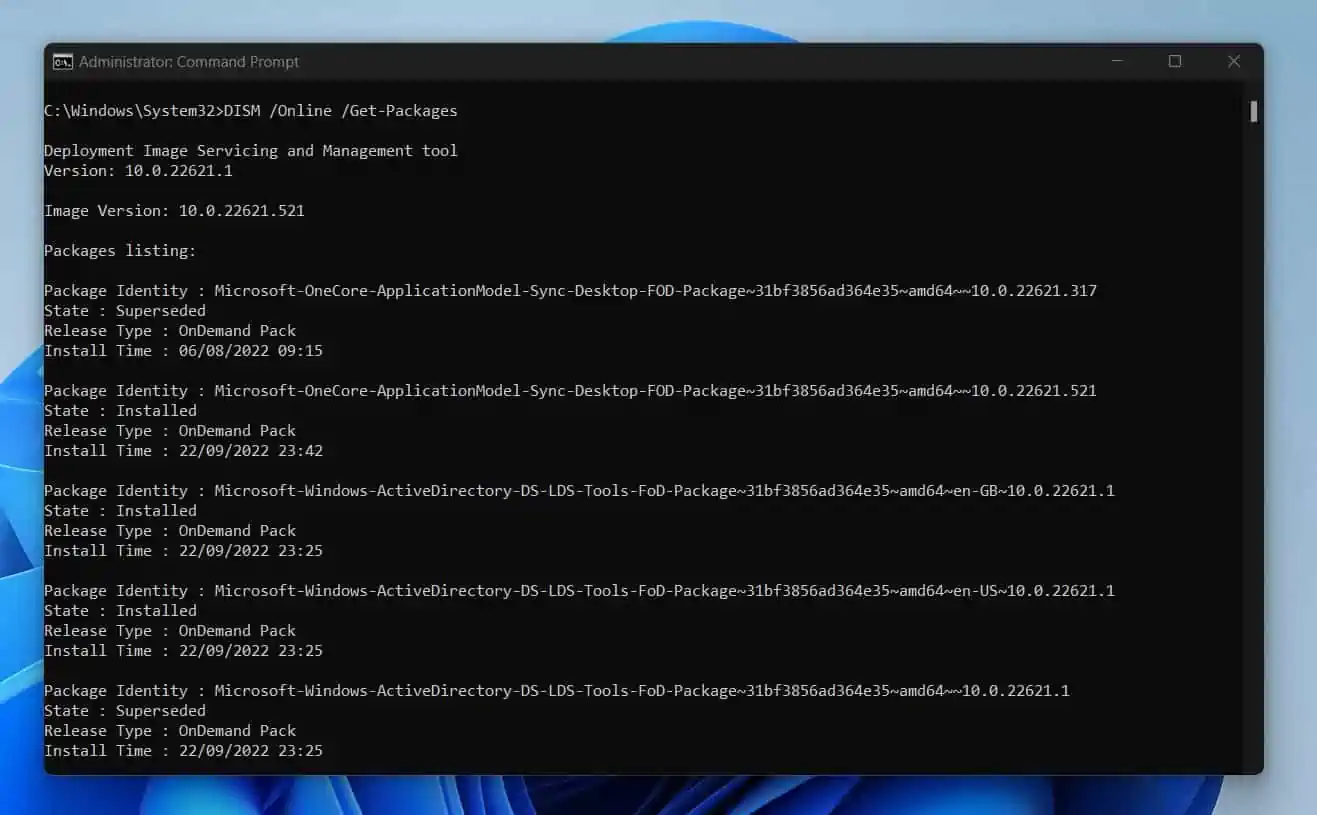
Use “DISM /Online /Get-Packages” Command to Display All Packages
You can use the /Get-Packages sub-switch of the DISM /Online or DISM /Image command to list all the packages in a Windows image.
To list the packages in a running Windows Operating System, use the DISM /Online command with the /Get-Packages sub-switch.
DISM /Online /Get-Packages
The above command will display the packages in my Windows 11 in a list.
Alternatively, you can display the result in a table by including the /Format argument of the /Get-Packages sub-switch.
DISM /Online /Get-Packages /Format:table
This last command presents the result in a table.

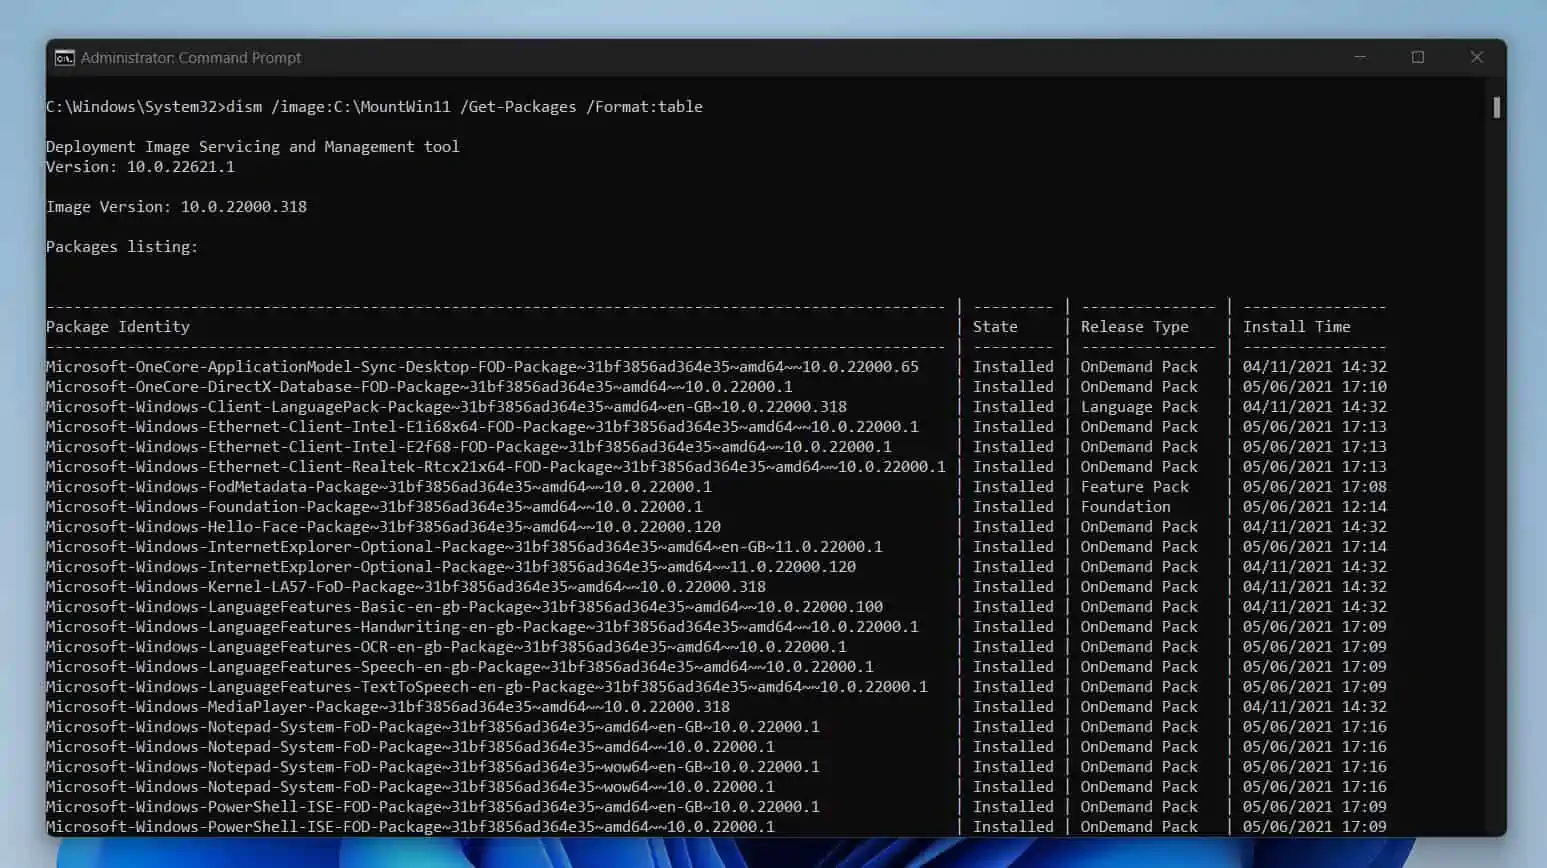
Use “DISM /Image /Get-Packages” Command to Display All Packages
In the last example, I showed you how to use the “DISM /Image /Get-Packages” command to display all the packages in a running Windows Operating System.
You can also use the /Get-Packages sub-switch to display the packages in a mounted offline image (WIM, VHD, or VHDX). However, you must replace the /Online switch with the /Image.
The sample command below displays all packages in a Windows 11 WIM I mounted in C:\MountWin11.
dism /image:C:\MountWin11 /Get-Packages /Format:table
Use DISM to Reduce the Component Store Size of a Running Windows Operating System
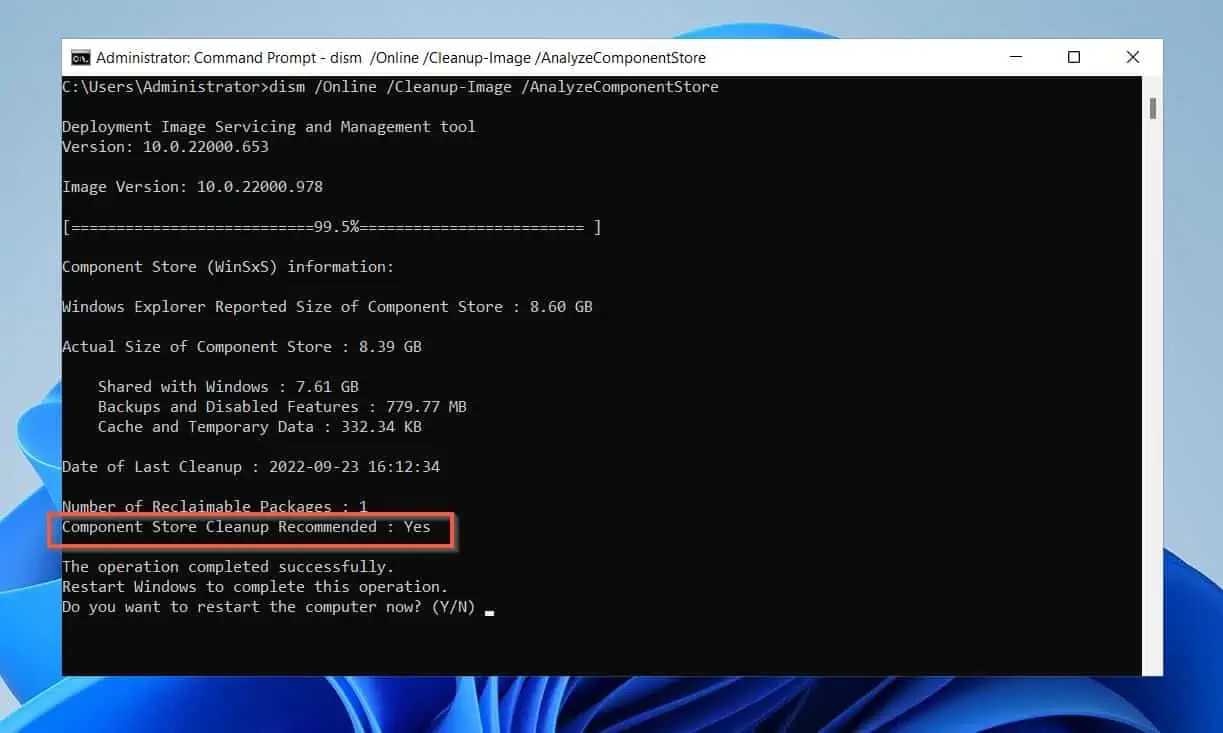
Before you run the /StartComponentCleanup command, you should first run the /AnalyzeComponentStore command. Here is a command that analyzes the component store of my running Windows 11.
dism /Online /Cleanup-Image /AnalyzeComponentStore
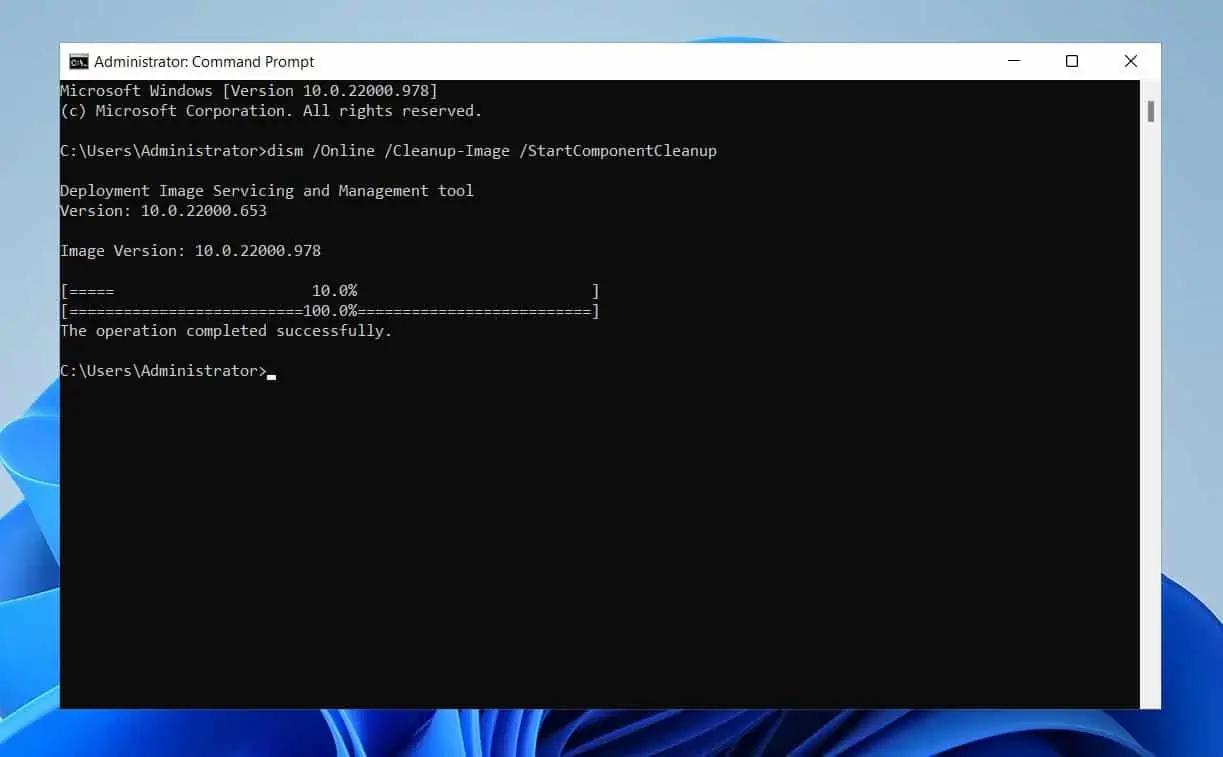
When you run the /AnalyzeComponentStore command, DISM returns a result that includes whether you need to run the /StartComponentCleanup. If you run the /AnalyzeComponentStore command, DISM may prompt you to restart the computer; type Y.
After your PC restarts, run the /StartComponentCleanup command.
dism /Online /Cleanup-Image /StartComponentCleanup
Use DISM to Reduce the Store Component Size Further
In the last example, I showed you how to use the “/Cleanup-Image /StartComponentCleanup” command to reduce the component store size of a Windows image.
In addition to that, you can reduce the size of the component store further by running the “/Cleanup-Image /StartComponentCleanup /ResetBase” command.
DISM /Online /Cleanup-Image /StartComponentCleanup /ResetBase
You can also run the command on a Mounted Windows image…
dism /image:C:\MountWin11 /StartComponentCleanup /ResetBase
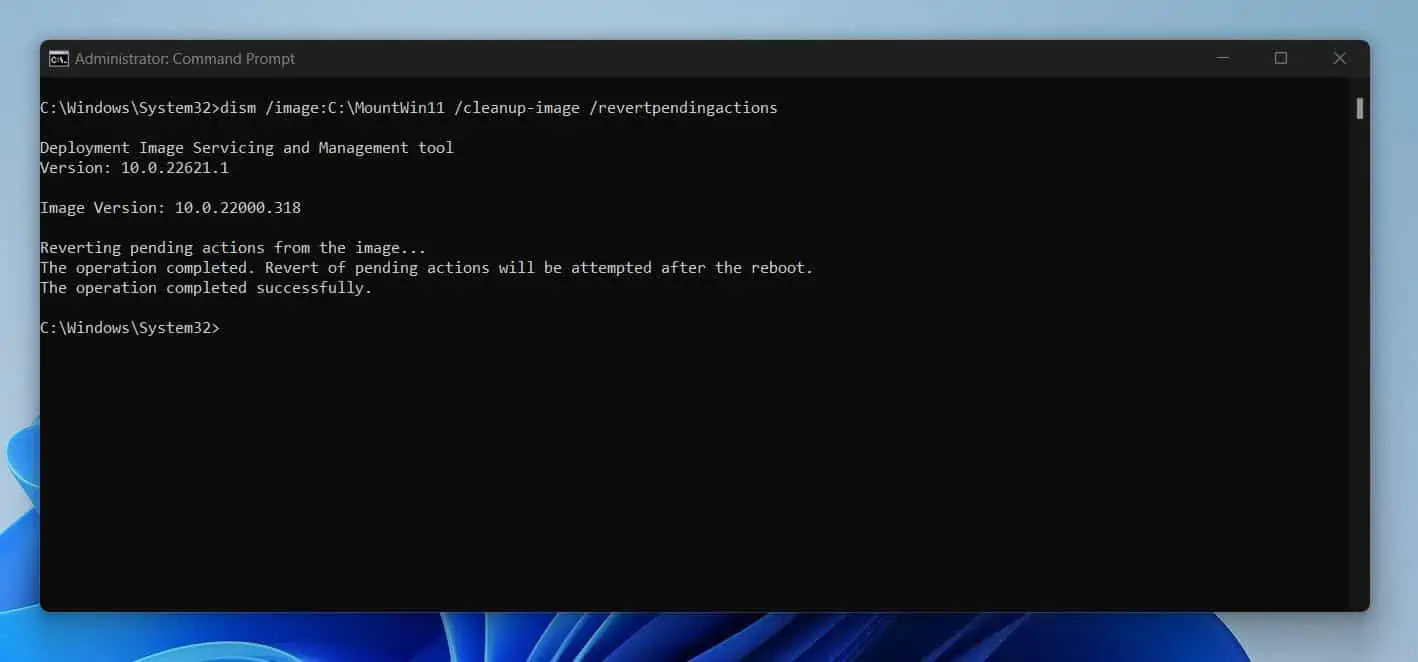
Use DISM to Repair a Windows Image that Does Not Boot
You can use the DISM command to repair Windows. Use the command below to repair a mounted online Windows image.
dism /image:C:\MountWin11 /cleanup-image /revertpendingactions
For a running Operating System, use the command below.
dism /online /cleanup-image /revertpendingactions
If your PC does not start to Windows, start it in recovery mode. Then, open the command prompt in recovery mode and run the above command.
When you run the command, DISM will prompt you to restart your PC to attempt reverting pending actions.
Frequently Asked Questions
The /Online DISM switch tells DISM that it will be servicing a running Windows Operating System. By “running Windows Operating System”, I mean Windows 10, Windows 11 or Windows Servers.
An offline Windows image is a Windows WIM, VHD or VHDX file. In other words, an offline Windows image is a Windows image that is not currently installed on a compouter and running.
To run DISM against an offline Windows image, follow the steps below:
i) Mount the offline Windows image (WIM, VHD, or VHDX) to a folder
ii) Run the DISM command by specifying the /Image swicth as shown below
DISM /Image:
To learn about the and , read the full Dism /Online vs /Image: Differences and Applications guide.
The “DISM /Online Cleanup-Image /RestoreHealth” command scans a running Windows Operating System for for component store corruption and then perform repair operations automatically.
In other words, the “DISM /Online Cleanup-Image /RestoreHealth” repairs a running Windows Operating System.
No, there is no DISM command line option that wipes the data on your PC.
Conclusion
DISM is one of the most versatile Windows command line tools. The command line tool gives you vast options to service a running Operating System as well as an offline Windows image.
Talking about “running Operating System” and “offline Windows image”, DISM uses different switches to service a running Operating System and a different switch to service an offline Windows image.
This is the main difference between DISM /Online vs /Image switches.
Specifically, when you want to use DISM to service running Operating System, you specifiy the /Online switch. On the contrary, to service a mounted WIM, VHD, or VHDX Windows image, specify the /Image switch.
This DISM ultimate guide covered everything you need to know about all the sub-switches and arguments of DISM /Online vs /Image command line switch.
I hope that the hours I spent writing this comprehensive DISM guide has been userful to you by providing you every information you need to know about DISM /Online vs /Image!
If you found the guide helpful, kindly spare 2 minuites to share your thoughts about this guide by responding to the “Was this page helpful?” question below.