Do you need help configuring an Azure VM as a DC in an on-prem Active Directory domain? This article covers all the steps to add your first Azure VM to your hybrid on-prem-azure-AD environment.
Step 1 of 9: Create and Configure VNet and VNet Gateway (Azure)
The first step to setting up an Azure VM as DC in an on-prem Active Directory is to create an Azure Virtual Network.
In this section, you’ll create an Azure Virtual Network (Azure VNet). When you create an Azure VNet, you must include an address space in the process.
Additionally, the VNet requires a Virtual Network gateway that connects the VNet to the internet. However, before creating a VNet gateway, you must create a gateway subnet, which is named “GatewaySubnet” by default and cannot be changed.
1 of 3: Create an Azure VNet and add Address Space and Subnets
- Sign in to portal.azure.com, click on the menu, and select “Create a new resource.”
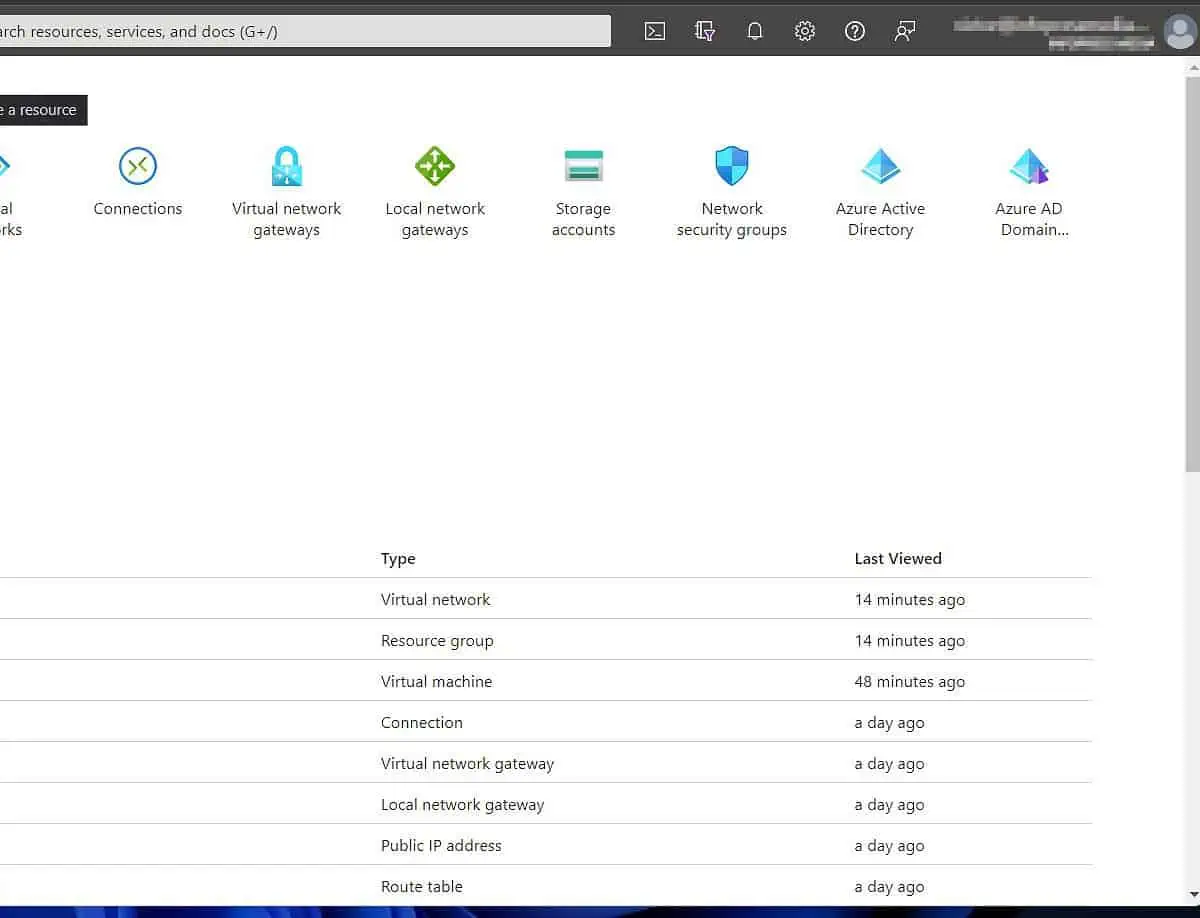
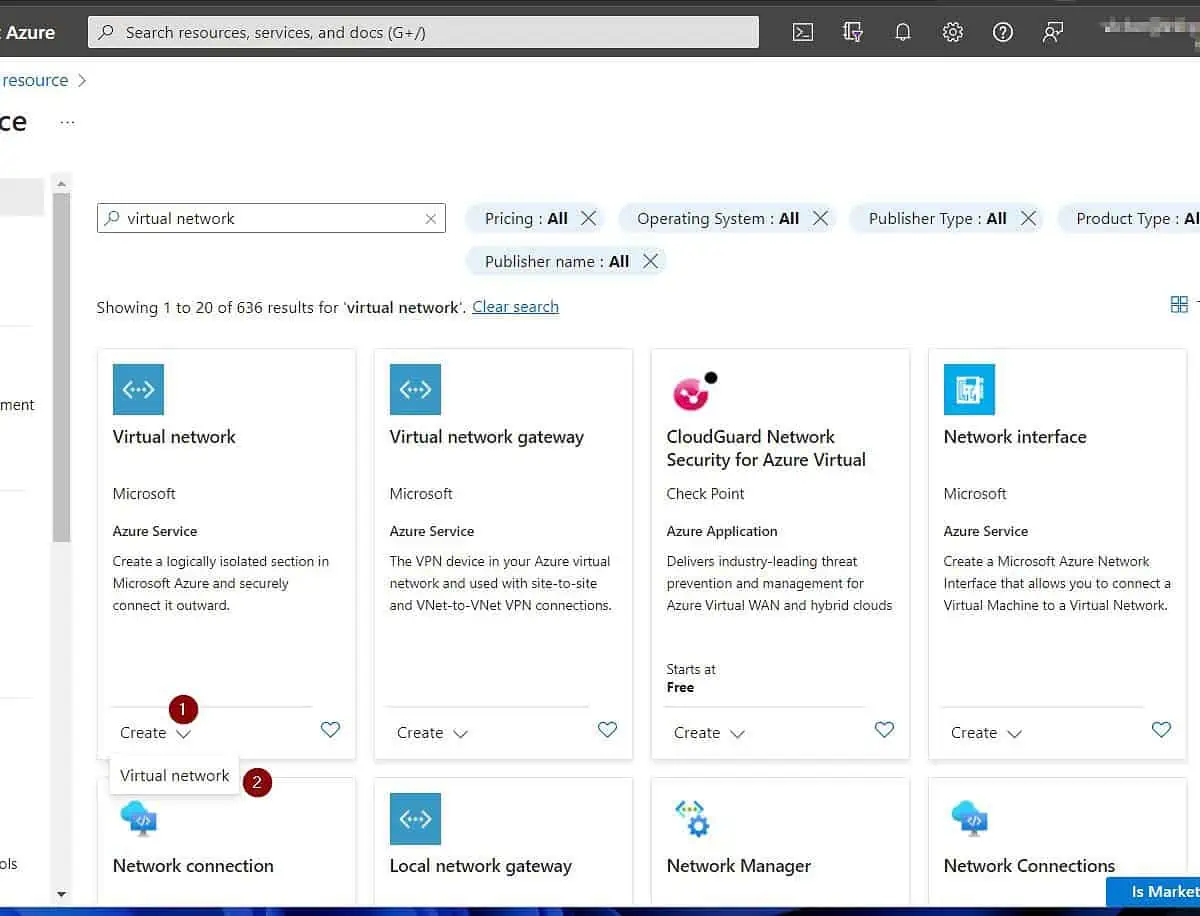
- Then, when the “Create a resource” page opens, search for and open “virtual network.”

- At the bottom of the “Virtual network” resource, click “Create” and choose “Virtual network.”
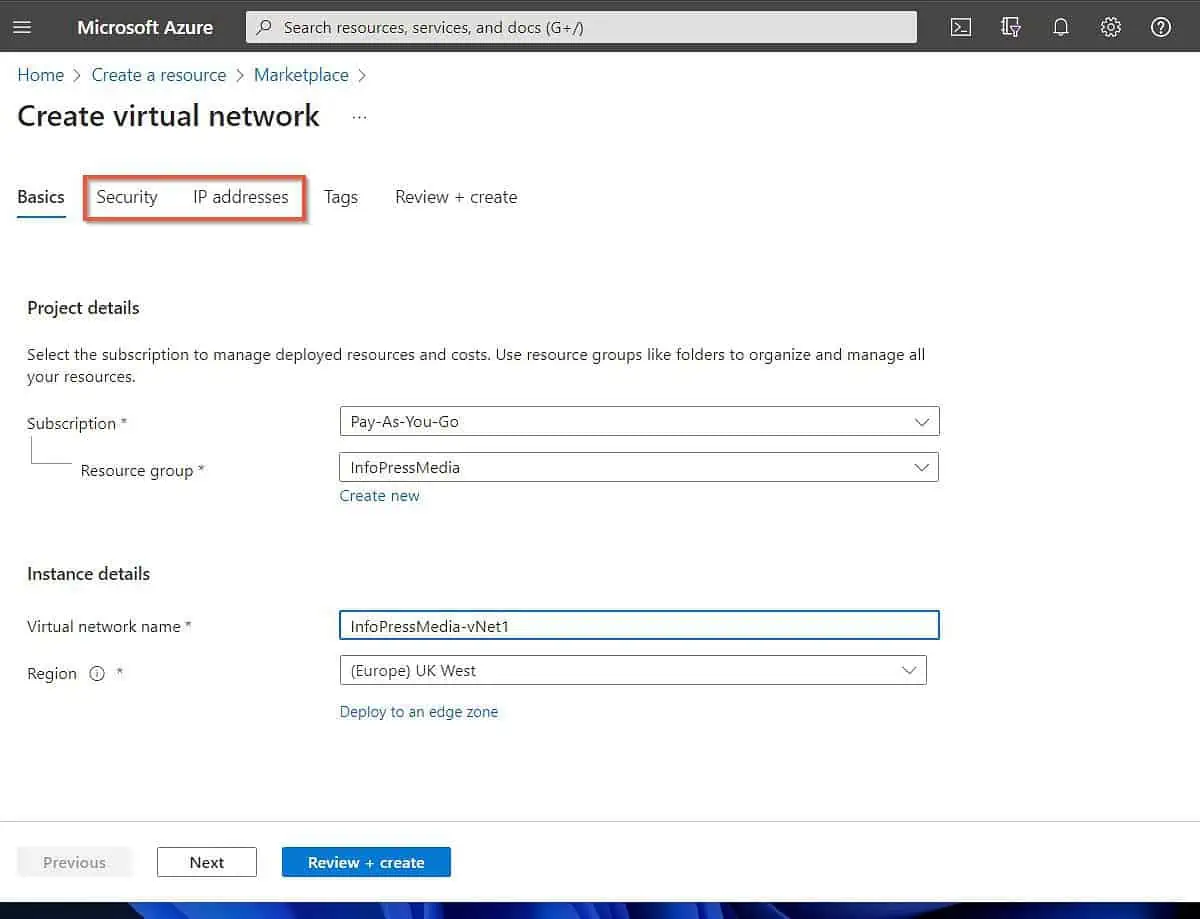
- Once the “Create virtual network” page opens, select a subscription if you have more than one. After that, choose a resource group or create a new one.
Finally, give your VNet a name, and pick an Azure region to deploy it.
When you finish, if you need to configure security features such as Azure Bastion, Azure Firewall, or DDoS Network Protection, click the Security tab. Otherwise, click the “IP address” tab.
For this guide, I’ll skip the security tab.
- On the “IP address” tab, Azure populates an IPv4 address space. You can edit the “default” subnet, add a new one or add more.
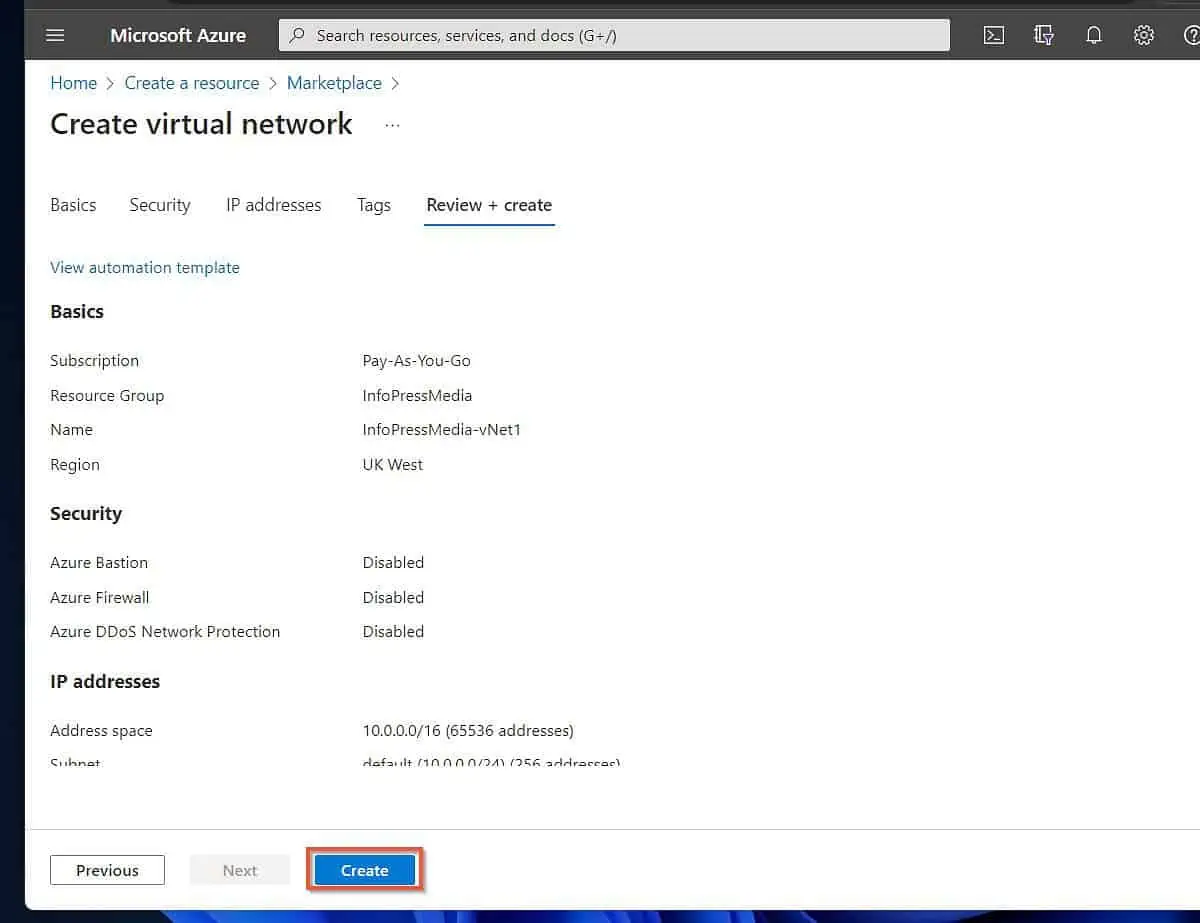
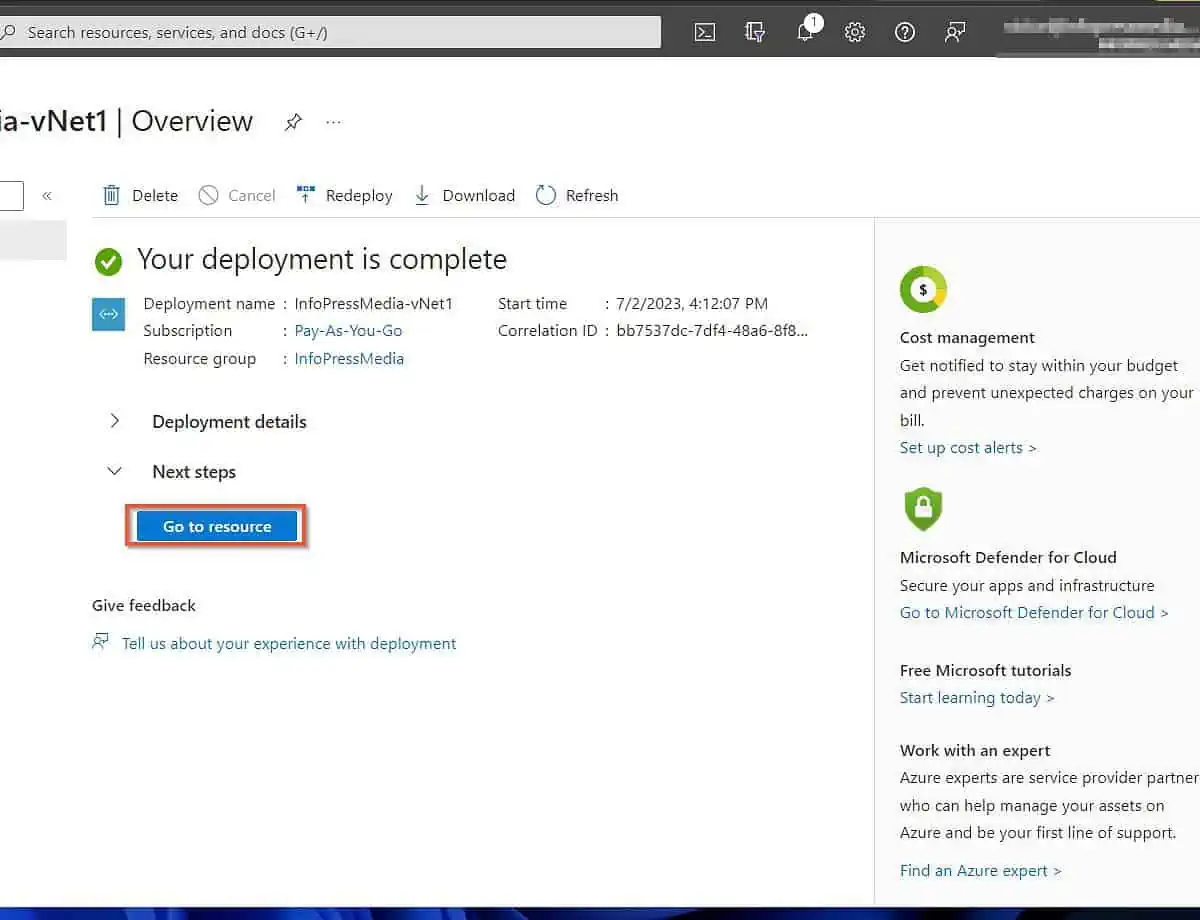
After configuring the IP address subnets, click “Review + create.” Then wait for Azure to validate your configurations and click “Create.”
When Azure creates the VNet, click “Go to resource,” then proceed to 2 of 3 below.
2 of 3: Add a GatewaySubnet to the VNet
- On the Settings menu of the VNet, click “Subnets.” After that, click “+ Gateway subnet.”
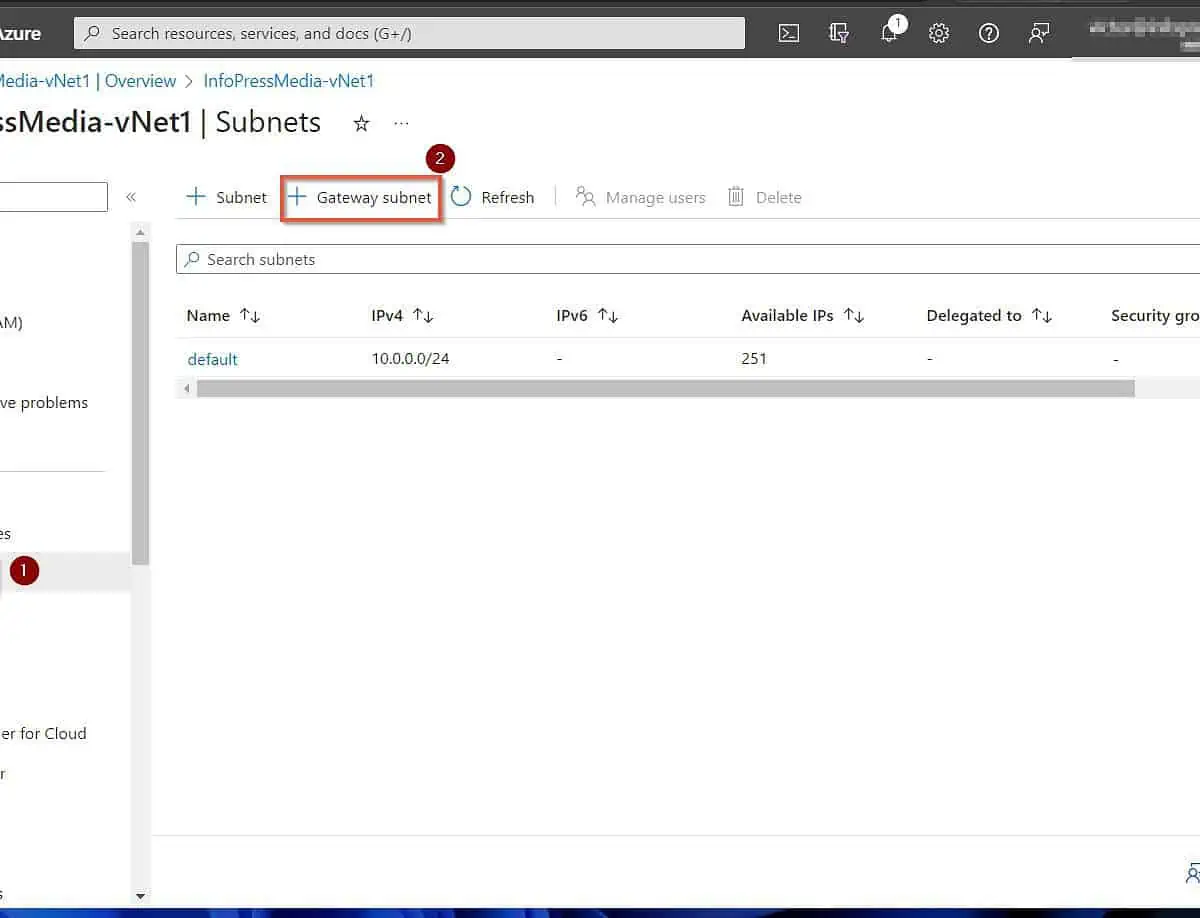
- Finally, enter an IP address space for the GatewaySubnet, configure other settings as required, and click Save.
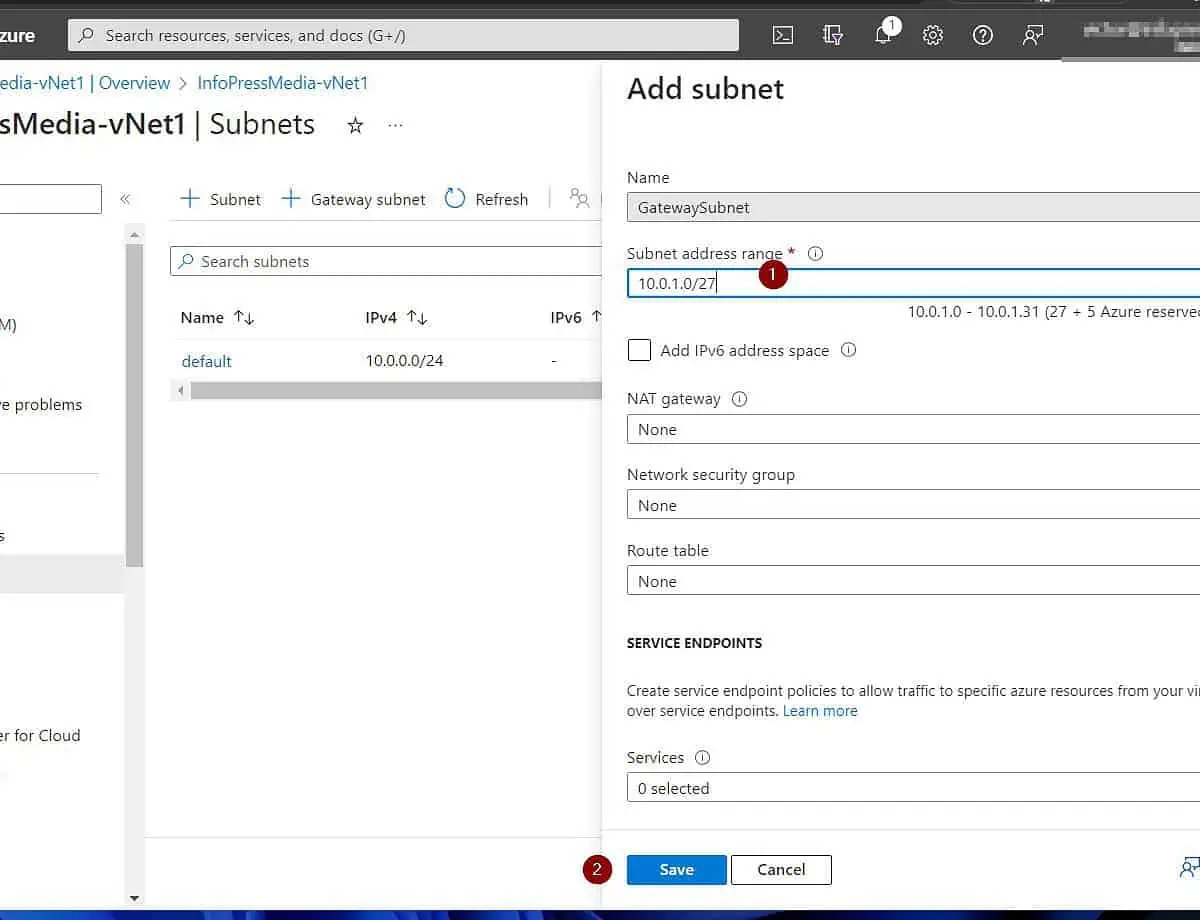
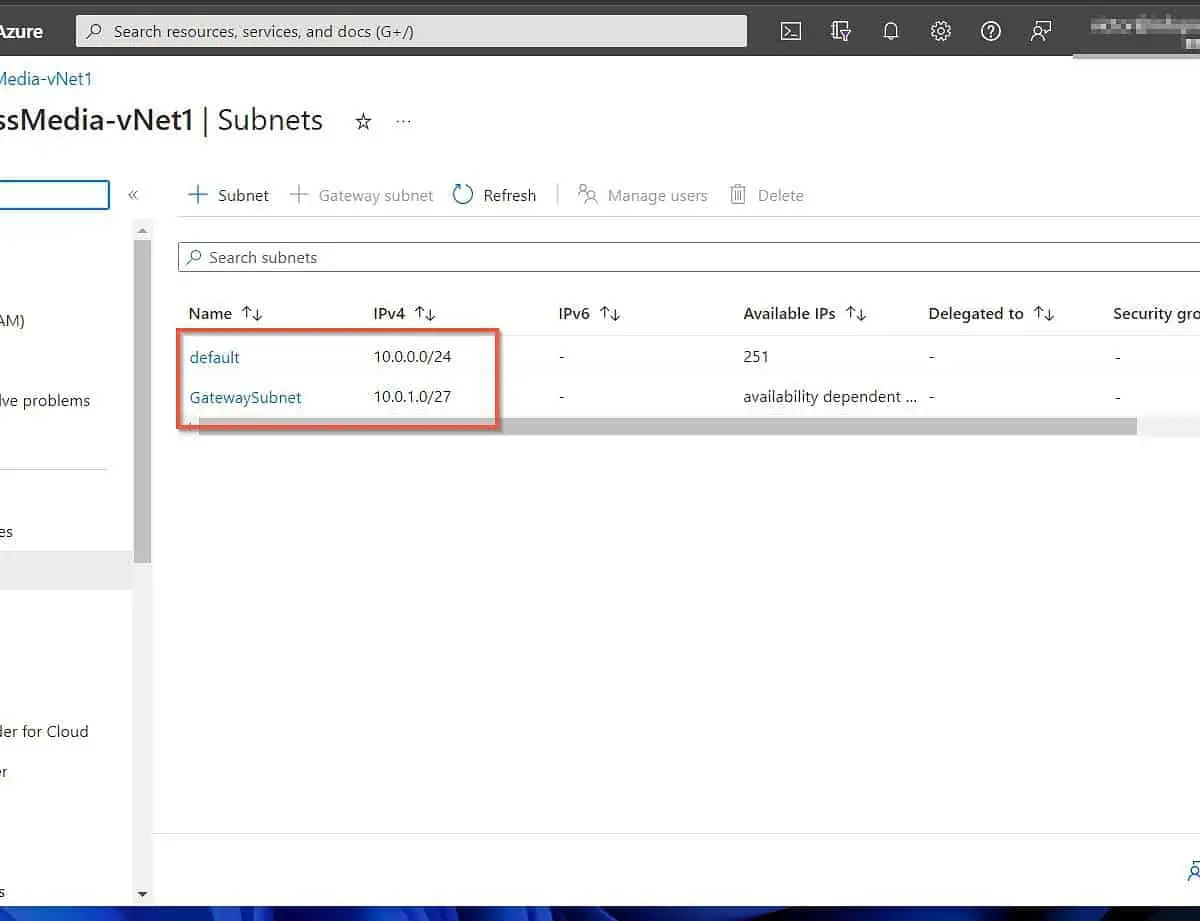
After saving your GatewatSubnet, the VNet will now have two subnets.
3 of 3: Create a Virtual Network Gateway Linked to the VNet
- Search for “virtual network gatways” and choose it from the results.
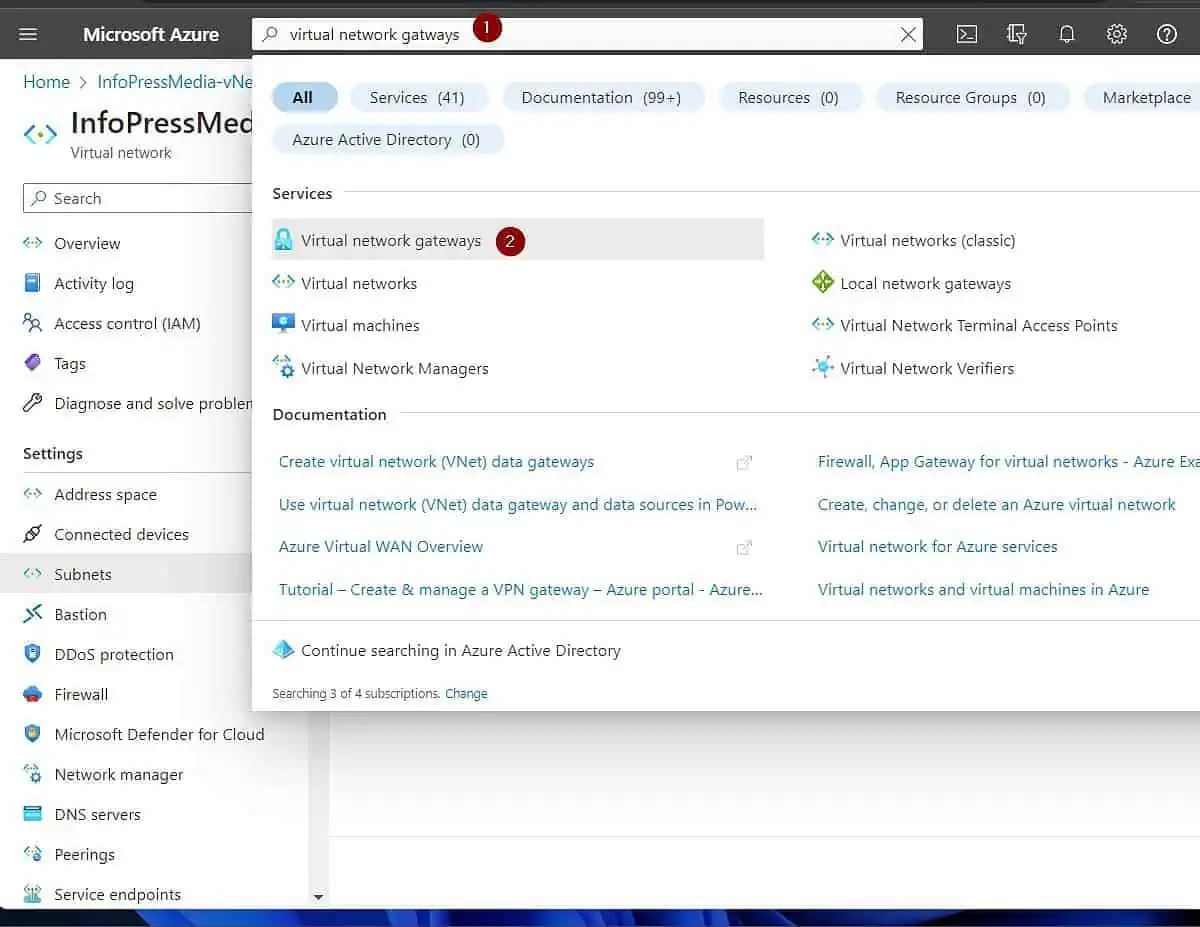
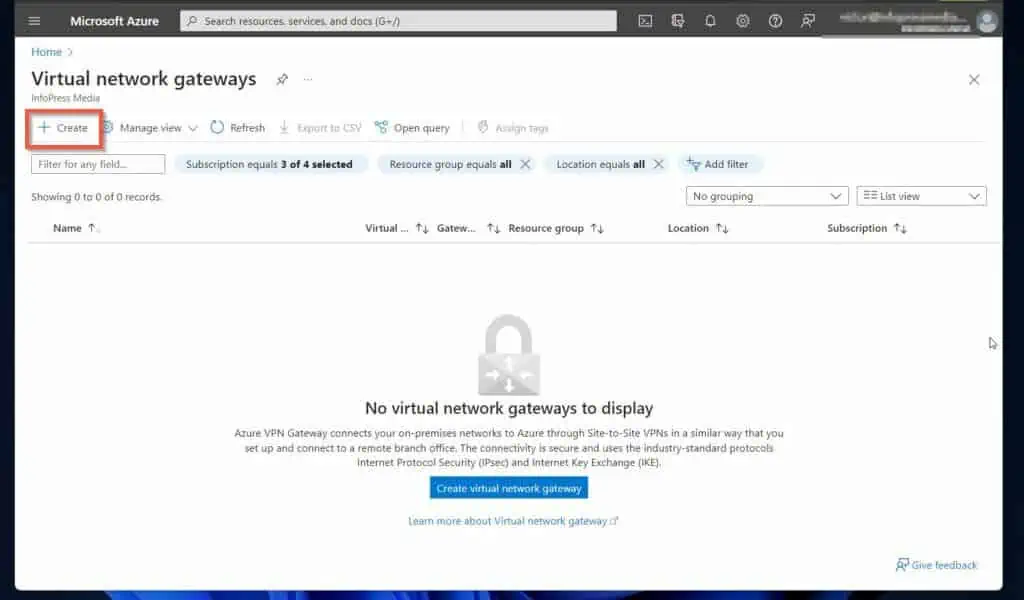
- Once the “Virtual network gateways” page opens, click “+ Create.”
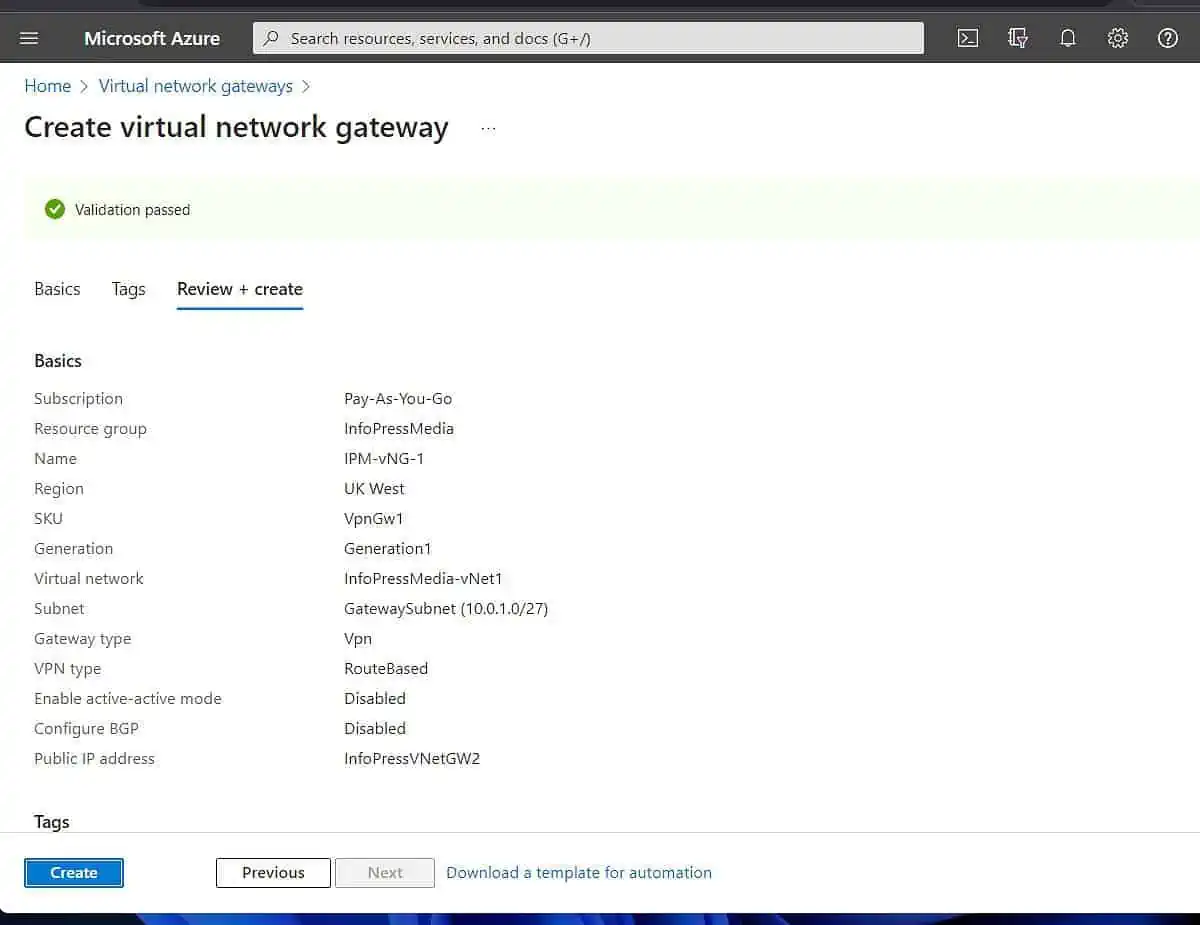
- Then, enter the details of the Create virtual network gateway. Select a subscription, name the VNet gateway, and select an Azure Region.
Select VPN as the “Gateway type.” Then, on the “VPN type,” select “Route-based.”
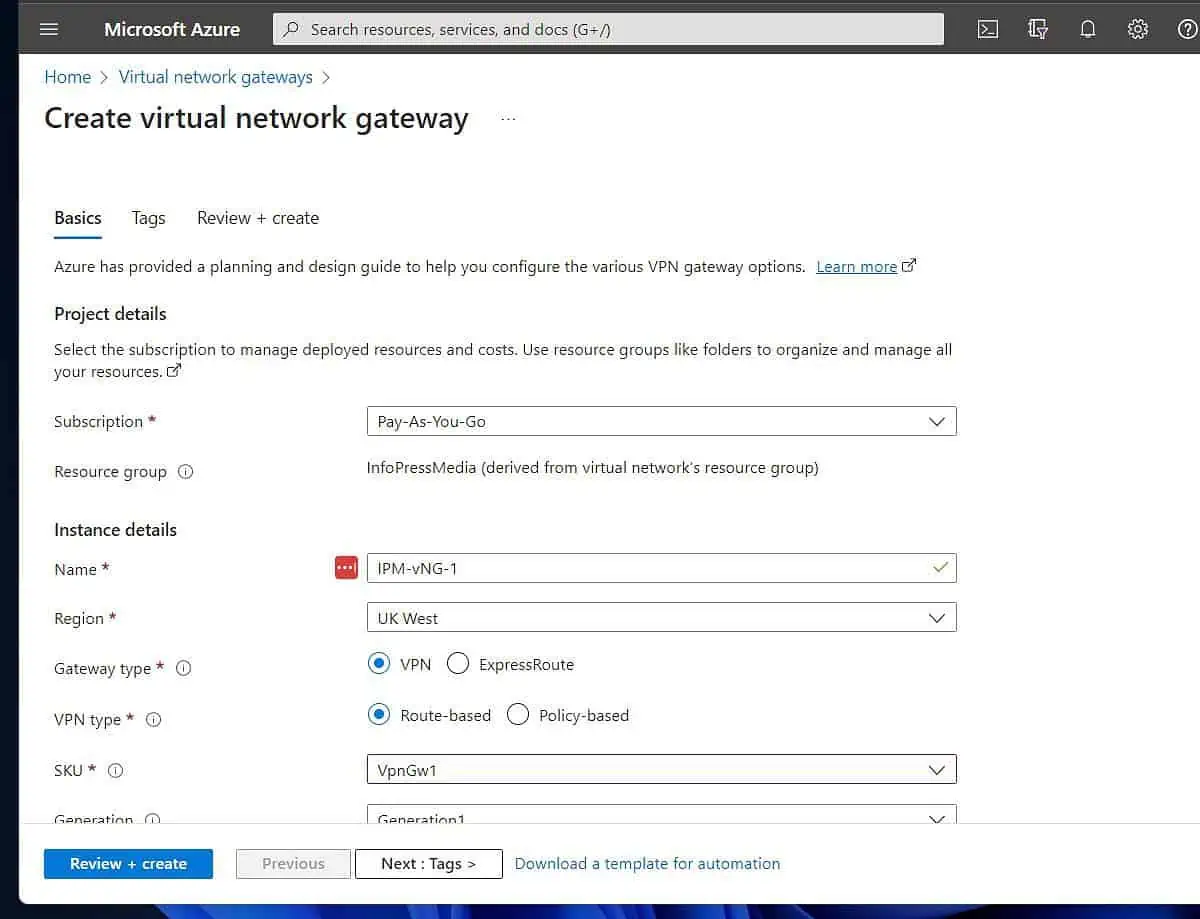
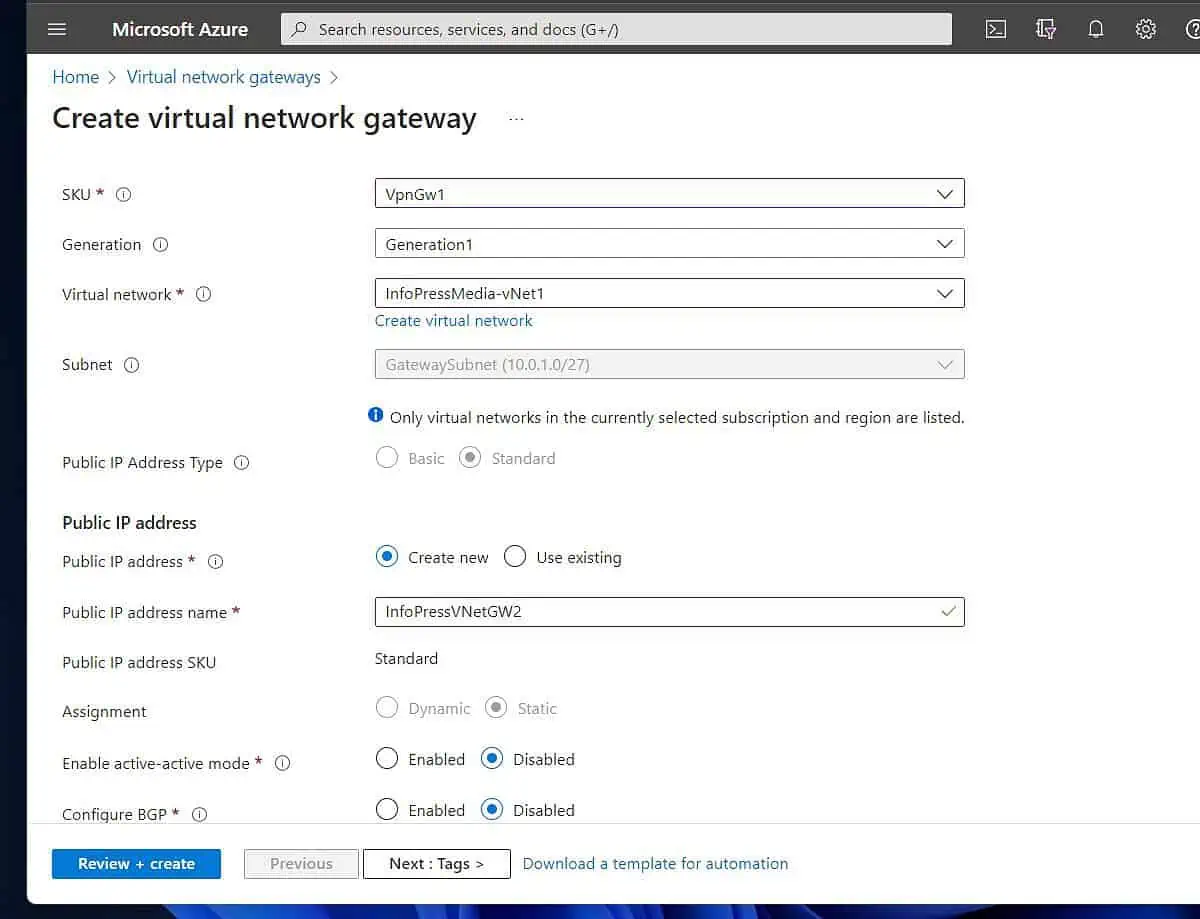
Scroll down and choose a SKU for the VNet gateway. Next, select the VNet you created earlier as the Virtual network.
Once you do that, the wizard automatically chooses the GatewaySubnet you created in 2 of 3 earlier. Also, configure the “Public IP address” section.
When you’re done, click “Review + create” and wait for Azure to validate your configuration.
- If all goes according to plan, the validation should pass. To create the VNet gateway, click “Create.”
Step 2 of 9: Configure the NICs on the Windows RRAS Server (On-prem)
As I hinted earlier, before configuring an Azure VM as an additional DC on the on-prem Active Directory, the VM must communicate with the on-prem network.
To achieve this, the Azure VNet the VM belongs to must be connected on a site-to-site mode with the on-prem VPN device.
In this configuration, I am using a Windows Server 2019 Routing and Remote Access Server as my on-prem VPN device. The server must have two NICs – one connected to the internet LAN, the second to the internet.
Both NICs should have TCP/IP v4 enabled. Finally, the intranet NIC should not be connected to the internet, while the internet one should.
In this section, you’ll learn how to configure the network cards of the Windows RRAS Server.
- Open Server Manager, click Local Server, and finally, click on one of the NICs

- Rename the NICs, “Intranet,” and “Internet.”
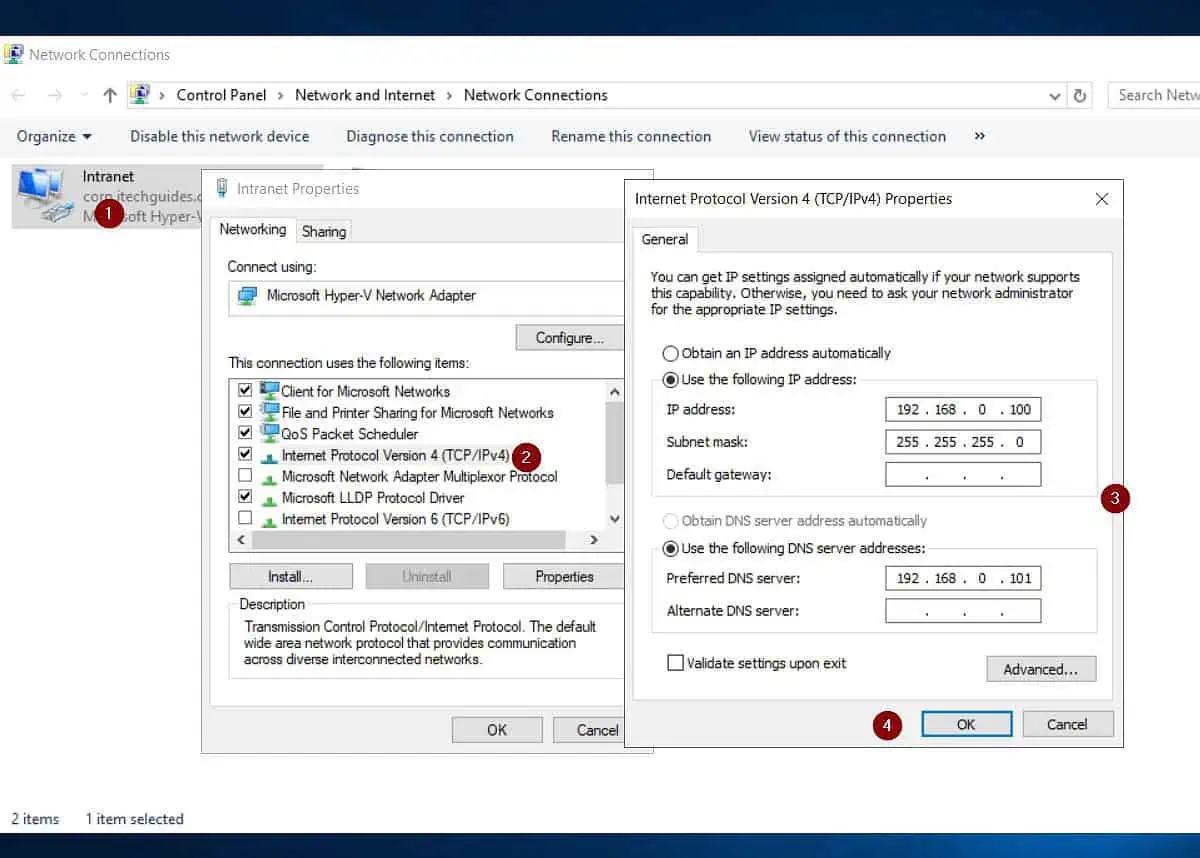

- Open the TCP/IP v4 of the internet NIC and click on Advanced. Then select the WINS tab, check Disable NetBIOS over TCP/IP, and click OK.

Step 3 of 9: Install Routing and Remote Access Server Role (On-prem)
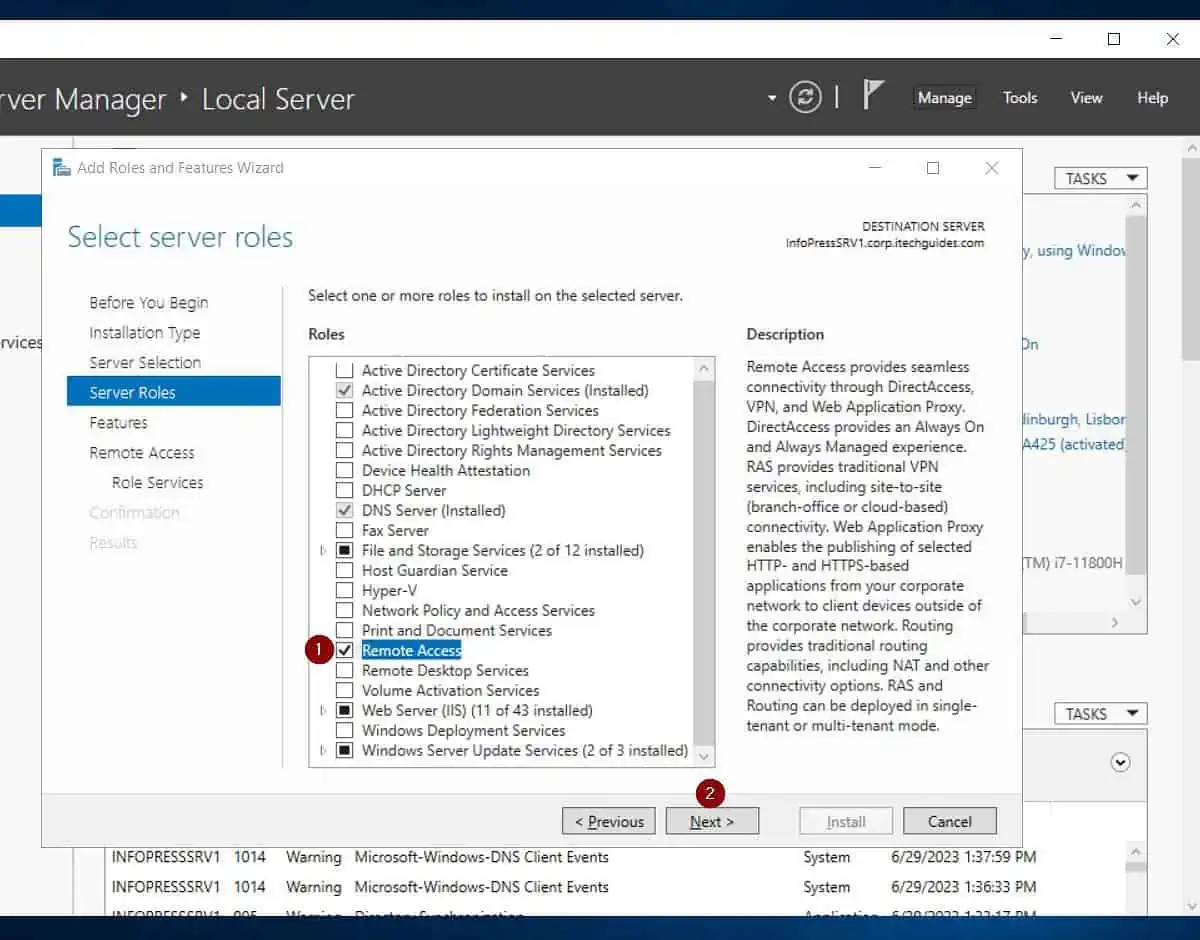
- From Server Manager, click Manage -> Add Roles and Features.

- On the first three pages of the wizard, accept the defaults, and click Next until you get to the “Select server roles” page. Then, check “Remote Access” and click Next.
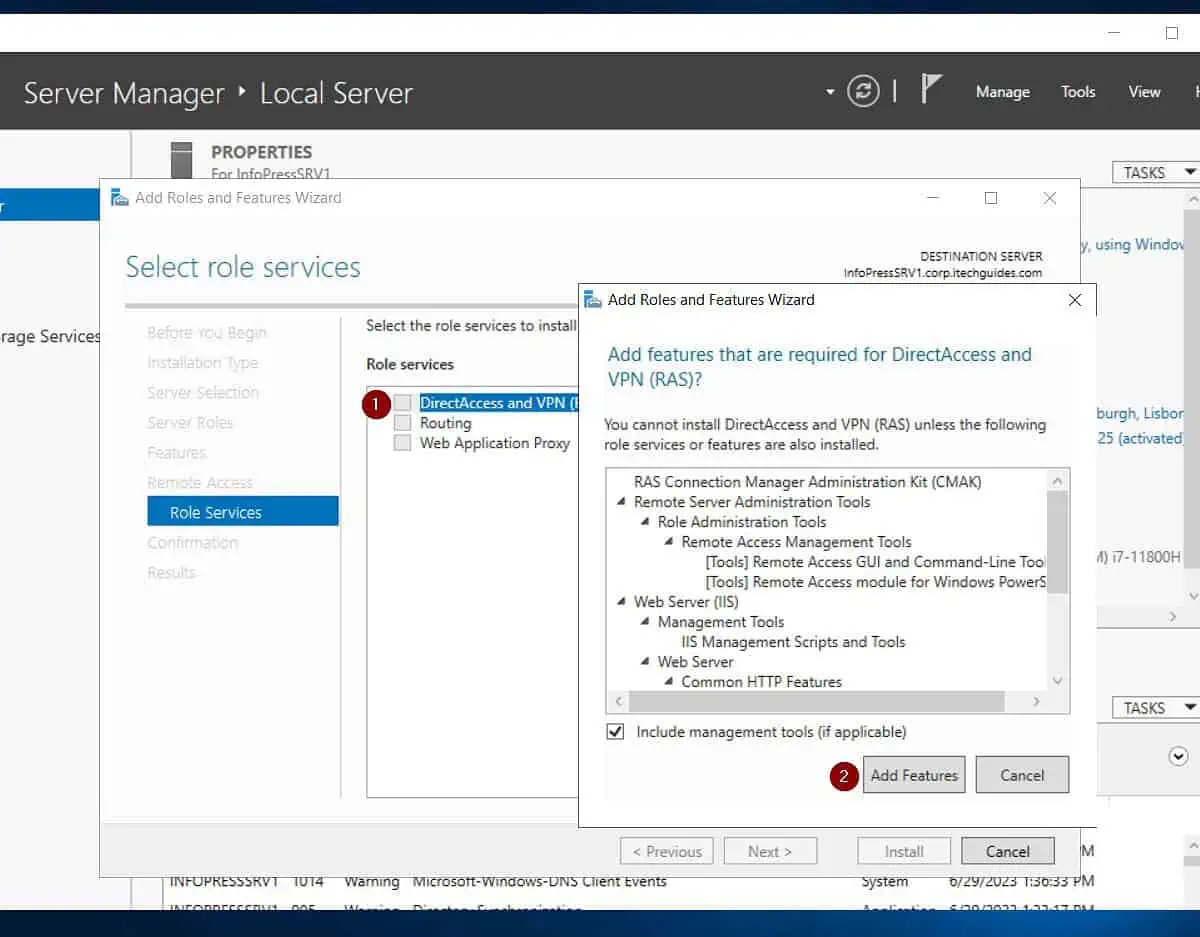
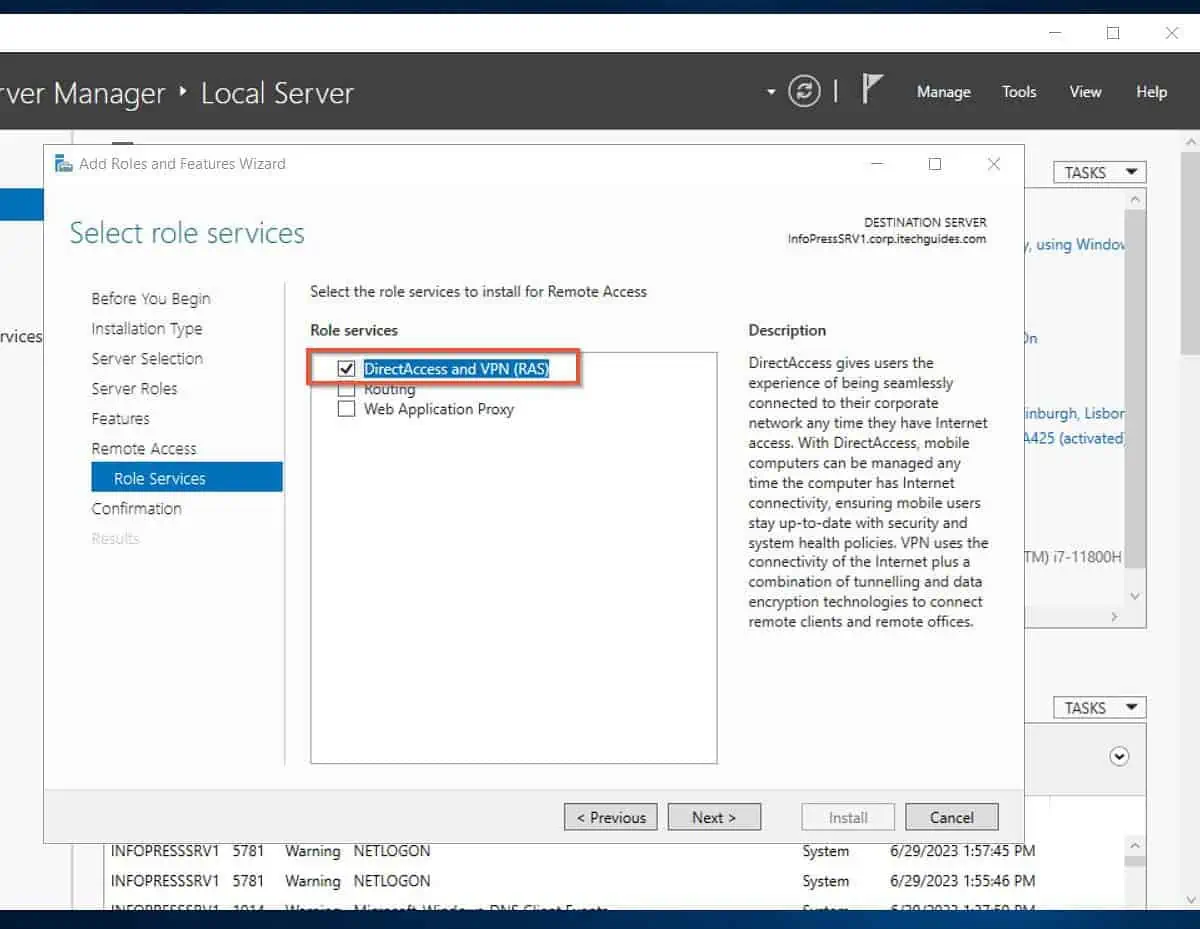
- Click Next twice until you get to “Select role services.” After that, check “DirectAccess and VPN (RAS).”
Then, click Add Features.
On the “Select role services” page, confirm that “DirectAccess and VPN (RAS)” is checked, and click Next.
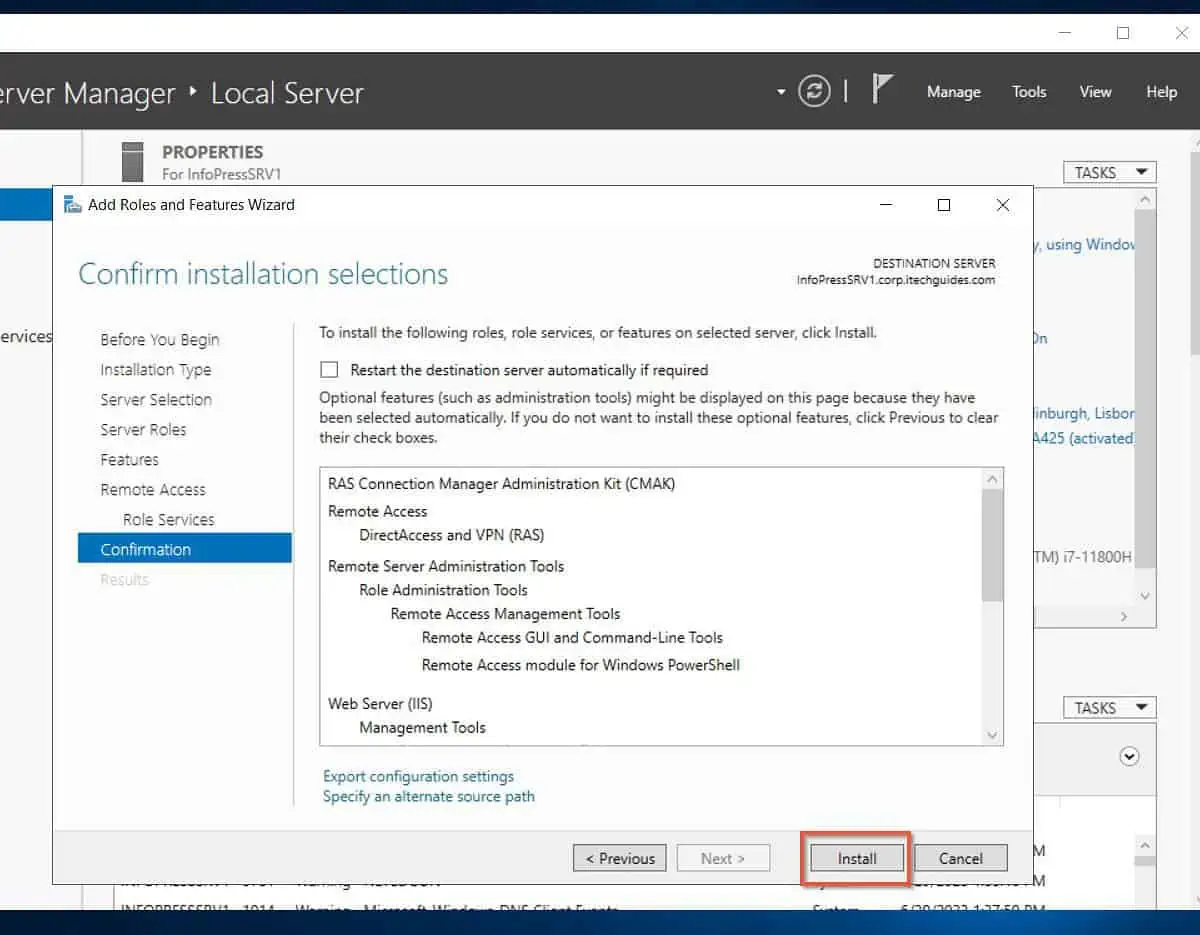
- Finally, confirm your settings and click Install. Wait for the installation to complete, then proceed to step 4 of 9 below.
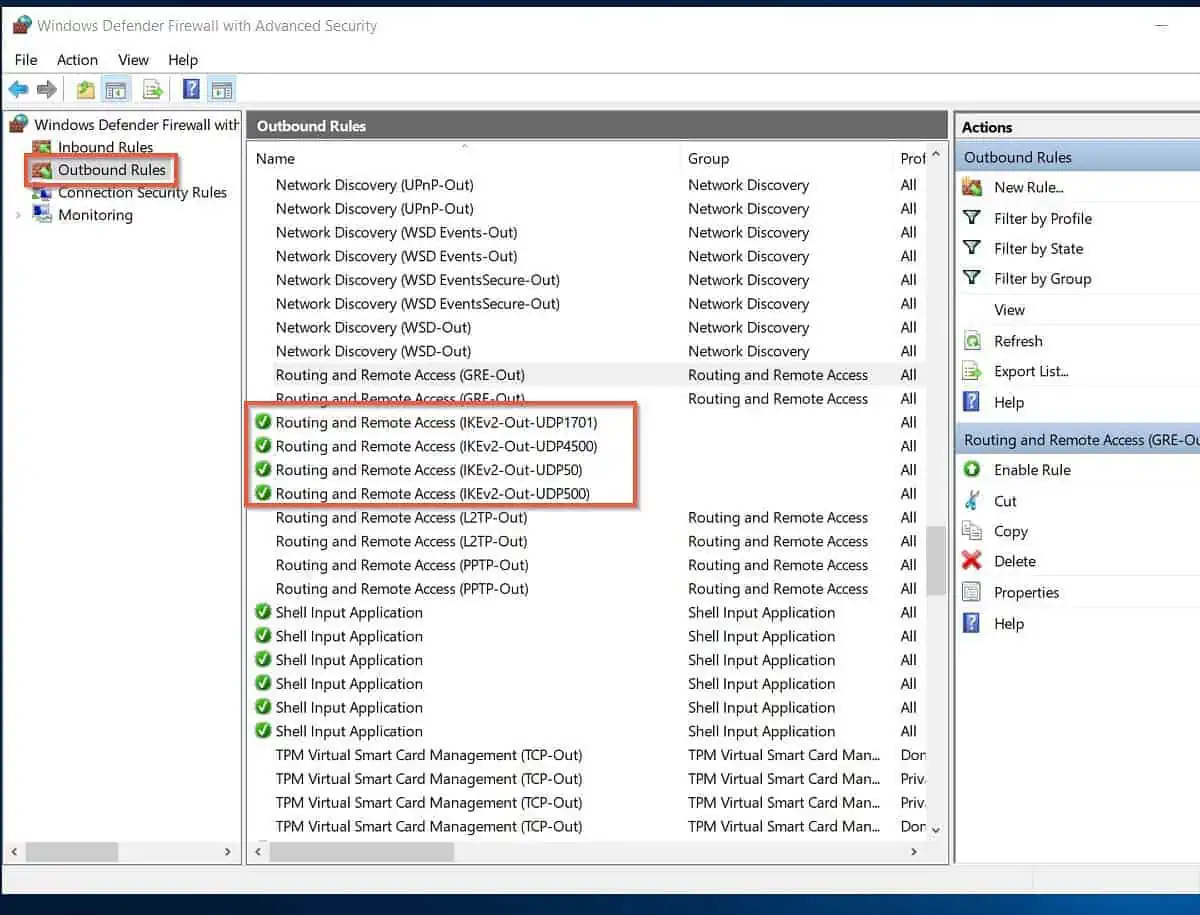
Step 4 of 9: Open IKEv2 Ports on Windows Firewall (On-prem)
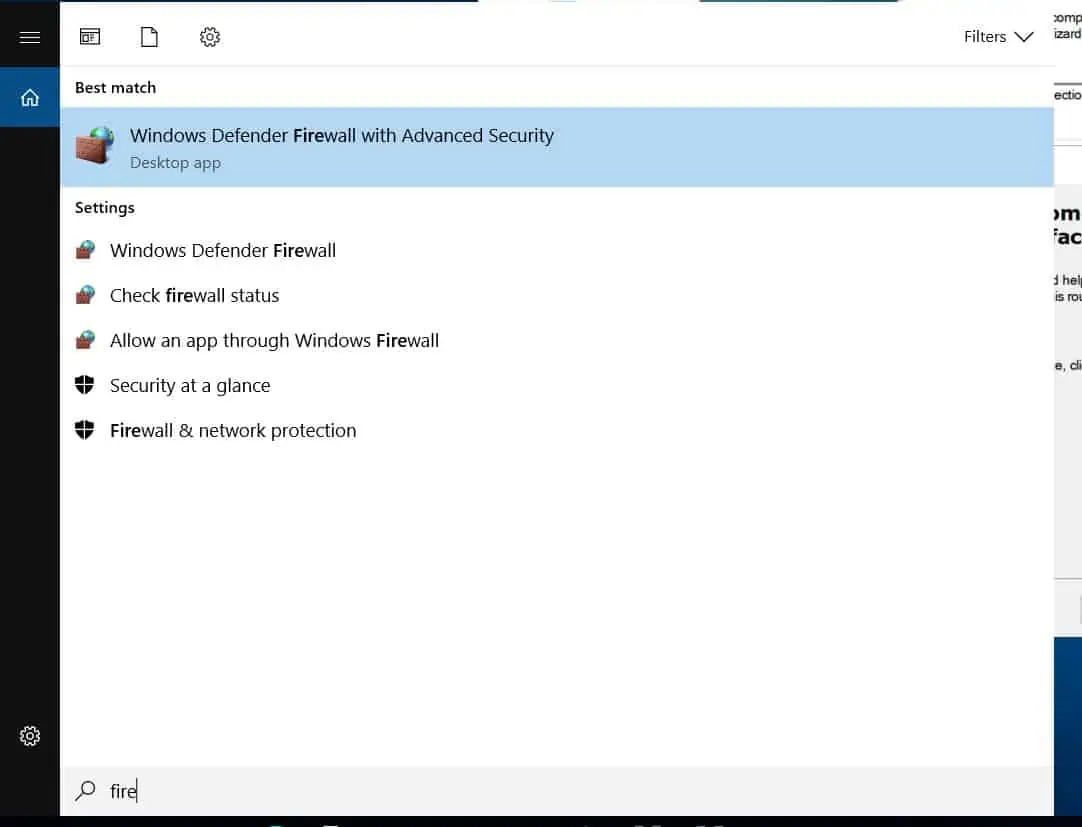
- Open Windows Defender Firewall with Advanced security
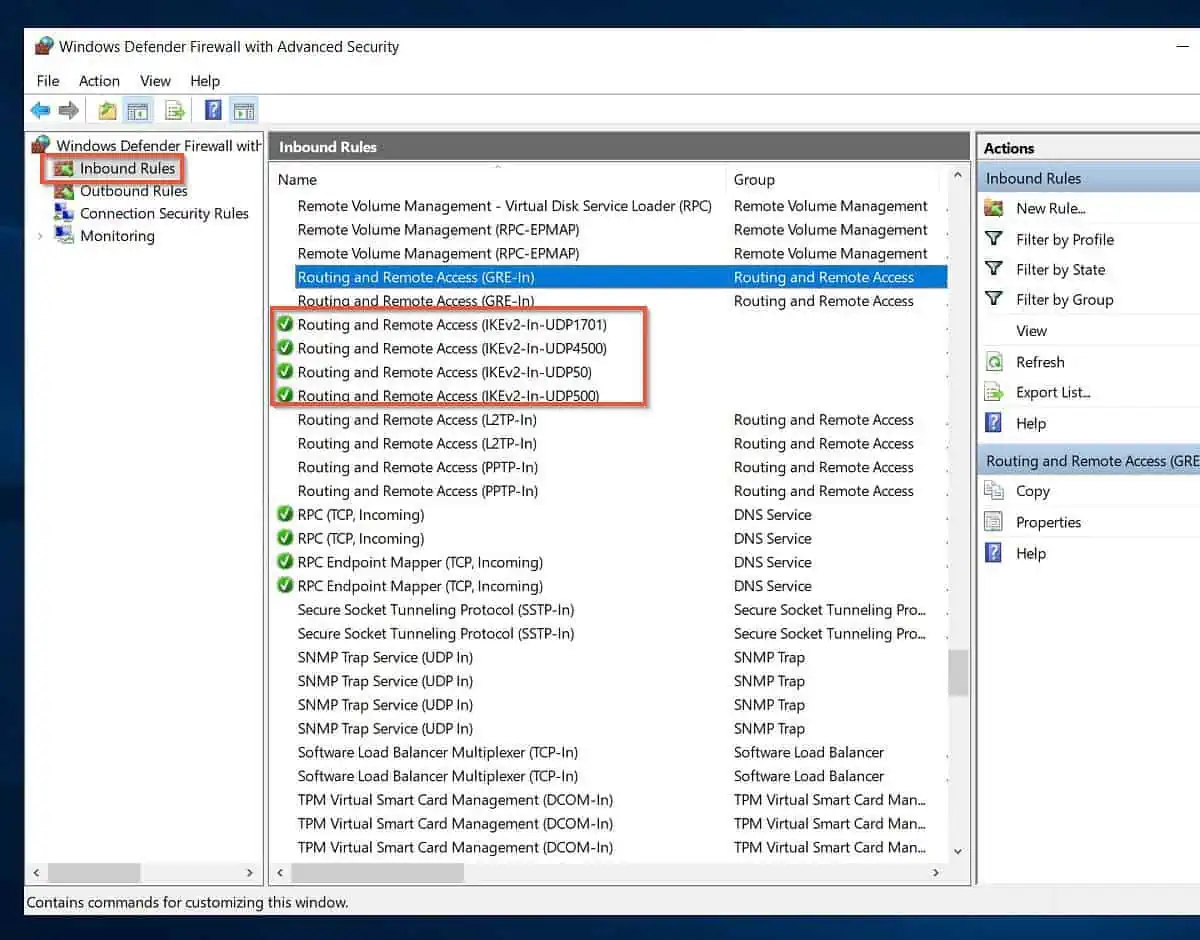
- When the Windows Defender Firewall opens, click on the Inbound rule node, create and enable the following rules:
Routing and Remote Access (IKEv2-In-UDP500): UDP Port 500, Allow the connection, Apply to Domain, Private, Public network.
Routing and Remote Access (IKEv2-In-UDP4500): UDP Port 4500, Allow the connection, Apply to Domain, Private, Public network.
Routing and Remote Access (IKEv2-In-UDP1701): UDP Port 1701, Allow the connection, Apply to Domain, Private, Public network.
Routing and Remote Access (IKEv2-In-ESP50): UDP Port 50, Allow the connection, Apply to Domain, Private, Public network.
When you finish, you should have the highlighted inbound rules.
Create the same rules in the outbound node:
Step 5 of 9: Configure and Enable Routing and Remote Access (On-Prem)
Earlier, I hinted we’d use a Windows Server RRAS as our on-prem VPN device. This allows a site-to-site connection between the Azure VNet and the on-prem network.
Once you establish the connection, the Azure VM can be configured as a DC in the on-prem Active Directory.
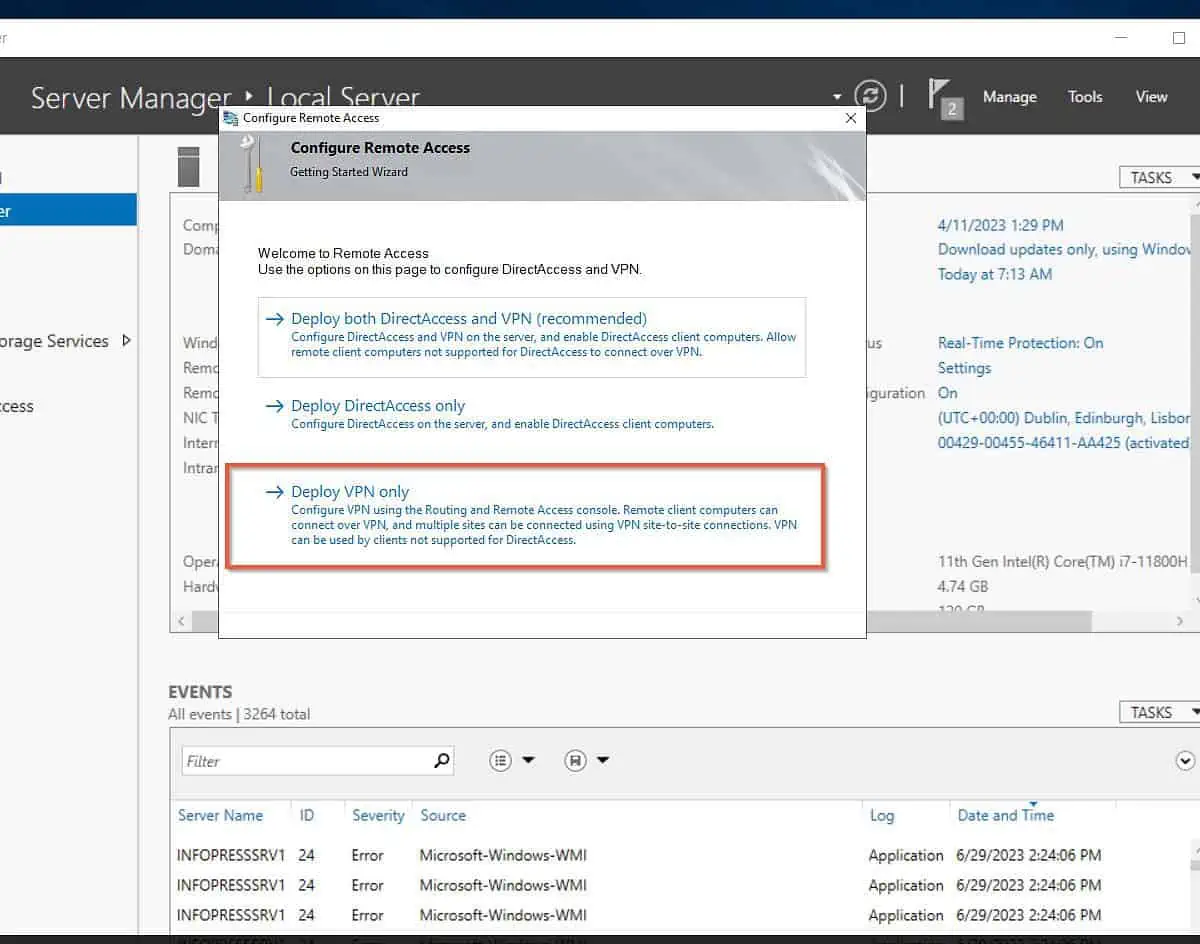
- When the installation completes, close the role installation wizard. Then, click the amber notification icon and select Open the Getting Started Wizard.
- On the “Configure Remote Access” page, click Deploy VPN only.
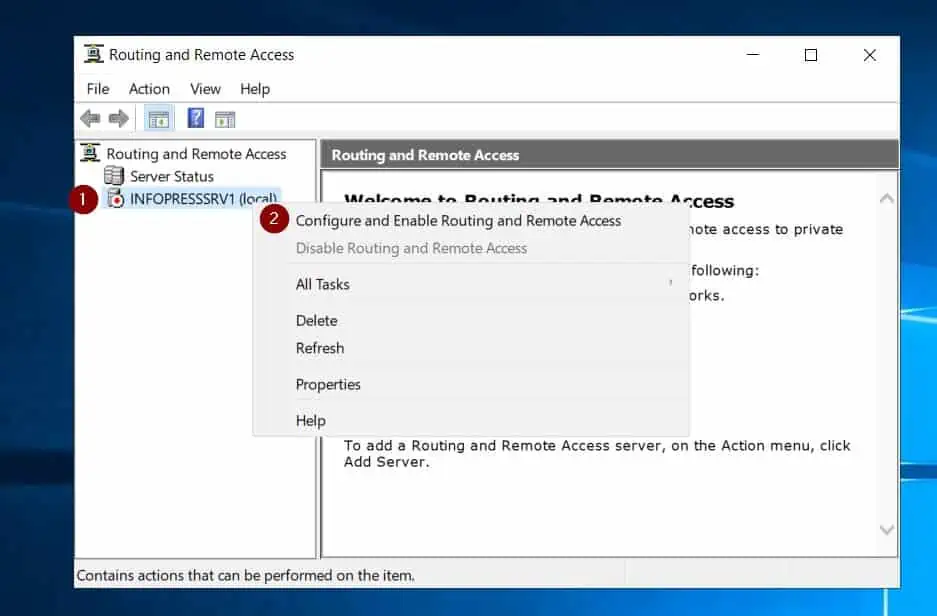
- Then, right-click the server name on the Routing and Remote Access console and select Configure and Enable Routing and Remote Access.
This will open the configuration wizard. Click Next.
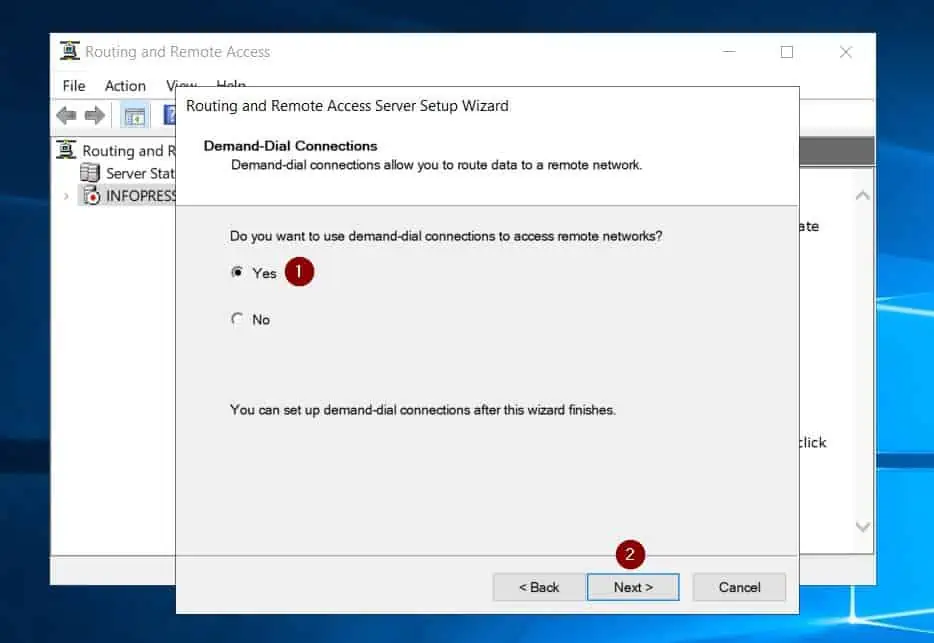
- Next, when the configuration page opens, select “Secure connection between two private networks,” and click Next.

- On the demand-dial connections page, choose Yes, then click Next.
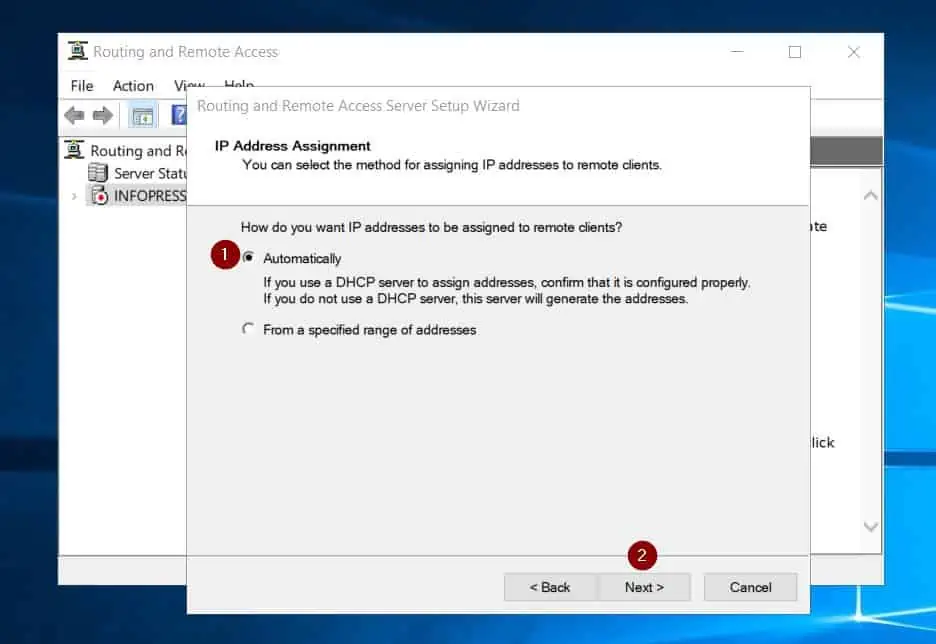
- When the IP address assignment page opens, accept the default (Automatically) and click Next. Finally, click Finish.
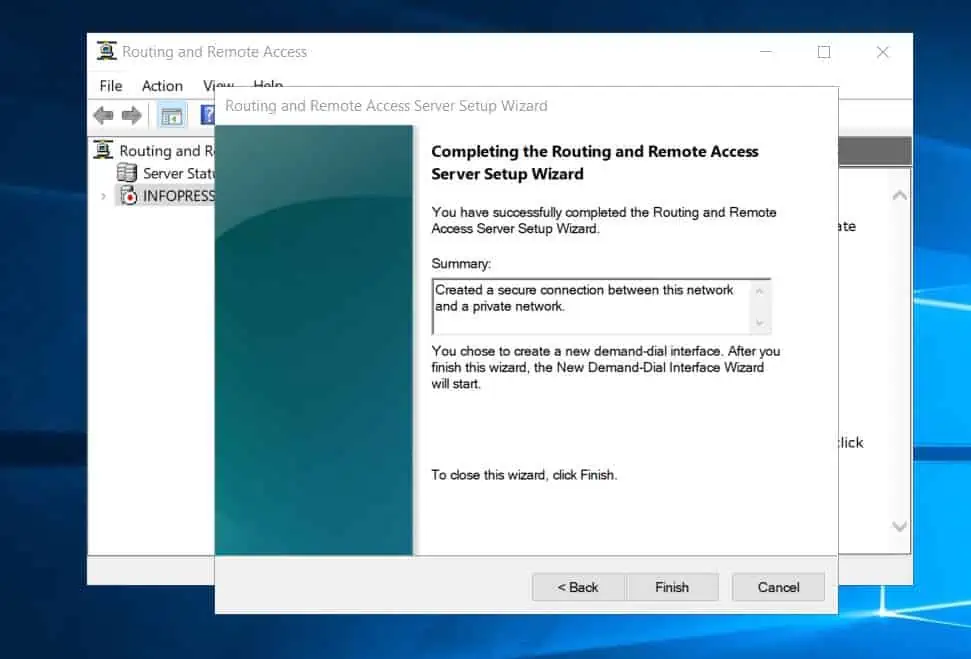
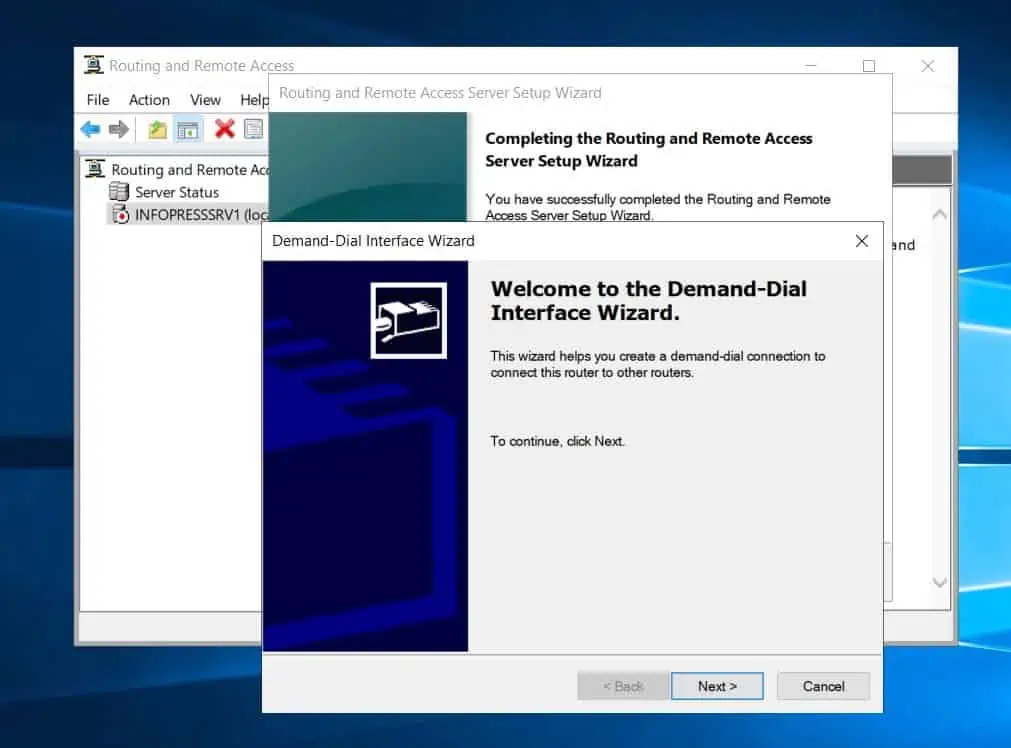
- Wait for the RRAS wizard to display the Demand-Dial Interface Wizard before proceeding to step 6 of 9 below. DO NOT proceed with the wizard yet.
We will return to it in step 7 of 9.
Step 6 of 9: Configure a Site-to-site Connection using Azure Local Network Gateway (Azure)
Azure offers the Local Network Gateway resource. The local network gateway defines the on-premises VPN device used for routing.
Furthermore, when you create a Local Network Gateway, you must specify the IP address of the on-premises VPN device that you intend to connect with.
Finally, after defining the Local Network Gateway, you must define a site-to-site connection on it.
1 of 2: Create a Local Network Gateway
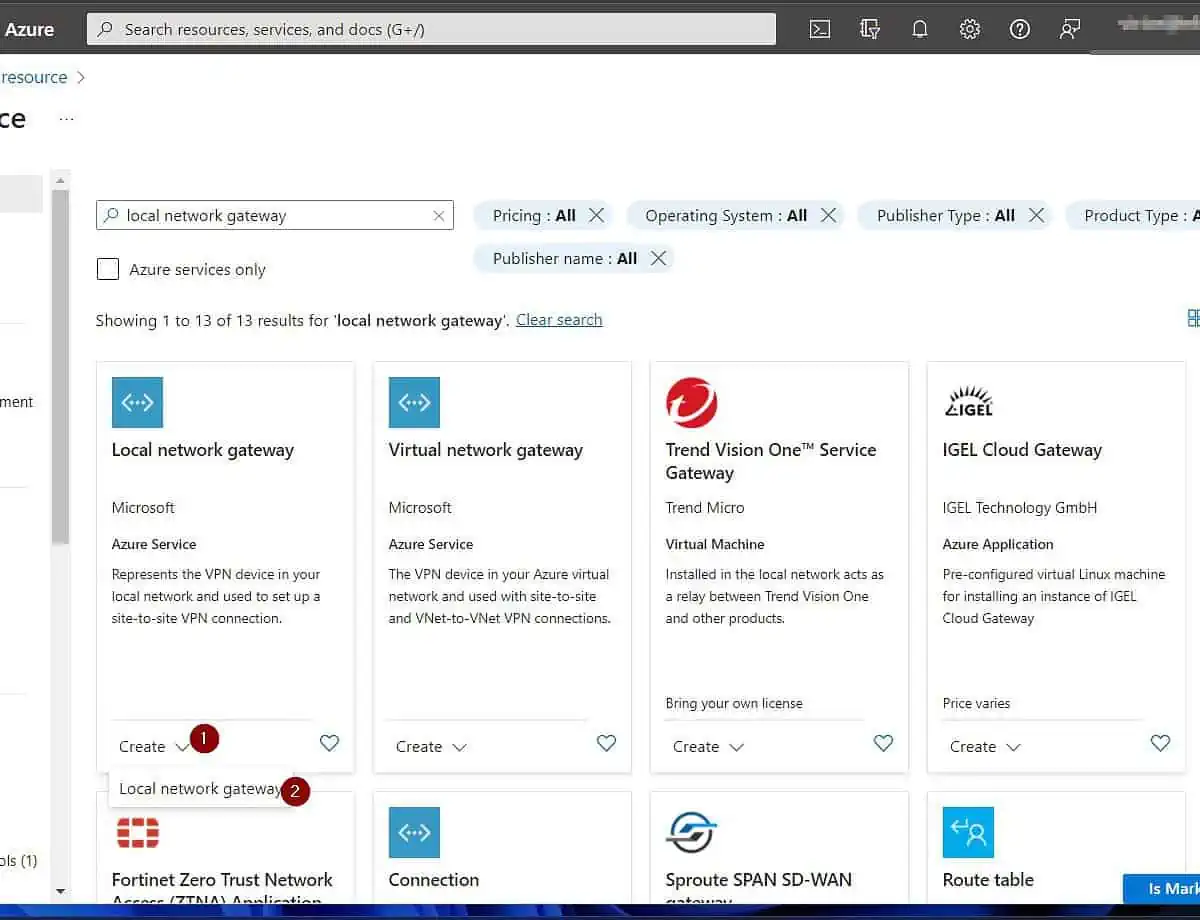
- Sign in to portal.azure.com, click the menu, and select “Create a resource.”
- On the “Create a resource” page, search for and open “local network gateway.”
Then, at the bottom of the first “Local network gateway” – its description contains “set up a site-to-site VPN connection” – click the Create drop-down and select “local network gateway.”
- On the “Create local network gateway” page, enter the information shown in the screenshot below.
The “IP address” is the public IP address of your Routing and Remote Access Service server. If you don’t know this IP from the Windows server, click “what is my IP” to display it on Google.
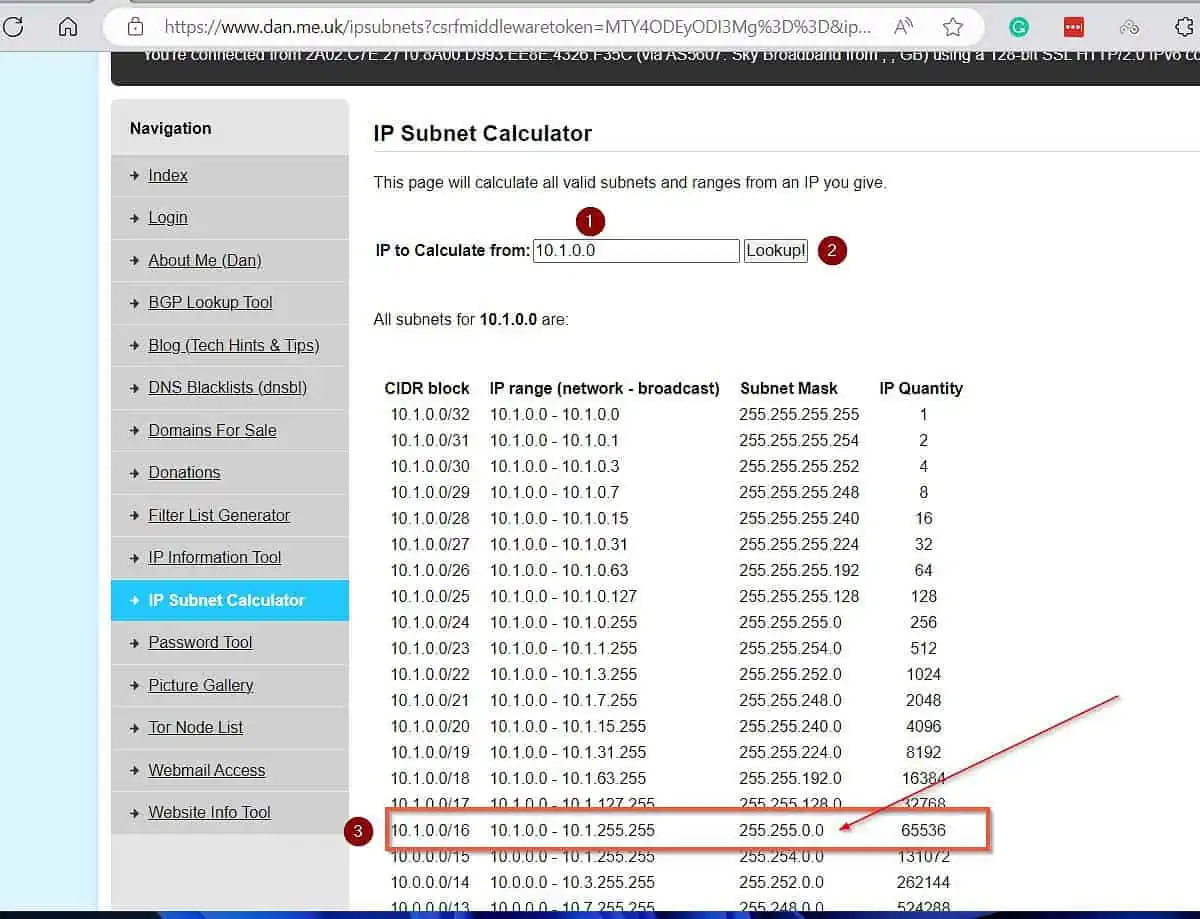
Another essential piece of information is the “Address Space(s).” This is the CIDR IP block for the local LAN of the on-prem VPN device (the routing server.)
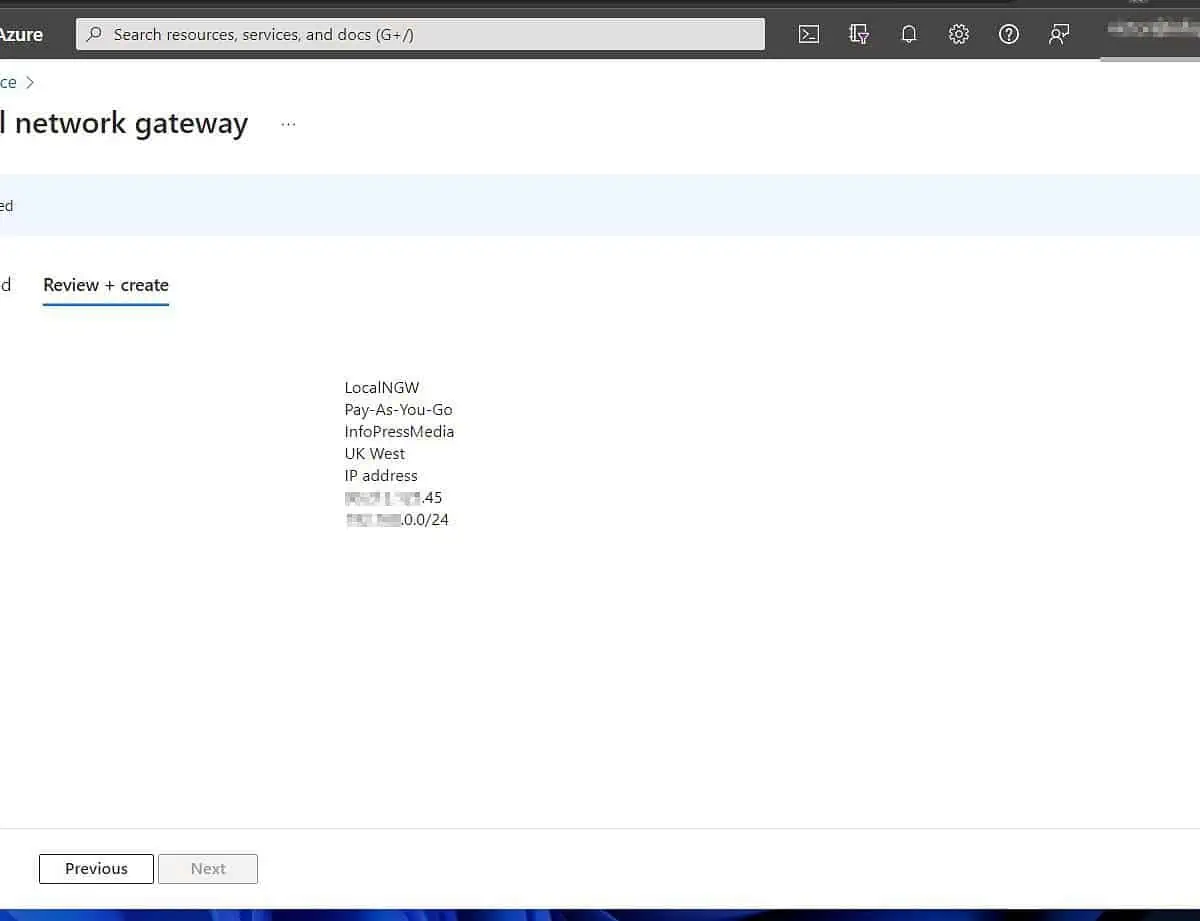
Use the IP Subnet Calculator to get this information. After entering all the information, click “Review + create.”
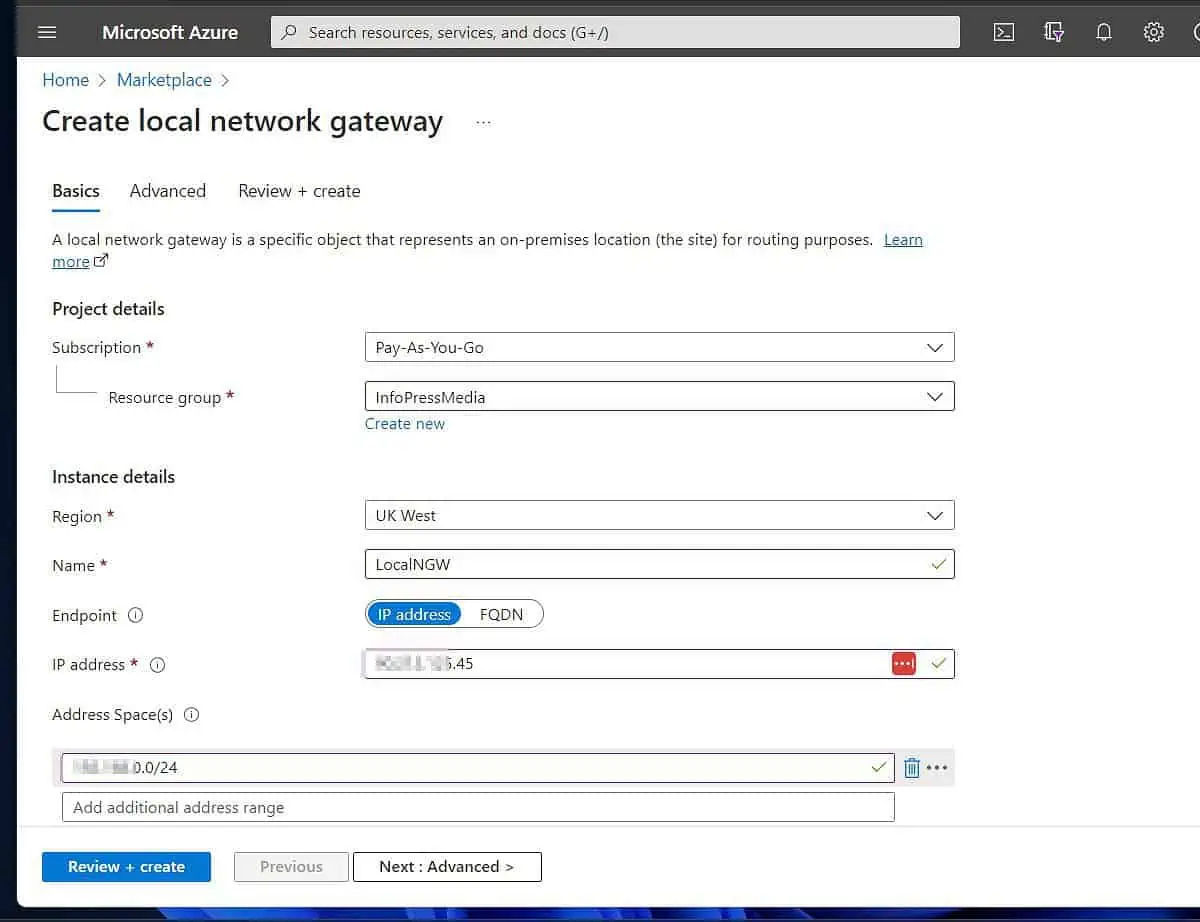
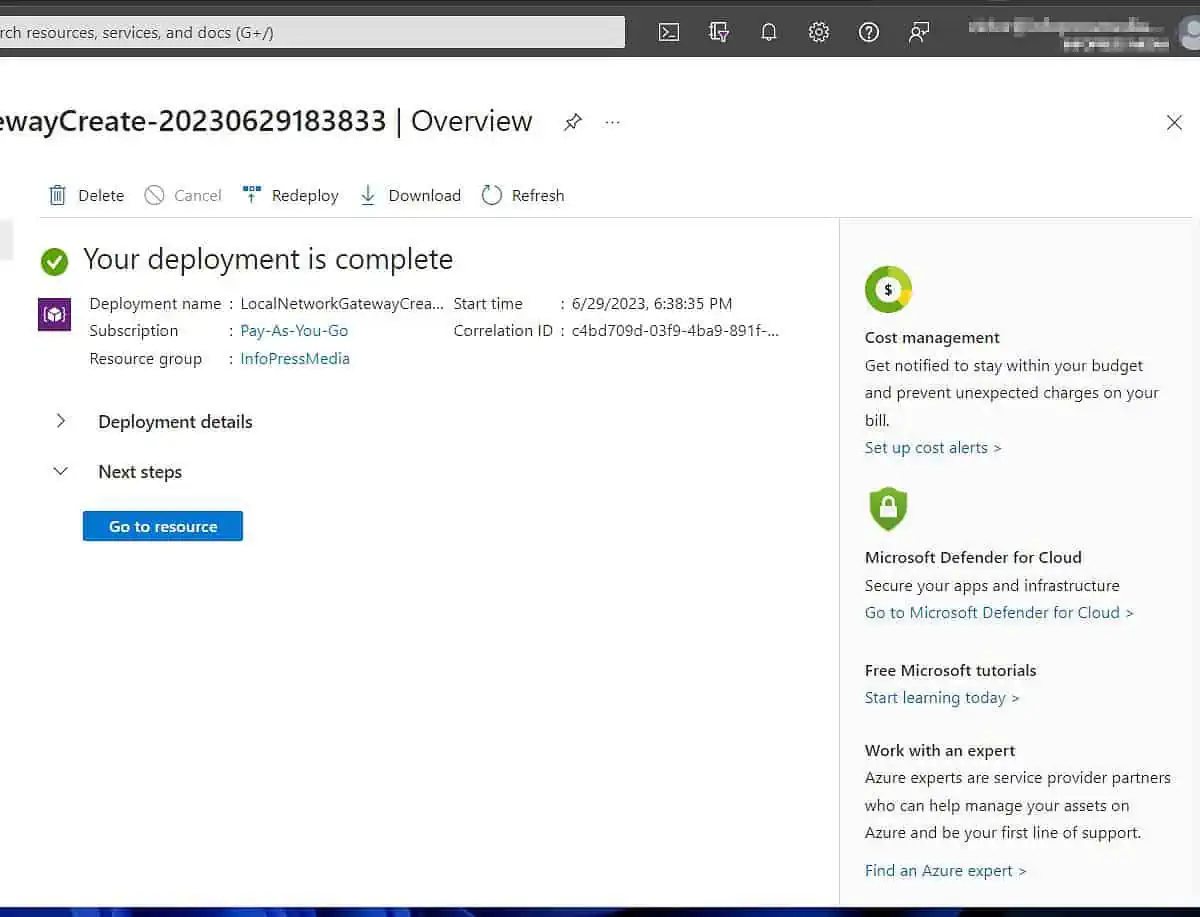
- Finally, click Create to create the Local Network Gateway.
- Wait for Azure to complete the resource creation, then click “Go to resource.”
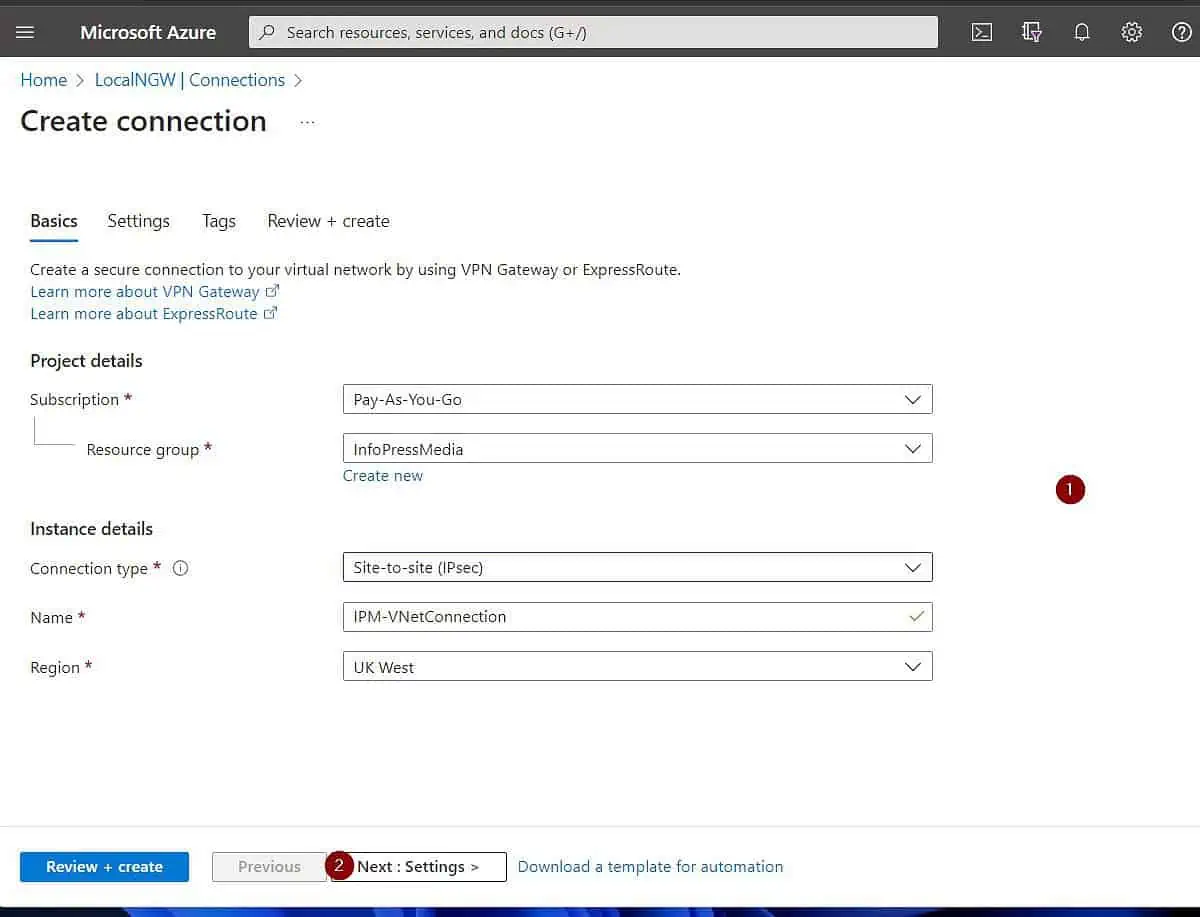
2 of 2: Create a Site-site VPN Connection on the Local Network Gateway
- When the local network gateway resource page opens, click Connections. Then, click” +Add.”

- On the “Create connection” page, select a subscription and a Resource group. After that, choose “site-to-site (IPsec)” as the Connection type, give the connection a name, and select an Azure Region.
Once you finish, click “Next: Settings >.”
- Finally, on the “Virtual network gateway” page, select the “Virtual network gateway” and “Local network gateway” you created earlier.
Then, enter a Shared key gateway, make this complex, and note it. It is the password for authenticating the IPSec connection from your on-prem VPN device to the Azure VPN.
Leave the rest as defaults unless you require customizing any of them. When you’re done, click “Review + create.”
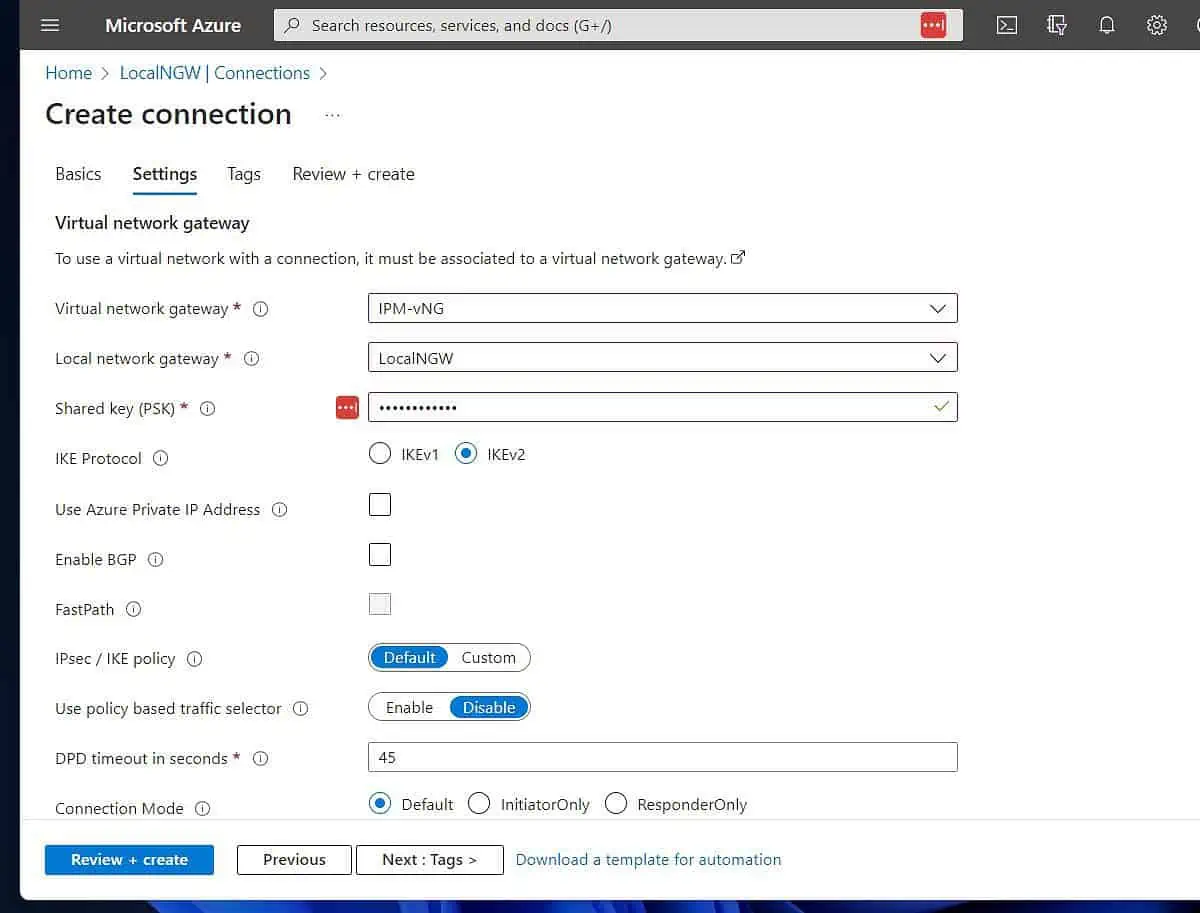
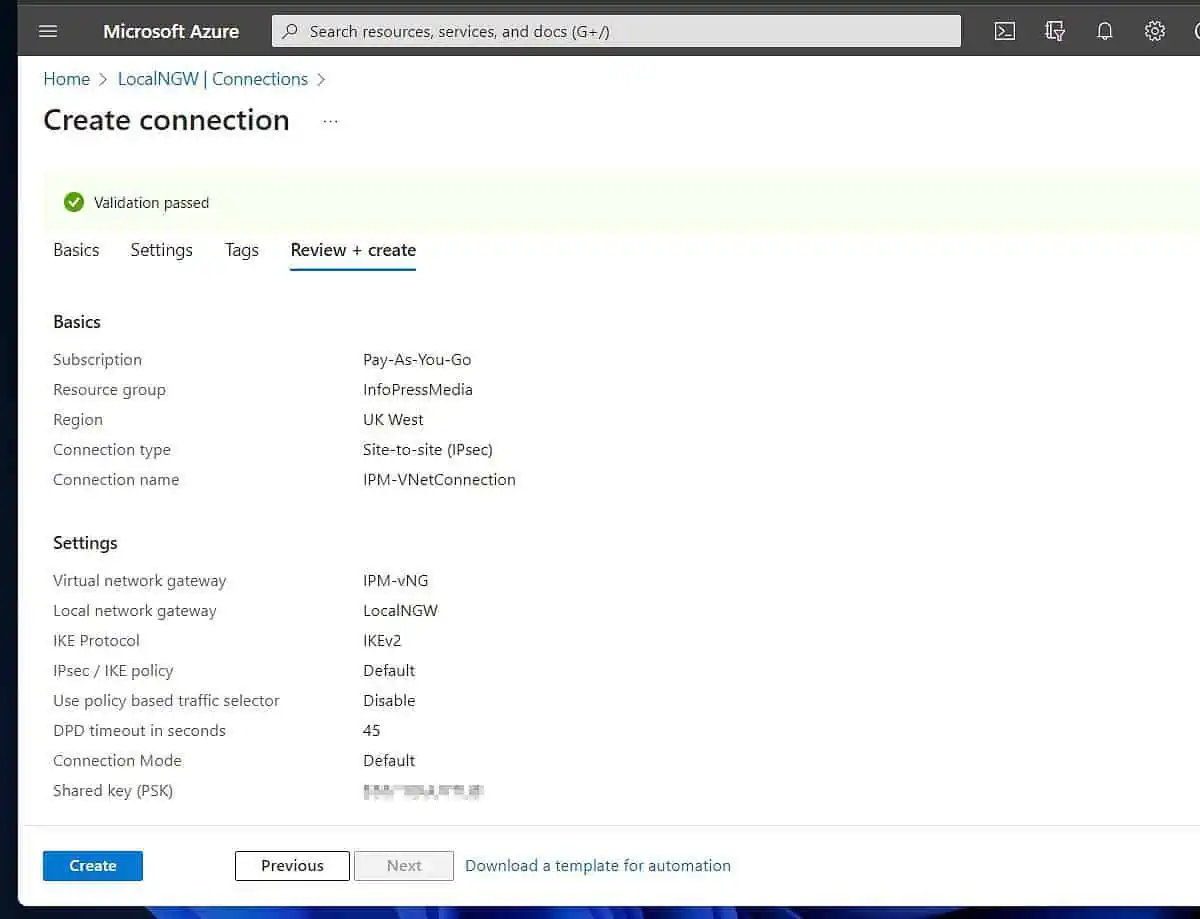
- Finally, if Azure successfully validates your settings, review it and click Create. If you haven’t, this is your last chance to copy the Share key (PSK).
Please note this information as you require it to complete step 7 of 9. While Azure is deploying the resource, proceed to step six below.
Step 7 of 9: Configure Demand-Dial Site-to-site VPN Connection (On-prem)
Return to your Routing and Remote Access Server to complete the tasks in this section.
When you completed Step 5 of 9 earlier, you stopped at the Demand-Dial Interface Wizard. Open your on-prem RRAS server and proceed with the steps below.
- Click Next to initiate the Demand-Dial wizard.
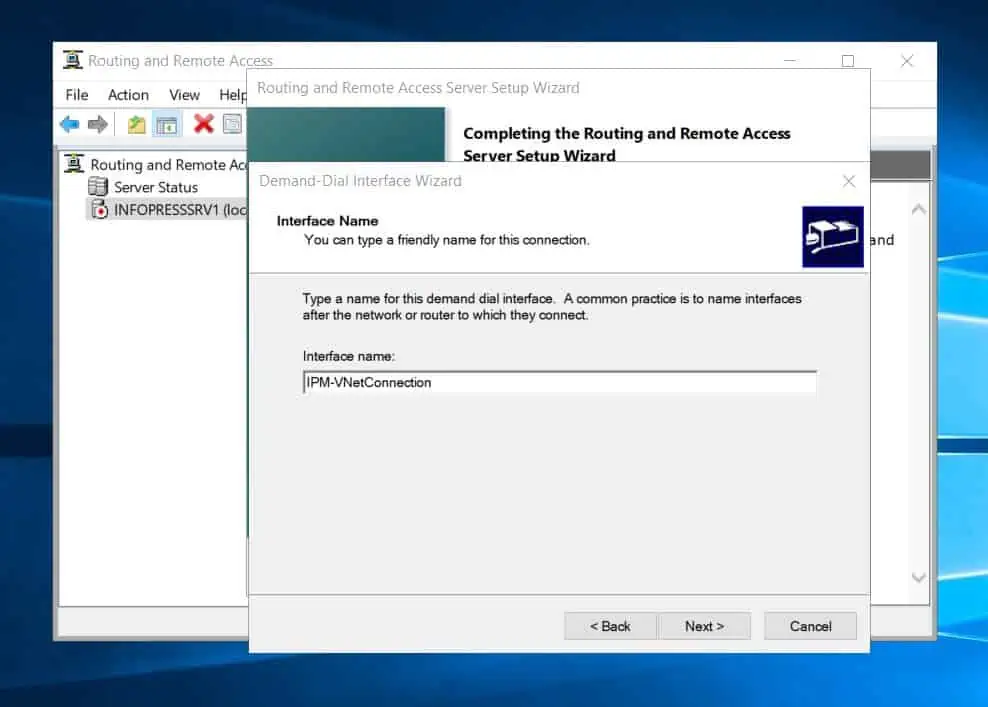
- Then, on the interface name page, enter a name. It is common practice to use the same name as the Azure site-to-site connection name – see the second screenshot below.
Get this information from step 5, number 7. Once you’ve entered a name, click Next to continue.
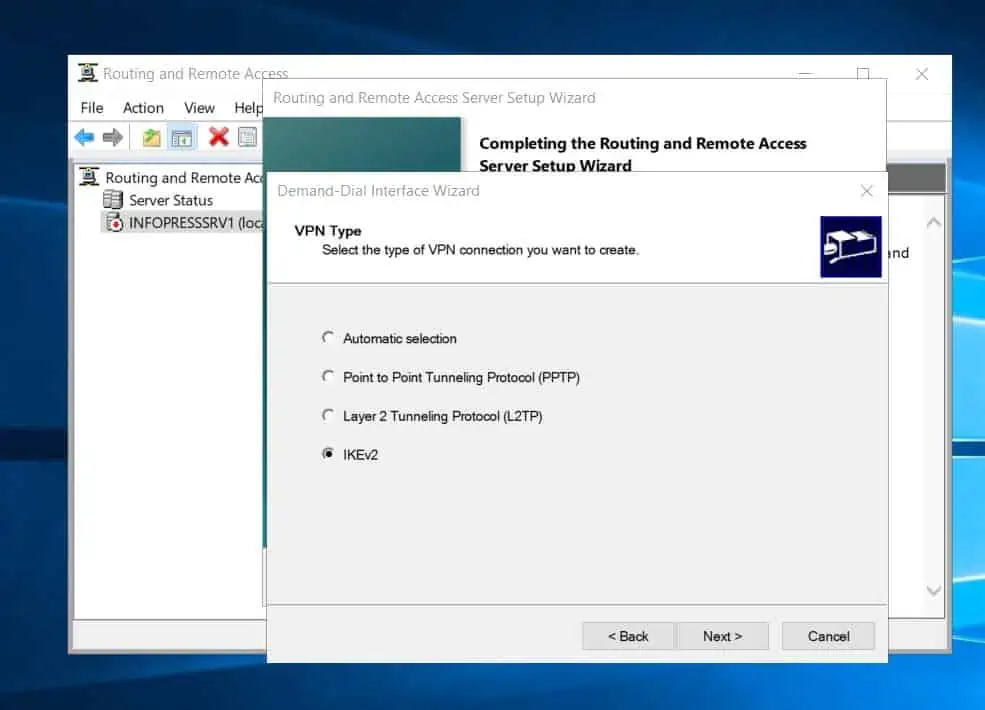
- After that, on the “Connection type” page, select VPN and click Next.
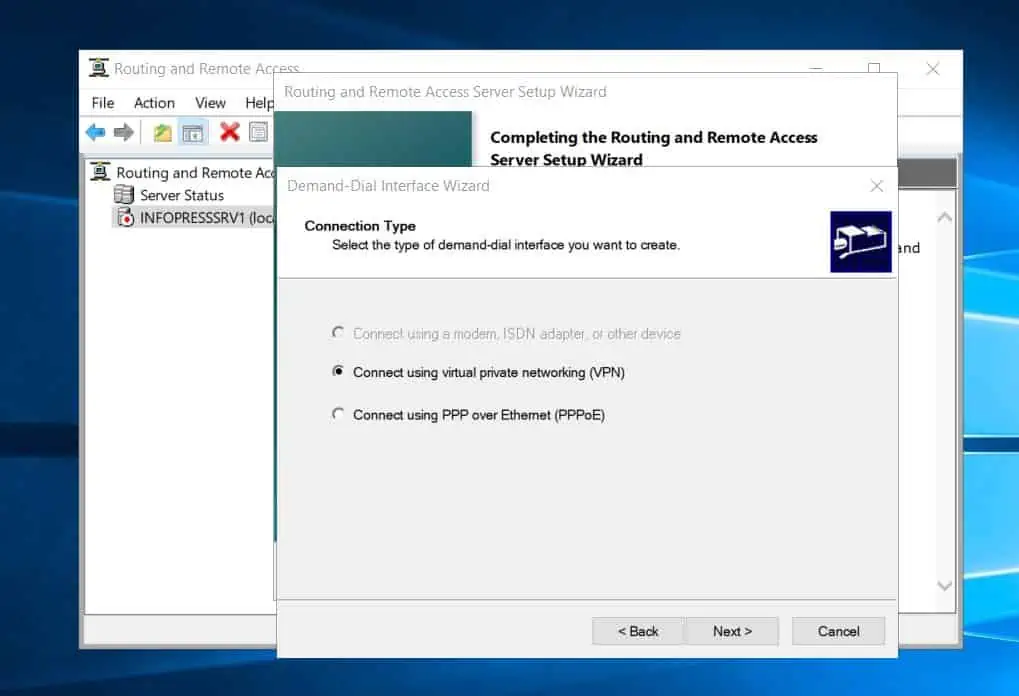
- Then, choose IKEv2 as the type of VPN connection and click Next.
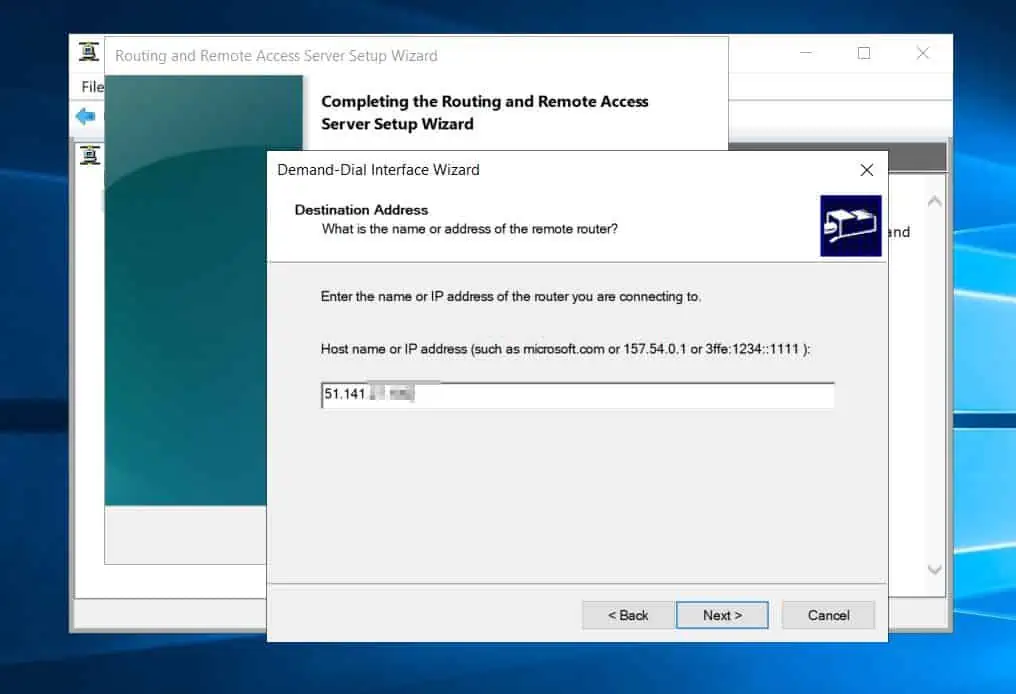
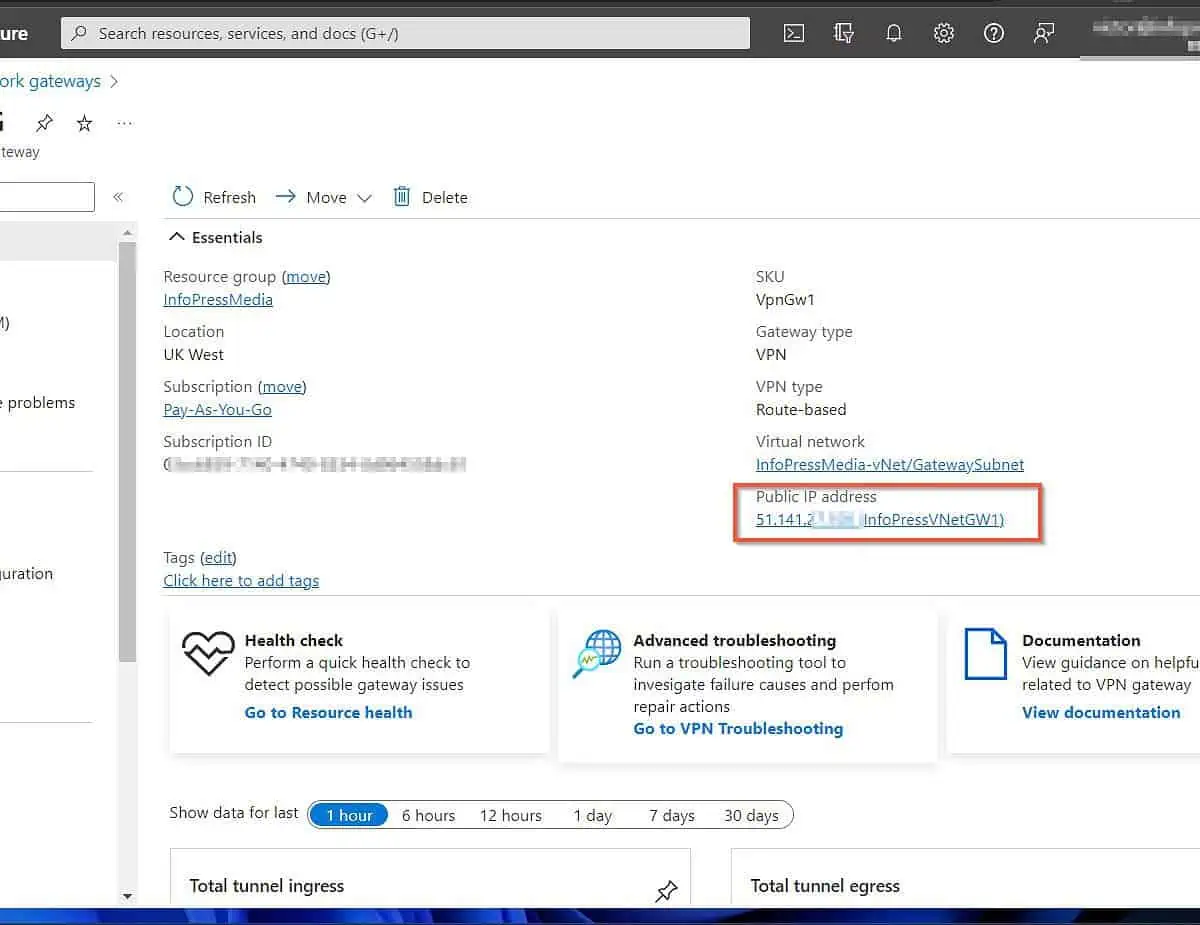
- After that, enter the public IP address of the virtual network gateway you configured in step 1 of 9. Then, click Next.
If you did not note the public IP address of the virtual network gateway, open it on Azure to get the information – see the second screenshot below.
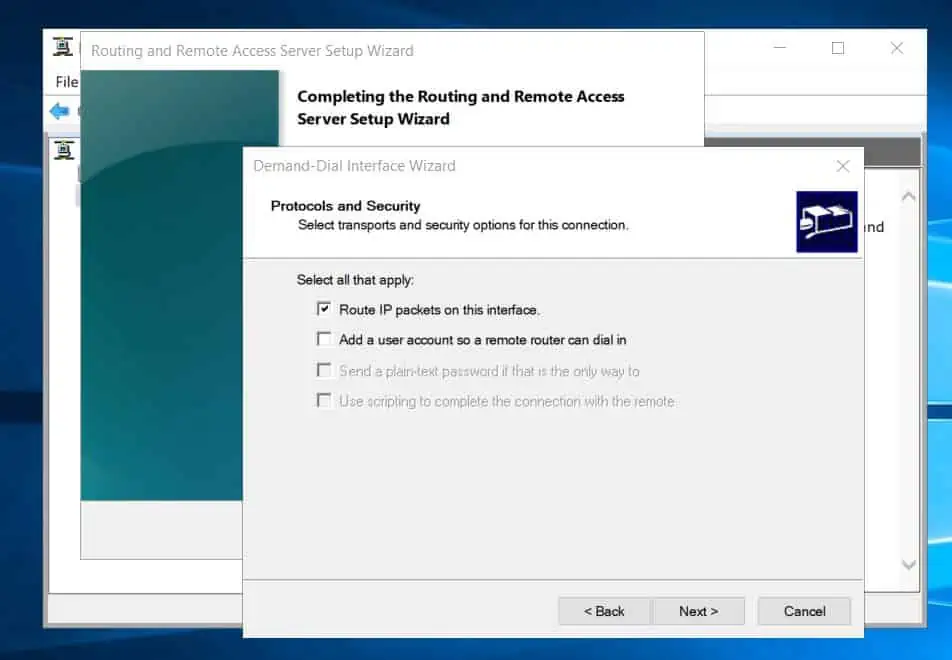
- On the “Protocols and security” page, accept the defaults and click Next.
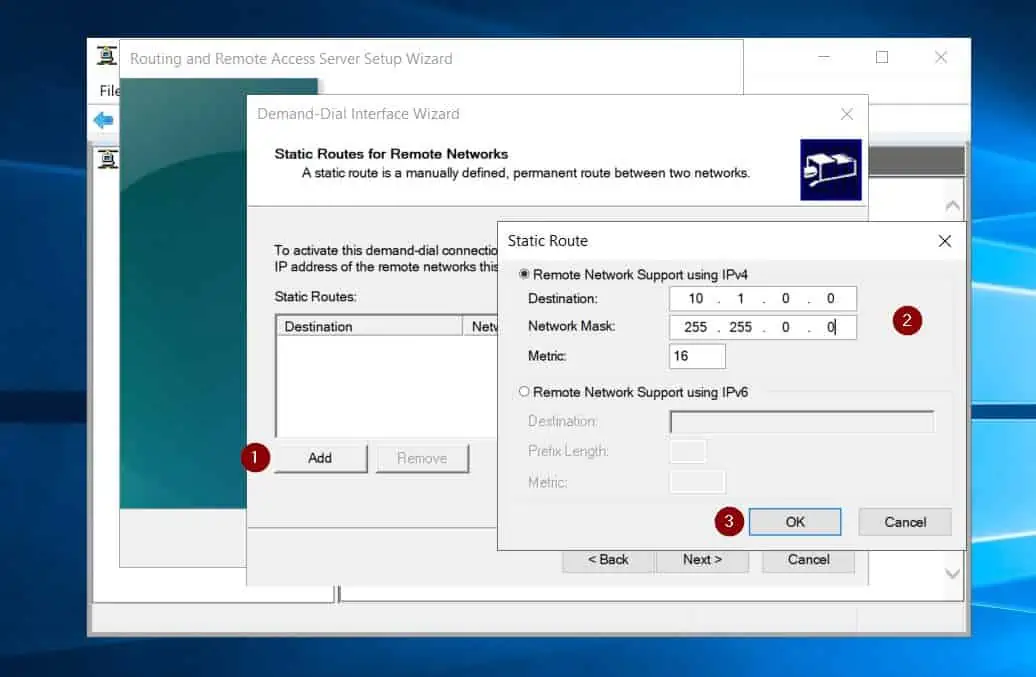
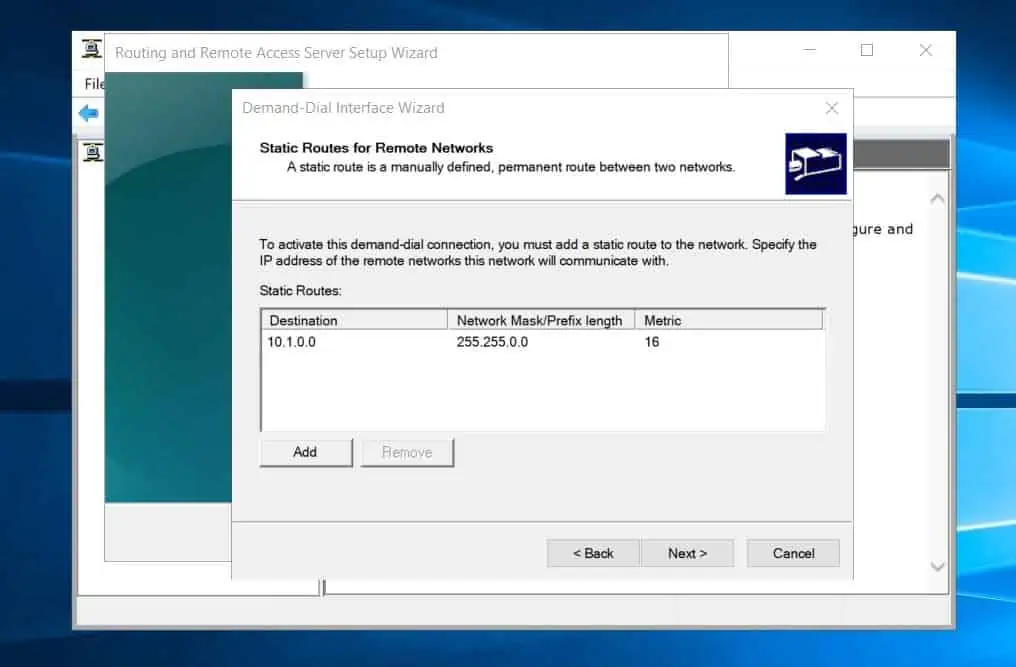
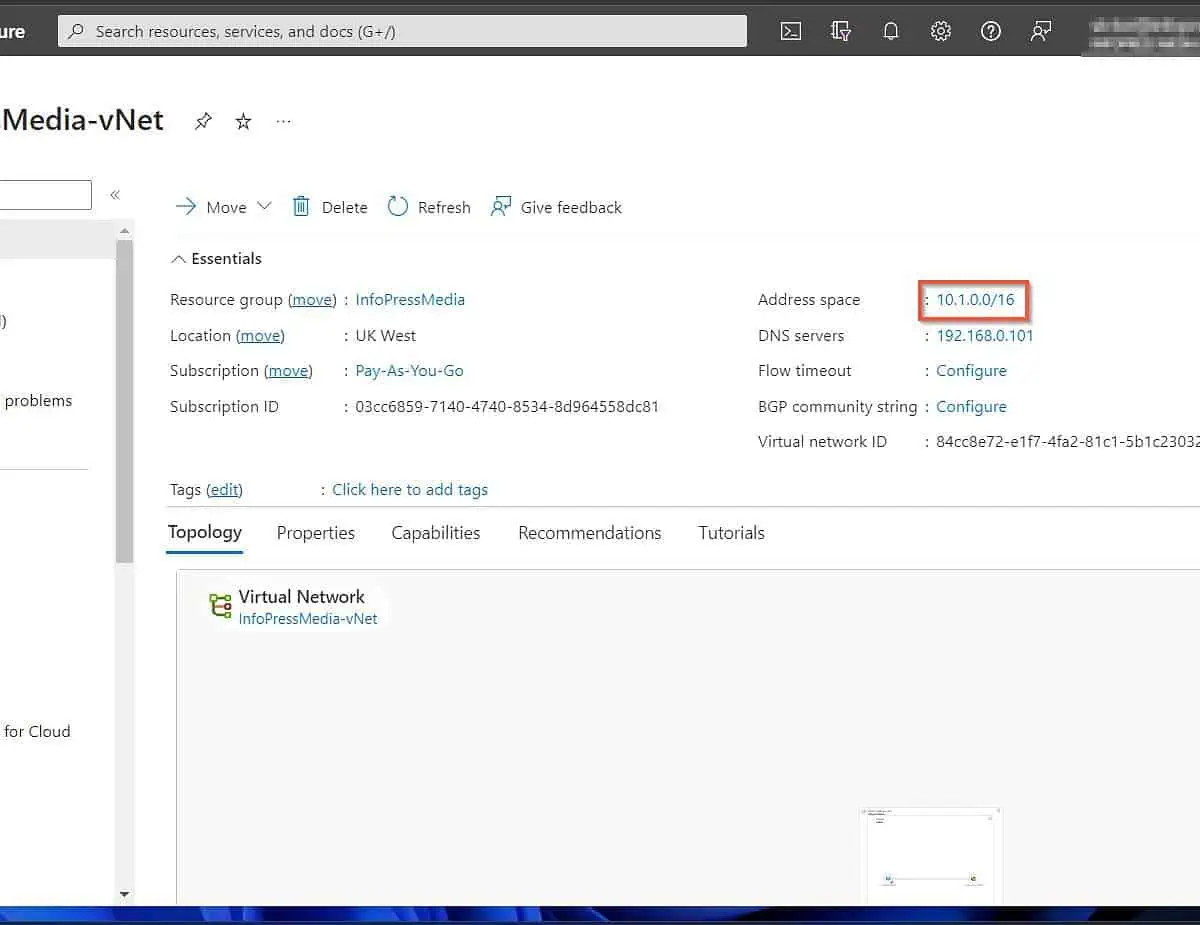
- Thereafter, specify the static route to the Azure network gateway (the remote network). Click Add, then enter the address space of the Azure VNet you created in step 1 of 9 and click OK.
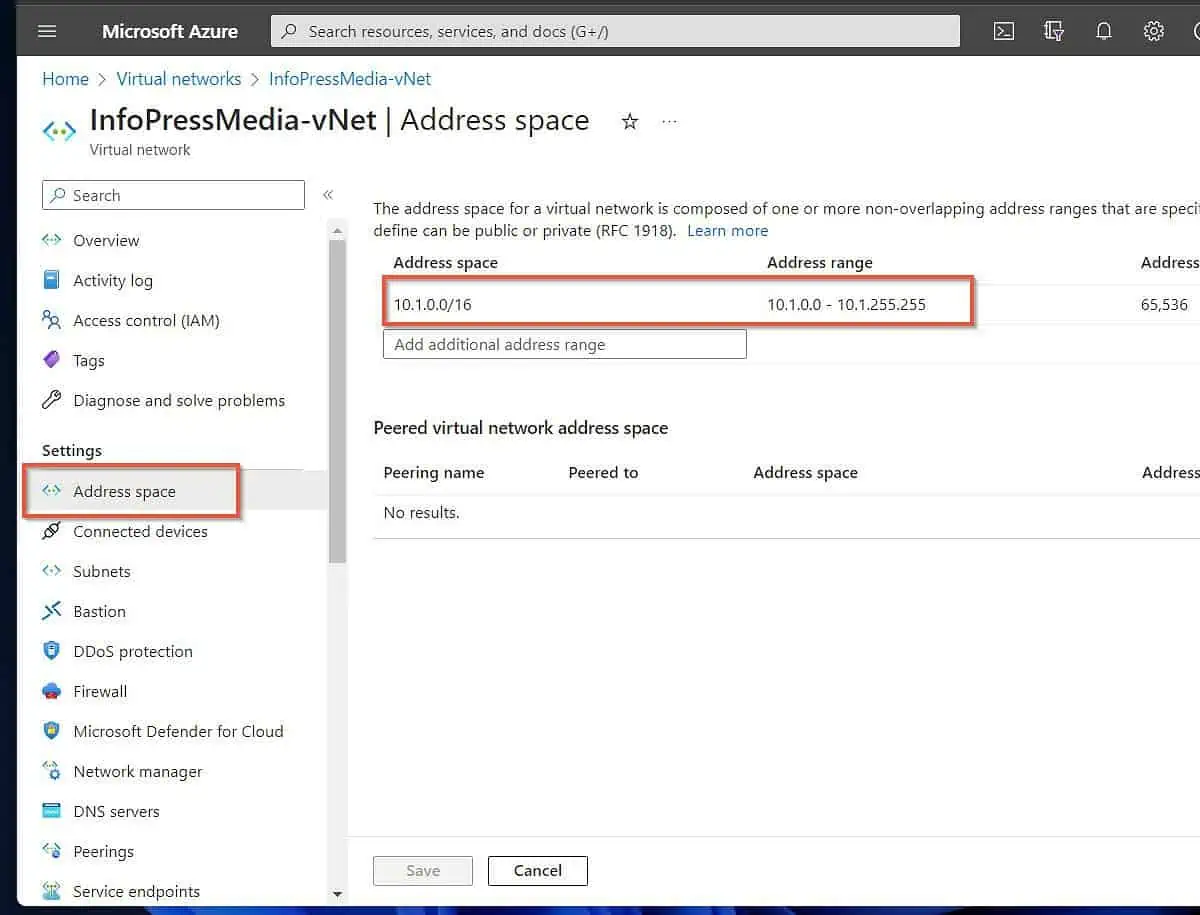
You can get this information by opening the Azure VNet and clicking “Address space” – see my second screenshot below.
- After adding the Azure static route, click Next.
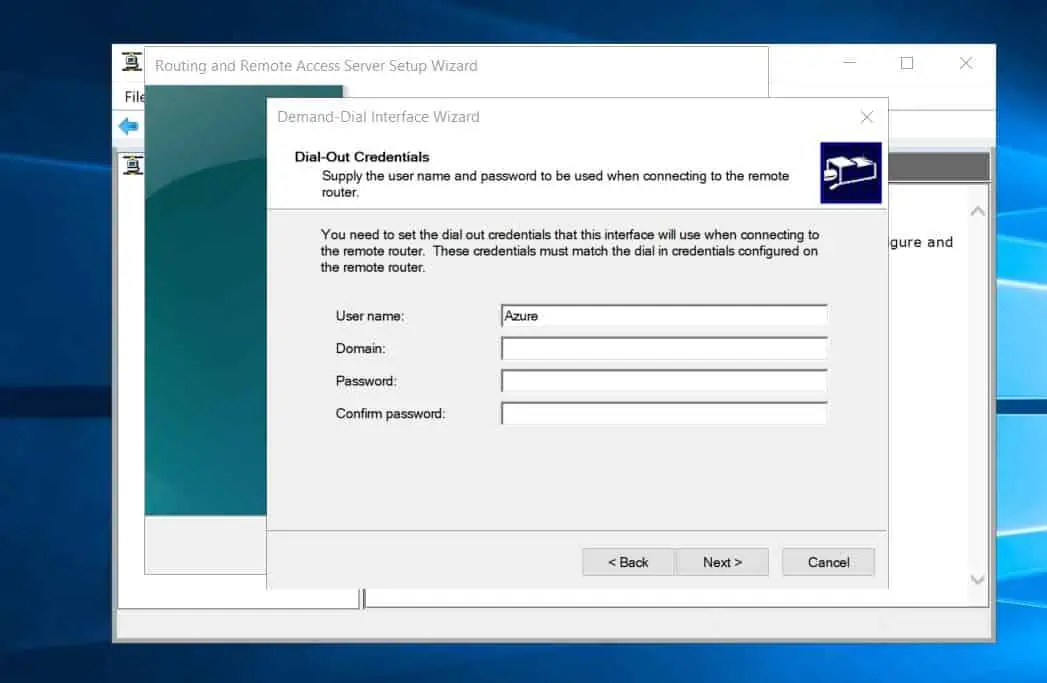
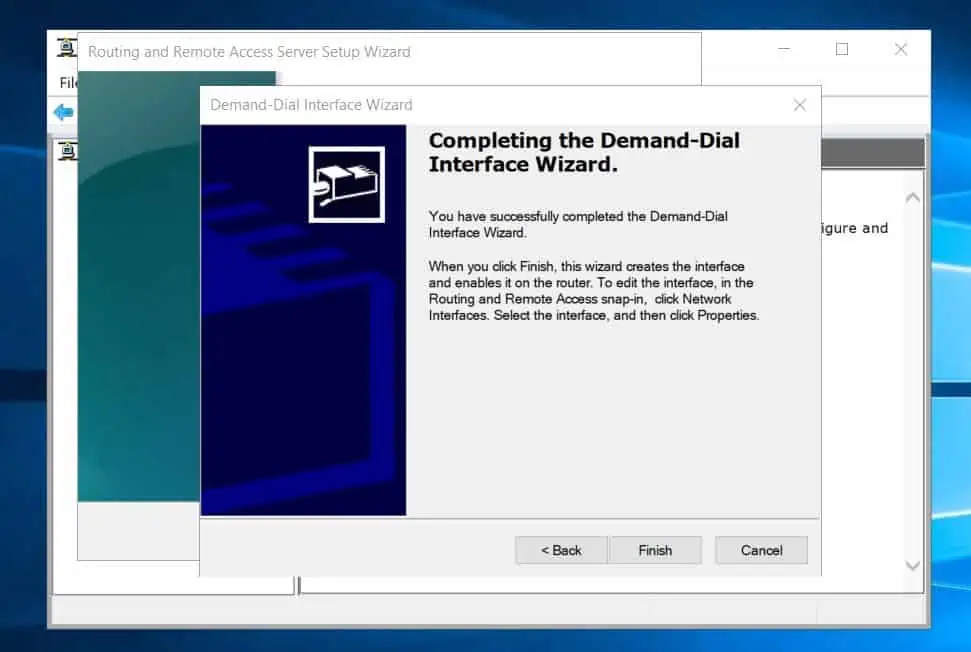
- On the dial-out credentials page, enter any username and click Next. Finally, click Finish to complete the configuration.
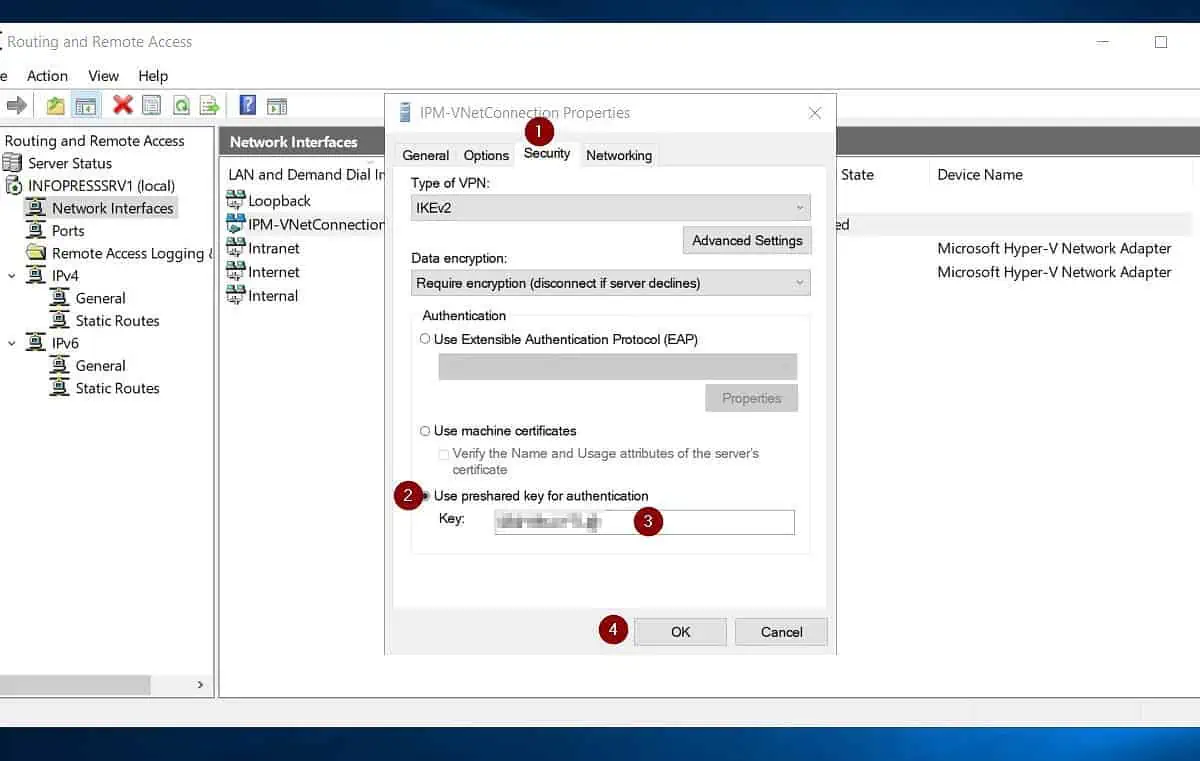
- Once you’ve created the site-to-site demand-dial interface, click “Network interfaces.” Then, right-click the demand-dial interface and select Properties.
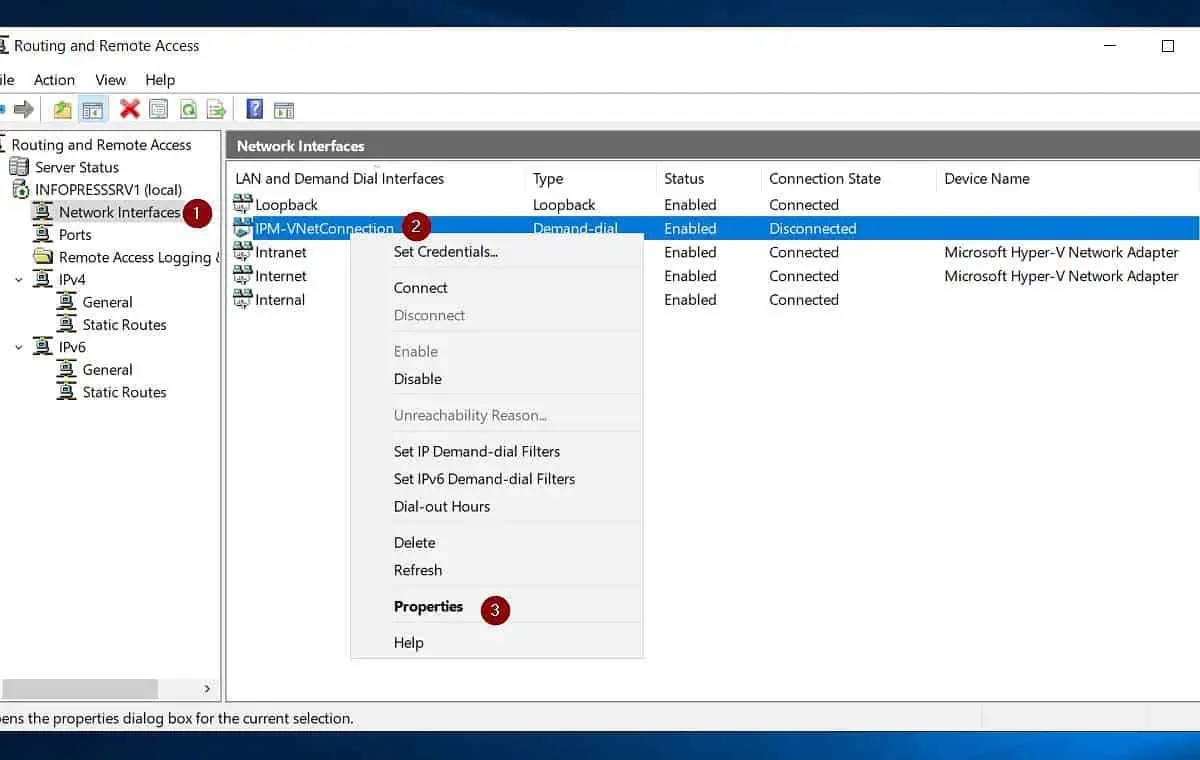
- On the Security tab, choose “Use preshared key for authentication.” Finally, enter the Share key (PSK) from Step 6 of 9, number 9 in the “Key” field, and click OK.
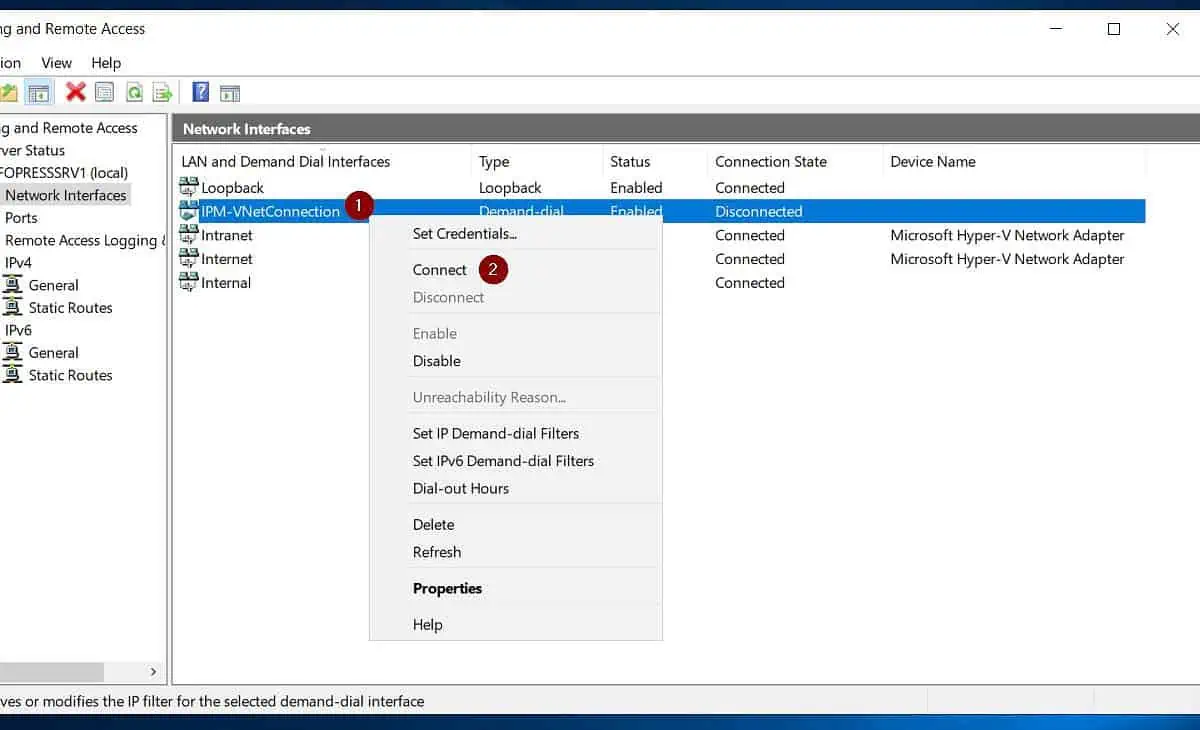
- Once you’ve completed these steps, right-click the interface and click Connect.
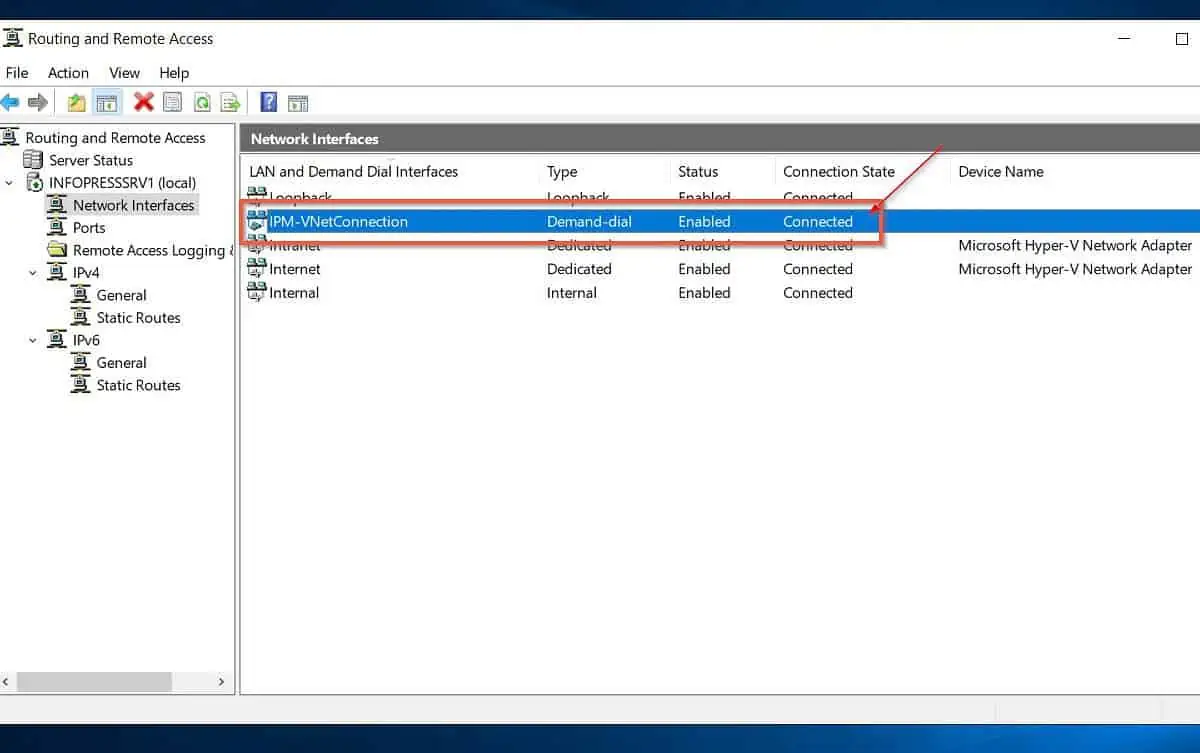
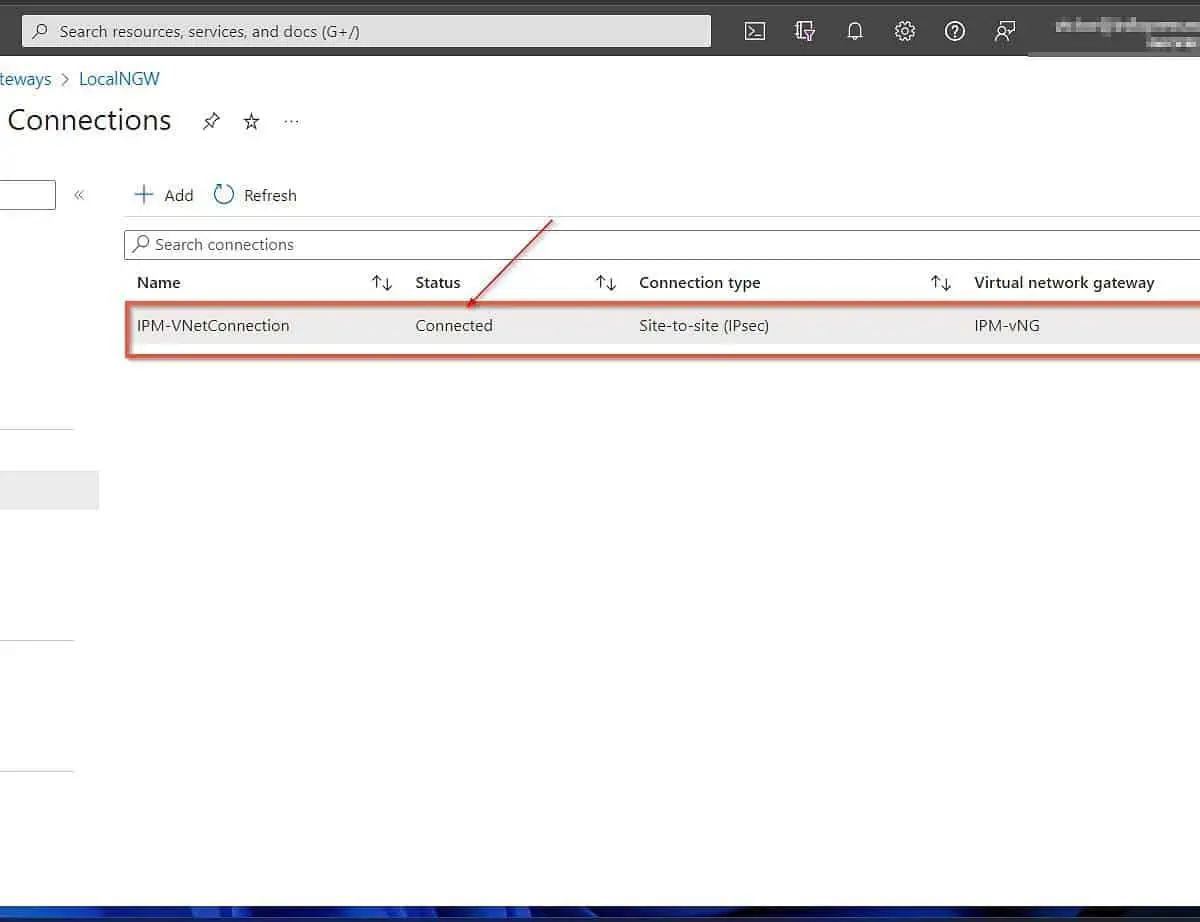
If all goes as expected, the connection status should display “Connected.” Moreover, the status of your Azure Local network gateway should be “Connected.”
See my second screenshot below. After creating the Azure VM that we would configure as an additional DC in the on-prem Active Directory, we will perform additional ping tests.
Step 8 of 9: Add Routing Tables (On-prem)
To enable communication between the Azure Virtual Network and your on-premises network, you need to add a routing table on both sides.
Without adding routing tables, your Azure VM cannot communicate with your on-premises domain controllers. Until this communication is established, you cannot configure the Azure VM as DC in your on-prem Active Directory.
1 of 2 Add Routing Table on the on-premises VPN Device (RRAS Server)
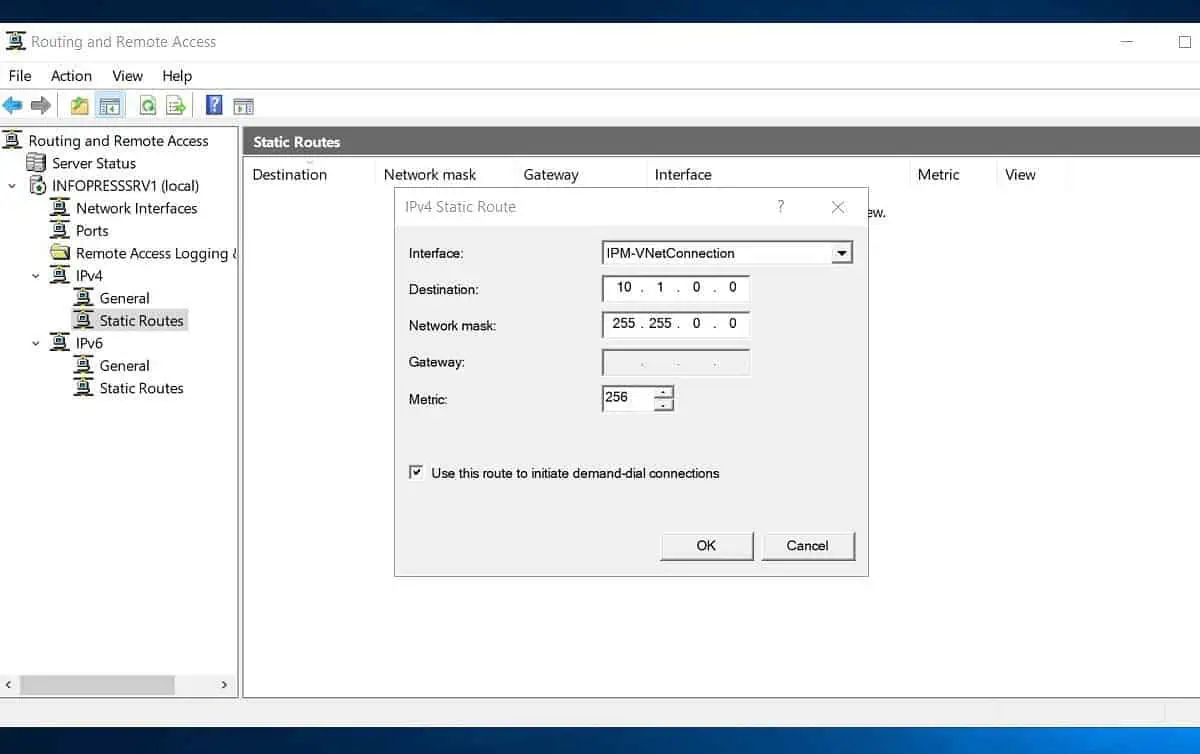
- On the RRAS server, expand IPv4, right-click “Rout tables,” and select “New Static Route.”
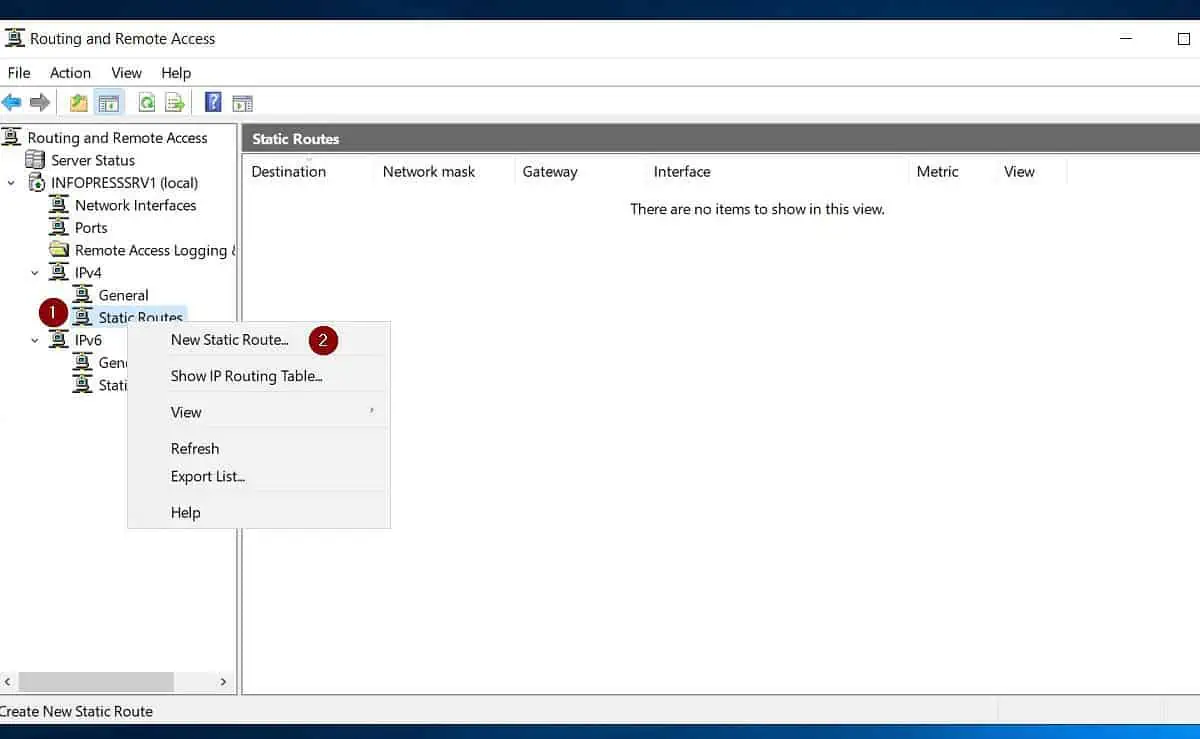
- Once the IPv4 Static Route pop-up opens, on the Interface drop-down, select the Dedmand-Dial interface you created earlier. Then, enter the address space of your Azure VNet in the Destination and Network mask spaces.
2 of 2 Add Routing Table to the Azure VNet
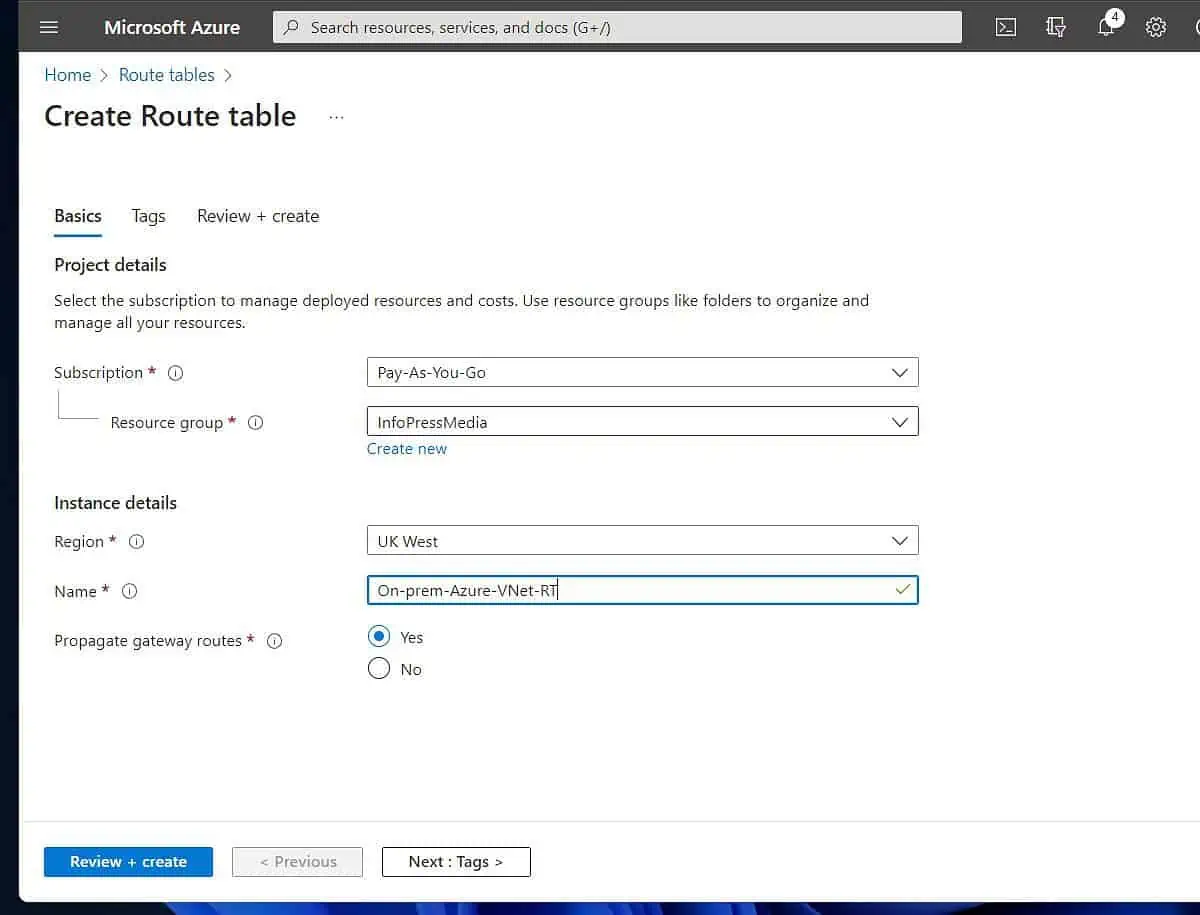
- Sign in to portal.azure.com, then search and select “Route tables.”
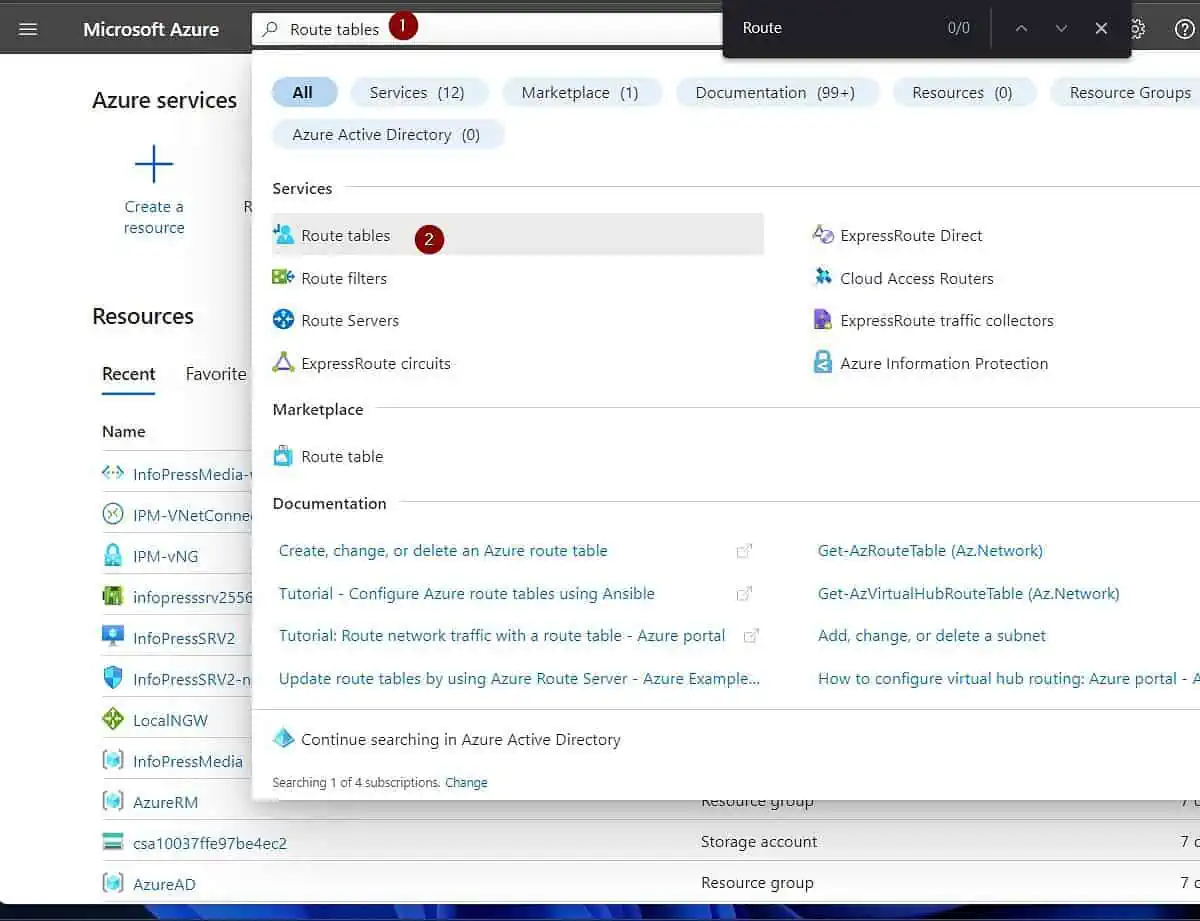
- After that, click “Create route table” (you’ll find it at the bottom of the page).
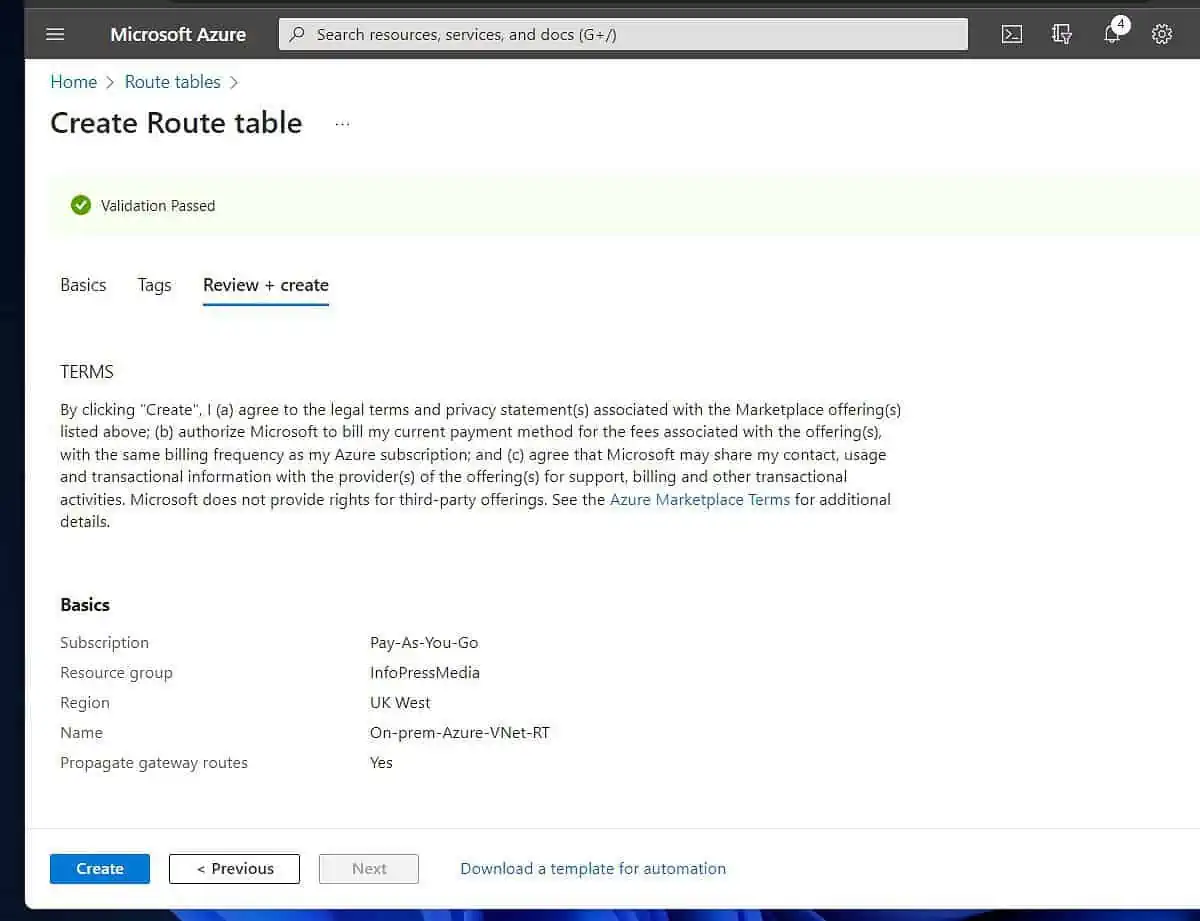
- Once the “Create Route table” page opens, enter the required information and click “Review + create.”
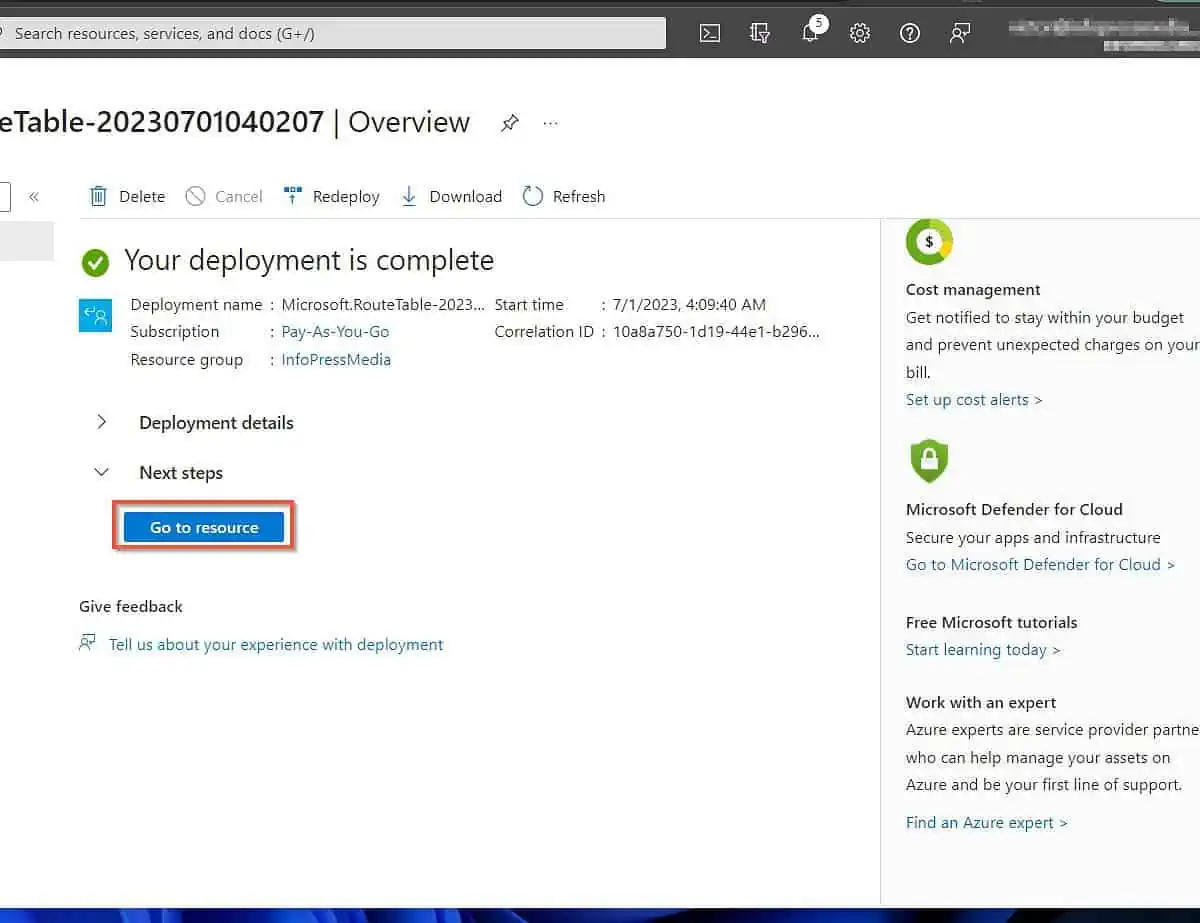
- Once the validation is complete, click Create and wait for Azure to create the routing table.
- After the Route table is created, click “Go to resource.”
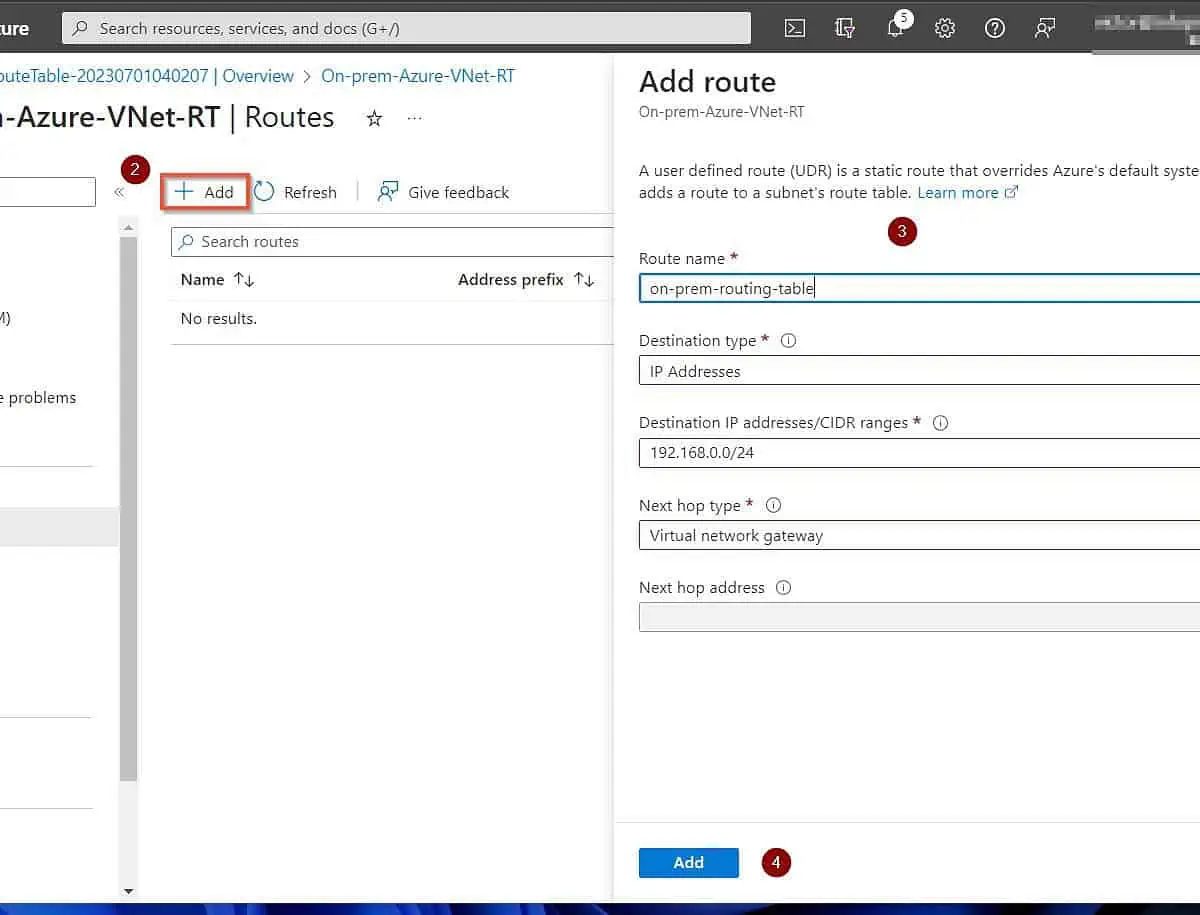
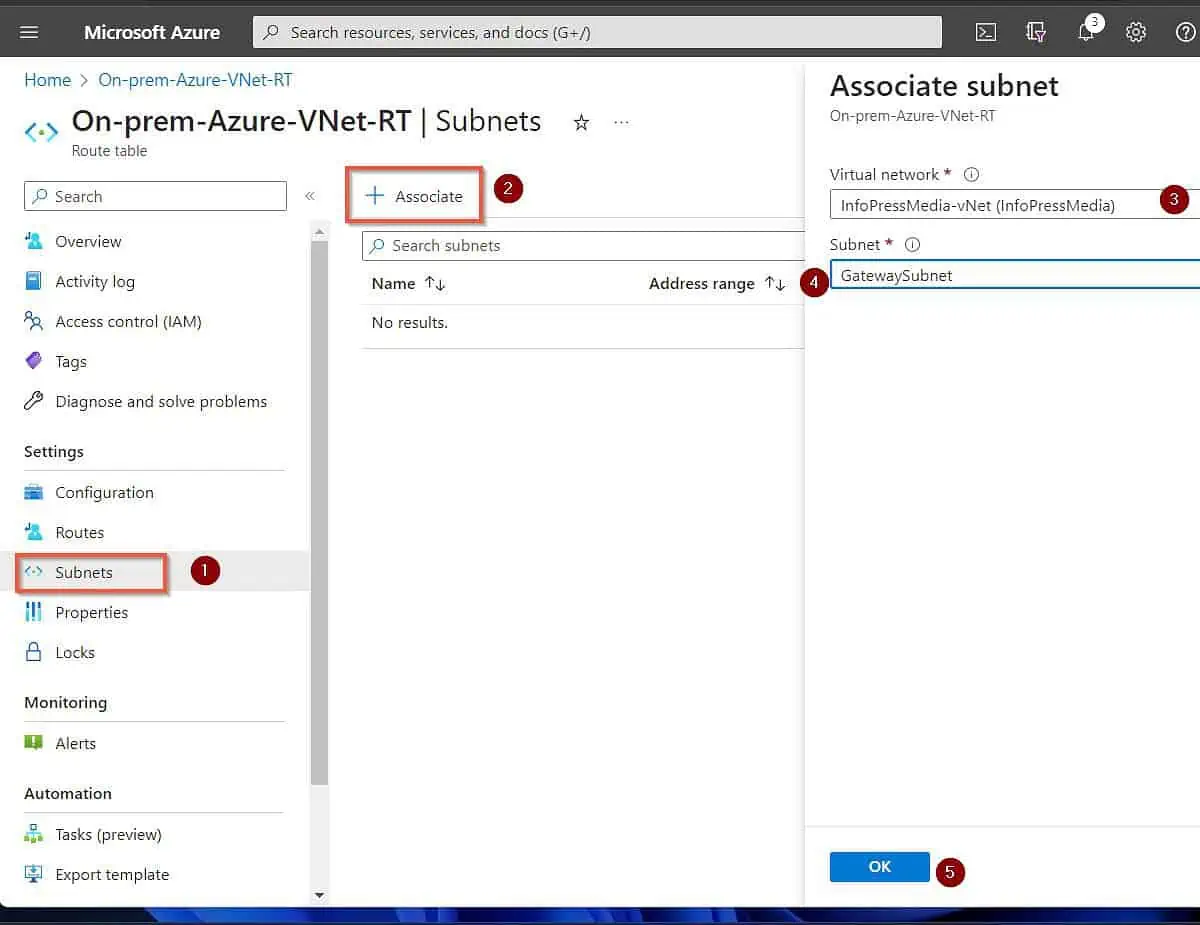
- Then, on the route table’s page, click Routes on the Settings menu and click “+Add.”
Next, enter a name for the route. After that, select the options in the screenshot below and click Create.
- Finally, associate the routing table to your on-prem network using the steps in this screenshot. Associate the default and GatewaySubnet subnets.
Step 9 of 9: Configure an Azure VM as DC in an on-prem Active Directory (Azure and On-Prem)
In the subsections below, you’ll configure a custom DNS server on your Azure VNet. Additionally, we will guide you through the steps to set up a Windows Server 2019 VM on Azure and make it a DC in your on-prem AD.
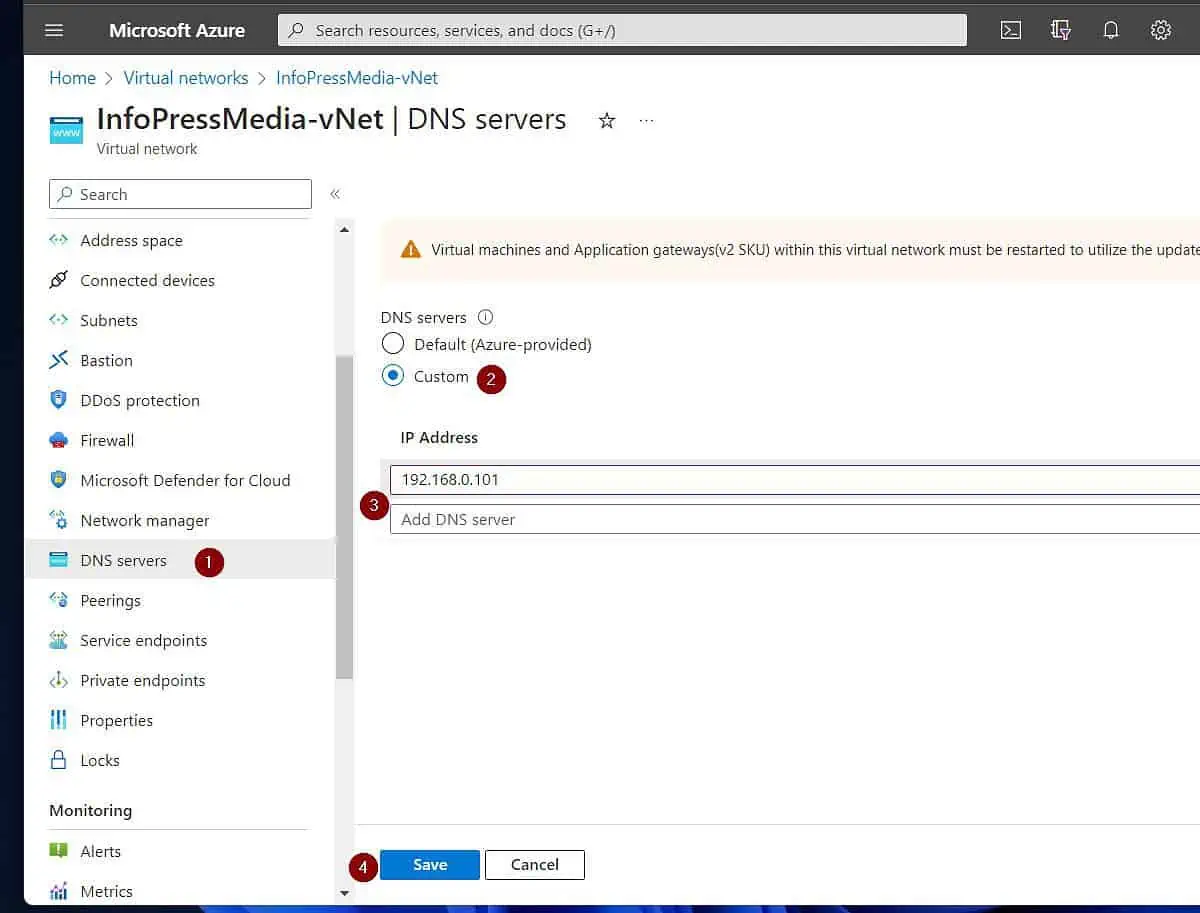
1 of 4: Configure Custom DNS Server in the Azure Virtual Network
When adding your Azure VM as a DC, it uses DNS to query the on-prem Domain Controller. For the Azure VM to query your on-prem DC, it must use your on-prem DNS server.
Use the steps below to configure a custom DNS on your Azure VNet. When you configure a custom DNS on the VNet, you specify your on-prem DNS server.
Open the Azure VNet you created in Step 1 of 9 and click “DNS Servers.” Then, select Custom and enter the IP address of your on-premises DNS server.
When you finish, click Save.
2 of 4: Create a Windows Server a 2019 Azure VM
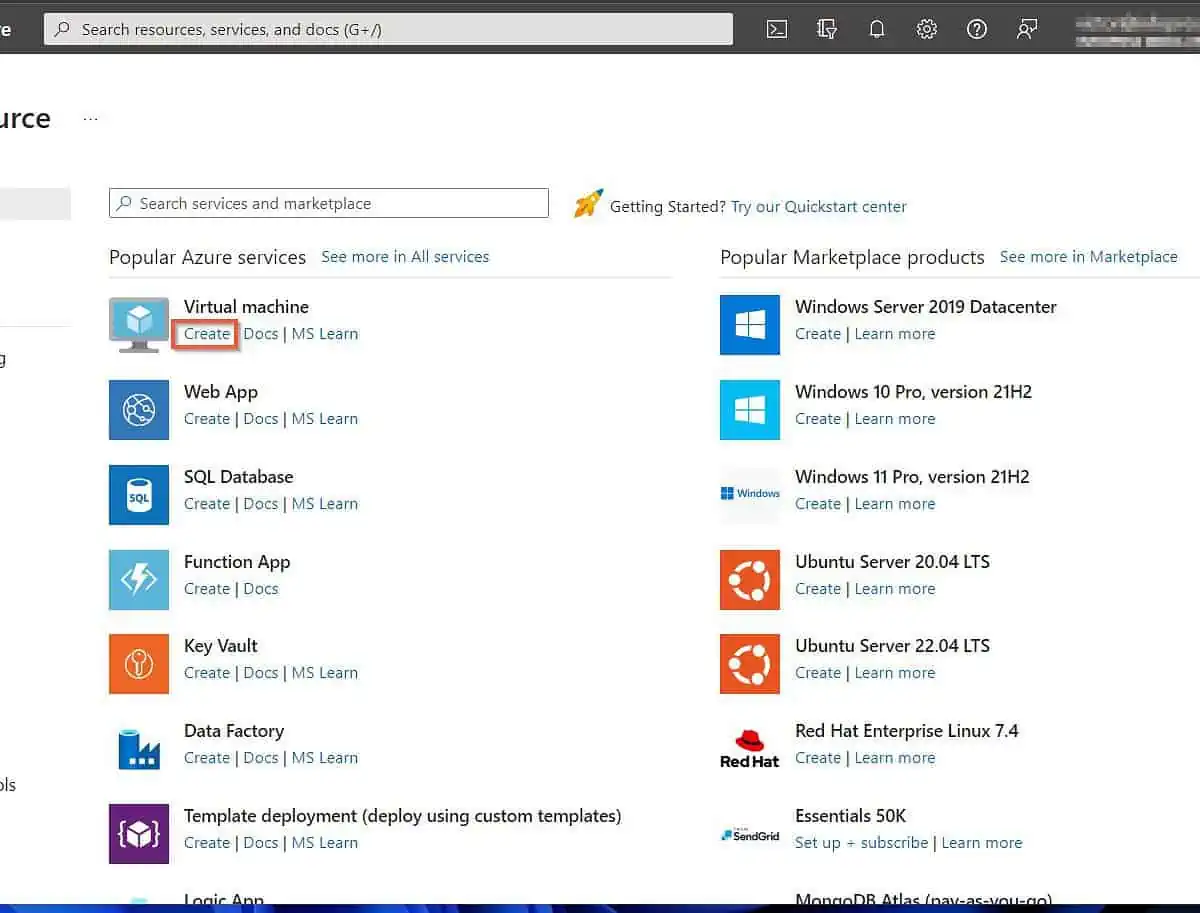
- Sign in to portal.azure.com, click the menu, and select “Create a resource.”
- After that, locate “Virtual Machine” under “Popular Azure services” and click Create. However, if “Virtual Machine” is not listed, use the search box.
- Then, on the Basic tab of the “Create a virtual machine” page, choose a subscription and a Resource group.
We recommend using the same resource group as the other resources you created for this project.
After that, scroll down and enter the “Virtual machine name,” then the Azure Region to create the VM. Use the same region as the VNet and the other resources.
Configure other settings shown on my screenshot and proceed.
After creating the VM, you can change its host name. However, the virtual machine name cannot be changed.
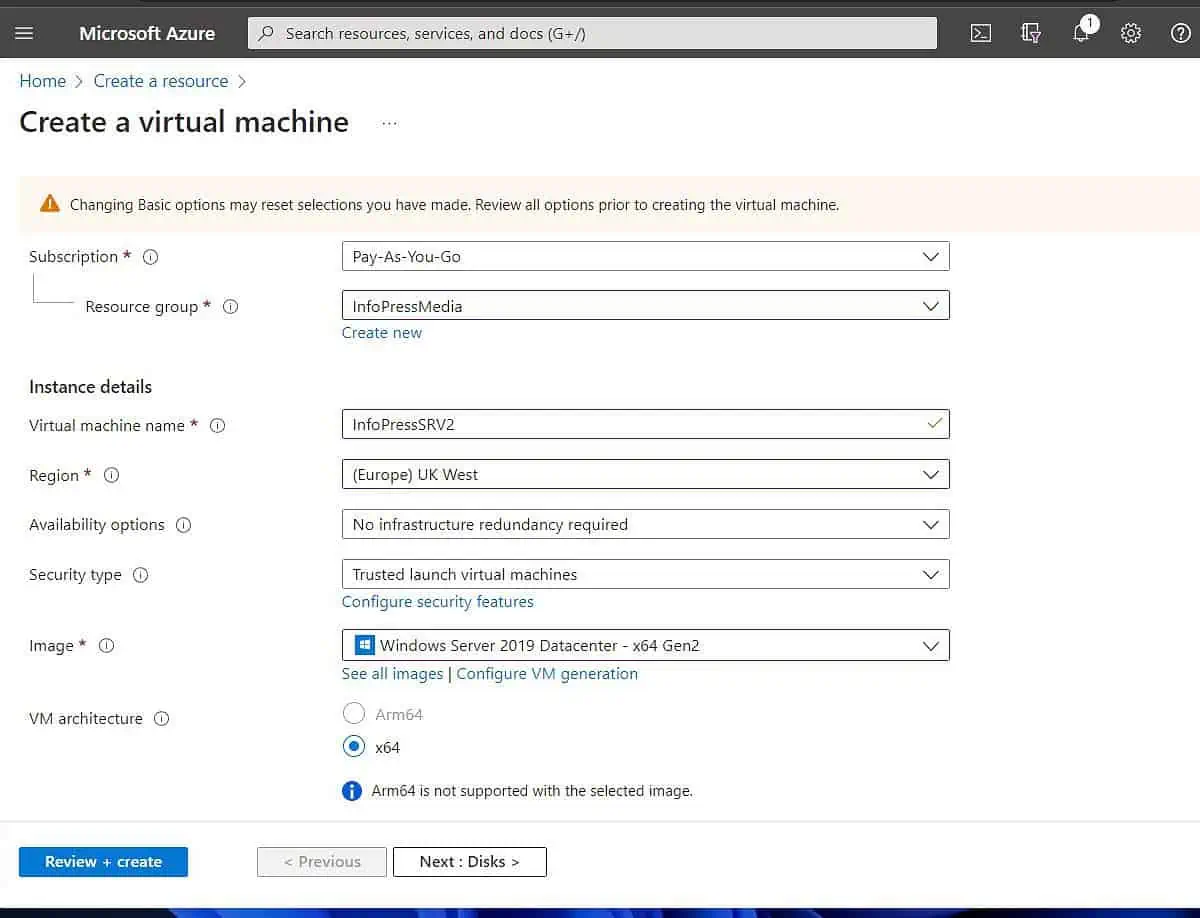
The Basic tab has additional settings, such as the VM’s size and the Administrator account credentials. Additionally, Inbound port rules can be configured.
RDP (port 3389) is configured by default as you require this port to connect to the VM via Remote Desktop. Licensing can also be configured at the bottom of the Basic tab.
When you finish, click “Next: Disks >.”

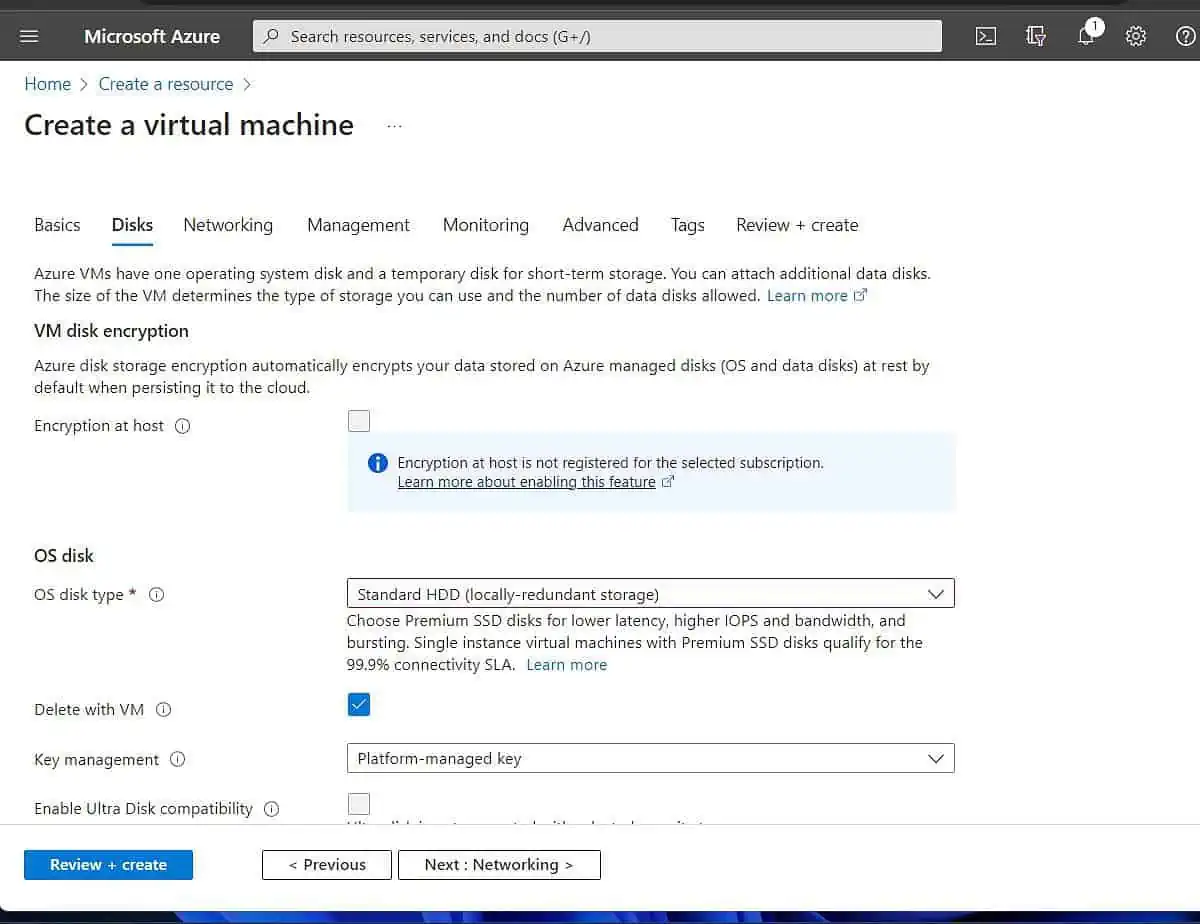
- On the disk tab, select your options and proceed to Networking.
- Then, on the Networking tab, select the Virtual Network and the subnet to which you want this VM to belong. Select the VNet you created earlier.
Azure automatically creates a Public IP for the VM.

- Finally, before you click “Review + create,” check other tabs and configure as required.
- Finally, after Azure has reviewed your settings, check that you’re happy with the settings and click Create. Wait for Azure to create the VM, then click “Go to resource.”
3 of 4: Connect to the Azure VM Via RDP
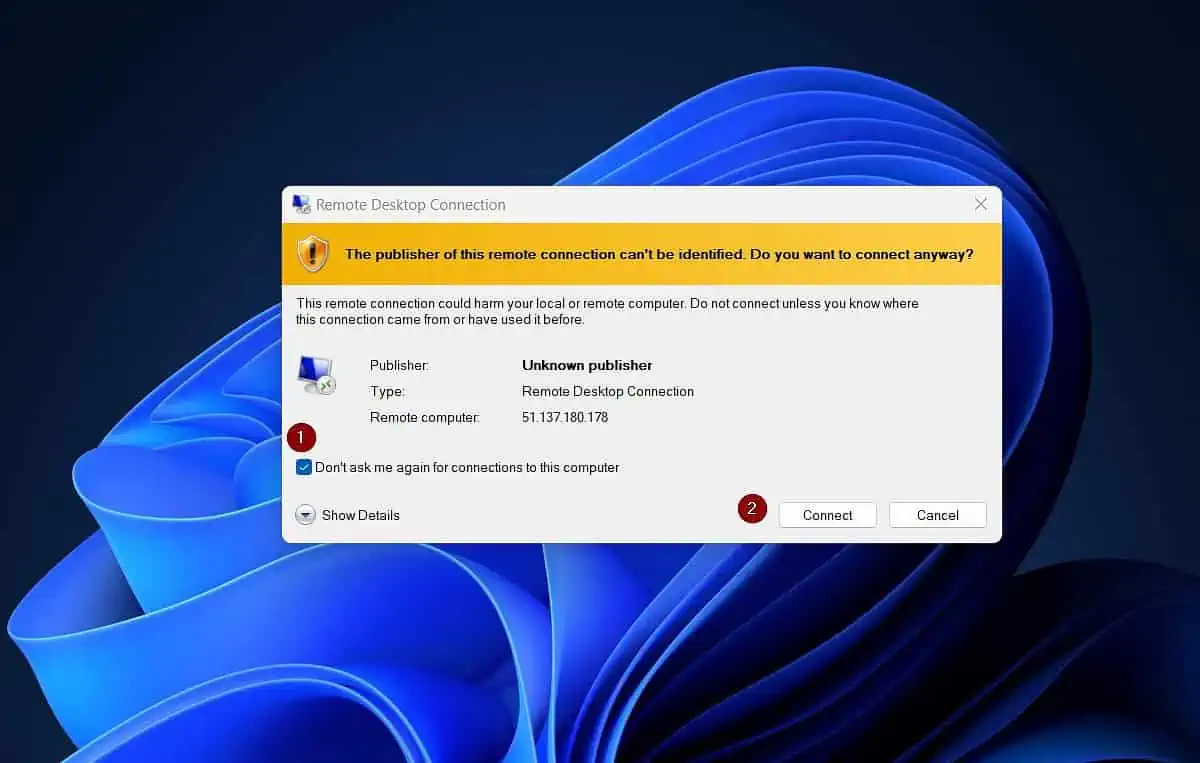
- When the VM opens, click the Connect, then download the RDP file.

- When you click the downloaded RDP file, Windows will request you to confirm that it is safe to connect. Check “Don’t ask me again for connections to this computer.”
After that, click Connect.
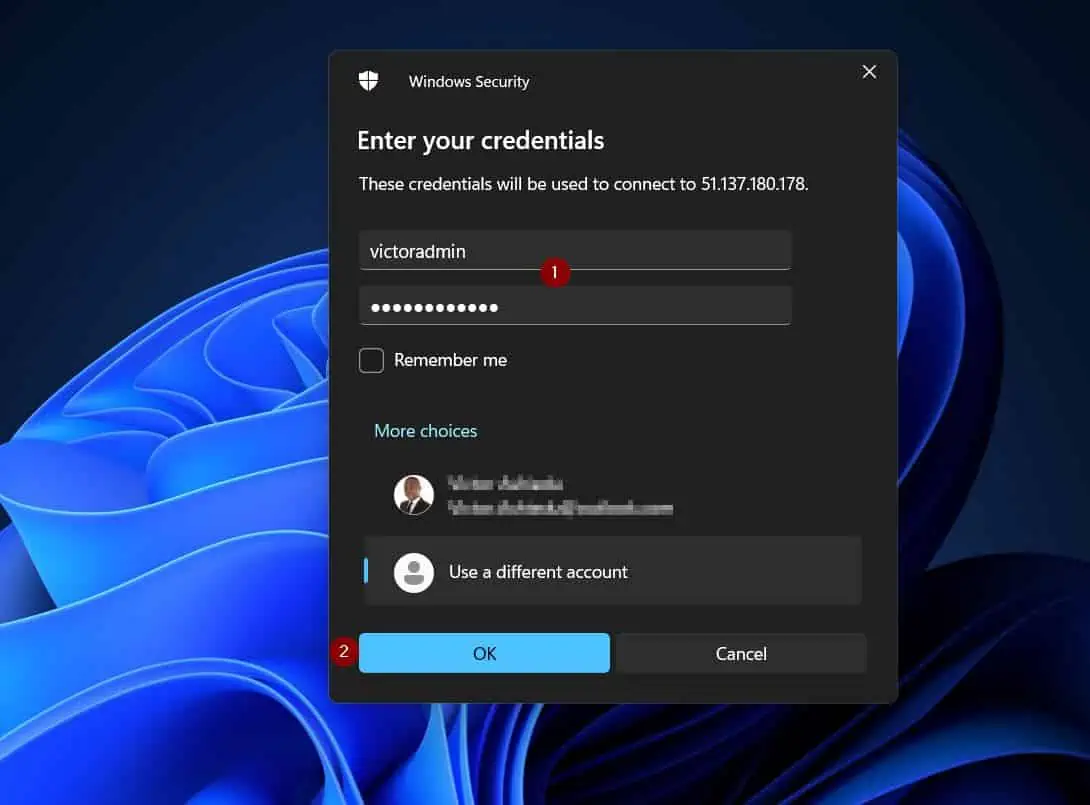
- Next, Windows security will open a login window. Click “More choices” to enter the VM’s admin credentials.
Then, click “Use a different account.”
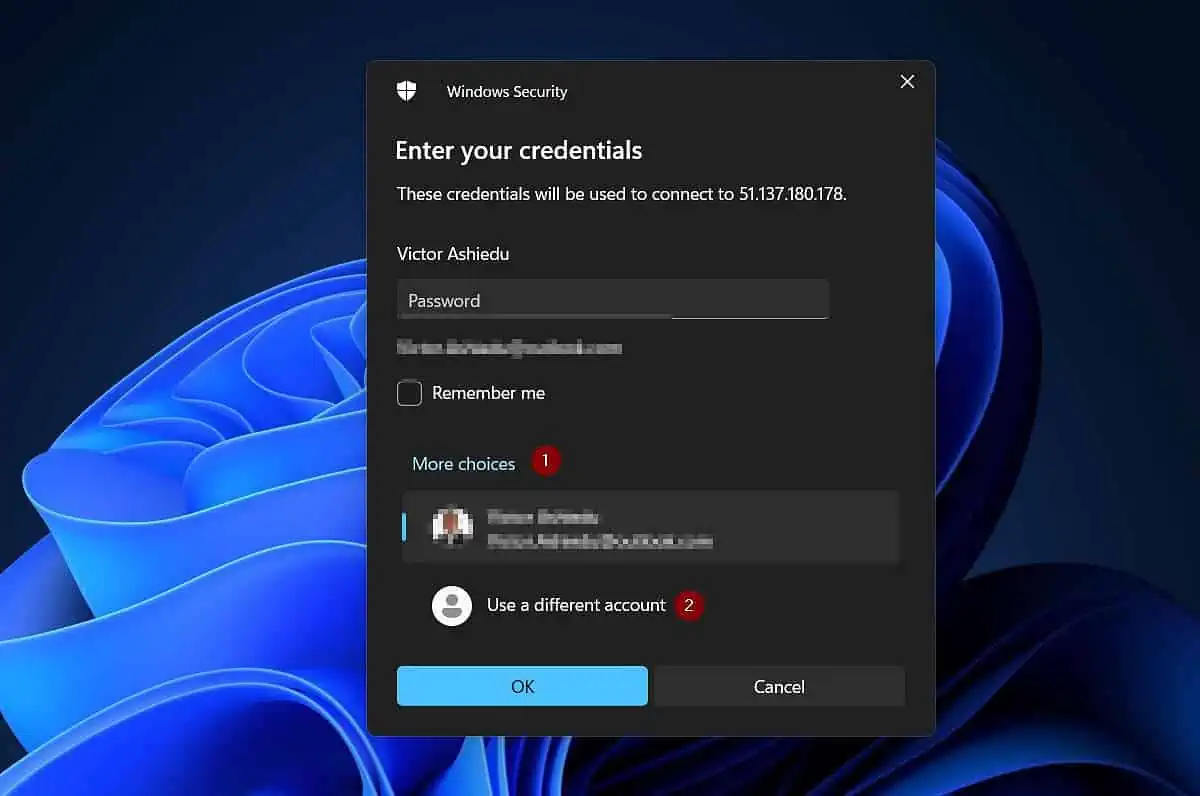
- Enter the VM’s admin credentials you created in subsection 2 of 3, number 3. After entering the credentials, click OK.
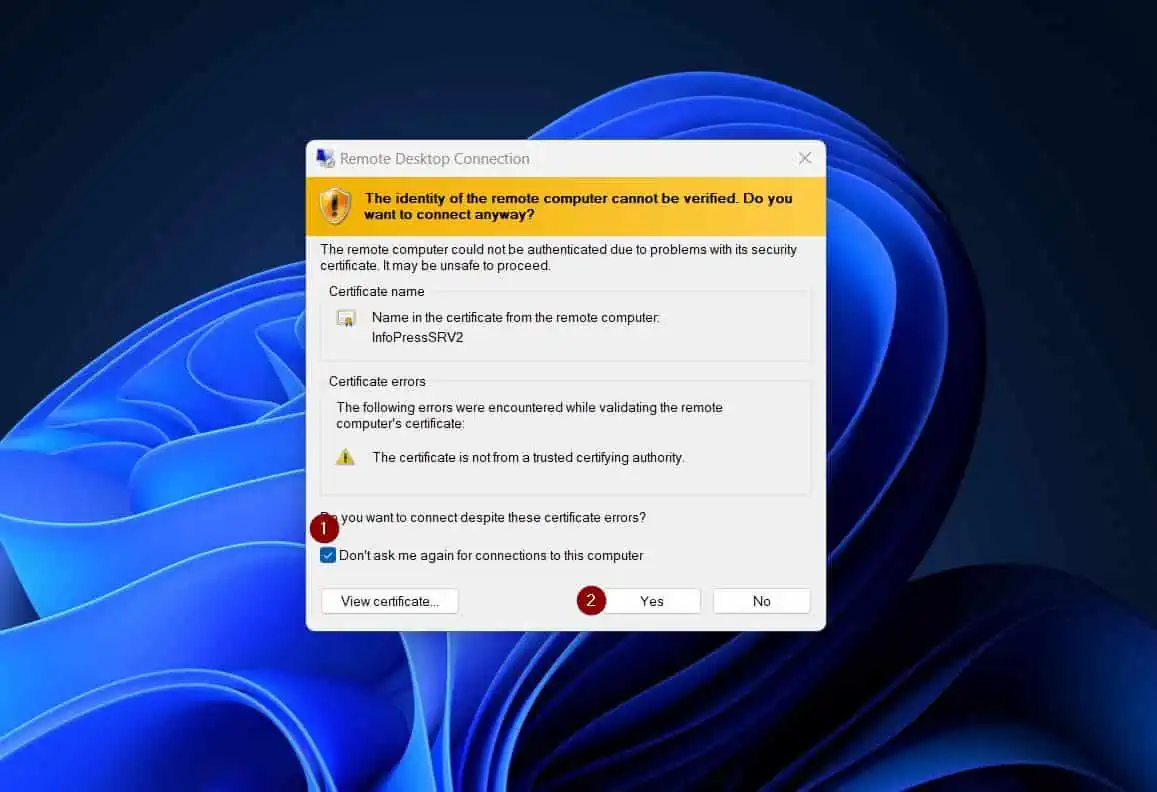
- Since this is the first time you’re connecting to this VM, your PC needs to install a certificate. Check “Don’t ask me again for connections to this computer,” then click Yes.
4 of 4: Make the Azure VM an additional DC in your On-prem Active Directory
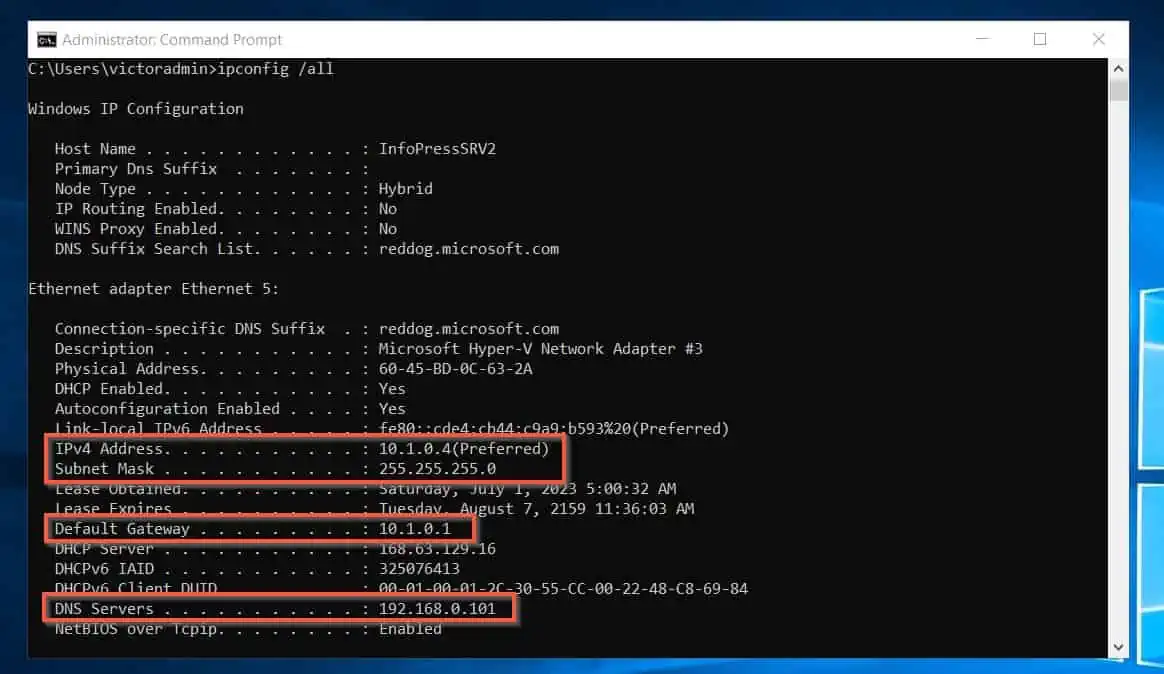
- Once connected to the VM, open the command prompt and run the “ipconfig /all” command. Leave this window open and proceed to step 7 below.
I have highlighted what you require for the next step in the screenshot below.
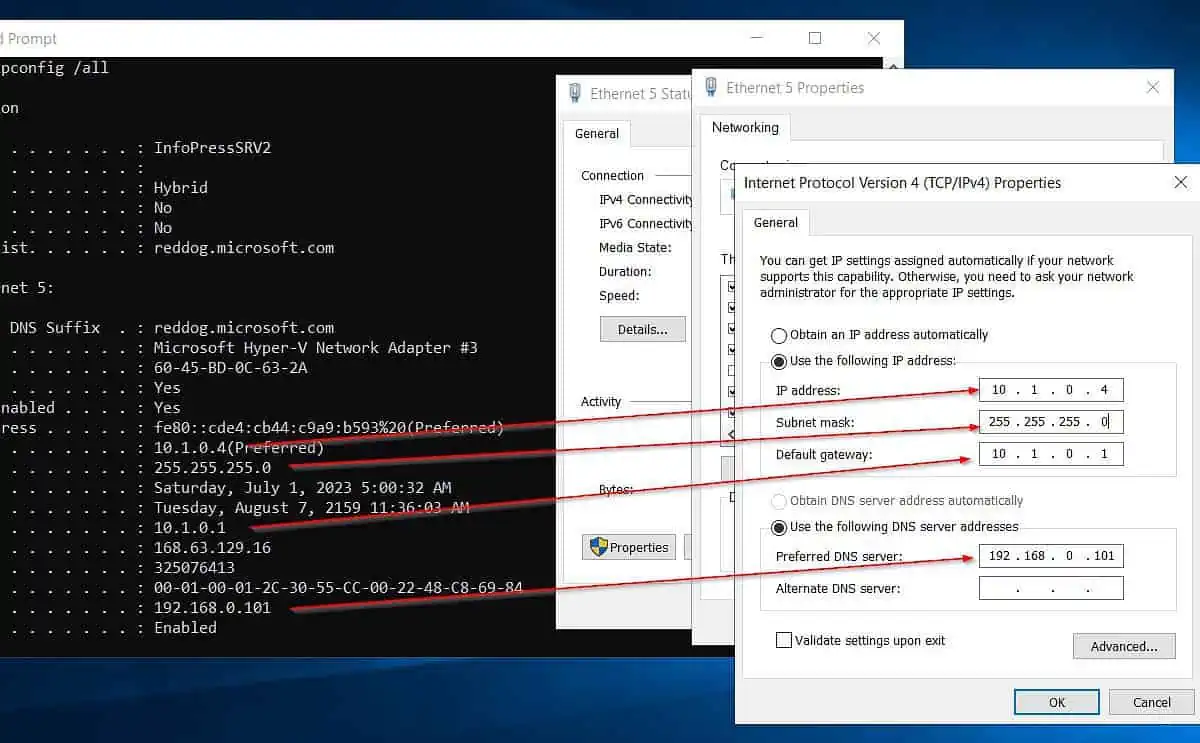
- Open the TCP/IPv4 properties of the VMs NIC and configure static values. When you click OK, you’ll be disconnected from the VM.
- Install Active Directory Domain Service (AD DS) on the Azure VM.
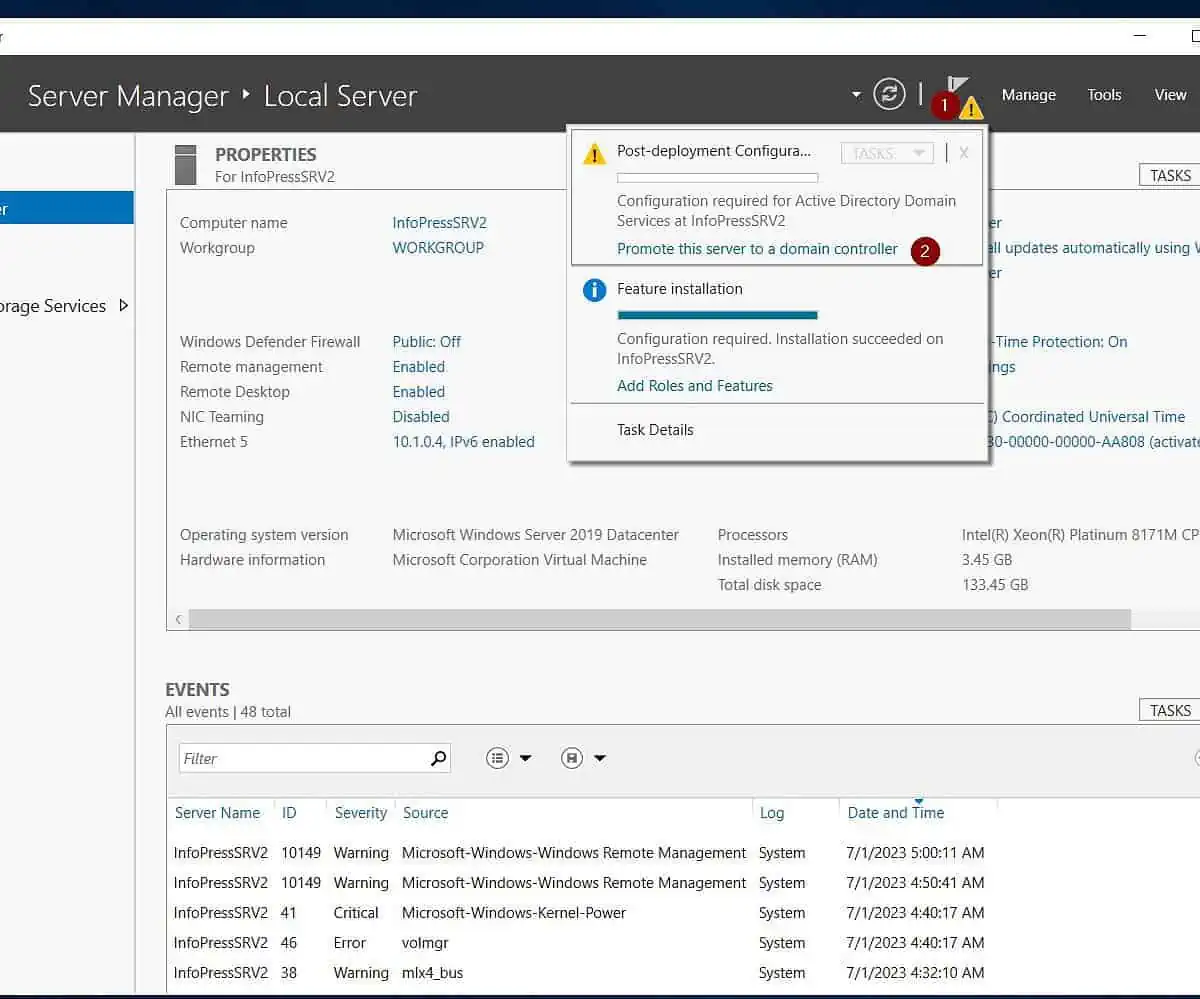
- After installing AD DS on the VM, click the yellow amber notification and select “Promote this server to a domain controller.”
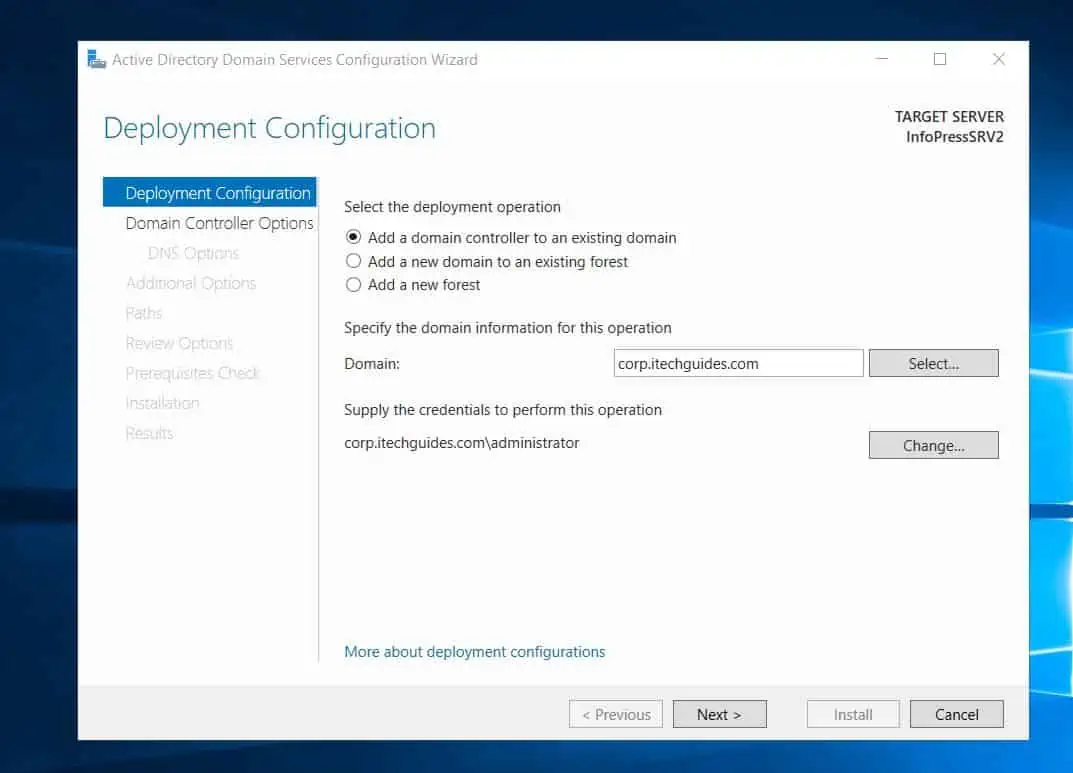
- Then, on the “Deployment Configuration” page, enter the FQDN of the AD domain in the Domain field. After that, click “Select.”
On the “Windows Security” pop-up, enter your username and password and click OK.

- Click Next to continue.
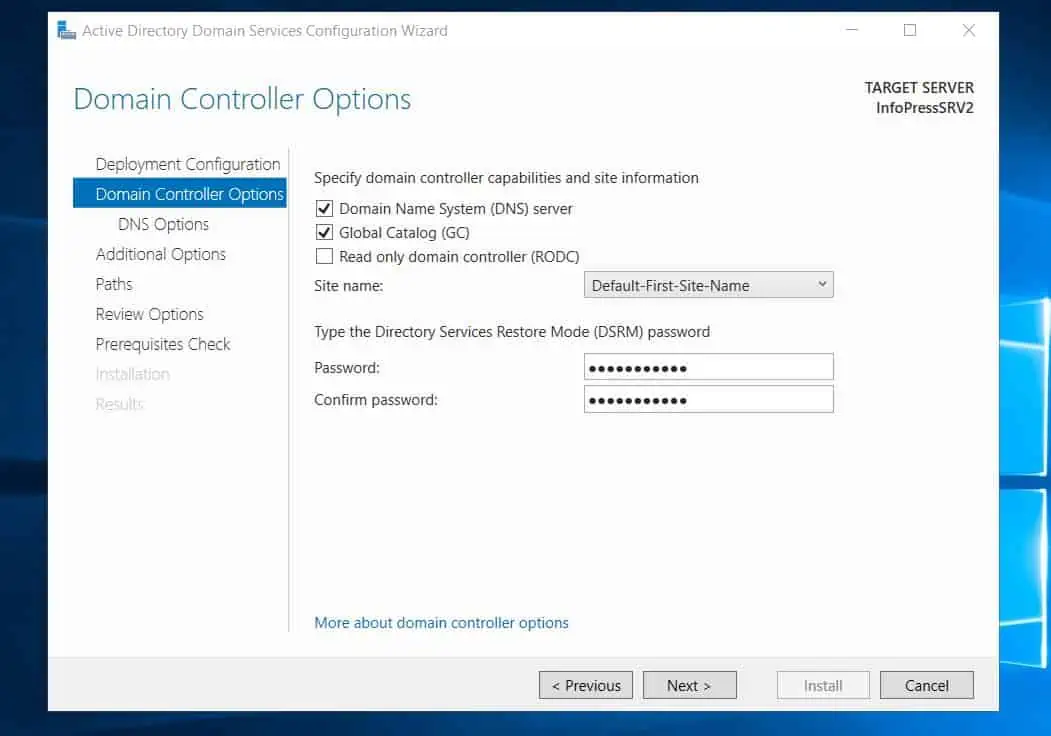
- Once the “Domain Controller Options” page displays, it indicates that the Azure VM server has successfully signed into and detected your on-prem AD.
Select the additional services you want to install on the Azure VM DC. Then, enter a password for the server’s Directory Services Restore Mode.
Repeat the password and click Next.
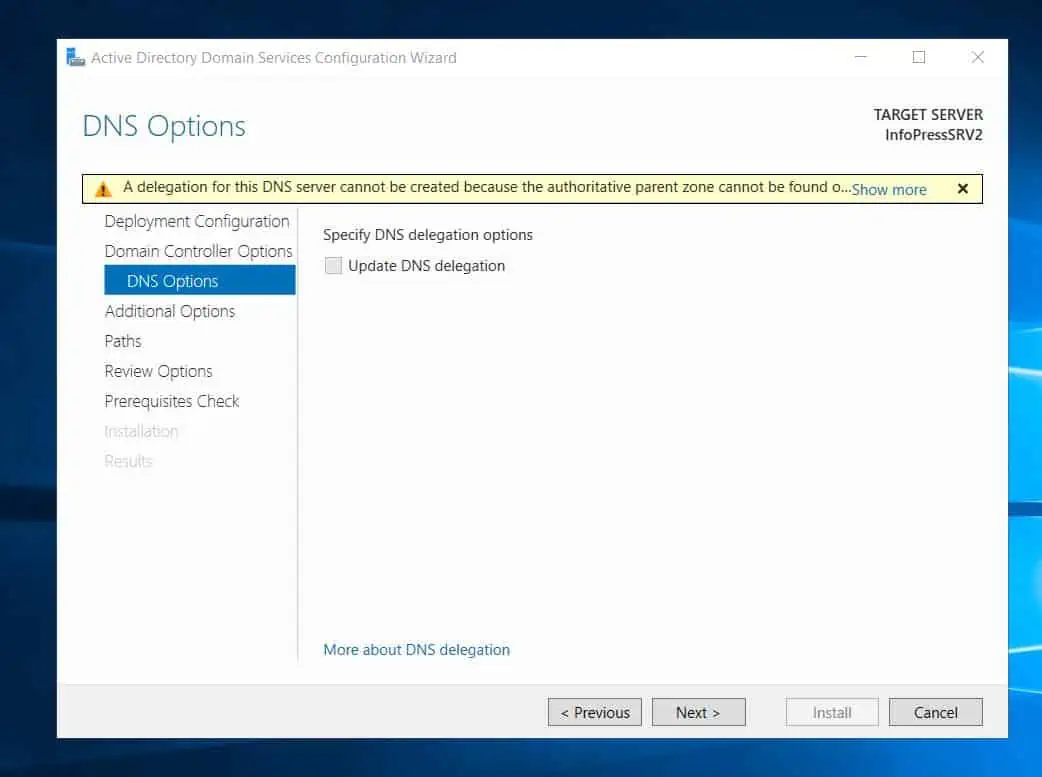
- On the DNS Options page, ignore the error and click Next.
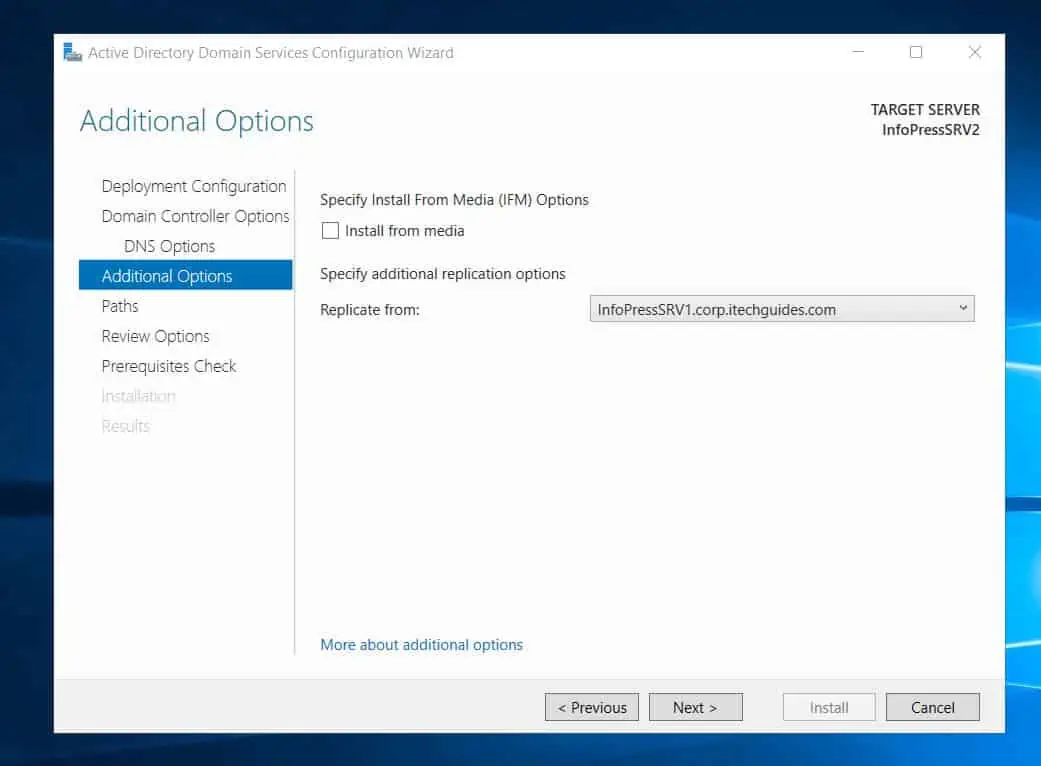
- Then, when the Additional Options page opens, select the on-prem Domain Controller you want the Azure VM to replicate from.
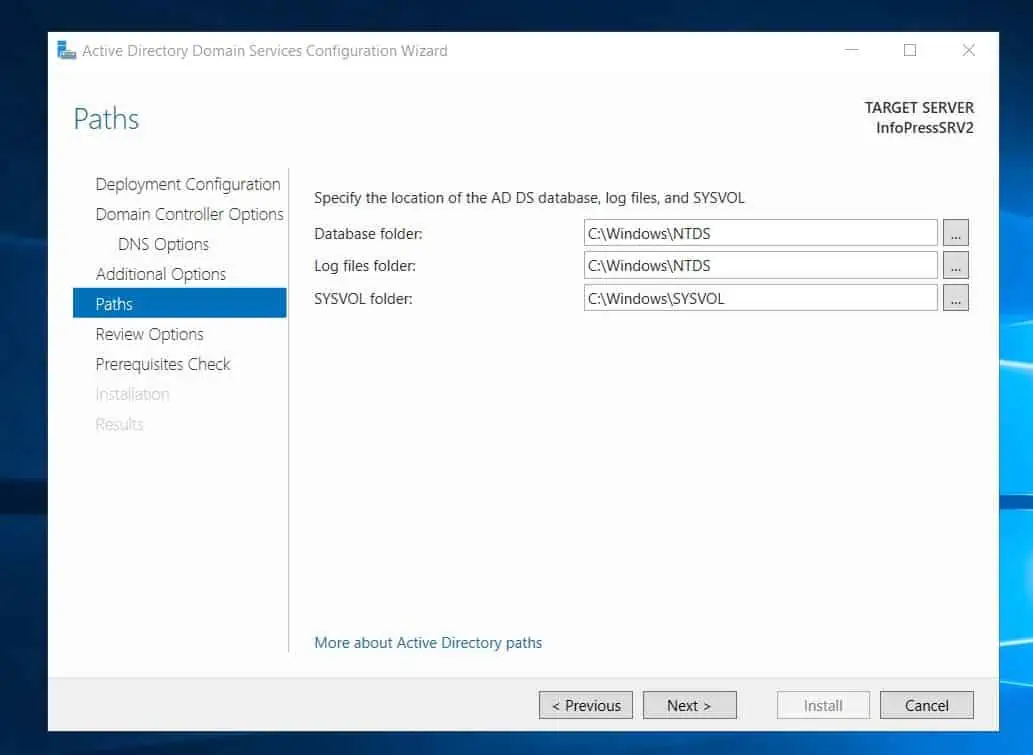
- Click Next on the page below to accept the default location to save the Azure AD DS databases, log files, and SYSVOL. Otherwise, change the drive and click Next.
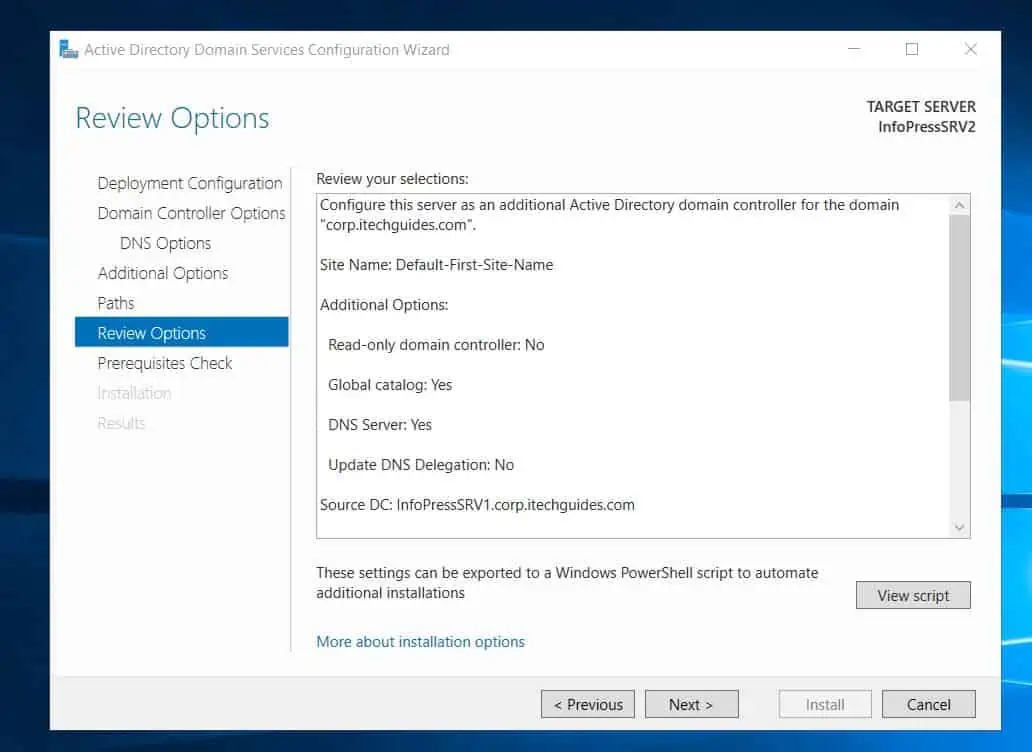
- Review your selections and click Next to proceed.
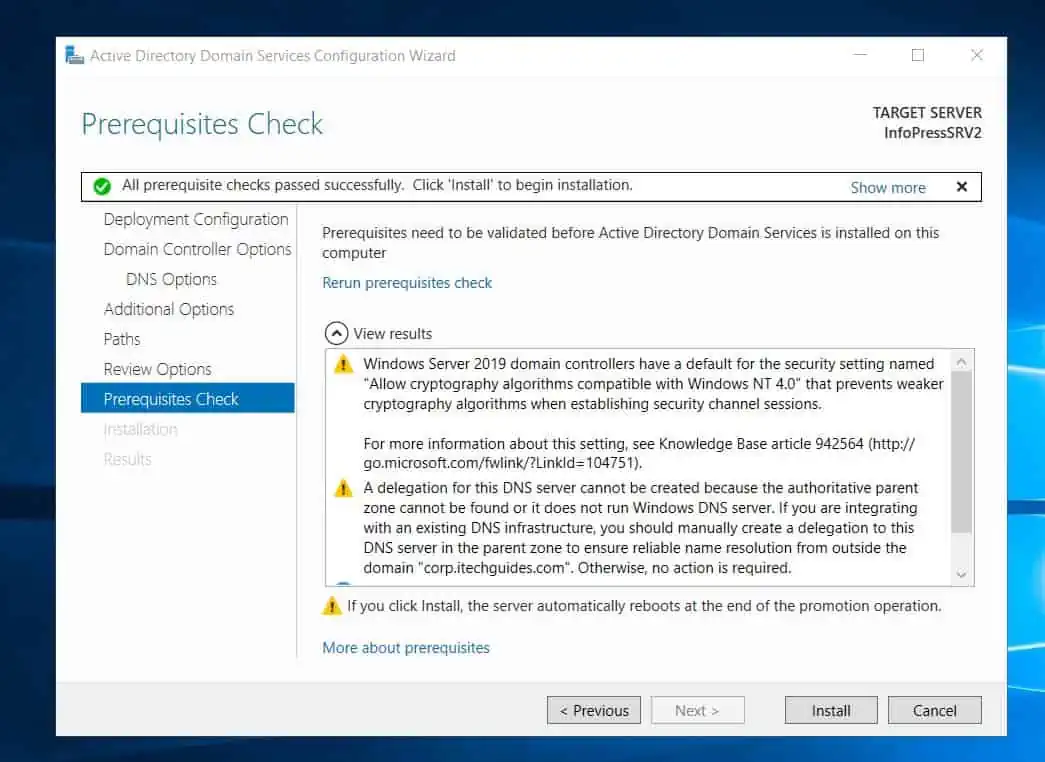
- Finally, click Install.
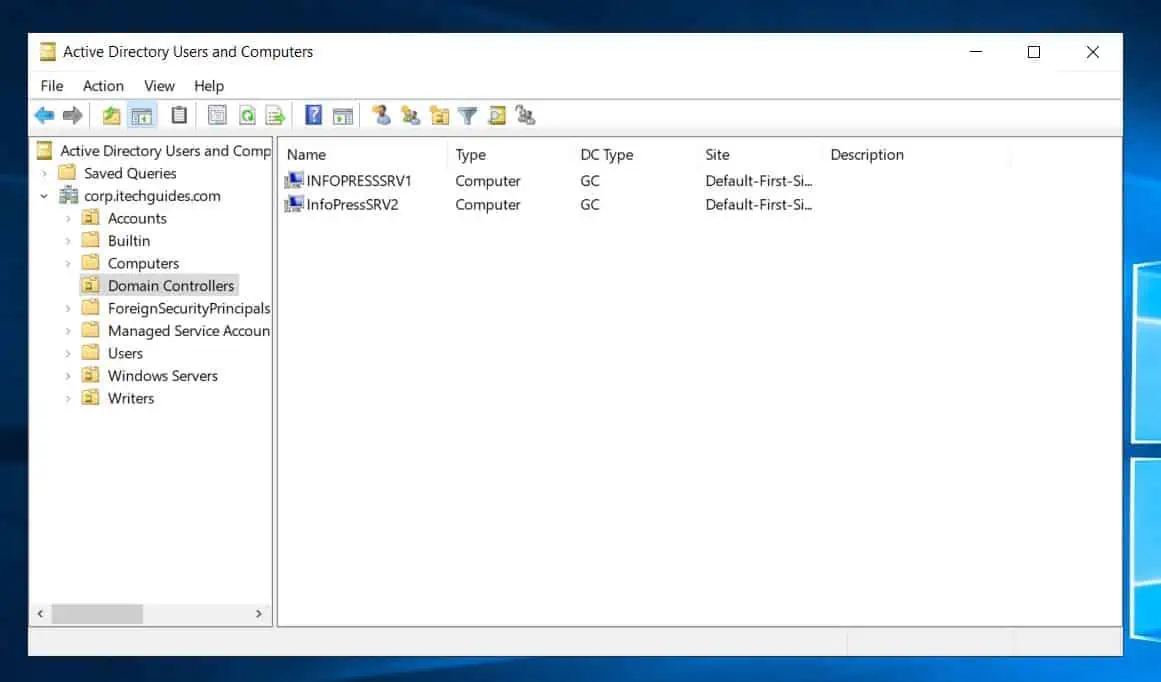
- When the Azure VM has been successfully configured as a DC in your on-prem Active Directory, it will be listed in the Domain Controller’s OU.
Frequently Asked Questions
There are multiple ways to integrate Azure AD with on-prem AD. The first option is to use Azure AD Connect, which synchs on-prem Active Directory users to Azure Active Directory.
Another option is to create a VNet in Azure and create a site-to-site VPN connection to your on-premises. After that, create a Windows Server Azure VM and add it as an additional domain controller on your Active Directory domain.
Before adding an Azure VM to your on-premises domain, you must create a site-to-site VPN connection between the Azure VMs VNet and your on-premises network.
After that, install the Active Directory role on the Azure VM. Finally, join the domain like any server on your on-premises network.
No, Azure AD is NOT the same as on-prem AD.
Azure AD (Azure Active Directory) is an Azure SaaS identity service you sign up for on Azure. Signing up for Azure AD does not require you to install or configure servers – thus, it is a SaaS (Software as a Service) offering.
On the contrary, on-prem AD runs on Domain Controllers in your data center.
According to the Microsoft Azure AD Connect Prerequisites page, “Azure AD Connect must be installed on a domain-joined Windows Server 2016 or later.”
This means that it is not a requirement to install Azure AD Connect on a Domain Controler.
Yes, you can migrate from on-prem AD to Azure AD. The first option is to use Azure AD Connect.
With this method, after synching your on-prem AD objects to Azure AD, you can decommission your on-premises AD directory service.
Alternatively, you can migrate your domain controllers to Azure Virtual Machines. Secondly, transfer FSMO roles to the Azure VM Dcs.
Finally, decommission the on-premises domain controllers.
Conclusion
Adding an Azure VM as a DC in an on-prem Active Directory is a complex process. The process involves creating an Azure VNet and configuring a site-to-site VPN connection with an on-prem VPN device.
Once the connection is established and the Azure VM can communicate with the on-premises Domain Controllers, it can become a DC on the on-premises network.
Following the steps in this guide, I believe you would have successfully added an Azure VM in your tenant as a Domain Controller in your on-prem AD DS.
Take a moment to leave your comments using the “Leave a Reply” form at the bottom of this page.
Alternatively, you can respond to the “Was this page helpful?” question below.