In this guide, I share the 20 command prompt commands I use regularly. For each command, I explain the syntax, parameters, then end with some examples.
General Command Prompt Commands
HELP
The HELP command provides help information for Windows commands. When you type HELP in cmd without any parameters, it lists and briefly describes every system command.
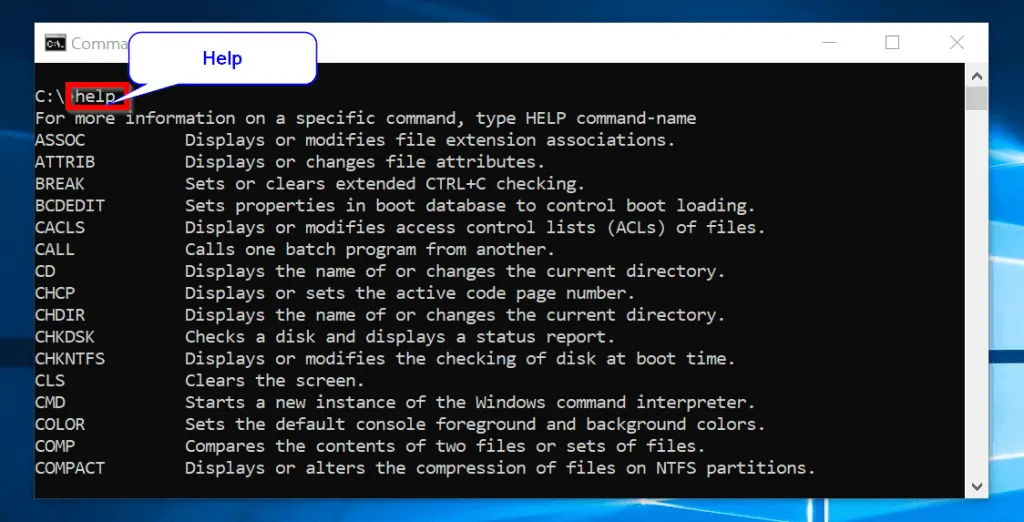
This is very useful if you are trying to find a particular command but can’t remember it.
HELP Syntax
HELP [<command>]
Or
[<command>] /?
<command> is the Windows command you want to get information about.
HELP Parameters
| Parameter | Description |
| <command> | Specifies the name of the command prompt command you want information about |
HELP Examples
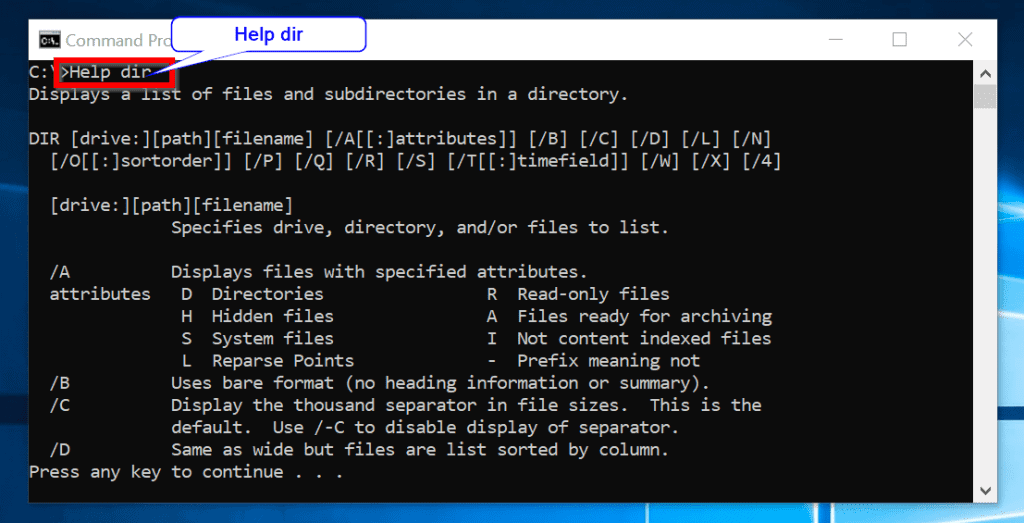
As an example, to get information about the DIR command, type the following command and press enter.
HELP DIR
The command below will achieve the same result as HELP DIR:
DIR /?
DIR
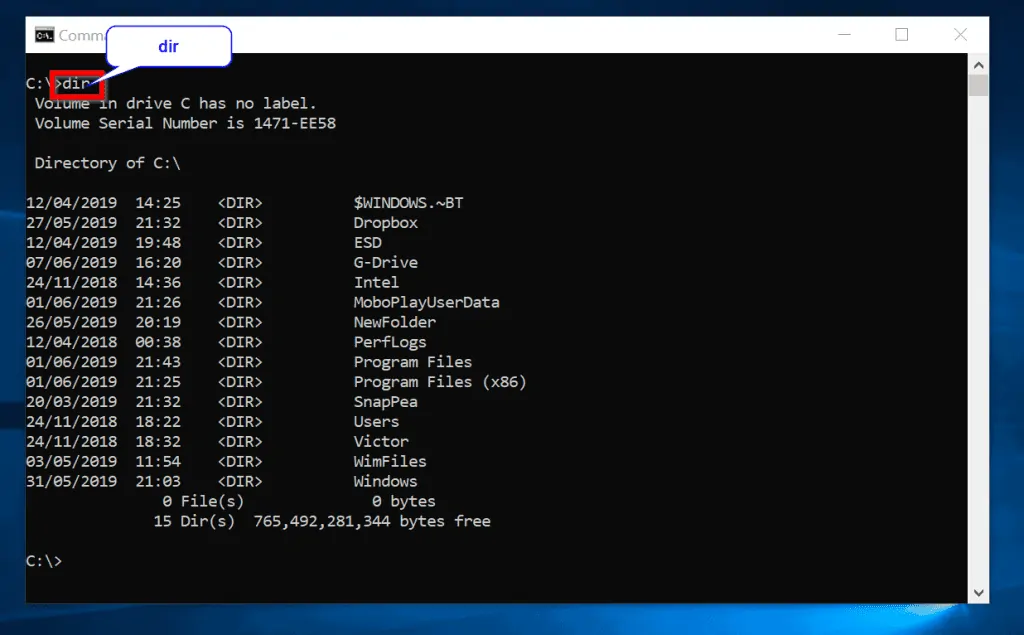
The DIR command displays a list of files and sub-directories in a directory. If you use DIR without any parameter, it displays volume label, Volume Serial Number and a list of folders in the path.
DIR Syntax
The full syntax of the DIR command is
DIR [drive:] [path] [filename] [/A[[:]attributes]] [/B] [/C] [/D] [/L] [/N] [/O[[:]sortorder]] [/P] [/Q] [/R] [/S] [/T[[:]timefield]] [/W] [/X] [/4]
For the purpose of this guide, I will limit the syntax to include parameters that you need to use regularly. Below is the modified syntax for DIR command.
DIR [drive:] [path] [filename] [/A[[:]attributes]] [/P] [/Q] [/W] [/D] [/L] /O[[:]<SortOrder>] [/S]
DIR Parameters
| Parameter | Description |
| [drive:][path][filename] | Specifies drive, directory, and/or files to list. |
| [/A[[:]Attributes]] | Displays files with specified attributes. Click Attributes for more information |
| /P | Pauses after each screenful of information. To see the next screen, press any key. |
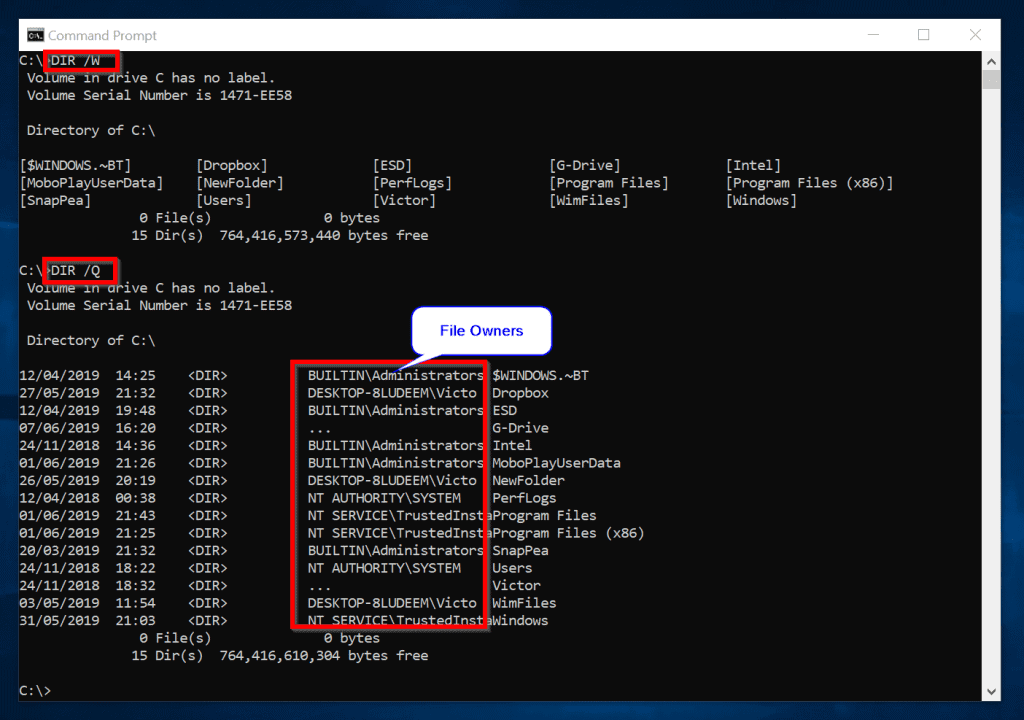
| /Q | Display file ownership information. |
| /W | Displays the results in wide list format. |
| /D | Same as /W but files are sorted by column. |
| /L | Displays directory and file names in lowercase (lists are not sorted). |
| /O[[:]<SortOrder>] | Files are listed as defined by <SortOrder> |
| /S | Displays all files in the specified directory and all sub-directories. |
If /A is used without specifying Attributes, DIR displays the names of all files, including hidden and system files. This is very useful if you wish to see hidden files in a directory.
DIR Examples
To display all top directories in drive C in wide list, use this command below:
DIR /W
To display owners of the files, use the one below:
DIR /Q
Here are the results:
CHDIR (CD)
CD is the short version of CHDIR. CHDIR displays the name of or changes the current directory to another directory.
CHDIR Syntax
CHDIR [/D] [drive:] [path]
Or
CHDIR [..]
“..” changes to the parent directory.
CD Parameters
| Parameter | Description |
| /D | Changes the current drive as well as the current directory for a drive. |
| [drive:] | Specifies the drive to display or change to. (if different from the current drive). |
| [path] | Specifies the path to the directory that you want to display or change to. |
| [..] | Tells command prompt to change to the parent folder of the current directory. |
CD Examples
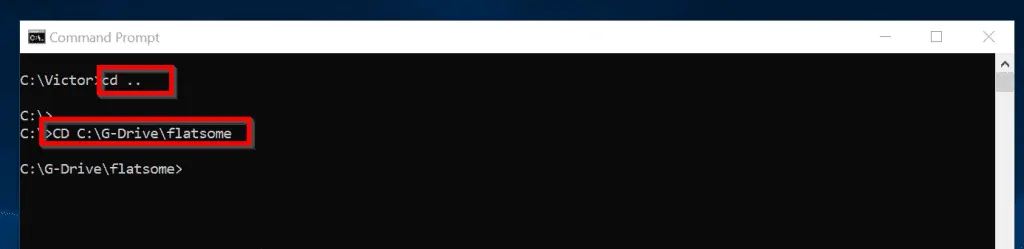
In the example below, I want to change from my current directory (\Victor) to the parent directory C:\
CD ..
To change to the directory, C:\G-Drive\flatsome, enter the command:
CD C:\G-Drive\flatsome
Results
Commands for Managing Disks & Partitions
The next set of command prompt commands are used to check your disk for errors, fix problems with your disk or format disks.
CHKDSK
Checks the file system and file system metadata of a disk volume for logical and/or physical errors. It then displays a status report.
CHKDSK Syntax
The full syntax is:
CHKDSK [<volume>[[<path>]filename]]] [/F] [/V] [/R] [/X] [/I] [/C] [/L[:size]] [/B] [/scan] [/spotfix]
I will only discuss parameters that you will require to use often. Below is the modified syntax I will discuss in this guide:
CHKDSK [volume[[path]filename]]] [/F] [/R] [/X] [/B] [/SCAN]
If you use CHKDSK without specifying any parameters, it displays just the status of the volume without fixing any errors. Running CHKDSK requires admin permission.
CHKDSK Parameters
| Parameters | Description |
| <volume> | Specifies the drive letter (followed by a colon), mount point, or volume name. |
| [<Path>] <filename> | Specifies the location and name of a file or set of files that you want CHKDSK to check for fragmentation. |
| /F | Fixes errors on the disk. The disk cannot be used by another process. If the disk is in use by another process, you will be prompted to fix errors at next reboot. |
| /R | Locates bad sectors and recovers readable information. If the /scan option is not specified /R implies /F. |
| /X | Performs a less vigorous check of index entries. /X applies to NTFS only. |
| /B | Re-evaluates bad clusters on the volume. /B implies /R and only applies to NTFS volumes. |
| [/SCAN] | NTFS only – Runs an online scan on the volume. |
CHKDSK Examples
To find physical disk errors in the file system and attempt to recover data from any disk with bad sectors, run the command:
CHKDSK /F
To run the previous command, you MUST open command prompt as administrator. Search for cmd, right-click and click Run as administrator.
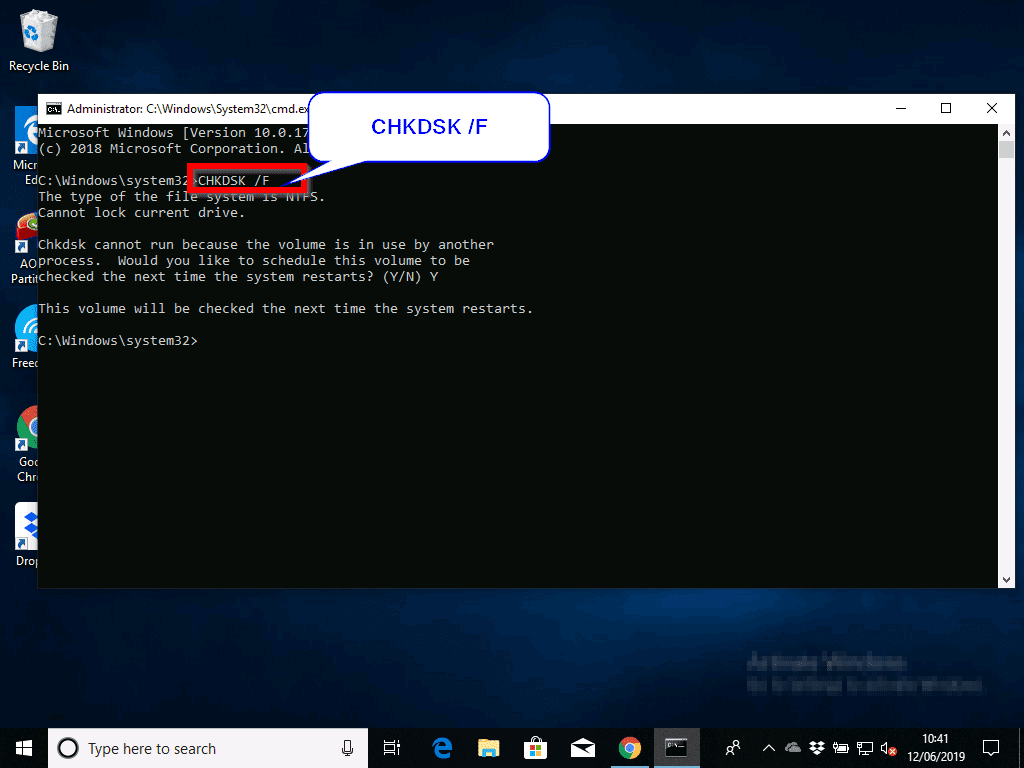
Because I ran CHKDSK on a system volume (Drive C:), I received the message “chkdisk cannot run…”. To run CHKDSK on next reboot, enter Y. Then press Enter. Reboot your computer.
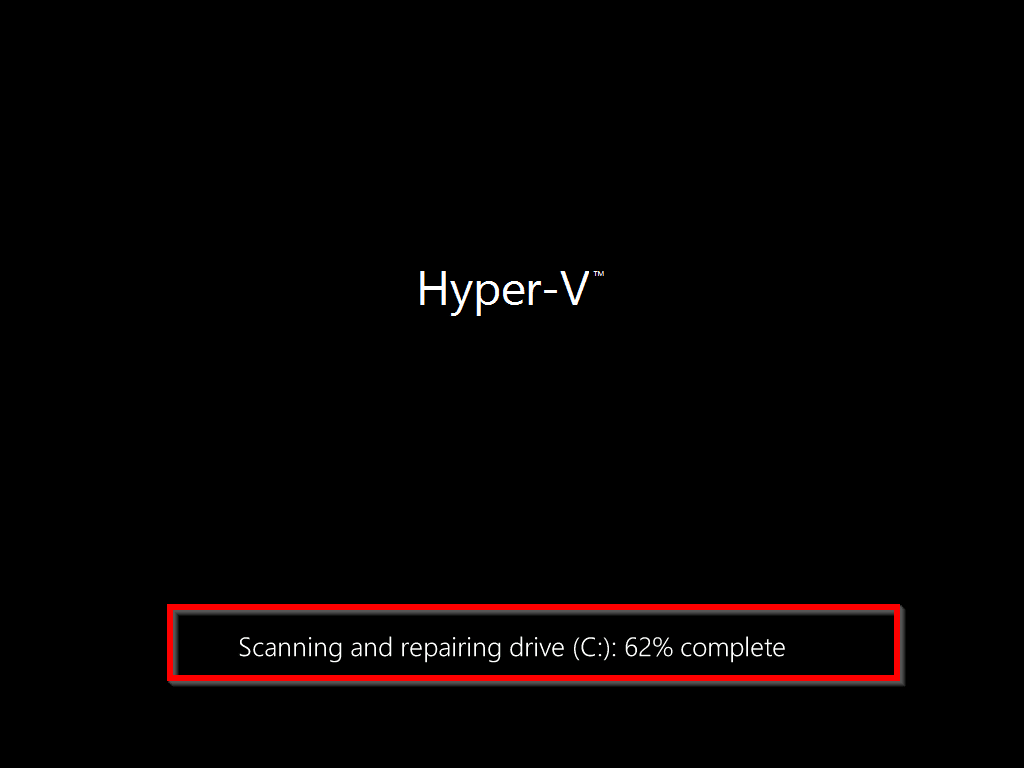
When I reboot my computer CHKDSK is scanning and repairing my drive.
To check your disks for errors without attempting to fix errors, run CHKDSK without any parameter.
CHKDSK

CHKNTFS
This is one of the most ignored command prompt commands. CHKNTFS is as important as CHKDSK. The difference is that CHKNTFS displays or modifies the checking of disk at boot time while CHKDSK can run when the Operating System is running.
CHKNTFS Syntax
CHKNTFS volume […]
CHKNTFS /D
CHKNTFS /T[:time]
CHKNTFS /X volume […]
CHKNTFS /C volume […]
If CHKNTFS is used without specifying parameters, it will show if the specified drive is dirty or scheduled to be checked on next reboot.
CHKNTFS Parameters
| Parameters | Description |
| volume | Specifies the drive letter (then a colon), volume name or mount point. |
| /D | Restores the computer to the default behavior; all drives are checked the next time the computer reboots. CHKNTFS will then run on all drives that are marked as dirty. |
| /T:time | Changes the AUTOCHK initiation countdown time to the specified amount of time in seconds. If time is not specified, displays the current setting. |
| /X | Used to define drives excluded from the default boot-time check. |
| /C | Schedules a drive to be checked at boot time; CHKDSK will then run if the drive is dirty. |
CHKNTFS Examples
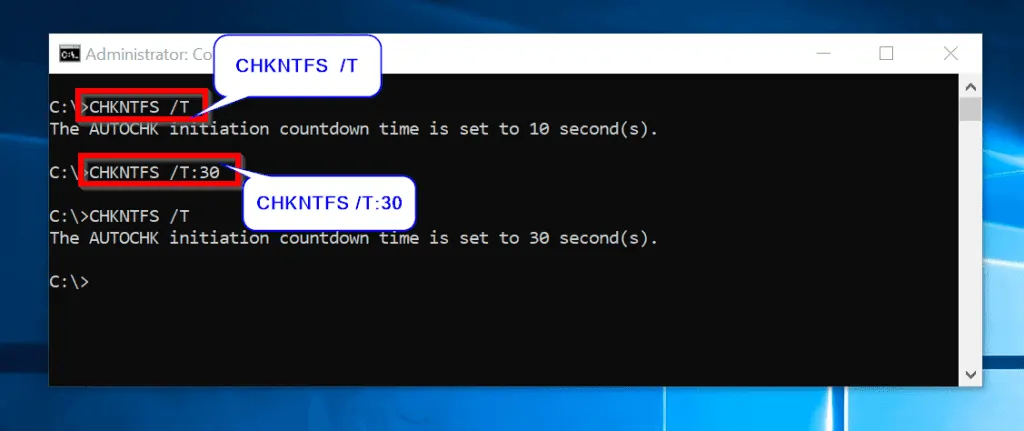
To see the Autochk.exe initiation countdown time for a computer:
CHKNTFS /T
If you wish to modify the initiation countdown time for Autochk.exe to 30 secs:
CHKNTFS /T:30
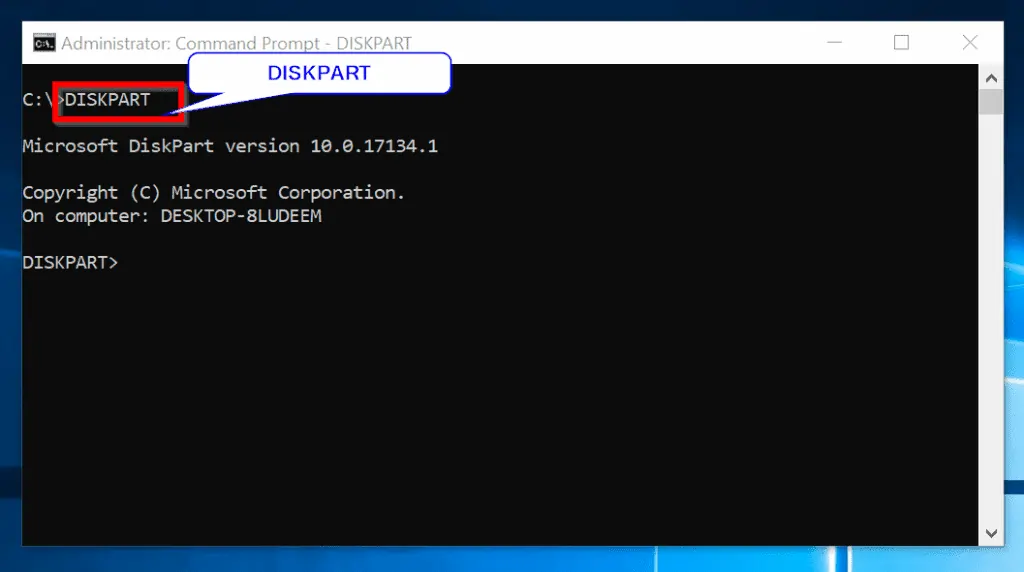
DISKPART
Used to manage disks, partitions, volumes, or virtual hard disks. DISKPART loads its own interface within cmd. For this reason, it does not operate like other command prompt commands.
DISKPART commands
DISKPART has a long lists of commands you can run. Below, I have listed the commands that you will need for most disk management tasks:
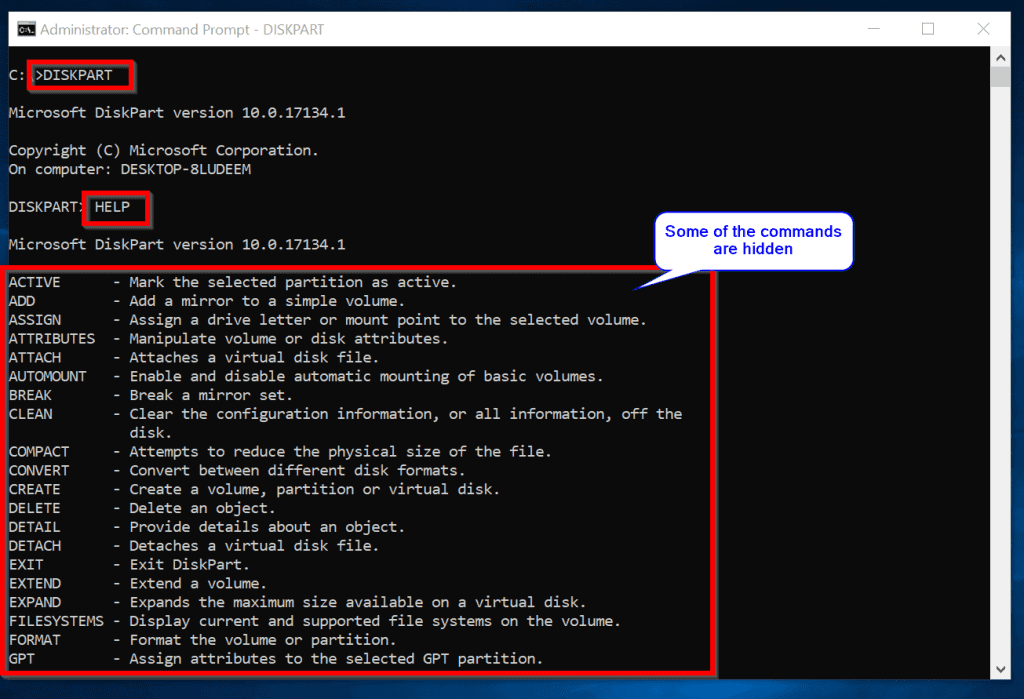
HELP: Displays all DISKPART commands.
LIST: Display a list of objects
SELECT: Shift the focus to an object – makes the object available for editing
RESCAN: Rescan your PC for new disks and volumes.
COMPACT: Attempts to reduce the physical size of a specified file.
ACTIVE: Mark the selected partition as active.
ASSIGN: Assigns a drive letter or mount point to the selected volume.
ATTACH: Attaches a virtual disk file.
DETACH: Detaches a virtual disk file.
CONVERT: Convert between different disk formats (FAT, FAT32, NTFS).
CREATE: Creates a volume, partition or virtual disk.
DELETE: Deletes an object.
EXIT: Exit DISKPART.
EXTEND: Extend a volume.
FORMAT: Formats the selected volume or partition.
For a full list of all DISKPART commands, enter into DISKPART interface, then execute HELP. More on this later. You could also get the full list of DISKPART commands by clicking DiskPart commands.
To get into DISKPART command interface, execute the command below:
DISKPART
The DISKPART command prompt will load:
To lists all available commands, run the HELP command:
DISKPART Examples
Once you get into DISKPART, run the LIST DISK command
LIST DISK
This will display all available disks on your computer

Next, to work on disk 0, execute:
SELECT DISK 0
DISK 0 is now selected

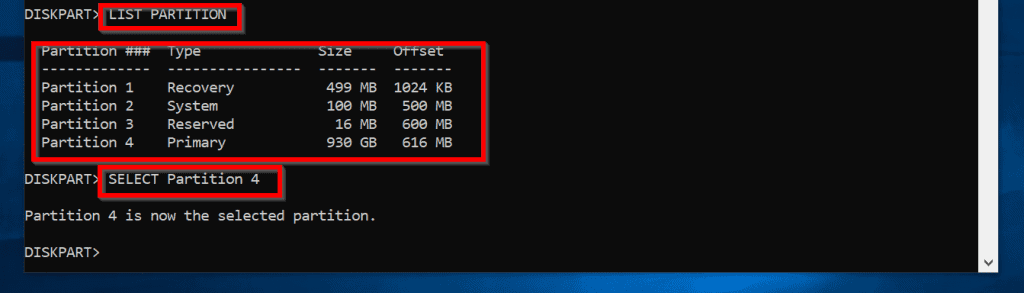
To view available partitions on disk 0, run this command:
LIST PARTITION
To work on Partition 4, for example, run:
SELECT Partition 4
Below are the result of both commands:
You can then DELETE the selected partition. I believe you get the gist now.
FORMAT
Formats a disk for use with Windows. Most people normally formats a disk using Disk Management. For administrators, using the FORMAT command may be necessary sometimes.
FORMAT Syntax
FORMAT has a long list of parameters. For this guide, I will stick to the commonly used parameters as shown in the syntax below:
FORMAT volume [/FS:file-system] [/V:label] [/Q]
FORMAT Parameters
| Parameters | Description |
| volume | Specifies the drive letter. Must specify a colon after drive letter. volume parameter may also specify mount point, or volume name. |
| /FS:filesystem | Specifies the type of the file system for format the drive for. Available options are FAT, FAT32, exFAT, NTFS, UDF and ReFS. |
| /V:label | Specifies the volume label. |
| /Q | Performs a quick format. |
FORMAT Examples
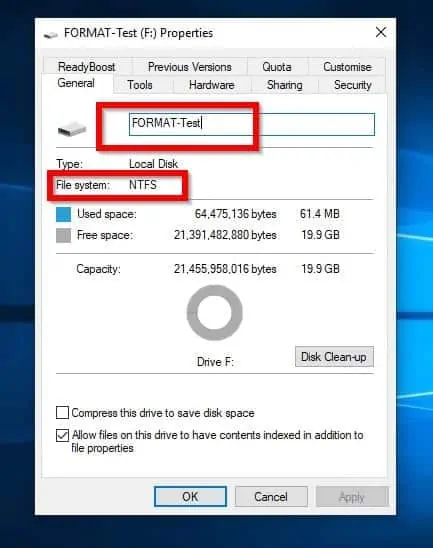
To format the volume highlighted in the image below with NTFS file system, and a volume label “FORMAT-Test”, then perform a quick format, use the command:
FORMAT F: /FS:NTFS /Q /V:FORMAT-Test
To use the FORMAT command, you MUST open command prompt as Administrator.
From the previous command, the volume is now formatted.

When you click Enter to run the last command you will be asked to confirm. Enter Y, then press the Enter key. See the result of the command below:
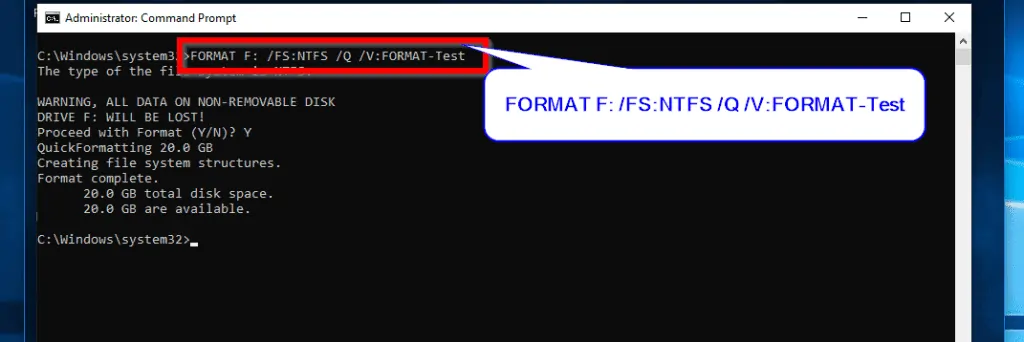
The disk is formatted as NTFS with volume label “FORMAT-Test”
Commands for Copying Items
In this category, I will discuss three commands: COPY, XCOPY and ROBOCOPY.
COPY
Copies one or more files to another location.
COPY Syntax
COPY [/D] [/V] [/N] [/Y | /-Y] [/Z] [/L] [/A | /B ] source [/A | /B] [+ source [/A | /B] [+ …]] [destination [/A | /B]]
Like some command prompt commands I discussed earlier in this guide, the COPY command has a lot of parameters. But I will only discuss the most relevant parameters. Below is a shortened syntax.
COPY <Source> <Destination> [/Y]
COPY <Source> <Destination> /-Y
COPY Parameters
| Parameters | Description |
| <Source> | Specifies the file or files to be copied. |
| <destination> | Specifies the directory and/or filename for the new file(s). |
| /Y | Suppresses prompting to confirm you want to overwrite a existing destination file. |
| /-Y | Causes prompting to confirm you want to overwrite an existing destination file. |
COPY Examples
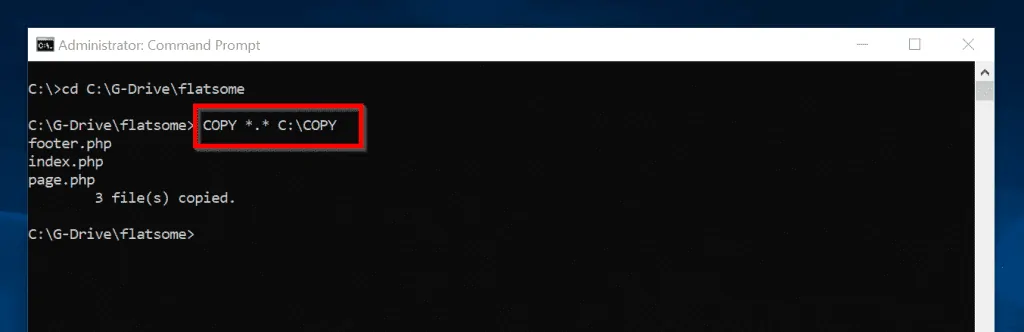
To copy all files in the current directory to a new directory, use the command below:
COPY *.* C:\COPY
In the last command, C:\COPY is the destination directory
XCOPY
Copies files and directories, including sub-directories. XCOPY has more advanced features than COPY.
XCOPY Syntax
Full syntax
XCOPY source [destination] [/A | /M] [/D[:date]] [/P] [/S [/E]] [/V] [/W] [/C] [/I] [/Q] [/F] [/L] [/G] [/H] [/R] [/T] [/U] [/K] [/N] [/O] [/X] [/Y] [/-Y] [/Z] [/B] [/J] [/EXCLUDE:file1[+file2][+file3]…]
Shortened version with mostly used parameters
XCOPY source [destination] [/A] [/M] [/D:m-d-y] [/EXCLUDE:file1[+file2][+file3]…] [/S] [/E] [/C] [/Y] [/-Y]
To see a full list of all XCOPY parameters and what they do, run the command HELP XCOPY.
XCOPY Parameters
| Parameters | Description |
| source | Specifies the file(s) to copy. |
| destination | Specifies the location and/or name of new files. |
| /A | Copies only files with the archive attribute set, doesn’t change the attribute. |
| /M | Copies only files with the archive attribute set, turns off the archive attribute. |
| /D:m-d-y | Copies files changed on or after the specified date. If no date is given, copies only those files whose source time is newer than the destination time. |
| /EXCLUDE:file1[+file2][+file3]…] | Specifies a string defining files to be excluded from being copied. |
| /S | Copies directories and sub-directories except empty ones. |
| /E | Copies directories and sub-directories, including empty ones. |
| /C | Ignores errors and continues copying. |
| /Y | Stops XCOPY prompting you to confirm for destination file to be overwritten. |
| /-Y | /-Y parameter makes XCOPY to prompt confirmation for an existing destination file to be overwritten. |
XCOPY Examples
If you automatically update a report you may want to copy report files that are have changed since a particular date. The command below will copy all files that have changed since May 20, 2019.
XCOPY \BackReports \Current /D:05-20-2019
ROBOCOPY
This is an even more advanced copy command.
ROBOCOPY Syntax
ROBOCOPY <source> <destination> [file [file]…] [options]
ROBOCOPY Parameters
| Parameters | Description |
| <Source> | Used to define the path to the source folder. |
| <Destination> | This is the path to the destination folder or directory. |
| [file [file] | Specifies the file or files to be copied. Wildcard characters (* or ?) are supported. |
| [options] | Specifies options to be used with the ROBOCOPY command. |
For a full list of all parameters, open command prompt and run the command below;
HELP ROBOCOPY
The command will return comprehensive information about ROBOCOPY. Alternatively, click ROBOCOPY link to read about the command.
18 Most Useful Powershell Commands for Windows Admins
Powershell NoTypeInformation: Applications and Examples
DISM.exe /Online /Cleanup-Image /Restorehealth: What it is and How to Use
Commands for System Administration and Reporting
These set of command prompt commands are useful for advanced system administration. Here they are.
SCHTASKS
Used to to create, delete, query, change, run or end scheduled tasks on a local or remote system. To run SCHTASKS you require administrator privilege.
SCHTASKS Syntax
SCHTASKS /parameter [arguments]
SCHTASKS Parameter Lists
| Parameters | Description |
| /Create | Use this parameter to create a new scheduled task. |
| /Delete | Opposite of /Create, the /Delete parameter deletes an existing scheduled task(s). |
| /Query | Lists all available scheduled tasks. |
| /Run | This switch runs a specified scheduled task. |
| /Change | Changes the properties of a specified scheduled task |
| /End | Ends a currently running scheduled task |
| /ShowSid | Shows the security identifier corresponding to a scheduled task name. |
To get help with how to use a parameter, enter SCHTASKS followed by the parameter. Then end with “/ ?”. For example, to learn how to use the /Create parameter, run the command below:
SCHTASKS /Create /?
This will give you a full list of all the [arguments] for the /Create parameter and how to use them.
SCHTASKS Examples
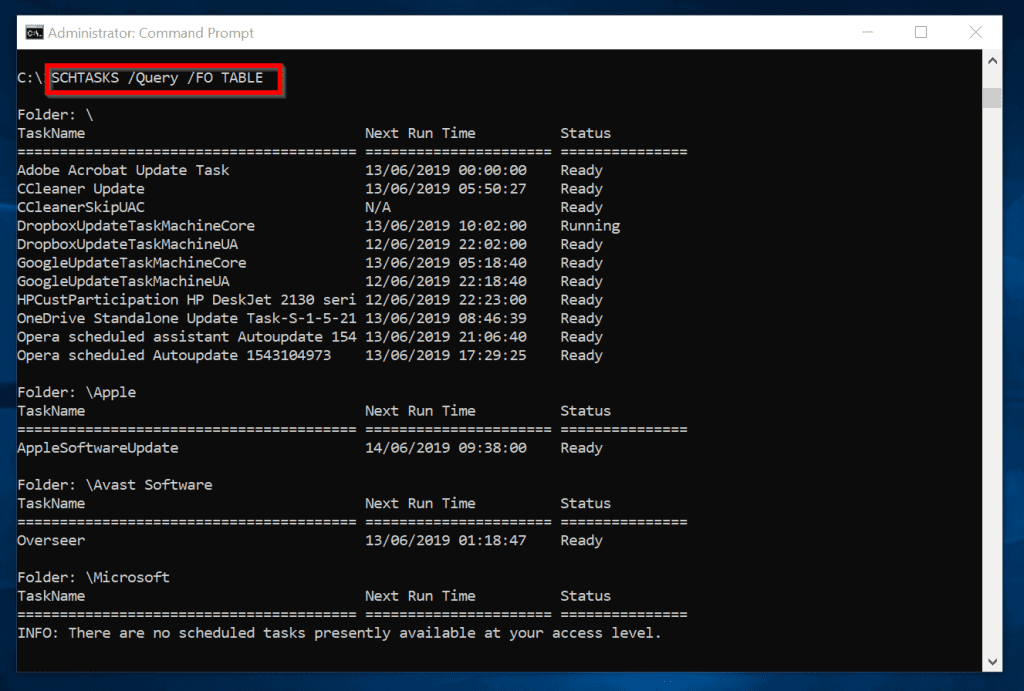
To get a full list of all the scheduled tasks on your computer, use this command:
SCHTASKS /Query /FO TABLE
The result
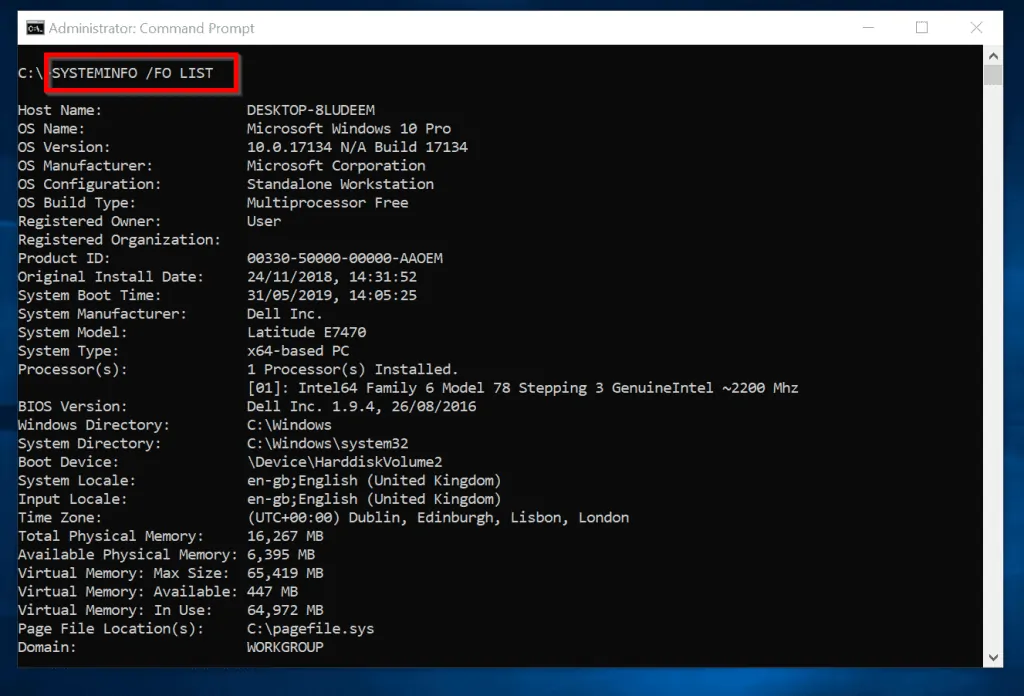
SYSTEMINFO
This is one of the command prompt commands that I use very often. SYSTEMINFO displays operating system configuration information for a local or remote computer. Information displayed include service pack and patch levels.
SYSTEMINFO Syntax
SYSTEMINFO [/S system [/U username [/P [password]]]] [/FO format] [/NH]
SYSTEMINFO Parameters
| Parameters | Description |
| /S system | Used to specify a remote computer to connect to. |
| /U username | Specifies a user with admin privilege to connect to the remote computer and run commands. |
| /P [password] | The password for the user specified with the /U parameter |
| /FO format | Specifies the format in which the output is to be displayed. Acceptable values: TABLE, LIST or CSV. |
| /NH | If used, the output will not display the “Column Header” in the output. /NH is only valid if /FO is used and TABLE and CSV formats are specified. |
SYSTEMINFO Examples
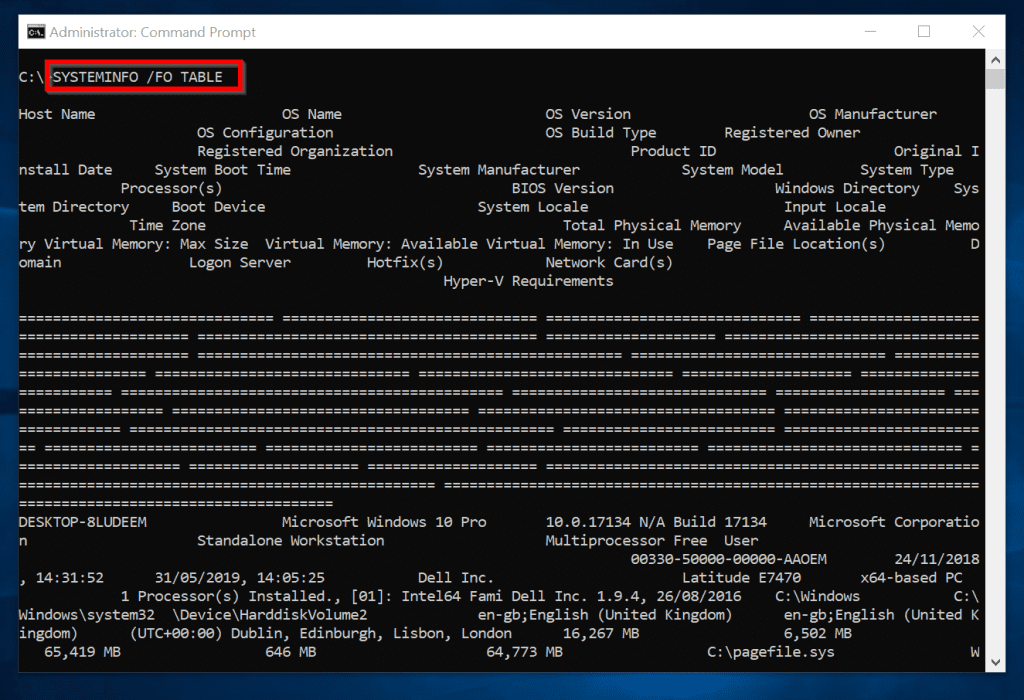
To display system information for your computer and display output in a table, use this SYSTEMINFO command:
SYSTEMINFO /FO TABLE
The output is not vert readable!
I may also display the result in a LIST format:
SYSTEMINFO /FO LIST
Gives a better result
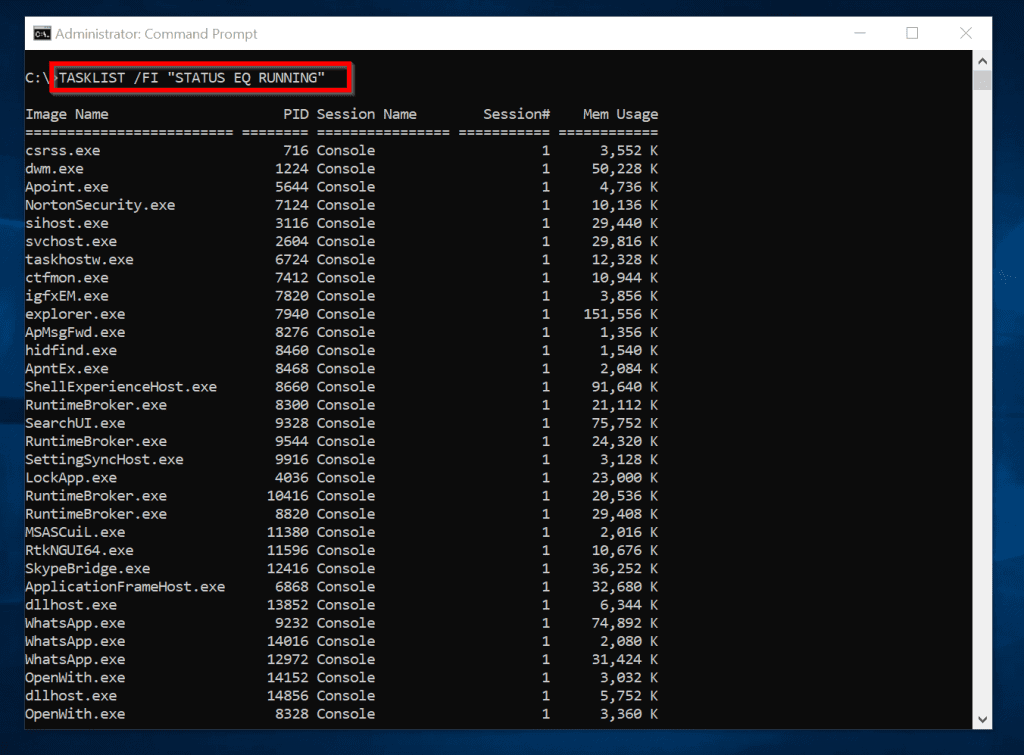
TASKLIST
Displays a list of all currently running processes in the local computer. It can also display processes in a remote computer.
TASKLIST Syntax
TASKLIST [/S system [/U username [/P [password]]]] [/M [module] | /SVC | /V] [/FI filter] [/FO format] [/NH]
TASKLIST Parameters
The description of the parameters: /S system, /U username, /P [password], /FO format and /NH are the same for the same parameters in the SYSTEMINFO command. Please read about these parameters in SYSTEMINFO (opens in a new window/tab).
The remaining parameters for TASKLIST are described in the table below:
| Parameters | Description |
| /M [module] | Lists all tasks currently running processes using the given exe/dll name. If the module name is not specified all loaded modules are displayed. |
| /SVC | Displays services hosted in each process. |
| /V | Displays verbose task information – shows the tasks as they are being displayed. |
| /FI filter | Displays a set of tasks that match given criteria specified by the filter. |
TASKLIST Examples
To display currently running processes on your computer, run the command below.
TASKLIST /FI "STATUS EQ RUNNING"
To export all running processes to CSV, use this command:
TASKLIST /FI "STATUS EQ RUNNING" /FO CSV > C:\G-Drive\flatsome\TASKLIST-csv
Here is what the CSV looks like

TASKKILL
Terminate tasks by process id (PID) or image name.
TASKKILL Syntax
TASKKILL [/S system [/U username [/P [password]]]] { [/FI filter] [/PID processid | /IM imagename] } [/T] [/F]TASKKILL Parameters
Like TASKLIST, the description of the parameters: /S system, /U username and /P are the same for the same parameters in the SYSTEMINFO command. Please read about this parameter click SYSTEMINFO (opens in a new window/tab).
The parameter table below describes TASKKILL parameters that have not been described in this guide.
| Parameters | Description |
| /FI filter | Used to apply a filter to select a set of tasks. Allowed filters: “*” to be used. ex. imagename eq acme* |
| /PID processid | Specifies the PID of the process to be terminated. You can use the TASKLIST command to get the PID of the process. |
| /IM imagename | Specifies the image name of the process to be terminated. You can use wildcard ‘*’ to specify all tasks or image names. |
| /T | This parameter tells TASKKILL to terminate the specified process and any child processes started by the original process. |
| /F | If /F is used, it forcefully terminate the specified process. |
Use TASKKILL with caution as terminating certain processes could make your Operating System unstable. Specifically, be careful with using wildcard “*”.
TASKKILL Examples
If you wish to terminate processes based on process ID, first run TASKLIST and pipe it to the MORE command.
TASKLIST | MORE
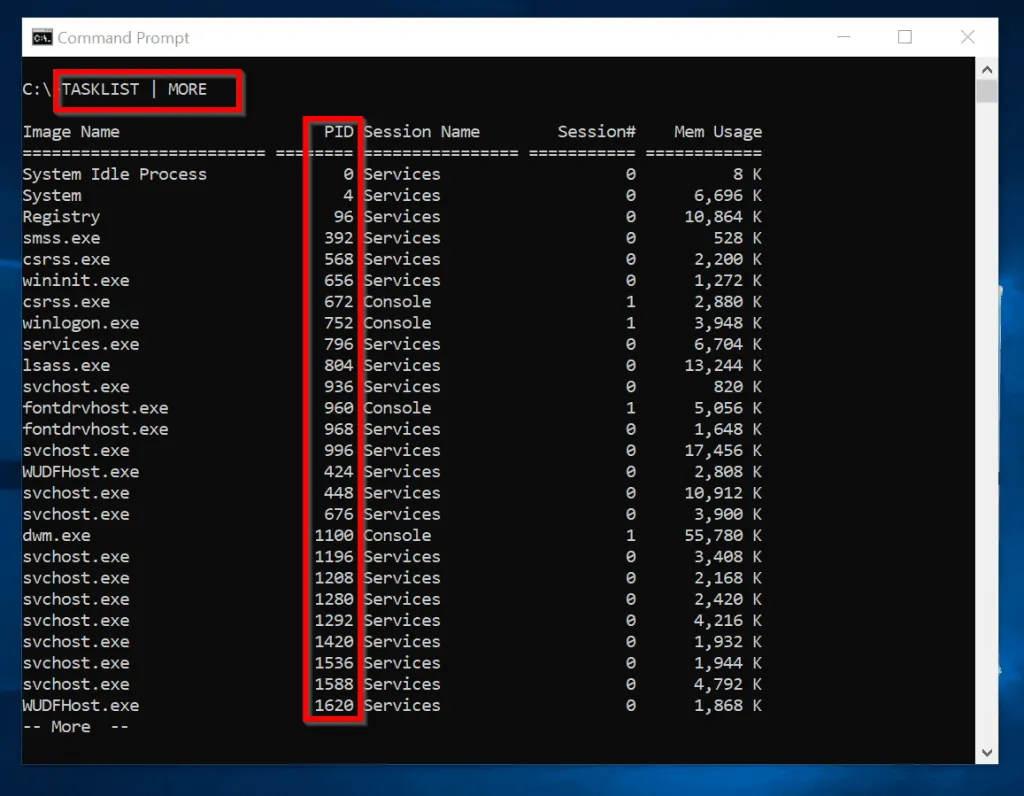
To terminate processes with IDs 960, 996 and 936, use the command below
TASKKILL /PID 960 /PID 996 /PID 936
SHUTDOWN
Used to shutdown or restart a local or remote computer.
SHUTDOWN Syntax
SHUTDOWN [/I | /L | /S | /SG | /R | /G | /A | /P | /H | /E | /O] [/Hybrid] [/Soft] [/FW] [/F] [/M \\Computer] [/T xxx]
SHUTDOWN Parameters
| Parameters | Description |
| /I | The /I switch displays Remote Shutdown GUI dialogue with options to specify remote computers to shutdown. The /I switch must be the first option in a SHUTDOWN command. See SHUTDOWN examples below. |
| /L | Logs the computer off. This cannot be used with /M or /D options. |
| /S | Shutdowns the computer. |
| /SG | Shutdown the computer. On the next boot, restart any registered applications. |
| /R | Shutdown and restart the computer. |
| /G | Full shutdown and restart the computer. After the system is rebooted, restart any registered applications. |
| /A | Abort a system shutdown. This can only be used during the time-out period. Combine with /FW to clear any pending boots to firmware. |
| /P | Turn off the local computer with no time-out or warning. Can be used with /D and /F parameters. |
| /H | Hibernate the local computer. Can be used with the /F switch. |
| /E | Document the reason for an unexpected shutdown of a computer. |
| /O | Go to the advanced boot options menu and restart the computer. Must be used with /R option. |
| /Hybrid | Performs a shutdown of the computer and prepares it for fast startup. Must be used with /S switch. |
| /FW | Combine with a shutdown option (/S) to cause the next boot to go to the firmware user interface. |
| /F | Force running applications to close without forewarning users. The /F parameter is implied when a value greater than 0 is specified for the /T parameter. |
| /M \\Computer | Specify a target remote computer. |
| /T xxx | Set the time-out period before shutdown to xxx seconds. Default is 30s with a max value of 315360000s (10 years). |
I left out /D [P|U:]xx:yy] and /C [“comment”] parameters as you may not need them often.
If you run SHUTDOWN without specifying any parameter, it will display help. Running SHUTDOWN without specifying any parameter is similar to typing “SHUTDOWN /?”.
SHUTDOWN Examples
To display a dialogue box with options to shutdown specified computers, simply use SHUTDOWN with /I switch:
SHUTDOWN /I
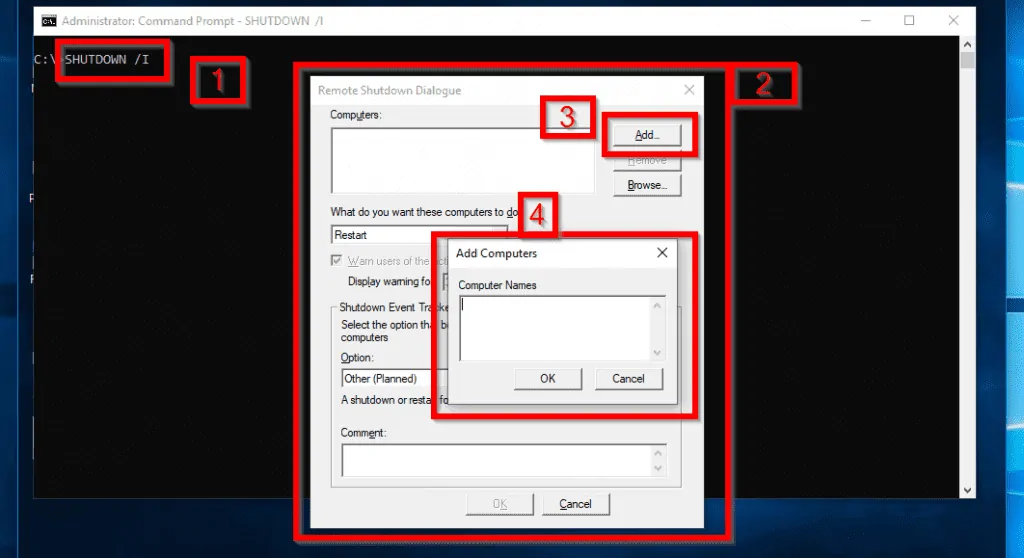
When you execute SHUTDOWN /I [1], the Remote Shutdown Dialogue GUI opens [2]. To add computers, click Add [3], this opens the Computer Names box [4]. When you finish adding the computers, click Ok. Then Ok to shut them down.
DRIVERQUERY
This is another very important but often ignored command prompt commands. An administrator can use DRIVERQUERY to display a list of installed device drivers on a local or remote computer.
DRIVERQUERY Syntax
DRIVERQUERY [/S system [/U username [/P [password]]]] [/FO format] [/NH] [/SI] [/V]
DRIVERQUERY Parameters
| /S | Specifies a remote computer to connect to. |
| /U username | Used to specify a user name with permission to connect to the remote computer. |
| /P password | Specifies the password for the user above. |
| /FO format | Specifies the type of output to display. Acceptable formats: “TABLE”, “LIST” or “CSV”, without the quotes. |
| /NH | Removes the column headers from the output. |
| /SI | Provides information about signed drivers. |
| /V | Displays verbose output. Not valid for signed drivers. |
DRIVERQUERY Examples
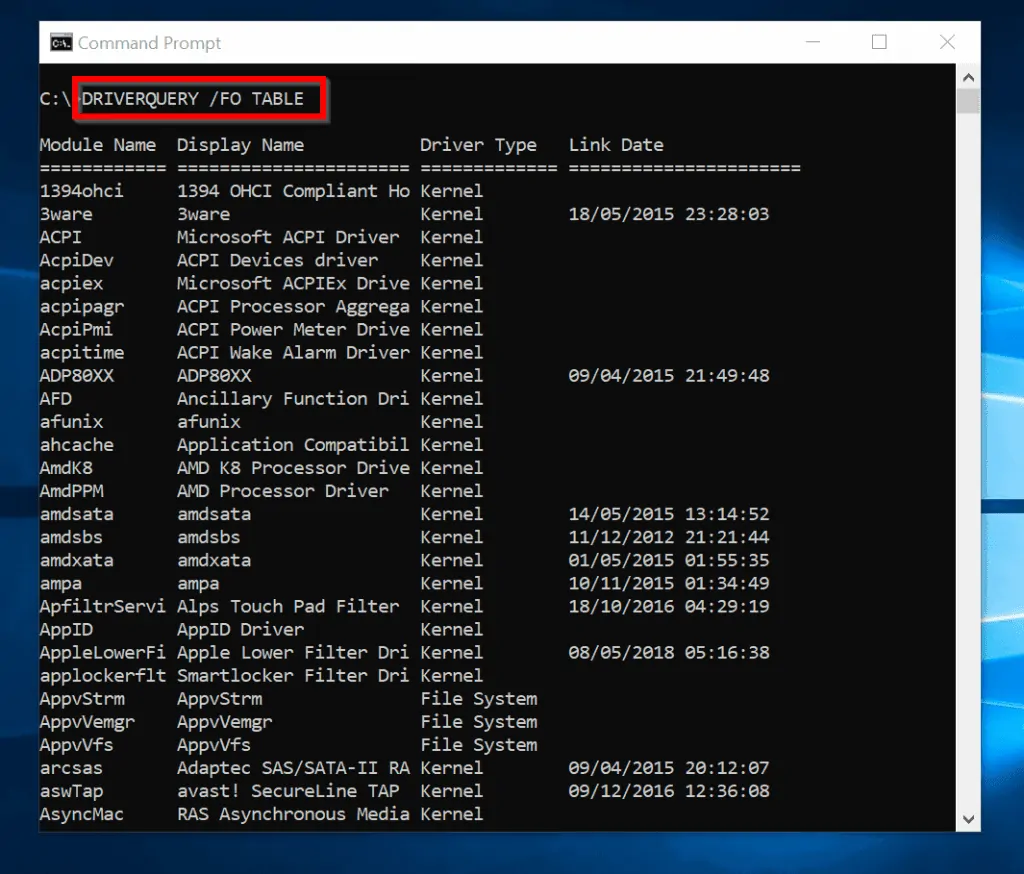
To list all drivers on your computer and display the result in a tabular format, use the command below:
DRIVERQUERY /FO TABLE
Here is the result
To add the information whether a driver is signed or not, include /SI switch to the previous command:
DRIVERQUERY /FO TABLE /SI
A new column, “IsSigned” is now included.

In the above result, if IsSigned is FALSE, it means the driver is NOT signed.
Commands for Managing Files and Folders
These sets of command prompt commands are used to rename, move or delete files and folders.
RENAME (REN)
Renames a file or files. The short version of the command is REN.
RENAME Syntax
RENAME [drive:][path] filename1 filename2.
REN [drive:][path] filename1 filename2.
RENAME command does not allow you to specify a new drive or path for your destination file.
RENAME Parameters
| Parameters | Description |
| [drive:][path]filename1 | Specifies the location and name of the file or set of files you want to rename. FileName1 can include wildcard characters (* and ?). |
| filename2 | The new name of the file |
RENAME Examples
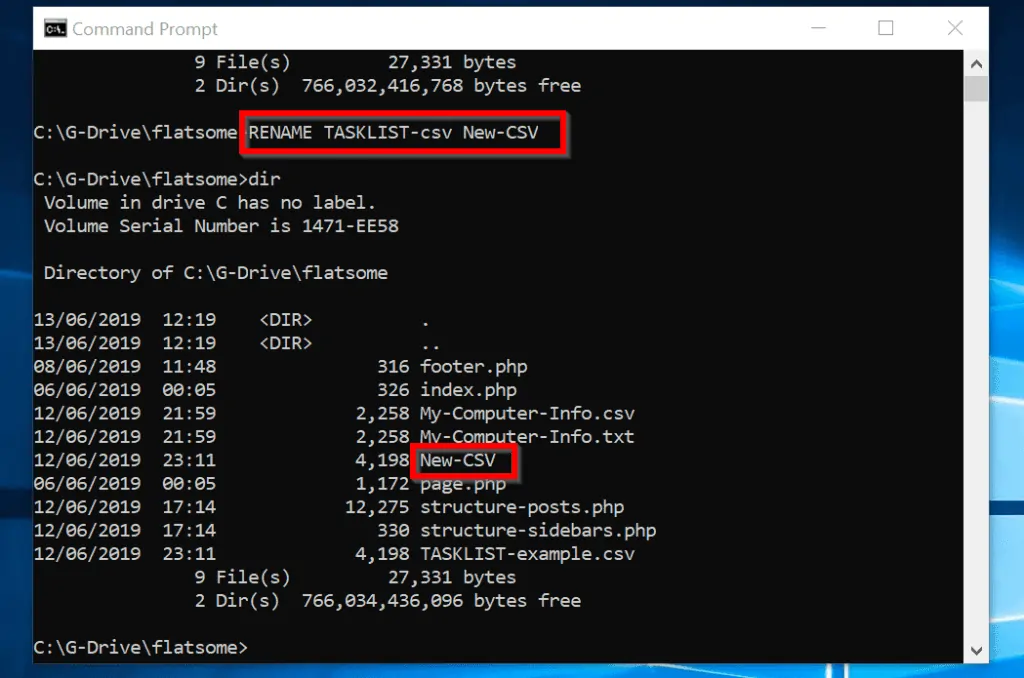
In the image below, I want to rename the file TASKLIST-csv to New-CSV

Here is the command I used:
RENAME TASKLIST-csv New-CSV
Here is the result:
MKDIR (MD)
Creates a directory or folder. Short version is MD.
MKDIR Syntax
MKDIR [drive:]path
MD [drive:]path
MKDIR Parameters
| Parameters | Description |
| [drive:] | Specifies the drive on which you want to create the new directory. |
| path | This is a required parameter. It specifies the name and location of the new directory. The maximum length of any single path is determined by the file system (FAT, FAT32 or NTFS). |
MKDIR Examples
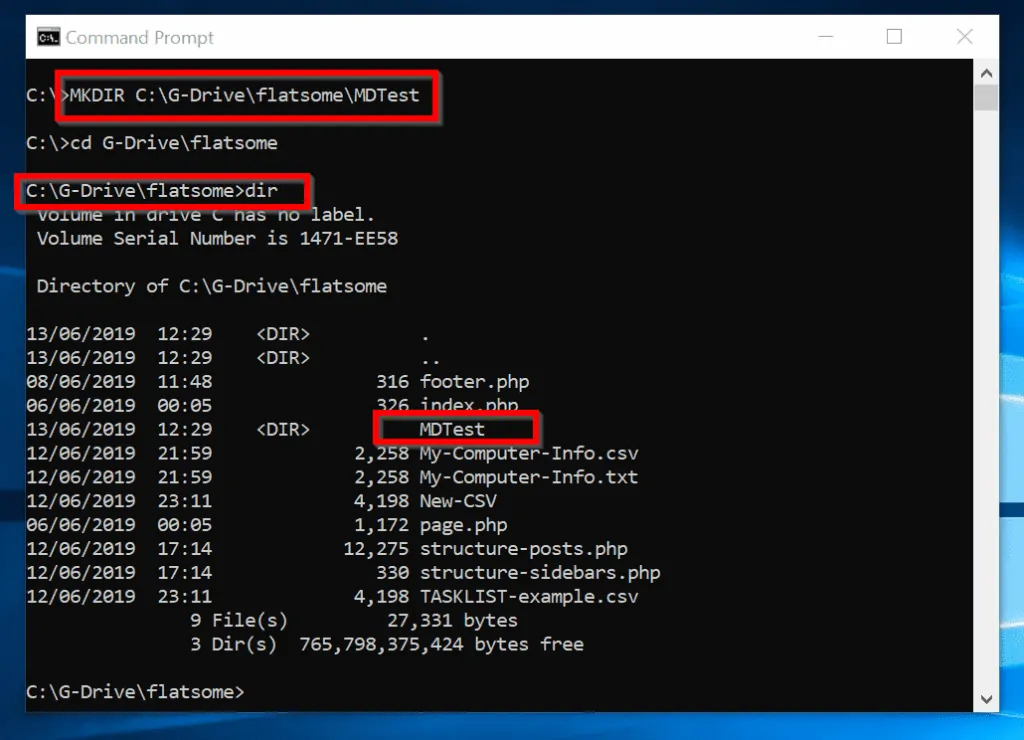
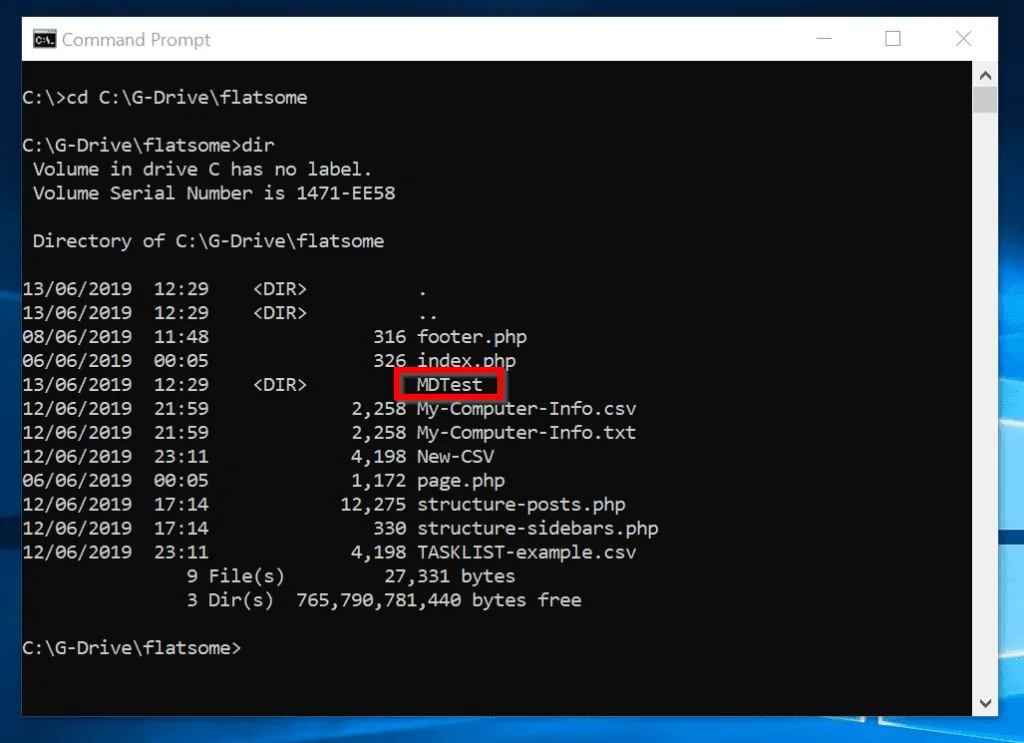
To create a folder called MDTest in the path “C:\G-Drive\flatsome”, run the command below:
MKDIR C:\G-Drive\flatsome\MDTest
The results:
MOVE
The MOVE command moves files and folders (directories). It also renames files and folders.
MOVE Syntax
Syntax to rename a file
MOVE [/Y | /-Y] [drive:][path]filename1[,…] destination
Syntax to a directory (folder)
MOVE [/Y | /-Y] [drive:][path]dirname1 dirname2
MOVE Parameters
| Parameters | Description |
| [drive:][path]filename1 | Specifies the location and name of the file or files you want to move. |
| destination | Specifies the new location of the file. |
| [drive:][path]dirname1 | Specifies the directory you want to rename. |
| dirname2 | Specifies the new name for dirname1. |
| /Y | Suppresses prompting to confirm you want to overwrite an existing destination file. |
| /-Y | Causes prompting to confirm you want to overwrite an existing destination file. |
For the file destination parameter, destination can consist of a drive letter and colon, a directory name, or a combination of both. If you are moving only one file, and want to rename the file when you move it, you can also include a filename.
MOVE Examples
In this example, I want to rename MDTest (highlighted in the image below) to MDTest2
Here is the command:
MOVE MDTest MDTest2
Here is the result:
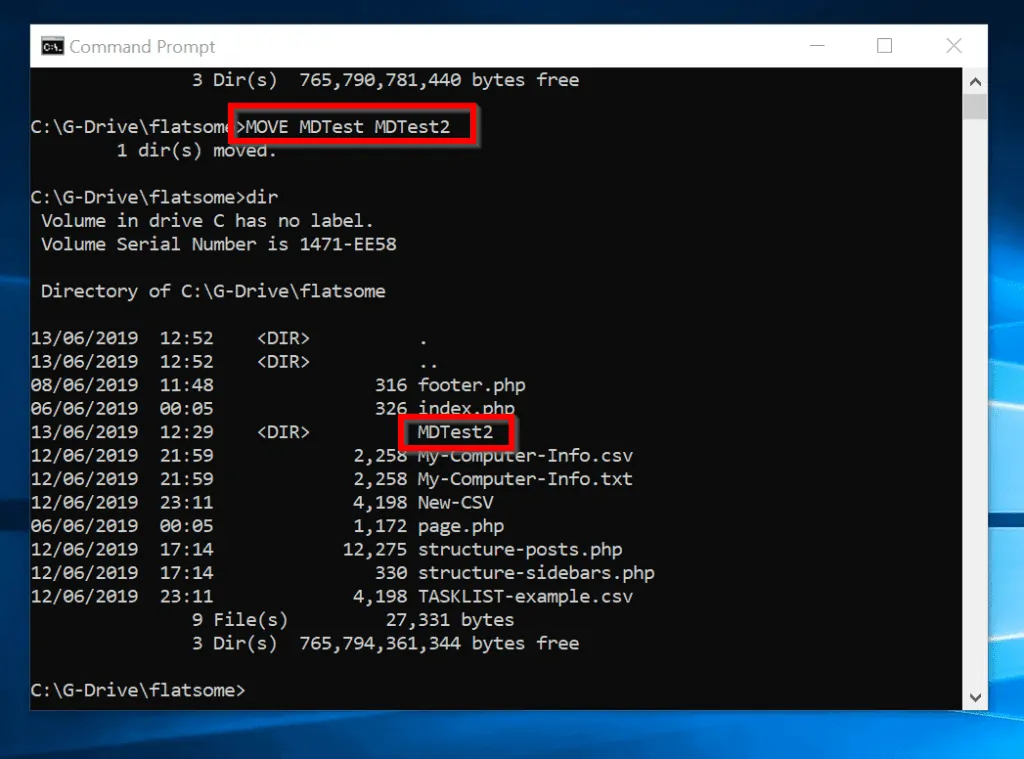
In the previous command, I did not need to specify the [drive:][path] because I wanted the command performed in the directory I was running the command from. The folder I was renaming was in the same directory.
ERASE (DEL)
This is the final in my ultimate list of command prompt commands. ERASE command deletes one or more files.
ERASE is the same as DEL command.
Use ERASE (DEL) with caution as the command may delete important Operating System files depending on how you use it. If you use DEL or ERASE to delete a file from your computer, you cannot retrieve the file.
ERASE (DEL) Syntax
ERASE [/P] [/F] [/S] [/Q] [/A[[:]attributes]] names
DEL [/P] [/F] [/S] [/Q] [/A[[:]attributes]] names
ERASE (DEL) Parameters
| Parameters | Description |
| /P | Asks for confirmation before deleting each file. |
| /F | Force deleting of files marked as read-only. |
| /S | Delete specified files from all sub-directories. |
| /Q | Quiet mode, do not ask if ok to delete when global wildcard is used. If you use /Q switch, all files will be deleted without prompting your for confirmation. [Use with caution!] |
| /A | Selects files to delete based on file attributes. |
| attributes | See below for acceptable attributes*. |
| names | Specifies a list of one or more files or directories. Wildcards may be used to delete multiple files. If a directory is specified, all files within the directory will be deleted. |
*Acceptable attributes of the /A parameter:
R Read-only files
S System files
H Hidden files
A Files ready for archiving
I Not content indexed Files
L Reparse Points
– Prefix meaning not
ERASE (DEL) Examples
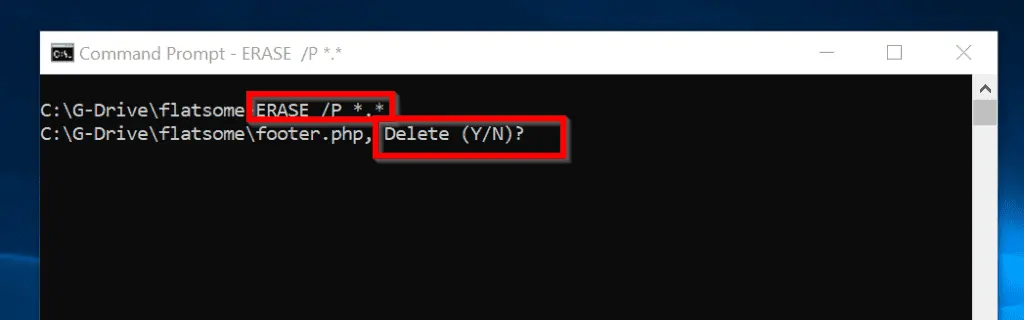
TO delete all files in the current directory but prompt you for confirmation, use the command:
ERASE /P *.*
*.* is a wildcard meaning delete every file in the current directory
When you press Enter key, for each file you will be asked to confirm with Y or N. Here is the result:
18 Most Useful Powershell Commands for Windows Admins
Powershell NoTypeInformation: Applications and Examples
DISM.exe /Online /Cleanup-Image /Restorehealth: What it is and How to Use
Conclusion
There you have it – my ultimate list of the most useful command prompt commands!
I hope you found this guide helpful. If you did, kindly spare 2 minutes of your time to share your experience with our community using the comments form (“Leave a Reply”) at the bottom of this page.
Alternatively, you can respond to the “Was this page helpful?” question below.
Finally, for more Command Prompt Itechguides, visit our Windows Command Prompt page.