Based on Windows 11 hardware requirements, itechguides.com built a Windows 11 Compatibility Checker (Get-Windows11Compatibility) to help you check if your PC can install Windows 11. This guide explains how to download this script
Parameters of Get-Windows11Compatibility
The code below shows the parameter definition of the Windows 11 Compatibility Checker. To make it easy for you to spot, I have boldened the parameters.
[CmdletBinding(DefaultParameterSetName="DisplayResult")]
 Param(
     [Parameter(
         ParameterSetName='DisplayResult',
         Position=0,
         Mandatory=$false)]
         [Switch]$DisplayResult,
     [Parameter(
         ParameterSetName='ExportToTextFile',
         Position=0,
         Mandatory=$false)]
         [Switch]$ExportToTextFile,
     [Parameter(
         ParameterSetName='PassThru',
         Position=0,
         Mandatory=$false)]
         [Switch]$PassThru,
         #define different parameter set names for $ExportToTextFile and $PassThru
         #Both parameters cannot be called in the same command
     [Parameter(
         ParameterSetName='ExportToTextFile',
         Mandatory=$true,
         Position=1)]
         [Parameter(
         ParameterSetName='PassThru',
         Mandatory=$true,
         Position=1)]
         [string]$ReportPath
 )
As you can see, there are four parameters – DisplayResult, ExportToTextFile, PassThru, and ReportPath.
I will explain the parameters in the next few sub-sections
DisplayResult Parameter
The DisplayResult parameter is a switch parameter. This means that to tell the Windows 11 Compatibility Checker to use this parameter, you call it without adding any values.
Here is how we defined this parameter…
[Parameter(
         ParameterSetName='DisplayResult',
         Position=0,
         Mandatory=$false)]
         [Switch]$DisplayResult
You would also have noticed that the parameter belongs to the ParameterSetName called ‘DisplayResult’. The implication of this is that you’ll only call the DisplayResult parameter with other parameters in this ParameterSet.
As you will see when I explain the script behind the tool, use the DisplayResult parameter to display the result of the Windows 11 Compatibility Checker on the PowerShell console.
ExportToTextFile Parameter
This is also a switch parameter. It belongs to another ParameterSetName called ‘ExportToTextFile’. This means that you cannot use this parameter in the same command as the DisplayResult parameter
Here is the code that defines this parameter…
 [Parameter(
         ParameterSetName='ExportToTextFile',
         Position=0,
         Mandatory=$false)]
         [Switch]$ExportToTextFile
When you call this parameter, Get-Windows11Compatibility will save the result of your PC’s compatibility report to a text file. Based on this, you’ll need to specify another parameter, ReportPath.
The ReportPath is used to specify the folder path where you want to save your Windows 11 Compatibility Checker compatibility report. More on this parameter later.
Back to the ExportToTextFile parameter, as I mentioned earlier, this is also a switch parameter. When you specify it, it does not require any values.
When you specify this parameter and the ReportPath parameter, Get-Windows11Compatibility will export the report to the path you specified in the ReportPath parameter.
PassThru Parameter
The PassThru parameter displays the result of the Windows 11 Compatibility Checker on the PowerShell console. Additionally, it saves the result in a text file.
Here is the code we used to create this parameter…
[Parameter(
         ParameterSetName='PassThru',
         Position=0,
         Mandatory=$false)]
         [Switch]$PassThru
Following the same logic as in the ExportToTextFile Parameter, if the PassThru parameter saves the result of the command to a text file, you need to specify a path to save the text file.
The implication is that you also need to specify the path to save the text file report with the ReportPath parameter.
This parameter belongs to a different ParameterSetName called ‘PassThru’.
So far, we have defined 3 ParameterSetNames – DisplayResult, ExportToTextFile, and PassThru.
ReportPath Parameter
This is the fourth and final parameter. As you can see from the code below, it is a string parameter.
   [Parameter(
         ParameterSetName='ExportToTextFile',
         Mandatory=$true,
         Position=1)]
         [Parameter(
         ParameterSetName='PassThru',
         Mandatory=$true,
         Position=1)]
         [string]$ReportPath
As you may have already deduced already, unlike a switch parameter, a string parameter requires an entry from you, the user.
Another important thing to note about the ReportPath parameter is that it is required in the ExportToTextFile, and PassThru commands. This also means that this parameter belongs to their respective ParameterSetNames – ExportToTextFile, and PassThru.
See how I define the ParameterSetNames in the ReportPath parameter code below…
   [Parameter(
         ParameterSetName='ExportToTextFile',
         Mandatory=$true,
         Position=1)]
         [Parameter(
         ParameterSetName='PassThru',
         Mandatory=$true,
         Position=1)]
         [string]$ReportPath
To learn more about PowerShell Parameters, read our full guide on the subject – PowerShell Param: Syntax, Types, Attributes, Arguments, And Examples.
The Get-Windows11Compatibility Script Decoded
The Get-Windows11Compatibility script is broken down into two sections. In the first section, we generated the different results required.
The Specs Results Code Decoded
The code below shows the full code in the first section…
Try {
  $Processor = Get-WmiObject Win32_Processor
  $MaxClockSpeed = $Processor.MaxClockSpeed
  $CurrentClockSpeed = [math]::round(($Processor.CurrentClockSpeed)/1000, 1)
  $NumberOfCores = $Processor.NumberOfCores
 $RAMSize = [math]::round(((Get-WmiObject -Class win32_computersystem).TotalPhysicalMemory)/1GB, 0)
  #The following commands gets the free space on the drive Windows 10 is installed
  $OSInstallDrive = ($Env:windir -split ":")[0] + ":" #Retrieves current OS install path Drive
 $FreeSpace = [math]::round(((Get-WmiObject -Class win32_logicaldisk | Where-Object {$_.DeviceID -like "$OSInstallDrive"}).FreeSpace)/1GB, 0)
 $TPMVersion = (Get-WmiObject -Namespace 'root\cimv2\security\microsofttpm' -Class win32_tpm -ErrorAction Stop).PhysicalPresenceVersionInfo #This command requires PS to open as Administrator
 $FirmwareType = $env:firmware_type
  $SecureBootState = Confirm-SecureBootUEFI -ErrorAction Stop #This command requires PS to open as Administrator
 $GraphicsResolution = (Get-WmiObject win32_VideoController).CurrentVerticalResolution
  }
  Catch {
  #$errormessage = $error.Exception.Message
  Write-Host "This command failed because you did not open PowerShell as administrator"
  Write-Host "To run this command, please open PowerShell as administrator"
  Write-Host "For steps, visit https://www.itechguides.com/run-powershell-as-administrator/"
  Break
 }
In the first instance, I wrapped the code in a Try, Catch block to allow me to capture and manage errors. Then, I used the following codes to check the specs of the PC:
$Processor = Get-WmiObject Win32_Processor
$MaxClockSpeed = $Processor.MaxClockSpeed
$CurrentClockSpeed = [math]::round(($Processor.CurrentClockSpeed)/1000, 1)
$NumberOfCores = $Processor.NumberOfCores
The first line gets the processor information and saves the information is a variable called Processor. I need this information because it is a key element of the Windows 11 Compatibility Checker.
Then, in the second line, I extracted the MaxClockSpeed of the processor.
I decided not to use this spec eventually but left the code in the script in case I decide to use it later.
In line 3, I saved the current clock speed to the processor in a variable called CurrentClockSpeed. This result is returned in Hz.
So, to convert it from Hz to GHz, I wrapped $Processor.CurrentClockSpeed (the processor speed in Hz) in a PowerShell [math]::round function.
[math]::round
This rounds the result to a defined number of decimal places. In this instance, I used 1 decimal place round up. However, to convert the processor speed from Hz to GHz, I divided $Processor.CurrentClockSpeed by 1000.
Here is the final code.
$CurrentClockSpeed = [math]::round(($Processor.CurrentClockSpeed)/1000, 1)
I also returned the number of CPU cores in the processor with the command below.
$NumberOfCores = $Processor.NumberOfCores
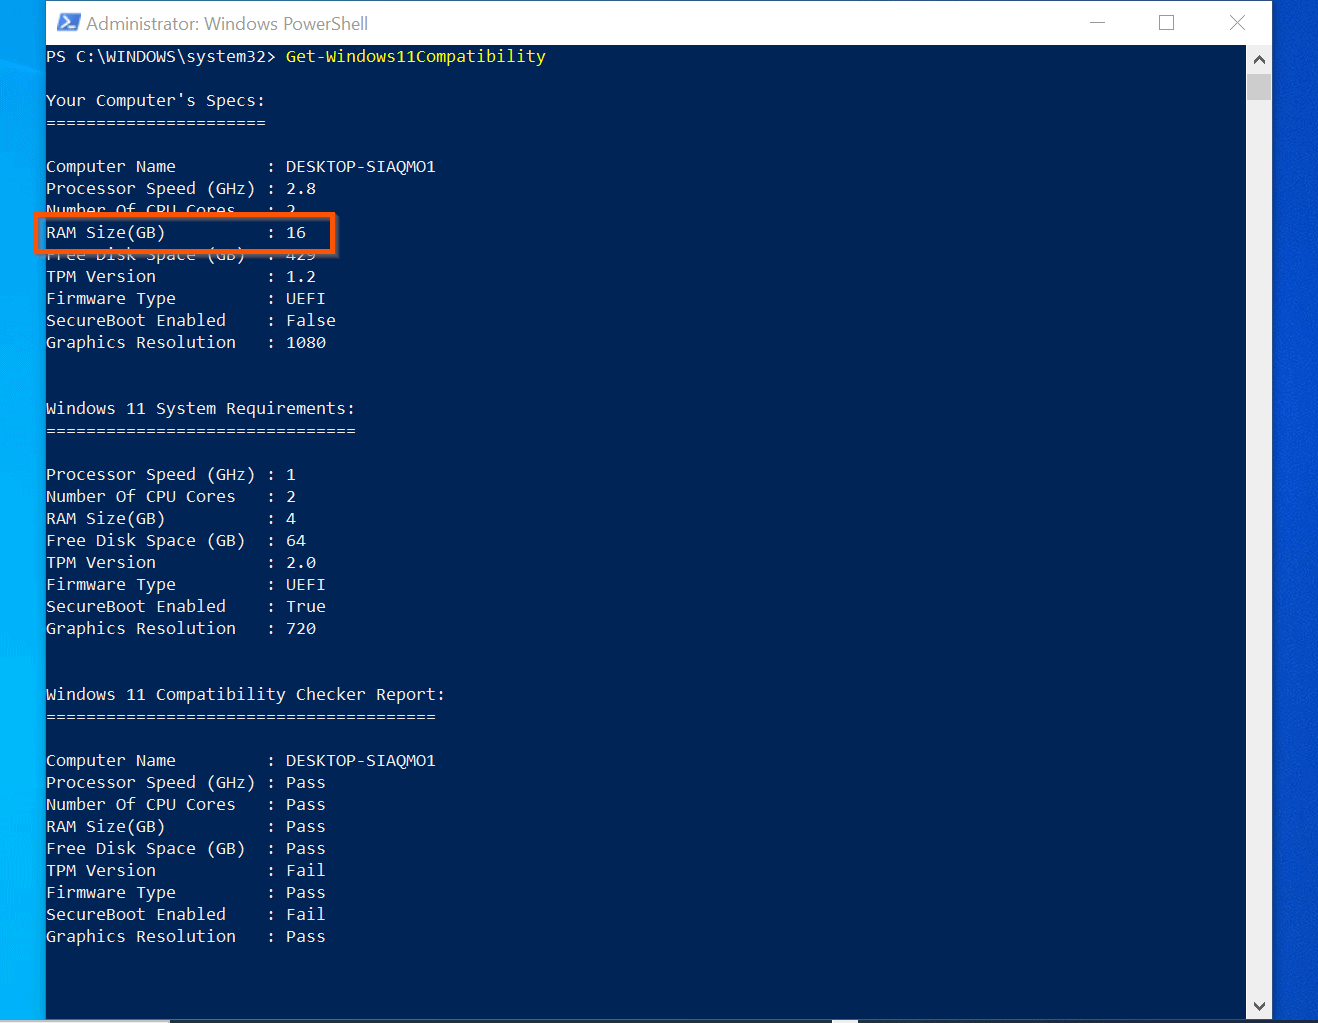
The results of these codes are highlighted in the screenshot below…More on how I generated this later.

Moving on from the processor specs code, the code below generates the RAM (memory) specs of the PC.
$RAMSize = [math]::round(((Get-WmiObject -Class win32_computersystem).TotalPhysicalMemory)/1GB, 0)
Similar to the processor code, this code uses the Get-WmiObject PowerShell command to extract some information about the PC. One of the results in this command is the TotalPhysicalMemory property.
This is the total RAM on the PC, returned in Bytes. Once again, like the processor specs, to convert this from Bytes to Gigabytes, I divided it by 1GB (1024 Bytes).
Finally, to round the numbers up, I wrapped the whole result in a PowerShell [math]::round function.. The result is shown in the highlighted portion of this screenshot.
After getting the processor and RAM specs of the PC, next I have a code that determines the current free space disk space on the PC. Once again, this is part of the Windows 11 System requirement and therefore part of the Windows 11 Compatibility Checker.
I used the code below to complete this task…
#The following commands gets the free space on the drive Windows 10 is installed
 $OSInstallDrive = ($Env:windir -split ":")[0] + ":" #Retrieves current OS install path Drive
 $FreeSpace = [math]::round(((Get-WmiObject -Class win32_logicaldisk | Where-Object {$_.DeviceID -like "$OSInstallDrive"}).FreeSpace)/1GB, 0)
In the first line (after the comment line), I determined the partition Windows 10 is installed. I used the code below for this…
$OSInstallDrive = ($Env:windir -split ":")[0] + ":"
The first part of the code used the PowerShell $Env:windir variable to return the OS partition. Then, I used the split property to break the result into two parts.
To make it easy for you to understand, here is the result of…
$Env:windir -split ":"

The PowerShell split property breaks C:\WINDOWS into two arrays, C, and \WINDOWS. However, I just need the drive letter.
To return the drive letter (the first part of the array), I added [0] at the end of the previous command…
($Env:windir -split ":")[0]

As you can see, the command returned the drive letter without the standard colon (:). To add that, I included the colon manually…
($Env:windir -split ":")[0] + ":"

If you are wondering why I went through all the troubles to determine the partition letter the OS is installed, here is why. I need it in my next command…
$OSInstallDrive = ($Env:windir -split ":")[0] + ":"
$FreeSpace = [math]::round(((Get-WmiObject -Class win32_logicaldisk | Where-Object {$_.DeviceID -like "$OSInstallDrive"}).FreeSpace)/1GB, 0)
Part of the Windows 11 system requirements is the free space available on the PC. Therefore, this is one of the specs our Windows 11 Compatibility Checker returns.
In the script above, I used the Get-WmiObject command to return the disk information on the local computer. Then, I piped the result to the Where-Object and filtered the output with the DeviceID from the previous command.
Get-WmiObject -Class win32_logicaldisk | Where-Object {$_.DeviceID -like "$OSInstallDrive"}
When I ran the command on my computer, it retured the result shown in the screenshot below.
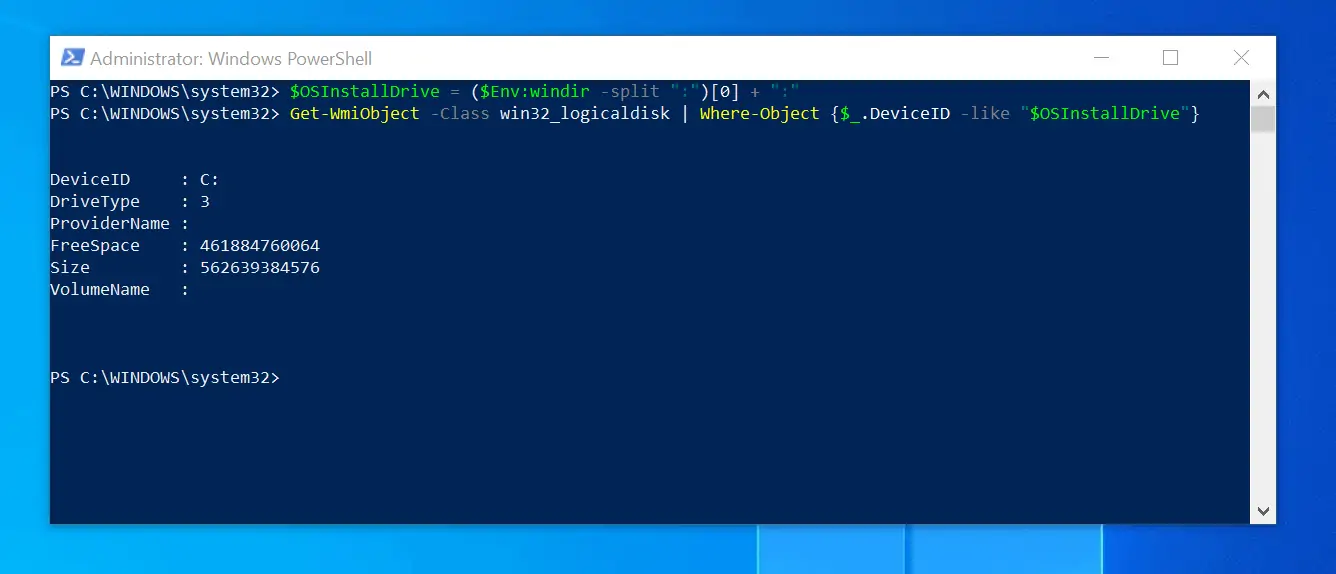
As you can see from the screnshot, the command returned a property called FreeSpace, in bytes. To convert this vaue to Gigabytes, I have to divide the value by 1GB.
Then, to round the value, I need to use the [math]::round function. The zero (0), boldened in the script below is the number of figures to round the value.
$FreeSpace = [math]::round(((Get-WmiObject -Class win32_logicaldisk | Where-Object {$_.DeviceID -like "$OSInstallDrive"}).FreeSpace)/1GB, 0)
Finally, I determined the TPM Version, the current firmware the computer supports (BIOS or UEFI). I also need to determine whether SecureBootState and the current display resolution.
I determined these values with the commands below…
$TPMVersion = (((Get-WmiObject -Namespace 'root\cimv2\security\microsofttpm' -Class win32_tpm -ErrorAction Stop).SpecVersion) -split (","))[0] #This command requires PS to open as Administrator
$FirmwareType = $env:firmware_type
$SecureBootState = Confirm-SecureBootUEFI -ErrorAction Stop #This command requires PS to open as Administrator
$GraphicsResolution = (Get-WmiObject win32_VideoController).CurrentVerticalResolution
Computing the Final Reports
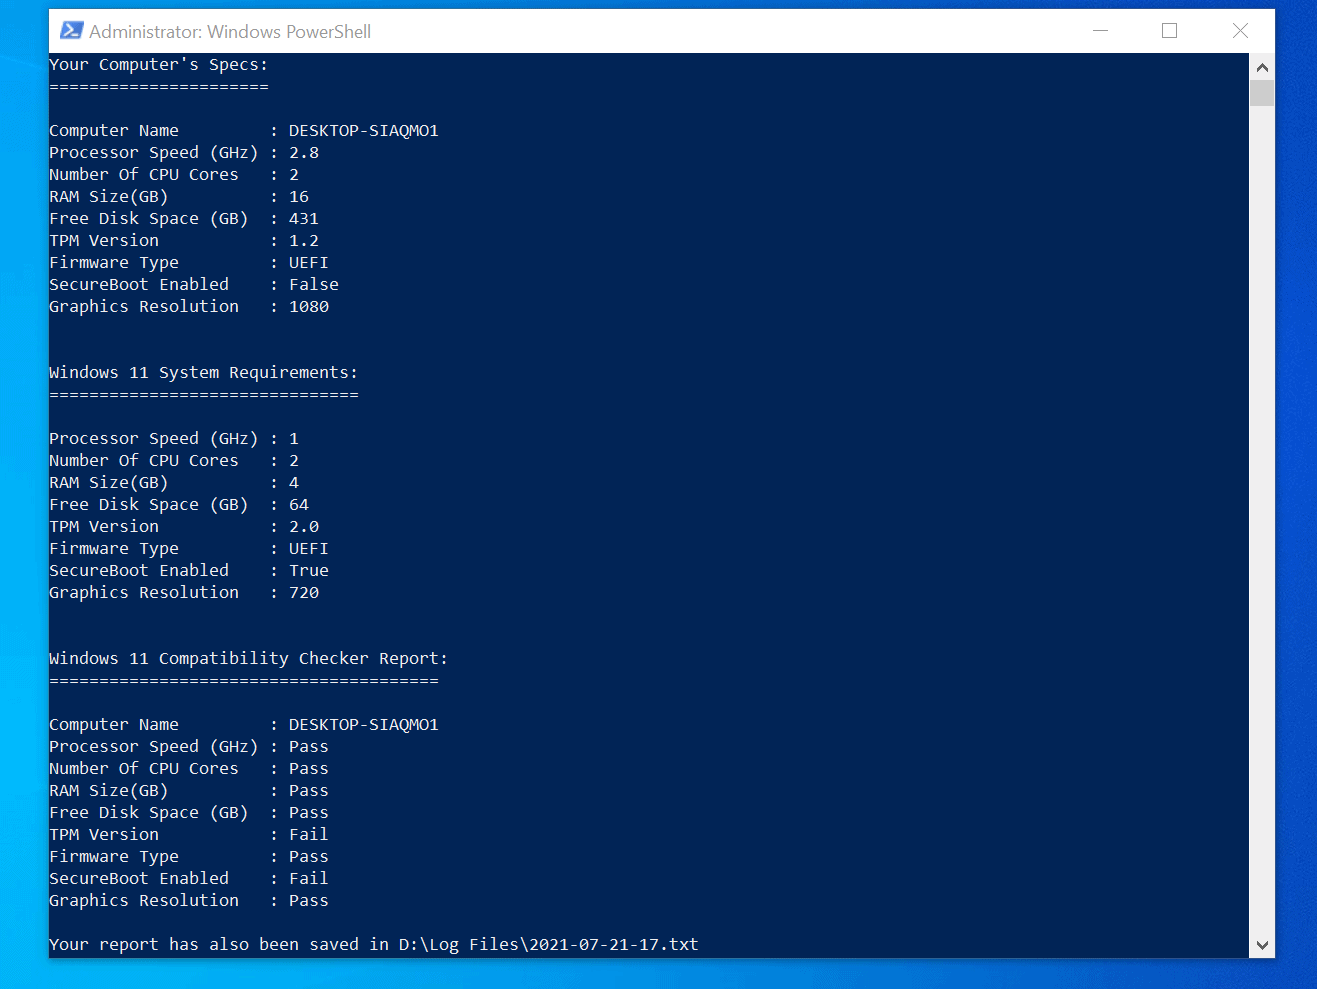
The final result of the Windows 11 Compatibility Checker is in three parts. Here is what the result looks like.
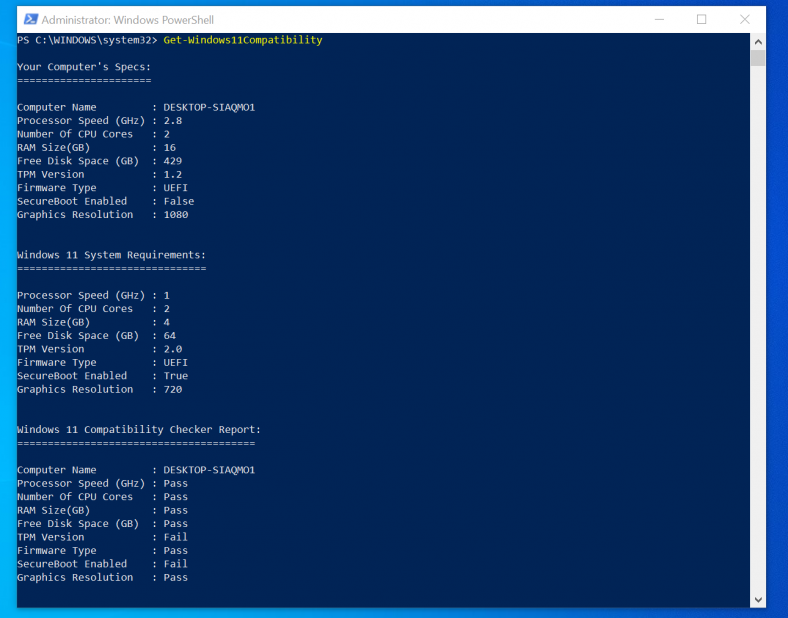
The first part of the result displays the current specs of the computers. This report is a compilation of the specs computed in the last section.
Then, the second part of the report displays Windows 11 system requirements. Finally, the third part is the actual Windows 11 Compatibility.
The method I used to generate the three results are similar. Here is the full script for the three reports:
$Report = "" | Select-Object -Property "Computer Name", "Processor Speed (GHz)", "Number Of CPU Cores", "RAM Size(GB)", `
  "Free Disk Space (GB)", "TPM Version", "Firmware Type", "SecureBoot Enabled", "Graphics Resolution" #creates an empty reports
 $Report.'Computer Name' = $env:COMPUTERNAME
  $Report.'Processor Speed (GHz)' = $CurrentClockSpeed
  $Report.'Number Of CPU Cores' = $NumberOfCores
  $Report.'RAM Size(GB)' = $RAMSize
  $Report.'Free Disk Space (GB)' = $FreeSpace
  $Report.'Firmware Type' = $FirmwareType
  $Report.'SecureBoot Enabled' = $SecureBootState
  $Report.'TPM Version' = $TPMVersion
  $Report.'Graphics Resolution' = $GraphicsResolution
  #Generate report based on parameter entered by user
  If ($ExportToTextFile) {
     #"" | Out-File -FilePath $TextFileReportPath -NoNewline -Append
     "Your Computer's Specs:" | Out-File -FilePath $TextFileReportPath -Append
     "======================" | Out-File -FilePath $TextFileReportPath -Append -NoNewline
     $Report | Out-File -FilePath $TextFileReportPath -Append
 }
 ElseIf ($PassThru) {
     Write-Host ""
     Write-Host "Your Computer's Specs:"
     Write-Host "======================" -NoNewline
     $Report
 #"" | Out-File -FilePath $TextFileReportPath -Append "Your Computer's Specs:" | Out-File -FilePath $TextFileReportPath -Append "======================" | Out-File -FilePath $TextFileReportPath -Append -NoNewline  $Report | Out-File -FilePath $TextFileReportPath -Append
 }
 Else {
 Write-Host ""
  Write-Host "Your Computer's Specs:"
  Write-Host "======================" -NoNewline
  $Report
 }
 #Windows 11 system requirements
  $Win11Report = "" | Select-Object -Property "Processor Speed (GHz)", "Number Of CPU Cores", "RAM Size(GB)", `
  "Free Disk Space (GB)", "TPM Version", "Firmware Type", "SecureBoot Enabled", "Graphics Resolution"
 $Win11Report.'Processor Speed (GHz)' = "1"
  $Win11Report.'Number Of CPU Cores' = "2"
  $Win11Report.'RAM Size(GB)' = "4"
  $Win11Report.'Free Disk Space (GB)' = "64"
  $Win11Report.'Firmware Type' = "UEFI"
  $Win11Report.'SecureBoot Enabled' = "True"
  $Win11Report.'TPM Version' = "2.0"
  $Win11Report.'Graphics Resolution' = "720"
  #Write-Host "Windows 11 System Requirements:"
  #Write-Host ""
 If ($ExportToTextFile) {
     #"" | Out-File -FilePath $TextFileReportPath -Append
     "Windows 11 System Requirements:" | Out-File -FilePath $TextFileReportPath -Append
     "==============================" | Out-File -FilePath $TextFileReportPath -Append -NoNewline
     $Win11Report | Out-File -FilePath $TextFileReportPath -Append
 }
 ElseIf ($PassThru) {
     Write-Host ""
     Write-Host "Windows 11 System Requirements:"
     Write-Host "==============================="
     Write-Host "                               "
     $Win11Report
 #"" | Out-File -FilePath $TextFileReportPath -Append "Windows 11 System Requirements:" | Out-File -FilePath $TextFileReportPath -Append  "==============================" | Out-File -FilePath $TextFileReportPath -Append -NoNewline  $Win11Report | Out-File -FilePath $TextFileReportPath -Append
 }
 Else {
 Write-Host ""
  Write-Host "Windows 11 System Requirements:"
  Write-Host "==============================="
  Write-Host "                               "
  $Win11Report
 }
 #Create a final report that compares both specs
  #System Compatibility Checker Report
 $CompReport = "" | Select-Object -Property "Computer Name", "Processor Speed (GHz)", "Number Of CPU Cores", "RAM Size(GB)", `
  "Free Disk Space (GB)", "TPM Version", "Firmware Type", "SecureBoot Enabled", "Graphics Resolution"
 $CompReport.'Computer Name' = $env:COMPUTERNAME
  $CompReport.'Processor Speed (GHz)' = IF ($Report.'Processor Speed (GHz)' -ge $Win11Report.'Processor Speed (GHz)') {"Pass"} Else {"Fail"}
  $CompReport.'Number Of CPU Cores' = IF ($Report.'Number Of CPU Cores' -ge $Win11Report.'Number Of CPU Cores') {"Pass"} Else {"Fail"}
  $CompReport.'RAM Size(GB)' = IF ($Report.'RAM Size(GB)' -ge $Win11Report.'RAM Size(GB)') {"Pass"} Else {"Fail"}
  $CompReport.'Free Disk Space (GB)' = IF ($Report.'Free Disk Space (GB)' -ge $Win11Report.'Free Disk Space (GB)') {"Pass"} Else {"Fail"}
  $CompReport.'Firmware Type' = IF ($Report.'Firmware Type' -eq $Win11Report.'Firmware Type') {"Pass"} Else {"Fail"}
  $CompReport.'SecureBoot Enabled' = IF ($Report.'SecureBoot Enabled' -eq $Win11Report.'SecureBoot Enabled') {"Pass"} Else {"Fail"}
  $CompReport.'TPM Version' = IF ($Report.'TPM Version' -ge $Win11Report.'TPM Version') {"Pass"} Else {"Fail"}
  $CompReport.'Graphics Resolution' = IF ($Report.'Graphics Resolution' -ge $Win11Report.'Graphics Resolution') {"Pass"} Else {"Fail"}
 #Write-Host "Windows 11 Compatibility Checker Report:"
  #Write-Host ""
  #$CompReport
 If ($ExportToTextFile) {
     #"" | Out-File -FilePath $TextFileReportPath -Append
     "Windows 11 Compatibility Checker Report:" | Out-File -FilePath $TextFileReportPath -Append
     "========================================" | Out-File -FilePath $TextFileReportPath -Append -NoNewline
     $CompReport | Out-File -FilePath $TextFileReportPath -Append
     Write-Host "Your report has been saved in $TextFileReportPath"
  }
 ElseIf ($PassThru) {
     Write-Host ""
     Write-Host "Windows 11 Compatibility Checker Report:"
     Write-Host "======================================="
     Write-Host "                               "
     $CompReport
 #"" | Out-File -FilePath $TextFileReportPath -Append "Windows 11 Compatibility Checker Report:" | Out-File -FilePath $TextFileReportPath -Append "========================================" | Out-File -FilePath $TextFileReportPath -Append -NoNewline $CompReport | Out-File -FilePath $TextFileReportPath -Append Write-Host "Your report has also been saved in $TextFileReportPath"
 }
 Else {
 Write-Host ""
  Write-Host "Windows 11 Compatibility Checker Report:"
  Write-Host "======================================="
  Write-Host "                               "
  $CompReport
 }
Limitations of the Function
itechguides.com’s Windows 11 Compatibility Checker has the following limitations:
- The current version runs only on the local computer. It does not support a remote computer
- Based on the limitation specified above, you cannot run the tool on multiple computers. We hope to fix these 2 limitations in subsequent versions. This will also depend on demand.
- The tool only checks the processor’s speed. It does not check the type of procesor. So, there is a limited chance that the compactibilitry checker may pass your PC for Windows 11 but it may still fail the installation. This may happen if your PC has a processor that is not in the Windows 11 procesor compactibility list.
- The final compactibility result displays “Pass” or “Fail” in the individual specs. The word “Fail” may be misleading. It does not necessarily mean that you’ll not be able to install Windows 11 on the PC. It simply means that, under the current state, you may not. In most instances, modifying the specific requirement allows you to install Windows 11.
- The techguides.com’s Windows 11 Compatibility Checker requires you to open PowerShell as administrator before running the tool. This is more of an inconvenienece and less of a limitation.
How to Download and Use the Function
Follow the steps below to download and use www.itechguides.com’s Windows 11 Compatibility Checker:
- To download the function, click Get-Windows11Compatibility.zip
- Then, unzip the file. When you unzip the downloaded file, it will create a folder called Get-Windows11Compatibility.
- Copy the folder, Get-Windows11Compatibility to your Windows 10 PowerShell modules folder.
Your PowerShell modules folder is located in C:\Users\<ptofile_name>\Documents\WindowsPowerShell\Modules - Then, open PowerShell as administrator and run the following commands before running the compactibility checker command…
Unblock-File C:\Users\VictorA\Documents\WindowsPowerShell\Modules\Get-Windows11Compatibility\Get-Windows11Compatibility.psm1
- Finally, to run the compactibility checker, run the command below…
Get-Windows11Compatibility
This command displays the result on the PowerShell console…
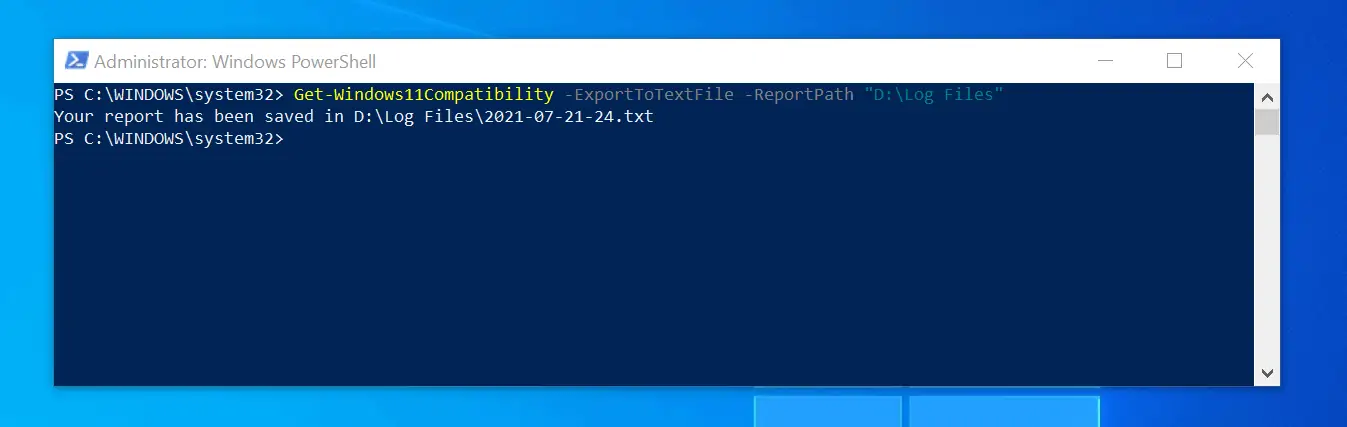
Alternatively, you may save the report in a text file with this command…
Get-Windows11Compatibility -ExportToTextFile -ReportPath "D:\Log Files"
The command will run and inform you the location the report is saved.
Finally, to display the result on the PowerShell console and save a copy to a text file, run the command below…
Get-Windows11Compatibility -PassThru -ReportPath "D:\Log Files"
Conclusion
Our custom Windows 11 Compatibility Checker (Get-Windows11Compatibility) is designed to help you check if your PC meets the requirements to install Windows 11.
I hope you found our Windows 11 Compatibility Checker tool helpful. If you found it helpful, kindly share your experience using our quick “Was this page helpful?” feedback tool.
Finally, to learn more about Windows 11, visit the page.


Your script is pulling the wrong information for TPM. You are failing that test based on retrieving and testing against the “PhysicalPresenceVersionInfo” instead of the “SpecVersion”.
Basically the most recent Physical Version is 1.3 supporting Specification Version 2.0. Please update your scrip[t accordingly or send me updated instructions.
Thanks
Hi Bruce,
Thank you so much for taking the time to share your views on this script!
I just checked your recommendation and using SpecVersion returns the same result as using PhysicalPresenceVersionInfo. The only difference is that SpecVersion returns the TCG specification version as well as the specification revision level, and the errata revision level.
However, looking at the definitions of SpecVersion and PhysicalPresenceVersionInfo, you are right since the SpecVersion is “The version of the Trusted Computing Group (TCG) specification that the TPM supports”.
Based on this, I will modify the script to pull the TPM version from the SpecVersion property.
When I upload the modified script, I’ll post additional updates here.
Thanks again for pointing this out.
To read more about these properties, visit – https://docs.microsoft.com/en-us/windows/win32/secprov/win32-tpm
Hi Bruce,
I have updated the script to use “SpecVersion” instead of “PhysicalPresenceVersionInfo” – to determine the TPMVersion. However, the result will be the same because the “SpecVersion” returns the same value as “PhysicalPresenceVersionInfo”.
Although the “SpecVersion” property returns 3 values, the first value is the major and minor TCG specification version. The second value is the specification revision level, while the third value is the errata revision level.
The first value that defines the major and minor TCG specification version is the TPM Version.
You can confirm that my function returns the correct information by running the command below (elevated command prompt):
tpmtool.exe getdeviceinformation