This PowerShell tutorial is based on my book with the same title. You can get the book on Amazon.
Alternatively, since you are here, you can read the content in the same book 100% free!
There are 4 articles with a total of 7 tutorials. This is PowerShell Tutorial 1 & 2 of 7
Whether you are new to PowerShell or you have been using PowerShell for a while, you will find this tutorial useful.
Finally, you could use the “Browse Post Topics” table of contents to navigate the tutorial. Using the table of contents is particularly useful if you are not new to PowerShell but want to learn a particular topic.
PowerShell Tutorial 1: Introduction to PowerShell and Cmdlets
In this first tutorial, I will introduce you to PowerShell. For readers new to PowerShell, the first section of this tutorial will act as a quick introduction to this exciting tool.
However, for readers that have some knowledge of PowerShell, it will act as a refresher. There is something for every reader in this tutorial.
This tutorial also covers PowerShell Cmdlets (Command-Lets) and shows you how to find cmdlets using the Get-Command Cmdlet. The tutorial covers cmdlets in detail including how they are named in Verb-Noun pairs.
Finally, the tutorial concludes by teaching you Cmdlet parameters and aliases. You will also learn the command completion capability of PowerShell.
What is PowerShell?
Wikipedia defines Windows PowerShell as “a task automation and configuration management framework”. Microsoft defines it as “a new Windows command-line shell designed especially for system administrators”.
I define Windows PowerShell as a command-line and scripting tool built for Windows Systems Administrators for the purpose of Windows task automation.
For a newbie reading this, one way to easily introduce PowerShell is to relate it to the Windows command prompt. However, relating PowerShell to the legacy CMD undermines PowerShell – but it is the easiest way to introduce this tool to you.
How to Open Windows PowerShell
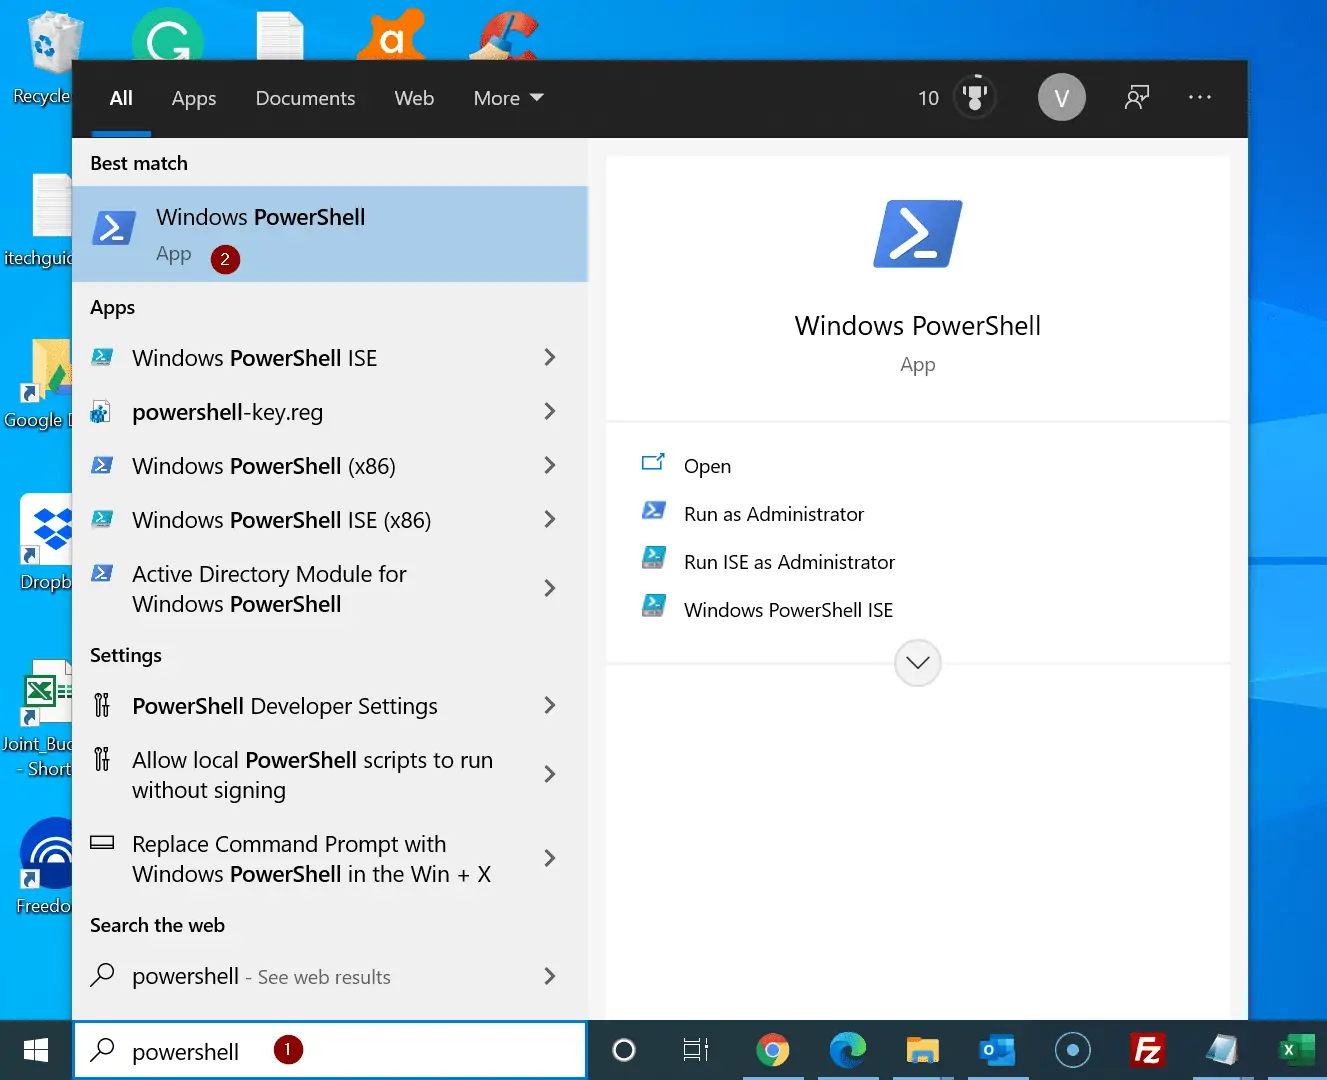
Now that you know what PowerShell is, the next logical part of this tutorial is to show you how to open PowerShell. To open Windows PowerShell, use one of the methods below:
- Search powershell. Then, from the search results, click Windows PowerShell.
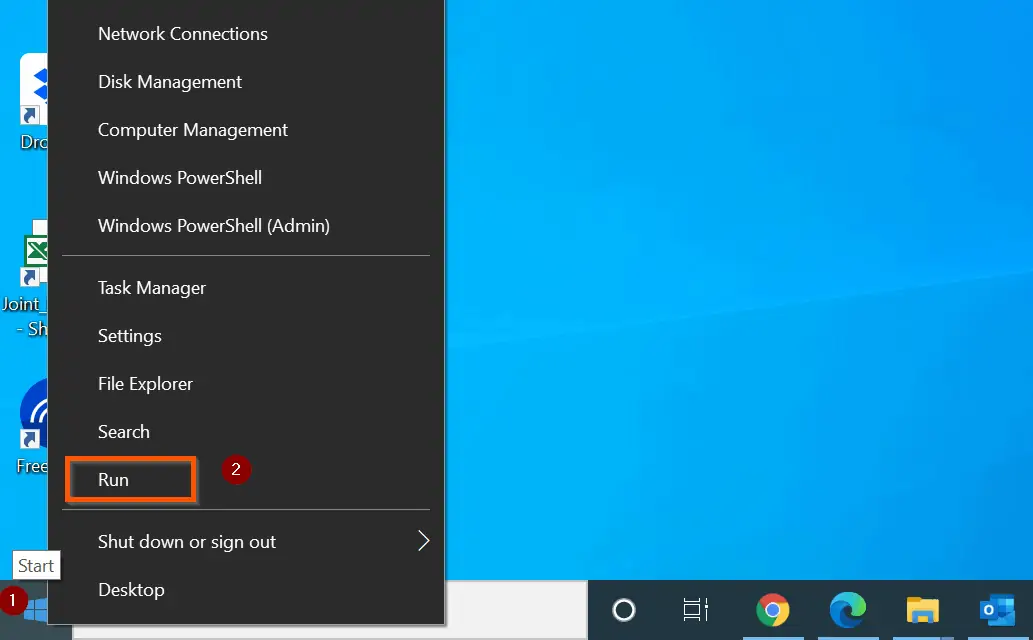
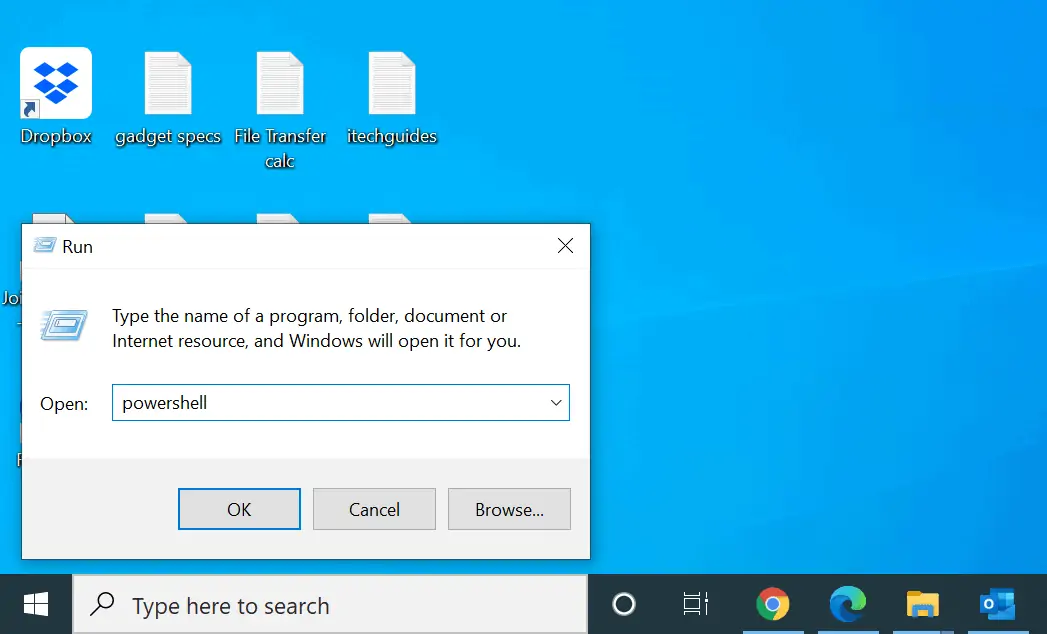
- Alternatively, you can open PowerShell by right-clicking the Starting Menu. Then, select Run. When Run Opens, enter powershell and click OK.
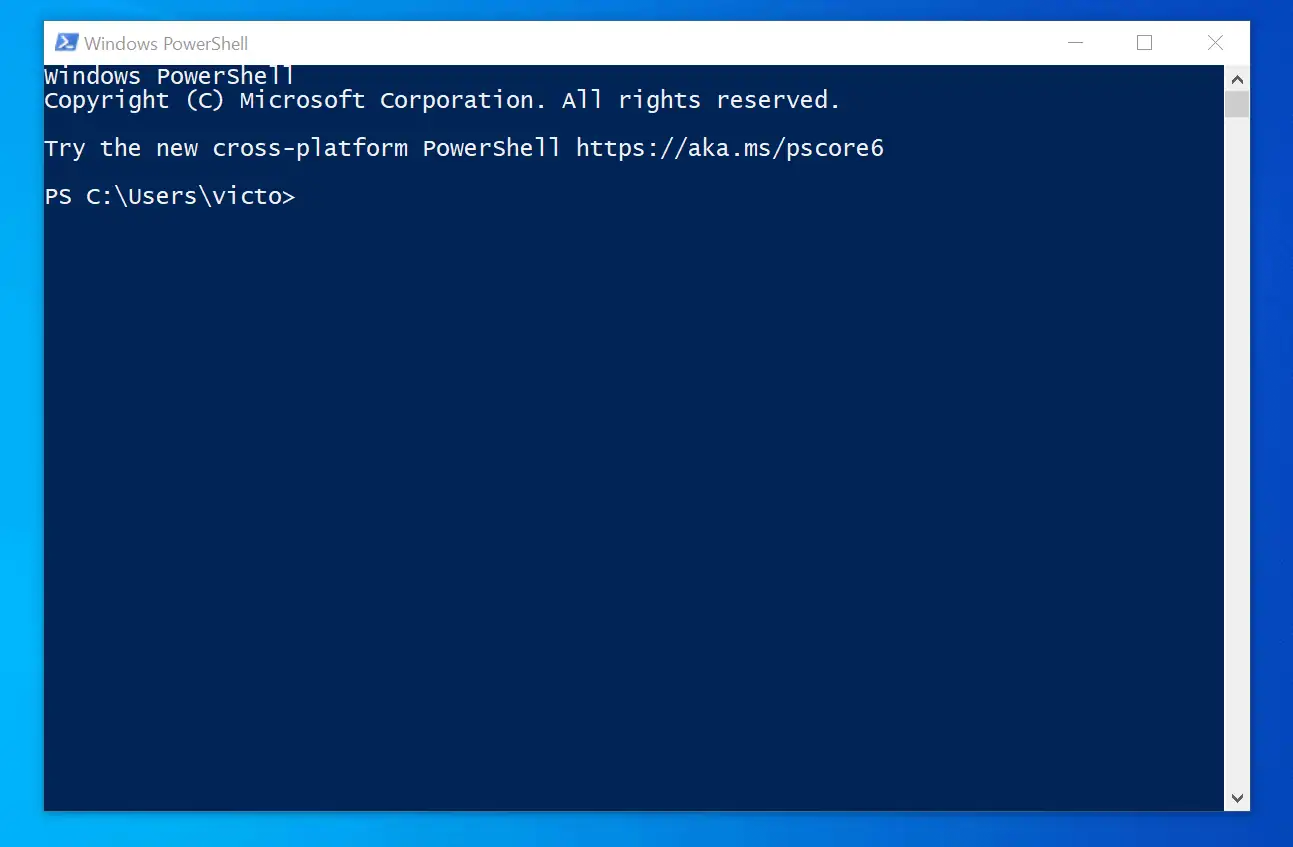
As you can see, the PowerShell command console looks like the legacy Windows command prompt. However, there is more to it.
I guess the next logical thing you want to learn in this tutorial is to start executing PowerShell commands! Not yet. Let me get some minor but important things out of the way first.
Like most applications, PowerShell comes in different versions. It is important that you know the version of PowerShell you are running. Moreover, it is also important to know how to upgrade Windows PowerShell if you need to.
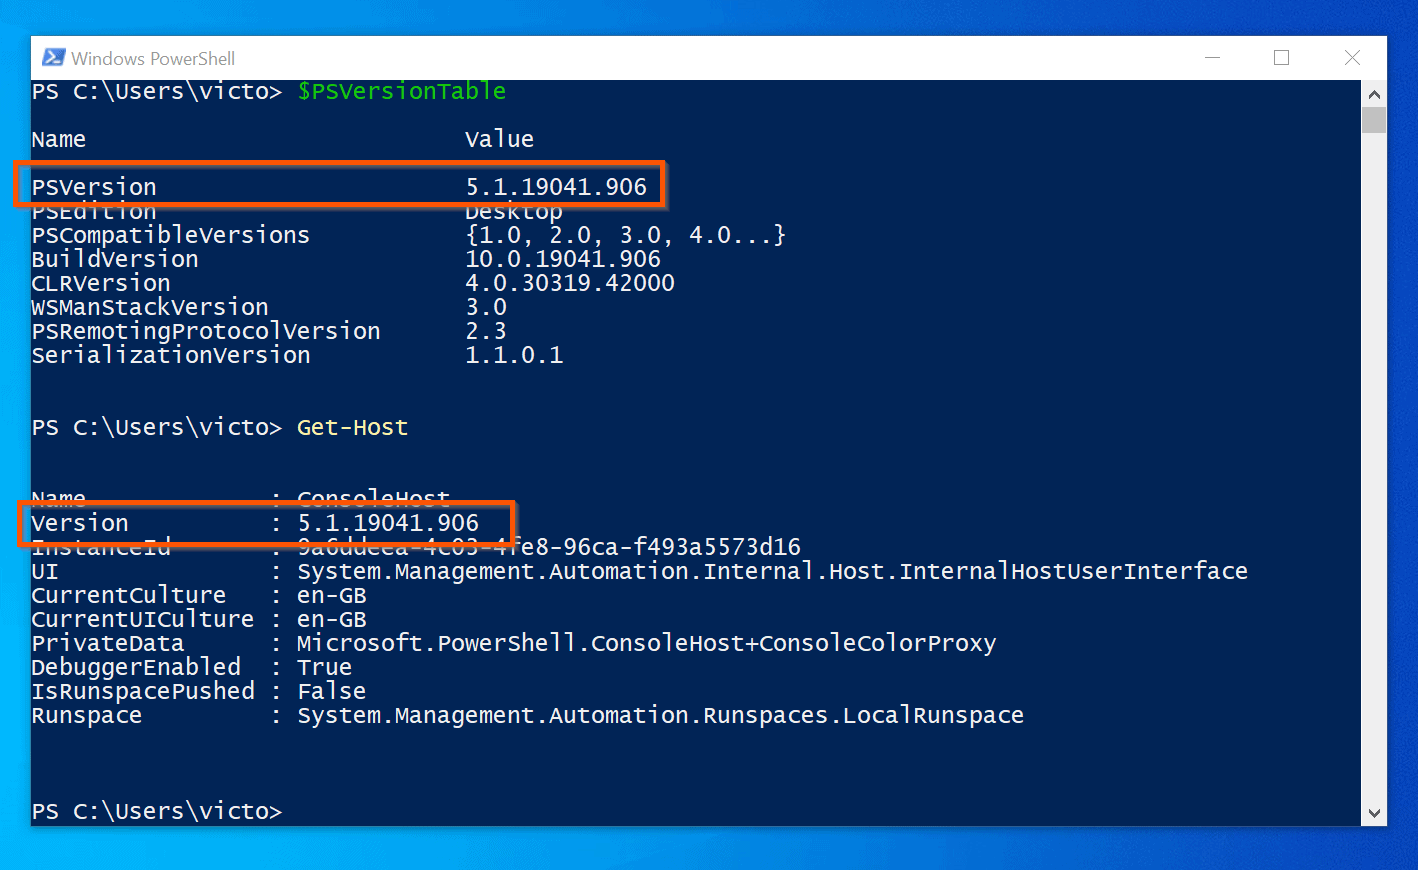
There are two ways to determine your current PowerShell version. By executing either of the commands below:
$PSVersionTable
Get-Host
Here are the results of both commands. To learn more, read our article – How to Check the Current PowerShell Version.
Introduction to Cmdlets
So far, in this PowerShell tutorial, you know what PowerShell is. Furthermore, you now know two methods to open Windows PowerShell.
I have also shown you how to check your PowerShell version.
In this sub-section of the tutorial, I will introduce you to PowerShell Cmdlets.
Windows PowerShell executes commands using Cmdlets (Command-Lets). “Cmdlet” is an entirely new concept introduced with PowerShell. They are command-line tools built into the shell in PowerShell.
Cmdlets are normally made of two English words. The first word is a verb, while the second is a noun.
A Cmdlet Verb and its Noun are separated with a hyphen (-), and written as a Verb-Noun pair.
The verb part of a cmdlet is usually an action word while the Noun part is the identity on which the action is performed. For example Get-Command.
The Verb part of this cmdlet is ‘Get’ while the Noun part (the object on which the ‘Get’ action is performed) is ‘Command’. This is the standard naming convention of cmdlets.
Although PowerShell uses the verb part of a cmdlet to imply actions, however, the word may not necessarily be a standard English verb. For example, the word ‘New’ is a PowerShell verb but it is not an English verb.
Another important thing to note about cmdlets is that the Verb-Noun combination is usually descriptive of what the cmdlet accomplishes. For example, Get-Help.
This, like most PowerShell cmdlets, is descriptive of what it does. Get-Help means get help!
Another example is the Get-Command Cmdlet. This Cmdlet returns information about other PowerShell commands or cmdlets.
To drive my point home, let’s examine some PowerShell verbs and see the reasoning behind them.
The verb ‘Add’ adds a resource to a container. For example, the cmdlet Add-Content, adds additional information to a file.
Furthermore, the verb ‘Set’ is used to replace existing data. For example, to amend the details of an Active Directory user, you would use the cmdlet Set-ADUser.
This consistency in Cmdlet names makes it easy to remember and use them.
The examples below illustrate the points in the preceding paragraphs.
The command below creates a new text file, Outfile.txt. It also adds the sentence “This is the first line in the text file Outfile.txt” to the file.
"This is the first line in the text file Outfile.txt" | Out-File ":\PSLab\Tutorial 1\Outfile.txt"
The Cmdlet Out-File illustrates the Verb-Noun naming convention of Cmdlets. Additionally, it also illustrates the descriptive nature of PowerShell Cmdlets.
In the last command, I used the pipeline, (|). I will cover pipelines in PowerShell Tutorial 3.
Reserved PowerShell Words
In Windows PowerShell, some words have special meanings. These words with special meanings are called “Reserved Words”.
When you use any of the reserved words in a script without quotation marks, Windows PowerShell attempts to apply the special meaning assigned to the word.
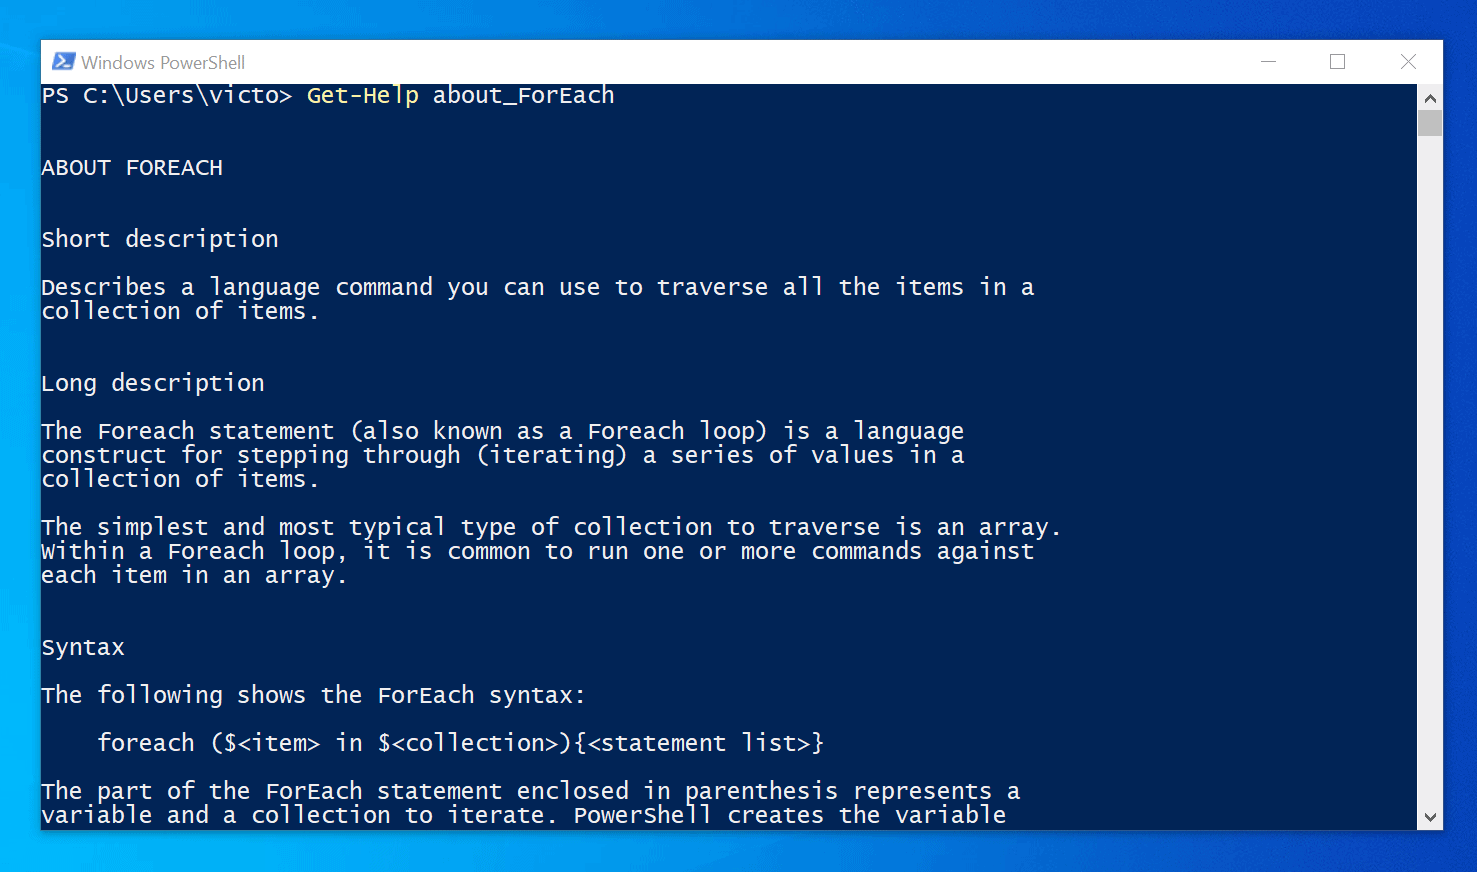
Some of the reserved words in PowerShell are “Function”, “Try”, “Catch”, “If”, “Else”, “ElseIf”, “Break”, “ForEach” and “In”.
I intentionally introduced these reserved words early in this PowerShell tutorial because we will be using a number of them as we progress. If you wish to get information about any of these reserved words, execute the command “Get-Help about_ReservedWord”.
For example, to get information about “ForEach”, execute the command below:
Get-Help about_ForEach
Here is the result of the command.
PowerShell Tutorial 2 covers the Get-Help command. It will also cover “Windows PowerShell Core About Topics”.
Additionally, in PowerShell Tutorial 2, you will learn a lot more about how to find information about PowerShell reserved words using the Get-Help Cmdlet.
Cmdlet Parameters, Aliases, and Command Completion
In the last PowerShell tutorial, you learned that PowerShell cmdlets are named in Verb-Noun pairs. This section introduces another important cmdlet concept called parameters
A cmdlet parameter is “the mechanism that allows a cmdlet to accept input”. It simply means that a parameter allows you to feed information into a Cmdlet.
Syntax Of A Cmdlet Parameter
In this PowerShell tutorial, you will meet the word ‘Syntax’ several times. A PowerShell command syntax tells you the correct way to execute commands using a PowerShell cmdlet.
Below is the syntax of a cmdlet parameter:
Cmdlet_Name -ParameterName Parameter-Value
In the syntax example above, ‘Cmdlet_Name’ represents a cmdlet. The parameter name comes after the cmdlet.
Before you add a parameter name, you have to add a hyphen (-). Finally, you have to add the parameter value.
For example, the Get-Command cmdlet has a parameter called Name. If I want to check whether a cmdlet called Get-Process is installed on my system, I will execute the command below:
Get-Command -Name Get-Process
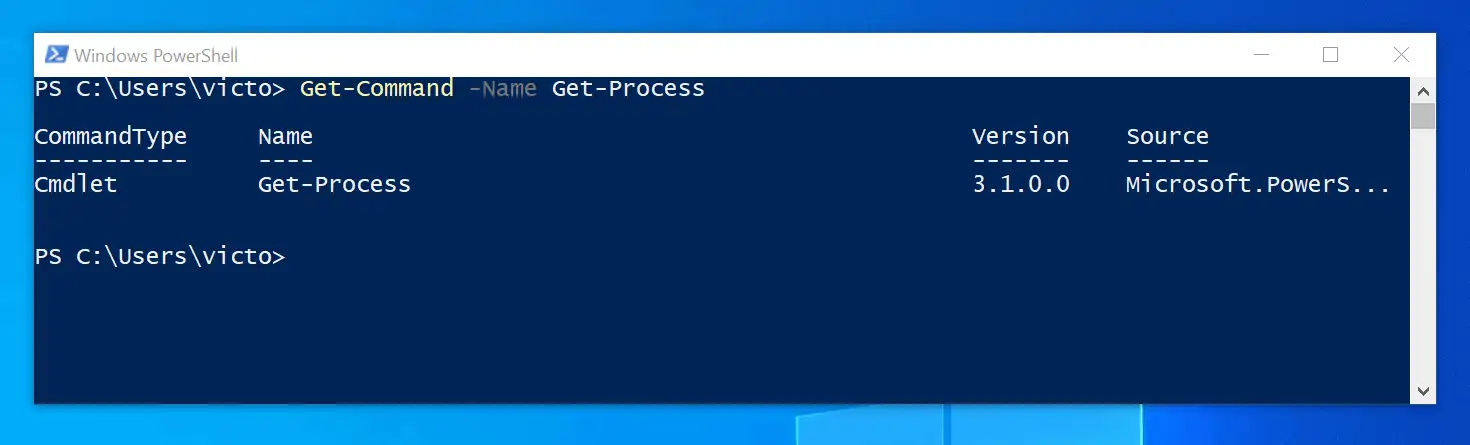
In the previous command, ‘Get-Command’ is the cmdlet. ‘Name’ is the parameter name while ‘Get-Process’ is the parameter value.
Still on the last example, the ‘Name’ parameter has provided a way for me to feed input into the Get-Command cmdlet.
If a cmdlet parameter allows me to feed input into the cmdlet, it means I can feed different inputs into the same cmdlet to get different results. Earlier, we fed ‘Get-Process’ into the ‘Name’ parameter of the Get-Command cmdlet.
In the next example, I will feed in a different value. Say we want to check whether the cmdlet, Get-WMIObject is on my PC, Get-WMIObject will then replace Get-Process as my parameter value as shown below:
Get-Command -Name Get-WMIObject

Types of Cmdlet Parameters
Some Cmdlet parameters accept input values, others will not. The parameters that accept input values are called ‘Strings’.
On the other hand, the Cmdlet parameters that do not accept input values are called ‘switches’.
In the last section, I gave some examples of a parameter that accepts or requires inputs. An example of a parameter that does not require any input value is the ‘Recurse’ parameter found in the Get-ChildItem cmdlet.
The Get-ChildItem cmdlet displays the items and child items in one or more specified locations. If the item in question is a container (a folder for example), Get-ChildItem retrieves the items inside the container.
The items inside the container are known as child items.
By default, Get-ChildItem retrieves only items in the main container. However, if you wish to retrieve information about items in all child containers, use the ‘Recurse’ parameter.
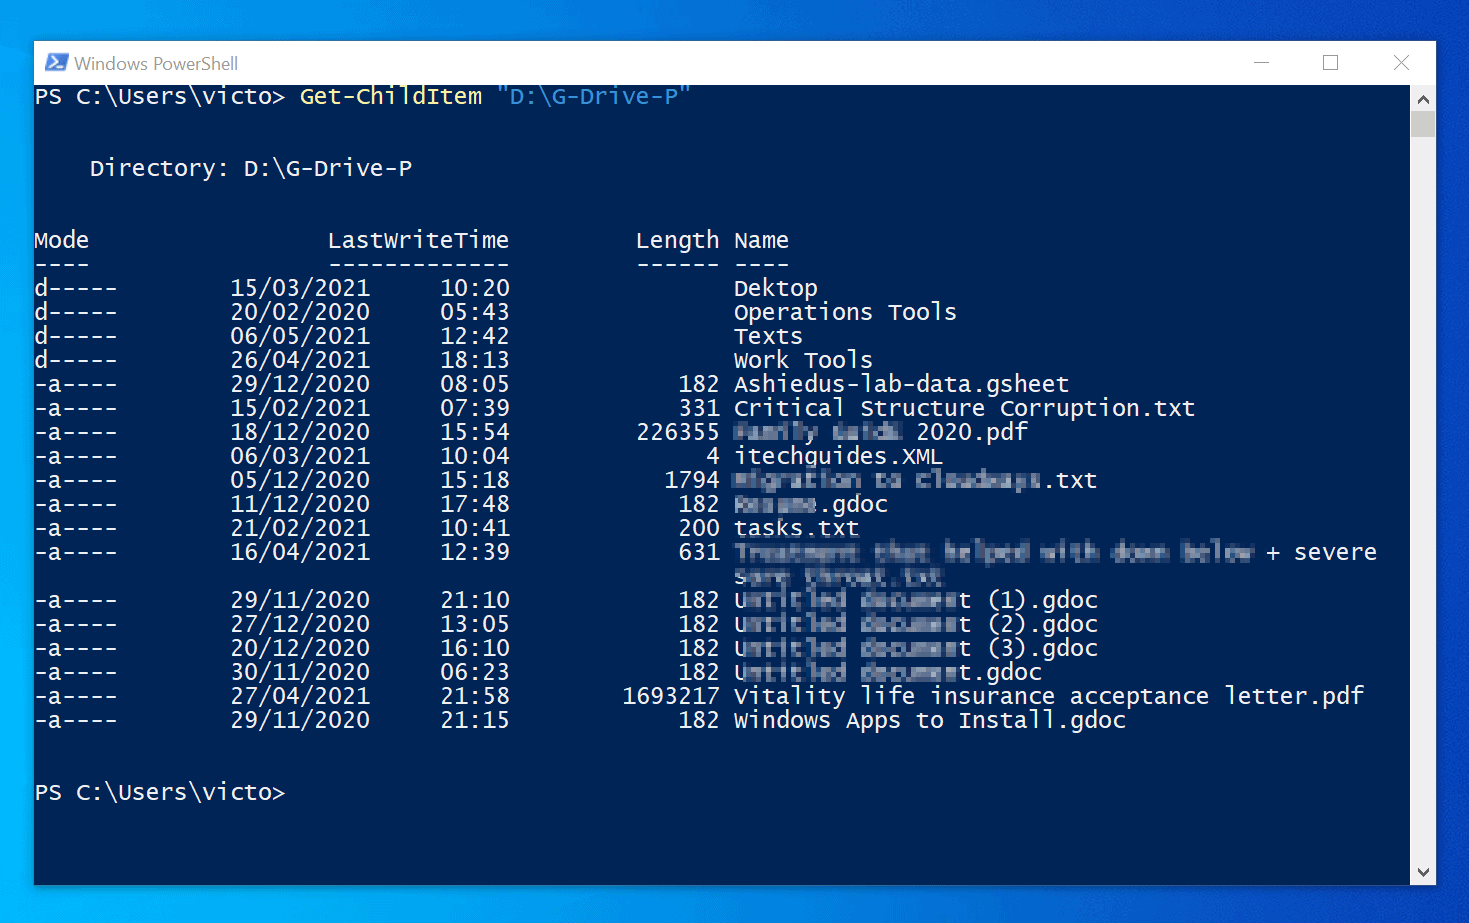
To illustrate the concept of parent and child containers, note the folders in the “D:\G-Drive-P” in this screenshot.
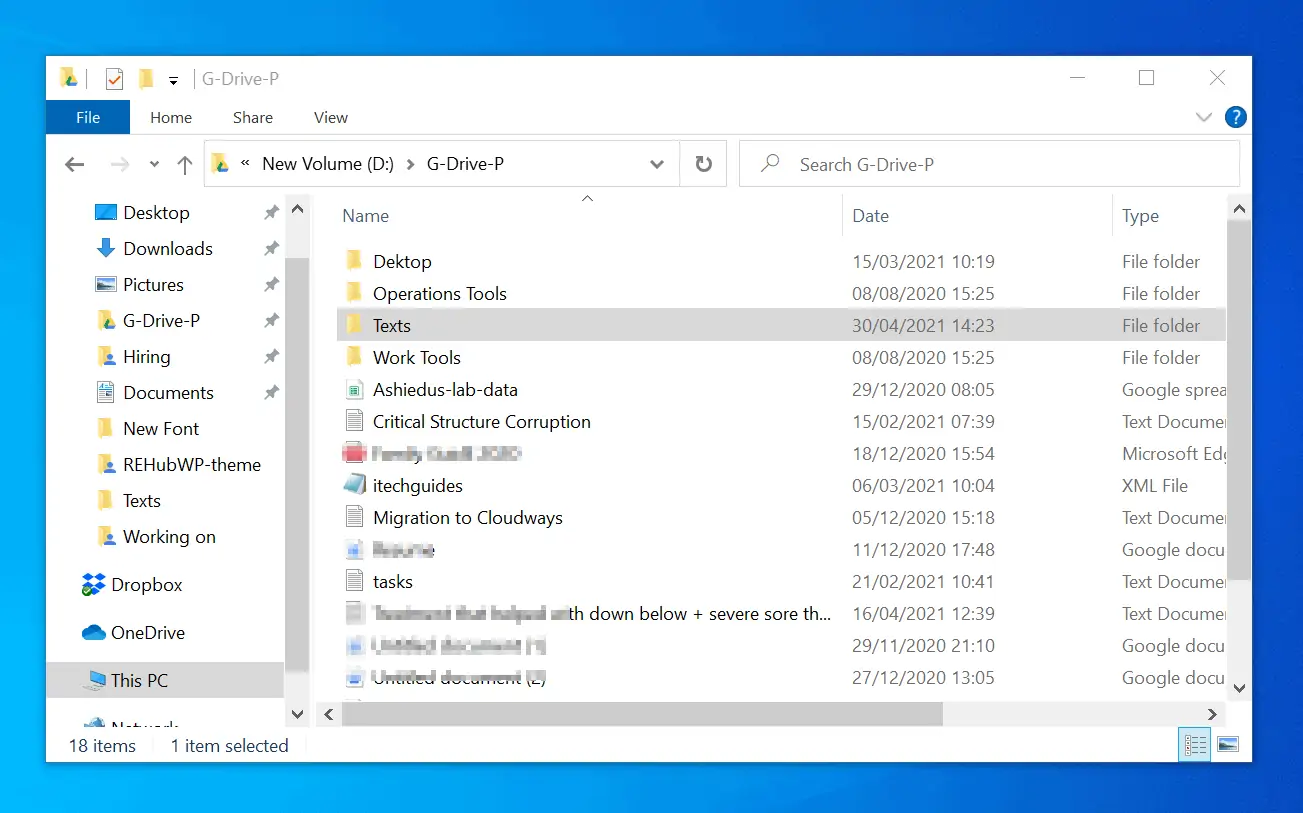
The Get-ChildItem Cmdlet can display the items in the G-Drive-P folder. However, if we run the command, without specifying the ‘Recurse’ parameter, the Get-ChildItem only displays items in the “D:\G-Drive-P” folder.
Get-ChildItem "D:\G-Drive-P"
Alternatively, to display all items in the top folder and all sub-folders, specify the ‘Recurse’ parameter.
Get-ChildItem -Recurse "D:\G-Drive-P"
The last command with the ‘Recurse’ parameter illustrates a parameter type called ‘switche’ parameter. Note that, unlike the other parameter we discussed earlier, the ‘Recurse’ parameter does not require an input.
PowerShell Command Completion
In this part of PowerShell tutorial 1, you will learn about a very useful PowerShell Cmdlet feature – Command Completion.
Command completion functionality of PowerShell provides it with the ability to auto complete commands for you. When you type a portion of a cmdlet and press the tab key, the shell completes the command for you.
Command completion can be used for cmdlets as well as parameter completion.
For example, assuming you wish to find the Get-Command cmdlet but you have forgotten the full name of the cmdlet. You could type Get-Co then hit the tab key.
Based on the commands I have on my computer, the shell returned Get-Command, Get-ComputerRestorePoint, Get-Content, etc. As I press the tab key, the shell returns more and more cmdlets.
With this functionality, you do not need to memorize cmdlets – though as you script more and more you get used to some cmdlets. However, command completion will remain useful in your scripting life!
Continuing with our Get-Command example, once you have found the cmdlet using command completion, you may wish to find the parameters associated with the cmdlet. To achieve this, add a space after Get-Command – then type hyphen (-).
Next, press the Tab key once more. Continue pressing the tab key to see all parameters associated with the cmdlet (in this instance, Get-Command).
PowerShell Cmdlet Aliases
The last two useful functionalities in PowerShell that I wish to introduce to you are aliases, high-light-to-copy and right-click-to-paste.
Most PowerShell cmdlets will have an alias. Aliases are alternate names for cmdlets and commands.
Aliases are shortened form of a cmdlet.
Furthermore, in PowerShell, an alias is an alternate name or nickname for a cmdlet. A command element, such as a function, script, file, or executable file may also have and alias.
Most people use aliases in commands and scripts to reduce the number of letters they type. Aliases might also be easier to remember.
However, I prefer using the full name of Cmdlets. I believe using the full name of a Cmdlet makes it easily recognizable.
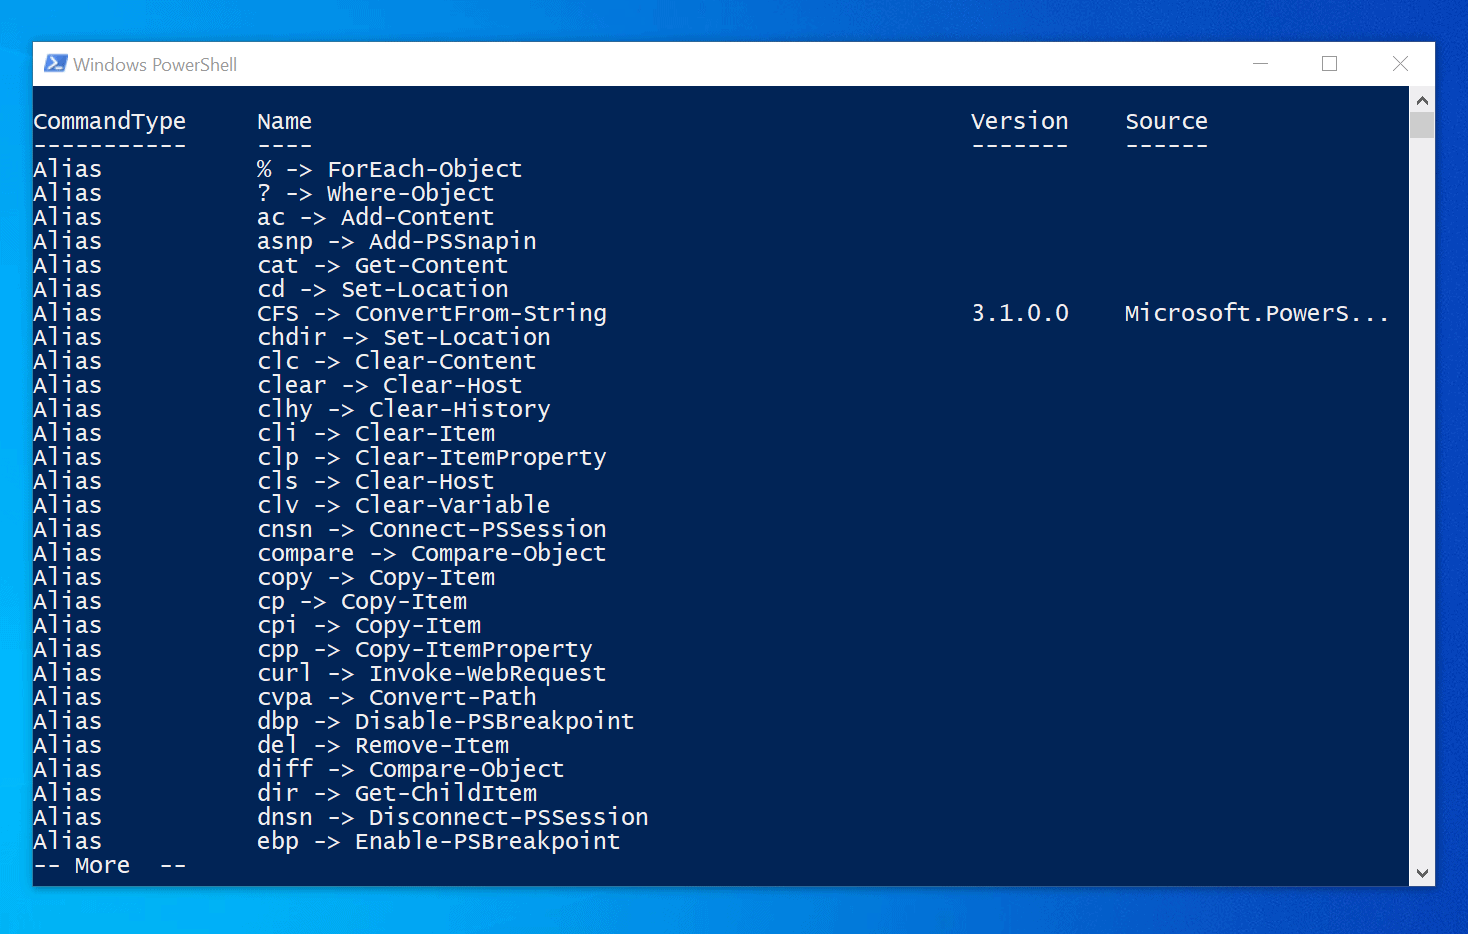
Finally, for this section, to list aliases for Cmdlets in your computer, use the command below:
Get-Alias | More
From the result of the last command, “%” is the alias for ForEach-Object. Additionally, “?” is the alias for Where-Object Cmdlet.
Moving on, if you know the alias of a Cmdlet and wish to find the full name of the cmdlet, use this command syntax:
Get-Alias -Name Alias_Name
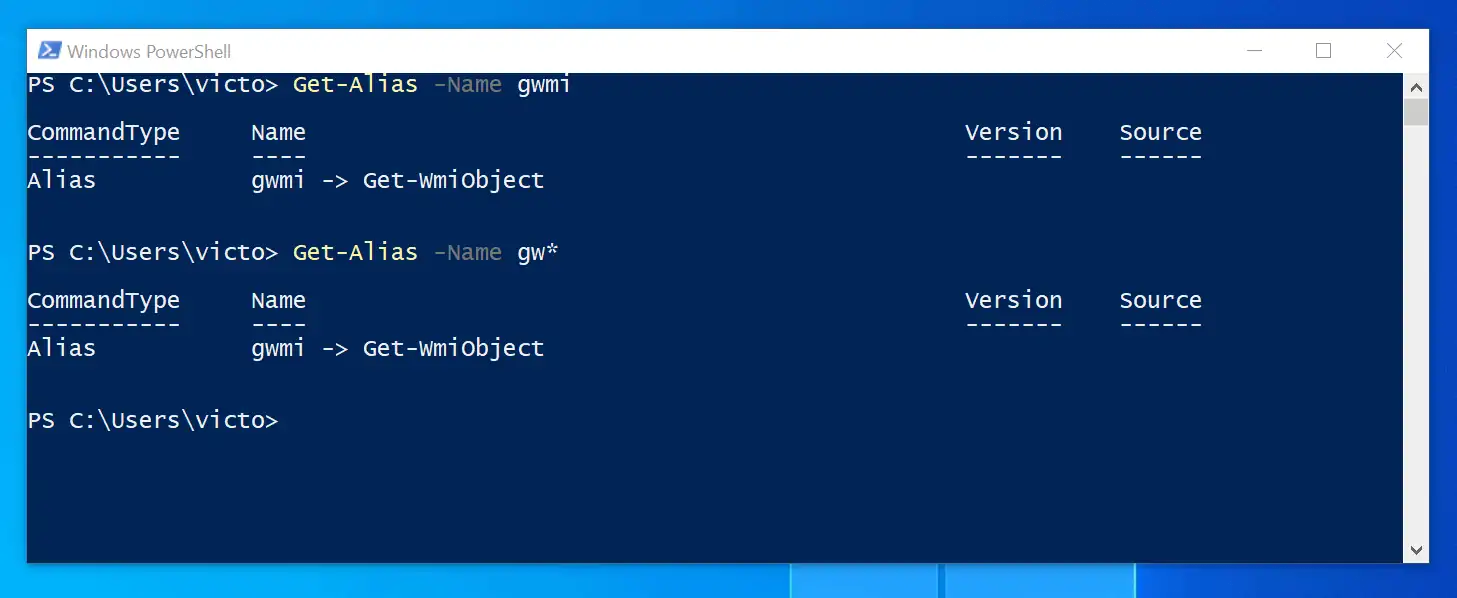
Replace “Alias_Name” with the Cmdlet alias you want to get its full name. For example, to get the full Cmdlet for “gwmi”, use the command below:
Get-Alias -Name gwmi
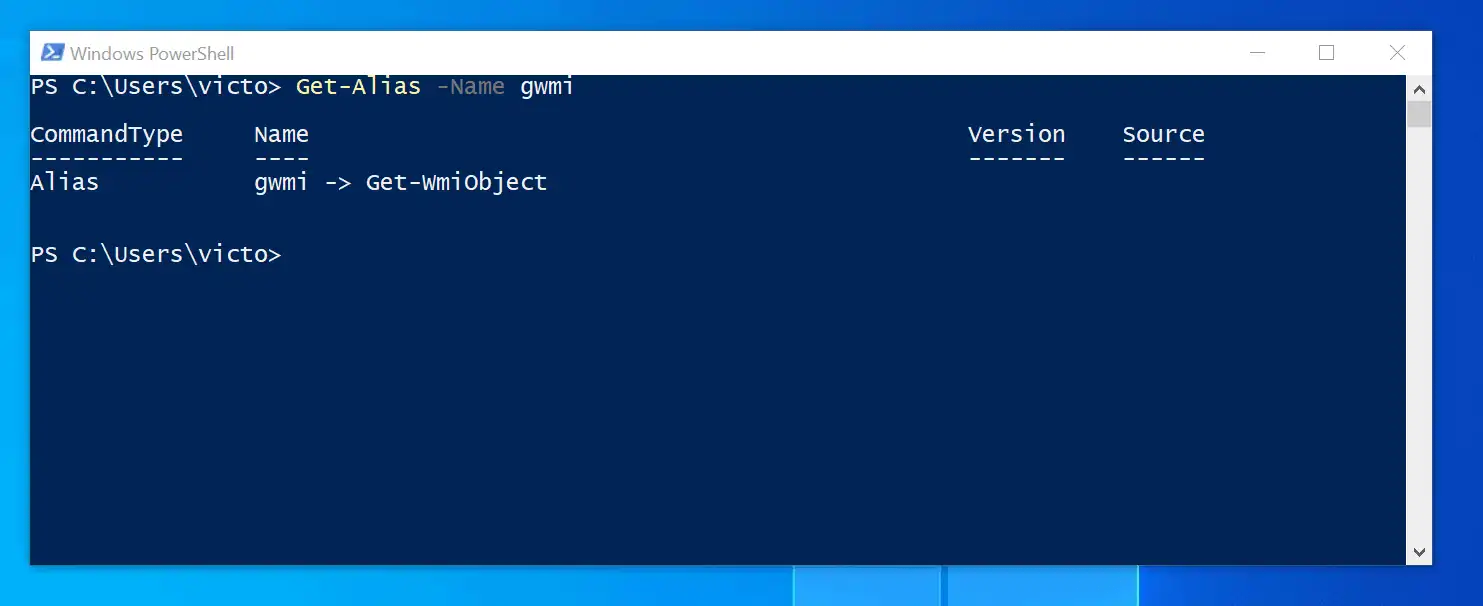
Interesting isn’t it. Based on the result of the command, the full name of the Cmdlet with “gwmi” alias is Get-WmiObject. You may also use a wild card, for example, Get-Alias -Name gw* as shown below.
Finally, for this section, I will show you how to copy and paste in a PowerShell shell. To illustrate, to copy the Get-WmiObject Cmdlet in this screenshot, highlight the whole text.
Then, press the enter key on your keyboard. Finally, to paste the copied item into the PowerShell command prompt, right-click anywhere on the shell.


I hope you are enjoying this PowerShell tutorial. Remember to give us your feedback using the “LEAVE A REPLY” form at the end of this page.
You can also scroll down to the “Was this post helpful?” section at the end of the post and provide your feedback.
How to Find Cmdlets Using Get-Command
Open a PowerShell console and execute the command below:
Get-Command | more
The command displays a list of Cmdlets in your computer. As I explained earlier, piping the output to “More” displays results on the screen – and offer you the option to press the enter key to display more results.
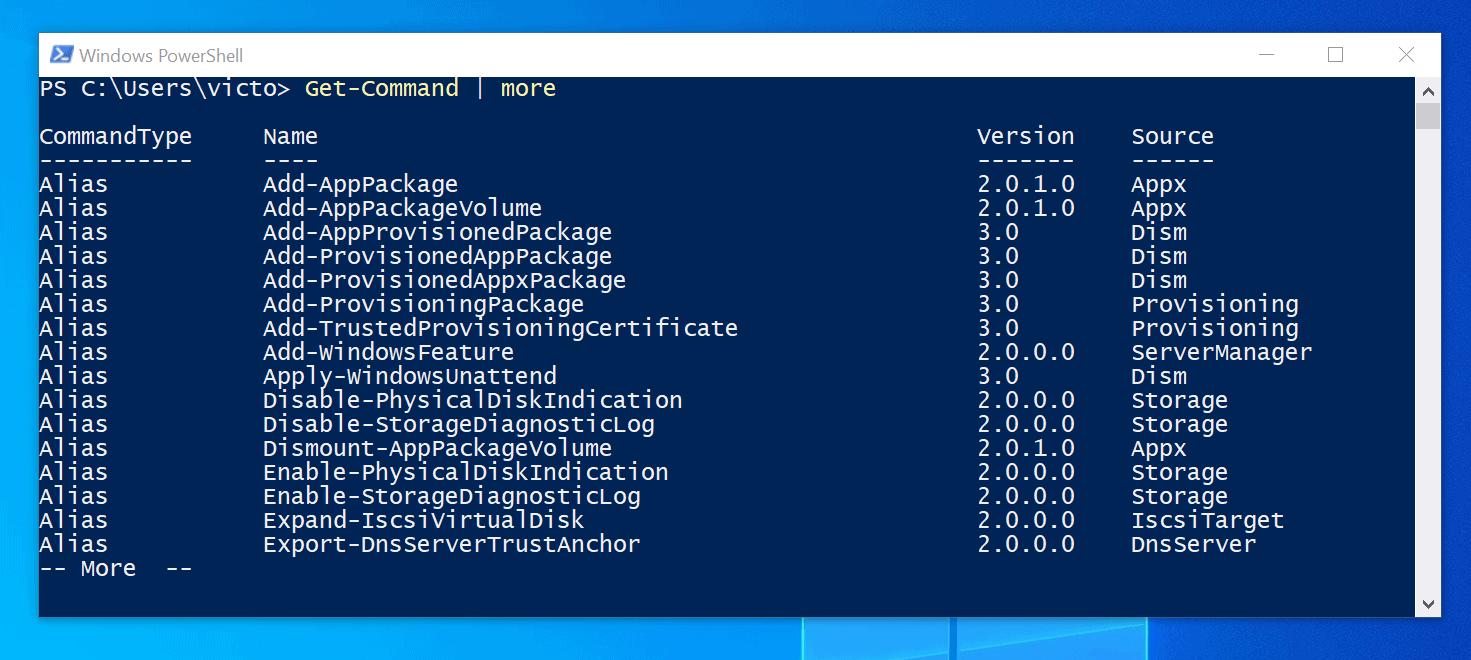
The result of the command has four columns – ‘CommandType’, ‘Name’, ‘Version’ and ‘Source’. The ‘CommandType’ column displays ‘Alias’, ‘Function’ or ‘Cmdlet’.
As you may have realized, running the Get-Command without any parameters is not very useful. In the next sub-section, I will teach you how to use Get-Command parameters to display more informative results.
Syntax Of The Get-Command Cmdlet
The simplest syntax of the Get-Command cmdlet is:
Get-Command Command-Name
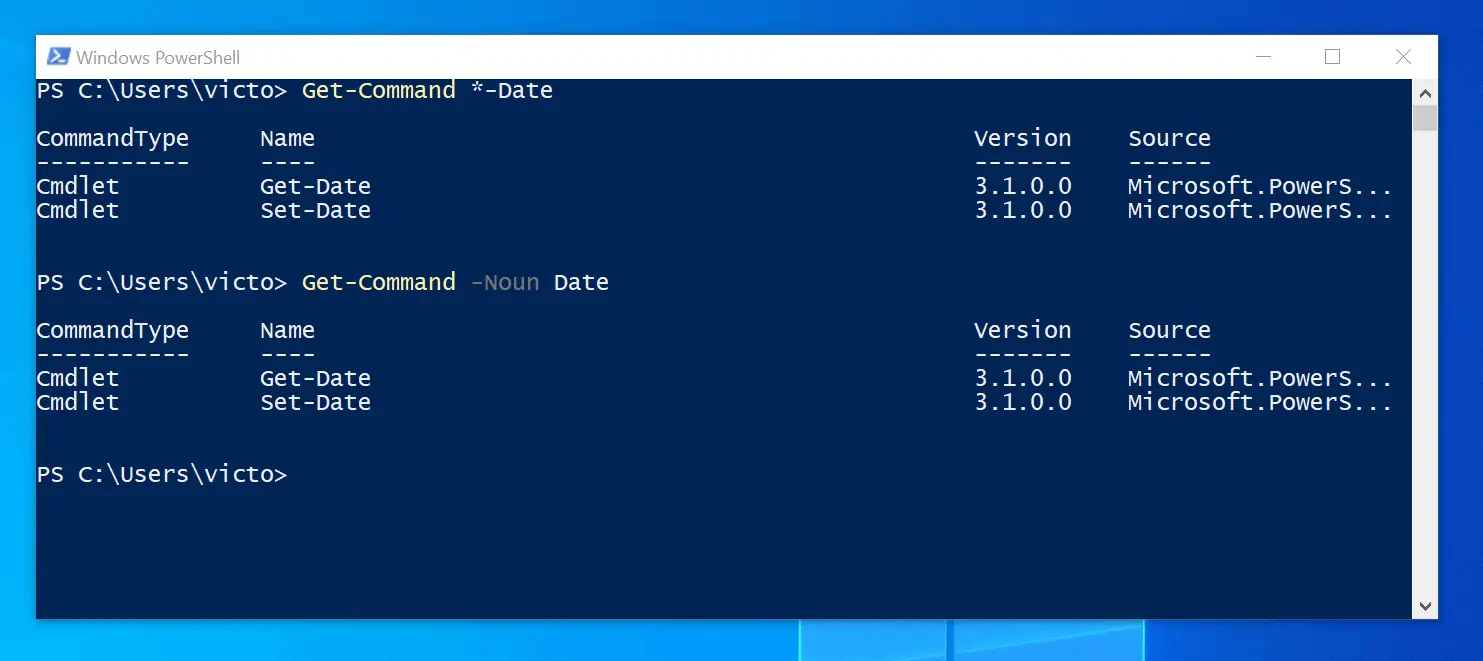
To find a specific cmdlet, enter Get-Command, followed by the name of the cmdlet. However, if you know portions of the cmdlet you need, you can find the actual name of the cmdlet by adding wildcards.
For example, to find all cmdlets with the Noun ‘Date’, execute the command below:
Get-Command *-Date
Alternatively, you can use the command below:
Get-Command -Noun Date
Both commands return the same results.
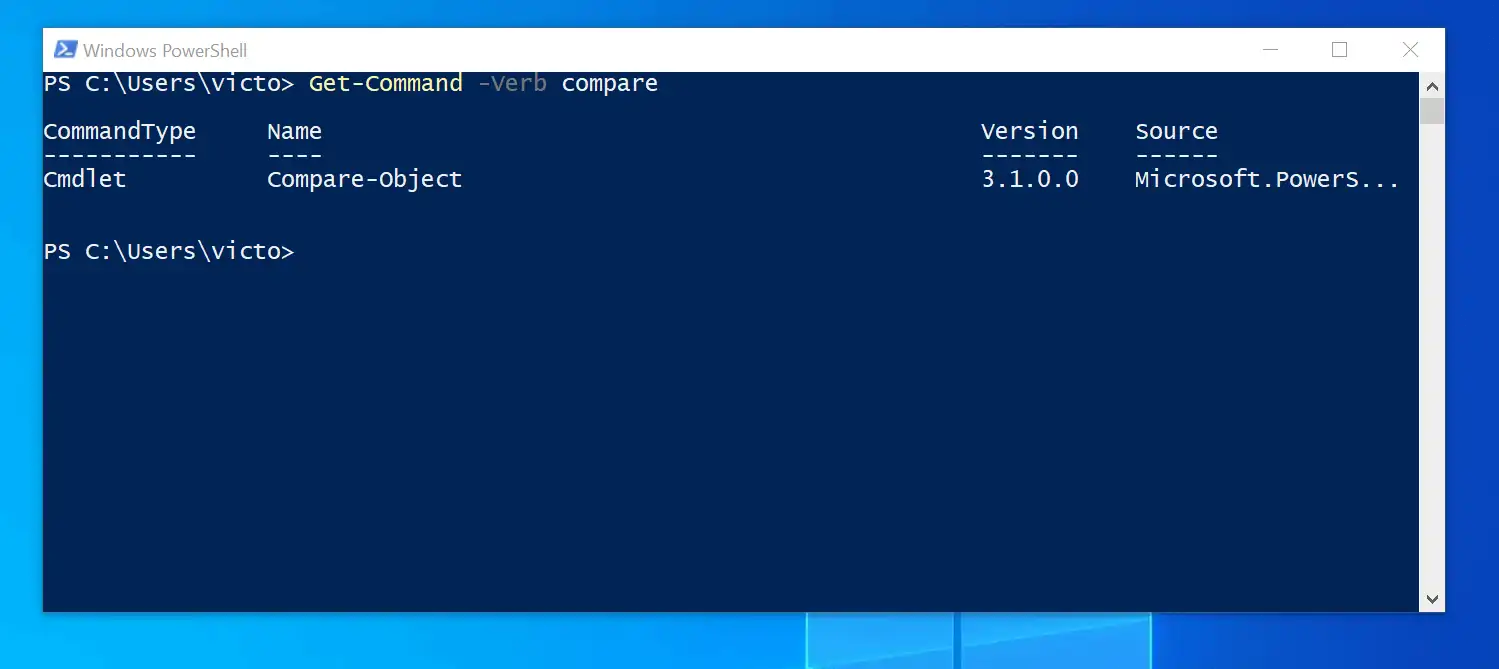
The Get-Command Cmdlet is handy if you need to find a Cmdlet to perform specific tasks. For example, to find a Cmdlet that can compare two Active Directory groups, you can guess that the Cmdlet will likely contain the verb “compare”.
The next step is to use the Get-Command Cmdlet to display all Cmdlets that contain the verb “compare”. Here is the command that can list the Cmdlets we need:
Get-Command -Verb compare
Bingo! We have our Cmdlet – Compare-Object!
Approved PowerShell Cmdlet Verbs
In this PowerShell tutorial, you know that PowerShell Cmdlets are named in Verb-Noun pairs. Windows PowerShell has a list of approved verbs used cmdlets, functions and modules.
Additionally, using a list of approved verbs in PowerShell has two benefits – a), it encourages consistency – b), it makes it easy to remember Cmdlets.
Approved verbs are grouped into seven types – ‘Common’, ‘Communications’, ‘Data’, ‘Diagnostic’, ‘Lifecycle’, ‘Security’, and ‘Other Verbs’. To display the full list of approved Cmdlet verbs, run the command below:
Get-Verb | Sort-Object Group, Verb
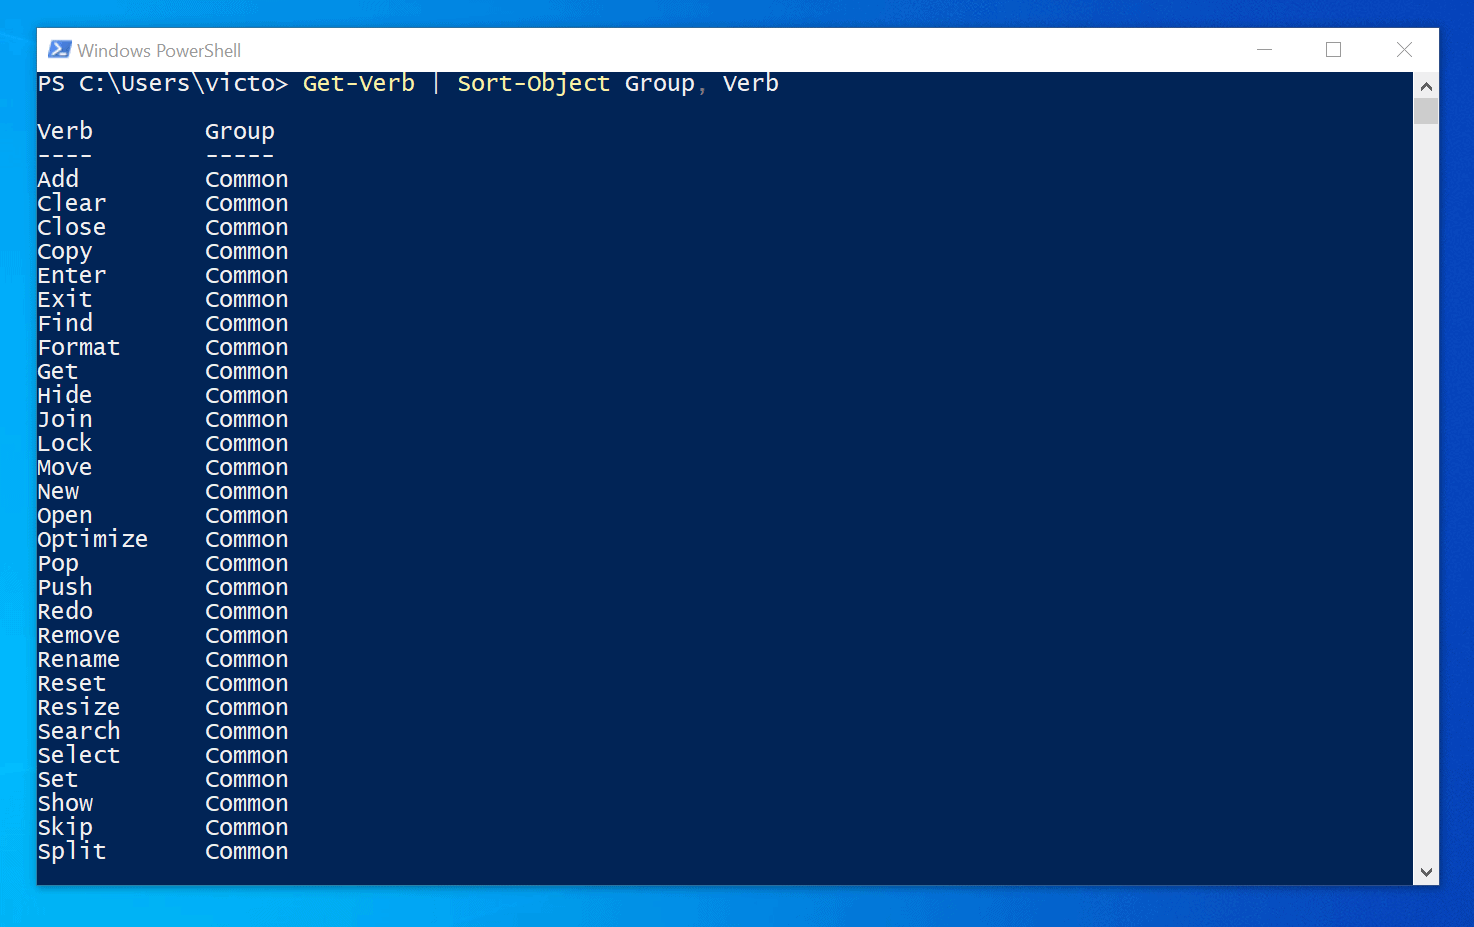
Knowing how to get this list makes it easy for you to find Cmdlets you need to automate tasks with PowerShell.
References and Further Reading for PowerShell Tutorial 1
- Installing PowerShell on Windows
- Approved PowerShell cmdlet Verbs
- Cmdlet Parameters
- Wikipedia Page For Windows PowerShell
- Getting Started with Windows PowerShell (Microsoft.com)
- Reserved PowerShell Words
- Get-Command Cmdlet (Microsoft.com)
This tutorial is based on my book with the same title. You can get it from Amazon.
PowerShell Tutorial 2: Getting Help with the Get-Help Cmdlet
In PowerShell Tutorial 1, we discussed Cmdlets. The tutorial also covered how to find other Cmdlets using the Get-Command Cmdlet.
When you find a cmdlet, it is likely that you may not know how to use it. You may need things like the syntax and parameters of the cmdlet.
Moreover, you may also want to see examples on how to use the Cmdlet.
Like any other tool in Windows, PowerShell has a built-in help functionality. Additionally, most PowerShell cmdlets has built-in help information.
The Get-Help Cmdlet provides information about any Cmdlet by accessing the cmdlet’s built-in help. In addition to using the Get-Help Cmdlet, you can also find helpful information about cmdlets online.
This second tutorial drives deep into the PowerShell Get-Help Cmdlet.
In my opinion, the Get-Help Cmdlet is one of the most important Cmdlets you will need in your PowerShell scripting career. The reason for this is simple: it is one Cmdlet that will help you find other Cmdlets – what can be more important!
Furthermore, the Get-Help Cmdlet not only displays helpful information about other Cmdlets. It also displays information about Functions, CIM commands, workflows, providers, aliases, and scripts.
Here is the simplest syntax of the Get-Help command:
Get-Help -Name -Parameter -Full -Detailed -Online[<CommonParameters>]
There are more parameters of the Get-Help Cmdlet. However, I included the common parameters.
If you need to get information about a Cmdlet, enter Get-Help, followed by the Cmdlet. For example, Get-Command Cmdlet, use the command below:
Get-Help Get-Command
The command displays the basic help sections – NAME, SYNOPSIS, SYNTAX, DESCRIPTION, RELATED LINKS, and REMARKS.
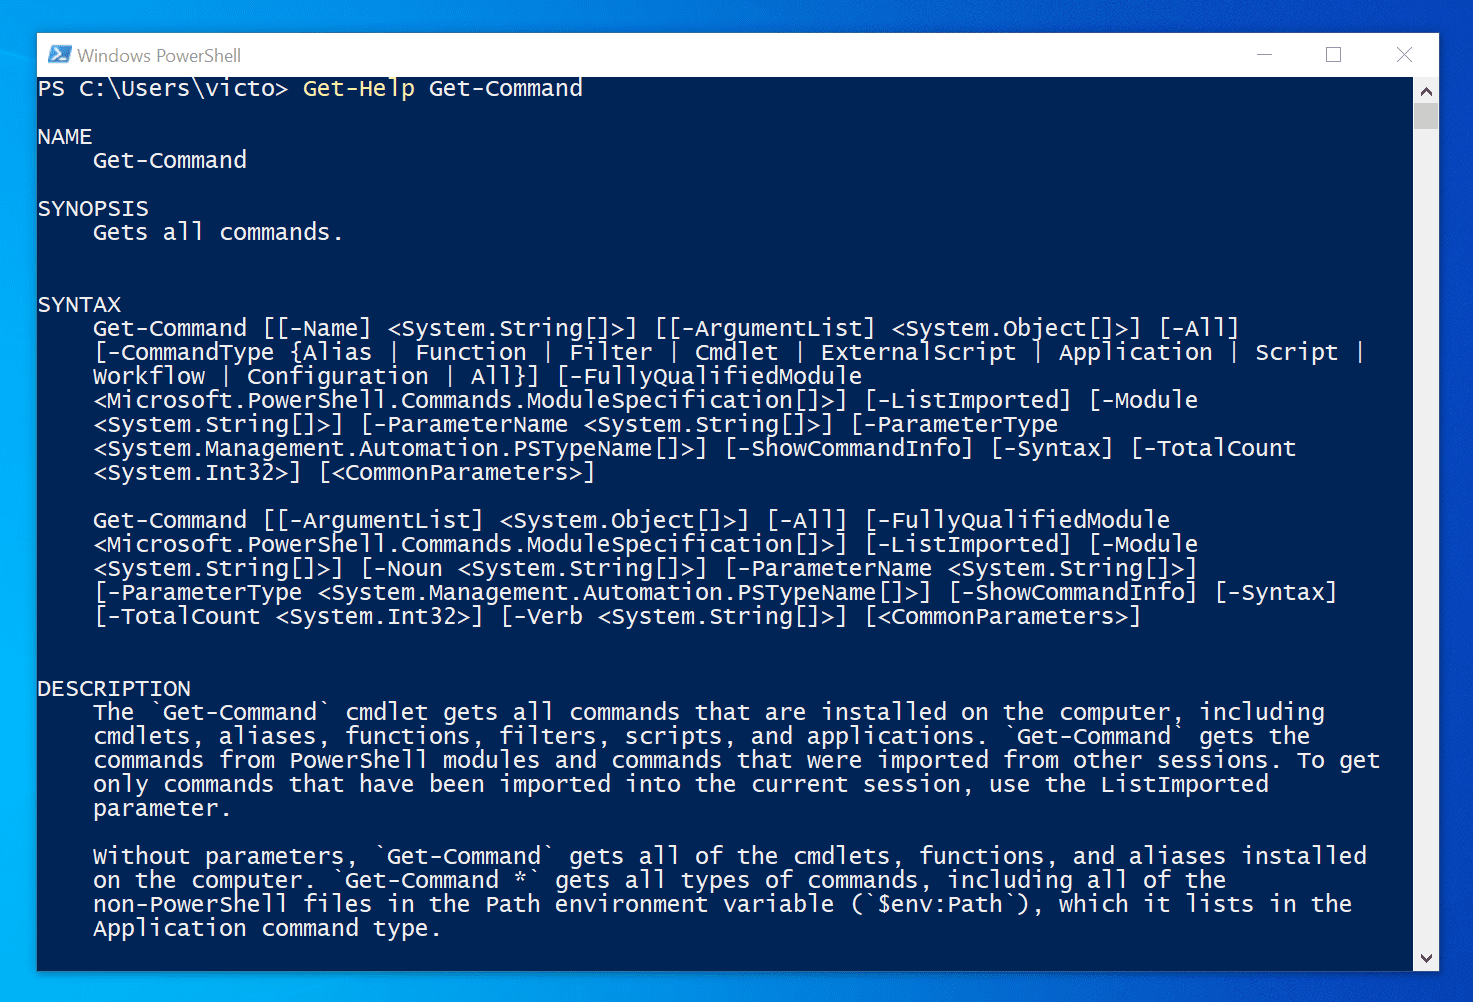
The most important section is the SYNTAX – shows how to use the Cmdlet and its parameters. This PowerShell tutorial covers syntaxes in section 2.2.
Common Parameters
PowerShell has a set of parameters called “Common Parameters”. These parameters are “common” to all PowerShell Cmdlets.
In other words, a Cmdlet does not have to specify these parameters for them to be available in the Cmdlet.
In the previous tutorial, we saw that SYNTAX section is one of the sections of the result of the Get-Help command. If you look closely at the syntax of any PowerShell cmdlet, you will see.
This simply means that you can use any of the in-built PowerShell Common Parameters in that cmdlet.
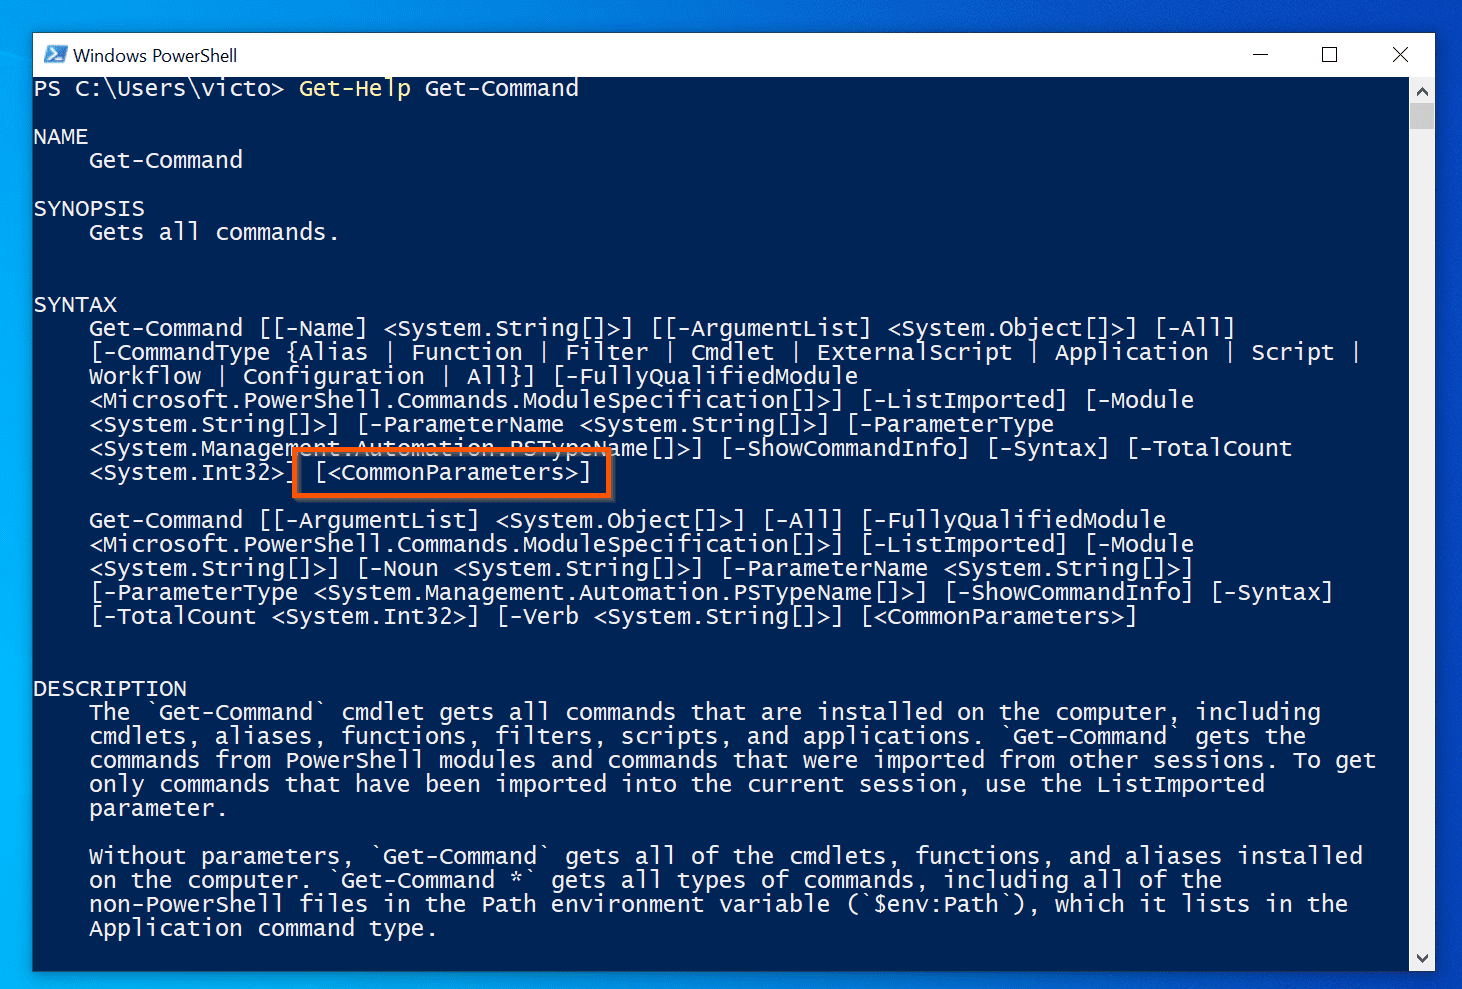
The table below is a list of common parameters in PowerShell and what they do.
| S/N | PowerShell Common Parameter | What The Common Parameter Does |
|---|---|---|
| 1 | Verbose | Displays detailed operation of a command. |
| 2 | Debug | This common parameter displays code-level information about the operation performed by a command. |
| 3 | ErrorAction | Tells PowerShell how to handle terminating errors |
| 4 | ErrorVariable | Stores error messages in a specified variable. The same error messages are also stored in the $Error automatic variable. |
| 5 | WarningAction | Similar to ErrorAction – controls how a cmdlet responds to warning messages from a command. |
| 6 | WarningVariable | WarningVariable is similar to ErrorVariable. However, instead of recording error messages in a specified variable, the WarningVariable records warning messages. |
| 7 | OutBuffer | This common parameter determines the number of objects saved on the buffer before the objects are sent through the pipeline. |
| 8 | PipelineVariable | Use a PipelineVariable to store the value of the current pipeline element as a variable |
| 9 | OutVariable | Stores the output of a command in a variable you specify. The command will also be sent to the pipeline |
To learn more about common parameter, visit the About CommonParameters Microsoft page.
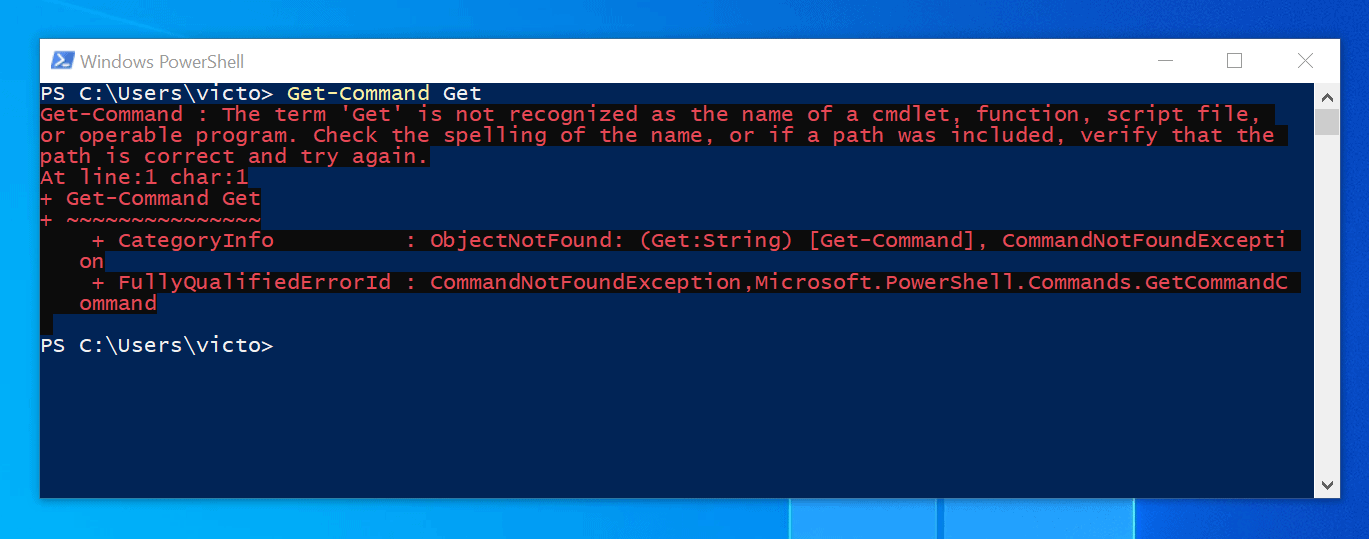
To illustrate the use of common parameters, let’s look at the ErrorAction common parameter. If we execute the Get-Command and supply a cmdlet that does not exist, an error message is generated.
For example, execute the command below:
Get-Command Get
The command will throw an error message because the “Get” Cmdlet does not exist in PowerShell.
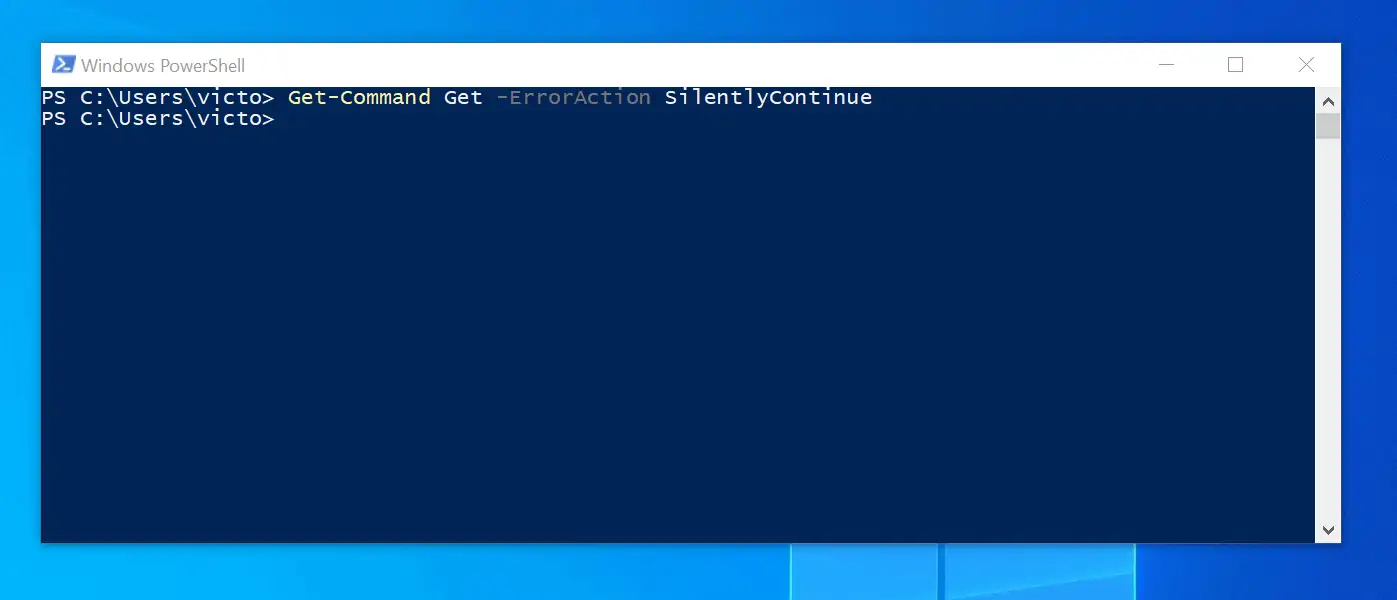
However, to stop the error message displaying, use this command instead:
Get-Command Get -ErrorAction SilentlyContinue
Woola! No error message this time. The error message is suppressed by the ErrorAction common parameter, SilentlyContinue.
Other Ways to Use the Get-Help Command
In this PowerShell tutorial section 1.3.1, I introduced Reserved PowerShell Words. The Get-Help Cmdlet also offers useful information about PowerShell reserved words.
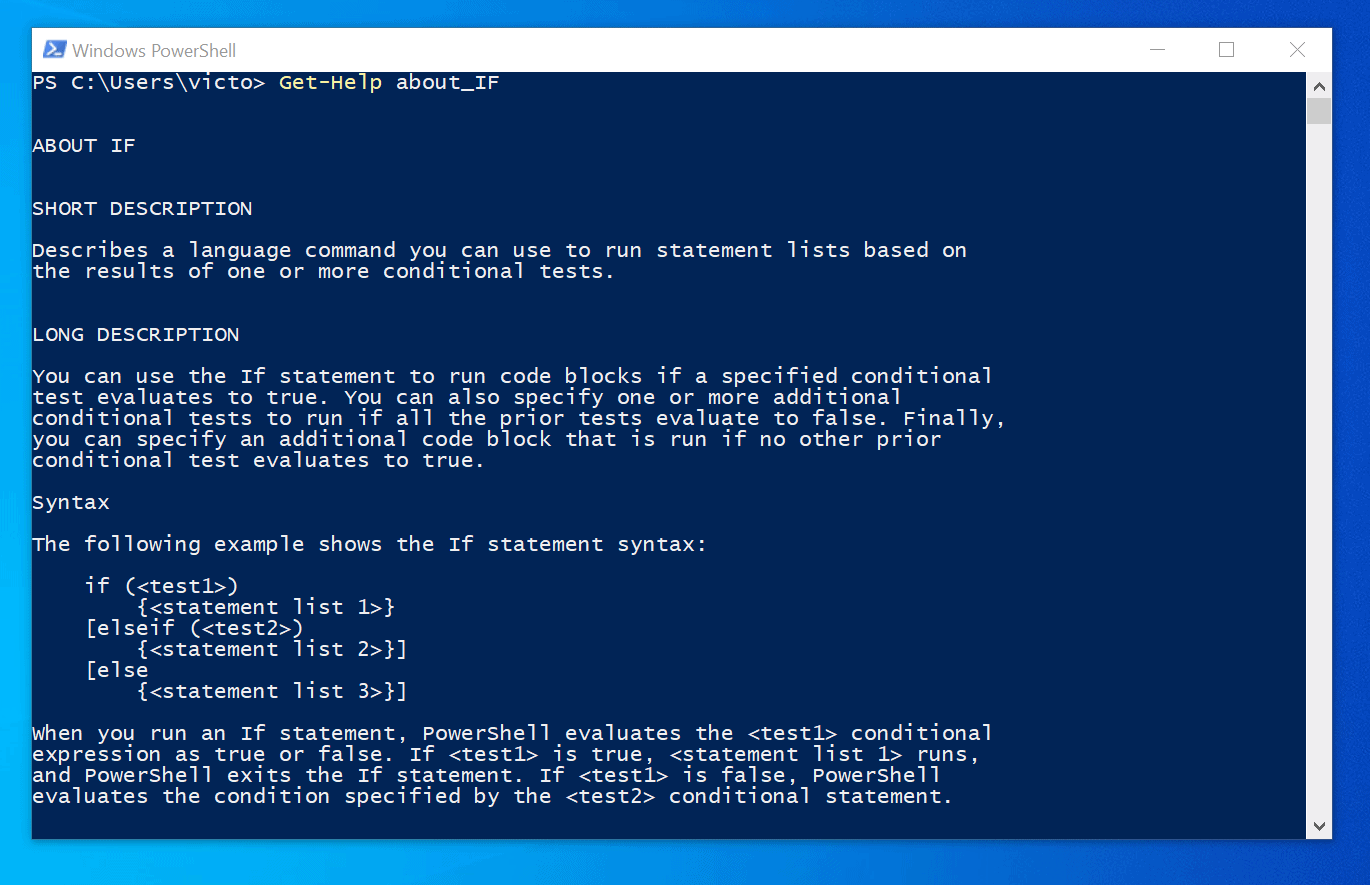
To get information about a reserved word and how to use it in PowerShell, use Get-Help about_ReservedWord. For example, to learn more about the reserved word, IF, use the comand below:
Get-Help about_IF
The above command displays information about the IF conditional statement and how to use it.
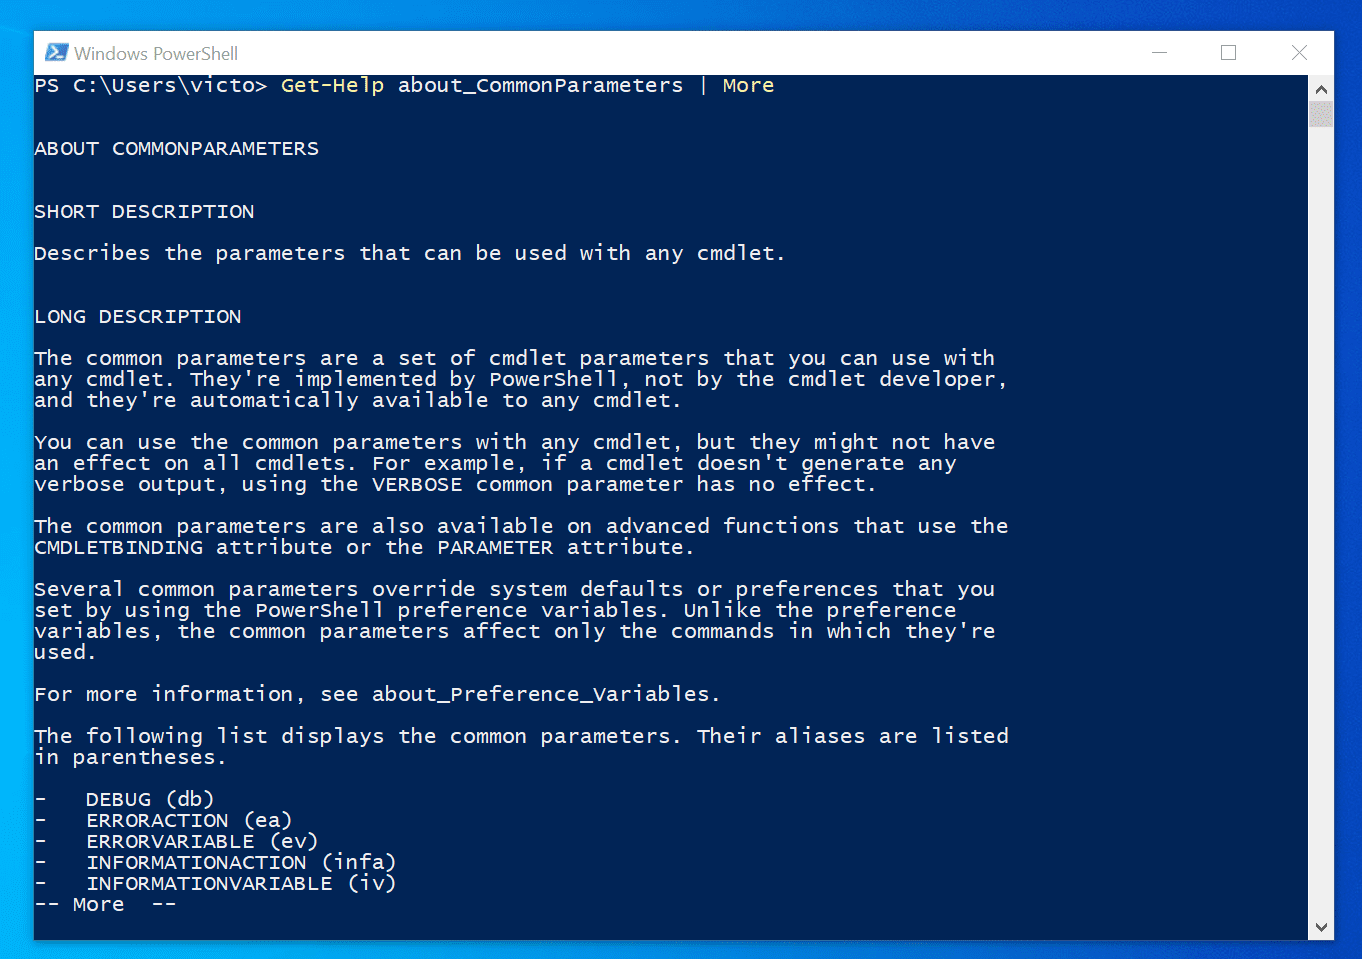
Continuing with “About” topics – in PowerShell tutorial 2.1, we discussed Common Parameters. There is an “About” help topic for Common Parameters.
To get information about Common Parameters (including examples), execute the command below:
Get-Help about_CommonParameters | More
The command displays information about CommonParameters. I piped the command to “More” so PowerShell displays the result per page and allows me to display more information as I need it.
How to Learn About a Command’s Syntax
This tutorial already hinted about PowerShell Cmdlet syntaxes. A Cmdlet command syntax helps you construct commands correctly.
In this section of the PowerShell tutorial, I will dive a little deeper into the SYNTAX section of the Get-Help command for a Cmdlet. To kick this section of the tutorial off, execute the command below:
Get-Help Get-ADUser -Detailed
The SYNTAX section of the results tells you how to use the Get-ADUser Cmdlet – including all its parameters and how to use them.
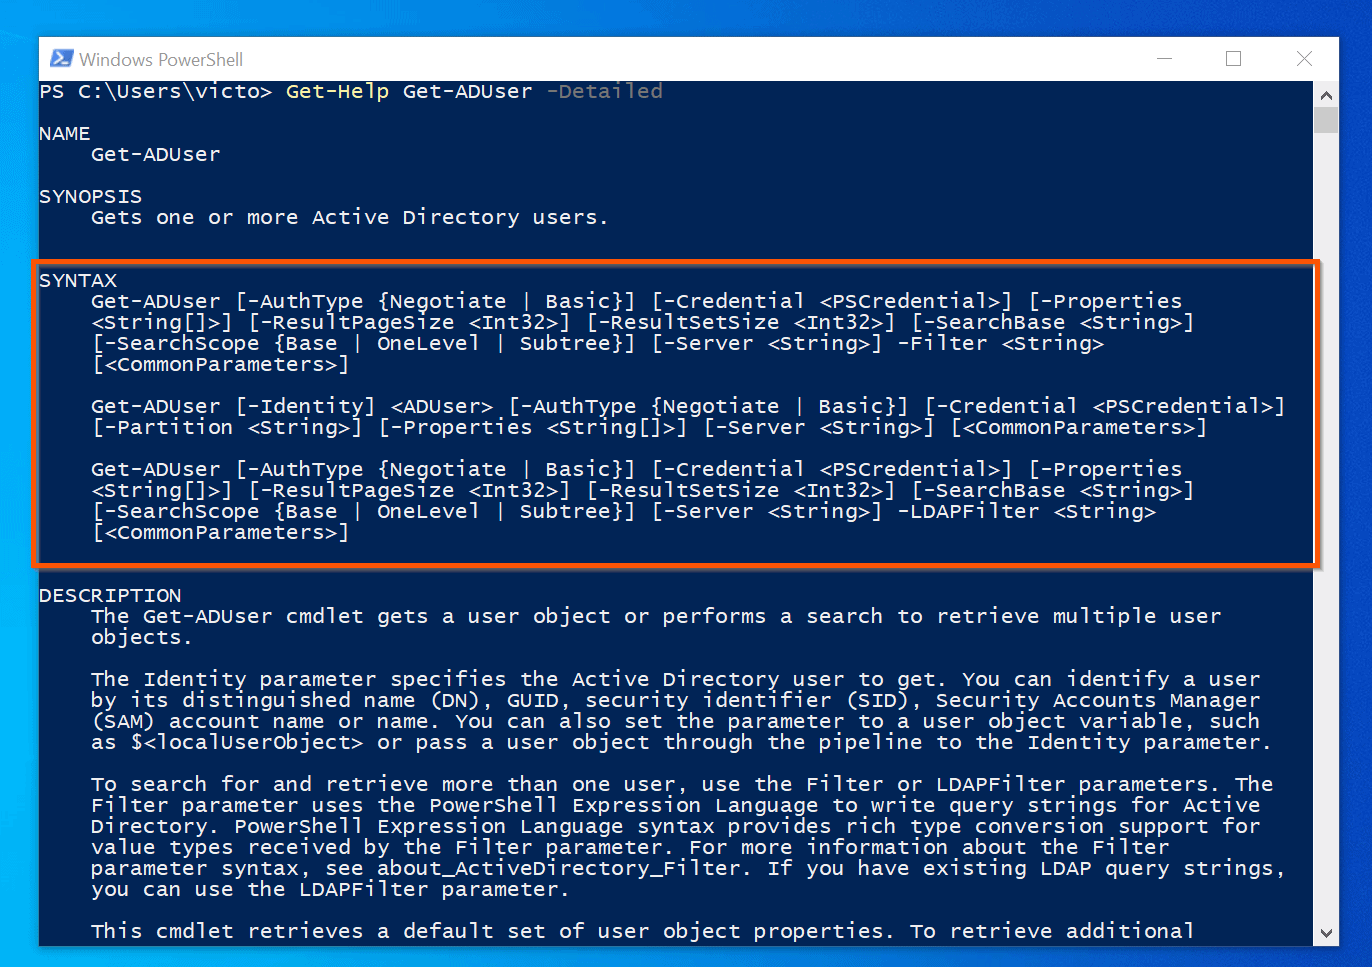
If you look a little bit closer at the SYNTAX section, you will notice that there are three sets of the Get-ADUser command syntaxes.
Firstly, you can use the Get-ADUser command with the -Filter parameter. Alternatively, you can also use the same command with the -Identity parameter.
Finally, you may also use the Get-ADUser command with the -LDAPFilter parameter.
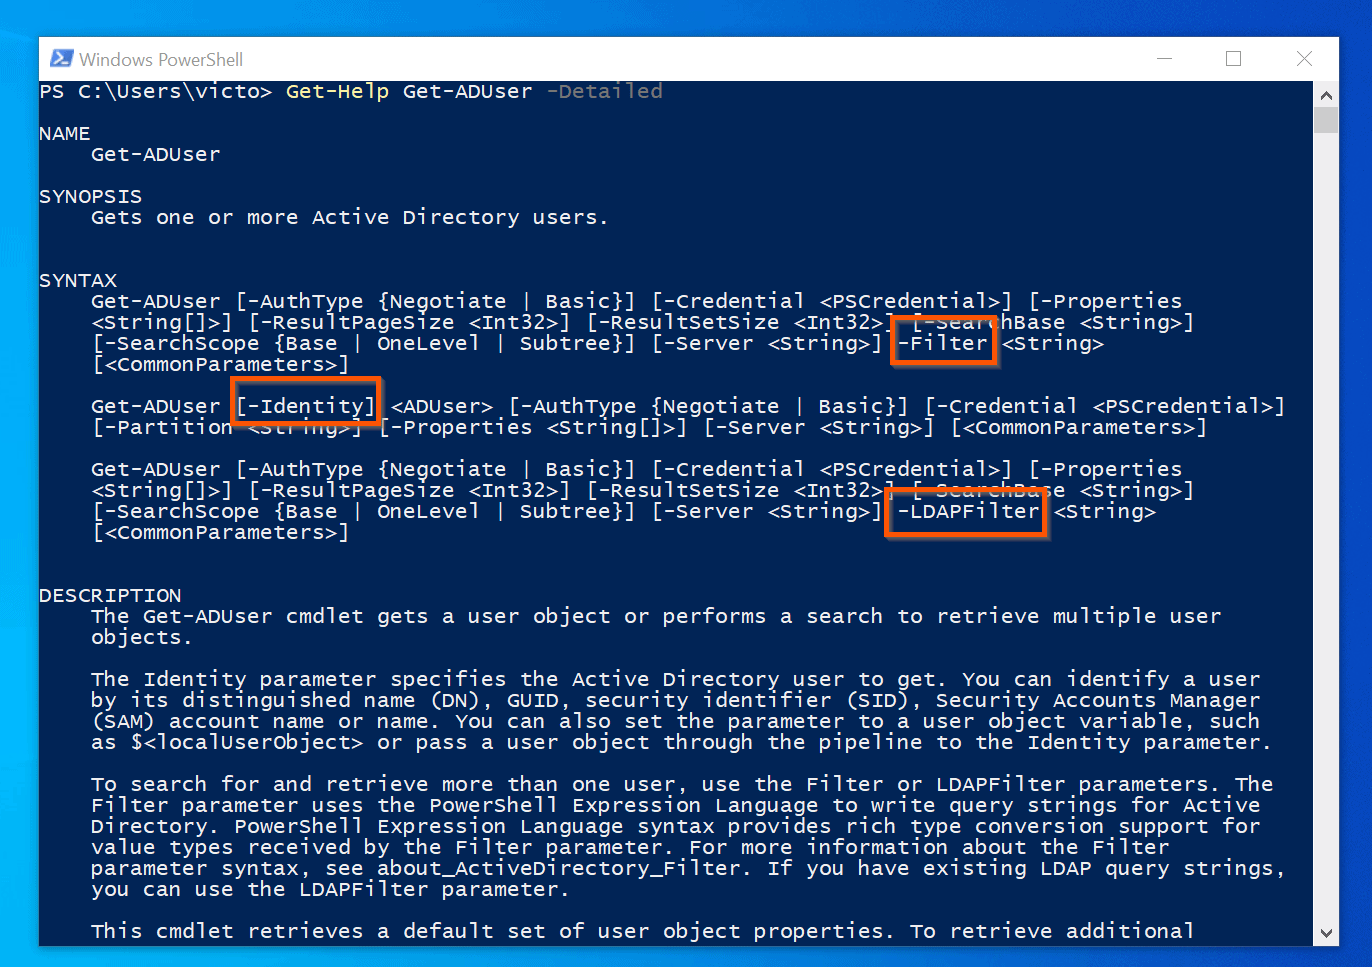
These three core parameters CANNOT be used on the same command. If you use any of the two parameters in the same command, you will receive an error message – “Parameter set cannot be resolved using the specified named parameters“.
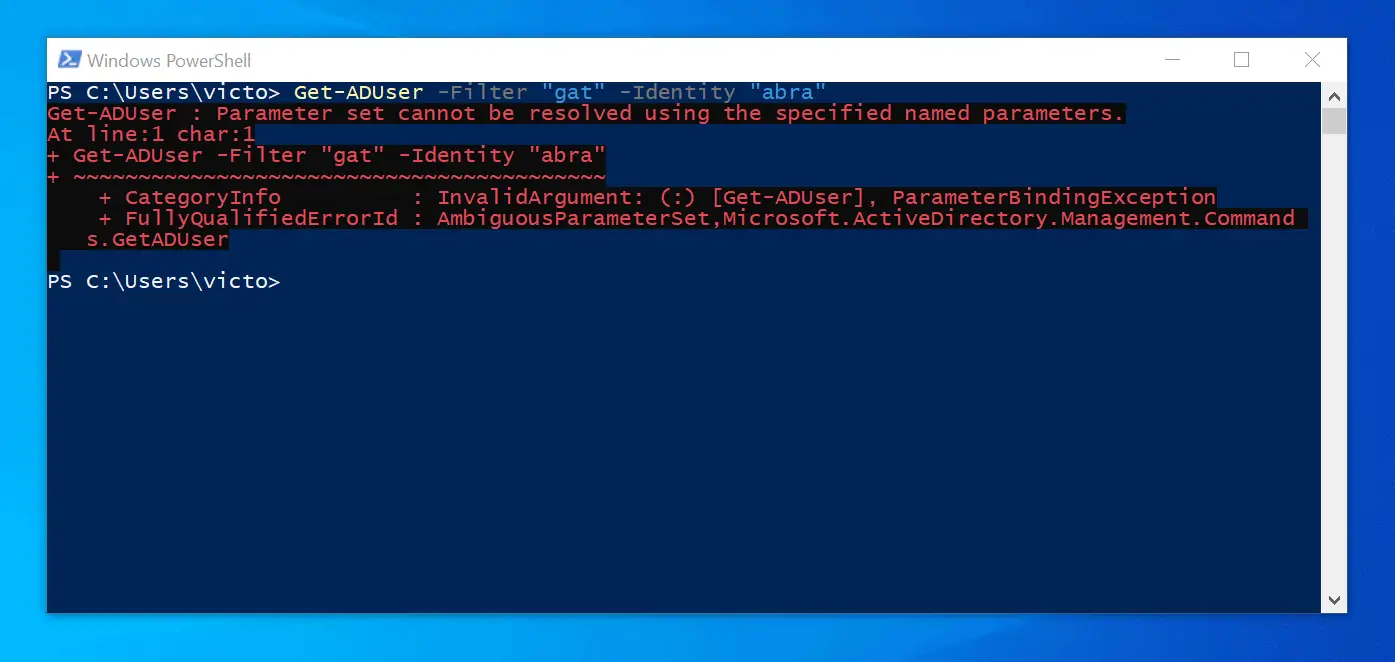
Anytime you execute a PowerShell command and receive this error message, it is likely that you have combined the wrong parameter set names. To fix the error, look at the syntax section of the Get-Help command result for that Cmdlet.
The SYNTAX section of the Get-Help command will provide the correct way to combine the parameters of the Cmdlet.
“Detailed”, “Full” and “Online” Parameters of the Get-Help Cmdlet
Like any other cmdlet, the Get-Help Cmdlet has some parameters. In the early part of this section, we saw the basic result produced by the Get-Help Command.
However, we can learn more about a command by applying other parameters of the Get-Help Cmdlet.
To continue with the Get-Command cmdlet, to display more help information about this cmdlet, include the ‘Detailed’ parameter as shown below:
Get-Help -Name Get-Command -Detailed
Unlike running the above command without the -Detailed parameter, with this parameter, the command returns more information. One of the information now included is a PARAMETERS section.
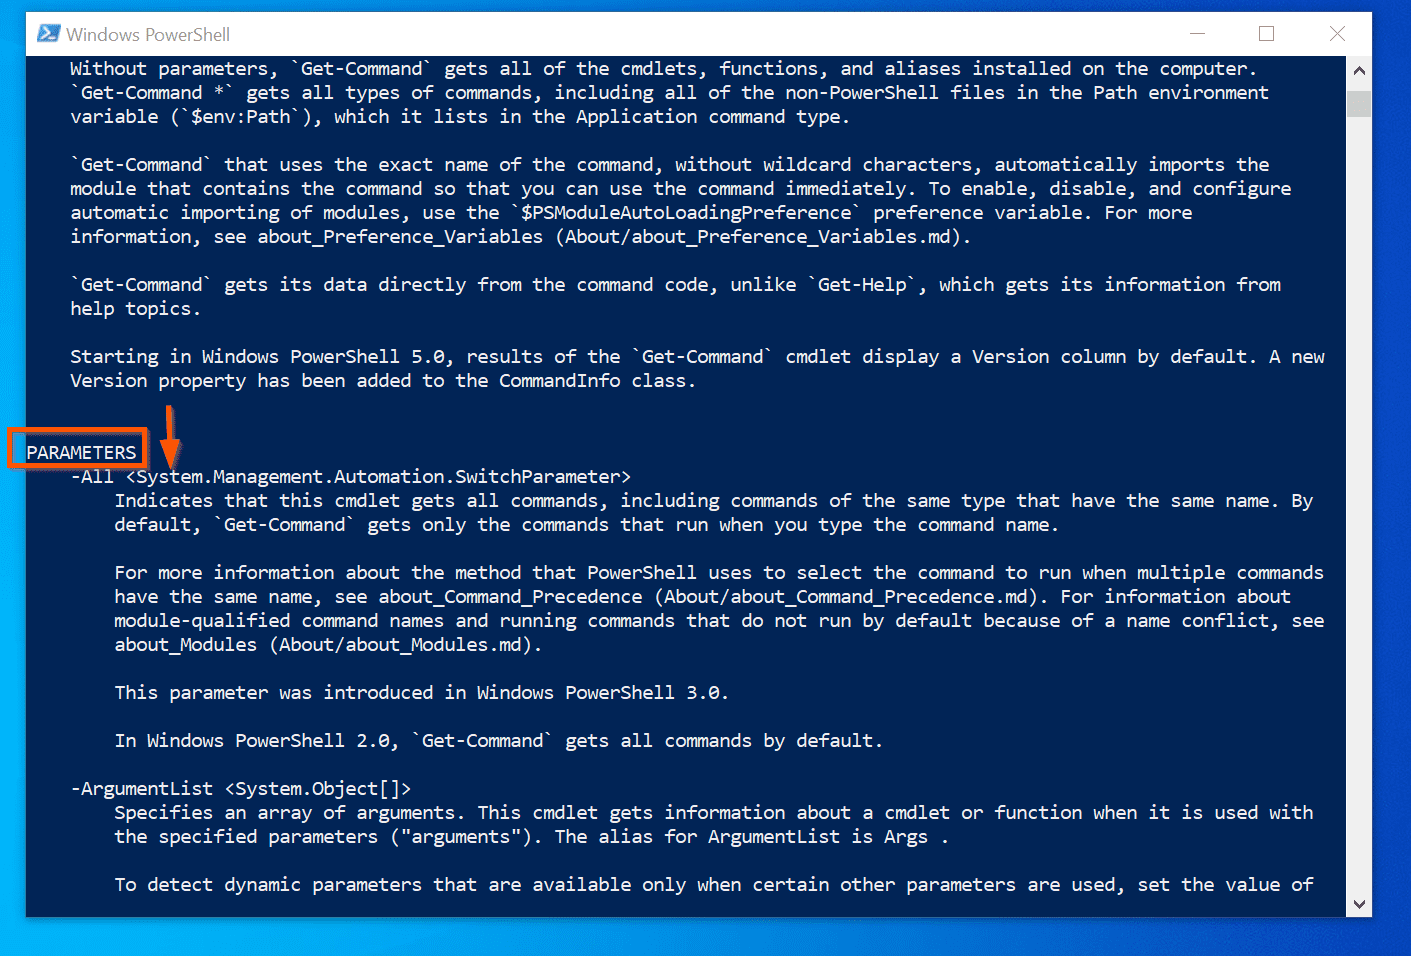
The PARAMETERS section lists and explains all the parameters of the Get-Command Cmdlet. This information helps you learn more about the parameters of a Cmdlet and how to use them.
There is yet another very useful Get-Help parameter, ‘Full’. The ‘Full’ parameter displays full help information about a cmdlet.
Additionally, the information provided by the ‘Full’ parameter, includes those provided by the ‘Detailed’ parameter and more. To see the effect of the ‘Full’ parameter, execute the command below:
Get-Help -Name Get-Command -Full
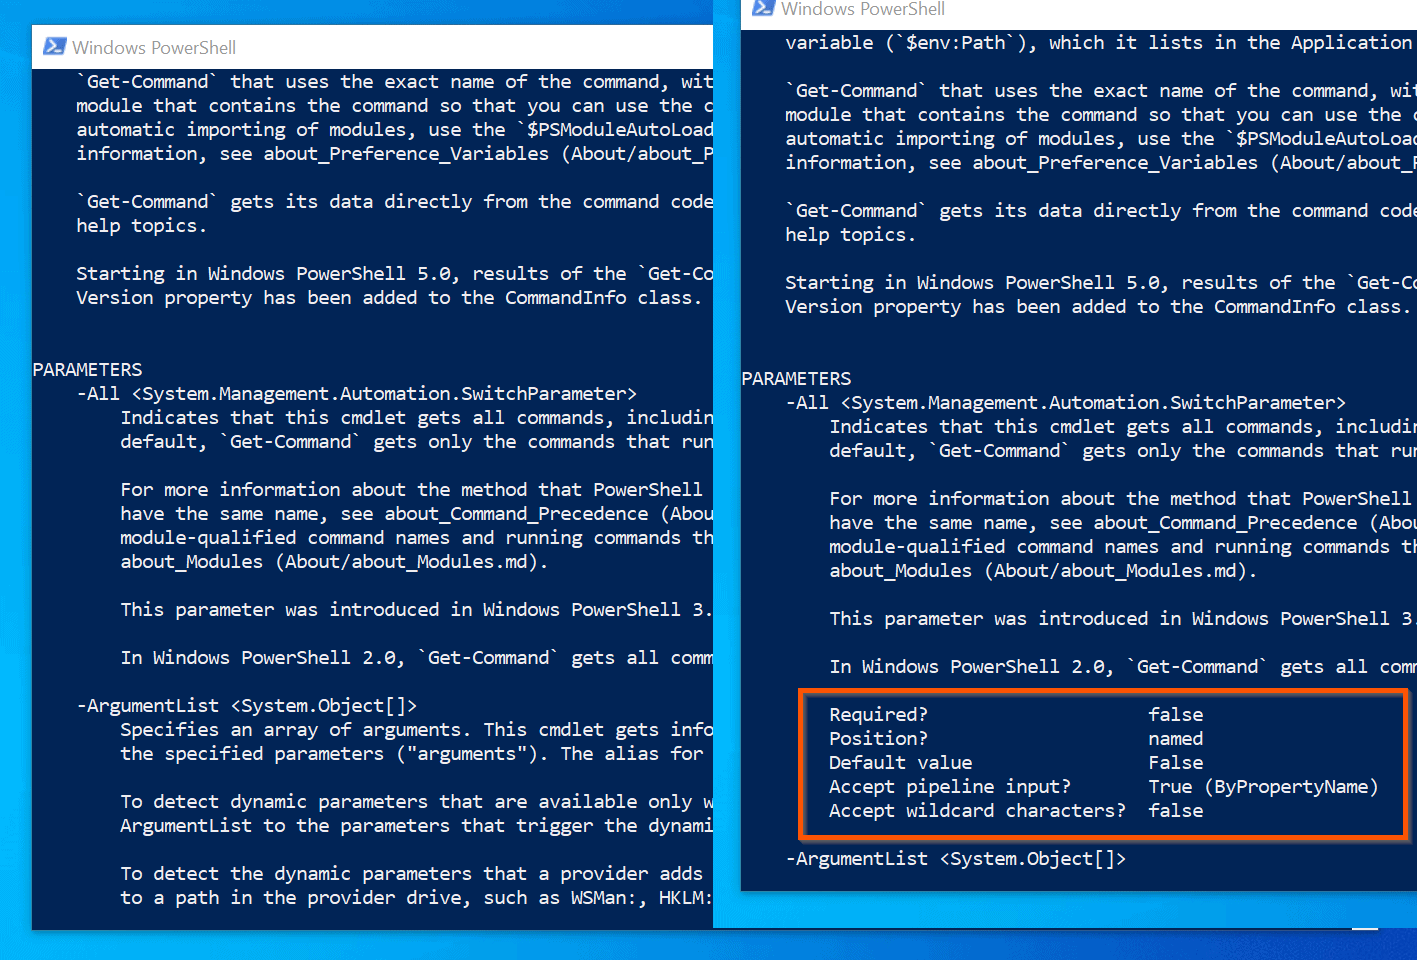
To help you appreciate the difference in the information provided by the ‘Detailed’ in comparison to the ‘Full’ parameter – examine the first parameter in the PARAMETER section (the All parameter).
The result displayed on the left of this screenshot is from the “Get-Help -Name Get-Command -Detailed” command. On the contrary, the result displayed on the right side is from the “Get-Help -Name Get-Command –Full” command.
I have highlighted the difference – the results of the command with the Full parameter have additional information.
Moving on, the Get-Help Cmdlet has two more very useful parameters: ‘Example’ and ‘Online’. The ‘Example parameter provides examples on how to use a cmdlet.
On the other hand, the ‘Online’ parameter takes you to the online help page of the cmdlet. For example, to launch the help online page for the Get-ChildItem cmdlet, execute the command:
Get-Help Get-ChildItem -Online
How to Use the ‘Examples’ Parameter of Get-Help
The help page of PowerShell Cmdlets has examples. After reviewing all other sections, the EXAMPLES section will show you ways you can execute the cmdlet using its parameters.
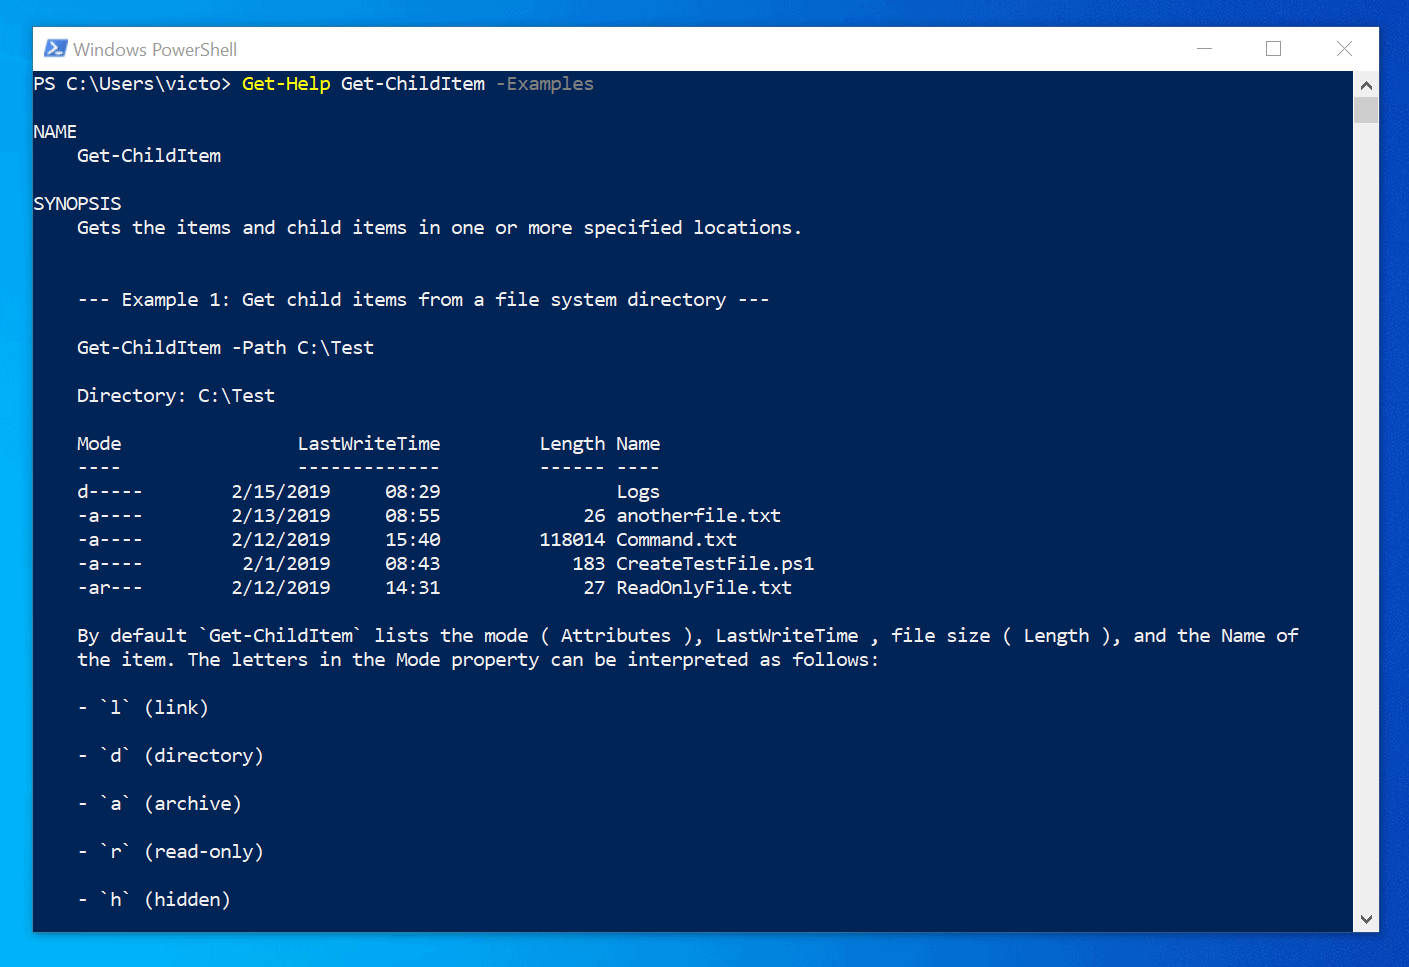
Sometimes, you can literally modify these examples for your scripts. For instance, to get examples on how to use the Get-ChildItem Cmdlet, execute the command below:
Get-Help Get-ChildItem -Examples
The above command displays multiple examples with same commands with the Get-ChildItem Cmdlet.
How to Update Cmdlet Help Information with Update-Help Command
The Cmdlet help information stored on your computer may become obsolete. If you ever need to update this information, there is a cmdlet that does this, Update-Help!
Sound like a cmdlet? Yes, ‘Update’ is the cmdlet Verb, while ‘Help’ is the Noun.
As you would expect, the Update-Help Cmdlet also has some parameters. However, we will stick with the basic command.
To update the help information for Cmdlets in your computer, execute the command below:
Update-Help
The command will take sometime to complete.
References and Further Reading for PowerShell Tutorial 2
- about_CommonParameters
- about_Command_Syntax
- PowerShell Core About Topics
- about_Parameters
- [discourse_topic_url]
This tutorial is based on my book with the same title. You can get it from Amazon.
I hope you found this PowerShell Tutorial helpful. If you found it helpful, we would love to hear from you.
Kindly spare two minutes to share your thoughts with our community using the comments form below.
Alternatively, simply respond to the “Was this page helpful” question below and provide us with your feedback.


Gracias