Do you need to use a PowerShell array in a script or just need to learn all about it? In this guide, I explain what this Powershell concept is and how I have used it in my scripts.
The Syntax of PowerShell Arrays
There are three methods to create an array. Based on these three methods, below are the three syntaxes of a PowerShell array:
$ArrayList = @('item 1', 'item 2', 'item 3')
$ArrayList = 'item 1', 'item 2', 'item 3'
[ArrayType[]]$ArrayList = 'item 1', 'item 2', 'item 3'
In the first syntax, an array is created by enclosing the items in the @() parentheses. Additionally, the second syntax creates an array with items in a comma-separated list.
Finally, the third syntax creates an array with a specific data type. More on types of PowerShell arrays later in the guide.
How to Determine the Data Type of an Array
Earlier in this guide, I defined a PowerShell as a collection of the same or different types of items. To make it easier for you to understand the remaining parts of the guide, I believe it is useful to show you how to determine the data type in an array.
To illustrate this, lets create a simple array…
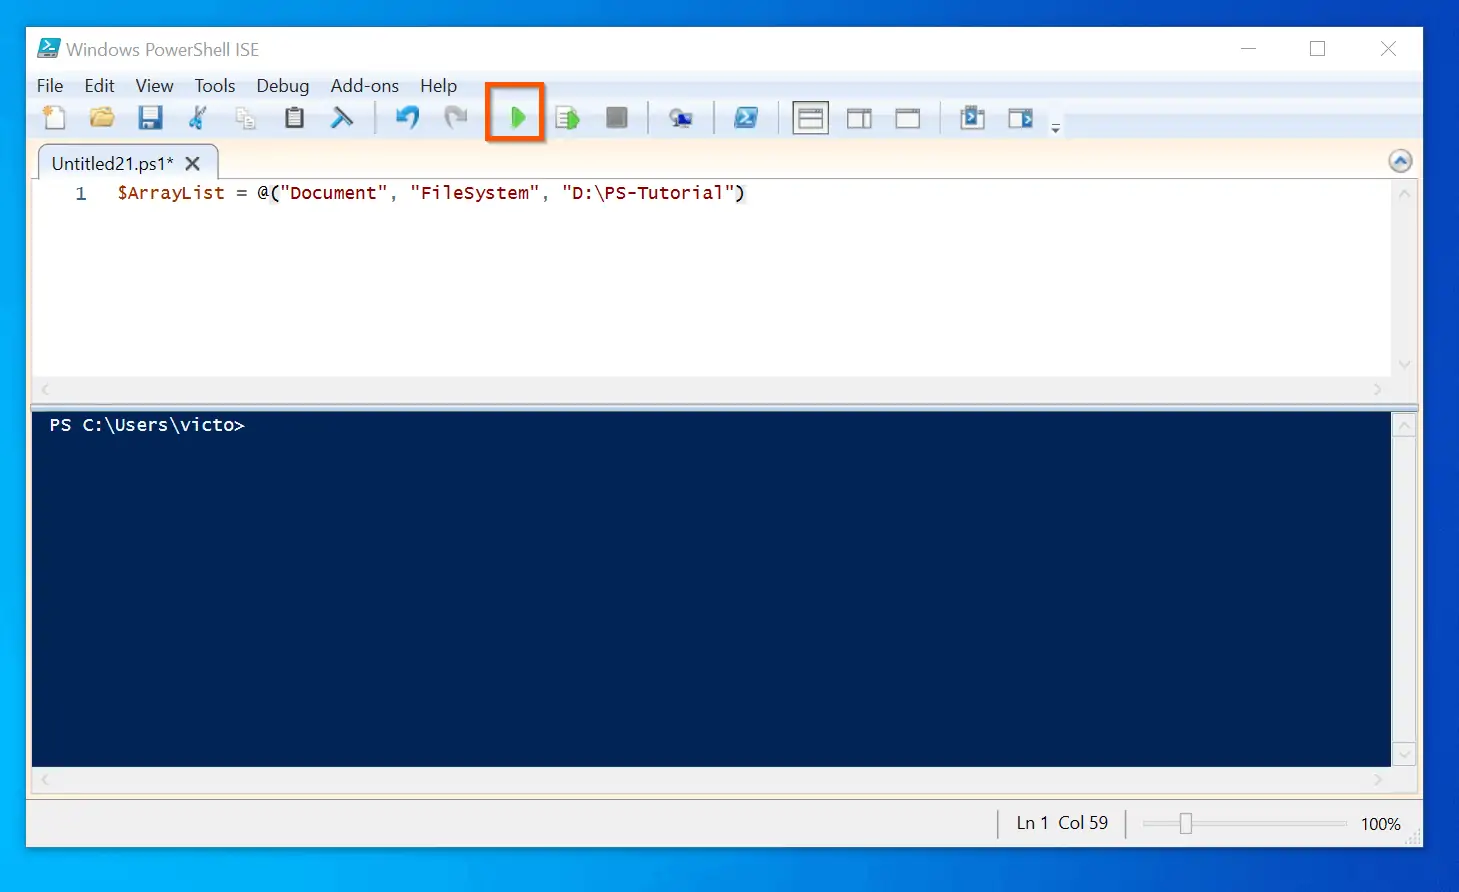
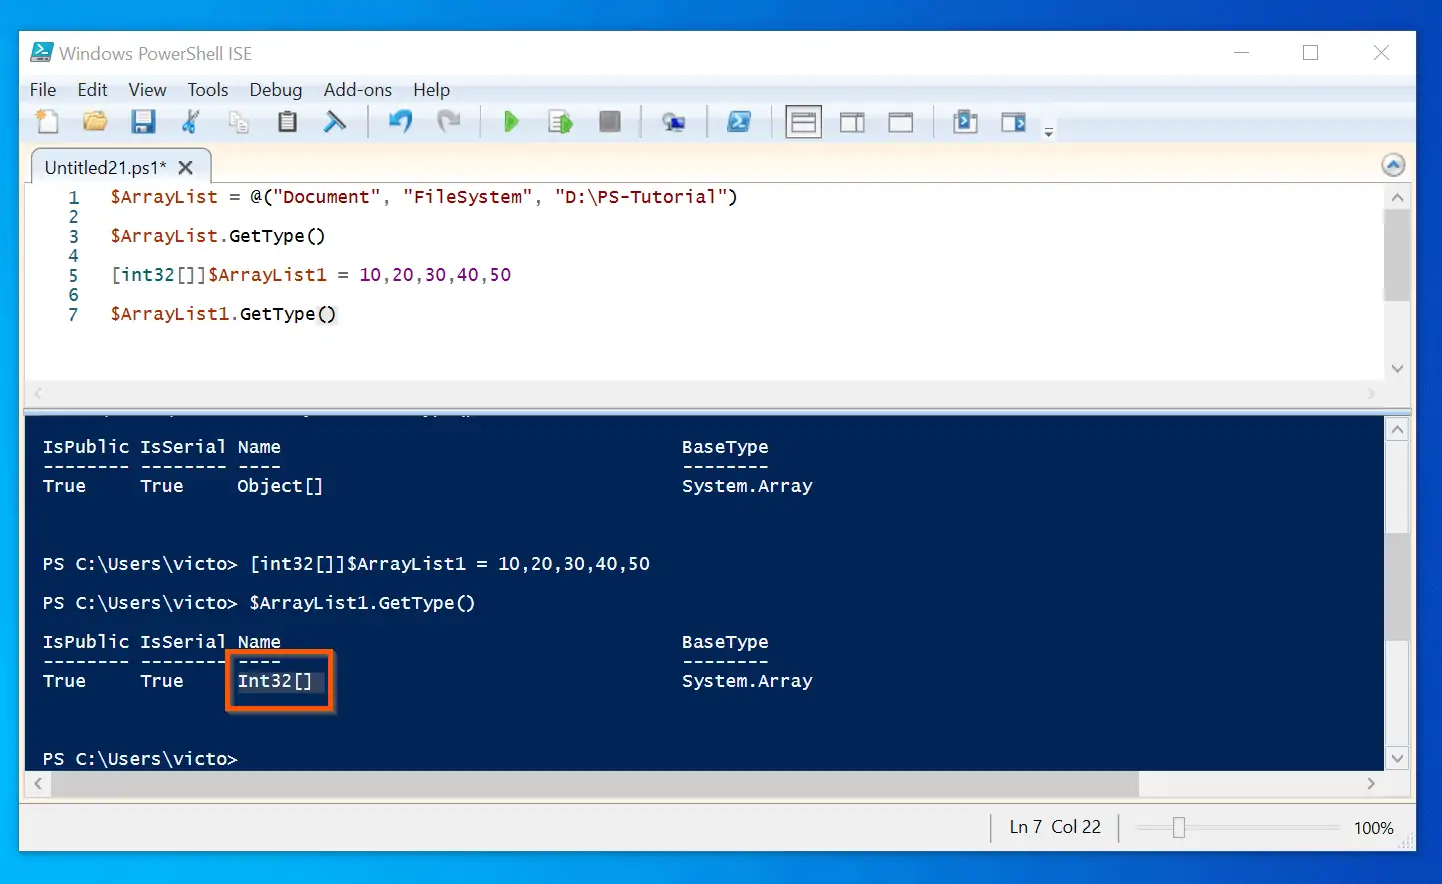
$ArrayList = @("Document", "FileSystem", "D:\PS-Tutorial")
Open a new PowerShell ISE document, copy the above script and run it.
Once you run the last command, to display the data type of the array created, run the command below:
$ArrayList.GetType()
The last command shows that the array we created earlier has the Object[] data type.
Now, lets try this array…
[int32[]]$ArrayList1 = 10,20,30,40,50
Then, run this command…
$ArrayList1.GetType()
The last PowerShell array has the Int32[] data type of array.
How to Get The “Methods” in an Array
If you are going to be good at PowerShell scripting, you need to understand how to find the Methods and Properties in a PowerShell object.
The same is true for PowerShell arrays. To understand arrays, and script with them, you need to know the Methods and Properties of the array.
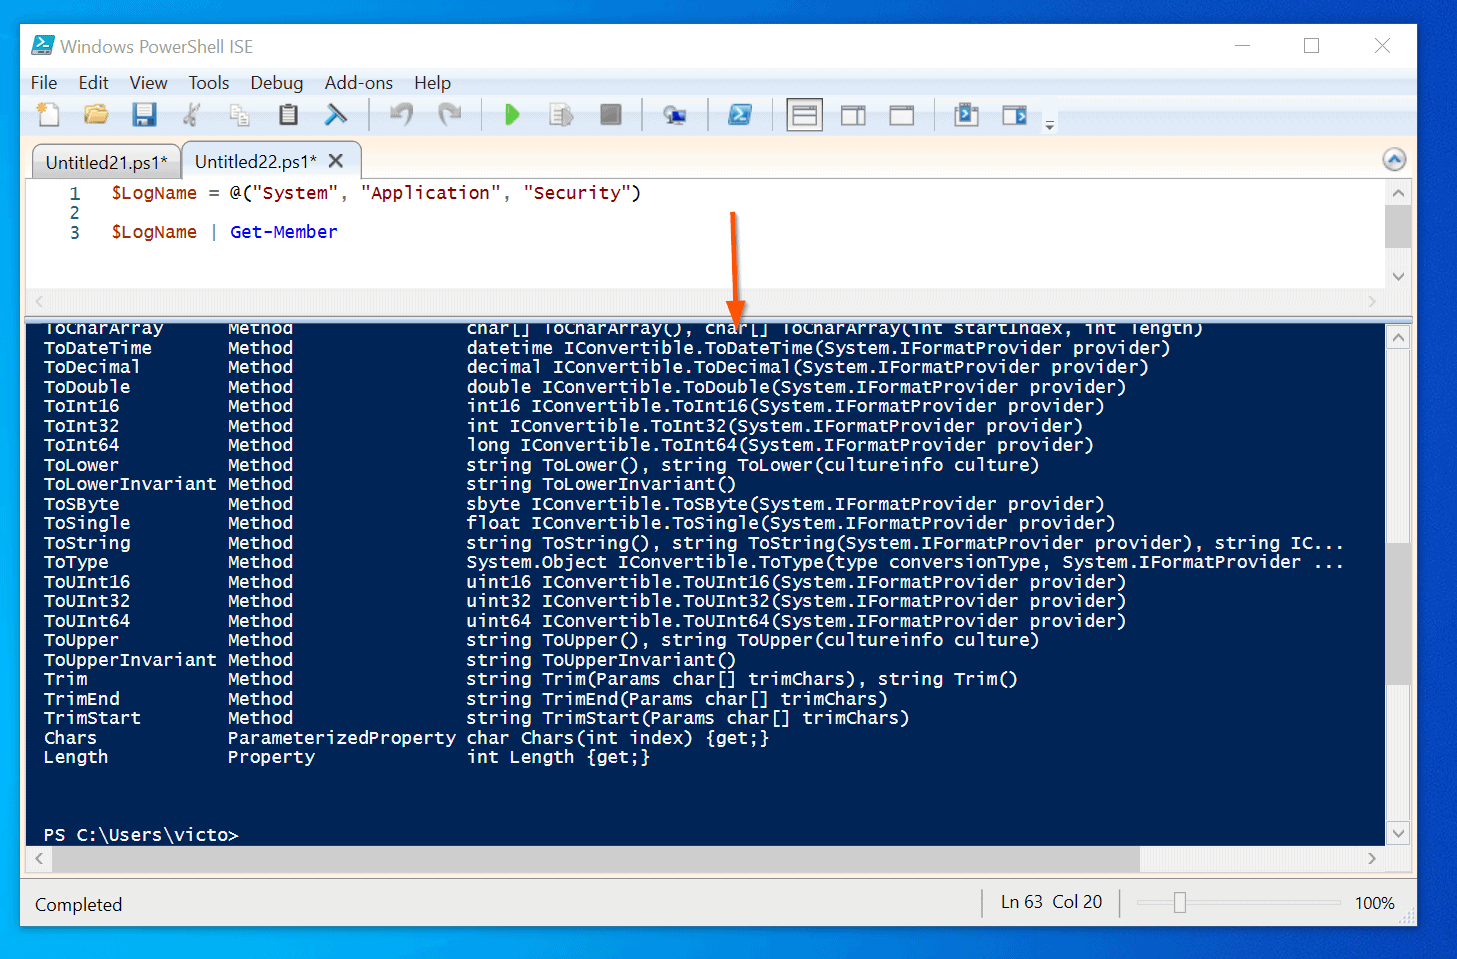
To illustrate this point, let’s create a new array with the names of some Windows event logs…
$LogNames = @("System", "Application", "Security")
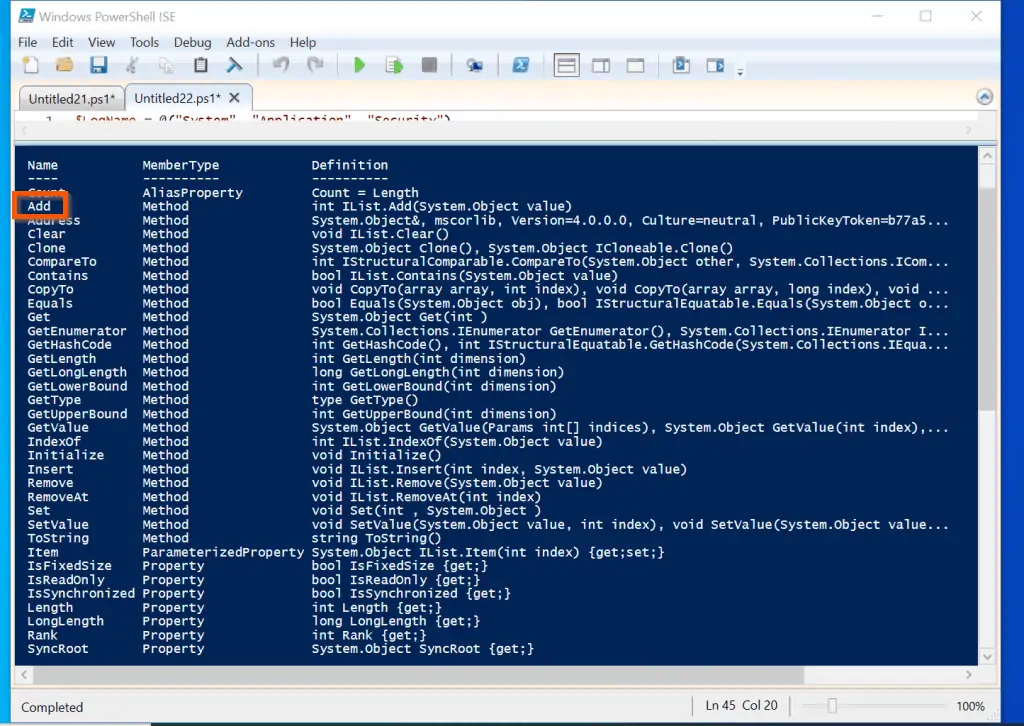
Now let’s go “behind the hood” and determine the Methods and/or Properties of this PowerShell array with the command below…
$LogNames | Get-Member
The last command pipes the output of the array saved in the LogNames variable into the Get-Member command. The result displays all Methods and Properties in the array.
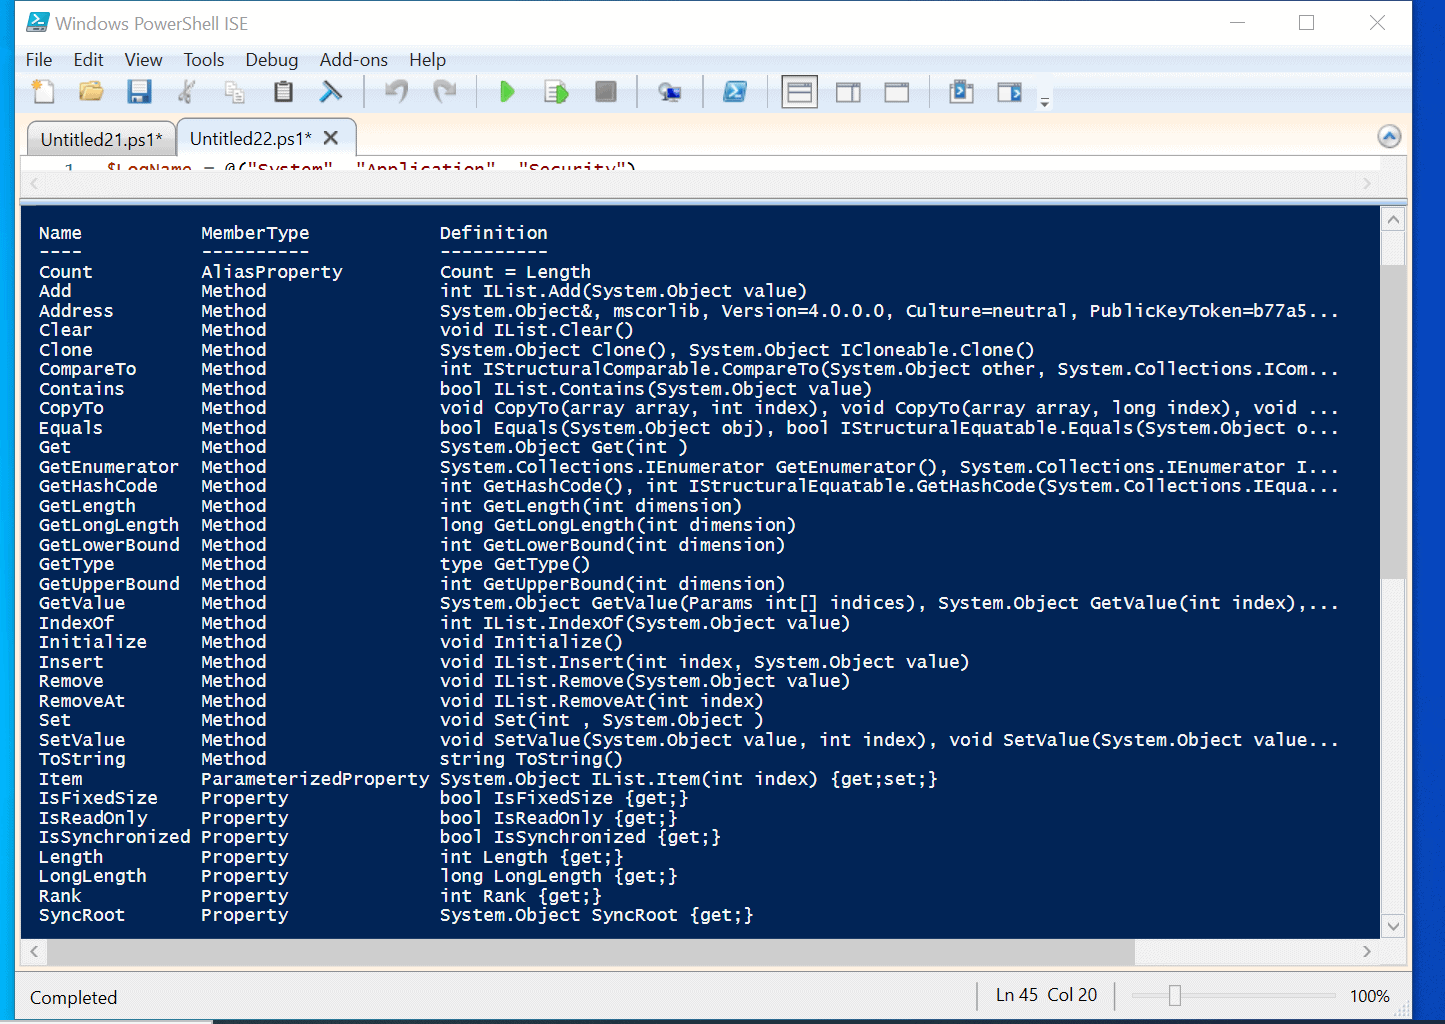
Before I move on, I want to show you another way to use the Get-Member command. This method returns more values.
In this command, I used the InputObject parameter of the Get-Member Cmdlet. Then, specify the array saved in the variable, LogName as the InputObject.
Get-Member -InputObject $LogName
The above command returns a different set of values. I will use the results from these 2 Get-Member commands in subsequent examples in this guide.
How to Create a PowerShell Array
In this section, you will learn how to create a PowerShell array that can take any type of data. Additionally, you will also learn how to create arrays that can take a specific type of data.
Create an Array that Will Contain Any Data Type
In the examples so far, we have created a PowerShell array that can take any type of data. In our last example, we created an array saved in the LogNames variable.
$LogNames = @("System", "Application", "Security")
The array can take any data type because we did not specify the data type.
Create an Array that Will Contain a Specific Data Type
If you want to create a PowerShell array that can store a particular type of data, say Int16 sized data, append [int16[]] in front of the variable – see a sample command below…
[int16[]]$Numbers = @('10', '20', '20')
The above array saved in the Numbers variable can only take data of type Int16. If you try to add a string, for example, you will receive a “wrong data type” error message.
In the next section, I will teach you how to add items to PowerShell arrays. In that section, I will touch on add the right data type to an array.
How to Create an Empty PowerShell Array and Add or Remove Items
All the examples in this guide have shown you how to create a PowerShell Array with values added immediately to the array.
In this section you will learn how to create an empty array. Then, I will teach you how to add or remove items from an array.
This section will also teach you how to check if an item exists in a PowerShell Array. Moreover, there is a section that will teach you how to check the lenght (size) and and count the number of items in an array.
Finally, you will learn how to break an arraylist into individual items.
First of all, to create an empty array (an array with no values stored), run the command below…
$LogNames = @()
This will create a empty array and save it in the LogNames variable.
How to add or Remove Items from an Array
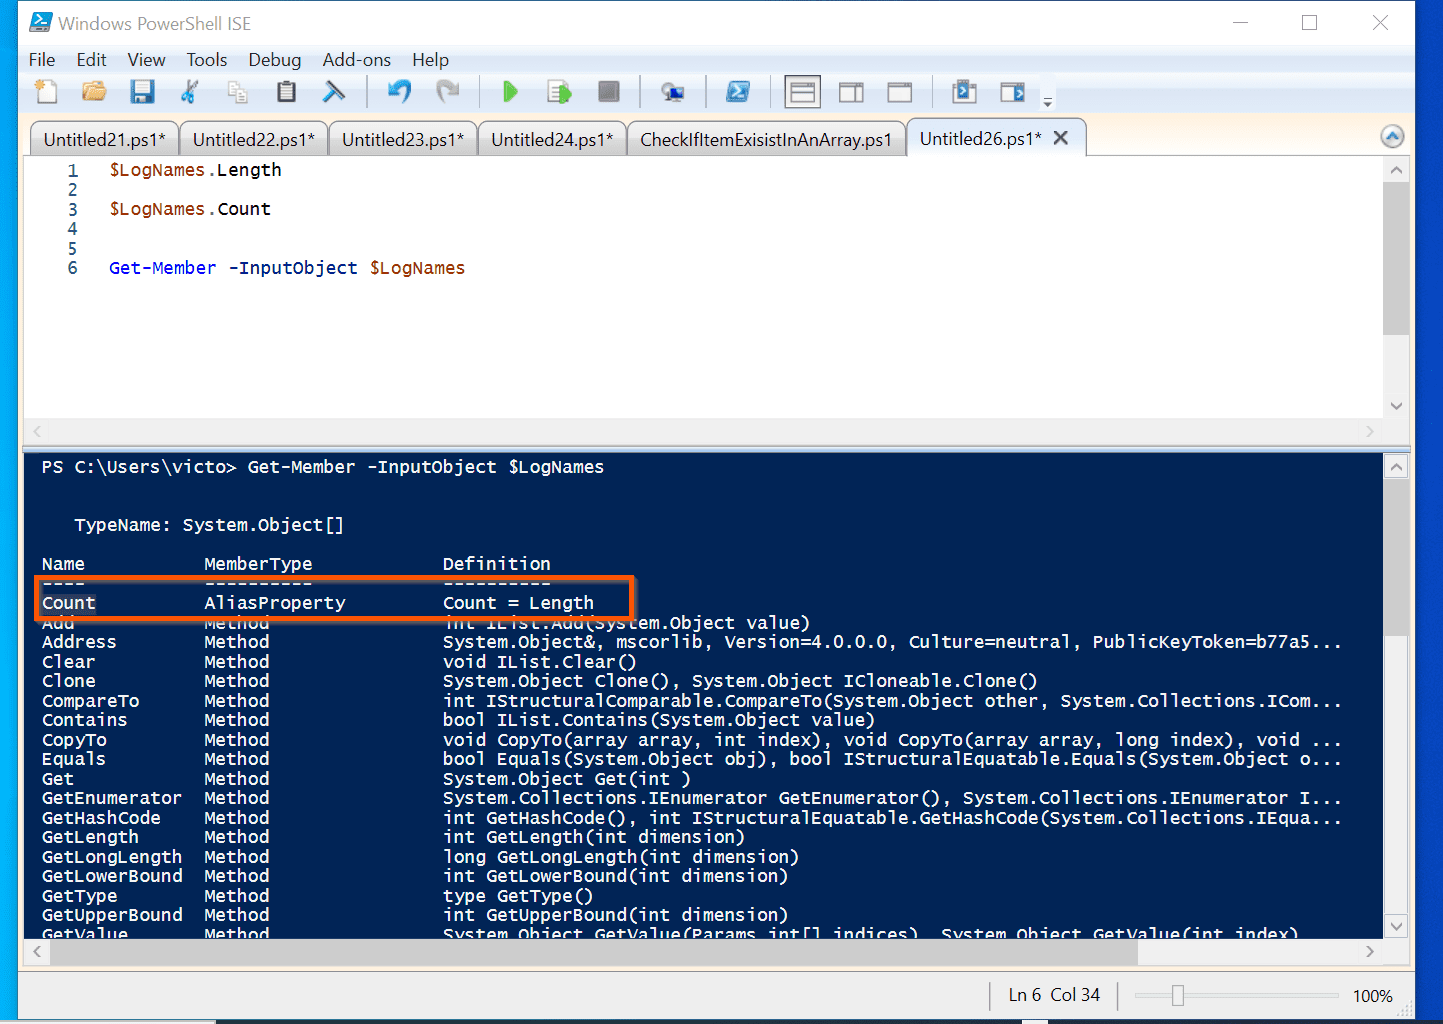
When we ran the command below in a previous section, one of the methods displayed is the Add Method.
Get-Member -InputObject $LogName
See the highlighted portion of the screenshot below…
You can use the Add Method of the PowerShell array to add an item to the array. As an example, the command below adds the item, “System” to the array previously saved in the LogNames variable.
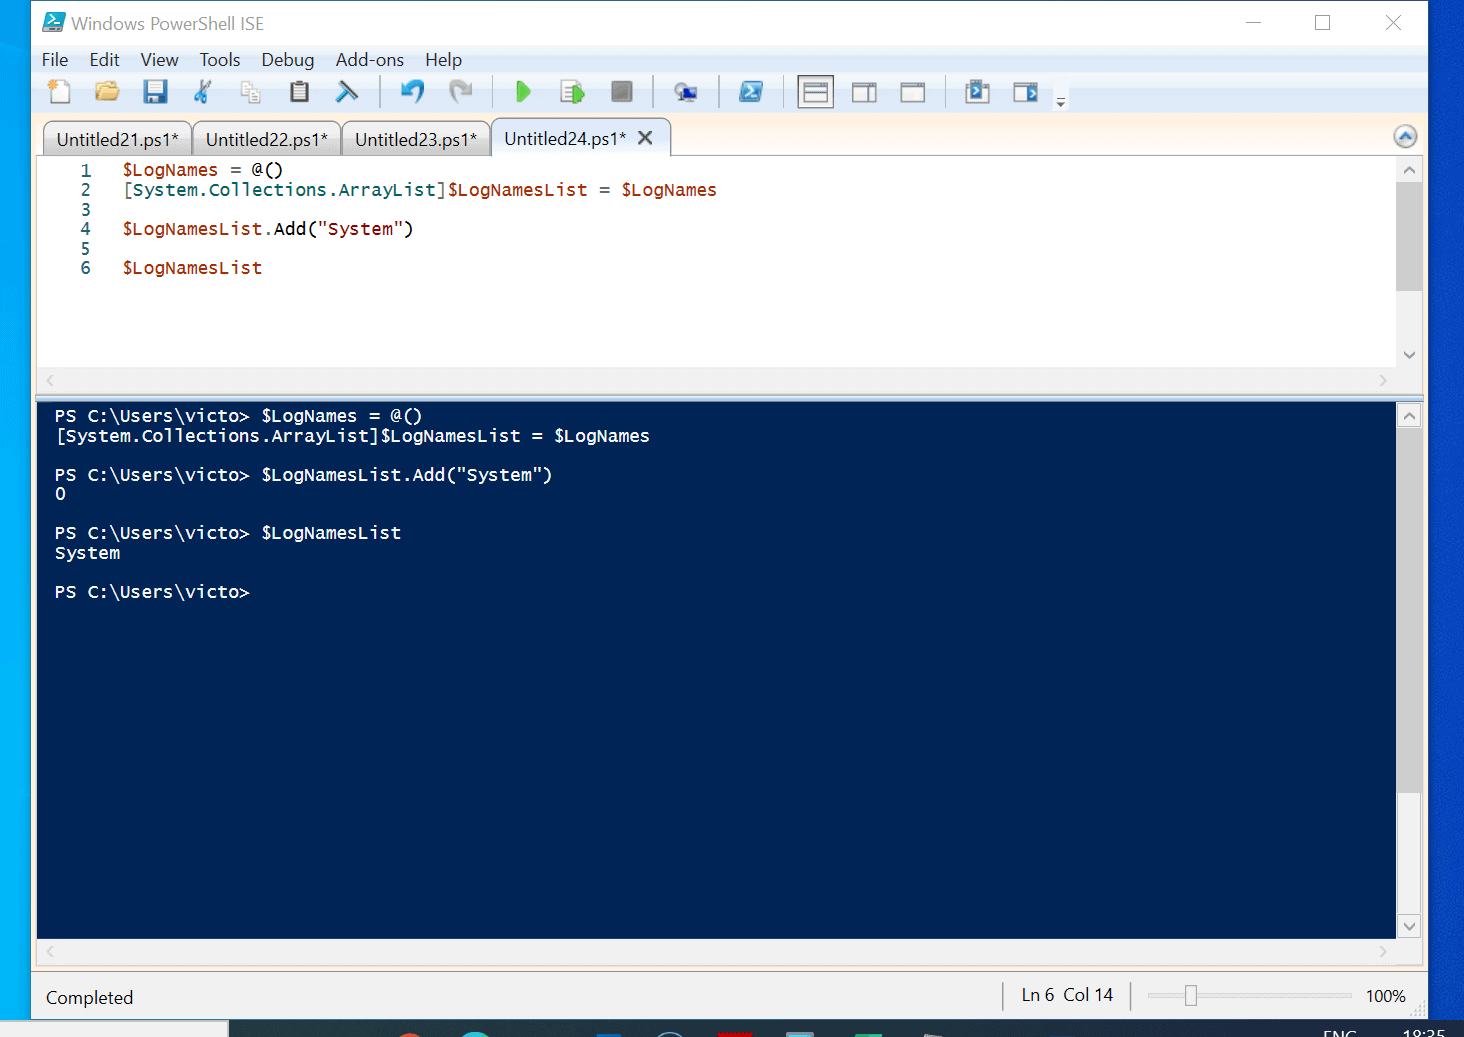
First convert the array into a system collection array list…
[System.Collections.ArrayList]$LogNamesList = $LogNames
The last command converted the arrays saved in LogNames variable into a System.Collections.ArrayList – then, saved the output in a new variable, LogNamesList.
To add a new item to the array list, use a command similar to the one below.
$LogNamesList.Add("System")
Finally, to confirm that the item was added to the PowerShell array, run the variable alone…
$LogNamesList
Here are the results of the commands in PowerShell ISE.
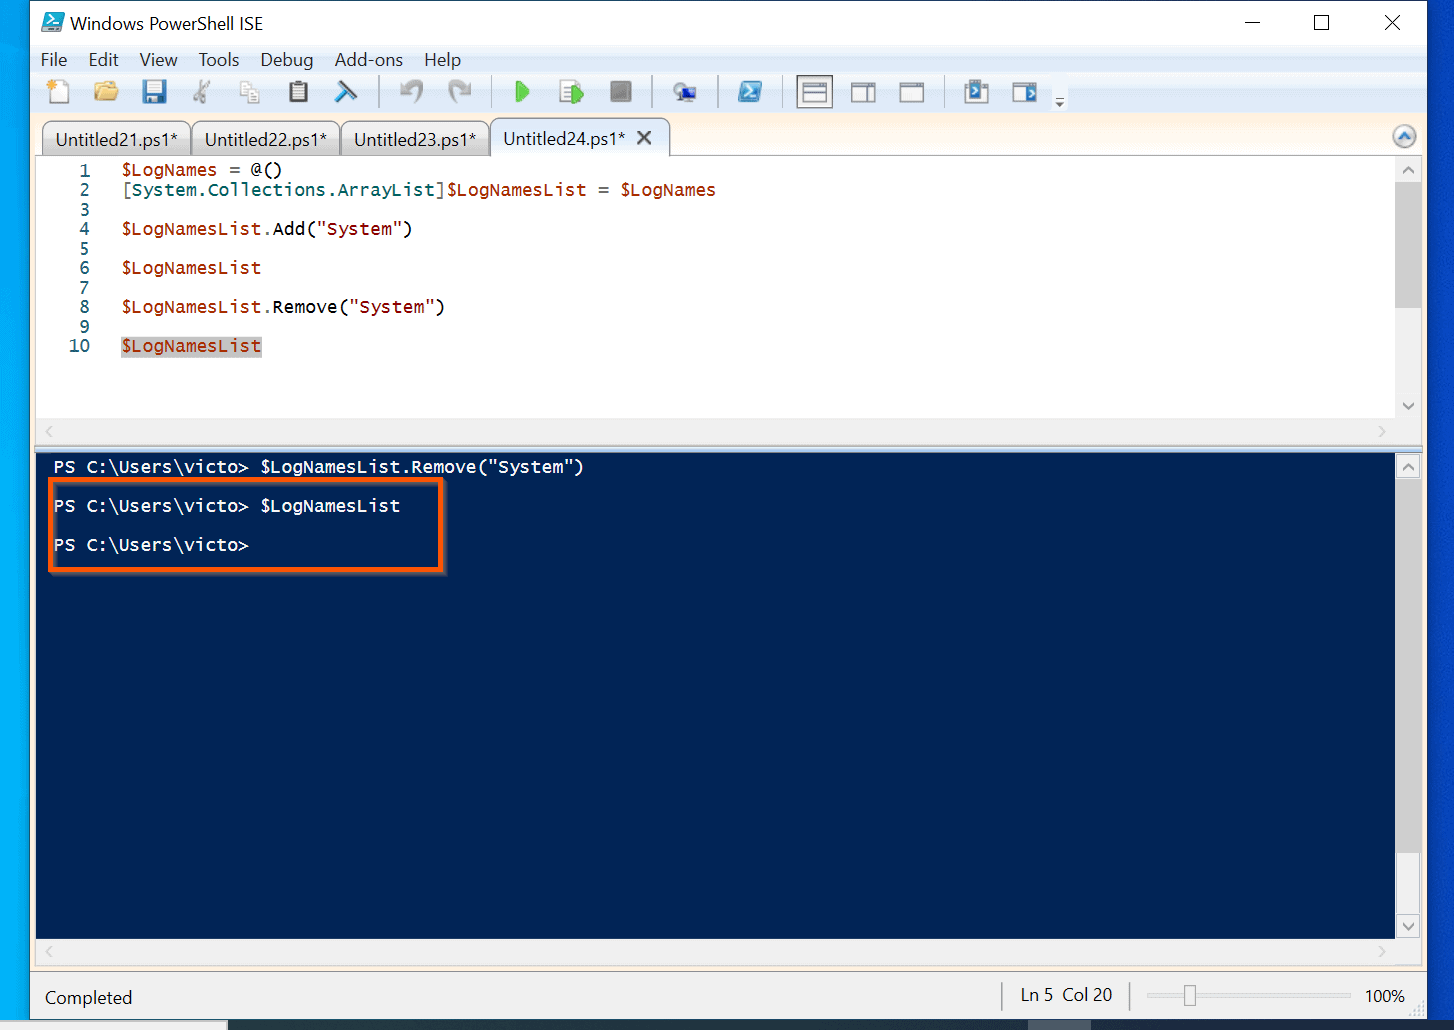
Furthermore, you can remove an item from a PowerShell array. To remove an existing item from an array, use the Remove Method.
The command below will remove “System” from the previous array..
$LogNamesList.Remove("System")
Now, if you run the variable, it will not display any value..
$LogNamesList
How to Check if a PowerShell Array Contains an Item
Another important feature of an array is that you can check if an item exists in an array. This may be used in two ways.
1, may want to simply check if an item exists in an array. 2, alternatively, you may want to add an item to an array but want to check if it exists first.
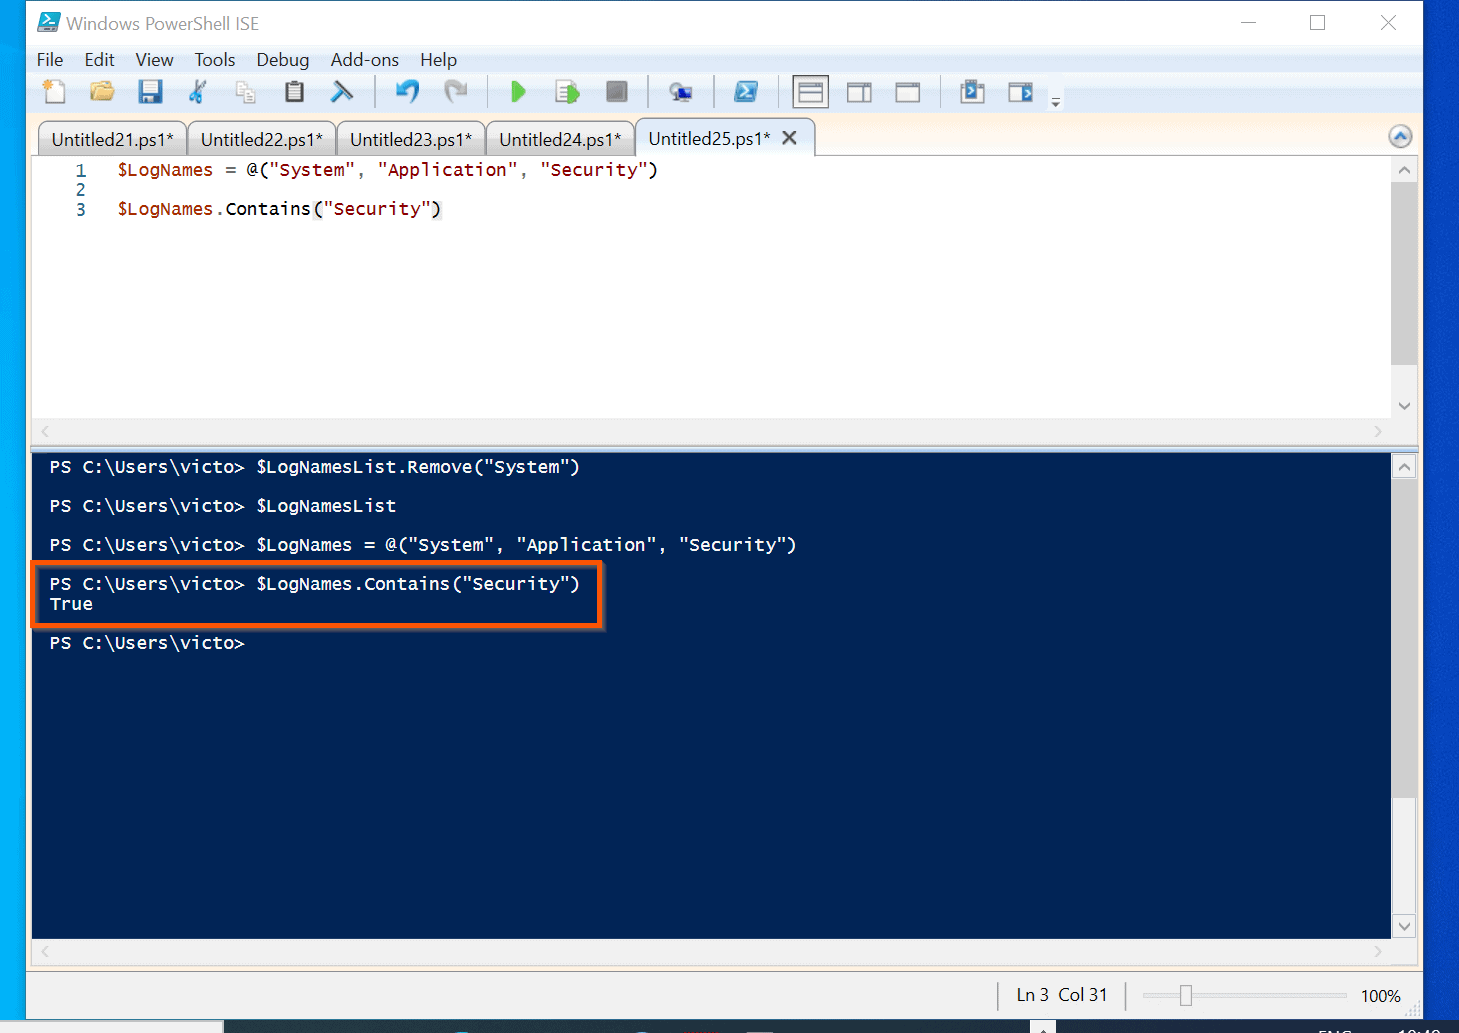
To illustrate how to check if an item exists in an array, let’s use our original script.
$LogNames = @("System", "Application", "Security")
To check if the item, “Security” exists in the PowerShell array saved in the LogNames variable, use the command below…
$LogNames.Contains("Security")
If the item exists in the array, the command will display True.
On the contrary, if the item does not exist in the array, the command will display False. We can take this to the next level by testing whether an item exists in a PowerShell array – then, if it does not exist, add it to the array.
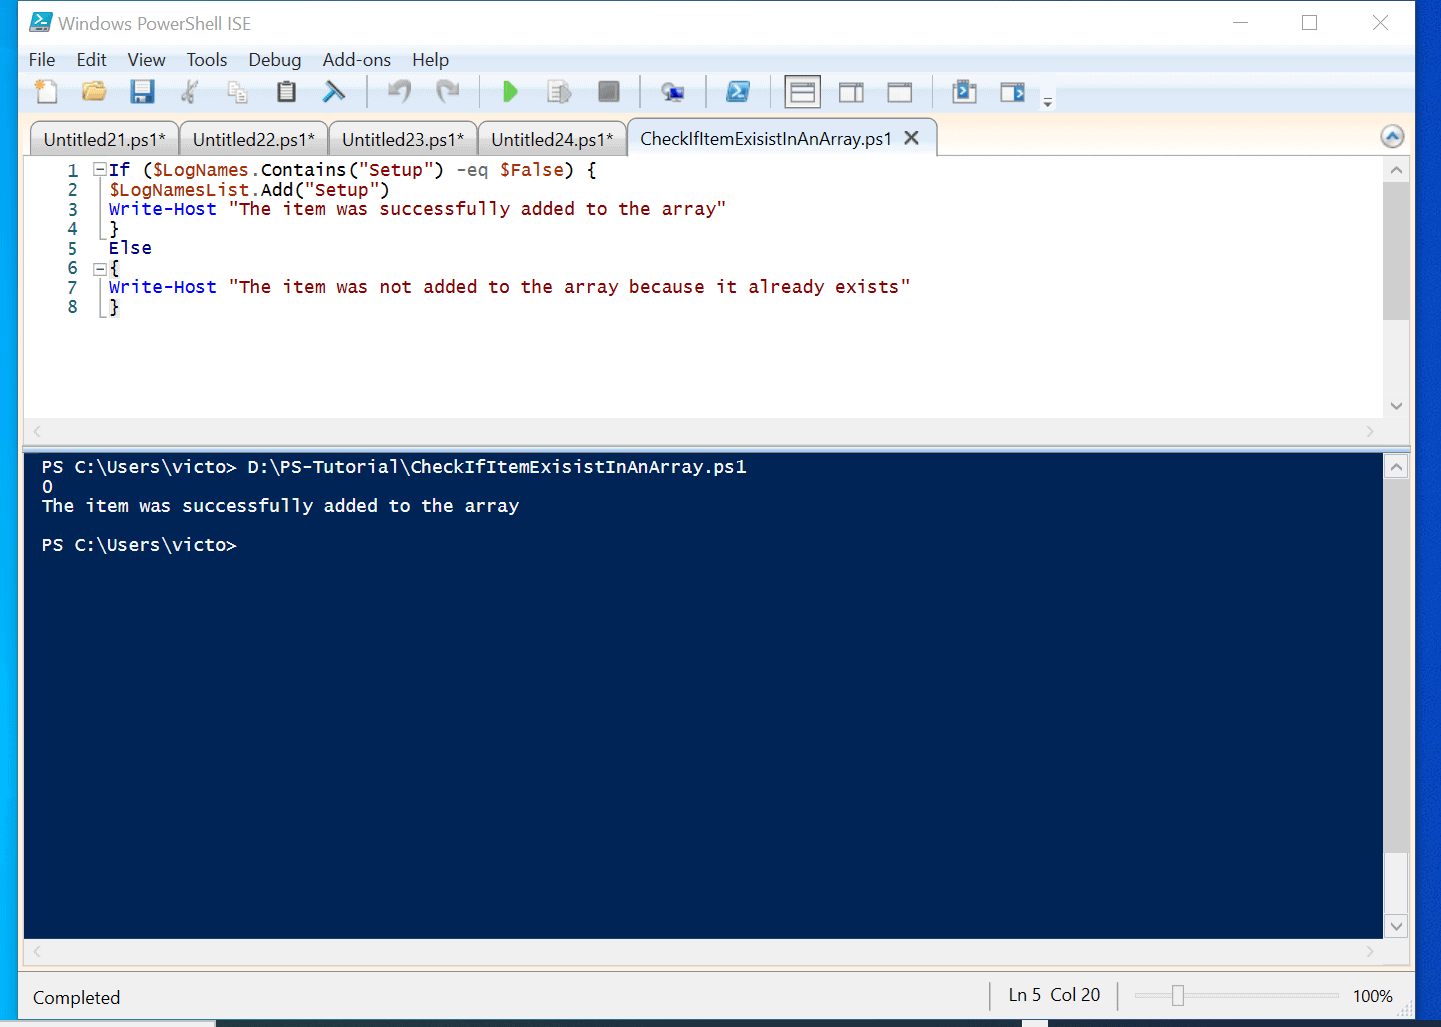
The script below uses the IF statement to check if the item, “Setup” exists in our array. Then, if it does not, add the item with the Add Method.
If ($LogNames.Contains("Setup") -eq $False) {
$LogNamesList.Add("Setup")
Write-Host "The item was successfully added to the array"
}
Else
{
Write-Host "The item was not added to the array because it already exists"
}
Here is the result of the command in PowerShell…
How to Get the Number of Items in an Array
A PowerShell Array has a Property called Length. Additionally, it has an AliasProperty, Count.
Count is an Alias of Length. These two Properties return the number of items in an array.
Although Count and Length return the same value, however, there is a difference between the two. I found this on Social.msdn.microsoft.com – Matt Mikul compares PowerShell array Length vs Count:
One way to think of it is that Arrays are static (size is always the same, at least in C#), whereas a Collection’s size can grow.
So, .Length & .Count refers to the same thing (number of items), but belongs to different object types.
The .Count() method is a part of the IEnumerable interface, which arrays happen to implement”.
Back to getting the number of items in our PowerShell array – to return the number of items in the array saved in the LogNames variable – run one of the commands below:
$LogNames.Length
$LogNames.Count
Both commands return 3 because there are 3 items in my array…

How to Break the Items in a Array into Individual Items
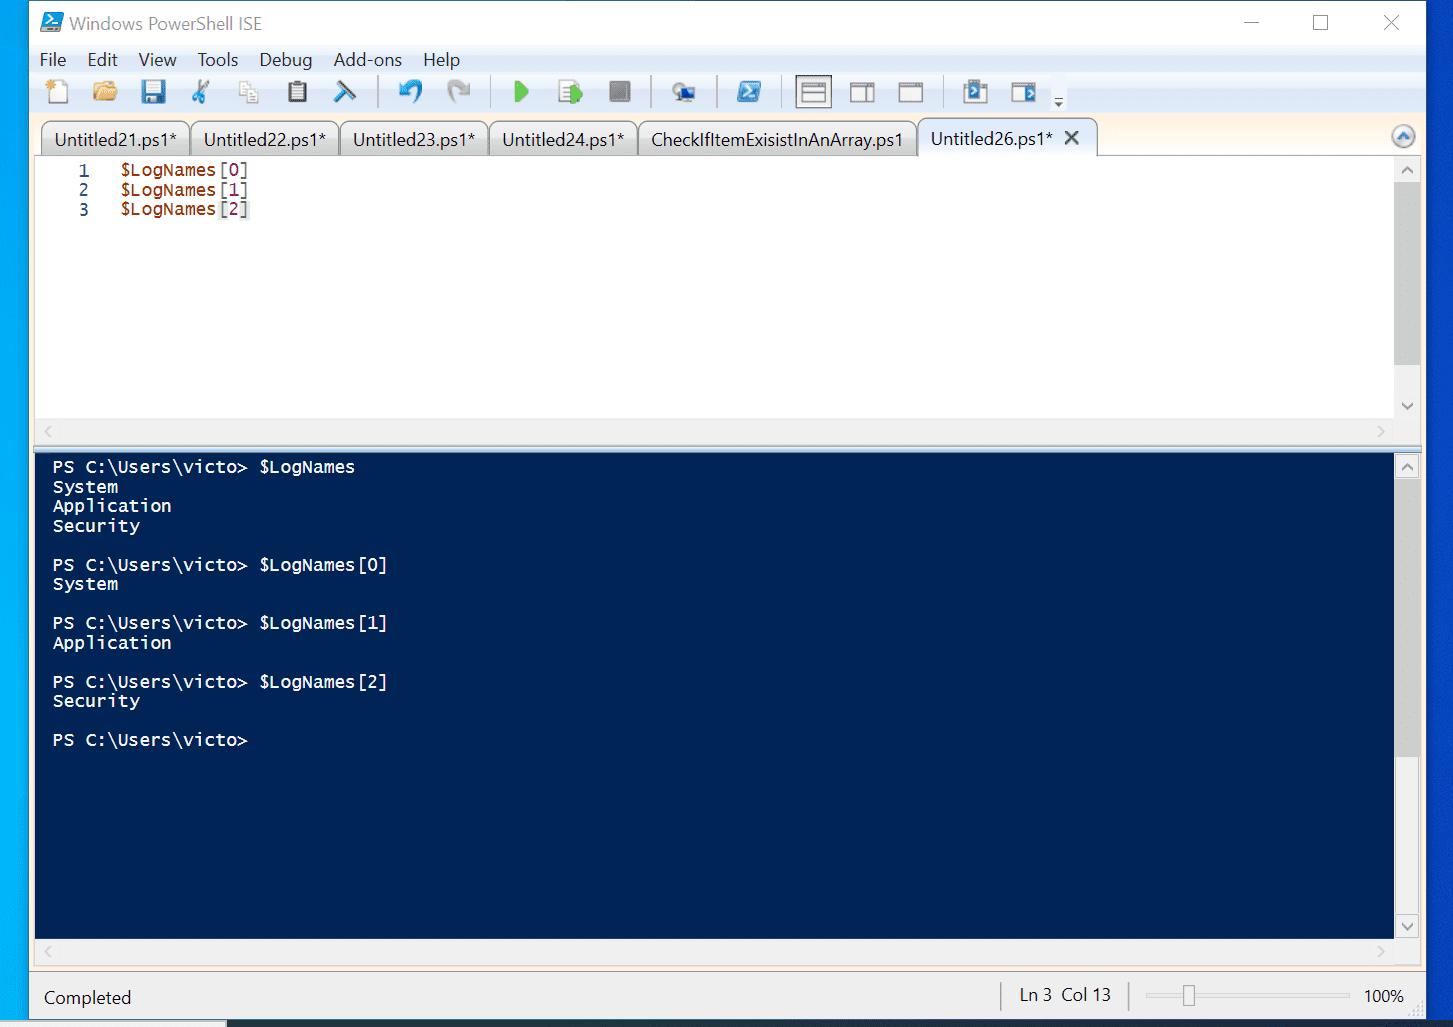
When you work with a PowerShell array, you may need to break the array list into individual items. PowerShell arrays number the items in the array from zero (0).
So, the first item can be displayed by placing ‘[0]’ after the variable, the array is saved. As an example, to display the first, second, and third items in the array saved in LogNames variable, use commands below:
$LogNames[0]
$LogNames[1]
$LogNames[2]
The commands return ‘System’, ‘Application’, and ‘Security’. These are the first, second, and third items respectively, in the array.
See the screenshot below…
How to Loop Through an Array with ForEach
You can use ForEach to loop through a PowerShell array in two ways. One way is to use the ForEach Method available in an array.
Alternatively, you can use the ForEach loop. In the next two sub-sections, I will illustrate how to use these two methods to iterate the items in an array.
How to Use PowerShell Array ForEach Method
To use the ForEach Method available in an array, first, enter a period (.) next to the variable the array is stored. Then, enter the word ForEach, followed by ‘()’ brackets (without the quotes).
Within the ‘()’ brackets, enter another bracket ‘{}’. Finally, within the ‘{}’ brackets, enter the command you want to execute with the items in the array represented with the automatic pipeline variable, ‘$_’.
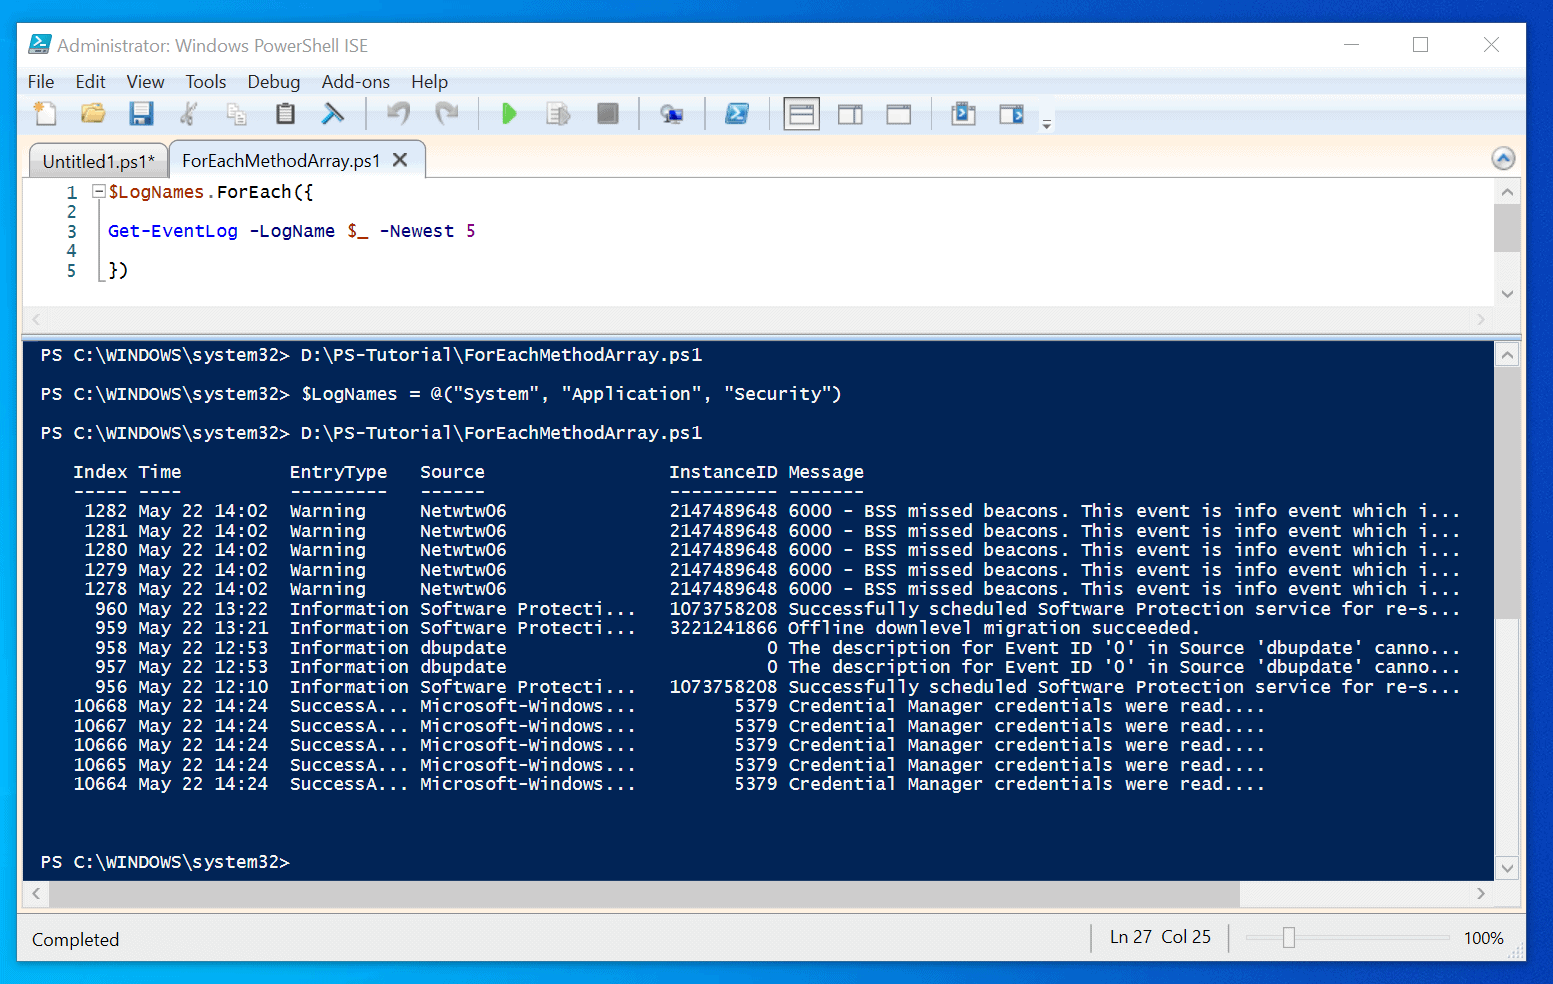
Here is a sample command that uses the ForEach Method in the array saved in the LogNames variable.
$LogNames.ForEach({
 Get-EventLog -LogName $_ -Newest 5
 })
In the ‘{}’ brackets, I entered the command below:
Get-EventLog -LogName $_ -Newest 5
The ForEach Method iterates through the PowerShell array items saved in LogNames variable. At each iteration, the ForEach Method stores an item in the array in a temporal automatic variable, ‘$_’.
This variable is then used in the Get-EventLog command to display the last 5 events in the individual logs.
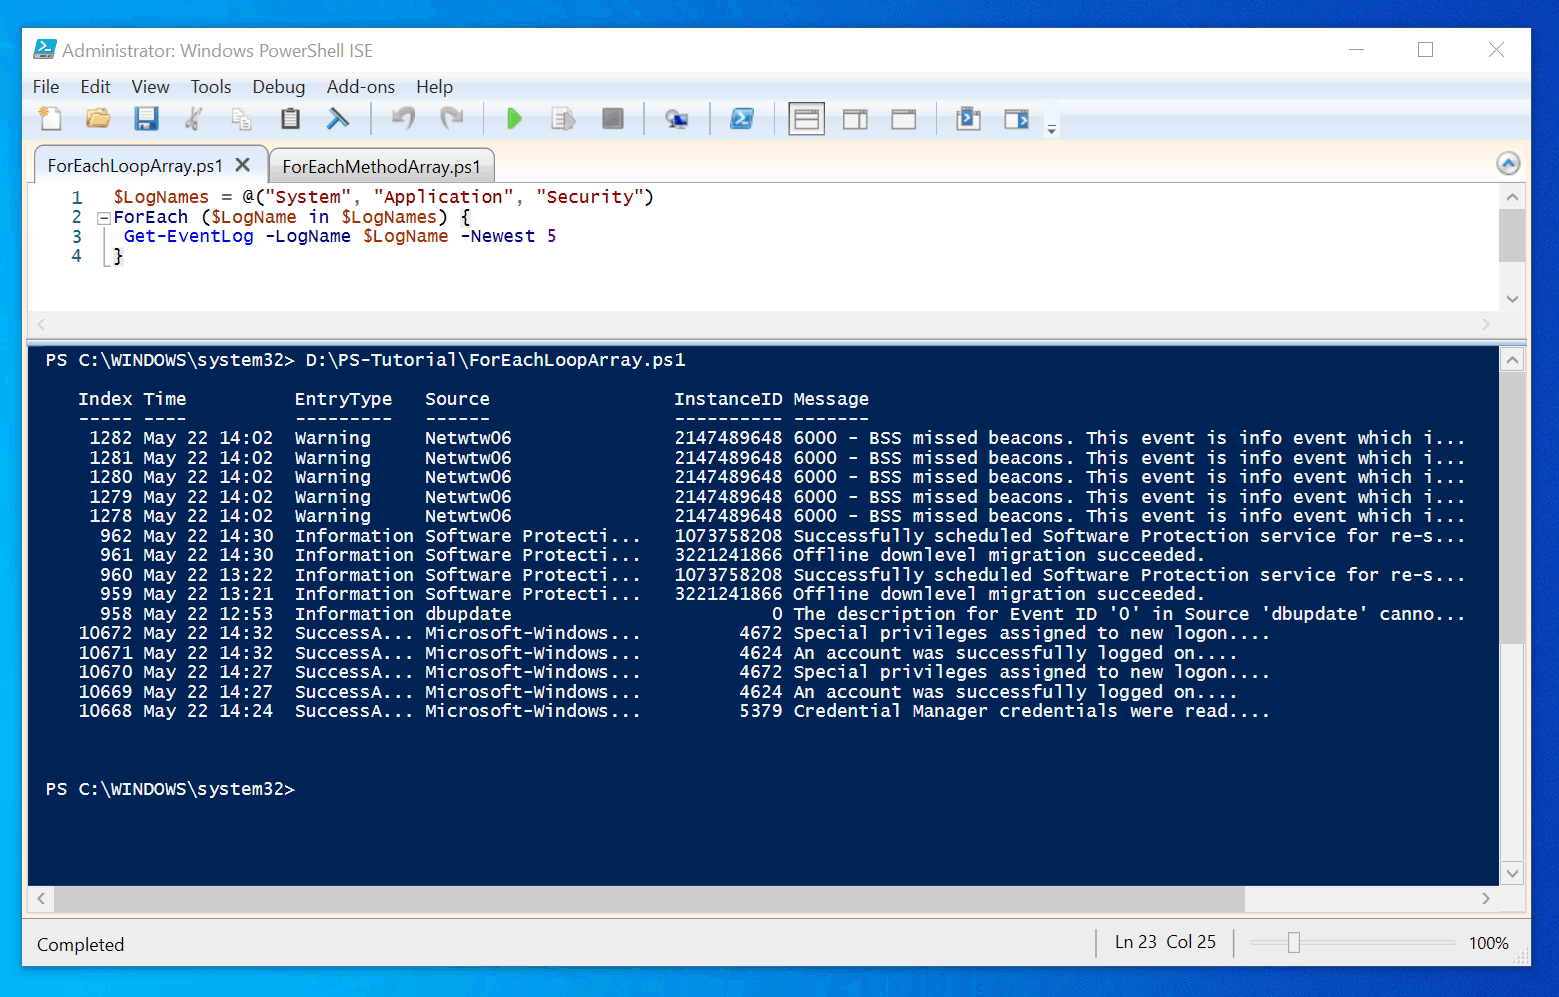
Once you open PowerShell ISE as administrator, run the script below, in order:
$LogNames = @("System", "Application", "Security")
$LogNames.ForEach({
 Get-EventLog -LogName $_ -Newest 5
 })
The final result (of the second command) is a report of 15 event logs – 5 logs for each of the three event log names in the array.
How to Use ForEach Loop to Iterate the Items in an Array
In the last sub-section, I showed you how to use the PowerShell array ForEach Method to iterate the items in the array.
This sub-section will show you how to use the ForEach loop to iterate the items in a PowerShell array.
In this example, I will use the
$LogNames = @("System", "Application", "Security")
To use the ForEach loop to iterate the items of the PowerShell array saved in the LogNames variable, use the command below:
$LogNames = @("System", "Application", "Security")
ForEach ($LogName in $LogNames) {
 Get-EventLog -LogName $LogName -Newest 5
}
This script is similar to the script in the last section. However, in each ForEach loop iteration cycle – instead of passing each item in the array into the temporal automatic variable, ‘$_’ – the items are saved temporarily in a variable, called LogName.
Like the script in the last section, to run this script, open PowerShell ISE as administrator and run this script:
$LogNames = @("System", "Application", "Security")
ForEach ($LogName in $LogNames) {
 Get-EventLog -LogName $LogName -Newest 5
}
The script returns exactly the same result as the script in the last sub-section.
How to Export a PowerShell Array to CSV
In this section, you will learn how to export the result of this script (from last section) to CSV.
$LogNames = @("System", "Application", "Security")
ForEach ($LogName in $LogNames) {
 Get-EventLog -LogName $LogName -Newest 5
}
Before I show you how to export the final result to CSV, let me first show you how to export the items in the original PowerShell array to CSV. Here is the array…
$LogNames = @("System", "Application", "Security")
To export the result of the script to CSV, you need to make the following changes:
- Break the items in the array into individual items and save them in variables, LogNames1, LogNames2, and LogNames3.
- Create an empty hashtable saved in a variable, LogNameHash.
- Add the array items saved in LogNames1, LogNames2, LogNames3 variables into the hashtable
- Finally, pipe the output of the hashtable to the Select-Object command – then, to the Export-Csv command.
Here is the final script that exports my original PowerShel array to CSV.
$LogNames = @("System", "Application", "Security")

 $LogNames1 = $LogNames[0]
 $LogNames2 = $LogNames[1]
 $LogNames3 = $LogNames[2]

 $LogNameHash = @{
 }

 $LogNameHash.Add( "EventLog 1", "$LogNames1")
 $LogNameHash.Add( "EventLog 2", "$LogNames2")
 $LogNameHash.Add( "EventLog 3", "$LogNames3")

 $LogNameHash.GetEnumerator() | Select-Object Name, Value | `
 Export-Csv -Path D:\PS-Tutorial\PSArrayTOCSV.csv -NoTypeInformation
More Practical Applications
This PowerShell array guide has covered a lot of grounds. In this last section, I want to show you one last application.
In this section I will show you how to use PowerShell to determine the process that consumes the most CPU on your computer.
To complete this task, follow the steps below:
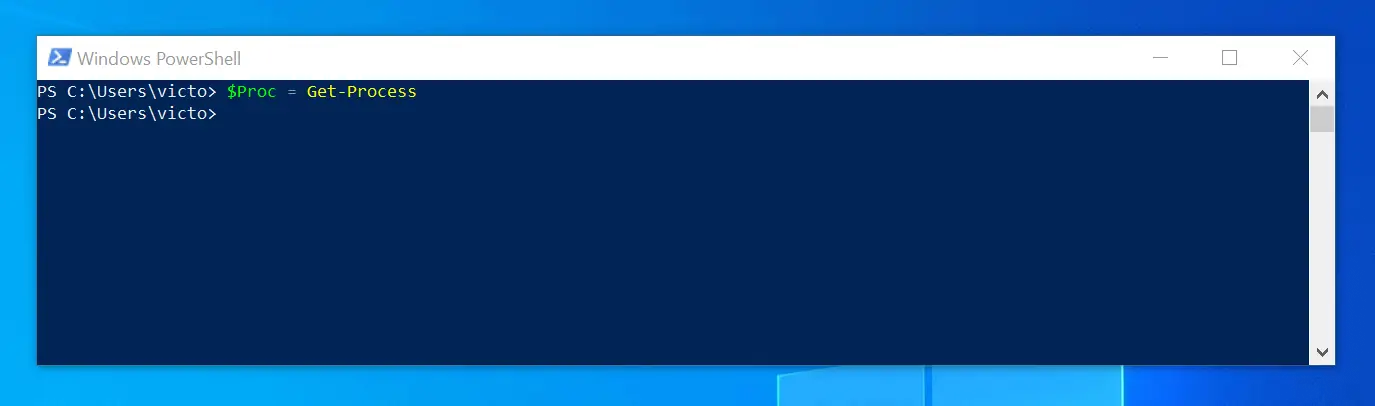
- Run the Get-Process command and save the result in a variable called Proc.
$Proc = Get-Process
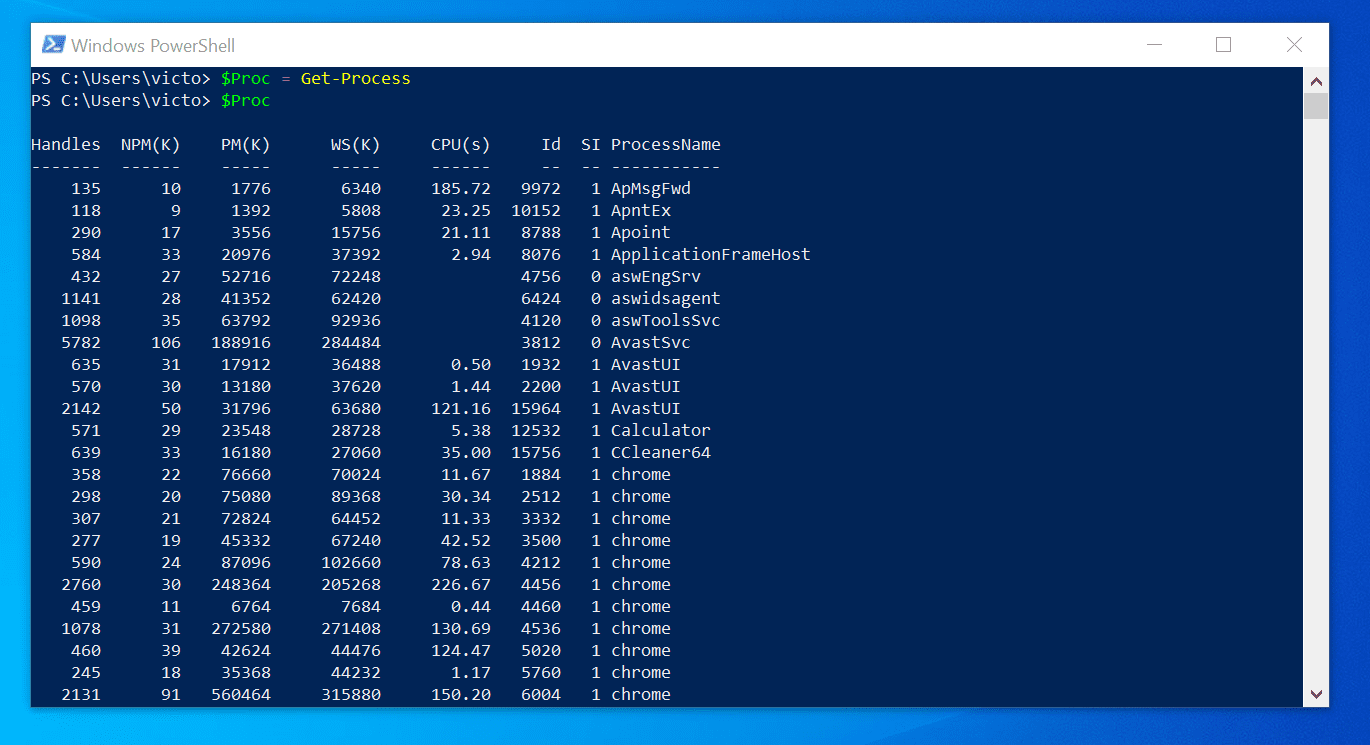
- To display the result of the command, run the command below:
$Proc
The command displays the information saved in the variable – all processes currently running on my computer.
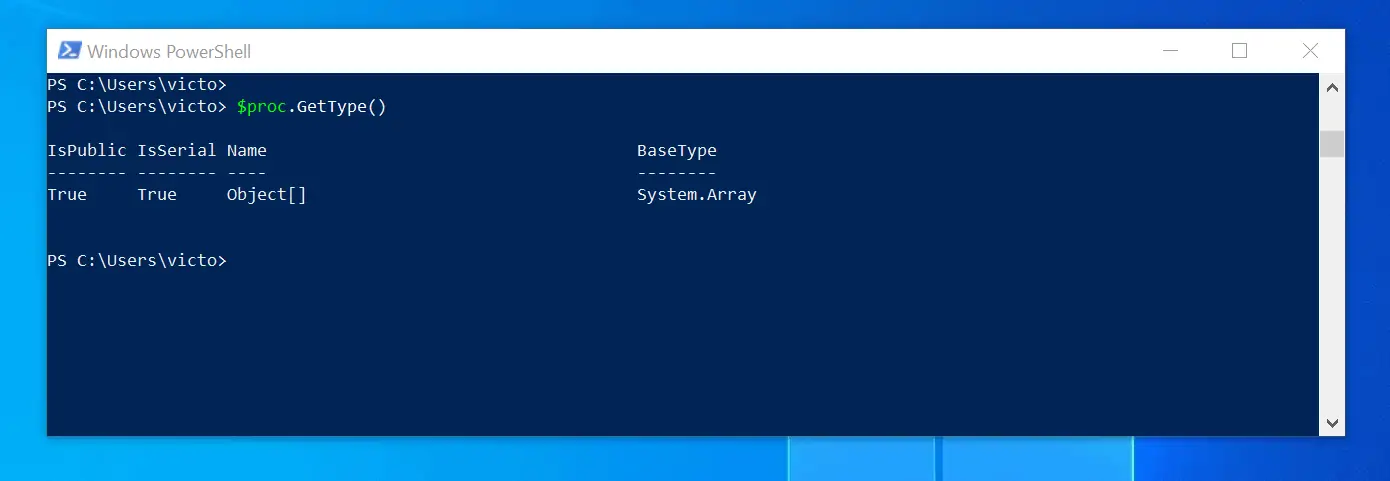
Before we proceed to the next step, lets just confirm that the result saved in the Proc variable is an array. To confirm this, run the command below:
$proc.GetType()
It is a System.Array.
The next step is to find the process that consumes most CPU. Before that though, we need to sort the result by CPU consumption.
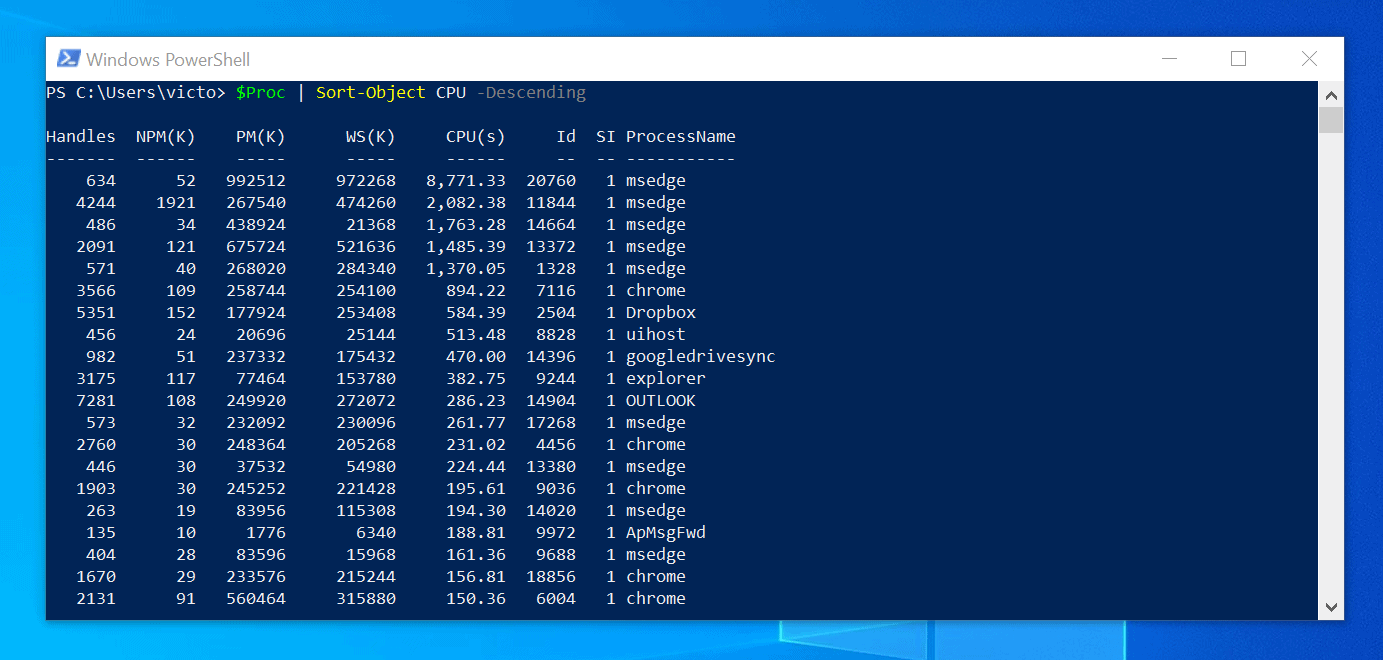
- To sort the result by CPU consumption, run the command below:
$Proc | Sort-Object CPU -Descending
The command sorts the result in descending order, displaying the top CPU consumers on top.
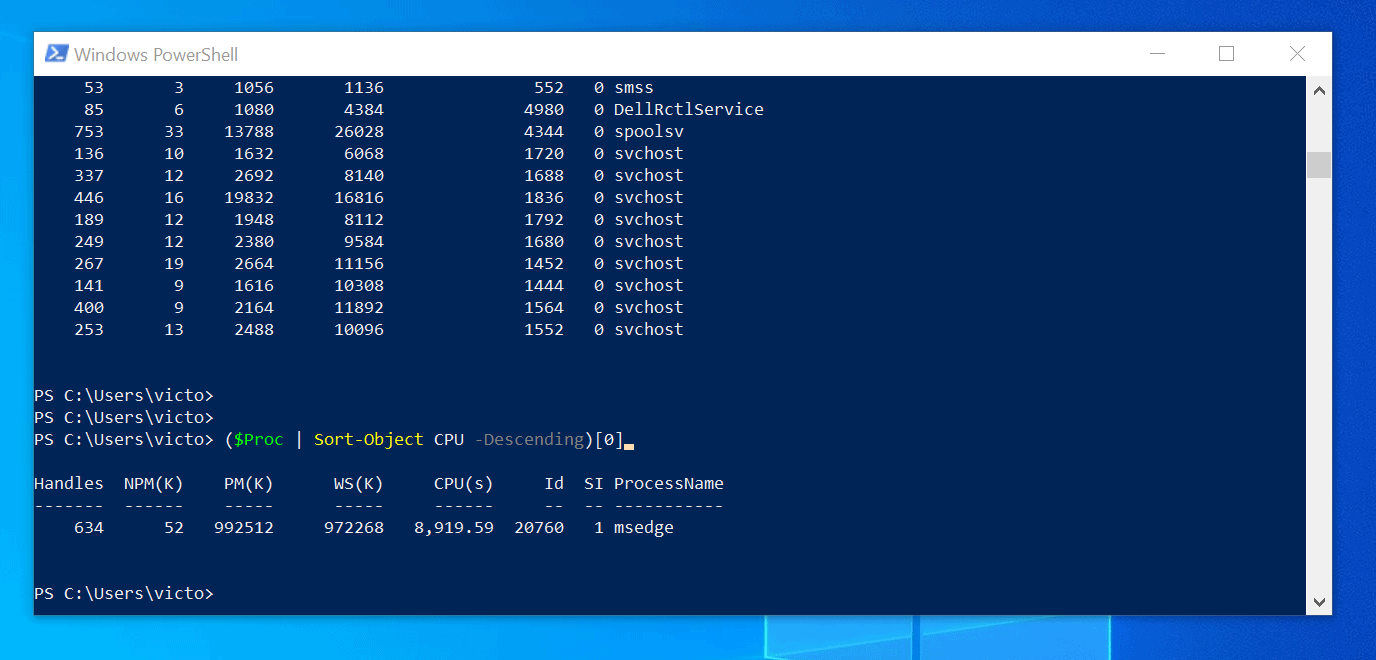
- Finally, to return the process that consumes the highest CPU, return the first item in the array, using the command below:
($Proc | Sort-Object CPU -Descending)[0]
The result of the last command confirms that a process called msedge consumes CPU most.
Conclusion
I hope you found this PowerShell array guide helpful. If you found this article helpful, kindly spare two minutes of your time to share your experience with our community using the comment form at the bottom of this page.
Alternatively, you can respond to the “Was this page helpful?” question below.
Finally, for more PowerShell tech Itechguides, visit our Windows PowerShell How-To guide page. You may also find our Work from Home page very helpful.