How to Install or Remove Windows Server Roles with PowerShell

Photo of author

By Victor Ashiedu

Published

Read this guide to learn how to install Windows Server roles, features, and roles management tools with the PowerShell Install-WindowsFeature command.

Overview

Most SysAdmins install Windows server roles with Server Manager. Server Manager is great because it can also deploy roles on remote servers.

However, PowerShell offers a faster way to perform the task on multiple servers. However, you need the role’s name to install it with PowerShell.

In step 1 below, I will show you how to find the name for any Server role you wish to install. After that, I will show you how to install the role.

Task 1: Get the Role’s Name with Get-WindowsFeature

To find the name of a role, run the Get-WindowsFeature command and specify any word in the role. To specify the word in the role, use a * wildcard before and after the word.

For example, to find the role name for Active Directory Domain Services – use any work in “Active Directory Domain Services,” for example “directory” – with Get-WindowsFeature.

Here is the full command.

Get-WindowsFeature *domain* | Format-Table -AutoSize
I piped the output of the Get-WindowsFeature command to Format-Table to avoid truncating the results.

The command returns all server roles that contain the phrase ‘directory’. If a role is not installed yet its Install State displays the Available.

Get-WindowsFeature *domain* | Format-Table -AutoSize

To install the role, use the role’s name in the Name column.

Another example is Hyper-V. If you need to install the Hyper-V manager role without installing the Hyper-V role, get the name of the role by running the command below:

Get-WindowsFeature *Hyper-V* | Format-Table -AutoSize

The command returns all Hyper-V roles, including its management tools. On the Display Name column, “Hyper-V Management Tools” and its SubFeatures – “Hyper-V GUI Management Tools” and “Hyper-V Module for Windows PowerShell” – are checked.

Get-WindowsFeature *Hyper-V* | Format-Table -AutoSize

This indicates that the “Hyper-V Management Tools” are installed on this server as confirmed by the “Install State” column.

If you run the command with a phrase or word but it doesn’t return any role name, try another word.

Finally, if you need to install roles admin tools without installing the role, as I already explained, you can get the name of a specific management tool with the method I explained above. However, to return a list of all management tools, run the Get-WindowsFeature command with *RSAT*.

Get-WindowsFeature *RSAT* | Format-Table -AutoSize

I have highlighted some common role admin tools for Active Directory Domain Services (AD DS) and “Failover Cluster Management Tools.”
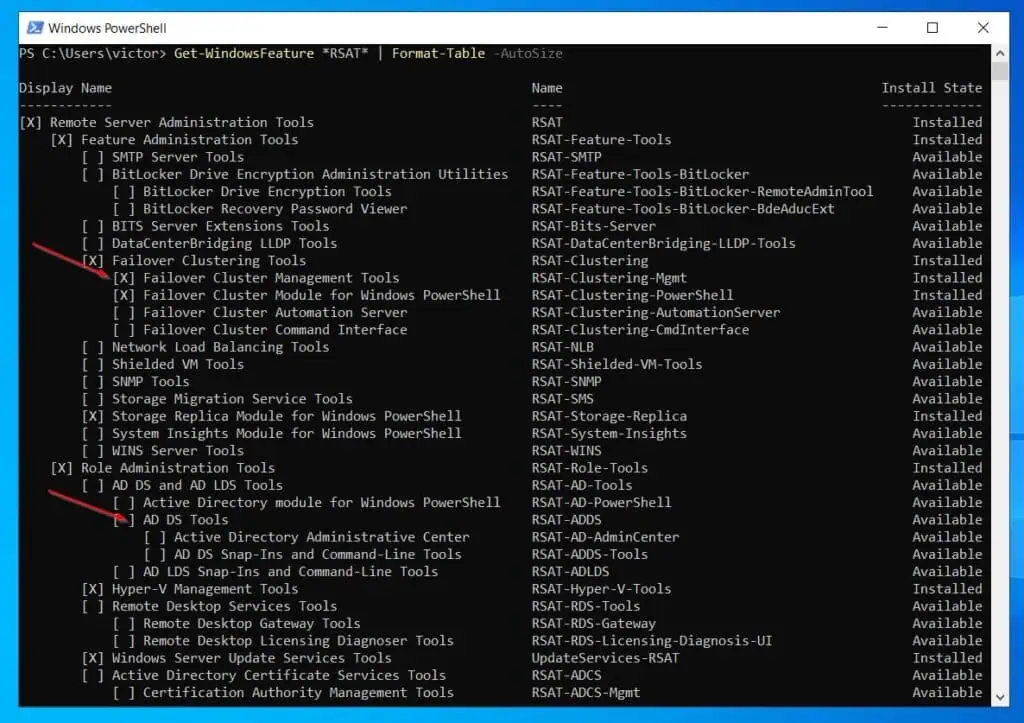
Get-WindowsFeature *RSAT* | Format-Table -AutoSize

Task 2: Install the Role with Install-WindowsFeature

Once you have the name of the role, use the Install-WindowsFeature command to deploy the role.

For example, I will run the command below to install the Hyper-V Manager without installing the Hyper-V role.

Install-WindowsFeature -Name RSAT-Hyper-V-Tools

In another example to install the Failover Cluster Management Tool, I will use the get-winowsfeature command below to find the role name.

Get-WindowsFeature '*clustering*' | Format-Table -AutoSize

Then, install the Clustering admin tools and all its sub-features with this command. By the way, I have already installed the clustering management tool on the server I ran the above command.

Install-WindowsFeature -Name RSAT-Clustering

Finally, if you need to install any Windows Server role on multiple computers, you can list the names of the computers on a text file. Then, use the script below to deploy the roles on the servers.

Lists the names of the servers on the text file as shown in my screenshot below.

I have included comments before each command to explain what the command does. All texts starting with # are comments.

#Get a list of all the servers from the text file and save them in the $Servers variable

$Servers = Get-Content <path to the text file>

#Save the domain credential to use in installing the roles in the $Credential parameter

$Credential = Get-Credential domainname\username

#Install the roles on all the servers
#This script installs the DNS and Active Directory admin tools

ForEach ($Server in $Servers) {Invoke-Command -ComputerName $Server { Install-WindowsFeature -Name "RSAT-ADDS", "RSAT-DNS-Server" } -Credential $Credential -Verbose}

The screenshot below shows the result of the above script in action. I used the script to install the AD DS and DNS management tools on two servers.

The command’s results show whether the installation was successful and if the server requires a restart.
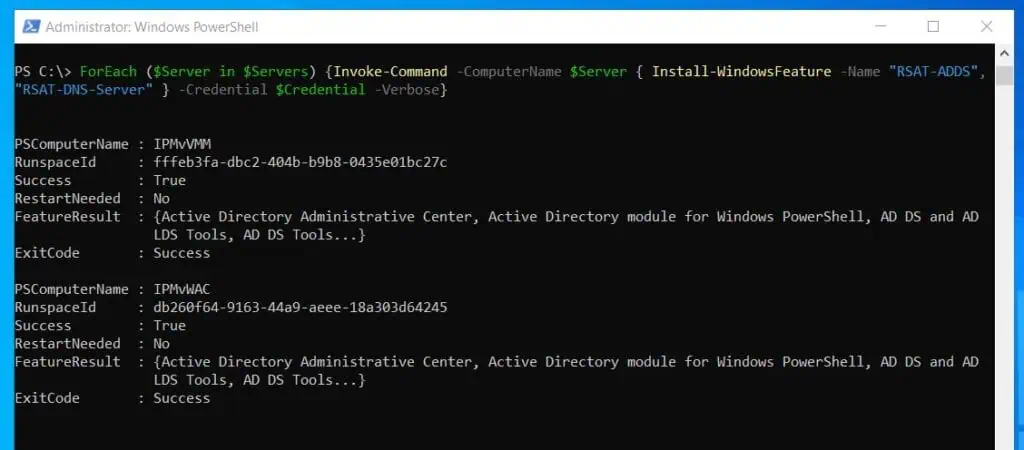
Install Windows Server Roles on multiple remote servers with PowerShell

Task 3: Uninstall Roles with Remove-WindowsFeature

If you need to uninstall or remove a Windows Server role, use the Remove-WindowsFeature command. The example below removes the AD DS and DNS management tools from one of the servers where the roles were installed in step 2.

The command below was executed remotely. If you’re running the command locally, use Remove-WindowsFeature -Name “RSAT-ADDS”, “RSAT-DNS-Server” without the Invoke-Command command.
Invoke-Command -ComputerName IPMvVMM { Remove-WindowsFeature -Name "RSAT-ADDS", "RSAT-DNS-Server" } -Credential $Credential -Verbos

Conclusion

PowerShell provides a way to automate the installation of Windows Server roles on multiple servers. However, to install a Windows Server role, you require the role’s name.

Meanwhile, to get the name of a role, run the Get-WindowsFeature command. Then, install the role with the Install-WindowsFeature command.
About the Author

Photo of author

Victor Ashiedu

Victor is the founder of InfoPress Media, publishers of Ilifeguides and Itechguides. With 20+ years of experience in IT infrastructure, his expertise spans Windows, Linux, and DevOps. Explore his contributions on Itechguides.com for insightful how-to guides and product reviews.

Related Articles

Get in Touch

We're committed to writing accurate content that informs and educates. To learn more, read our Content Writing Policy, Content Review Policy, Anti-plagiarism Policy, and About Us.

However, if this content does not meet your expectations, kindly reach out to us through one of the following means:

  1. Respond to "Was this page helpful?" above
  2. Leave a comment with the "Leave a Comment" form below
  3. Email us at [email protected] or via the Contact Us page.

How to Install or Remove Windows Server Roles with PowerShell

Photo of author

By Victor Ashiedu

Published

Read this guide to learn how to install Windows Server roles, features, and roles management tools with the PowerShell Install-WindowsFeature command.

Overview

Most SysAdmins install Windows server roles with Server Manager. Server Manager is great because it can also deploy roles on remote servers.

However, PowerShell offers a faster way to perform the task on multiple servers. However, you need the role’s name to install it with PowerShell.

In step 1 below, I will show you how to find the name for any Server role you wish to install. After that, I will show you how to install the role.

Task 1: Get the Role’s Name with Get-WindowsFeature

To find the name of a role, run the Get-WindowsFeature command and specify any word in the role. To specify the word in the role, use a * wildcard before and after the word.

For example, to find the role name for Active Directory Domain Services – use any work in “Active Directory Domain Services,” for example “directory” – with Get-WindowsFeature.

Here is the full command.

Get-WindowsFeature *domain* | Format-Table -AutoSize
I piped the output of the Get-WindowsFeature command to Format-Table to avoid truncating the results.

The command returns all server roles that contain the phrase ‘directory’. If a role is not installed yet its Install State displays the Available.

Get-WindowsFeature *domain* | Format-Table -AutoSize

To install the role, use the role’s name in the Name column.

Another example is Hyper-V. If you need to install the Hyper-V manager role without installing the Hyper-V role, get the name of the role by running the command below:

Get-WindowsFeature *Hyper-V* | Format-Table -AutoSize

The command returns all Hyper-V roles, including its management tools. On the Display Name column, “Hyper-V Management Tools” and its SubFeatures – “Hyper-V GUI Management Tools” and “Hyper-V Module for Windows PowerShell” – are checked.

Get-WindowsFeature *Hyper-V* | Format-Table -AutoSize

This indicates that the “Hyper-V Management Tools” are installed on this server as confirmed by the “Install State” column.

If you run the command with a phrase or word but it doesn’t return any role name, try another word.

Finally, if you need to install roles admin tools without installing the role, as I already explained, you can get the name of a specific management tool with the method I explained above. However, to return a list of all management tools, run the Get-WindowsFeature command with *RSAT*.

Get-WindowsFeature *RSAT* | Format-Table -AutoSize

I have highlighted some common role admin tools for Active Directory Domain Services (AD DS) and “Failover Cluster Management Tools.”

Get-WindowsFeature *RSAT* | Format-Table -AutoSize

Task 2: Install the Role with Install-WindowsFeature

Once you have the name of the role, use the Install-WindowsFeature command to deploy the role.

For example, I will run the command below to install the Hyper-V Manager without installing the Hyper-V role.

Install-WindowsFeature -Name RSAT-Hyper-V-Tools

In another example to install the Failover Cluster Management Tool, I will use the get-winowsfeature command below to find the role name.

Get-WindowsFeature '*clustering*' | Format-Table -AutoSize

Then, install the Clustering admin tools and all its sub-features with this command. By the way, I have already installed the clustering management tool on the server I ran the above command.

Install-WindowsFeature -Name RSAT-Clustering

Finally, if you need to install any Windows Server role on multiple computers, you can list the names of the computers on a text file. Then, use the script below to deploy the roles on the servers.

Lists the names of the servers on the text file as shown in my screenshot below.

I have included comments before each command to explain what the command does. All texts starting with # are comments.

#Get a list of all the servers from the text file and save them in the $Servers variable

$Servers = Get-Content <path to the text file>

#Save the domain credential to use in installing the roles in the $Credential parameter

$Credential = Get-Credential domainname\username

#Install the roles on all the servers
#This script installs the DNS and Active Directory admin tools

ForEach ($Server in $Servers) {Invoke-Command -ComputerName $Server { Install-WindowsFeature -Name "RSAT-ADDS", "RSAT-DNS-Server" } -Credential $Credential -Verbose}

The screenshot below shows the result of the above script in action. I used the script to install the AD DS and DNS management tools on two servers.

The command’s results show whether the installation was successful and if the server requires a restart.

Install Windows Server Roles on multiple remote servers with PowerShell

Task 3: Uninstall Roles with Remove-WindowsFeature

If you need to uninstall or remove a Windows Server role, use the Remove-WindowsFeature command. The example below removes the AD DS and DNS management tools from one of the servers where the roles were installed in step 2.

The command below was executed remotely. If you’re running the command locally, use Remove-WindowsFeature -Name “RSAT-ADDS”, “RSAT-DNS-Server” without the Invoke-Command command.
Invoke-Command -ComputerName IPMvVMM { Remove-WindowsFeature -Name "RSAT-ADDS", "RSAT-DNS-Server" } -Credential $Credential -Verbos

Conclusion

PowerShell provides a way to automate the installation of Windows Server roles on multiple servers. However, to install a Windows Server role, you require the role’s name.

Meanwhile, to get the name of a role, run the Get-WindowsFeature command. Then, install the role with the Install-WindowsFeature command.
About the Author

Photo of author

Victor Ashiedu

Victor is the founder of InfoPress Media, publishers of Ilifeguides and Itechguides. With 20+ years of experience in IT infrastructure, his expertise spans Windows, Linux, and DevOps. Explore his contributions on Itechguides.com for insightful how-to guides and product reviews.

Related Articles

Get in Touch

We're committed to writing accurate content that informs and educates. To learn more, read our Content Writing Policy, Content Review Policy, Anti-plagiarism Policy, and About Us.

However, if this content does not meet your expectations, kindly reach out to us through one of the following means:

  1. Respond to "Was this page helpful?" above
  2. Leave a comment with the "Leave a Comment" form below
  3. Email us at [email protected] or via the Contact Us page.

Leave a comment

Send this to a friend