Does your Windows 10 PC not display WiFi networks? Not to worry, this guide provides various solutions to fix this problem.
Solution 1: Turn on Network Discovery
Sometimes, if the network discovery of your Windows 10 PC is turned off, it might be the cause of this problem. So, to fix the problem, we will have to turn on network discovery.
To perform this task, follow the steps below.
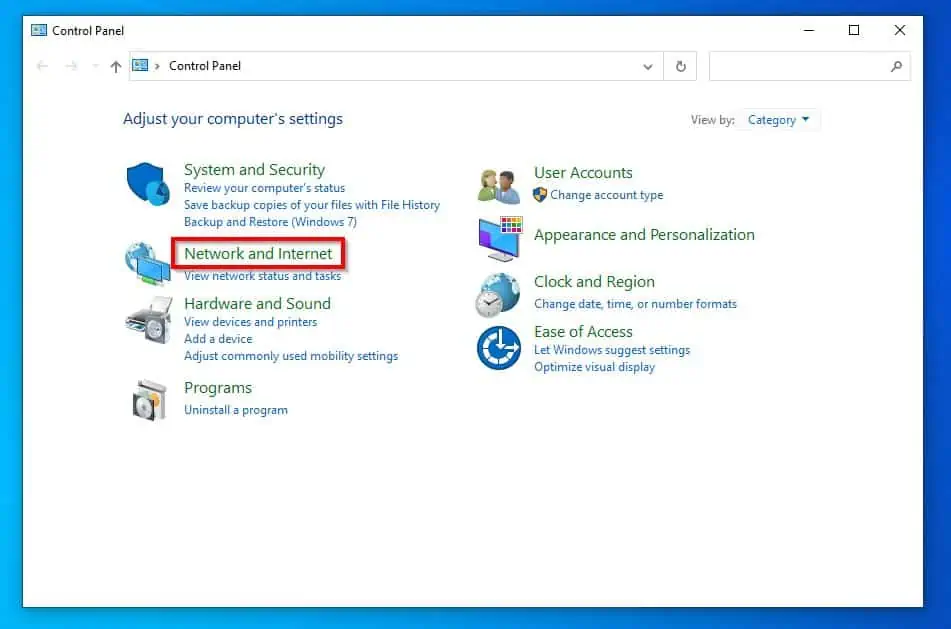
- Click the search field on your Windows 10 taskbar and type “control panel”. Then, select the Control Panel app from the search result.

- After that, select Network and Internet.
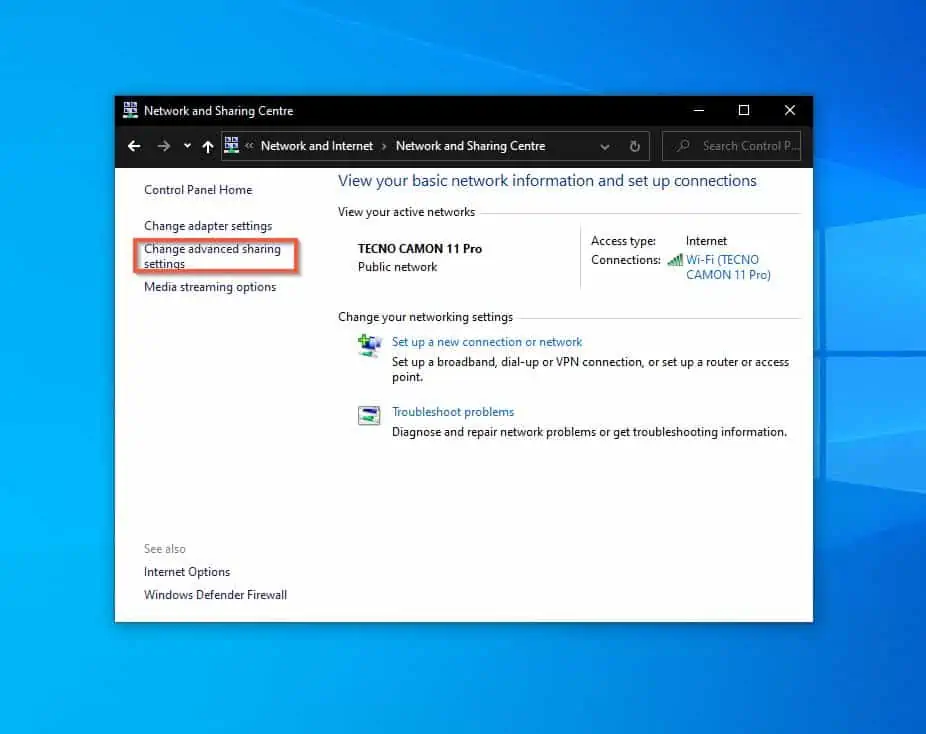
- Then, click on Network and Sharing Centre.

- When you have done that, click Change advanced sharing settings on the left pane.
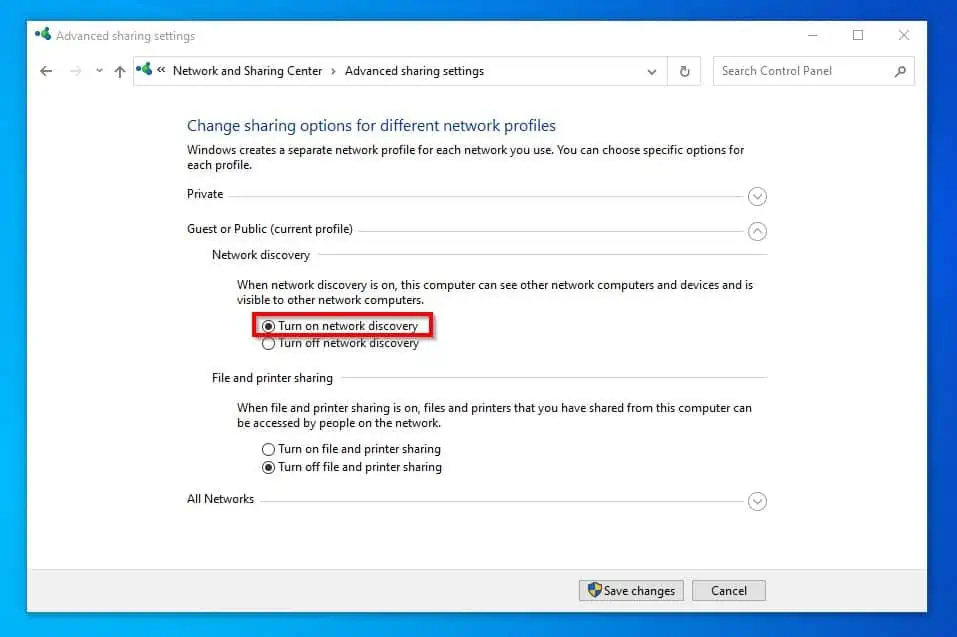
- After that, make sure Turn on network discovery is selected underneath the Network discovery category.
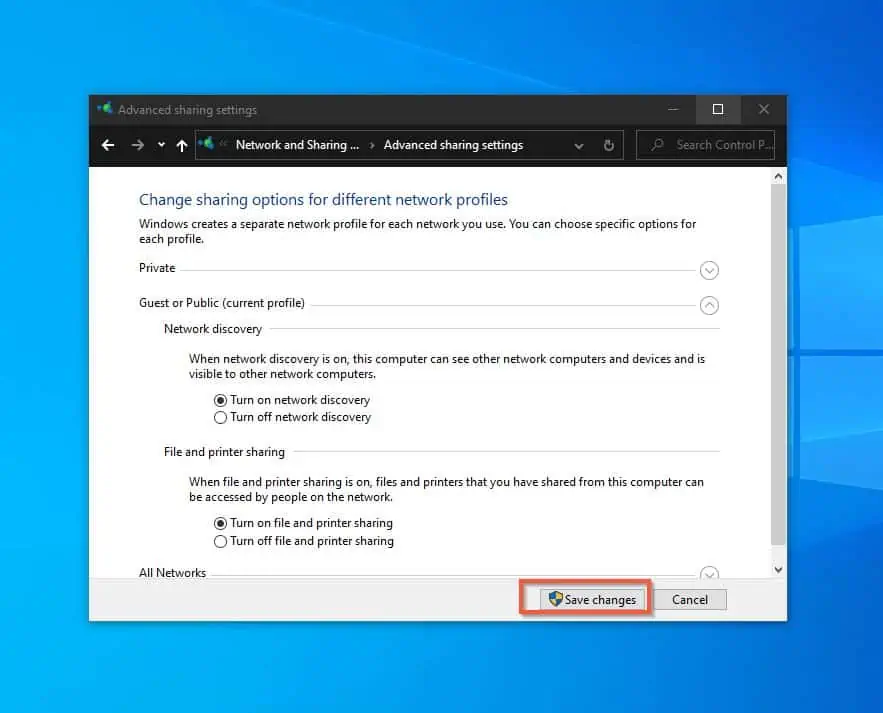
- Then, click Save changes at the bottom right corner of the Advanced sharing settings window.
After doing all that, check if the problem has been resolved. If it isn’t and you still can’t see WiFi networks on your Windows 10 PC, try out the other solutions below.
Solution 2: Run Some Commands on the Command Prompt
Another way to fix your Windows 10 PC if you can’t see WiFi networks is to run some commands in the command prompt. To achieve that, follow the procedures below.
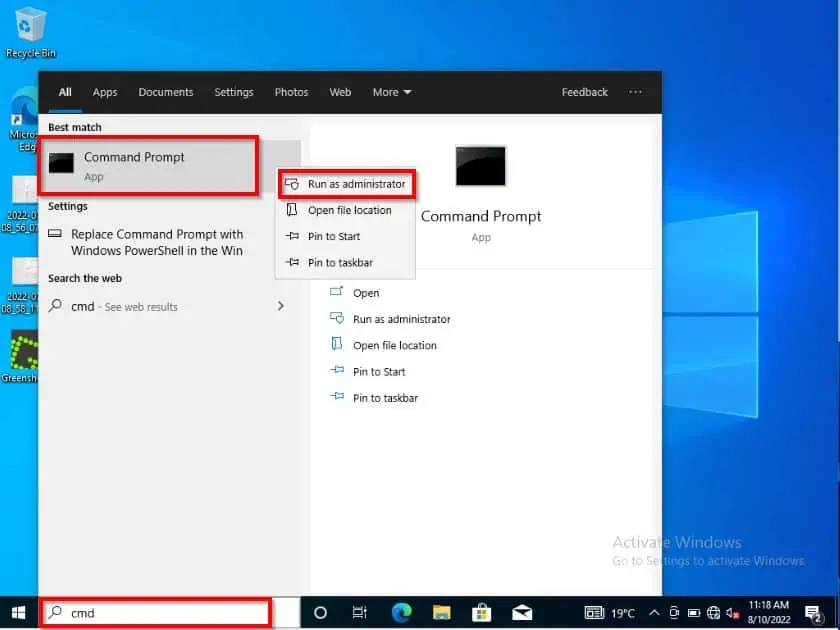
- Click the search field on your Windows 10 taskbar and type “cmd’. Then, right-click the Command Prompt app from the search result and select Run as administrator.
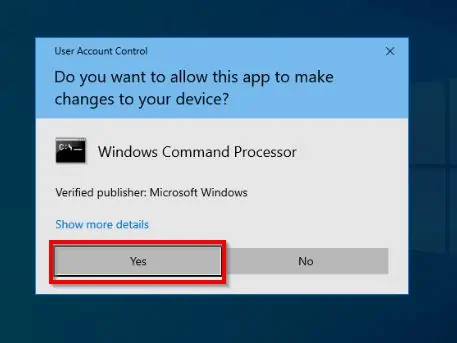
- After that, you will receive a User Account Control prompt requesting permission to allow the app to make changes to your computer. Select Yes to continue.
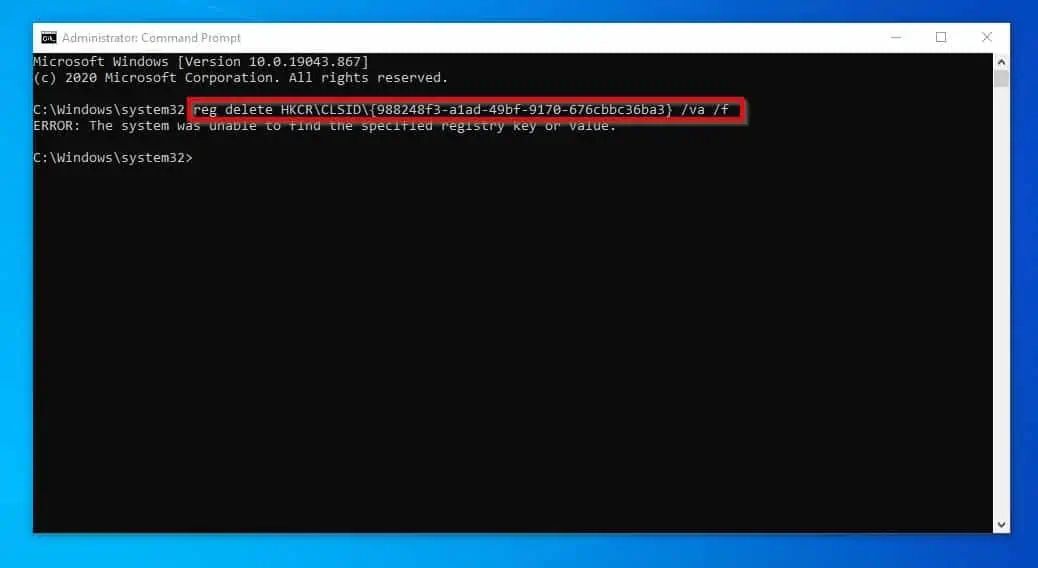
- Then, when the Command Prompt application opens, type the commands below and press Enter.
reg delete HKCR\CLSID\{988248f3-a1ad-49bf-9170-676cbbc36ba3} /va /f
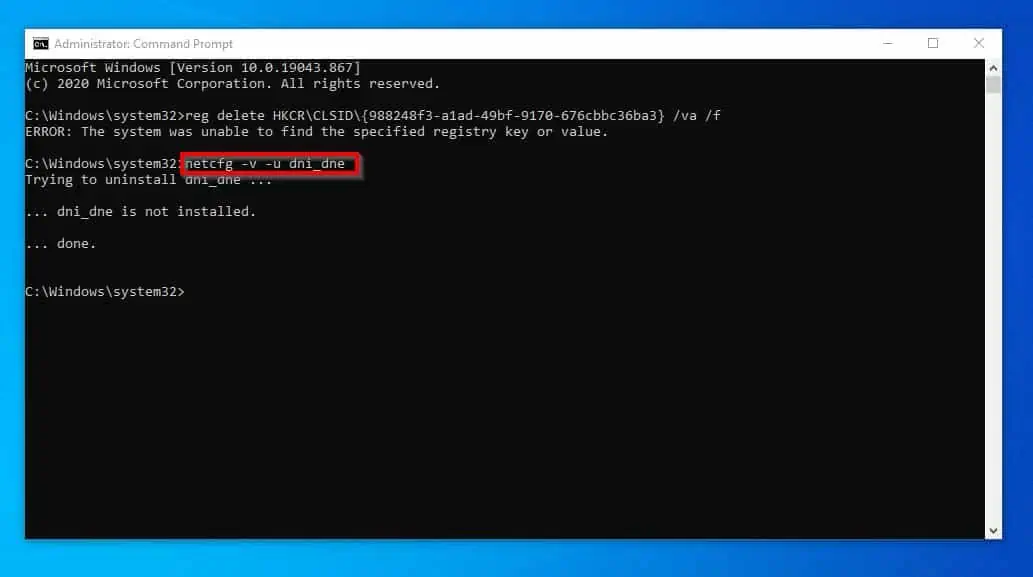
- After doing that, input the commands below and press Enter on your keyboard.
netcfg -v -u dni_dne
- Finally, restart your computer, and the problem should be fixed by now. However, if you still can’t see WiFi networks on your Windows 10 PC, check out the last solution in this guide.
Solution 3: Enable Some Windows Services
There are certain Windows services that, if not running, can cause Windows 10 not to display WiFi.
Hence, we have to enable these Windows services in order to fix the problem. To do that, follow the steps as well as the screenshots below.
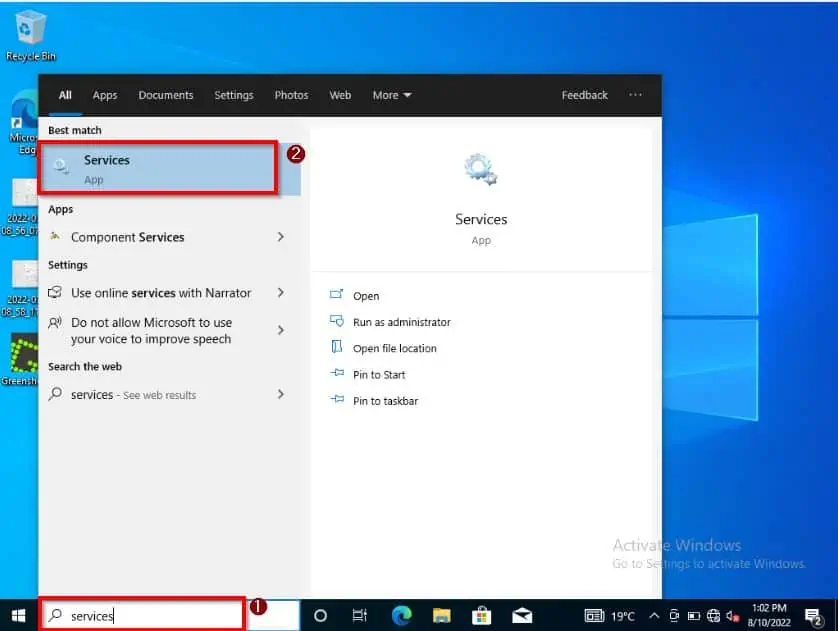
- Click the Windows 10 search field on the taskbar and type “services”. Then, select the Services app from the search result.
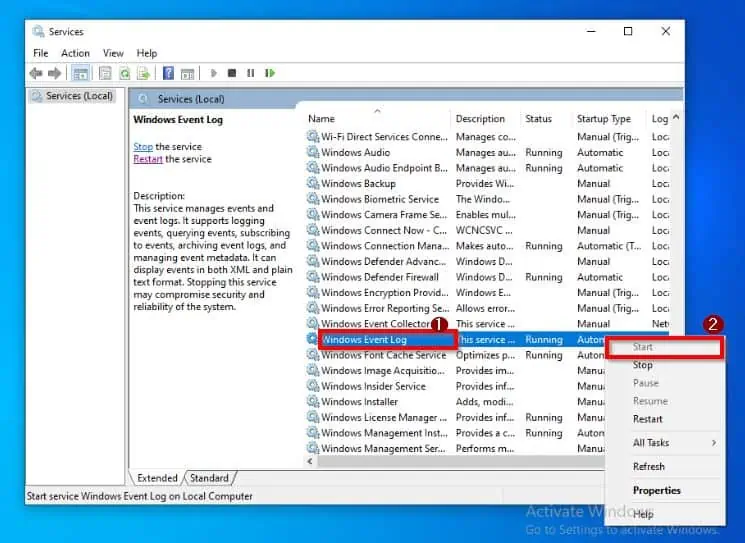
- After that, locate the Windows Event Log service and check if it is running. If it isn’t running, right-click it and select Start.
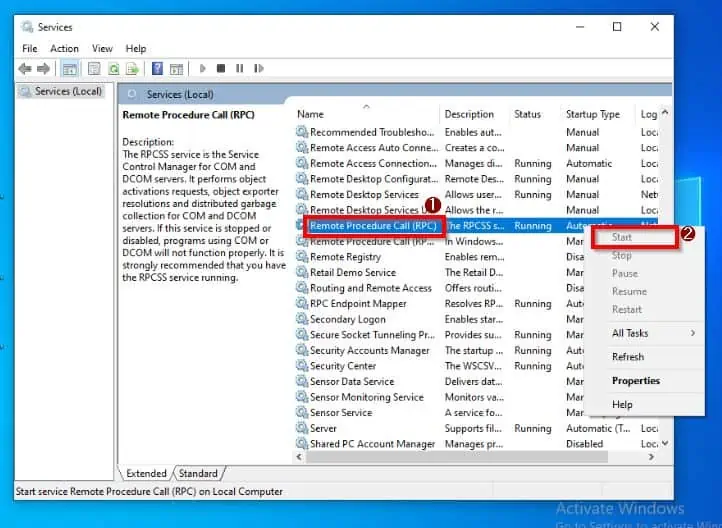
- Then, locate the Remote Procedure Call (RPC) service and make sure it is also running. If it isn’t, right-click it and select Start from the options that appear.
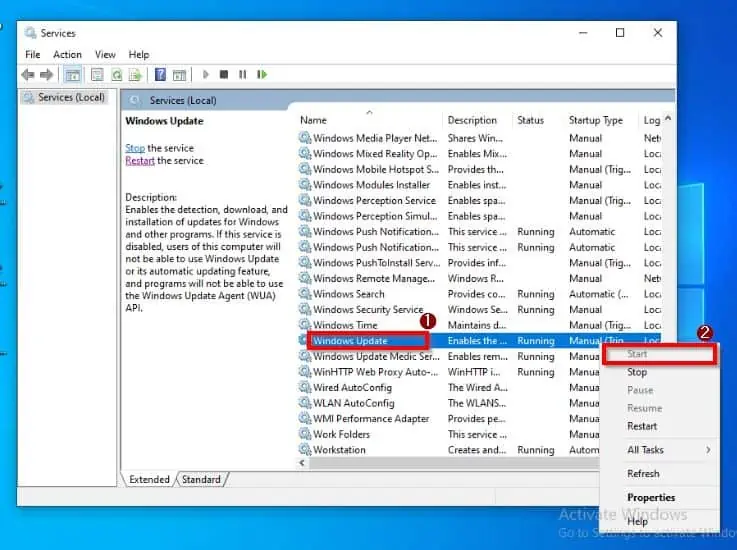
- When you are done with that, locate the Windows Update service and make sure it is also running. If this service isn’t running, right-click it and select Start from the options that appear.
- Lastly, restart your Windows 10 computer, and you should be able to see WiFi networks.
Frequently Asked Questions
It is normal for new features to be added during an update. This may sometimes result in the change of already existing settings on the computer.
Sadly, the network settings might just be one of them.
Follow the steps below to find Wi-Fi networks on your Windows 10 PC.
a) Click the Windows 10 Start menu
b) Then, select the Setting icon
c) After that, select Network & Internet
d) Then, click Show available networks
The full meaning of Wi-Fi is Wireless Fidelity.
To see all the WiFi networks on your Windows 10 computer using CMD, follow the steps below.
a) Click the search field on the taskbar and type “cmd”.
b) Then, right-click the Command Prompt application from the search result and select Run as administrator.
c) After that, a User Account Control prompt should appear requesting permission to allow the app to make changes to your PC – select Yes to continue.
d) To start the “WLAN AutoConfig service”, enter “net start wlansvc” (do not include the quotes), then press enter
e) Then, type – “netsh wlan show profiles” (without the quotes) – and the WiFi networks on your Windows 10 PC should appear.
No, you cannot connect to a WiFi network when your computer is in airplane mode.
Conclusion
Not being able to connect your Windows 10 PC to a WiFi network so as to access the internet can be annoying. Hopefully, with the solutions provided in this guide, you can say goodbye to that problem for good.
Specifically, we discussed three solutions to fix Windows 10 if you can’t see WiFi networks. Firstly, we talked about how to solve the problem by turning on network discovery.
Secondly, we looked at a solution that involves using Command Prompt. That’s not all, we also discussed how to fix the issue by enabling some Windows services.
I hope you found this guide helpful. If you did, click on “Yes” beside the “Was this page helpful” question below.
You may also express your thoughts and opinions by using the “Leave a Comment” form at the bottom of this page.
Finally, for more Windows 10 fix-it guides, visit our Windows 10 Fix-it guides page.