Do you want to configure your Discourse forum S3 backup and S3 CDN but you need help configuring it? In this guide, I’ll teach you how to save your Discourse forum’s S3 backup in DigitalOcean Spaces.
When you configure Discourse to save S3 backups on a cloud storage, you may also configure the setting that allows some static Dicourse assets to be copied to the cloud storage.
Then, add a CDN to serve those static assets. This guide include steps to configure StackPack CDN to deliver the static assets saved in your cloud storage.
Step 1: Create a DigitalOcean Space
The first step is to create a DigitalOcean Spaces for your S3 backup.
Follow the steps below to create a DigitalOcean Space for your Discourse forum S3 backup.
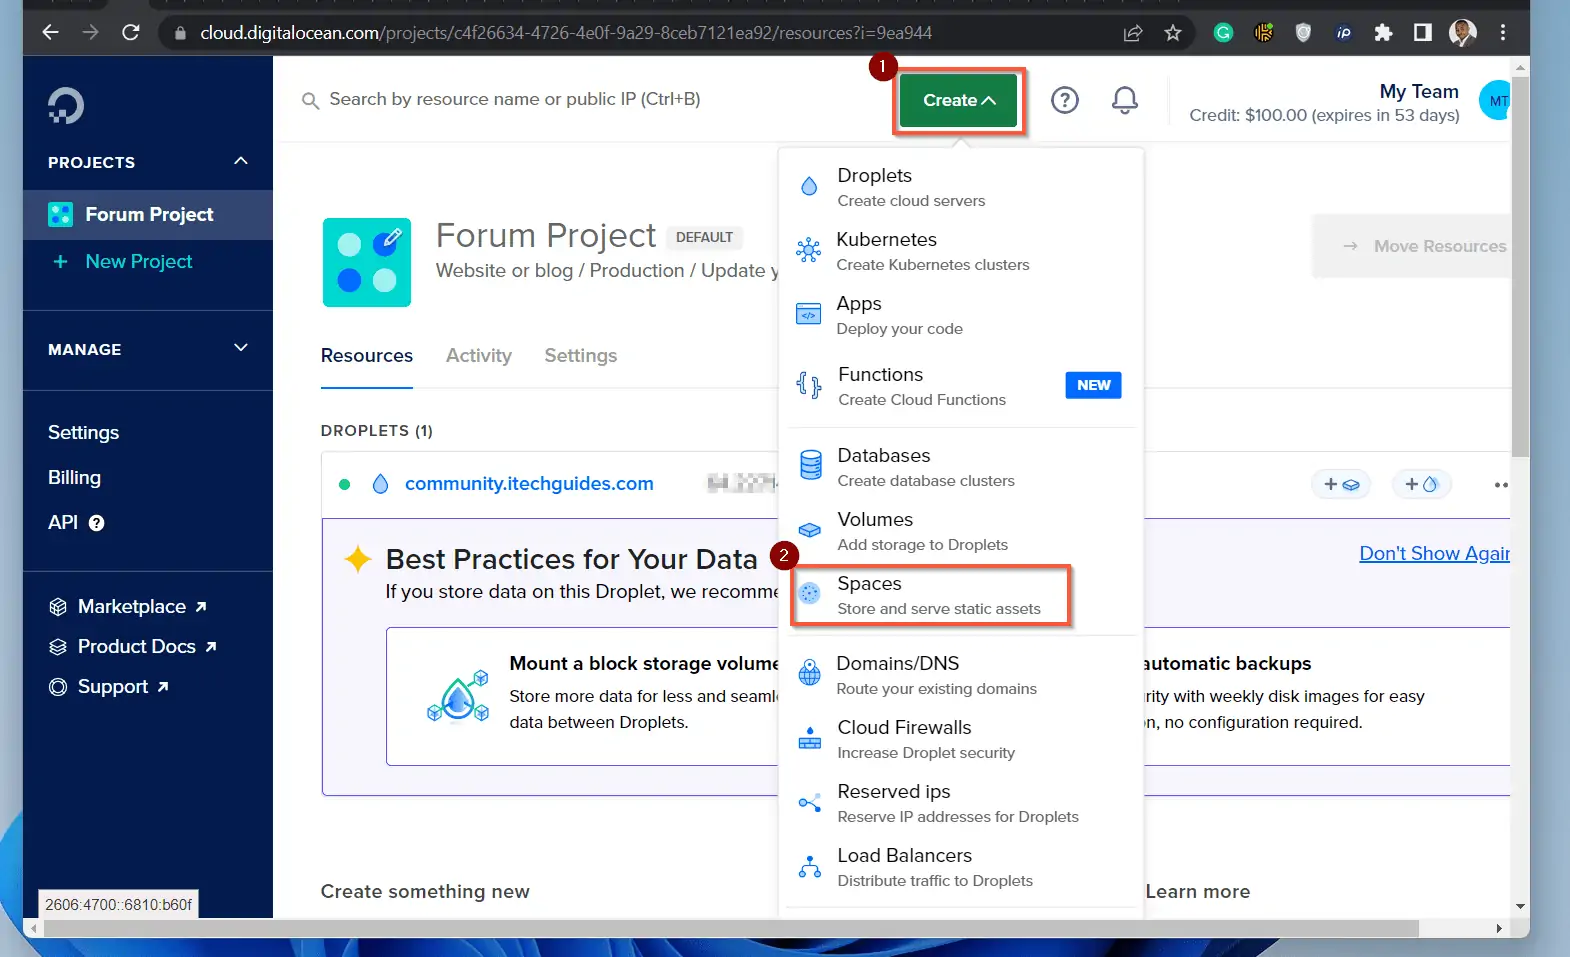
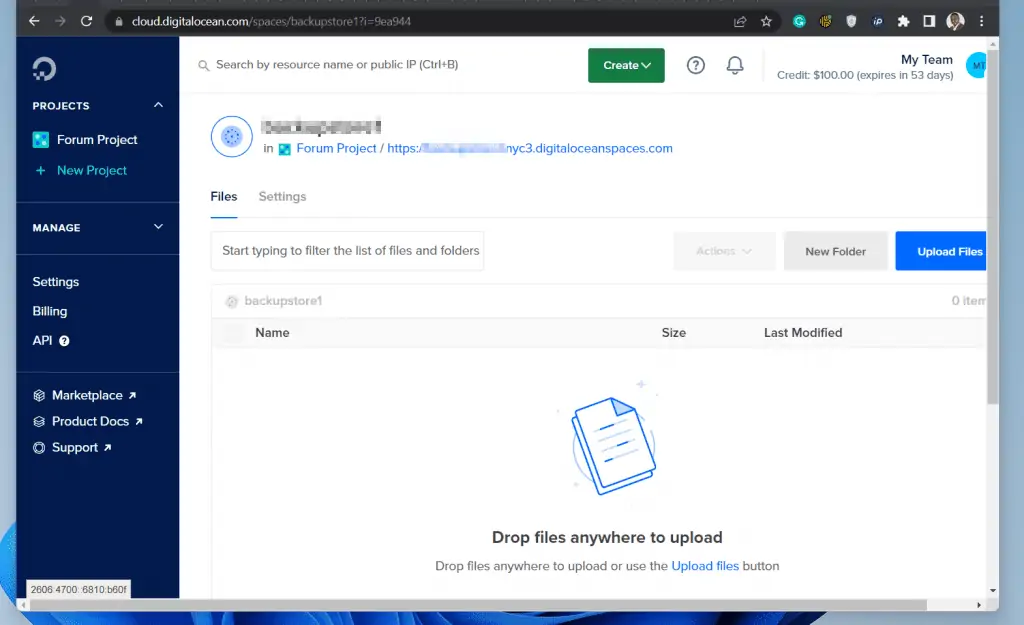
- Log in to your DigitalOcean account. Then, on the top right, click the top right, click the Create button drop-down, and select Spaces.
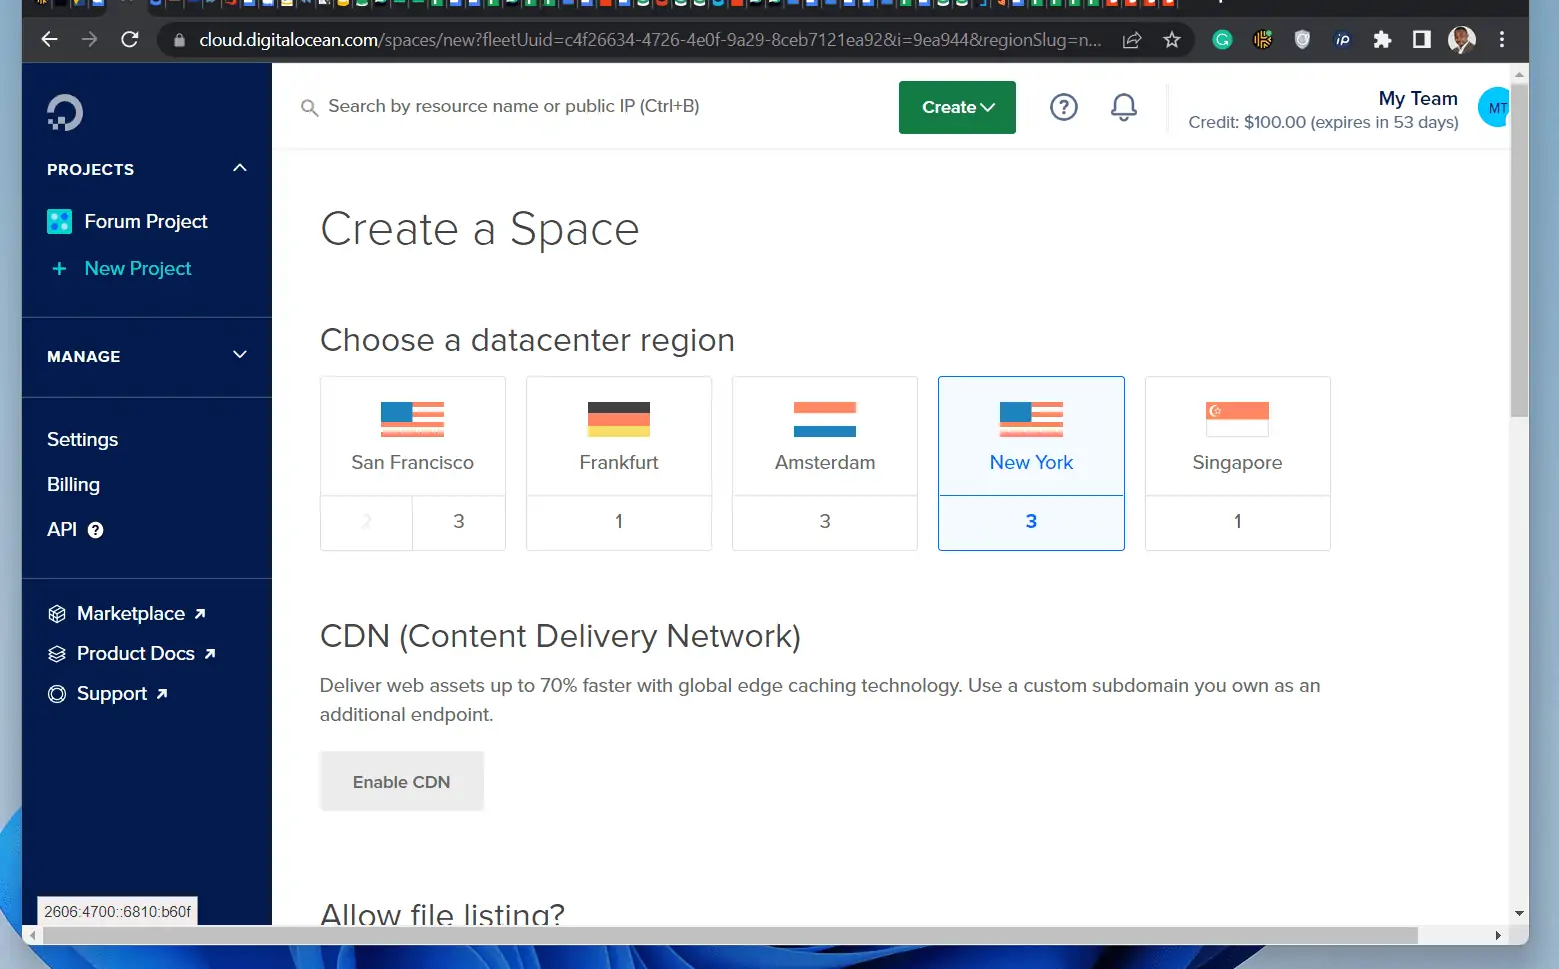
- On the Create a Space page, select a data center close to your users. Then, scroll down to Finalize and Create section and give the Space a name – see the screenshot in step 3 below.
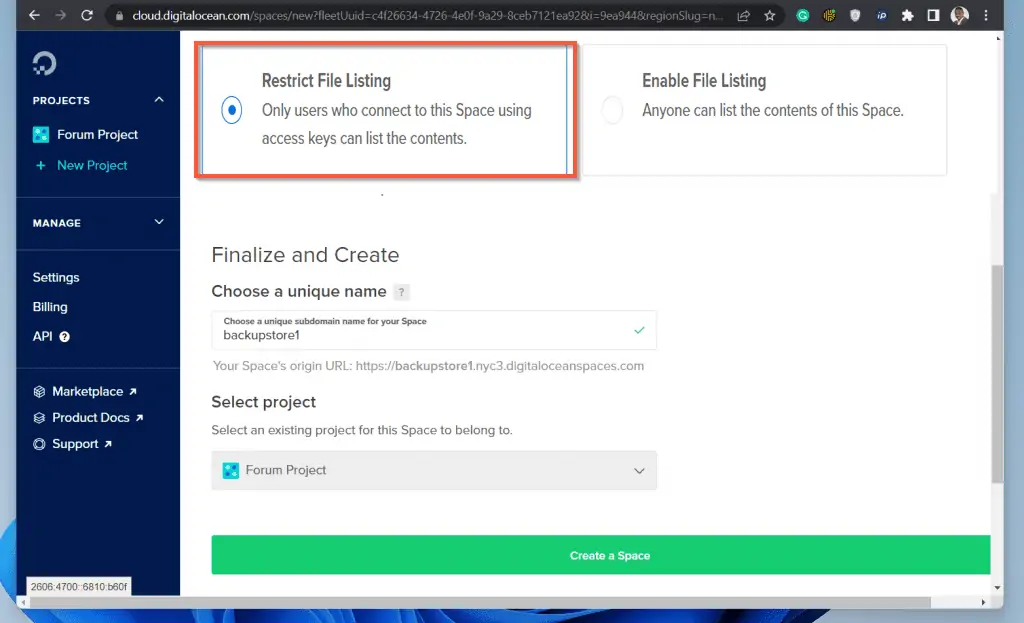
- Finally, to create the DigitalOcean Space to store Discourse forum backup in S3, select Restrick File Listing (default), then click Create a Space.
- Once you receive a confirmation that the Space has been created, move to the next section.
Step 2: Create a StackPath CDN
Before you can finally configure Discourse forum S3 backup, you need to create a CDN. This CDN is not required for the backup to work.
Rather, it is another layer of the configuration that allows some Discourse static assets to be copied to the cloud storage and served from there.
The CDN that points to your Discourse hostname is defined in the DISCOURSE_CDN_URL. On the other hand, the CDN you’re about to set up is defined in DISCOURSE_S3_CDN_URL. This CDN points to your cloud object storage bucket.
You need the DigitalOcean Space bucket URL to create a StackPath CDN. So, ensure that you completed the steps in the last section before you proceed with the steps below:
- Log in to your StackPath account. If you do not have a StackPath account, create one.
- Once you have logged in, on the left pan, click Sites.

- Then, on the top menu, click Create, then select Sites from the list.
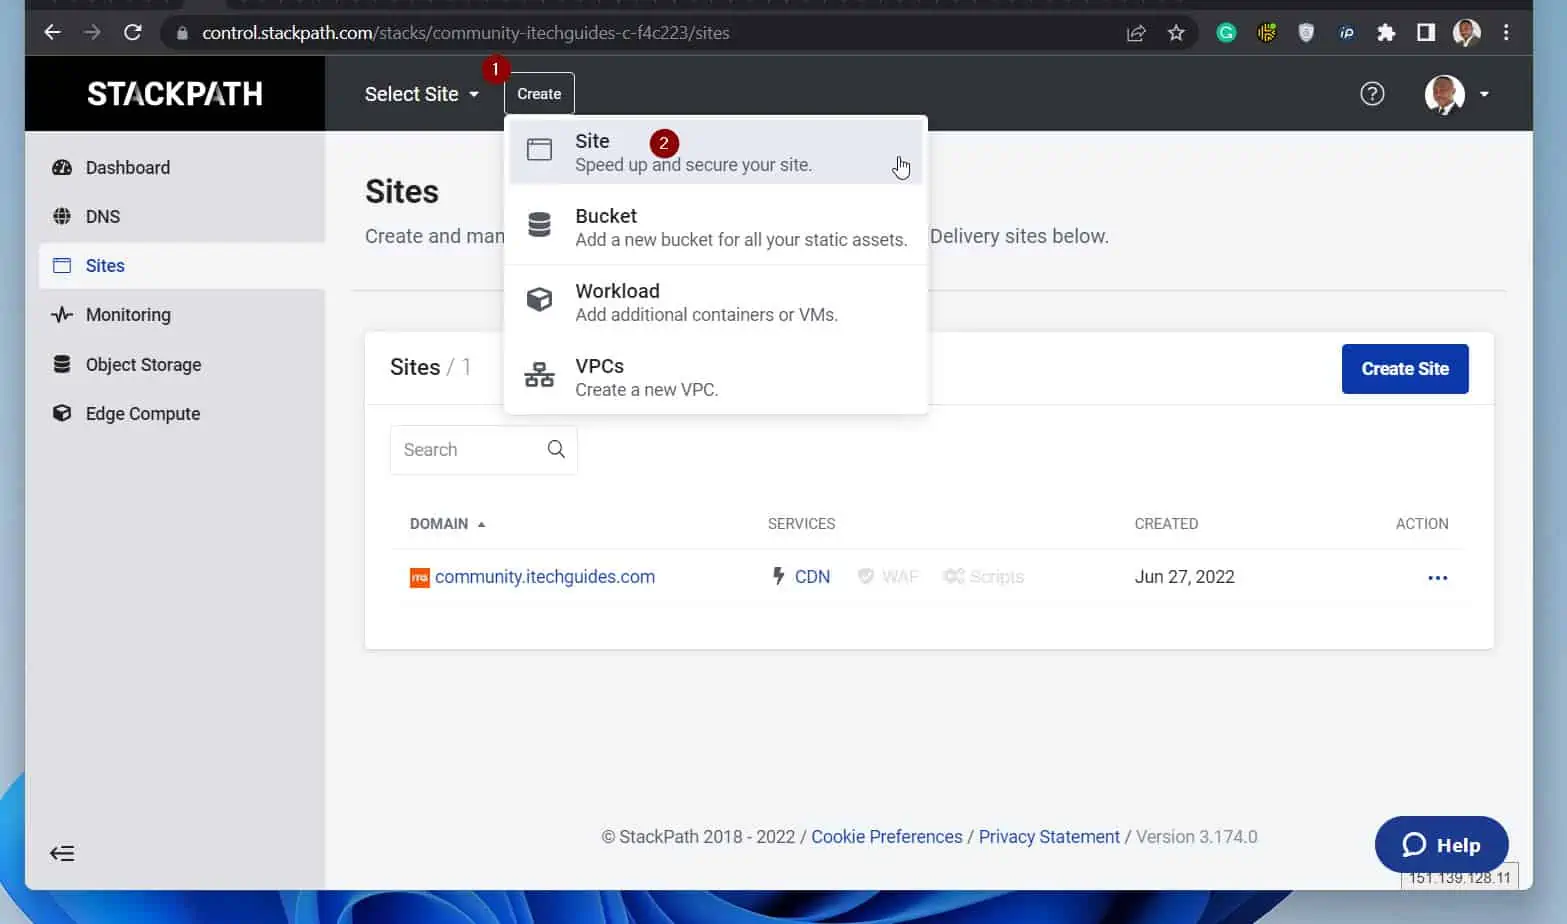
- On the first page of the Create Site wizard, select the second option, Select Static Assets.

- Then, on the next page that loads, enter the CDN URL you wish to you. You can use the naming convention <DigitalOcean-Space-Name>-cdn.yourdomainname.com.
I am using backupstore1-cdn.www.itechguides.com.
Secondly, ensure that Content Delivery Network (CDN) is checked. Finally, click Set Up Your Domain.

- When the next page loads, on the “Origin Hostname / IP Address” field, enter the full URL of your DigitalOcean Spaces URL. Finally, click Complete Setup.


- When you clicked Complete Setup in step 5, StackPath will display the DNS record you need to add to your domain.
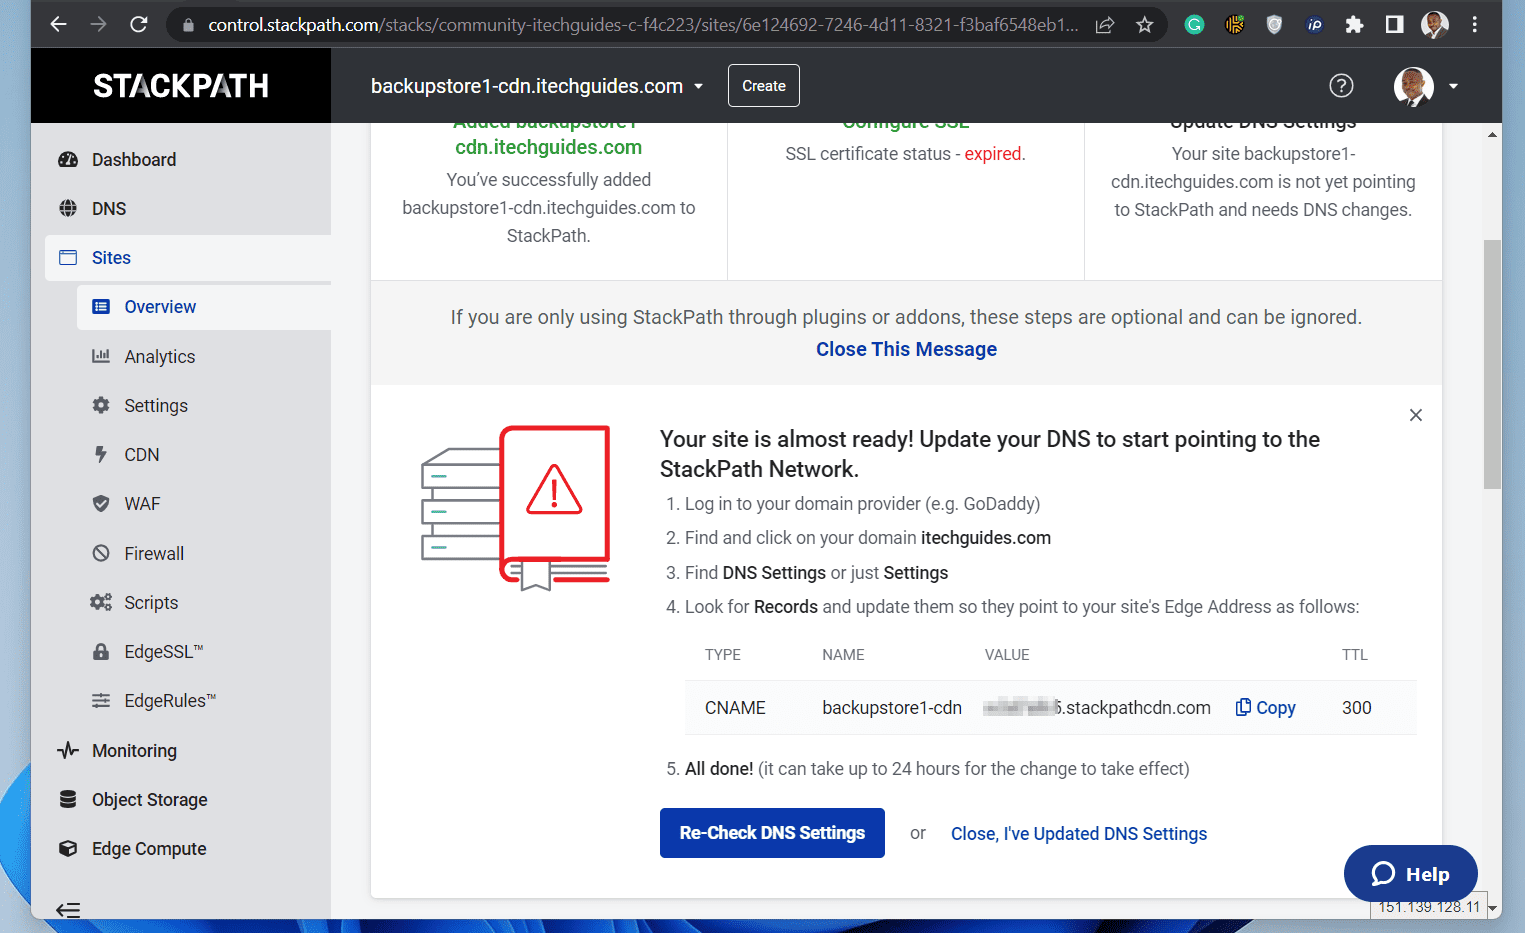
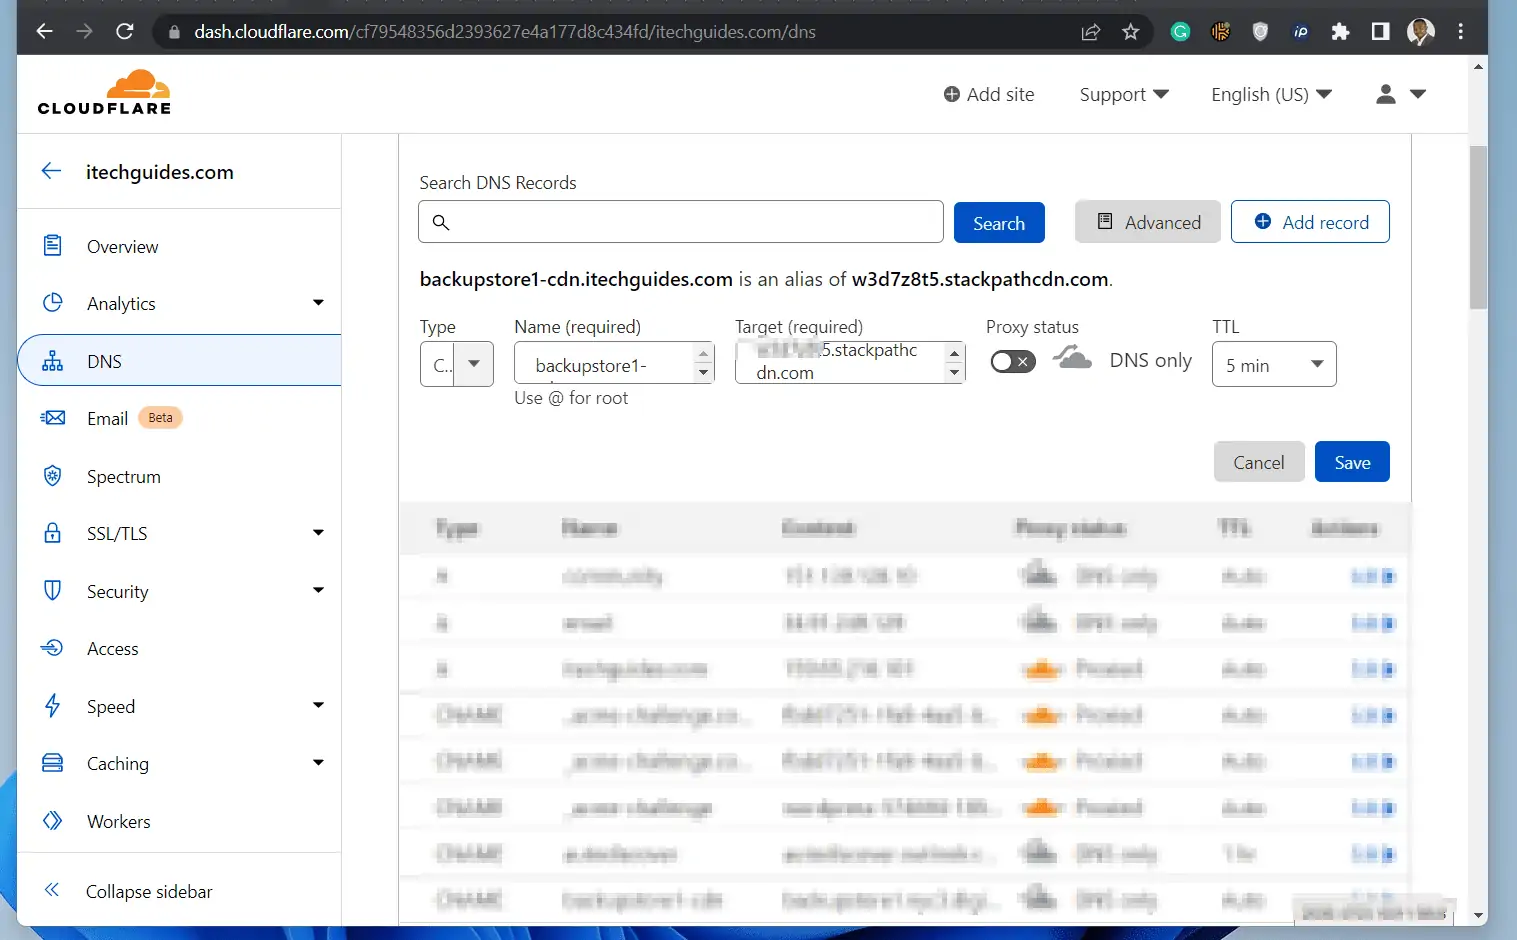
- Login to your DNS provider’s site and add the CNAM record. In this example, I am using Cloudflare. If you use Cloudflare, when you add the CNAM record, make sure you uncheck Proxy status.
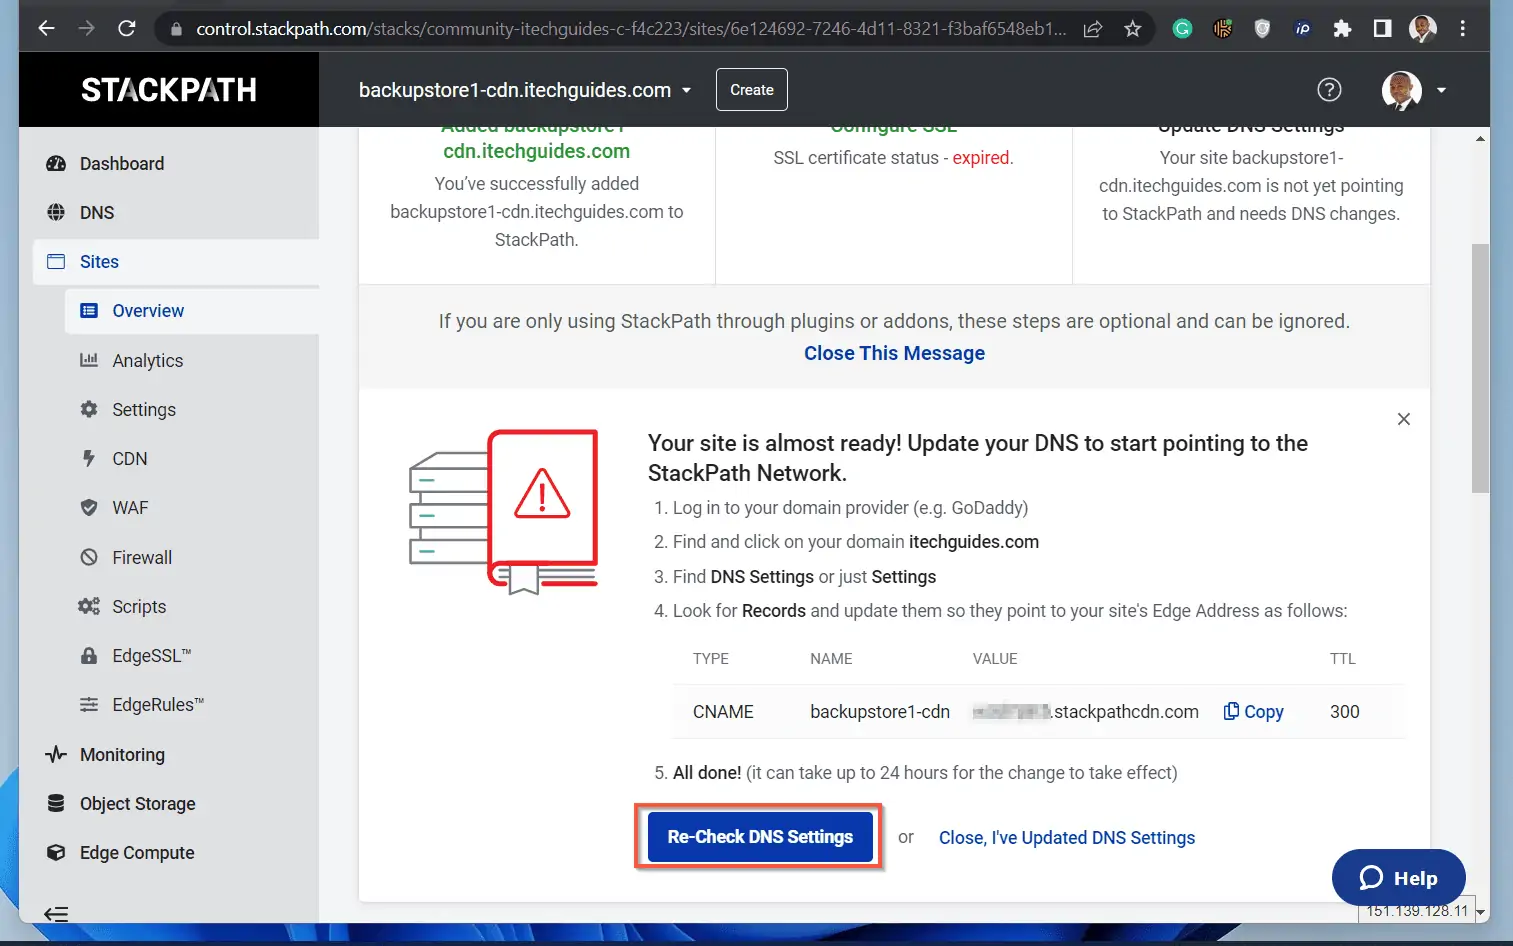
- Once you have completed step 7, return to StackPath and click Re-Check DNS Setup. If you got the configuration right, StackPath should display that setup is complete.
Then, it will display the Overview section of the new CDN site you just created. You’re not done yet – see step 9 for the next task.
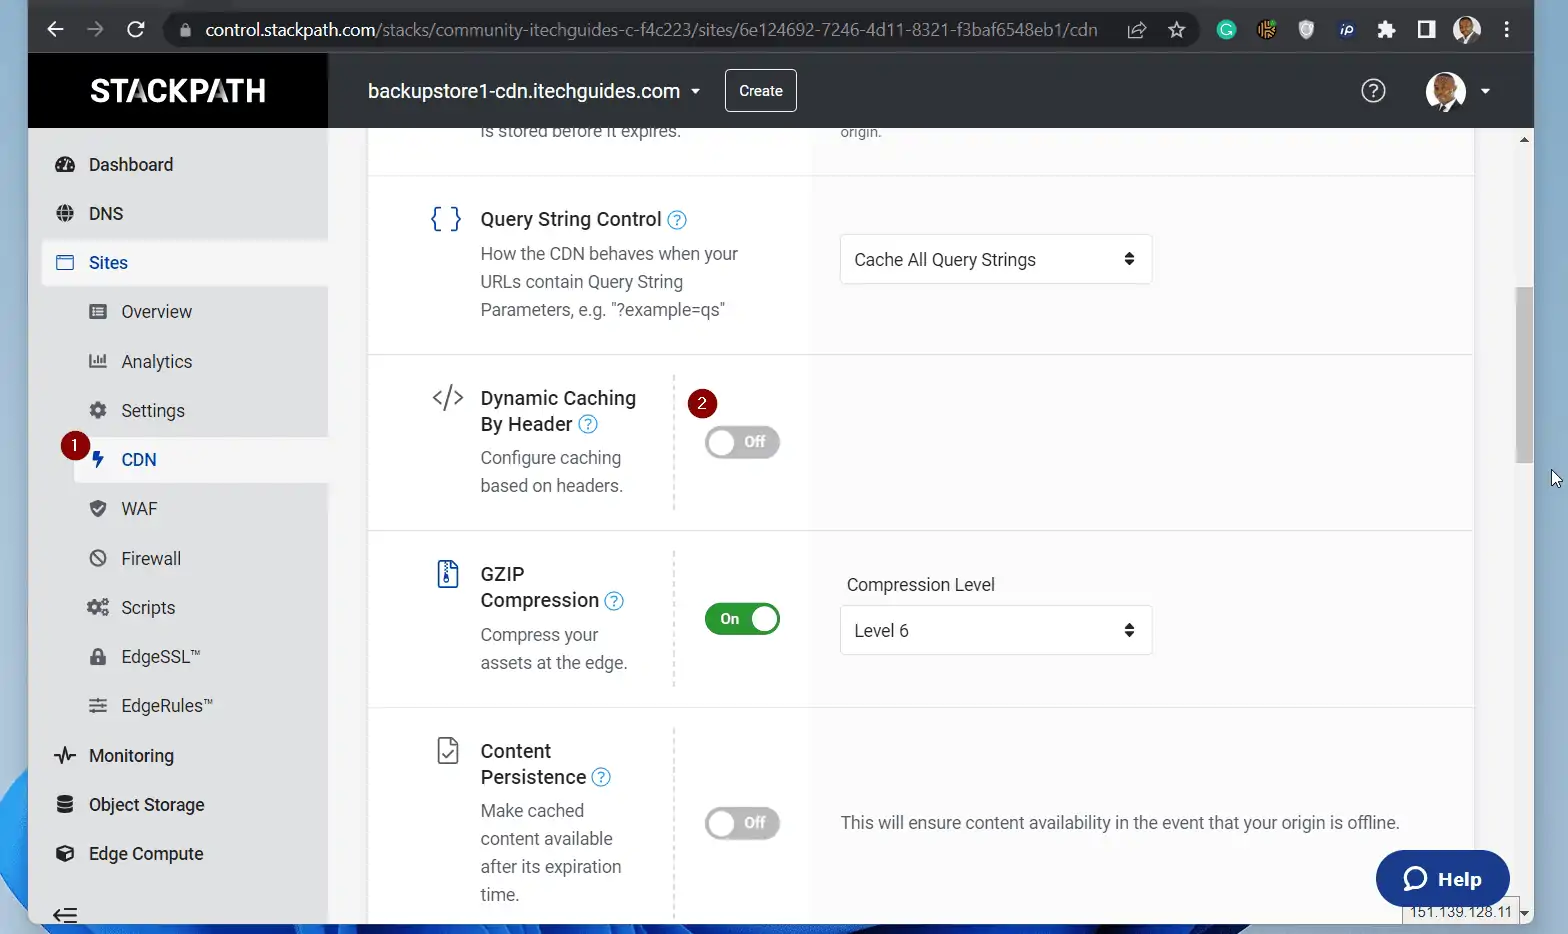
- On the left pane, click CDN. Then, on the CDN page, turn on Dynamic Caching By Header.
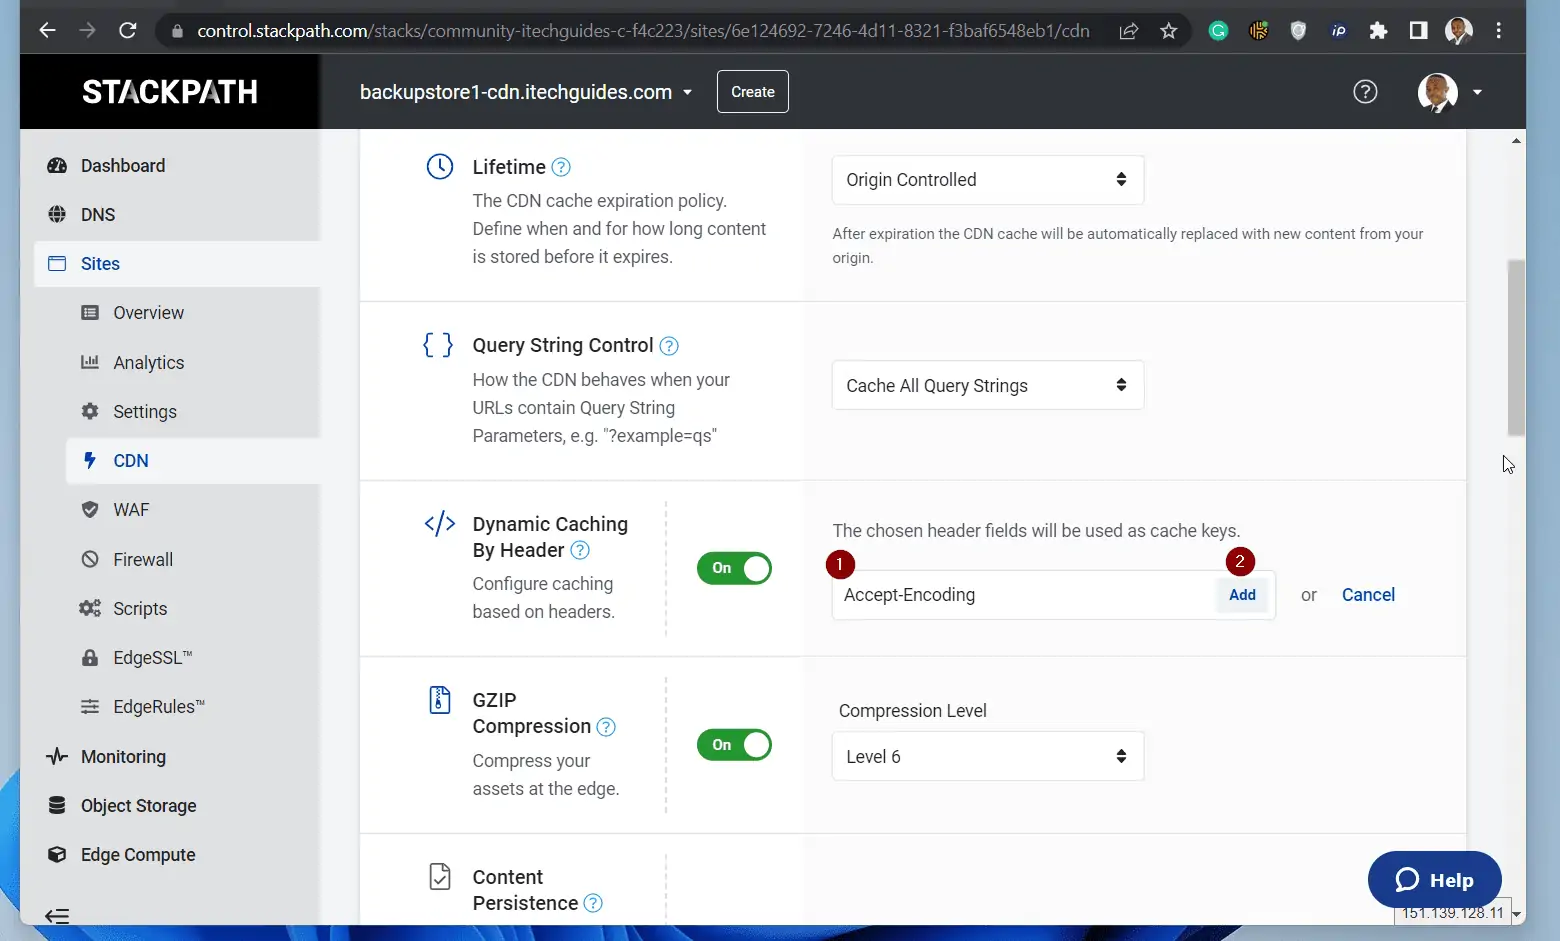
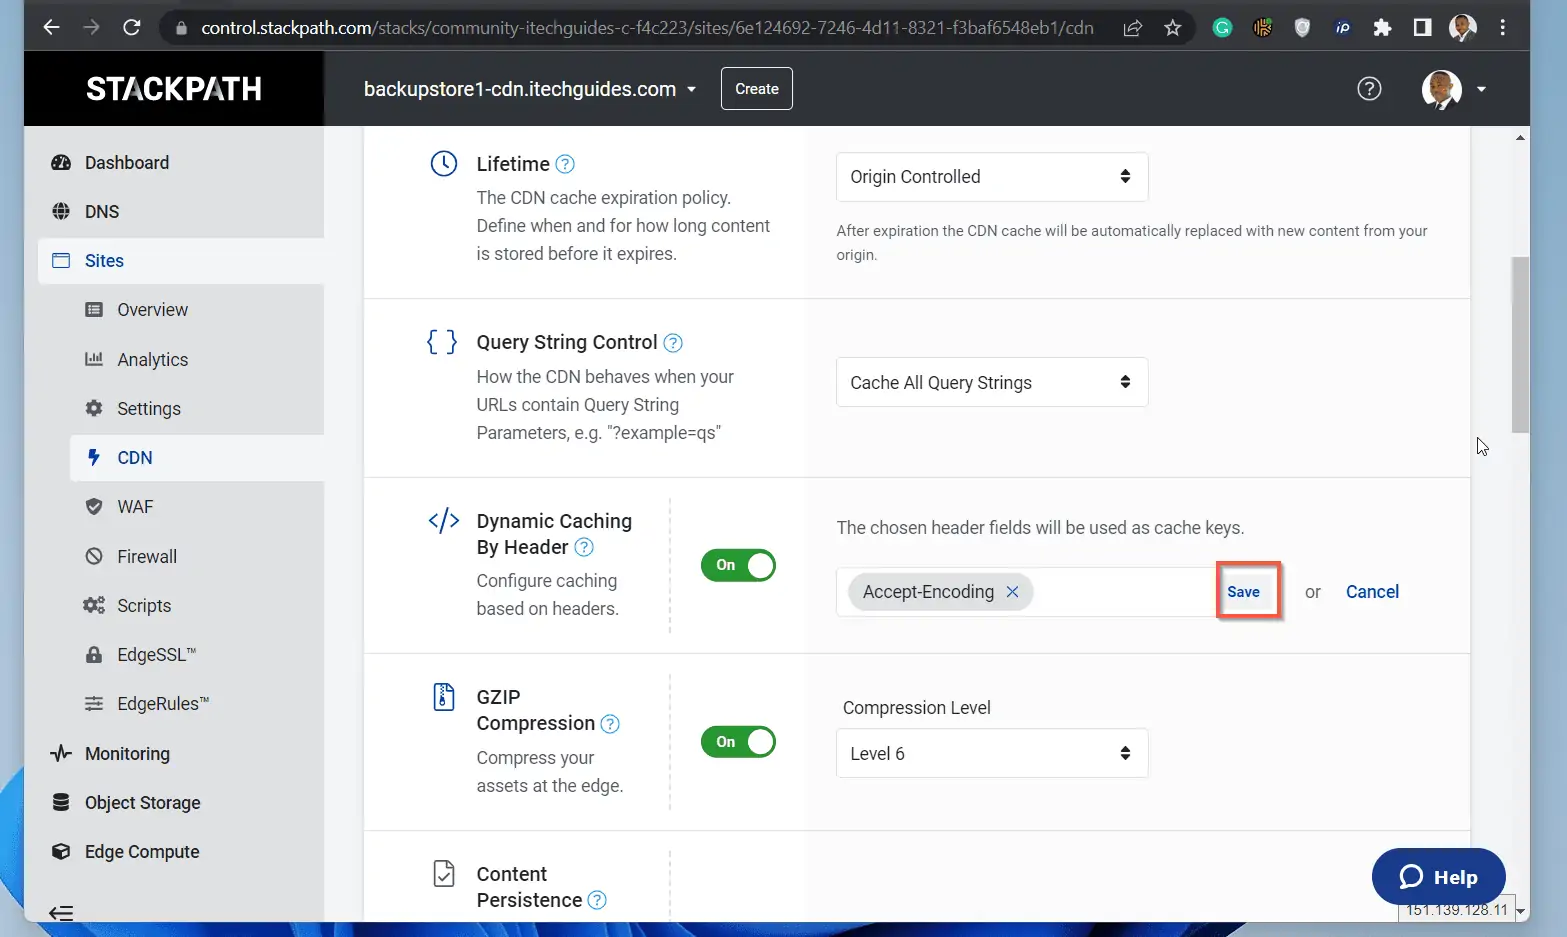
- On the Enter Header Fields field, enter Accept-Encoding and click Add. Finally, to save the host header, click Save.
- Next, click EdgeSSL and turn Force HTTPS Connections on.
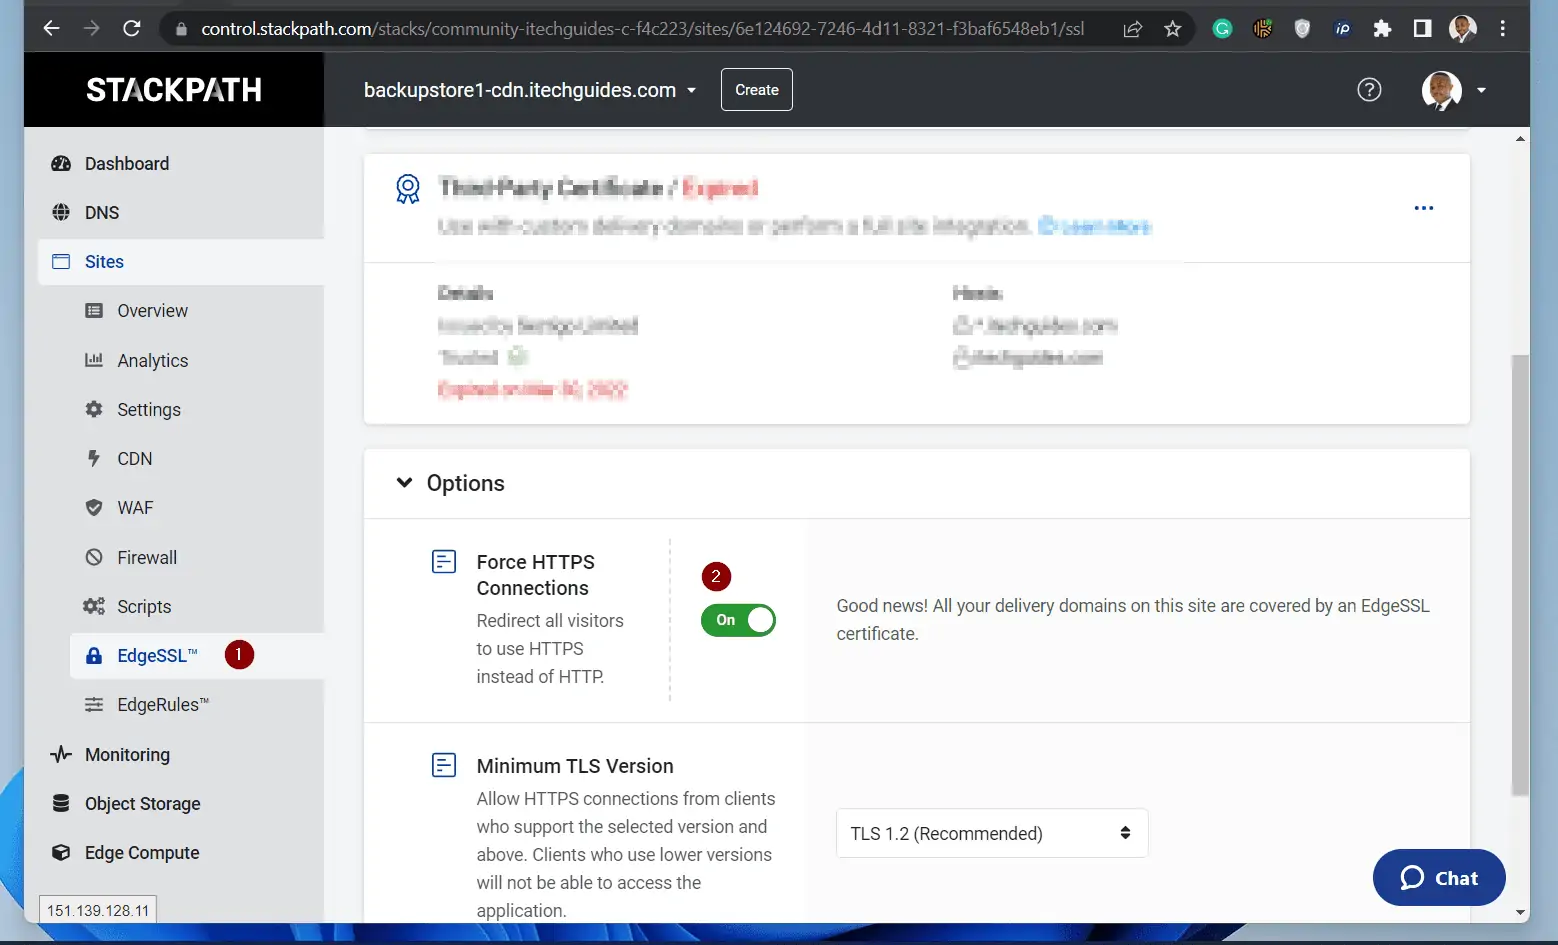
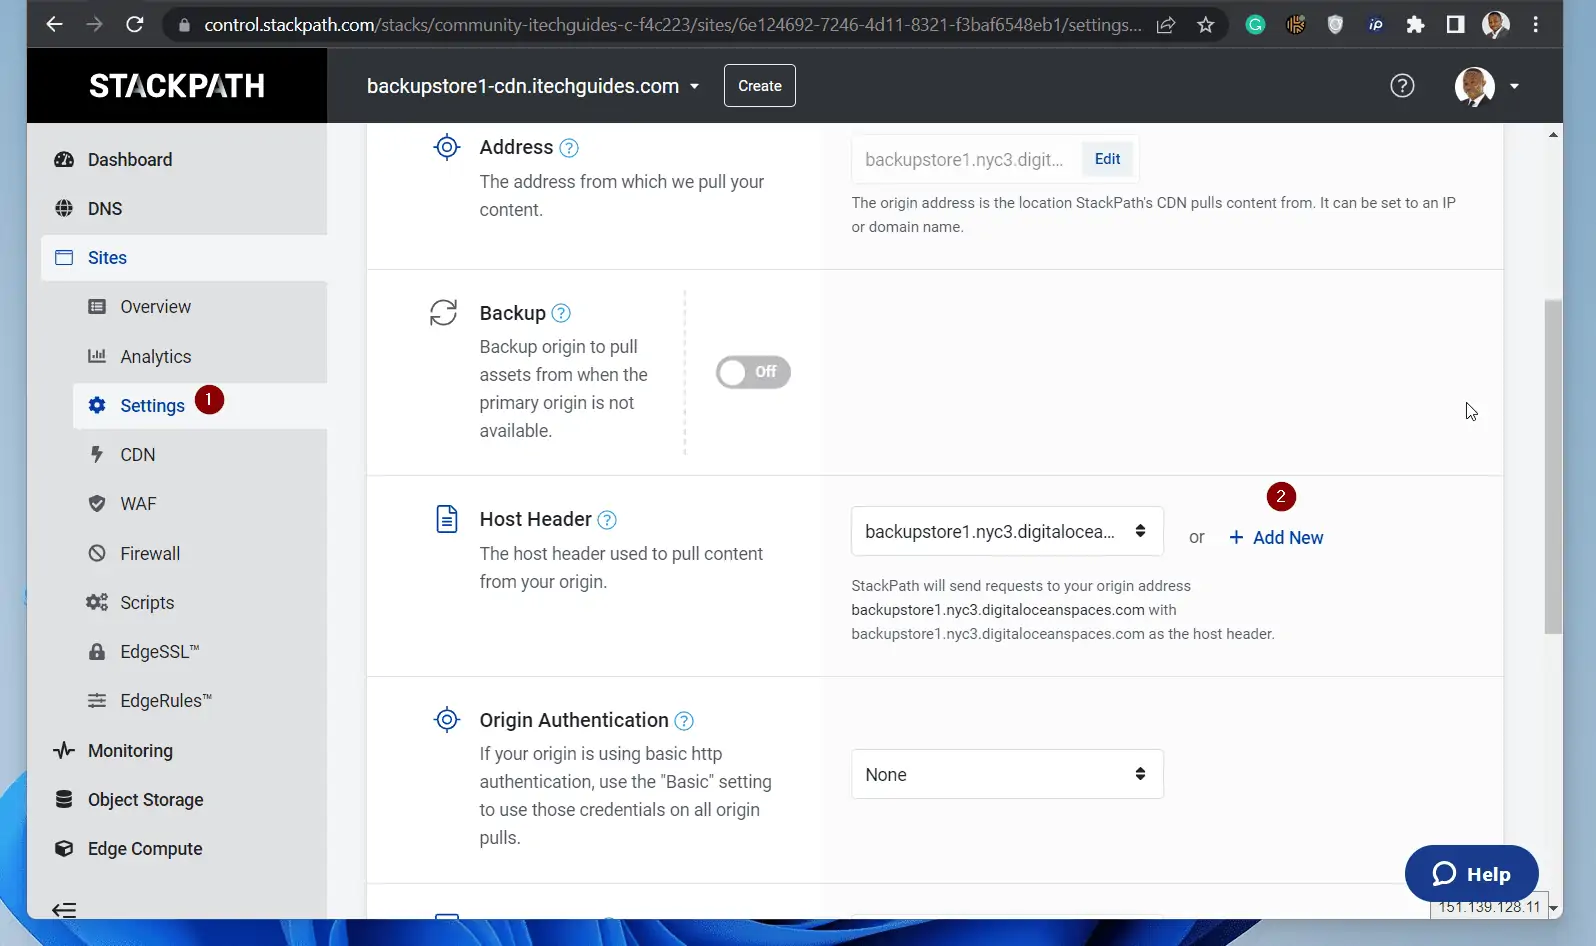
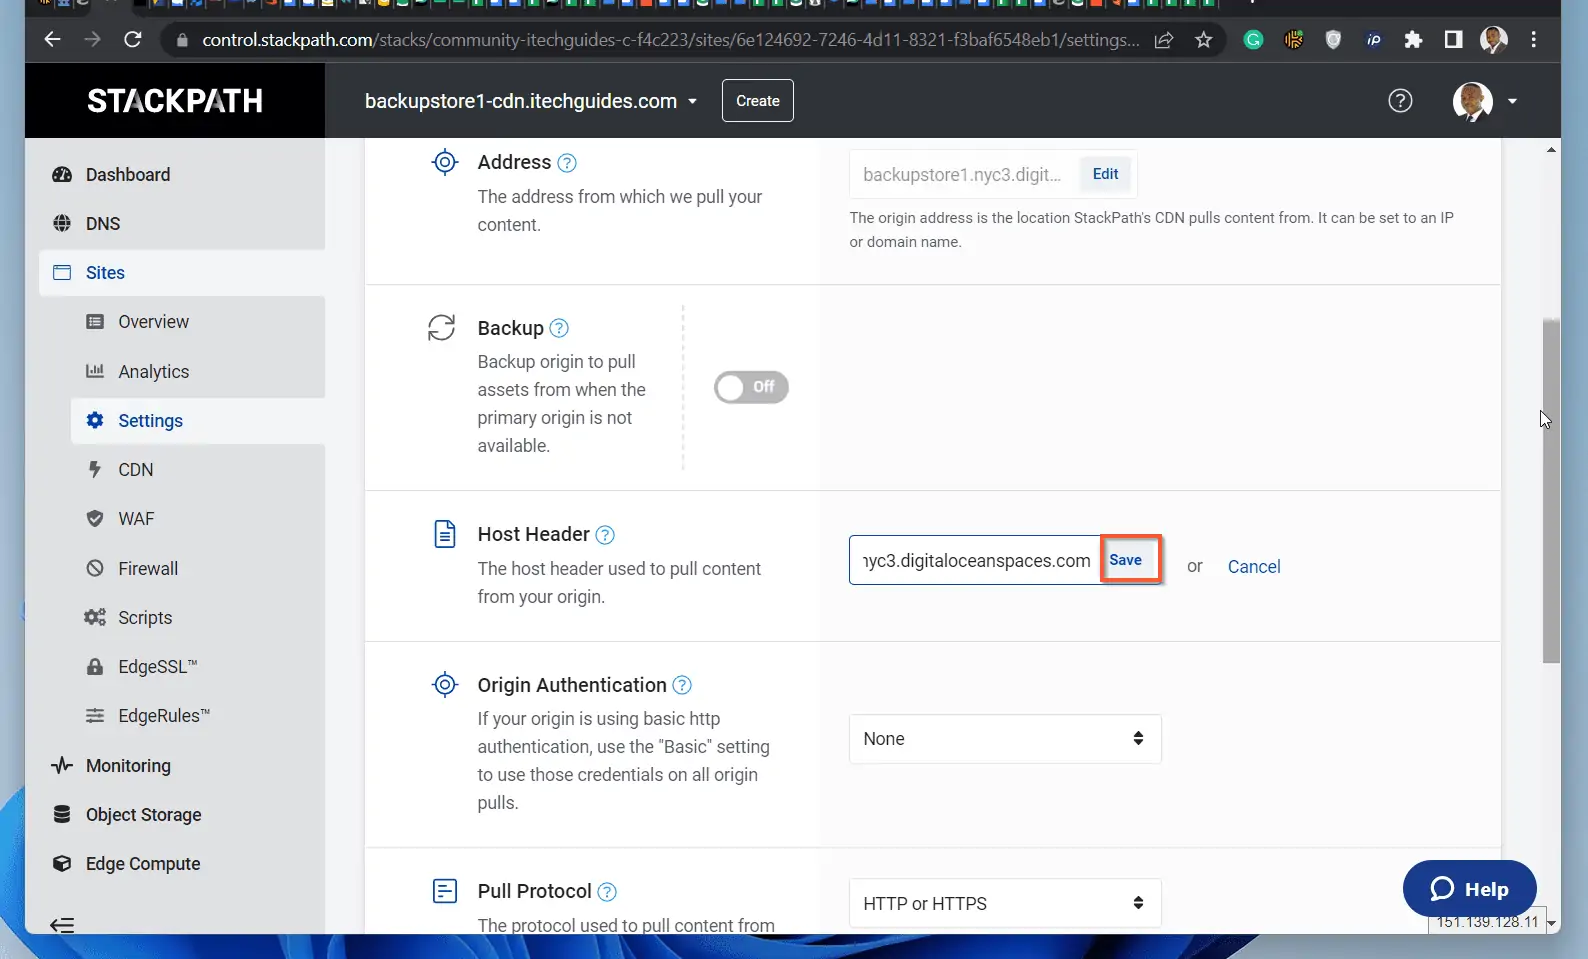
- Finally, click Settings. Then, in the Host Header section click Add.
Then, add the full URL for your Digital Space (DO NOT include the https://) and click Save. When you finish, make sure that the bucket URL is displayed as the Host header.
Step 3: Update the Discourse Configuration
Now that you have created a DigitalOcean Space, and created a StackPath CDN to point to that cloud storage, it is time to configure Discourse forum S3 backup.
In this section, you will modify the app.yml file in your Discourse Forum instance. But first, let’s put the information we need together.
In the next few steps, you will update the lines of code shown below with your own configurations.
  DISCOURSE_USE_S3: true
  DISCOURSE_S3_REGION: whatever
  DISCOURSE_S3_ENDPOINT: https://nyc3.digitaloceanspaces.com
  DISCOURSE_S3_ACCESS_KEY_ID: myaccesskey
  DISCOURSE_S3_SECRET_ACCESS_KEY: mysecretkey
  DISCOURSE_S3_CDN_URL: https://falcoland-files-cdn.falco.dev
  DISCOURSE_S3_BUCKET: falcoland-files
  DISCOURSE_S3_BACKUP_BUCKET: falcoland-files/backups
  DISCOURSE_BACKUP_LOCATION: s3
Follow the steps below to find the relevant information.
- Back in your DigitalOcean profile, with the previous Space you created open, click Settings.
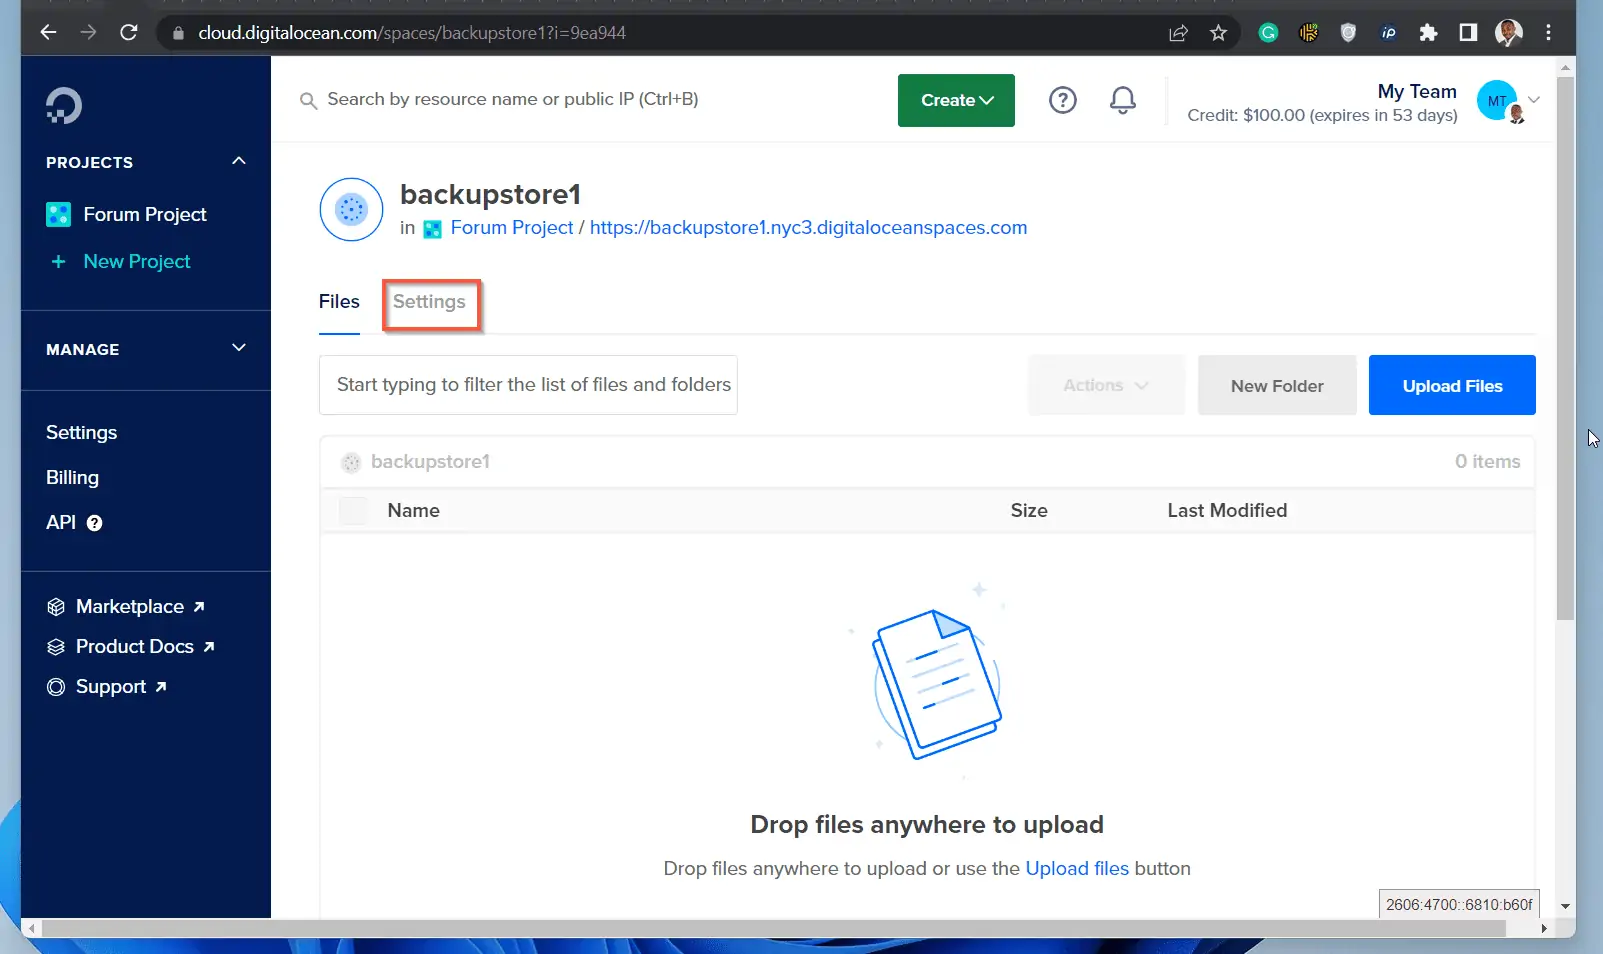
- Then, scroll down to the Endpoint section and click Copy.
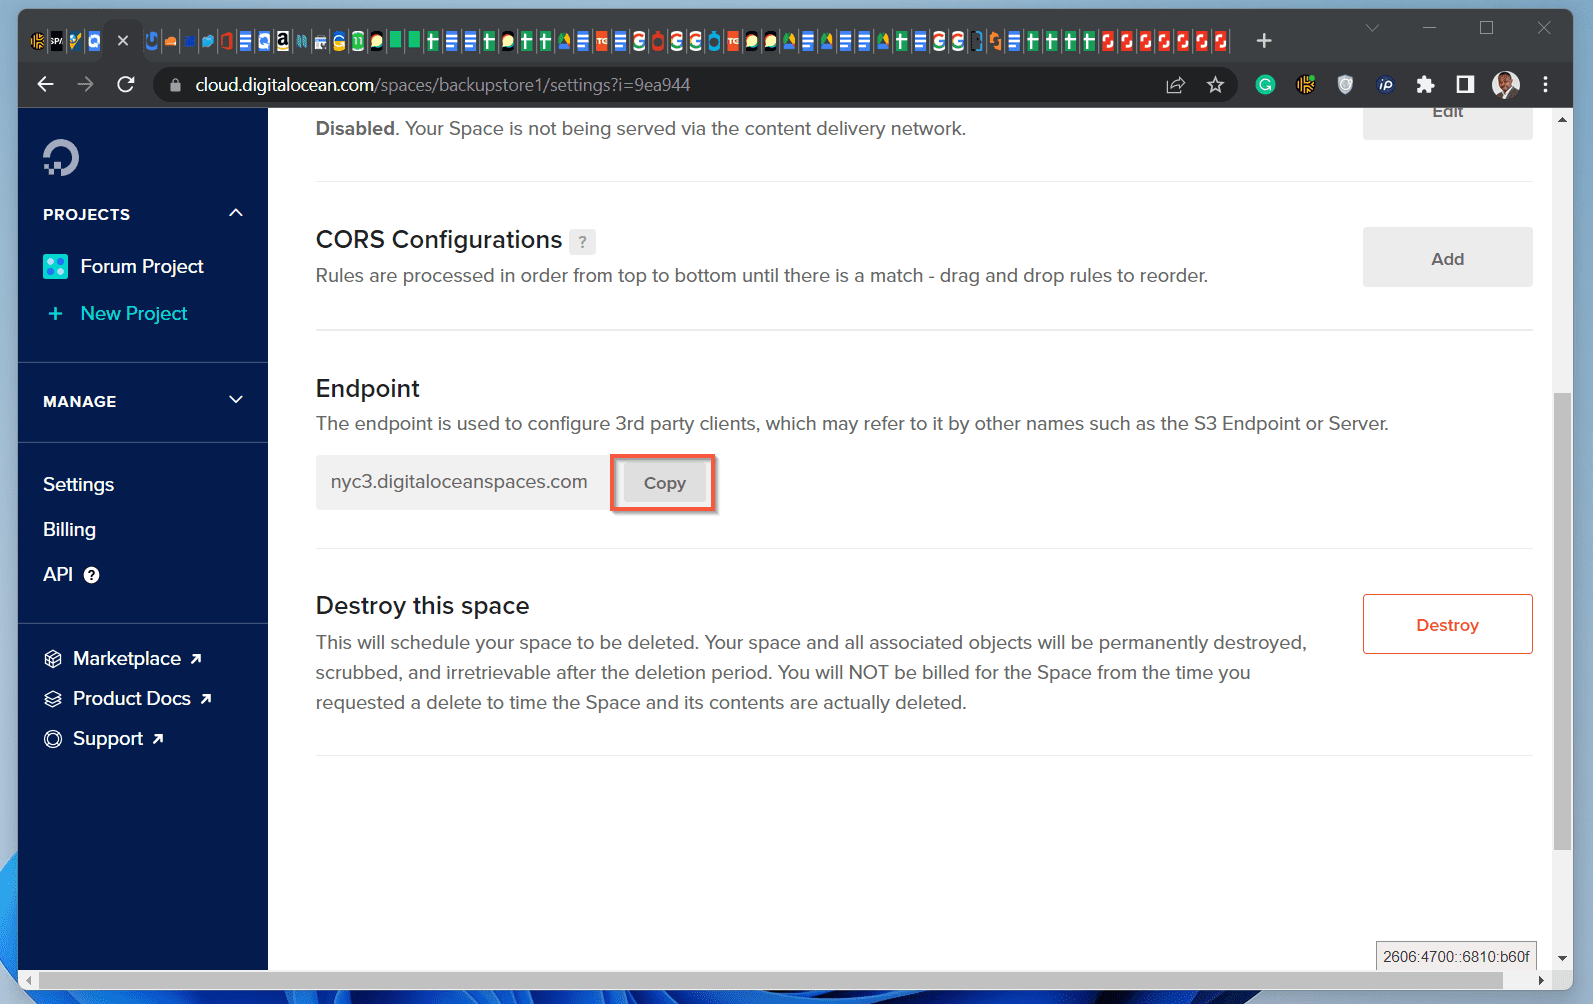
- Paste the Endpoint in DISCOURSE_S3_ENDPOINT. Then, return to DigitalOcean to get the other parameters.
  DISCOURSE_USE_S3: true
  DISCOURSE_S3_REGION: whatever
  DISCOURSE_S3_ENDPOINT: https://nyc3.digitaloceanspaces.com
  DISCOURSE_S3_ACCESS_KEY_ID: myaccesskey
  DISCOURSE_S3_SECRET_ACCESS_KEY: mysecretkey
  DISCOURSE_S3_CDN_URL: https://falcoland-files-cdn.falco.dev
  DISCOURSE_S3_BUCKET: falcoland-files
  DISCOURSE_S3_BACKUP_BUCKET: falcoland-files/backups
  DISCOURSE_BACKUP_LOCATION: s3
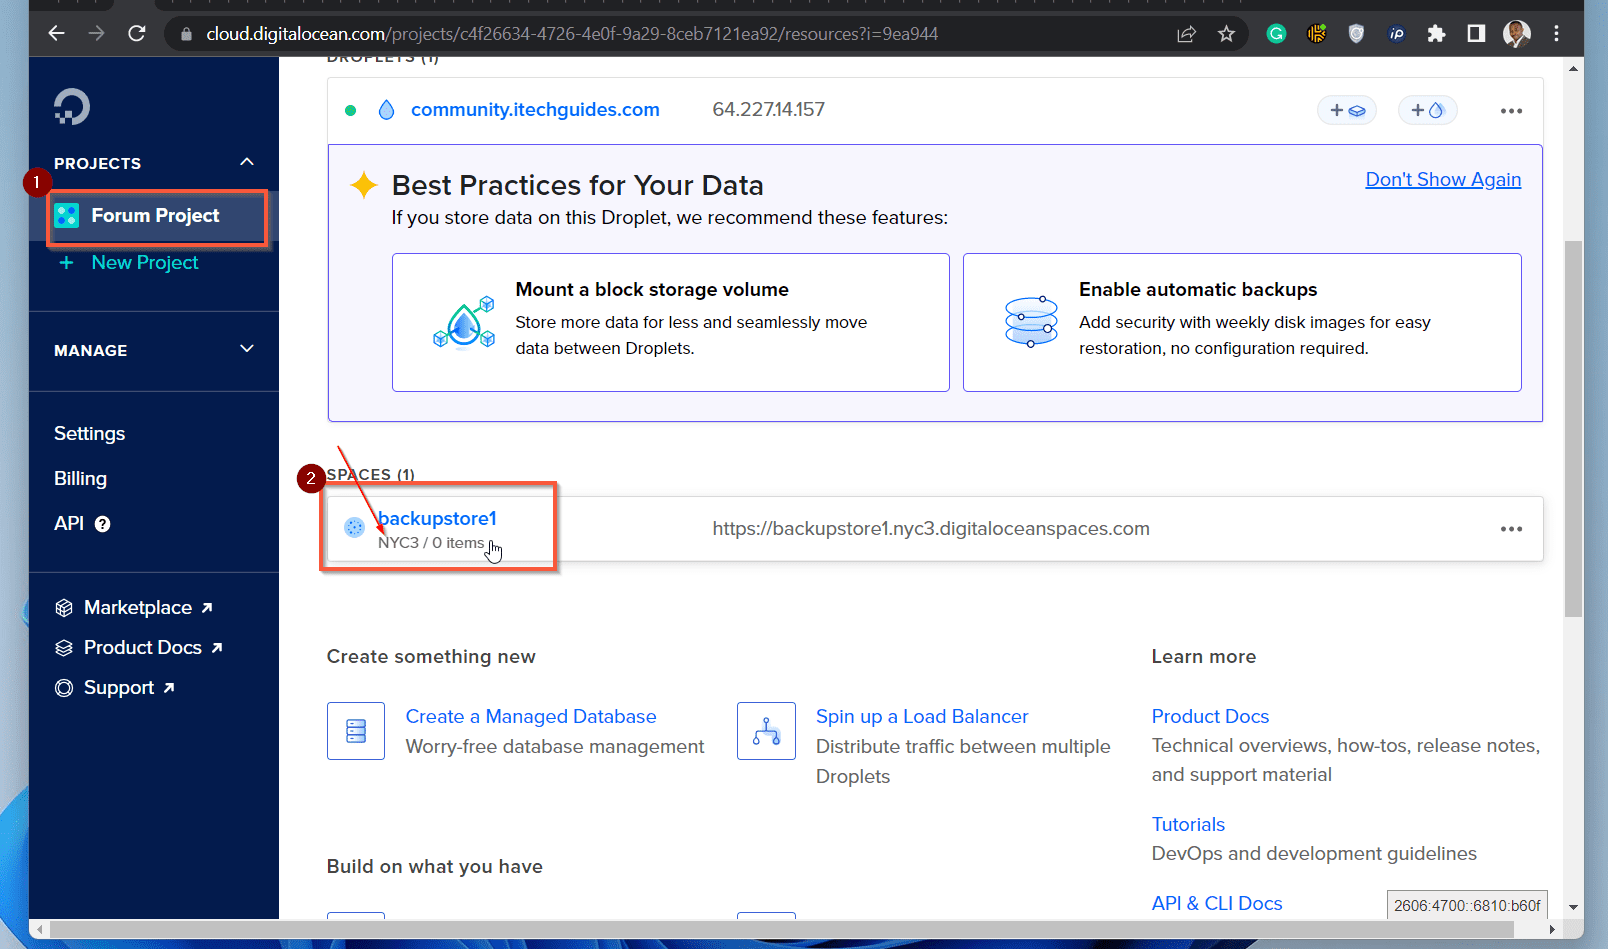
- Back in DigitalOcean, click your project name (1). Then, scroll down to the Spaces section and hover over the Space you created earlier.
When you hover over the name of the Space, DigitalOcean will display the region. In my example, my Space is located in NYC3 but I’ll use the lowercase – nyc3.
It appears that this S3 backup configuration requires all lower case characters.
Enter this information in DISCOURSE_S3_REGION – see my updated file below this screenshot. In the next steps, we will get the Access and Secret keys of the Space.
  DISCOURSE_USE_S3: true
  DISCOURSE_S3_REGION: nyc3
  DISCOURSE_S3_ENDPOINT: https://nyc3.digitaloceanspaces.com
  DISCOURSE_S3_ACCESS_KEY_ID: myaccesskey
  DISCOURSE_S3_SECRET_ACCESS_KEY: mysecretkey
  DISCOURSE_S3_CDN_URL: https://falcoland-files-cdn.falco.dev
  DISCOURSE_S3_BUCKET: falcoland-files
  DISCOURSE_S3_BACKUP_BUCKET: falcoland-files/backups
  DISCOURSE_BACKUP_LOCATION: s3
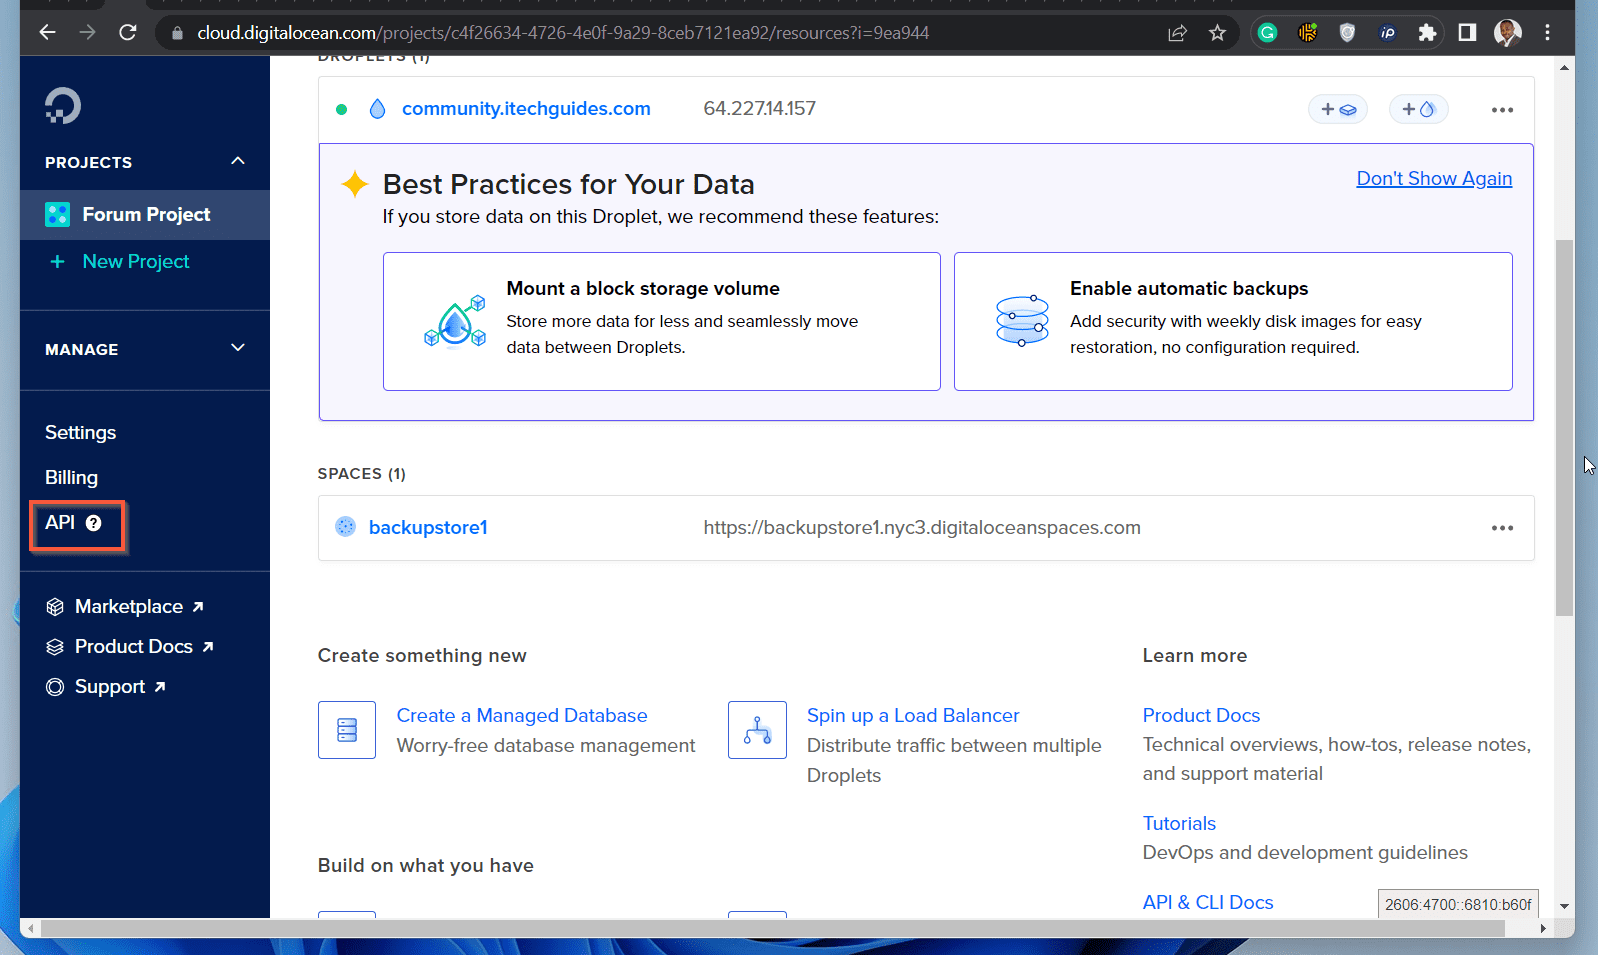
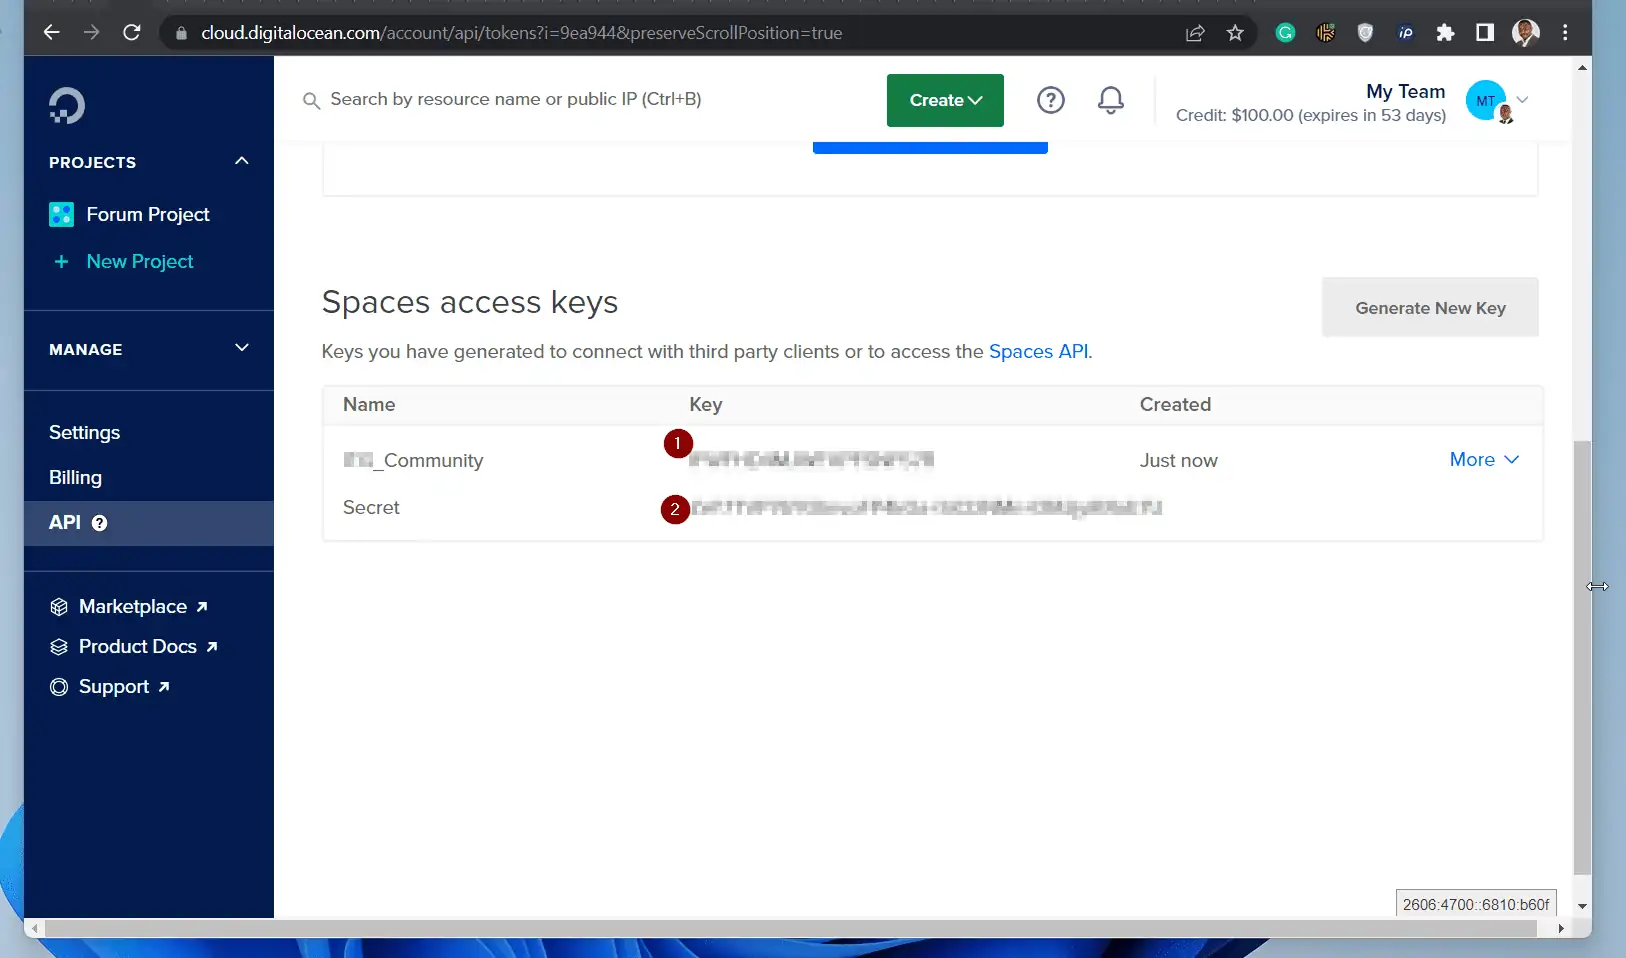
- On the left pane of your DigitalOcean account, click API. Then, scroll down to the Spaces access keys section and click Generate New Key.

- On the page displayed by the new key wizard, enter a name for the new Spaces access key and click the confirmation button.
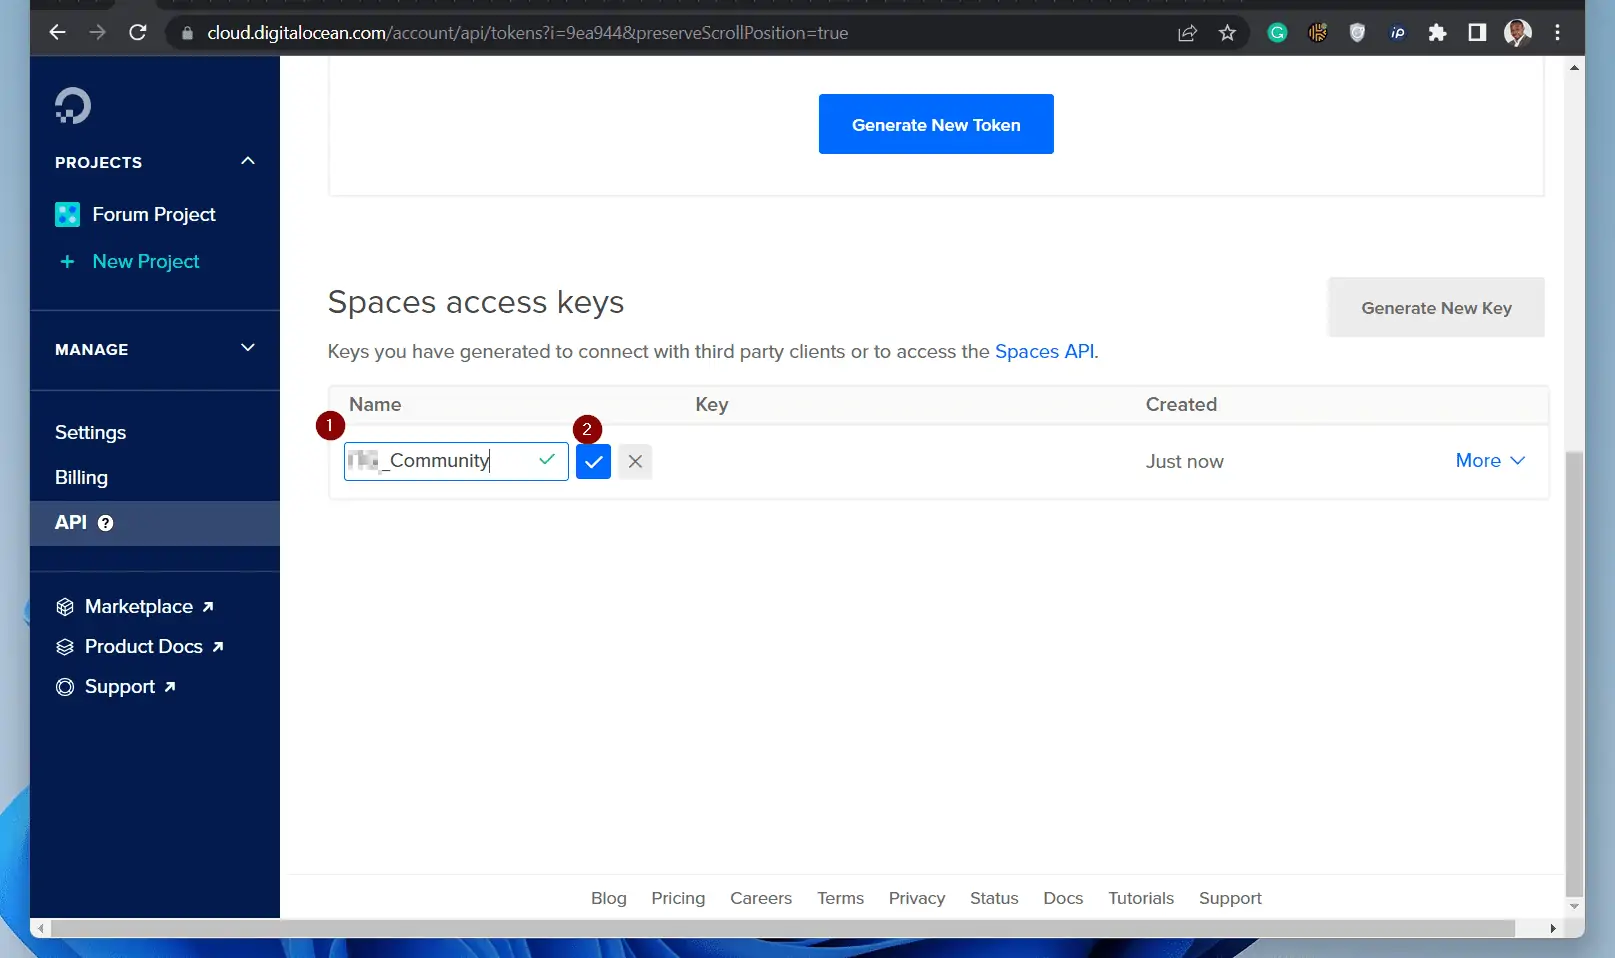
- Once the Spaces access key is created, copy the Access key (1) to the DISCOURSE_S3_ACCESS_KEY_ID. Then, copy the Secret key to DISCOURSE_S3_SECRET_ACCESS_KEY.
  DISCOURSE_USE_S3: true
  DISCOURSE_S3_REGION: NYC3
  DISCOURSE_S3_ENDPOINT: https://nyc3.digitaloceanspaces.com
  DISCOURSE_S3_ACCESS_KEY_ID: myaccesskey
  DISCOURSE_S3_SECRET_ACCESS_KEY: mysecretkey
  DISCOURSE_S3_CDN_URL: https://falcoland-files-cdn.falco.dev
  DISCOURSE_S3_BUCKET: falcoland-files
  DISCOURSE_S3_BACKUP_BUCKET: falcoland-files/backups
  DISCOURSE_BACKUP_LOCATION: s3
- Back to DigitalOcean, click on your DigitalOcean project. Then, scroll down and copy the name of the Spaces bucket.
Mine is backupstore1.
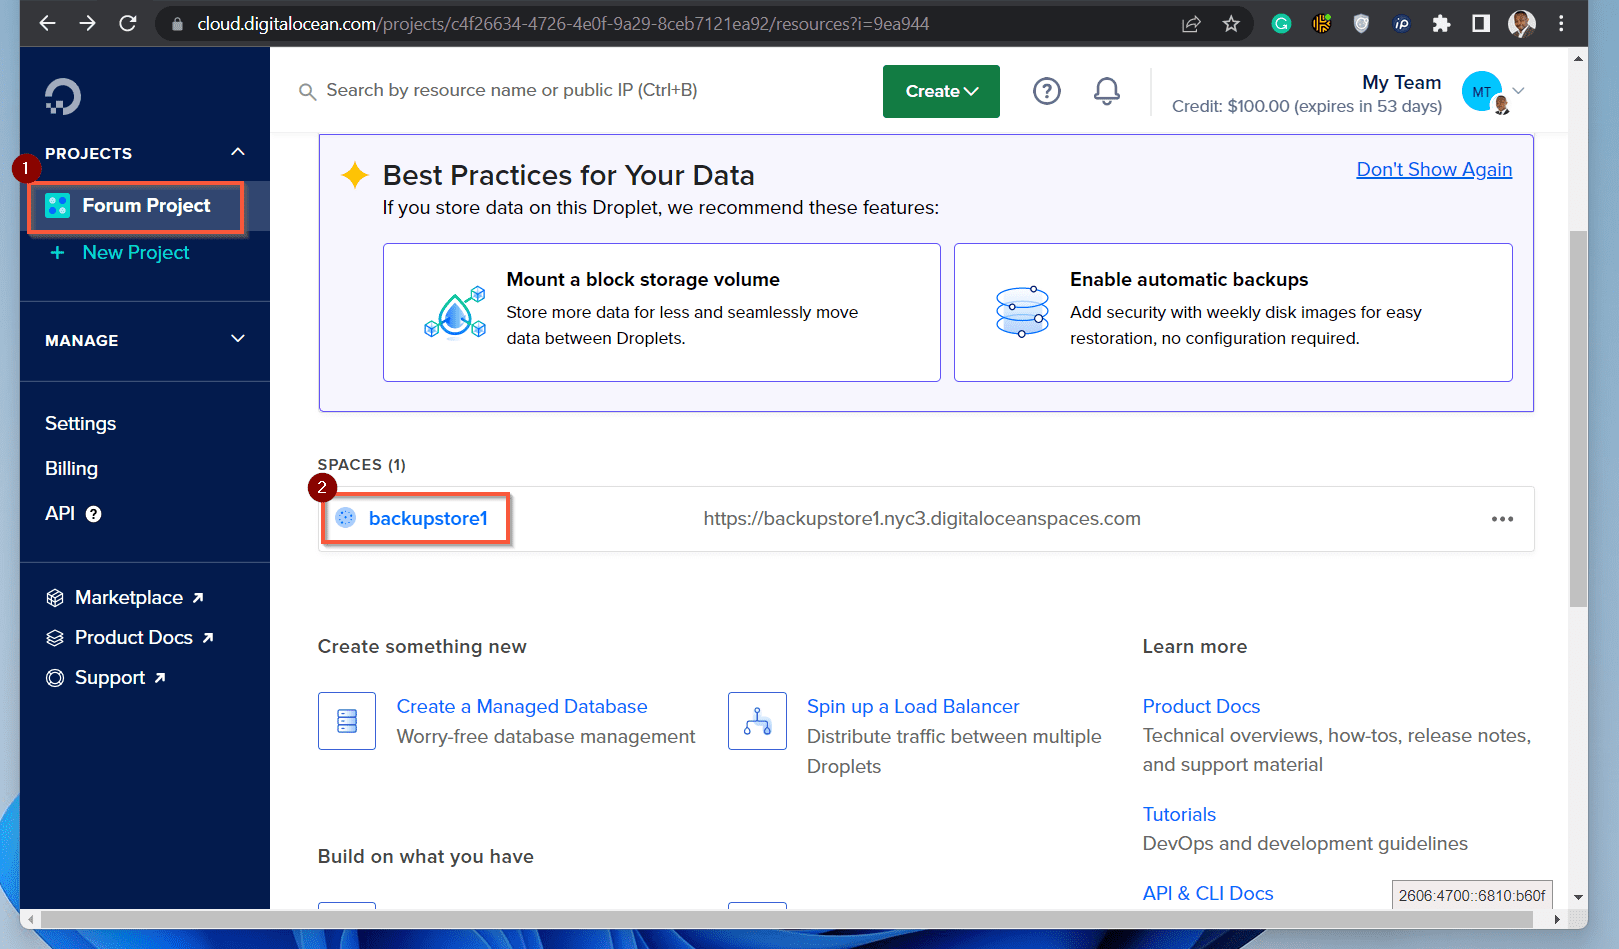
Enter the name of your Spaces bucket next to DISCOURSE_S3_BUCKET.
  DISCOURSE_USE_S3: true
  DISCOURSE_S3_REGION: nyc3
  DISCOURSE_S3_ENDPOINT: https://nyc3.digitaloceanspaces.com
  DISCOURSE_S3_ACCESS_KEY_ID: myaccesskey
  DISCOURSE_S3_SECRET_ACCESS_KEY: mysecretkey
  DISCOURSE_S3_CDN_URL: https://falcoland-files-cdn.falco.dev
  DISCOURSE_S3_BUCKET: backupstore1
  DISCOURSE_S3_BACKUP_BUCKET: falcoland-files/backups
  DISCOURSE_BACKUP_LOCATION: s3
- Open your Space bucket, then click New Folder. Call the folder backups. To save the change, click the thick icon.
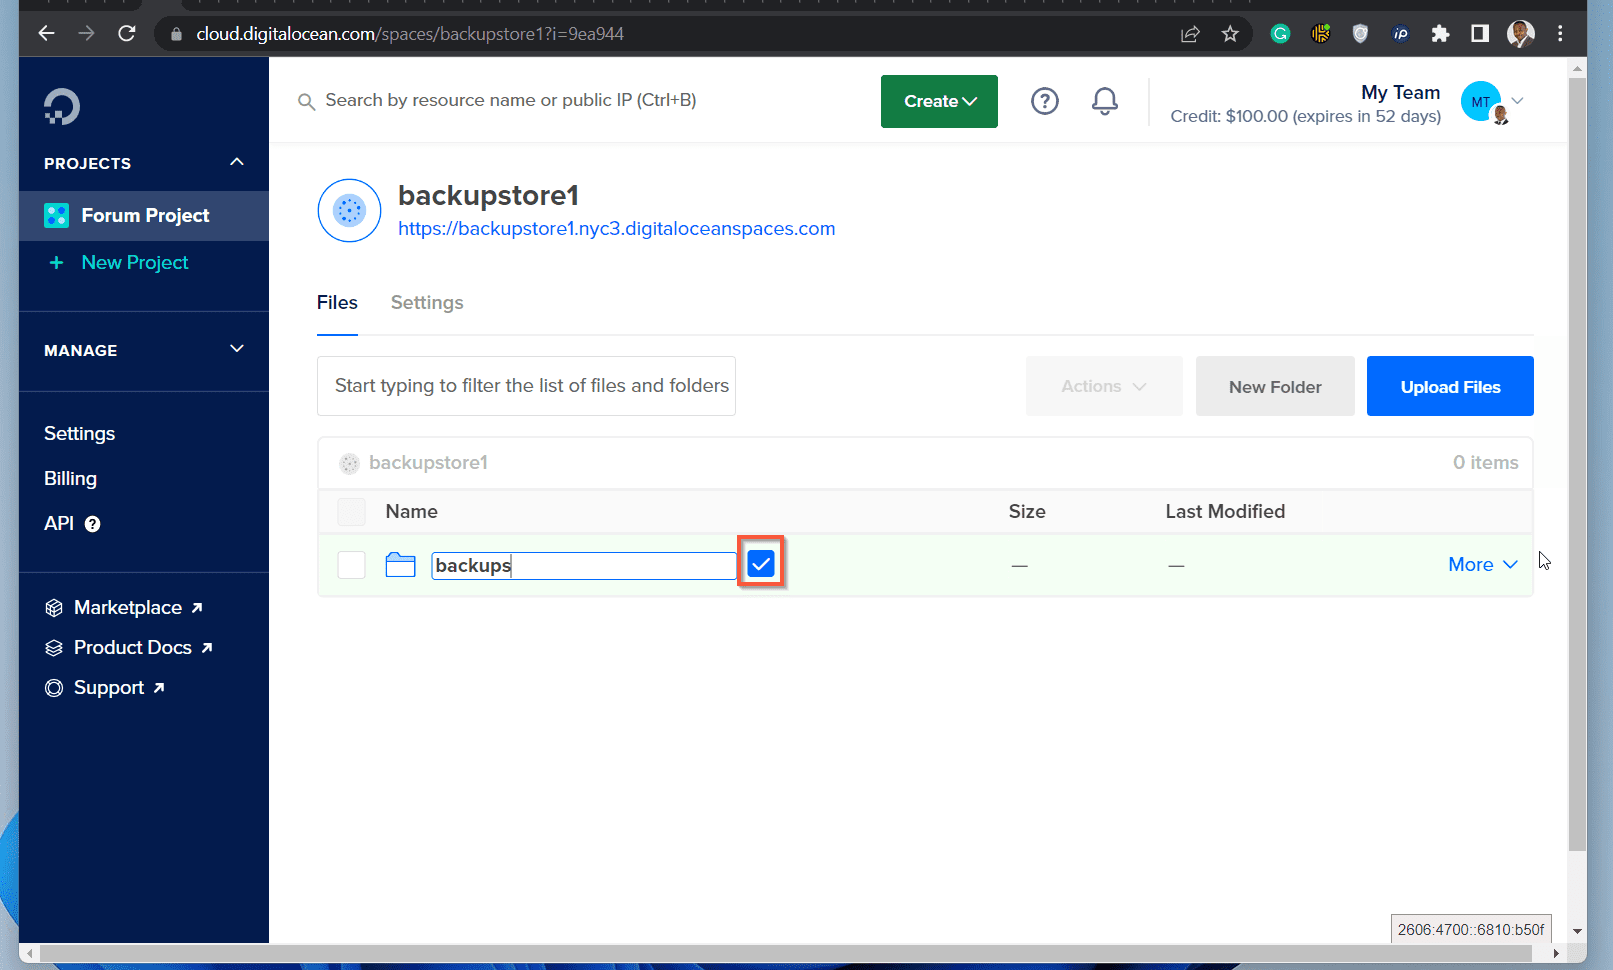
- Enter the name of the bucket beside DISCOURSE_S3_BUCKET. Finally, add a forward slash (/) next folder name, followed by the name of a folder.
In my example, I used backupstore1/backups. With this naming convention, my Discourse forum S3 backup will be stored in the DigitalOcean Space backupstore1/backups
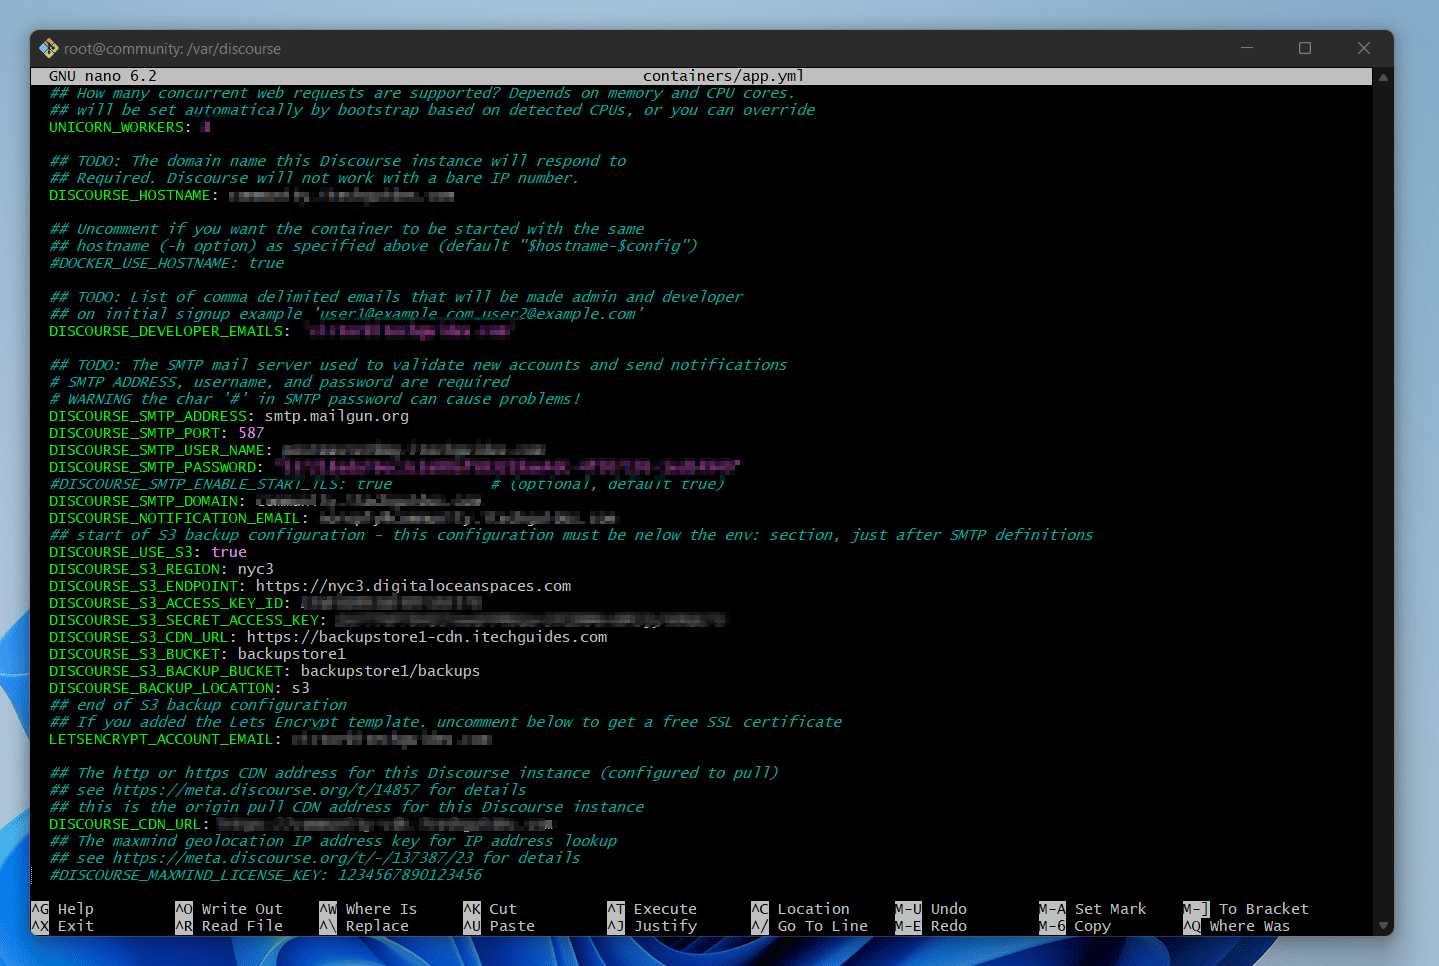
When you finish, your file should look something like what I have below. Note that I did not include my DigitalOcean’s Space access and secret keys.
- Next, replace “https://falcoland-files-cdn.falco.dev” below with the StackPath CDN URL you chose when you created your CDN. Mine is “https://backupstore1-cdn.www.itechguides.com”
  DISCOURSE_USE_S3: true
  DISCOURSE_S3_REGION: NYC3
  DISCOURSE_S3_ENDPOINT: https://nyc3.digitaloceanspaces.com
  DISCOURSE_S3_ACCESS_KEY_ID: myaccesskey
  DISCOURSE_S3_SECRET_ACCESS_KEY: mysecretkey
  DISCOURSE_S3_CDN_URL: https://backupstore1-cdn.www.itechguides.com
  DISCOURSE_S3_BUCKET: backupstore1
  DISCOURSE_S3_BACKUP_BUCKET: backupstore1/backups
  DISCOURSE_BACKUP_LOCATION: s3
- Next, SSH to your Discourse host server and open your Discourse app.yml file for editing. To open app.yml, run the following commands.
cd /var/discourse
nano containers/app.yml
The first command changes the directory to the Discourse directory. Then, the second command will open your Discourse instance’s app.yml file.
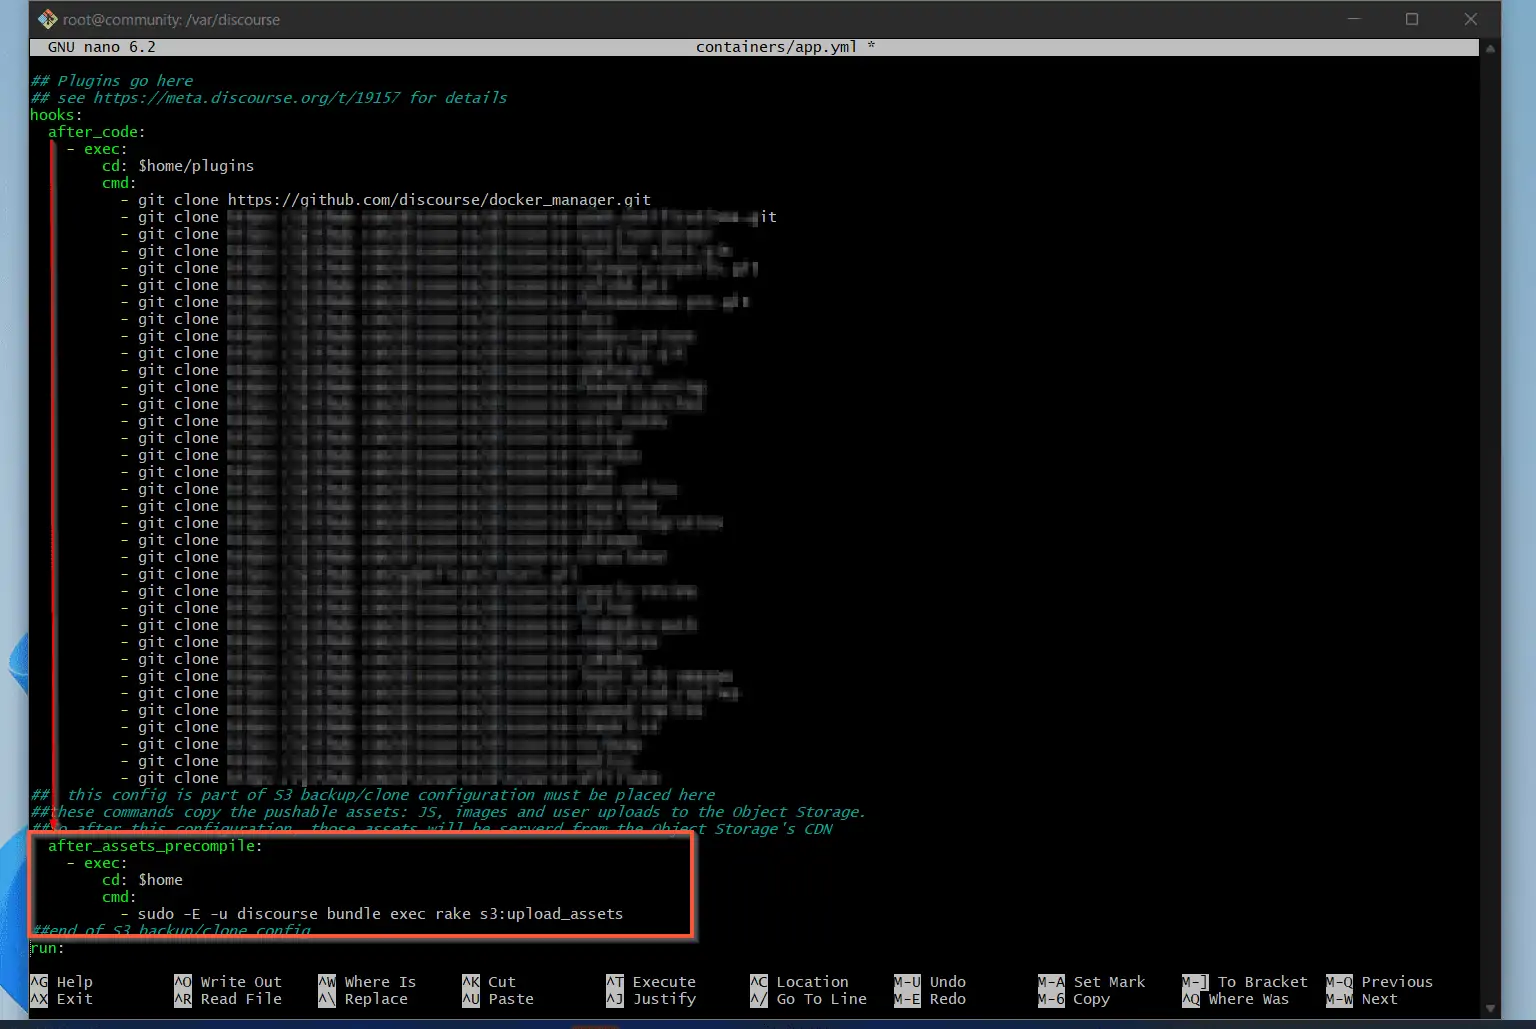
Copy the following lines below the hooks: section.
The next task will upload these assets to your Object Storage.
Place the following codes immediately after your last plugin in the list. The YAML file is a tree-like data structure – white space indentation defines the structure.
So, it is important that the “after_code:” next to “hook:”, MUST be on the same line with “after_assets_precompile:” See the next screenshot below for details.
Alternatively, you can read an explanation a Discourse support team member gave me when I was trying to figure this out – the YAML file is a tree-like data structure.
  after_assets_precompile:
    - exec:
        cd: $home
        cmd:
          - sudo -E -u discourse bundle exec rake s3:upload_assets
Next, copy the following codes after the env: section, just after the SMTP definitions.
DISCOURSE_USE_S3: true
DISCOURSE_S3_REGION: nyc3
DISCOURSE_S3_ENDPOINT: https://nyc3.digitaloceanspaces.com
DISCOURSE_S3_ACCESS_KEY_ID: myaccesskey
DISCOURSE_S3_SECRET_ACCESS_KEY: mysecretkey
DISCOURSE_S3_CDN_URL: https://backupstore1-cdn.www.itechguides.com
DISCOURSE_S3_BUCKET: backupstore1
DISCOURSE_S3_BACKUP_BUCKET: backupstore1/backups
DISCOURSE_BACKUP_LOCATION: s3
- Once you have copied the above information to your Discourse app.yml file, press the Ctrl and X buttons simultaneously. The editor will prompt you to confirm that you want to save the file – type Y and press enter.
- To rebuild your Discourse container, run the commands below.
cd /var/discourse
./launcher rebuild app
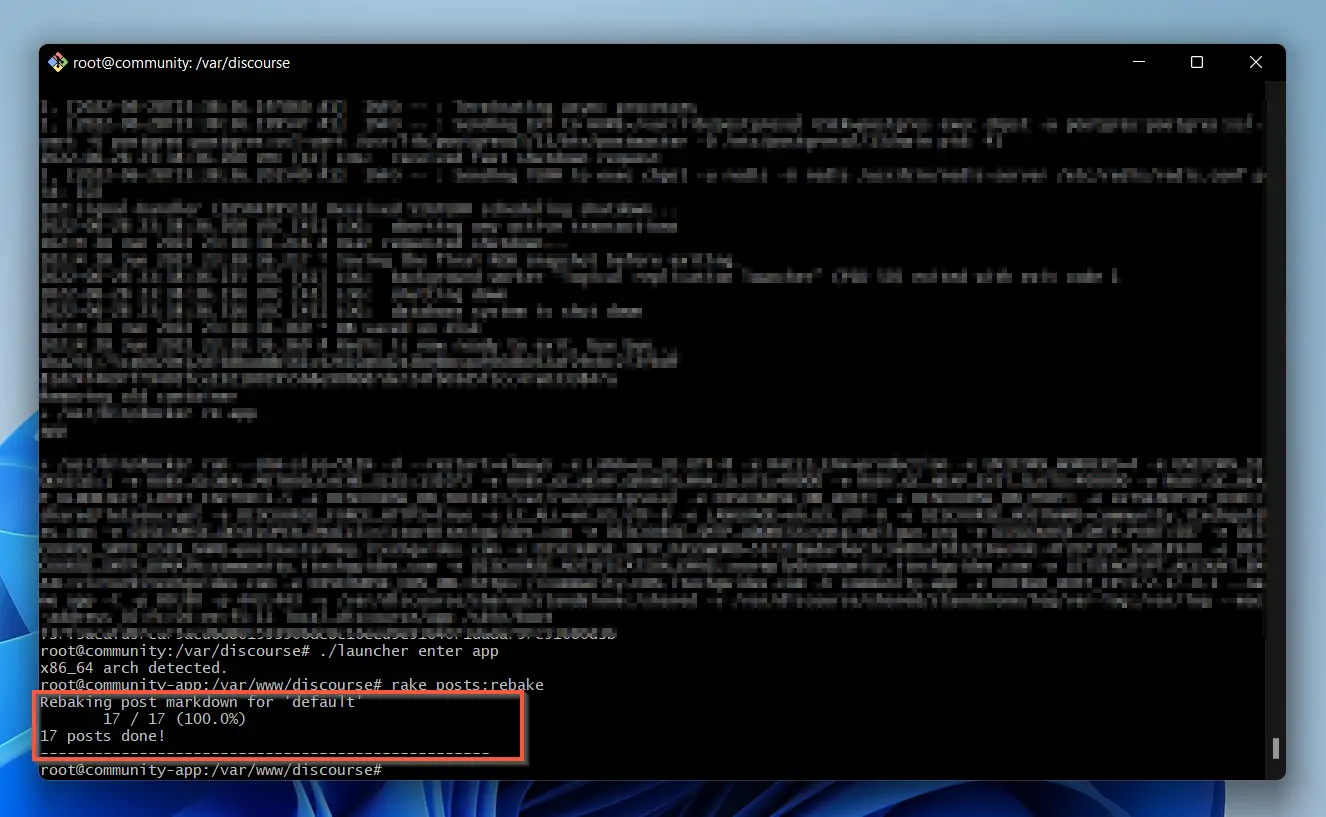
- Finally, to rebake all posts, run the commands below. If your forum has a lot of posts, the command may take hours to complete.
cd /var/discourse
./launcher enter app
rake posts:rebake
When the rebake command completes, the console will display a message similar to the highlighted portion of the screenshot below.
- To test that your Discourse forum S3 backup is saving to DigitalOcean Spaces, perform a backup of your Discourse forum instance.

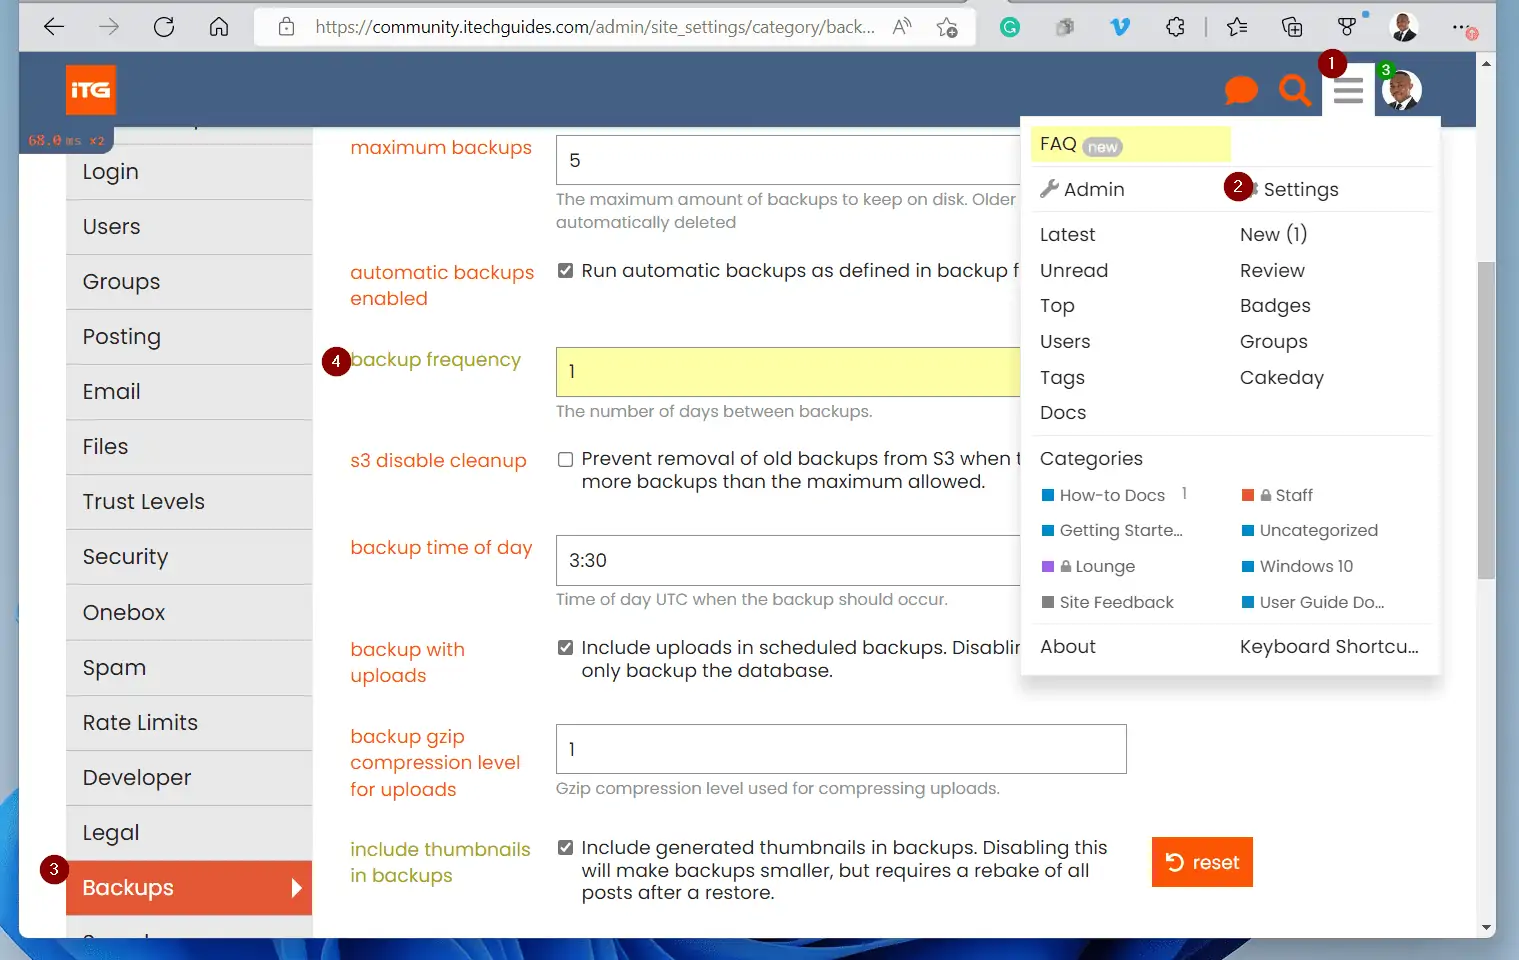
- Finally, to complete your Discourse backup configuration, click the menu icon (1). Then, from the displayed items, click Settings (2).
When Settings opens, on the left pane, click Backup. Finally, configure things like backup frequently, time, and other essential backup configurations.
Frequently Asked Questions
By default Discourse stores backup in the local storage. That is, the server storage you installed Discourse.
Obviously, this is not a good idea because if the server crashes, you may not be able to retrieve the backups.
So, apart from the option to store backups on the Discourse server local storage, you can also store backups in S3 storage.
With the S3 storage option, you can configure Discourse backup to store in a number of cloud storage. This guide covered steps to save Discourse backup to DigitalOcean Spaces.
For a full list of all the cloud storage that Discourse has tested, visit Using Object Storage for Uploads (S3 & Clones)
If you want to backup Discourse to local storage follow the steps below:
a) Log in to Discourse as the site admin
b) Then, the menu on the top right and select Settings.
c) When the settings page opens, click Backups.
d) Finally, to backup Discourse, click the Backup button.
DigitalOcean Spaces is Object Storage that is compatible with S3. The primary purpose of DigitalOcean Spaces is to store and serve large data.
DigitalOcean Spaces start at $5/month for 250GiB. With this, you get 1TB of outbound transfer. All files you save into the Space (storage) are free.
StackPath is primarily a CDN (Content Delivery Network) service provider. When you configure a CDN with StackPath, the CDN serves static assets like CSS and StackPath files from their global network of servers.
This makes your website after since these assets are delivered to your site visitors from a StackPath CDN server closest to them.
Note that like other CDN providers, StackPath offers other services.
Conclusion
When I wrote this guide, I was creating Itechguides Community with Discourse. When I got to the point of configuring Discourse forum S3 Backup and S3 CDN, I got stuck.
Although there is documentation to perform this task, the steps are not detailed. So, I had to piece a lot of the information together with the help of the document author (Falco team).
Another Discourse community member, Jay Pfaffman was also very helpful. So, to help other people, I decided to put this guide together.
I hope you were able to configure Discourse forum S3 backup and S3 CDN with the steps in this guide. If you found the guide helpful, click on “Yes” beside the “Was this page helpful” question below.
You may also express your thoughts and opinions by using the “Leave a Comment” form at the bottom of this page.
Finally, you may find other articles on our WordPress & Websites How-Tos page helpful.
![WordPress Lost Password Redirects to Page Not Found [Fixed]](https://www.itechguides.com/wp-content/uploads/2024/03/WordPress-Lost-Password-Redirects-to-Page-Not-Found-Fixed.webp)