Want to know how to add columns in WordPress? You have come to the right place, as this guide illustrates several ways to do that.
Option 1: Insert Columns Using Columns Block
By default, the WordPress block editor offers a Columns block. Thus, you can easily create columns in a WordPress post or page using this block.
To learn how to do that, follow the procedures below.
- As an administrator, sign in to the backend dashboard of your WordPress website. Then, depending on where you wish to add columns, select Posts or Pages among the options on the dashboard’s left pane.
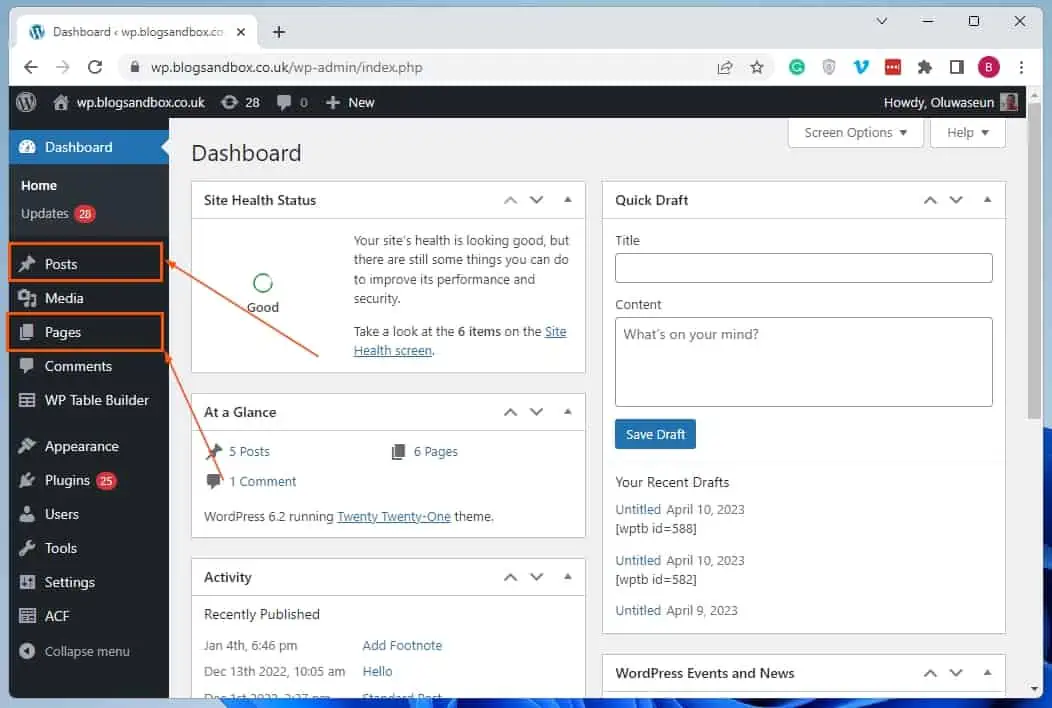
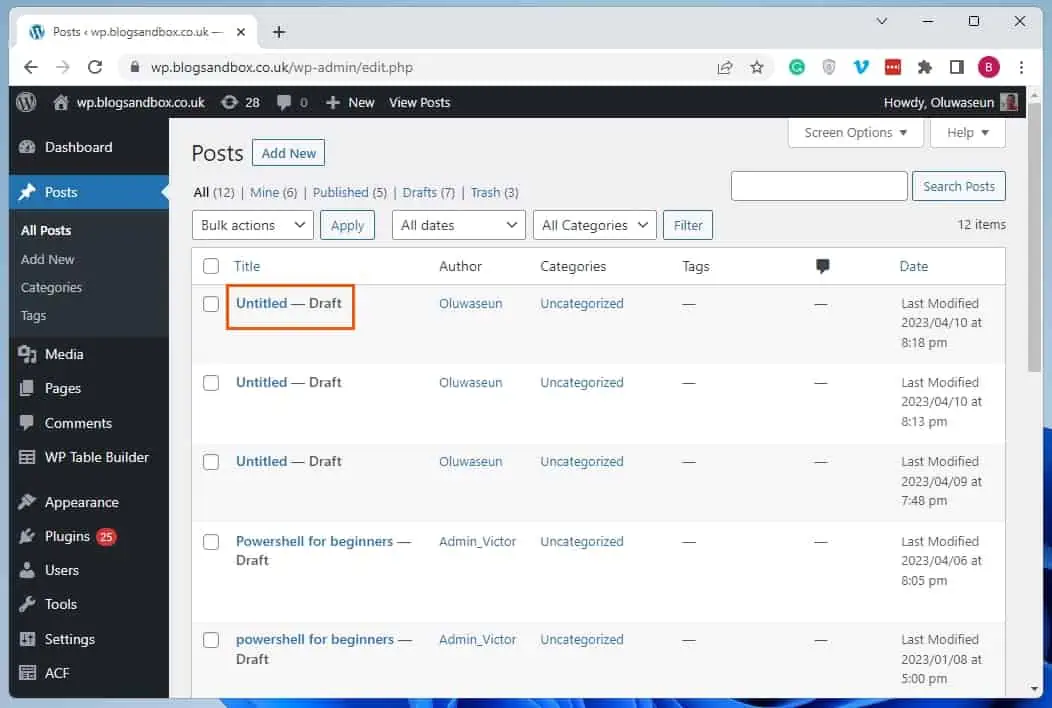
- Now, open the page/post where you wish to insert columns by left-clicking its title. In this case, I will open an untitled post on our WordPress site.
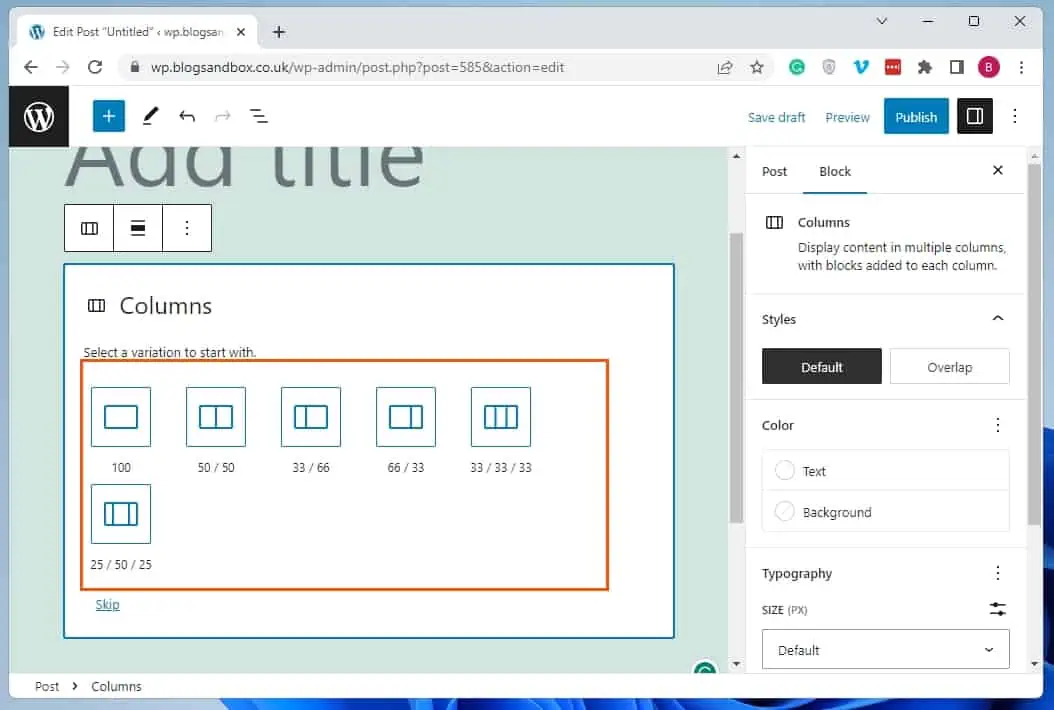
- When the post/page opens, click the Add block button (+ icon) where you wish to add columns. Then, input “columns” in the search field and select the Columns block from the search result.

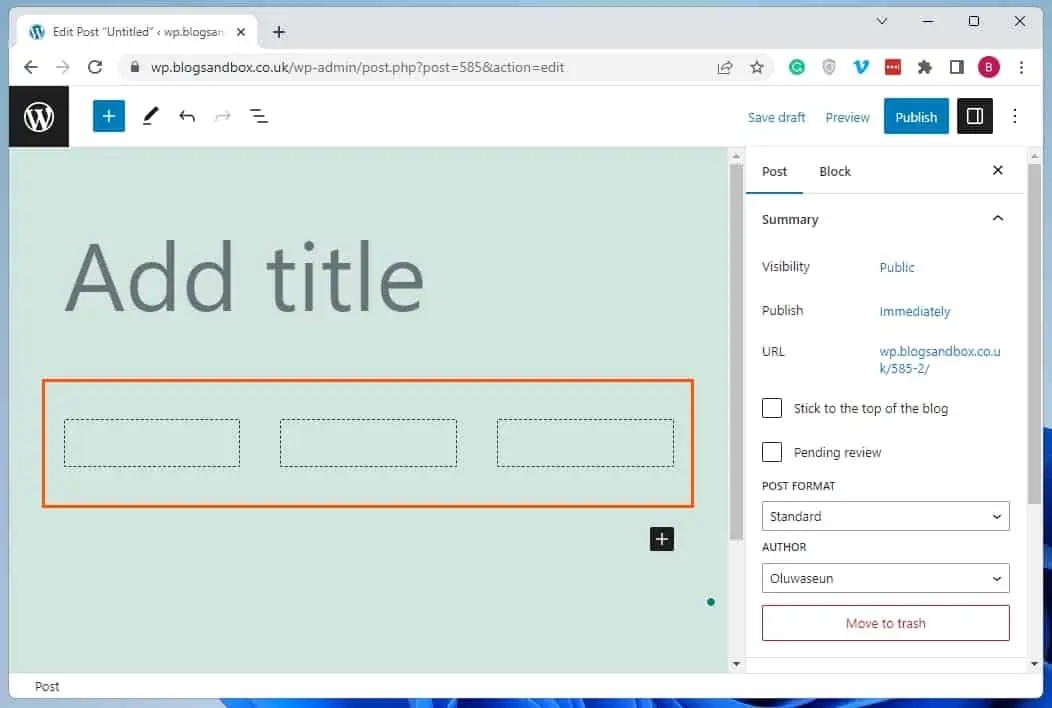
- Finally, select a column layout from the pre-defined columns in the Columns block. Thus, the columns should appear in the post/page – see the second screenshot below.
Option 2: Add Columns Using Table Block
As we all know, columns are part of what makes up a table. Hence, it’s no surprise you can insert columns in WordPress using the Table block.
The subsequent procedures will teach you how to do that.
- Enter the backend dashboard of your WordPress site as the administrator. Then, from the options on the dashboard’s left pane, choose Posts or Pages, depending on where you want to add columns.
- After doing that, left-click the title of the page/post where you wish to add columns to open it. Once again, I will open an untitled post on our WordPress site for this demonstration.
- In the post/page, left-click the Add Block button in the area you wish to insert the columns. Next, type “table” in the search field, then select the Table block from the search result.

- After doing that, ensure the row count is set to “1” in the Table block.

- Following that, input the number of columns you wish to insert on the page/post in the COLUMN COUNT input box.

- Finally, click the blue Create Table button. Consequently, the columns should appear in the page/post – see the second screenshot below.


Option 3: Create Columns Using a Plugin
There are various plugins that allow you to create columns in WordPress. However, for this article, we will focus on the WP Table Builder plugin.
This free plugin allows you to easily make and insert tables and columns in a WordPress post or page. Therefore, in the following sub-sections, you will learn how to install this plugin in WordPress.
Also, I will teach you how to use the plugin to create columns in WordPress.
Step 1: Install and Activate WP Table Builder Plugin
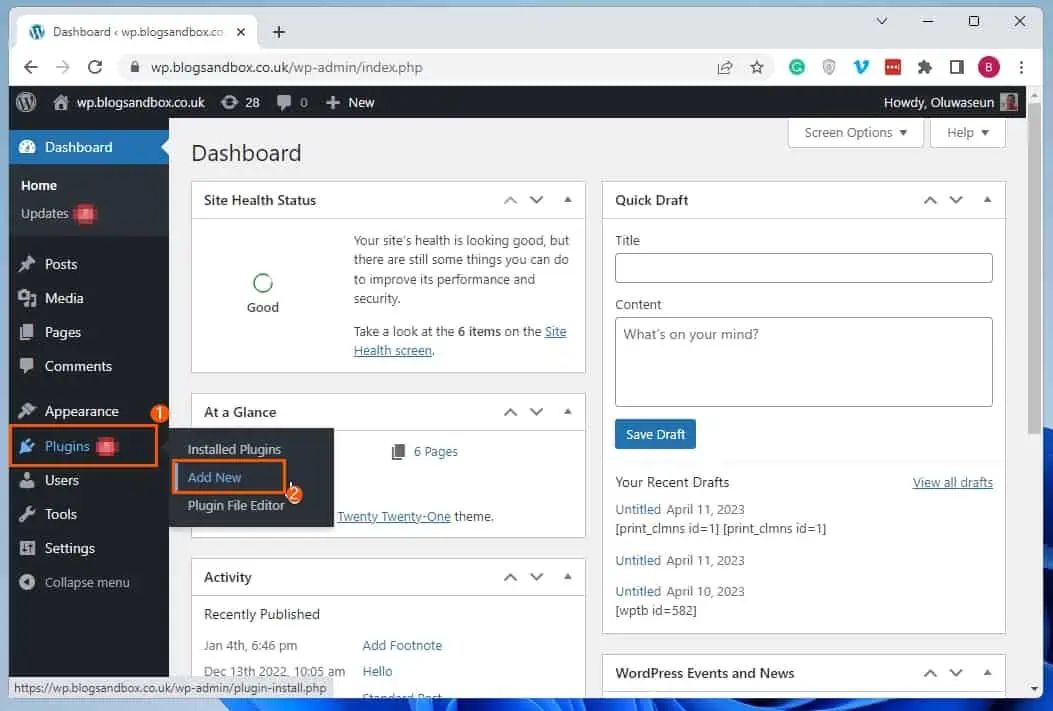
- Sign in as an administrator to the backend dashboard of your WordPress website. Following that, hover your mouse cursor on Plugins on the dashboard’s left pane, then left-click Add New from the displayed options.
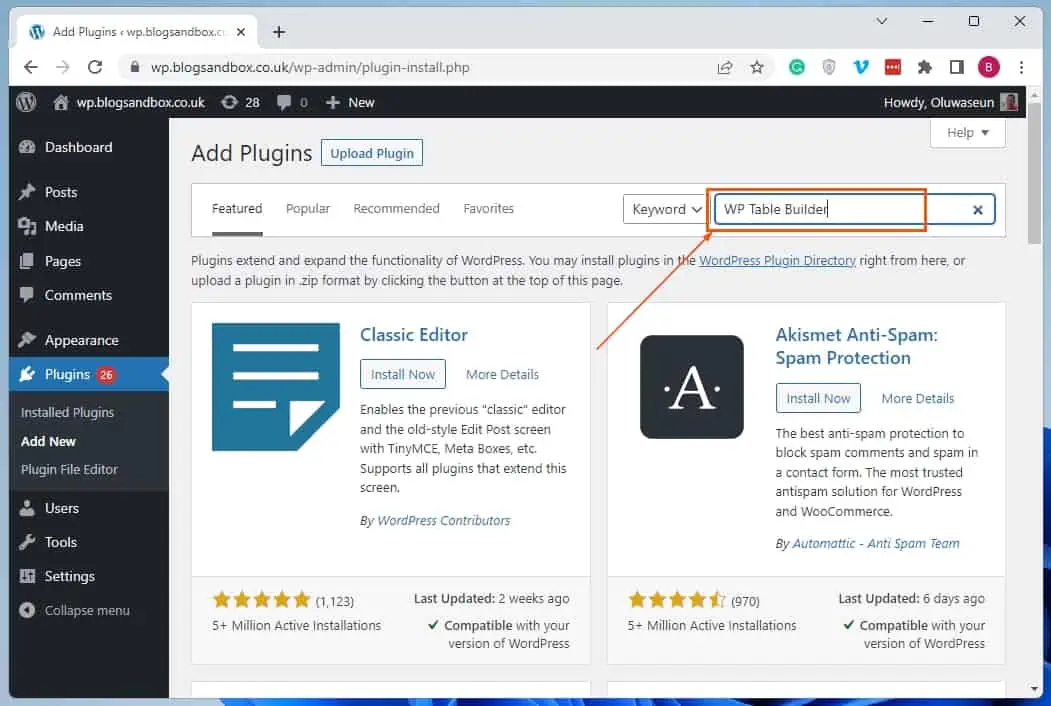
- Afterward, on the search field in the Add Plugins page, type “WP Table Builder.”
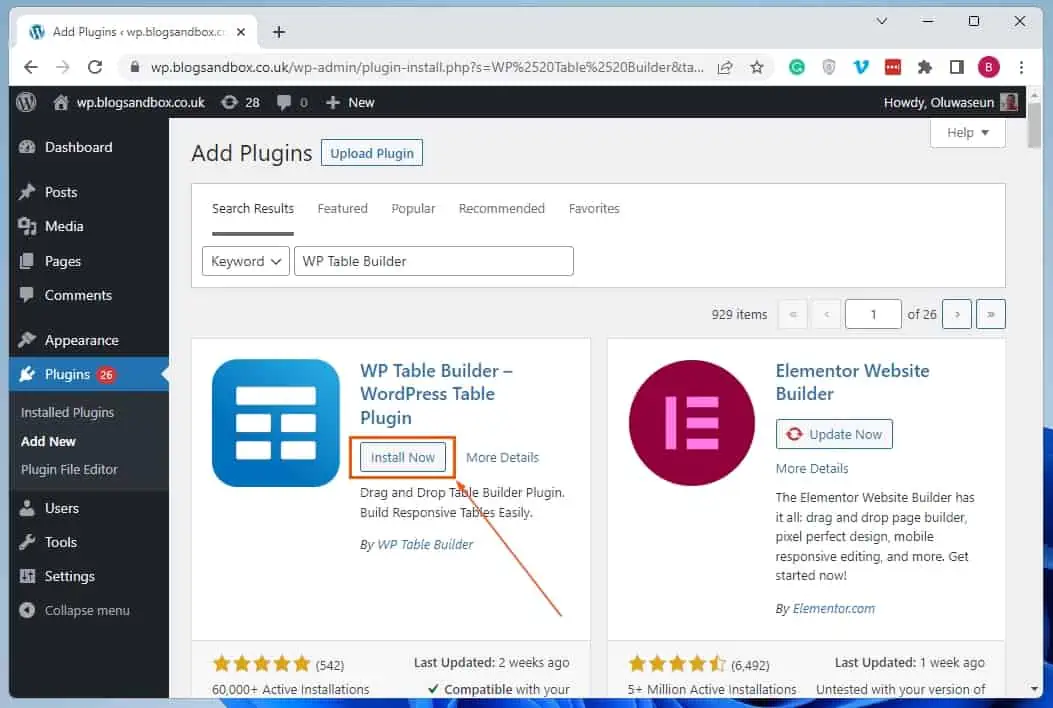
- Now, click the Install Now button on WP Table Builder – WordPress Table Plugin from the search result.
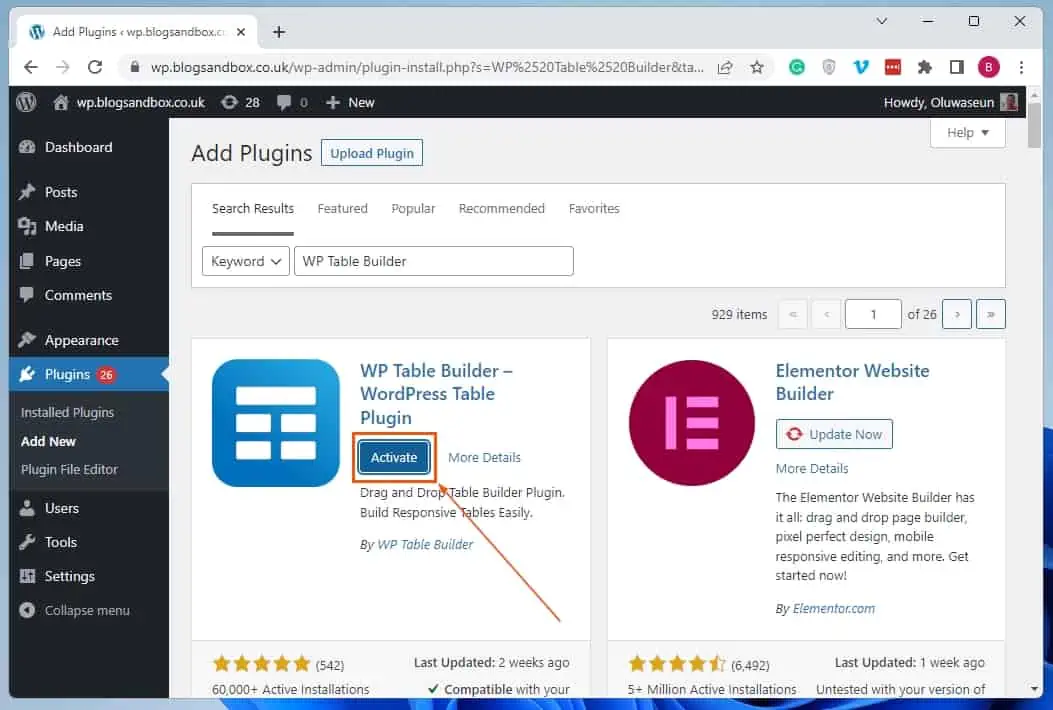
- After installing the plugin, click the Activate button to enable it on your WordPress site.
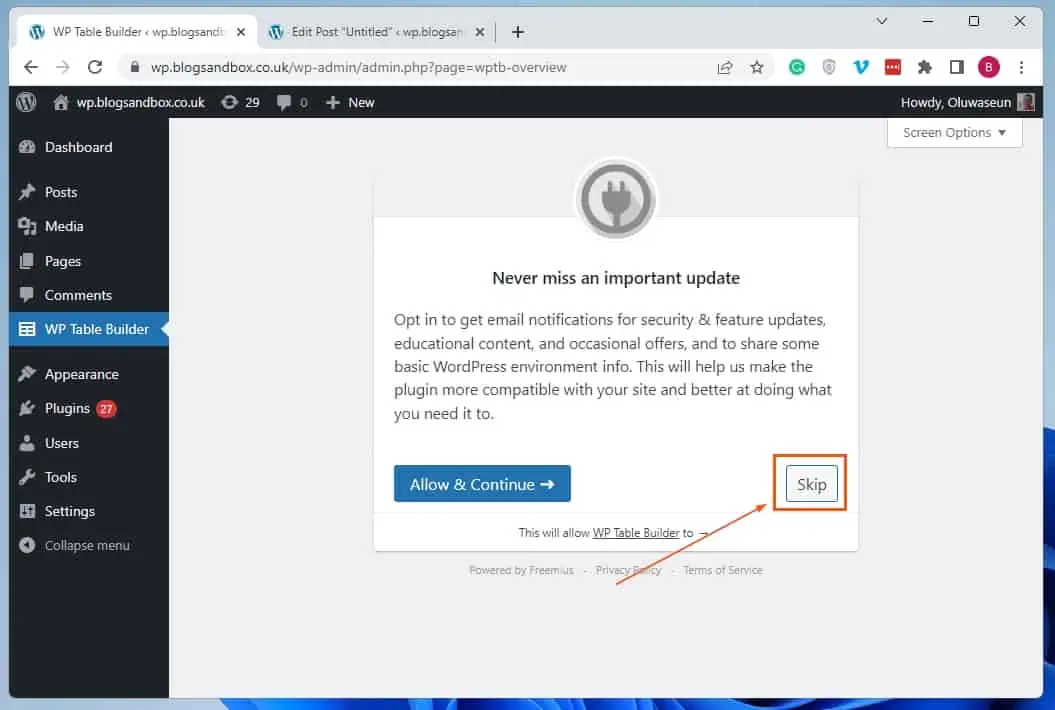
- Following that, you should be taken to a New miss an important update page. Hence, click the Skip button on the page.
Step 2: Add Columns Using WP Table Builder Plugin
- After activating the plugin, make sure you’re still logged in to your WordPress site’s backend as an admin. Then, from the menus on the backend’s left pane, select Posts or Pages, depending on where you want to add columns.
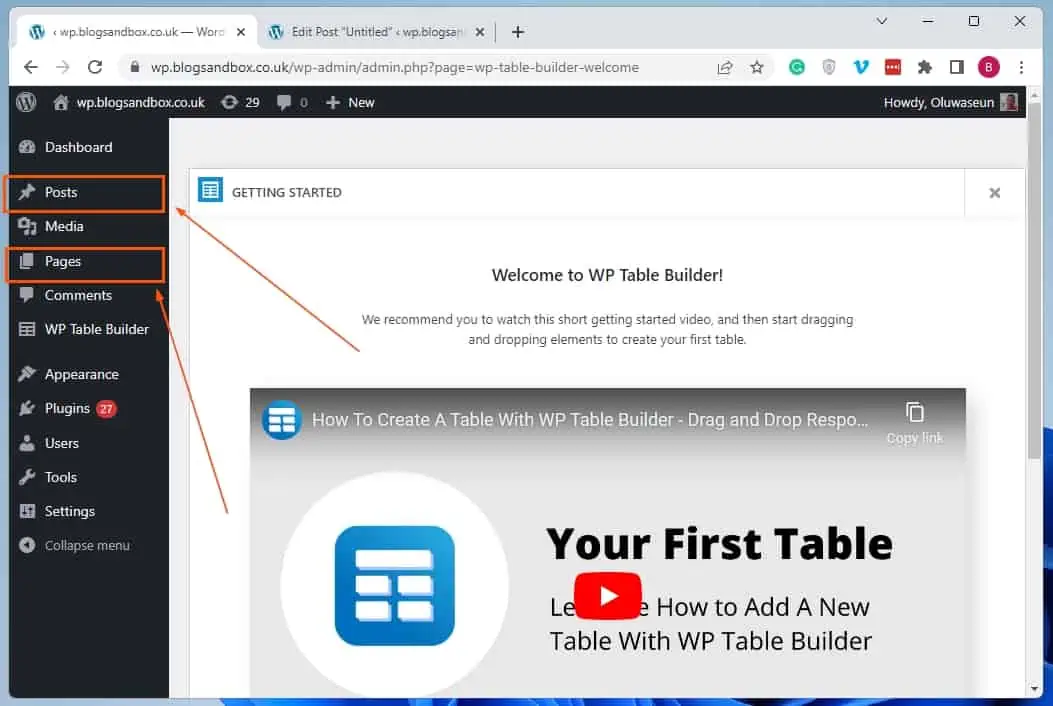
- Afterward, open the page/post where you wish to insert columns by clicking its title. For this demonstration, I will open an untitled post on our WordPress site.
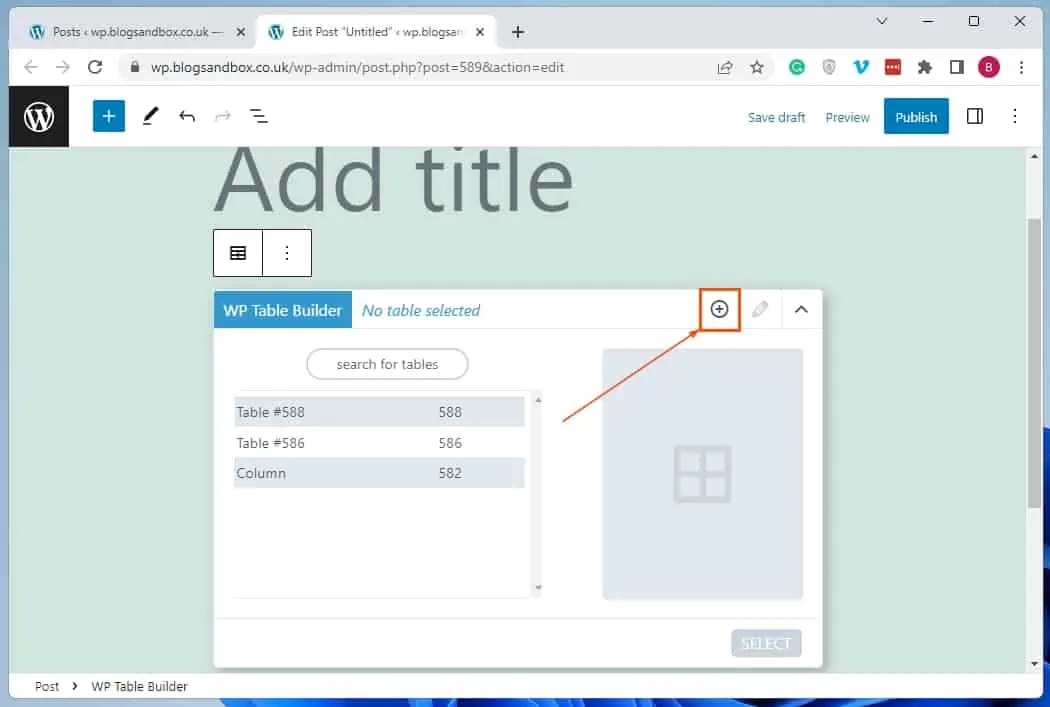
- When the post or page opens, left-click the Add Block button in the area you want to add the columns. Next, input “wp table builder” in the search field, then select the WP Table Builder block from the search result.

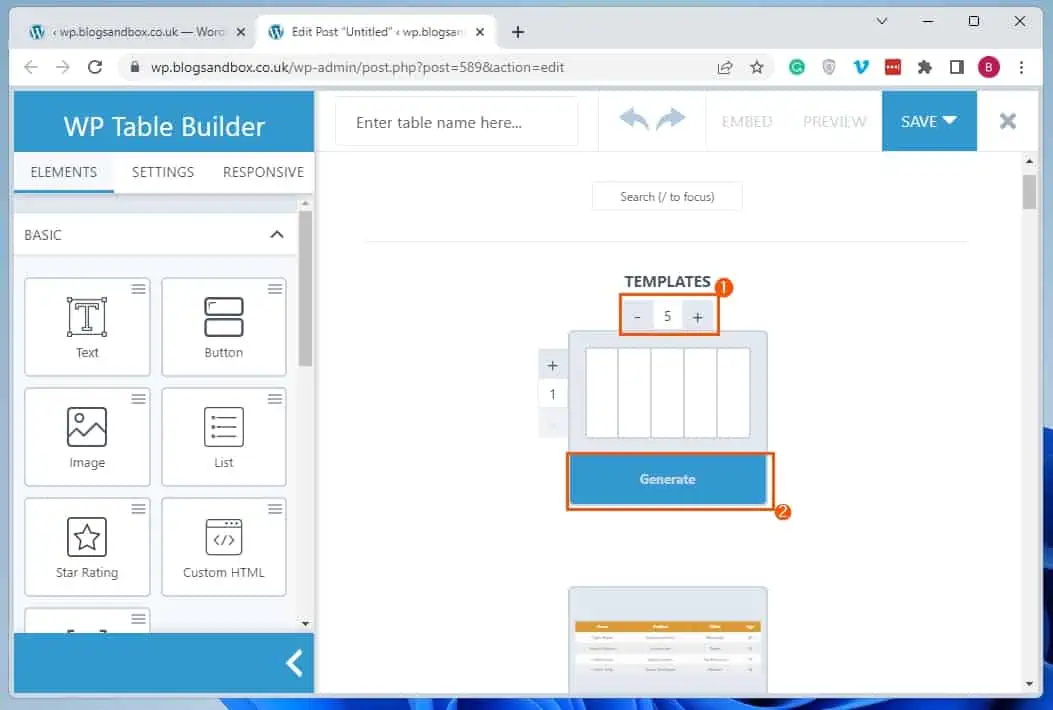
- Now, click the new table icon at the top right of the WP Table Builder block.
- Afterward, select a blank template on the WP Table Builder page.
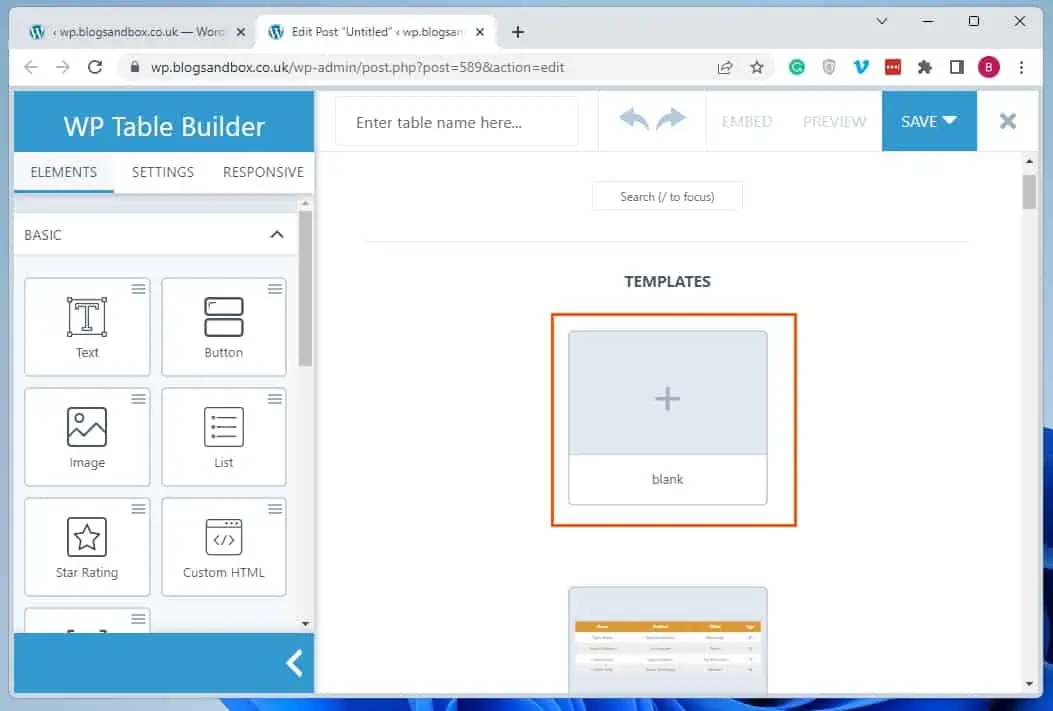
- Following that, at the top of the blank template, input the number of columns you wish to add. Then, click the blue Generate button at the bottom of the blank template.
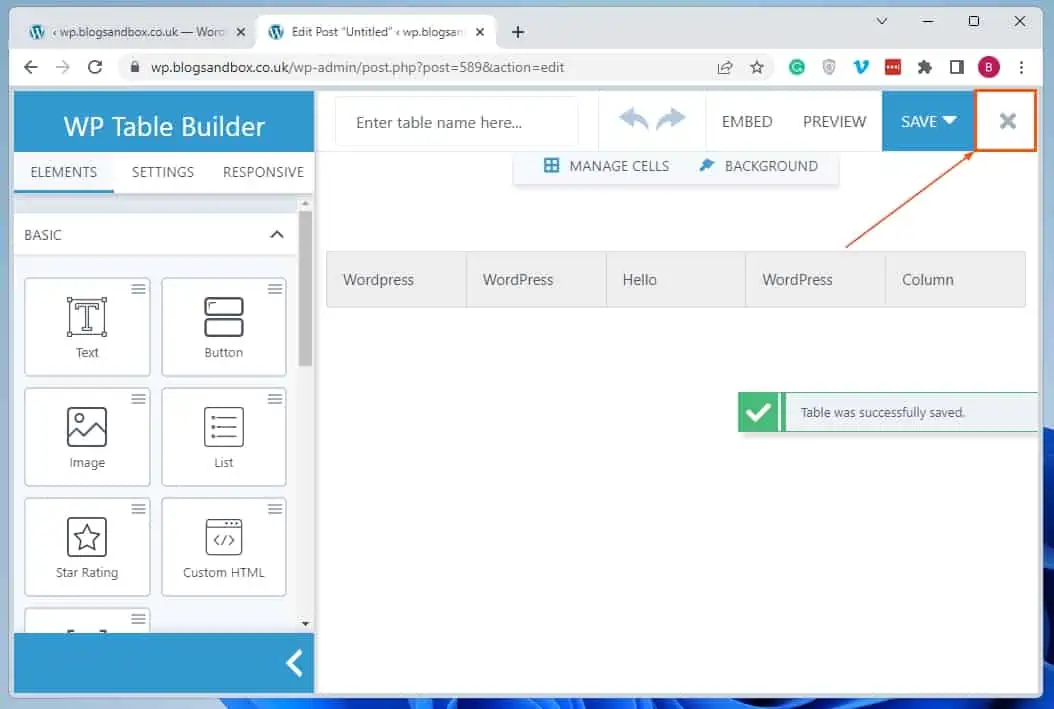
- Consequently, you will be taken to a page where you can edit and add text to the columns. After editing the columns to your satisfaction, click the Save button at the top right of the page.

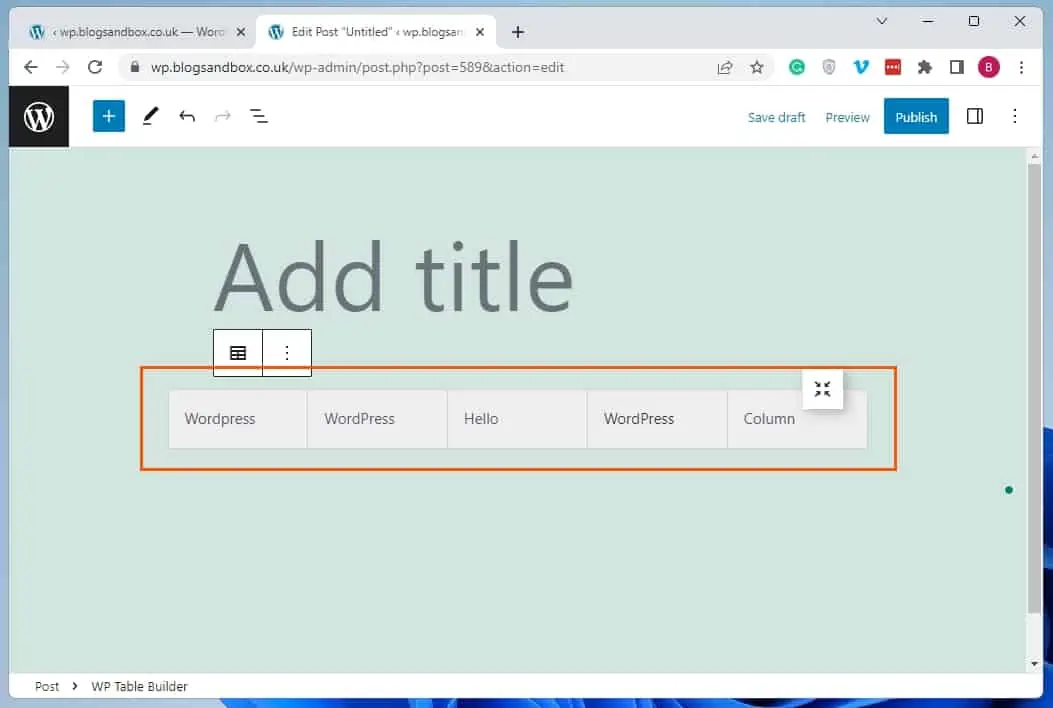
- After successfully saving the columns, click the “x” button at the top right corner to leave the page. Consequently, the columns should appear on your WordPress page/post – see the second screenshot below.
Frequently Asked Questions
A row is a horizontal alignment of data. A column, on the other hand, is the vertical alignment of data.
To make columns in WordPress without a plugin, follow the steps below.
a) As an administrator, log in to the backend dashboard of your WordPress site.
b) Then, depending on where you wish to add columns, select Posts or Pages among the options on the dashboard’s left pane.
c) Now, open the page/post where you wish to insert columns by left-clicking its title.
d) When the post/page opens, click the Add block button (+ icon) where you wish to add columns.
e) Then, input “columns” in the search field and select the Columns block from the search result.
f) Finally, select a column layout from the pre-defined columns in the Columns block.
Yes, adding columns to your WordPress website is totally free.
To add a table to your WordPress site, observe the following steps below.
a) Enter the backend dashboard of your WordPress site as the administrator.
b) Then, from the options on the dashboard’s left pane, choose Posts or Pages, depending on where you want to add columns.
c) After doing that, left-click the title of the page/post where you wish to add columns to open it.
d) In the post/page, left-click the Add Block button in the area you wish to insert the columns.
e) Next, type “table” in the search field, then select the Table block from the search result.
f) Following that, input the number of columns and rows you want in your table.
g) Finally, click the blue Create Table button.
Yes, every table feature columns.
Conclusion
Adding columns to a WordPress site is a typical requirement for users who wish to display content in an organized and structured manner. However, not everyone knows how to insert columns in WordPress.
Fortunately, this guide demonstrated three ways to do that. To be specific, we discussed how to add columns in WordPress using the Columns block.
This guide also taught us how to perform this task using the Table block. That’s not all; we also learned how to add columns with the aid of a plugin.
Hopefully, this article was helpful to you. If it was, click on “Yes” beside the “Was this page helpful” question below.
You may also express your thoughts and opinions by using the “Leave a Reply” form at the bottom of this page.
Finally, visit our WordPress & Websites How-to Guides page for more insightful guides like this.
![WordPress Lost Password Redirects to Page Not Found [Fixed]](https://www.itechguides.com/wp-content/uploads/2024/03/WordPress-Lost-Password-Redirects-to-Page-Not-Found-Fixed.webp)