Have you wondered what PowerShell Get-Childitem is about and how to use the Cmdlet? In this in-depth guide, I dive into this popular Cmdlet.
Overview
The easiest way to explain Get-Childitem is that it is like the dir command in Command Prompt. Like the dir command, Get-Childitem lists the content of a directory or folder.
However, the PowerShell Get-Childitem returns more information and has more options than the dir command. On the flip side of the coin, the dir command is faster.
Anyway, the most important thing to note about the Get-Childitem Cmdlet is that it is used to list the content of a directory. But, as you’ll see in subsequent sections, it does much more than just list the content of a directory.
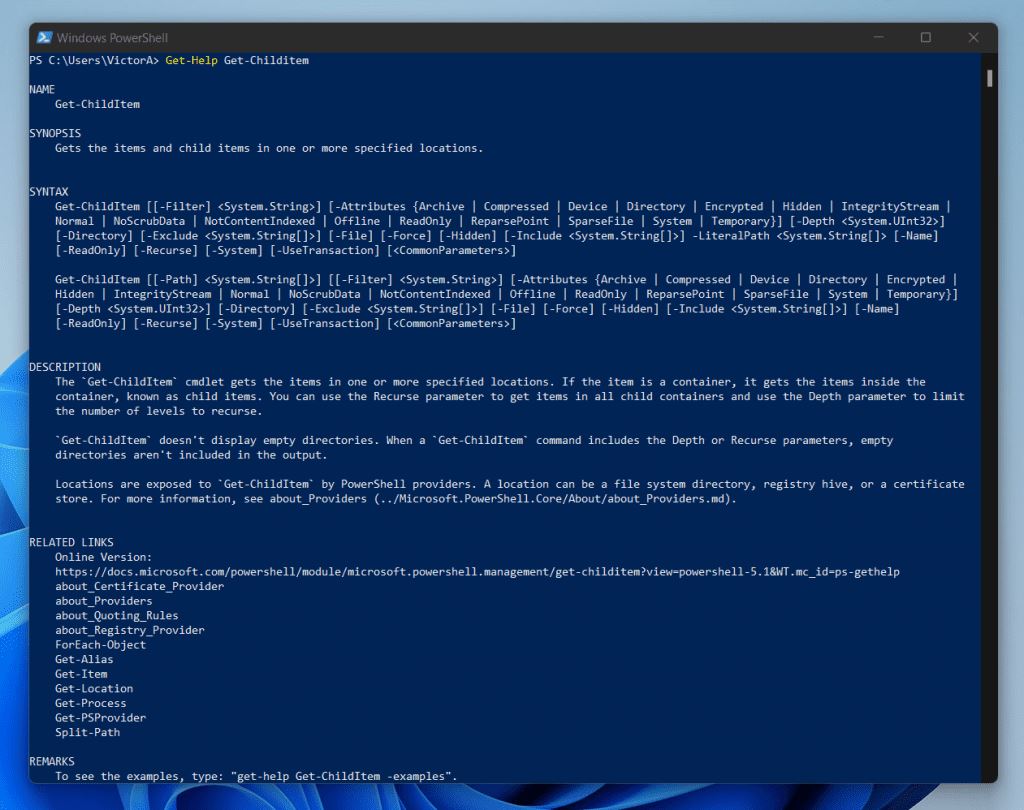
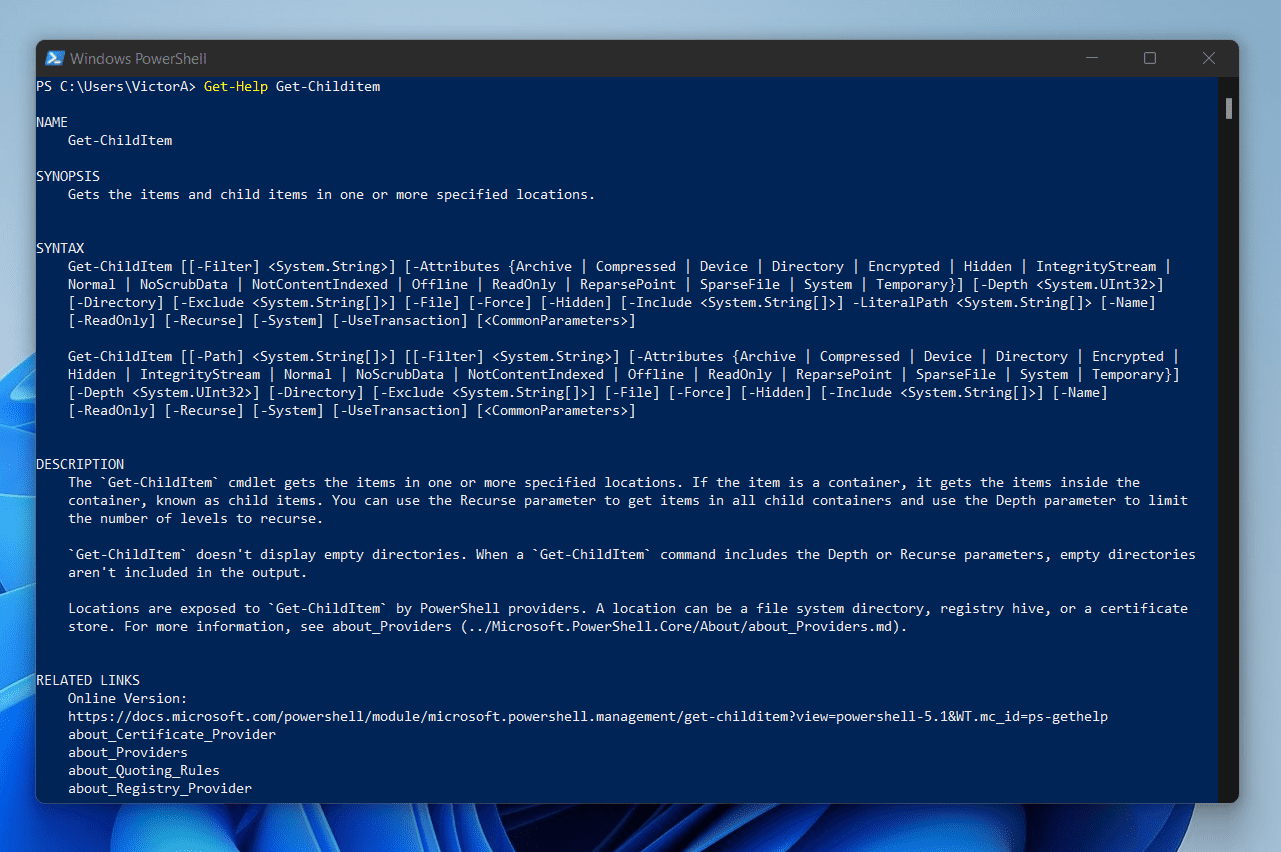
A better definition of the PowerShell Get-Childitem Cmdlet is that you can use it to list the items and child items in one or more specified locations. For clarity, a “location” could be a file system directory, registry hive, or a certificate store.
Like most PowerShell Cmdlets, Get-ChildItem has an alias. The alias of the Get-ChildItem is gci.
So, when you write scripts, you can use gci instead of using Get-ChildItem.
Syntax
The Get-Childitem Cmdlet has two syntaxes.
Get-ChildItem
   [[-Path] <string[]>]
   [[-Filter] <string>]
   [-Include <string[]>]
   [-Exclude <string[]>]
   [-Recurse]
   [-Depth <uint32>]
   [-Force]
   [-Name]
   [-Attributes <FlagsExpression[FileAttributes]>]
   [-UseTransaction]
   [-Directory]
   [-File]
   [-Hidden]
   [-ReadOnly]
   [-System]
   [<CommonParameters>]*
Get-ChildItem
   [[-LiteralPath <string[]>
   [[-Filter] <string>]
   [-Include <string[]>]
   [-Exclude <string[]>]
   [-Recurse]
   [-Depth <uint32>]
   [-Force]
   [-Name]
   [-Attributes <FlagsExpression[FileAttributes]>]
   [-UseTransaction]
   [-Directory]
   [-File]
   [-Hidden]
   [-ReadOnly]
   [-System]
   [<CommonParameters>]*
The difference between the two syntaxes is the Path and LiteralPath parameters. Every other parameter is the same in both syntaxes.
The implication is that when you run the PowerShell Get-ChilItem command, you CAN NOT use the Path and LiteralPath parameters in the same command. So, you can either use one or the other.
In the next section, I will explain the meaning of each parameter.
Parameters
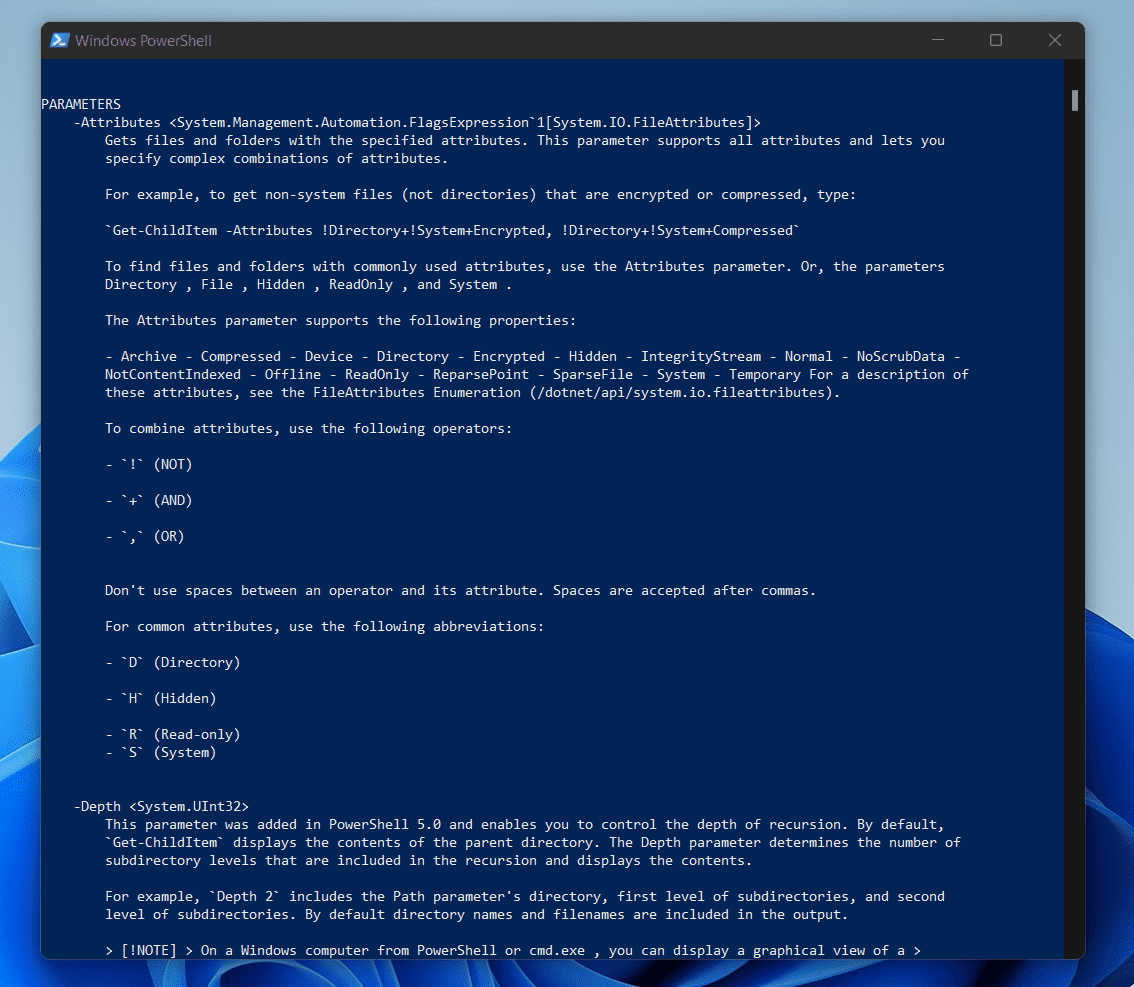
In the table below, I have listed all the parameters of the Get-Childitem Cmdlet. Also, I have explained what each parameter does.
| S/N | Get-Childitem Parameter Name | Get-Childitem Parameter Meaning/Notes |
|---|---|---|
| 1 | Path | Use the Path parameter to specify a path to one or more locations. Wildcards are accepted. The default location is the current directory (.). |
| 2 | LiteralPath | This parameter is also used to specify a path to one or more locations. However, unlike the Path parameter, LiteralPath does not permit the use of wildcards – its value is used exactly as it’s typed. |
| 3 | Filter | Using the filter parameter offers you a very efficient way to reduce the output of the Get-Childitem. You use this parameter to qualify the Path parameter. |
| 4 | Include | Use this parameter to specify an array of string patterns to be matched as Get-Childitem gets child items in a specified location. The Include parameter supports wildcards. |
| 5 | Exclude | Similar to the Include, but instead of including the matched pattern, when you use the Exclude parameter, the Get-Childitem Cmdlet will not include items that match a specified pattern |
| 6 | Recurse | This is a Switch parameter, meaning that it does not require any input. When you specify the Recurse parameter, PowerShell Get-Childitem returns all items in the specified locations. In addition to that, the Cmdlet also returns all child items of the locations. |
| 7 | Depth | The Depth parameter allows you to control the depth of recursion. In other words, the Depth parameter determines the number of subdirectory levels that are included in the recursion. |
| 8 | Force | When you specify the Force parameter, the PowerShell Get-Childitem Cmdlet can return items that otherwise can’t be accessed by the user, such as hidden or system files. Note that the Force parameter does not override security rules. |
| 9 | Name | Use the Name parameter to return the names of the items in a specified location. |
| 10 | Attributes | This is a very important parameter. When you specify the Attributes parameter, you can return files and folders with the specified attributes. |
| 11 | UseTransaction | Like the Recurse parameter, the UseTransaction parameter is a Switch parameter. This means that you do not need to specify a value when using the UseTransaction parameter. In terms of application, the UseTransaction parameter includes the command in the active transaction – only valid when a transaction is in progress. |
| 12 | Directory | This is also a Switch parameter (no input required). If you specify the Directory parameter, Get-Childitem returns only a list of directories. Another way to return only directories is to use the Attributes parameter and specify Directory as the property |
| 13 | File | To get a list of files in a specified path, use the File parameter. You can also use the Recurse parameter with the File parameter. |
| 14 | Hidden | To get the Get-Childitem Cmdlet to return only hidden items, use the Hidden parameter. Alternatively, you can use the Attributes parameter and specify the Hidden property. |
| 15 | ReadOnly | To get only read-only items (files, or folders), use the ReadOnly parameter. Another way to achieve the same result is to use the Attributes parameter and specify ReadOnly as the attribute you wish to return. |
| 16 | System | If you want the Get-Childitem Cmdlet to get only system files and folders, use the System parameter. Alternatively, you can use the Attributes parameter with the System property. |
Examples
In this section of the guide, you’ll learn different ways you can use the Get-Childitem command.
1. Use the “Path” and “Literalpath” Parameters
In the last section of the guide, I explained the parameters of the Get-Childitem Cmdlet. In that section, two of the parameters – “Path” And “Literalpath” – stood out.
If you recollect, I said that you cannot use the two parameters in the same command. The reason is that the two parameters work differently.
Specifically, when you use the Path Parameter, you can use wildcards. However, when you use the Literalpath Parameter, you have to use the full path – it does not support the use of wildcards.
In this example, I’ll show you how to use Path or Literalpath Parameter in PowerShell Get-Childitem.
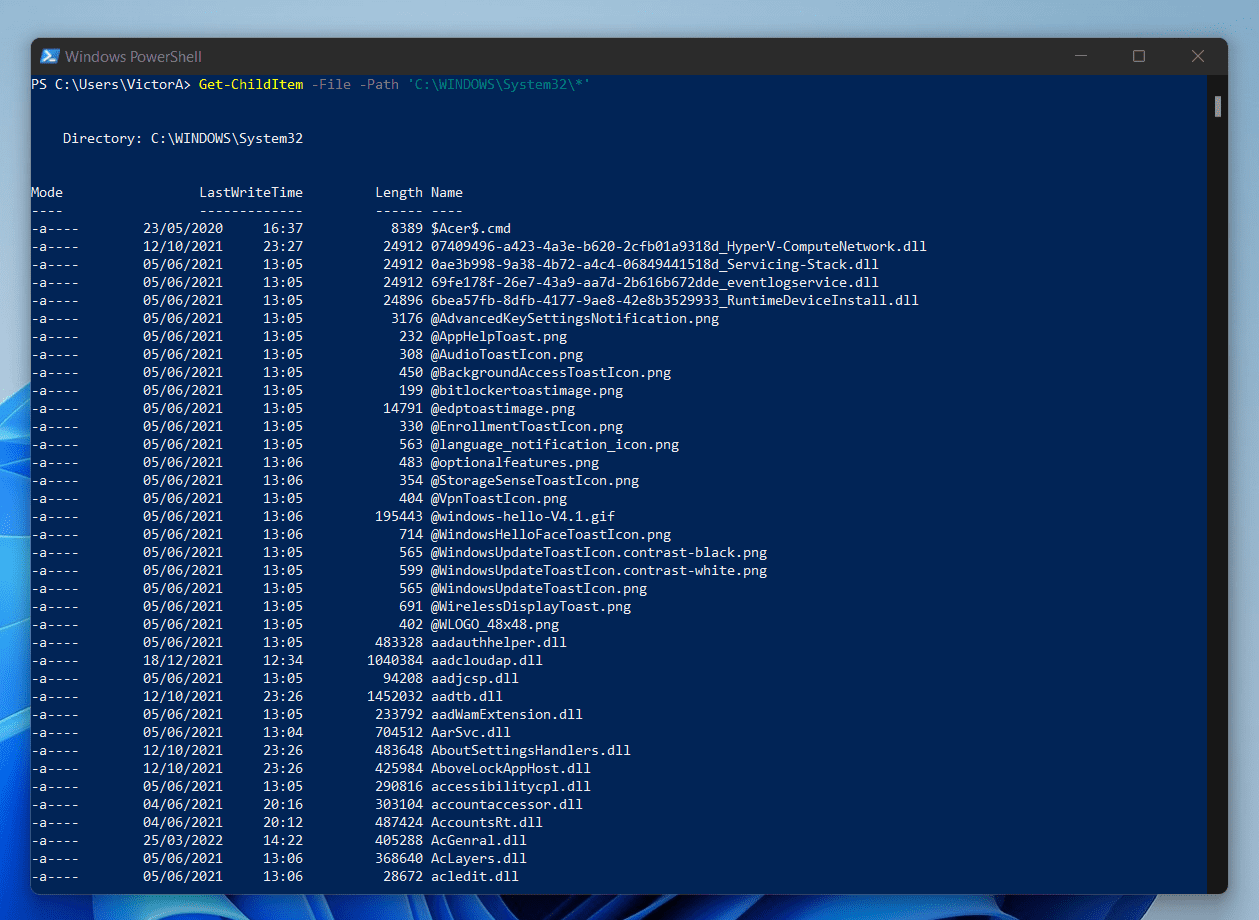
In my first example, I want to return the files in the path “C:\WINDOWS\System32”. To do this by specifying the Path parameter I will run the command below.
Get-ChildItem -Path 'C:\WINDOWS\System32\*' -File
Here is the result of the command.
On the other side of the coin, if I want to use the Literalpath Parameter, I’ll specify the path in full; without any wildcards. So, let me start by adding a wildcard at the end of the path…
Get-ChildItem -Literalpath 'C:\WINDOWS\System32\*' -File
The command will return an error message “Cannot find path ‘C:\WINDOWS\System32*’ because it does not exist.”
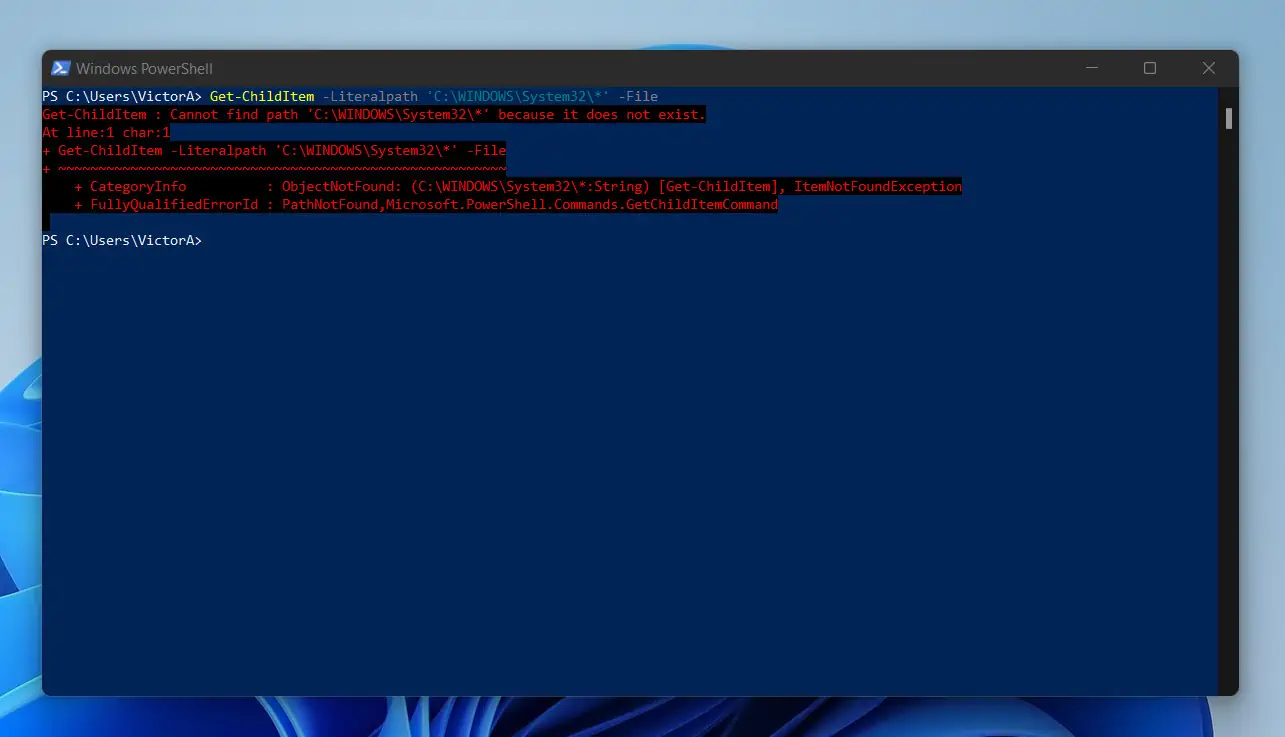
The reason for this error is that the Literalpath Parameter inteprets the specified path exactly as it’s typed.
So, to fix the problem, I’ll now run the command without the asterisks (*) at the end of the last slash after “System32”.
Get-ChildItem -Literalpath 'C:\WINDOWS\System32\' -File
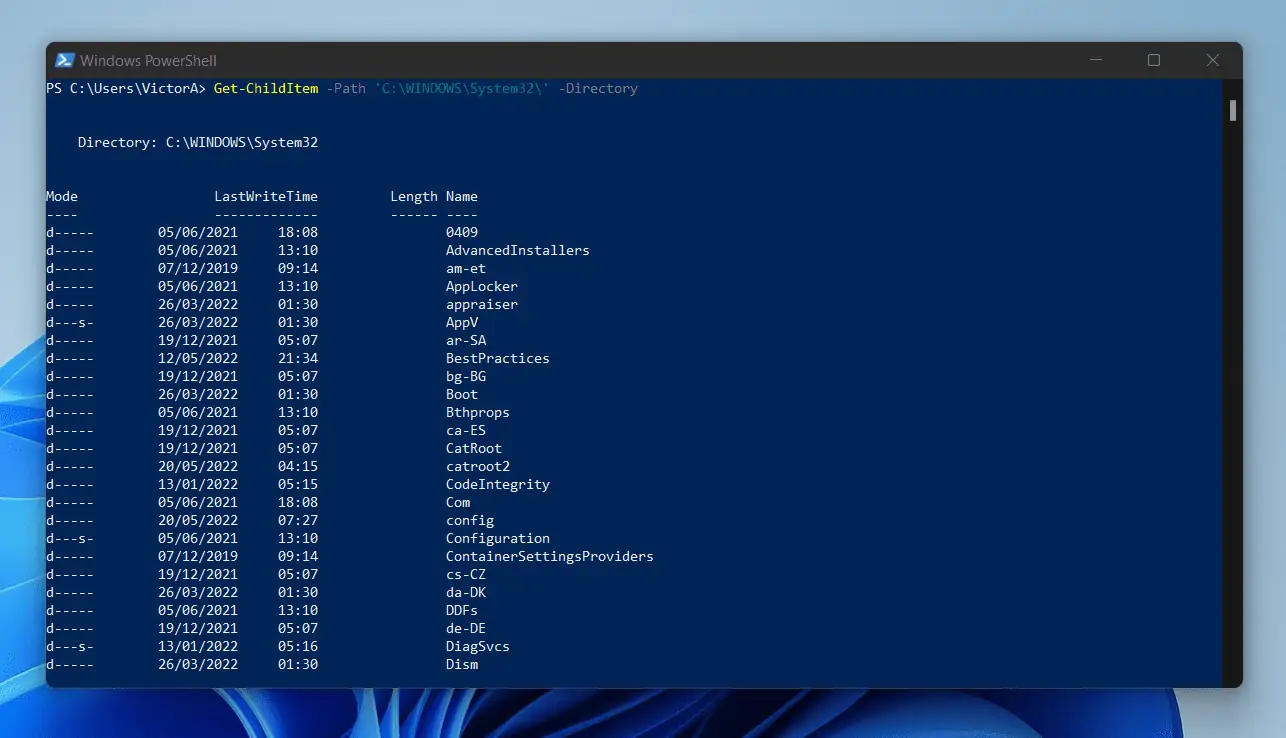
2. Get Directory or Folders Only
To return only directories or folders with the Get-Childitem command, use the Directory parameter. Here is a sample command.
Get-ChildItem -Path 'C:\WINDOWS\System32\' -Directory
Here is the result of the command in PowerShell…
Alternatively, if you do not want to use the Directory parameter, you can pipe the output of Get-Childitem to Where-Object. Then, filter PSIsContainer property.
Here is the command in PowerShell…
Get-ChildItem -Path 'C:\WINDOWS\System32\' | Where-Object {$_.PSIsContainer -eq $TRUE}
The command returns the same result as the previous command…

To help you understand the last command, here is a brief explanation.
Get-ChildItem -Path 'C:\WINDOWS\System32\' | Where-Object {$_.PSIsContainer -eq $TRUE}
When you run the PowerShell Get-Childitem command, the items returned has a property called PSIsContainer. Any object that has this property is a directory.
So, when you specify “Where-Object {$_.PSIsContainer -eq $TRUE}”, you’re asking PowerShell to return objects where the property PSIsContainer is true.
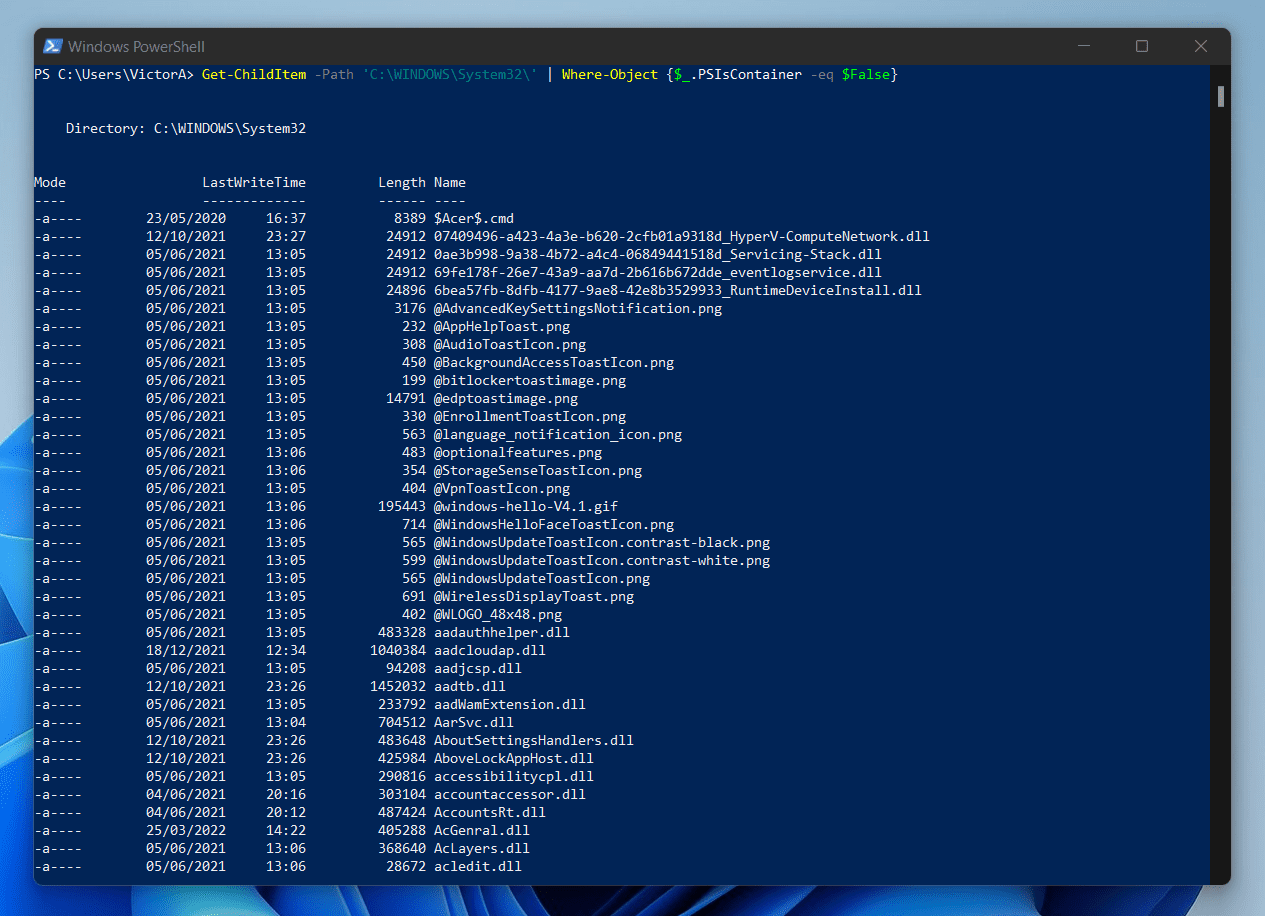
3. Get Files but Exclude Directories
In the last example, I showed you two methods you can use to Directories only. However, sometimes you may want to exclude Directories and return only files.
You can complete this task in two ways. One, by specifying the File parameter.
Get-ChildItem -File -Path 'C:\WINDOWS\System32\*'
Another way to achieve the same goal is to pipe the output of Get-ChildItem to Where-Object. Then, specify the PSIsContainer property as False.
Get-ChildItem -Path 'C:\WINDOWS\System32\' | Where-Object {$_.PSIsContainer -eq $FALSE}
4. Exclude a Sub-folder
In some instances, you may want to exclude a specific folder from the results of the Get-Childitem command.
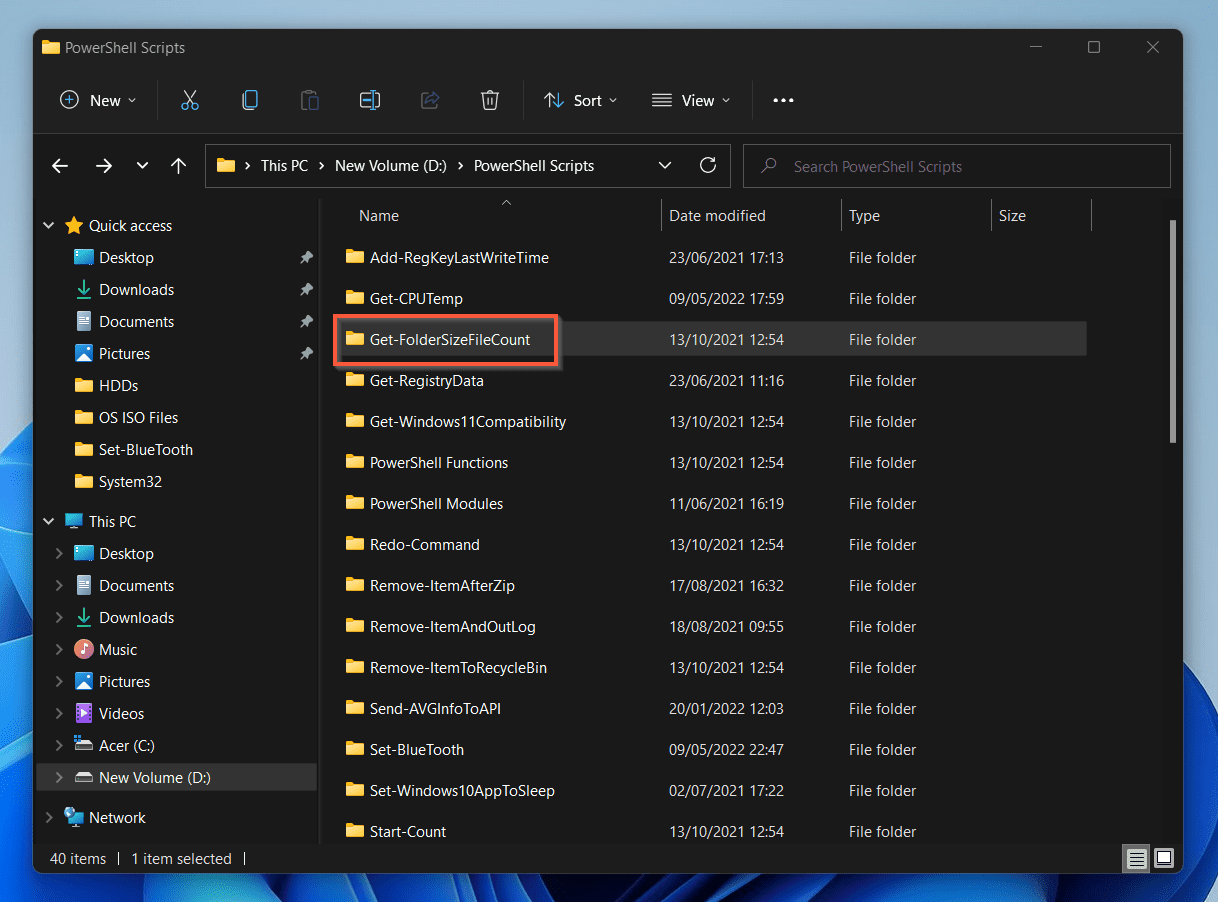
To demonstrate this, I will exclude the folder “Get-FolderSizeFileCount” from the result of Get-Childitem command. See the screenshot below.
I can achieve this in two ways:
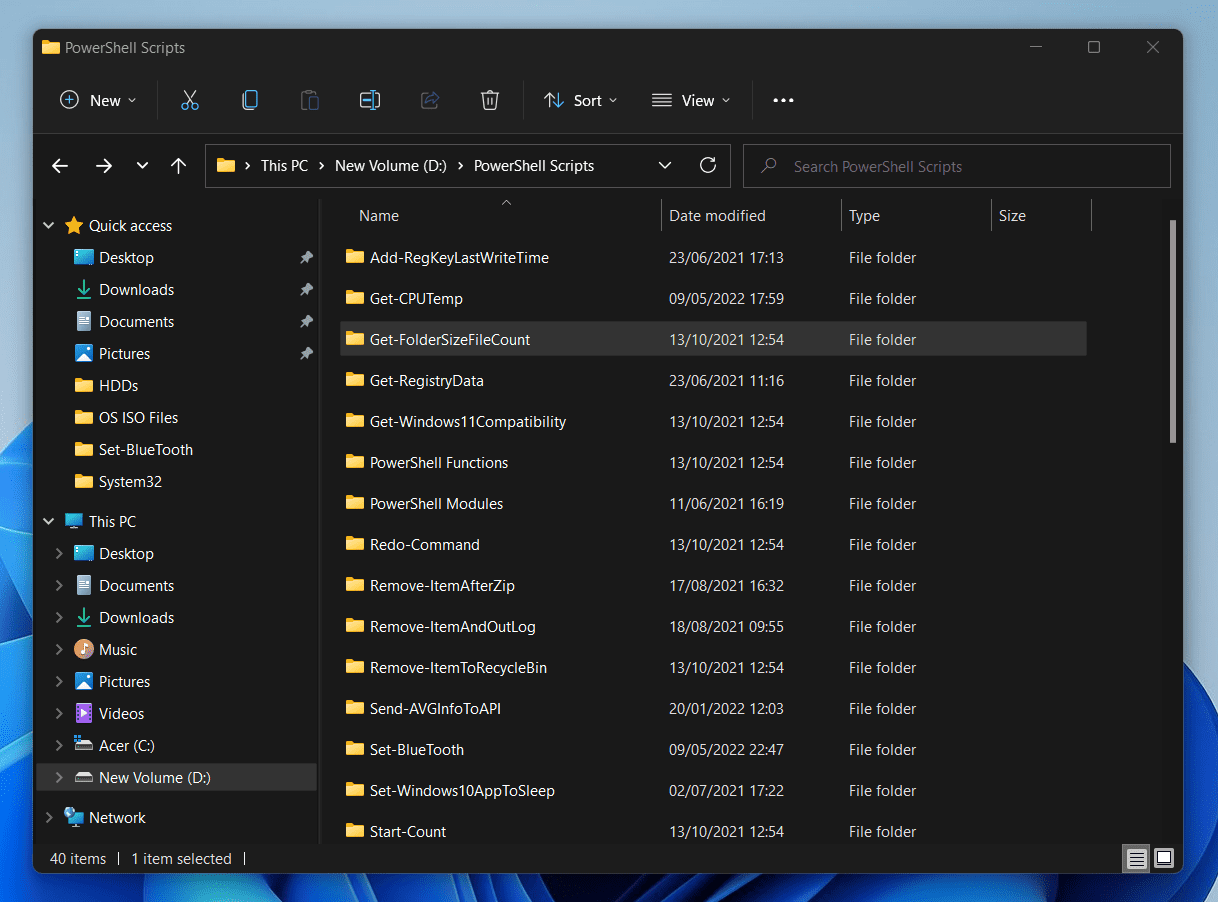
1, I can pipe the output of Get-ChildItem to Where-Object. Then, I will use the “Not Equal” operator to filter out the folder.
Get-ChildItem -Path "D:\PowerShell Scripts" | Where-Object {$_.Name -ne 'Get-FolderSizeFileCount'}
Alternatively, I can use the Exclude parameter of the Get-ChildItem to remove the folder I do not want PowerShell Get-Childitem to process.
Get-ChildItem -Path "D:\PowerShell Scripts" -Exclude Get-FolderSizeFileCount
Both commands produce the same result. See the screenshots below.

5. Get the Full Path and the Name of a Directory
When you run the Get-Childitem command, it returns the properties of objects. Two of the properties that Get-Childitem returns are the Name and Full Path of the items.
So, it is easy to return the Name and Full Path of Directories when you run the PowerShell Get-Childitem command.
To demonstrate, I’ll return the names and full paths of all directories in the screenshot below.
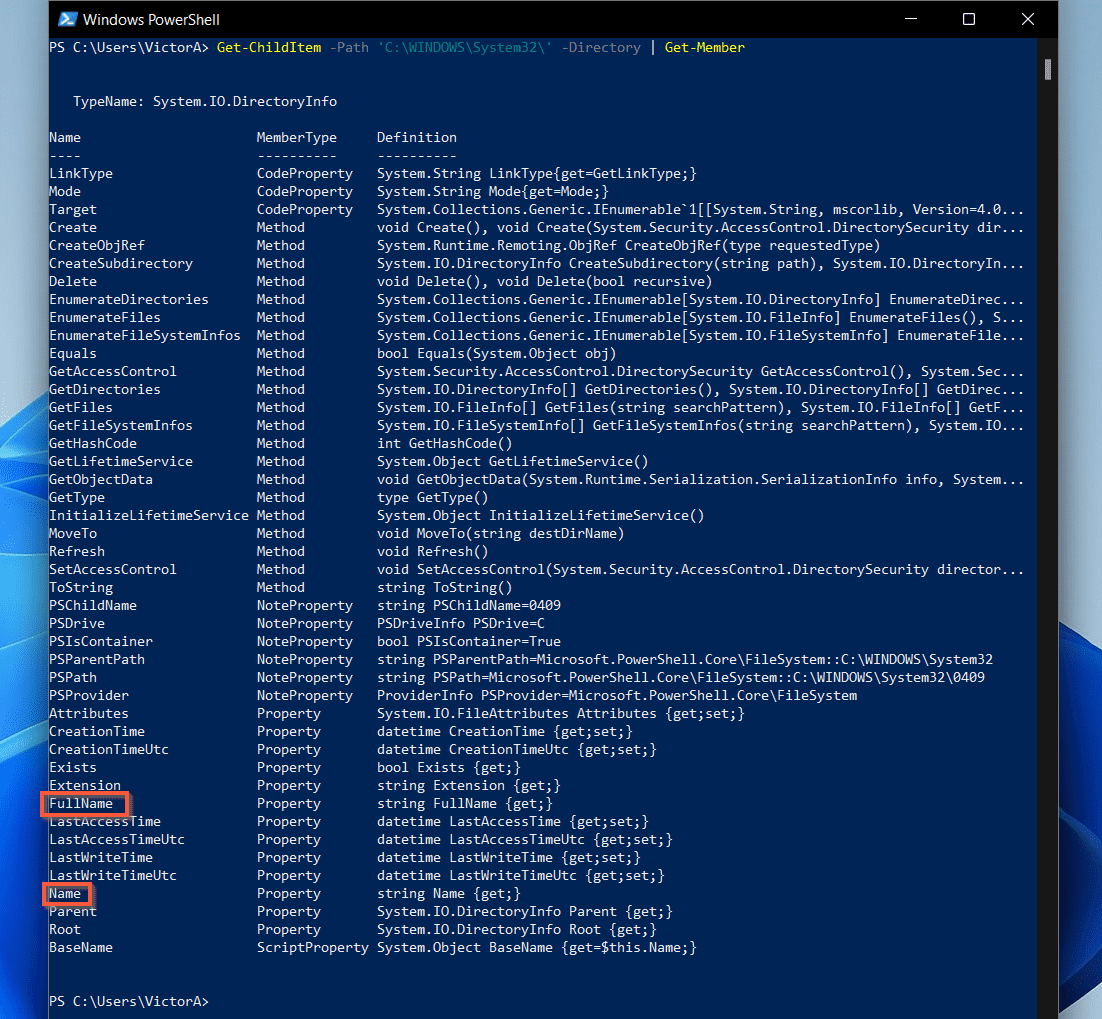
Before I run the command though, I need to determine the names of the two properties that represent the information I want to return.
To achieve this, I will pipe the output of the Get-ChildItem command to Get-Member.
Get-ChildItem -Path 'C:\WINDOWS\System32\' -Directory | Get-Member
As shown in the screenshot below, the command returns lots of properties. I have highlighted the two that I require for my command.
The Name property is easy to identify. However, the FullName property is not as straightforward.
I was able to identify this parameter as the Full Path of the directory because of my experience. However, if you’re new to PowerShell, you can start by highlighting all the properties you believe may represent what you need.
Then, try returning the properties to see what the result shows.
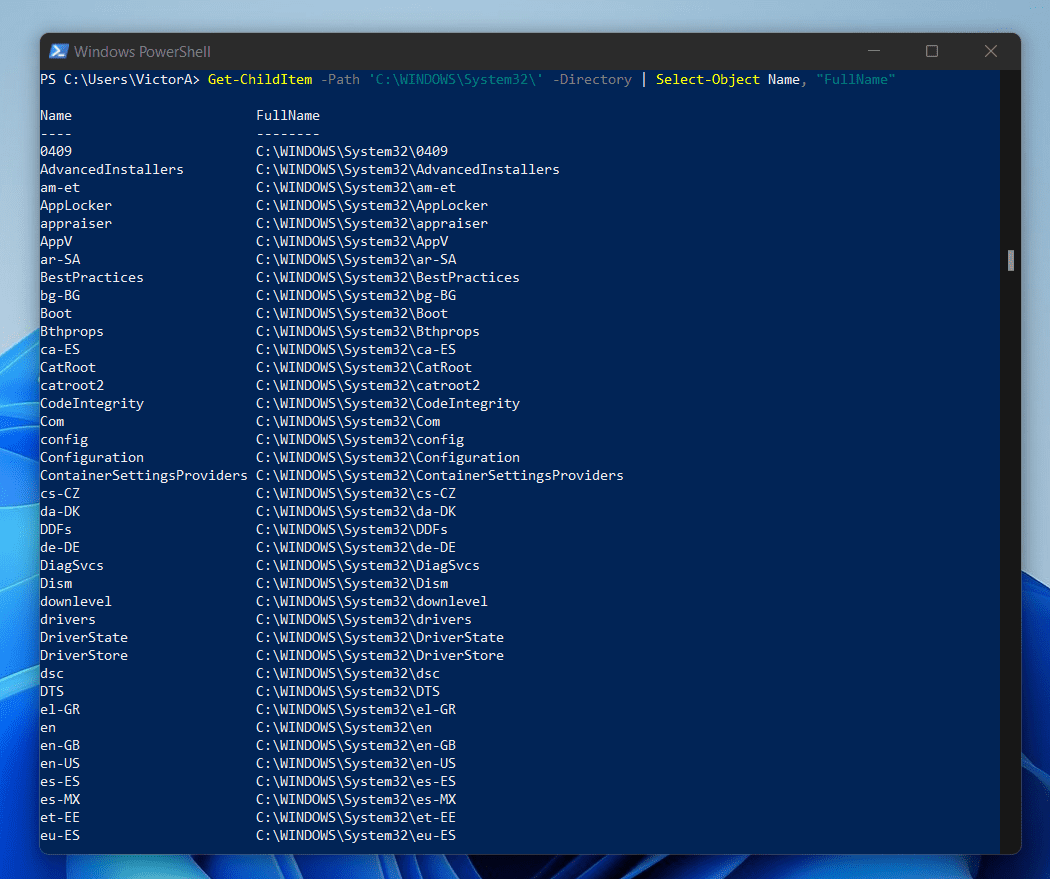
Moving on, based on the information I have from my previous command, I’ll use the command below to get the Full Path and Name of a Directory.
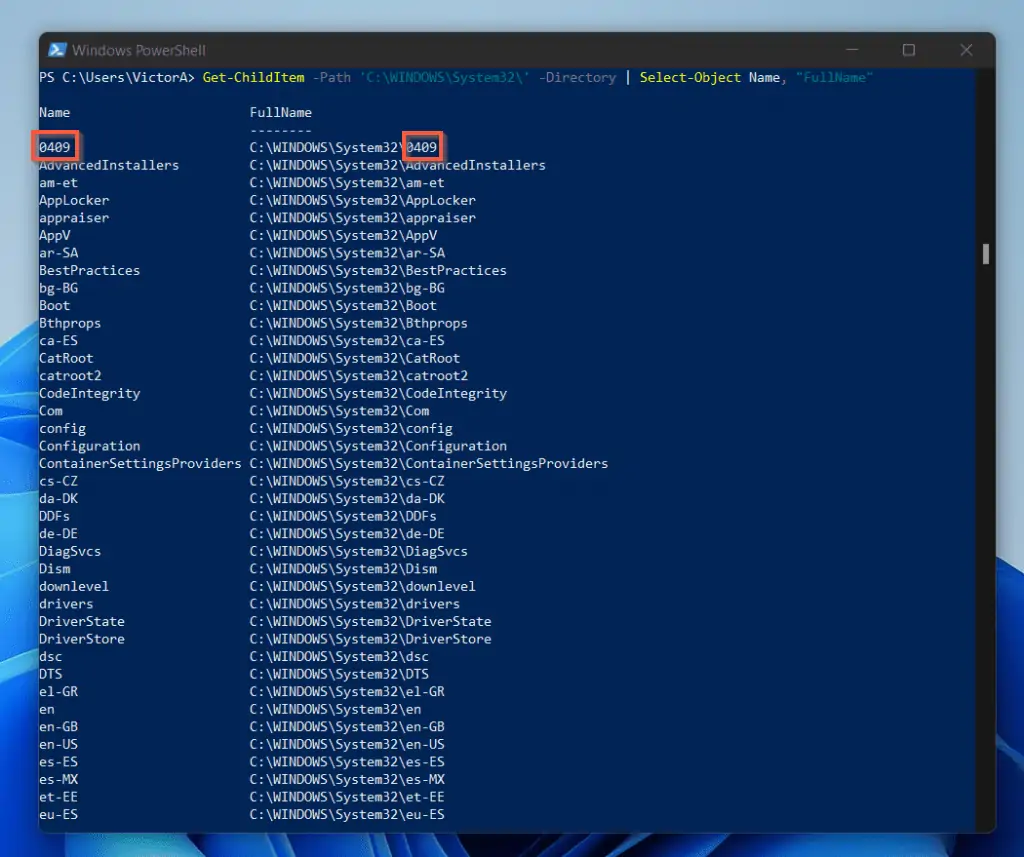
Get-ChildItem -Path 'C:\WINDOWS\System32\' -Directory | Select-Object Name, "FullName"
As you can see from the screenshot below, the command returns the full path, including the name of the folder (directory) itself.
6. Assign the Output to a Variable and Use in a Foreach Loop
To demonstrate this example, I’ll continue from the previous example. In the last example, I returned the Name and “FullName” (Full Path) of a Directory.
To refresh your memory, here is the command I used in the last sub-section.
Get-ChildItem -Path 'C:\WINDOWS\System32\' -Directory | Select-Object Name, "FullName"
Although the command returned the full path to the directory, it included the name of the directory to the path.
But, wait a minute, I do not want the path to include the name of the directory itself. One way to do this is to loop the output of the PowerShell Get-Childitem in a Foreach.
However, to reduce the complexity of the code, it is better to save the output of the Get-Childitem command in a variable.
To save the command below in a variable, modify the command as shown in the second command below the first one…
Get-ChildItem -Path 'C:\WINDOWS\System32\' -Directory | Select-Object Name, "FullName"
$dirs = Get-ChildItem -Path 'C:\WINDOWS\System32\' -Directory | Select-Object Name, "FullName"
In the second command, I simply added “$dirs =”. In the command, “$dirs” is the variable.
Next, I want to bring in PowerShell Foreach. I will then modify the last script as shown below:
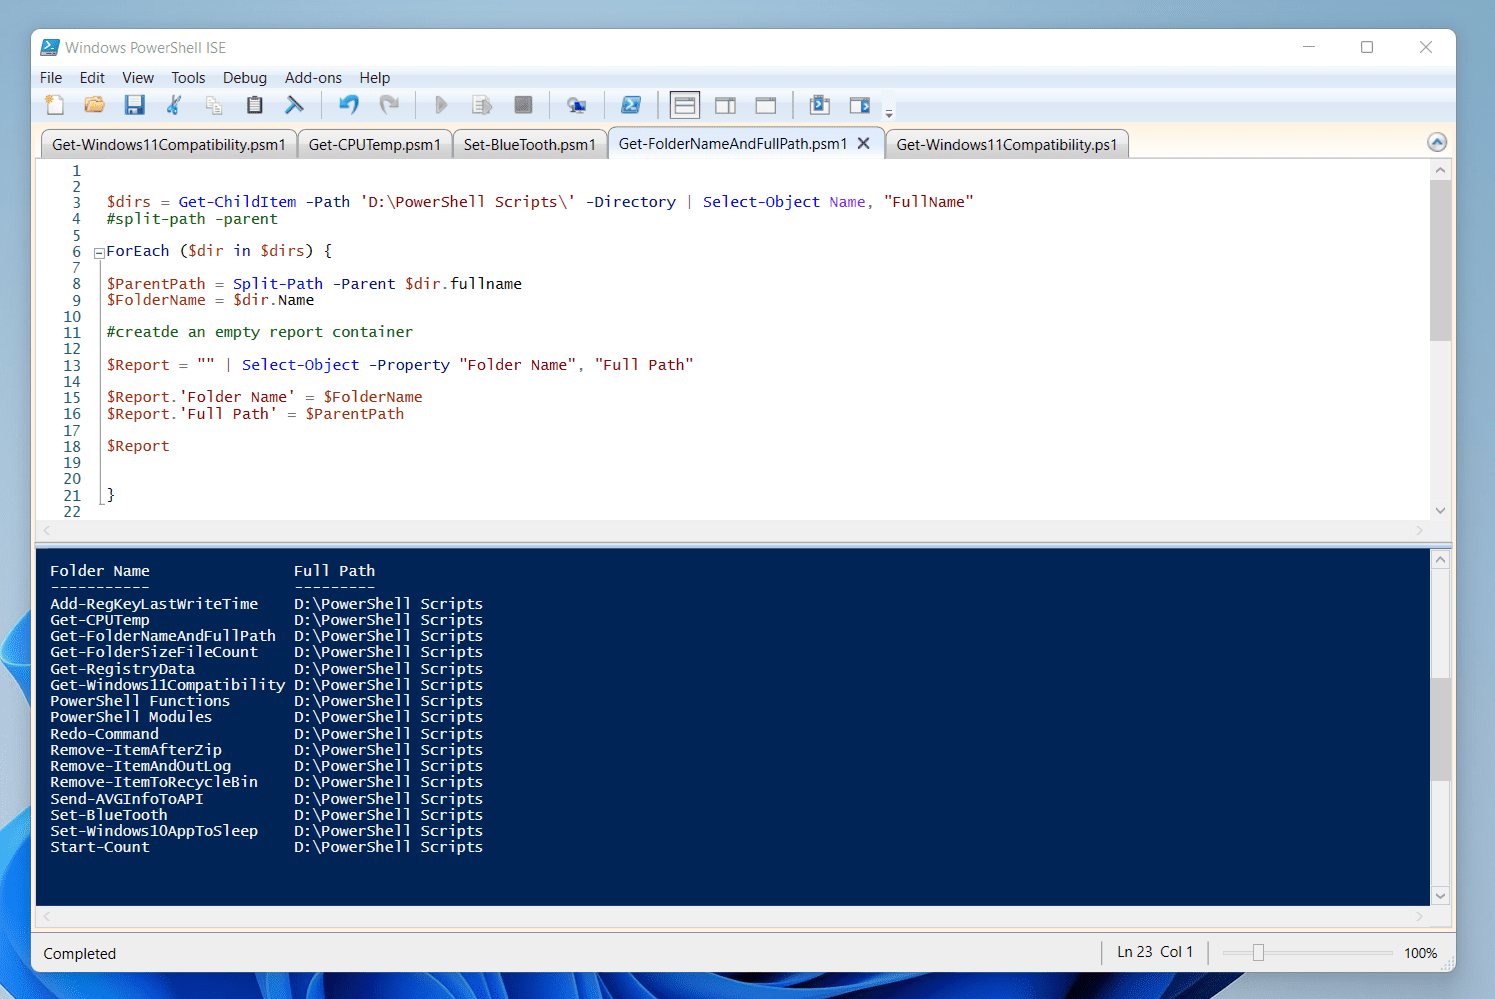
$dirs = Get-ChildItem -Path 'D:\PowerShell Scripts\' -Directory | Select-Object Name, "FullName"
  ForEach ($dir in $dirs) {
    $ParentPath = Split-Path -Parent $dir.fullname
    $FolderName = $dir.Name
#creatde an empty report container
    $Report = "" | Select-Object -Property "Folder Name", "Full Path"
#link the properties of the report to the outout of lines 3 and 4
    $Report.'Folder Name' = $FolderName
    $Report.'Full Path' = $ParentPath
#finally, call the report
$Report
}
Here is the result of the script in PowerShell ISE. Beneath the screenshot below, I have a detailed explanation of the script.
To make it easier for you to follow my explanation of the script, I have added line numbers.
1 $dirs = Get-ChildItem -Path 'D:\PowerShell Scripts\' -Directory | Select-Object Name, "FullName"
2  ForEach ($dir in $dirs) {
3  $ParentPath = Split-Path -Parent $dir.fullname
4  $FolderName = $dir.Name
5 #creatde an empty report container
6   $Report = "" | Select-Object -Property "Folder Name", "Full Path"
7 #link the properties of the report to the outout of lines 3 and 4
8   $Report.'Folder Name' = $FolderName
9  $Report.'Full Path' = $ParentPath
10 #finally, call the report
11 $Report
12 }
Here is a brief explanation of each line of the code:
- In line 1, I saved the result of the Get-ChildItem command in the dirs variable.
- Then, in line 2, I used the dirs variable in my ForEach statement loop. Every other line of code is within the ForEach statement loop.
- In line 3, I saved the result of “Split-Path -Parent $dir.fullname” in the ParentPath variable. The command “Split-Path -Parent $dir.fullname” removes the name of the directory from the FullName property. I used this property in an earlier example.
- Then, in line 4, I saved the command $dir.Name in the FolderName variable. The command $dir.Name extracts the folder name of the folder.
- Moving on to line 5, I added a comment providing information. Any comment you add in a PowerShell script does not execute.
- In line 6, I used the Select-Object command to create an empty report with two properties – “Folder Name” and “Full Path.” Then, I saved the result of the Select-Object command on the Report variable.
- Then, in line 7, I added another comment explaining what I intend to achieve with the codes below the comment.
- In pine 8, I linked the “Folder Name” property of the Select-Object command saved in the Report variable to information saved in the FolderName variable. The command in line 8 adds the information saved in the FolderName variable into the “Folder Name” property of the Select-Object command.
- The command in line 9 is similar to that in line 8. However, in line 9, I link the “Full Path” property to the information saved in the ParentPath variable.
- Line 10 is a comment.
- Then, in line 11, I call the report.
- Finally, in line 12, I close (with }) the ForEach loop statement I opened (with {) in line 2.
7. Use the “Recurse” and “Depth” Parameters
You specify the Recurse parameter when you want PowerShell Get-Childitem to return results from a specified path and all sub-folders. When you specify the Recurse parameter, Get-Childitem checks all sub-folders by default.
However, if you want Get-Childitem to check up to a particular sub-folder level, you specificity the Depth parameter.
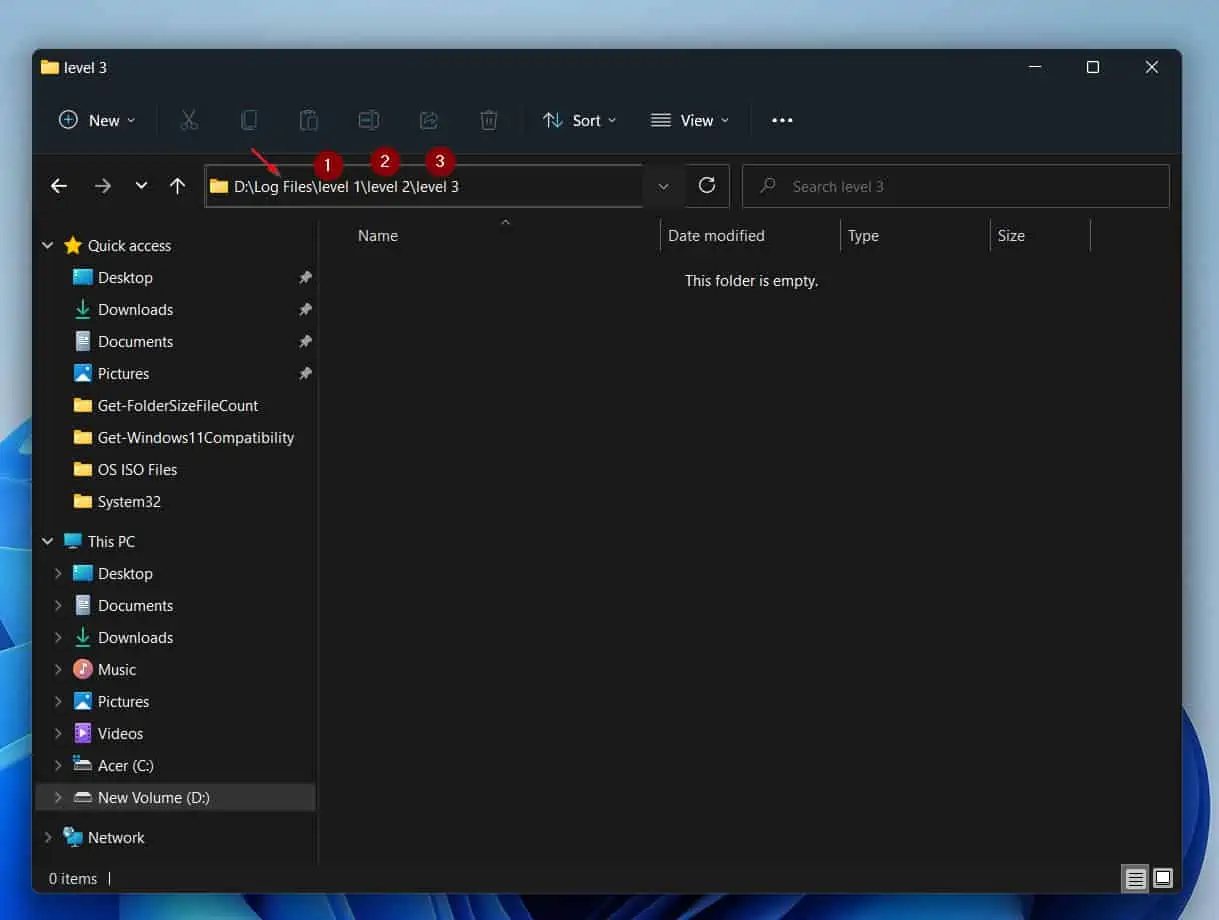
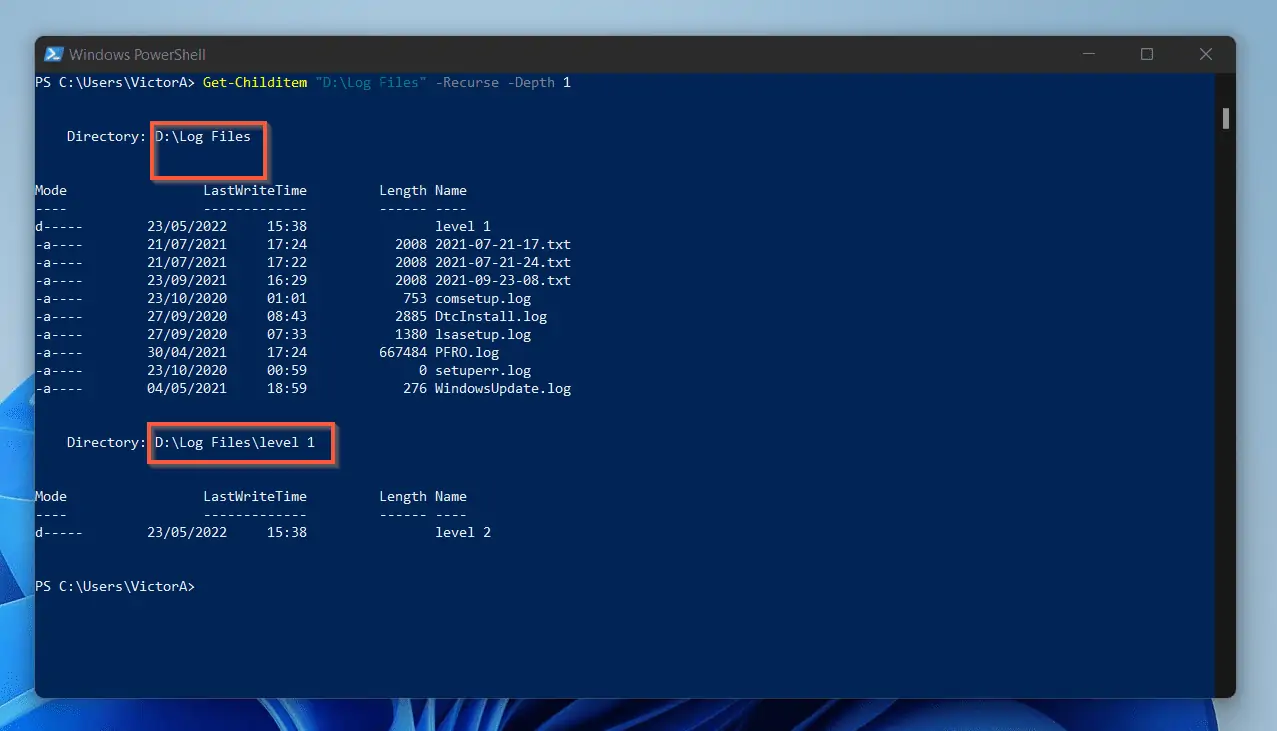
I have a folder called “Log Files” located in drive D on my laptop. I created three folders under “Log Files” to show you how this works – see the screenshot below.
First of all, I will run the Get-Childitem command with the Recurse parameter.
Get-Childitem "D:\Log Files" -Recurse
PowerShell Get-Childitem will display information about all the folders in “Log Files” and all sub-folders.
But if I want Get-Childitem to go just 1 level deep, I will include the Depth parameter as shown in the command below…
Get-Childitem "D:\Log Files" -Recurse -Depth 1
This time, the command will return information about “Log Files” and only the first level sub-folders.
8. Order the Output by Date, Name, Size, or File Extension
When you run the Get-Childitem command, it returns a number of properties. Some of the properties returned are Date, Name, Size (Length), and File Extension.
You can order the output of PowerShell Get-Childitem by any of these properties.
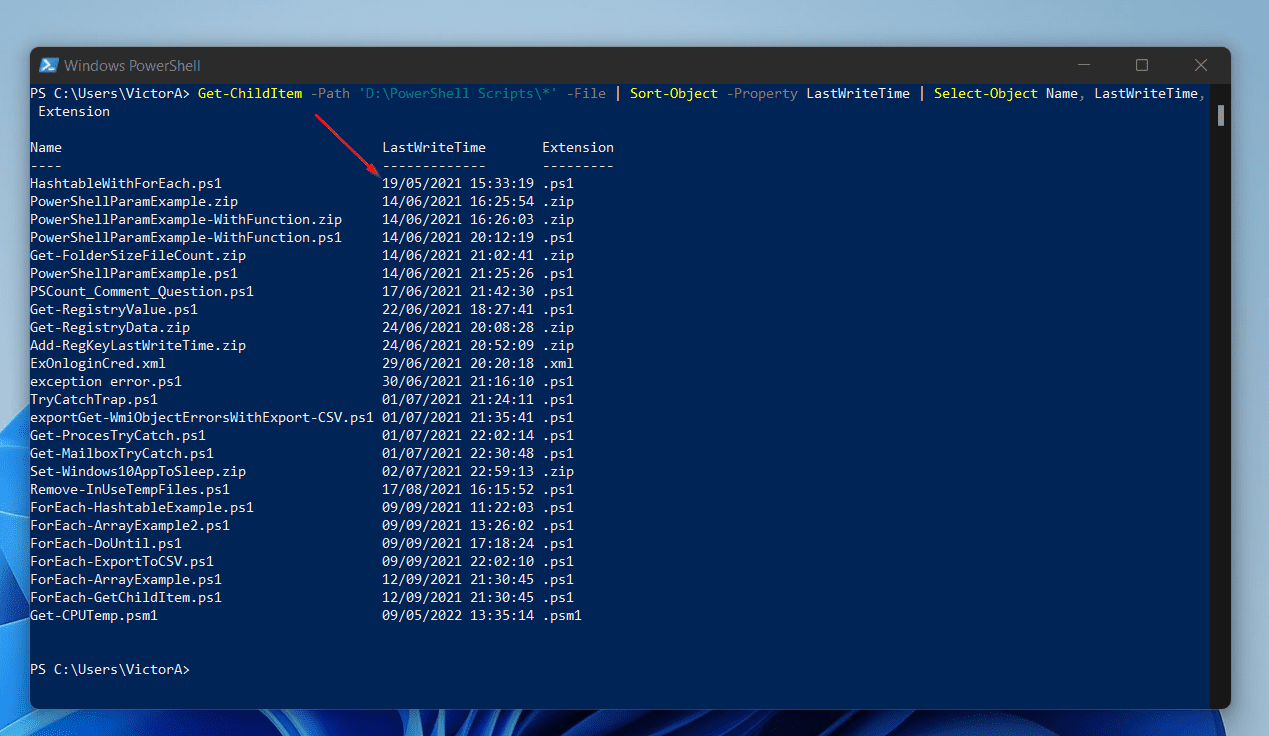
To kick the example in this sub-section off, the command below will order the result of Get-Childitem by Name.
Get-ChildItem -Path 'D:\PowerShell Scripts\*' -File | Sort-Object -Property Name | Select-Object Name, LastWriteTime, ExtensionThe command that does the sorting is the Sort-Object command. You can see in the screenshot below that the results are ordered by the name of the folders.
Similarly, I can order the result by the last time the folders or files were updated. The property with this information is called LastWriteTime.
So, here is the command that orders the result of Get-Childitem by date.
Get-ChildItem -Path 'D:\PowerShell Scripts\*' -File | Sort-Object -Property LastWriteTime | Select-Object Name, LastWriteTime, Extension
Now, the Get-ChildItem command has ordered the result by the date created – starting from the older item.
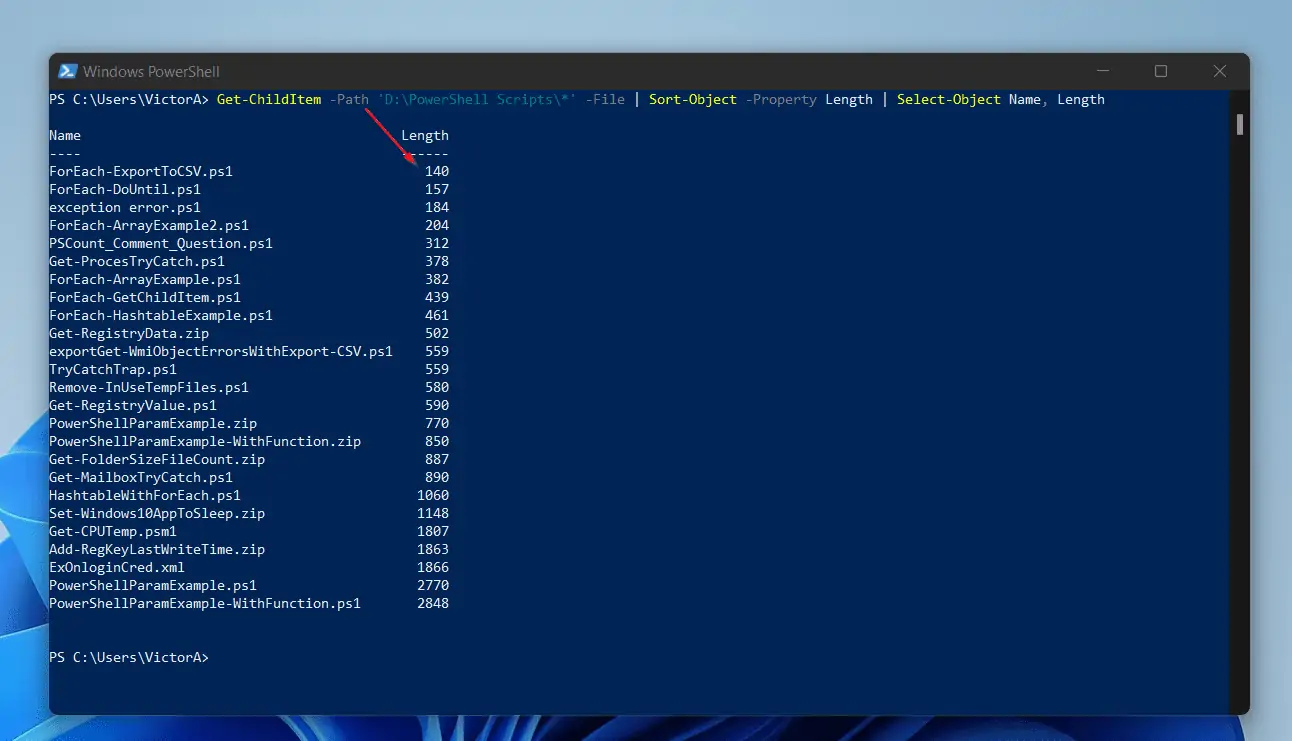
Similarly, to order the results of PowerShell Get-Childitem by Size or File Extension, I’ll use the following commands:
Get-ChildItem -Path 'D:\PowerShell Scripts\*' -File | Sort-Object -Property Length | Select-Object Name, Length
The command displays the file with the smallest size first.
Get-ChildItem -Path 'D:\PowerShell Scripts\*' -File | Sort-Object -Property Extension | Select-Object Name, Extension This time around, Get-ChildItem ordered the result by file Extension.
Frequently Asked Questions
The Get-ChildItem returns the items and child items in one or more specified locations. You can use Get-ChildItem to list items and child items in a file system directory, registry hive, or certificate store.
To get the full path of items with the Get-ChildItem command, return the “FullName” property. For example, the command below returns the full path of all items (files and folders) in the path ‘D:\PowerShell Scripts’
Get-ChildItem -Path ‘D:\PowerShell Scripts’ -Directory | Select-Object Name, “FullName”
To get only files using Get-ChildItem, specify the File parameter. For example, the command below returns only files.
Get-ChildItem –File -Path ‘D:\PowerShell Scripts’‘
To get a list of directories in PowerShell, specify the Directory parameter in a Get-ChildItem command. Here is an example:
Get-ChildItem –Directory-Path ‘D:\PowerShell Scripts’‘
To get a list of files in a directory and subfolders in PowerShell, run the Get-ChildItem command. Then, specify the File and the Recurse parameters.
The File parameter tells PowerShell Get-Childitem to return only files. On the other hand, the Recurse parameter returns items from all sub-folders.
Conclusion

The Get-Childitem Cmdlet is one of the most important Cmdlets in PowerShell. As you have seen in this guide, you can use this Cmdlet to return information about folders.
In addition to folders, you can also use Get-Childitem to list information about registry hives.
I hope you found this article helpful. If you did, click on “Yes” beside the “Was this page helpful” question below.
You may also express your thoughts and opinions by using the “Leave a Comment” form at the bottom of this page.
Finally, for more PowerShell tech Itechguides, visit our Windows PowerShell Explained page. You may also find our Windows PowerShell How-To Guides page valuable.