Have you been wondering what the Format-Table command does in PowerShell? I will tell you all about it in this guide!
Overview
The best way to introduce the Format-Table command is with an example. Let’s start by running the command below.
Get-Service -Name win*
This command returns all services on the local computer that begins with win. Here is the result of the command on my Windows 11 PC…
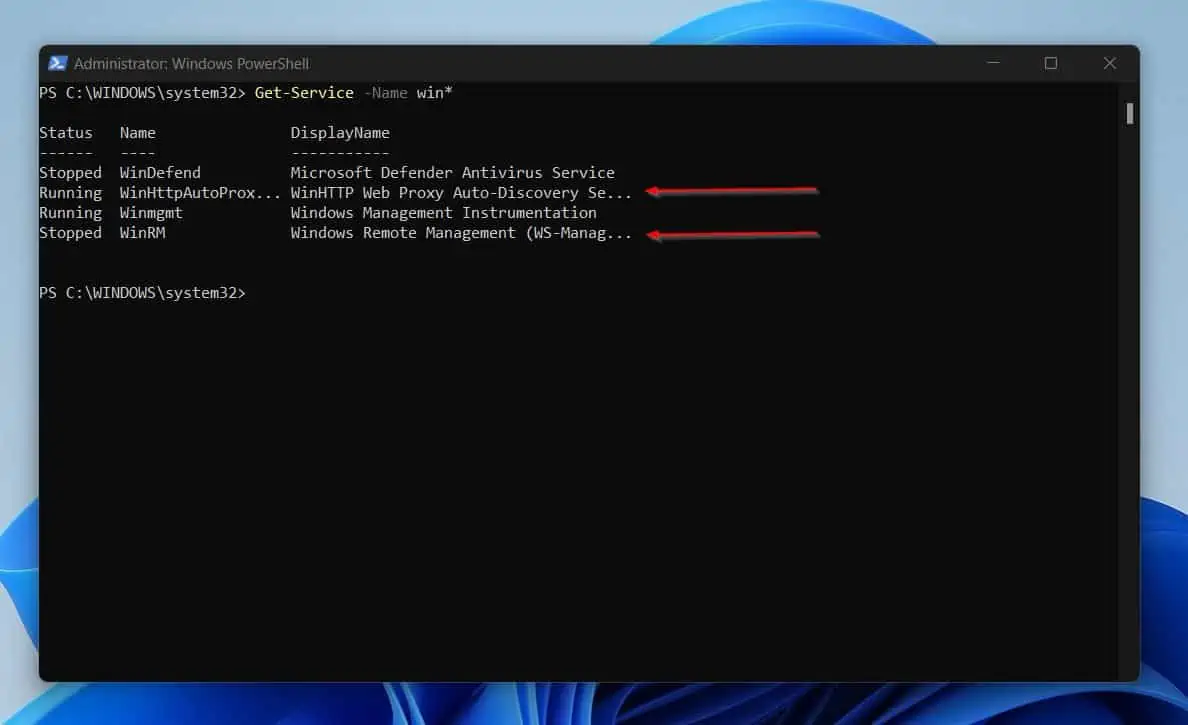
Take another look at the table returned by the last command. You’ll notice that some of the items in the DisplayName column are hidden.
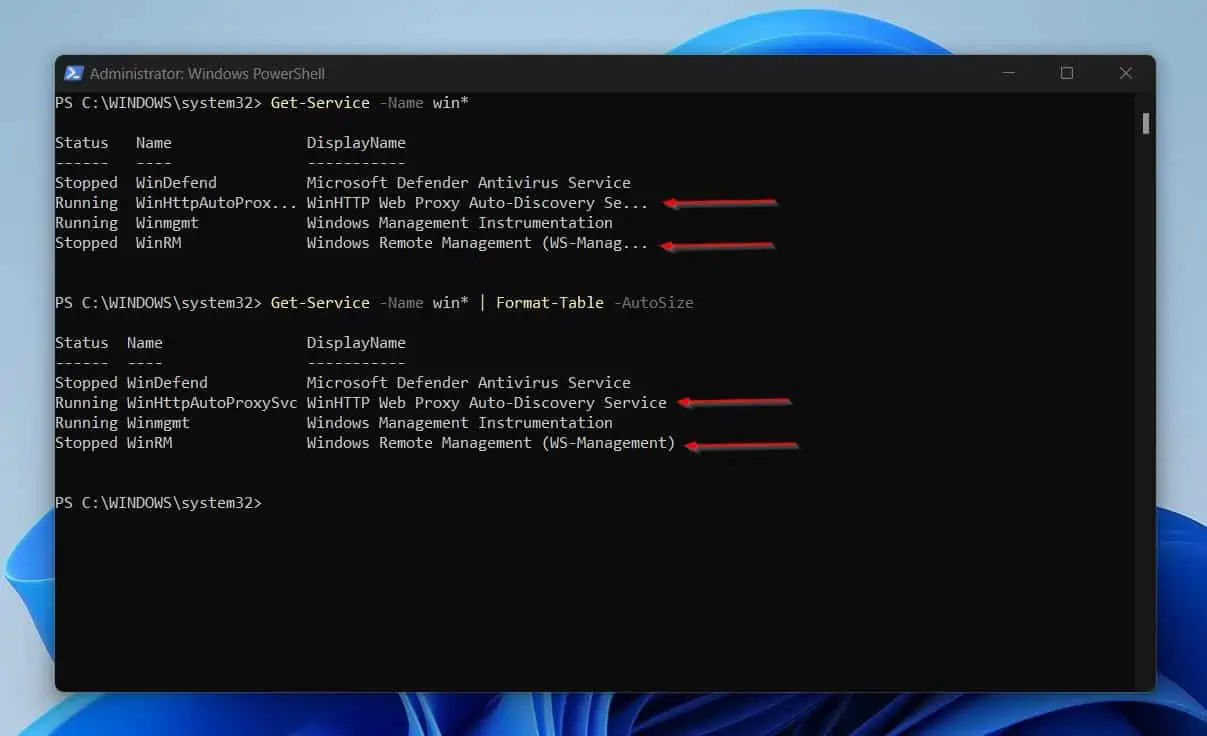
Now, run the last command again. But, this time, pipe the result to a PowerShell Format-Table command and include its AutoSize parameter.
Get-Service -Name win* | Format-Table -AutoSize
Now, the previously hidden items are now displayed. The Format-Table command with its AutoSize parameter has done some magic!
The PowerShell Format-Table command does what its name says. It formats the result of a command as a table.
Additionally, the Format-Table command uses the selected properties of the object in each column to format the output of the command piped into it.
So, if we go back to the last command above…
Get-Service -Name win* | Format-Table -AutoSize
The Format-Table command formatted the result piped to it by the Get-Service command.
Before I move on from this section, it is important to mention that the Format-Table command can also modify the columns it displays in the final results.
Similarly, Format-table supports calculated values like Select-Object. See how to do this in the examples section of this guide.
In the remaining sections of this article, I’ll be exploring different ways to explain this all-important PowerShell command.
Syntax and Parameters of the PowerShell Format-Table Command
The syntaxes of the Format-Table command are…
Format-Table
      [-AutoSize]
      [-RepeatHeader]
      [-HideTableHeaders]
      [-Wrap]
      [[-Property] <Object[]>]
      [-GroupBy <Object>]
      [-ShowError]
      [-DisplayError]
      [-Force]
      [-Expand <String>]
      [-InputObject <PSObject>]
      [<CommonParameters>]
Format-Table
[-AutoSize]
[-RepeatHeader]
[-HideTableHeaders]
[-Wrap]
[-GroupBy <Object>]
[-View <String>]
[-ShowError]
[-DisplayError]
[-Force]
[-Expand <String>]
[-InputObject <PSObject>]
[<CommonParameters>]In the table below, I have explained the parameters of the PowerShell Format-Table command.
| PowerShell Format-Table Parameter Name | Parameter Meaning/Notes |
|---|---|
| AutoSize | The AutoSize parameter is a SwitchParameter. This means that when you specify the AutoSize, you do not need to include any value. Furthermore, when you specify AutoSize, the PowerShell Format-Table command adjusts the column size and number of columns based on the width of the data. In other words, AutoSize fits all columns into the PowerShell window. If you do not specify the AutoSize parameter, the column size and number are determined by the view. |
| RepeatHeader | The RepeatHeader parameter is also a SwitchParameter. When you specify RepeatHeader, Format-Table repeats displaying the header of a table after every screen full. This parameter is useful if you pipe the output of Format-Table to “more.” |
| HideTableHeaders | The HideTableHeaders parameter of the PowerShell Format-Table command is yet another SwitchParameter. This parameter hides or removes the table headers. |
| Wrap | The Wrap parameter moves excess tests that would otherwise be hidden to the next line. If you do not specify the Wrap parameter, Format-Table truncates texts that exceed the column width. |
| Property | Use the Property parameter to specify the object properties that appear in the result and the order in which they appear. The value of the Property parameter can be a calculated property – a script block or a hash table. |
| GroupBy | The GroupBy parameter specifies sorted output in separate tables based on a property value. For example, you can use GroupBy to list services in separate tables based on their status. Note that the GroupBy parameter expects the table to be stored. So, before you send the result you want to be grouped to the PowerShell Format-Table command, first, sort it with the Sort-Object command. Finally, like the Property parameter, the value in the GroupBy result can also be a calculated value. |
| View | Prior to PowerShell 5.1, the default views were defined in *.format.ps1xml files stored in $PSHOME. You can use the View parameter to specify an alternate format or custom view for the table. |
| ShowError | The ShowError parameter sends errors through the pipeline. This is a good debug aid when you’re using expressions in a Format-Table command and need to troubleshoot the expressions. |
| DisplayError | Use this parameter to indicate that the cmdlet displays errors on the command line. Like the ShowError parameter, the DisplayError parameter is useful for debugging. |
| Force | This is also an error management parameter. It indicates that the PowerShell Format-Table command directs the cmdlet to display all the error information. |
| Expand | Useful for the formatting of a collection object and the objects in the collection. The following are acceptable values: EnumOnly: Displays the properties of the objects in the collection. CoreOnly: Displays the properties of the collection object. Both: Displays the properties of the collection object and the properties of objects in the collection. |
| InputObject | You can use the InputObject parameter to specify the objects to format. You can specify a variable or enter a command. Use the InputObject parameter instead of piping input to Format-Table. |
PowerShell Format-Table Examples
Now that you have read an overview of this cmdlet and also see its syntaxes and parameters, it is time to see how to use it in real-life! In the following subsections, I have discussed applications and examples of how to use the PowerShell Format-Table command.
Example 1: Control Column Width with PowerShell Format-Table
When you run some PowerShell commands that display results in a table, some of the texts in the columns are hidden.
The Format-Table command has multiple parameters you can use to control column width. One of those parameters is the AutoSize parameter.
If you specify this parameter, Format-Table displays all information that would otherwise be hidden.
To demonstrate how this works, I’ll use the same command I used in the overview section of this article.
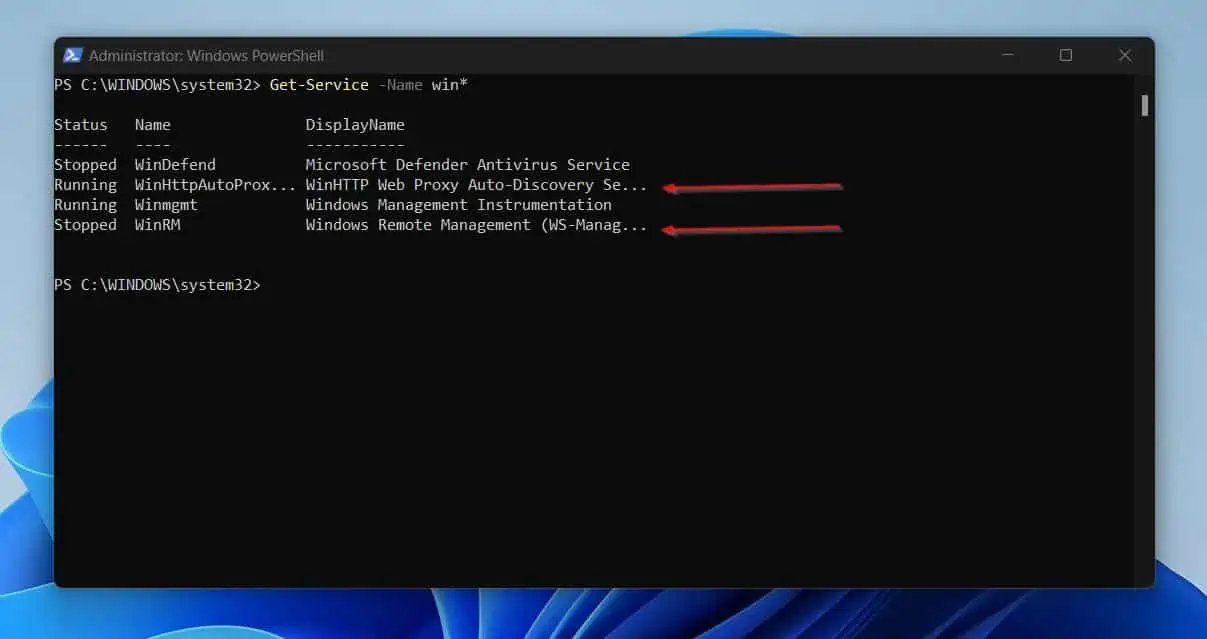
Get-Service -Name win*
The above command displays all Windows services that begin with a win on the local computer. However, some of the results in the DisplayName column are hidden.
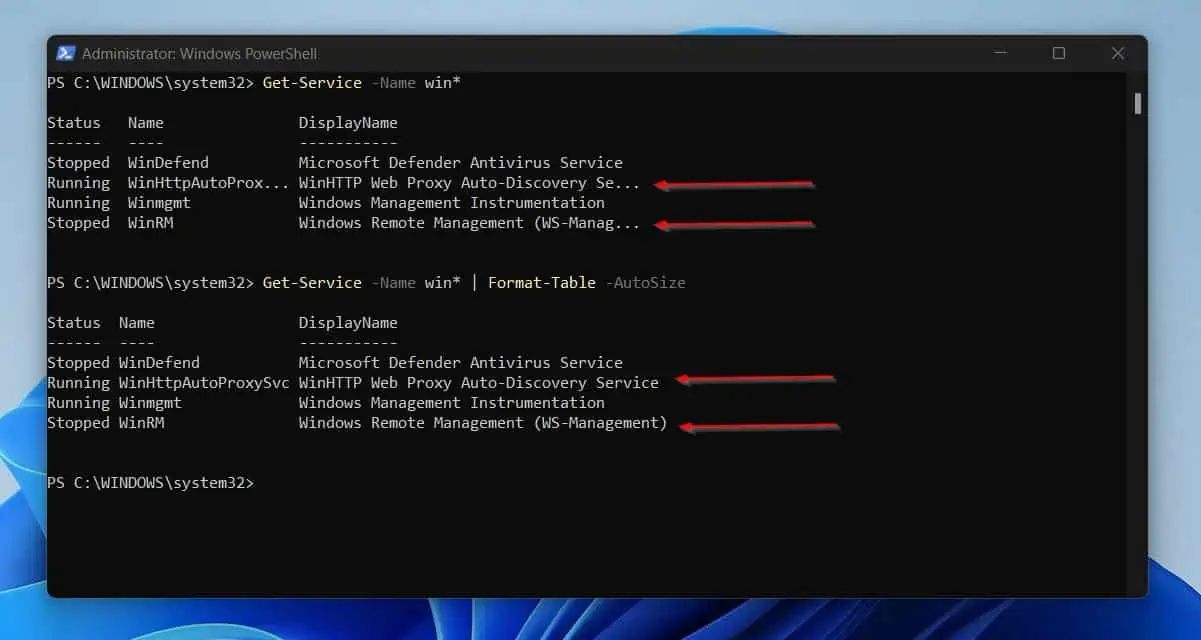
To fit all information into the display window without hiding any text, I’ll pipe the last command to a Format-Table command, then specify the AutoSize parameter…
Get-Service -Name win* | Format-Table -AutoSize
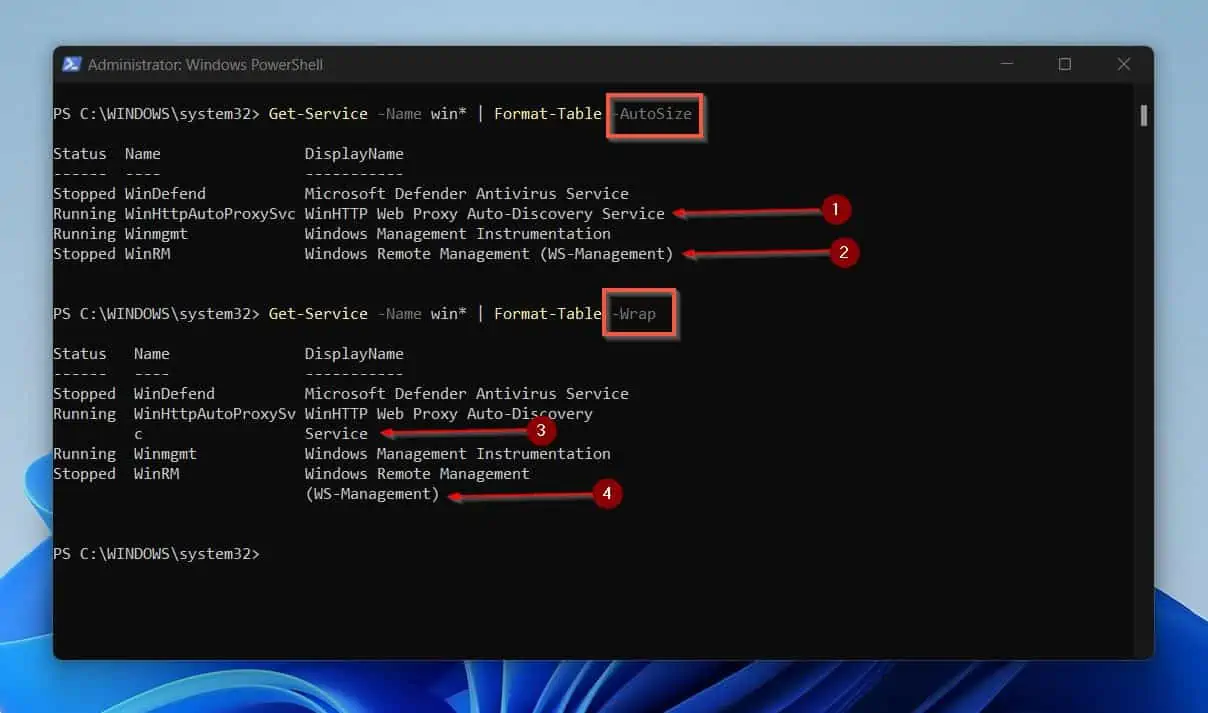
In the screenshot below, the last command displays also result in the DisplayName column. I left the result of the previous command to make it easy for you to compare.
Another parameter of the PowerShell Format-Table command that you can use to control column width is the Wrap parameter. This parameter works like the AutoSize parameter.
However, instead of displaying all column texts on the same line, the Wrap parameter moves texts that would have been hidden to the next line.
Let’s see how AutoSize is different from Wrap by running the previous command, but instead of using AutoSize, I’ll use Wrap.
Get-Service -Name win* | Format-Table -Wrap
In the screenshots below, you can compare the results of the AutoSize and the Wrap parameters of the Format-Table command.
As you can see, AutoSize expands the column width to accommodate all texts in a single line. On the contrary, Wrap moves the excess tests to the next line.
Example 2: Show All Columns with the PowerShell Format-Table Command
By default, the Format-Table command shows all columns. However, in the rare instance that it omits some columns, add the asterisks (*) wildcard.
To show how this works, I’ll use this Stack Overflow question. The Stack Overflow member was wondering why the code below does not display all columns…
New-Object PSCustomObject -Property ([Ordered] @{
        "BDS #" = $bdsVersion
        "Name" = $fullName
        "CompilerVersion" = $compilerVersion
        "RTLVersion" = $rtlVersion
        "Define" = $define
        "Characterset" = $characterSet
        "Architectures" = $architecture
        "Frameworks" = $framework
        "DllSuffix" = $dllSuffix
        "ProjectVersion" = $projectVersion
    #    "HKCU" = $hkcuBasePath
    #    "HKLM" = $hklmBasePath
        "HKCU/HKLM registry path" = $basePath
    }) | Format-Table
The simple solution is to add the asterisks (*) wildcard next to Format-Table.
New-Object PSCustomObject -Property ([Ordered] @{
"BDS #" = $bdsVersion
"Name" = $fullName
"CompilerVersion" = $compilerVersion
"RTLVersion" = $rtlVersion
"Define" = $define
"Characterset" = $characterSet
"Architectures" = $architecture
"Frameworks" = $framework
"DllSuffix" = $dllSuffix
"ProjectVersion" = $projectVersion
# "HKCU" = $hkcuBasePath
# "HKLM" = $hklmBasePath
"HKCU/HKLM registry path" = $basePath
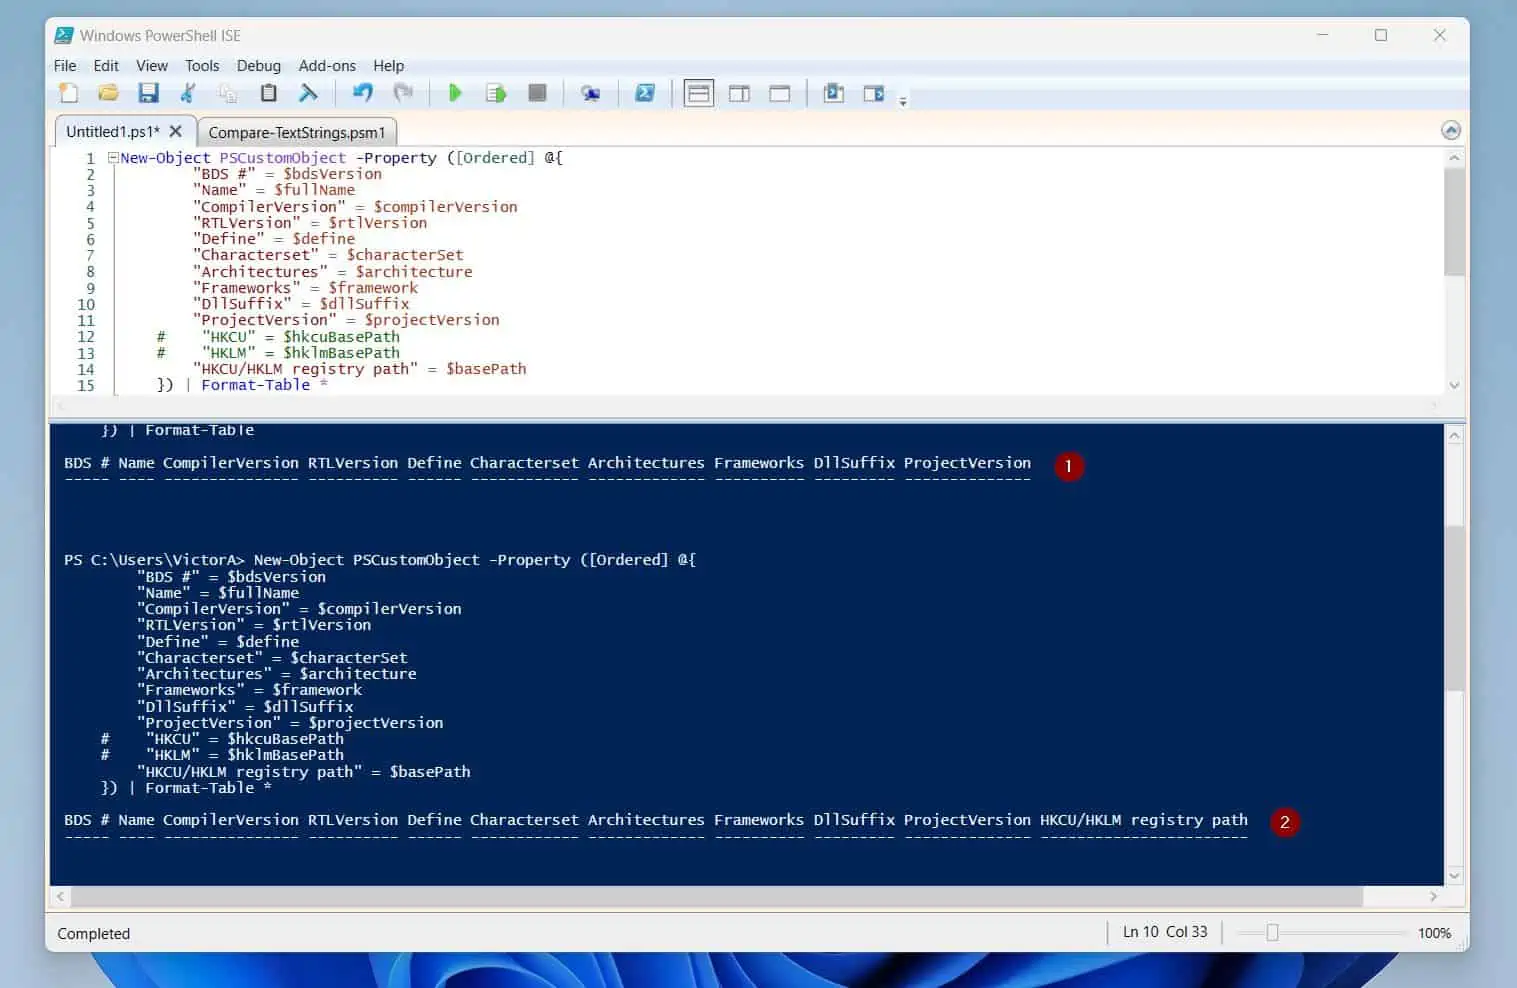
}) | Format-Table *The screenshot below shows the results of the script with (2) and without (1) the asterisks (*) wildcard. Without the asterisks (*) wildcard returns a maximum of 10 columns.
However, when I included the wildcard, the PowerShell Format-Table command returned all the columns.
Example 3: Sort Tables with Powershell Format-Table
The secret to sorting tables with Format-Table is to pipe the result of the command to the Sort-Object cmdlet first. Then, after sorting the result with the column name you wish, you pipe the result of the Sort-Object to Format-Table.
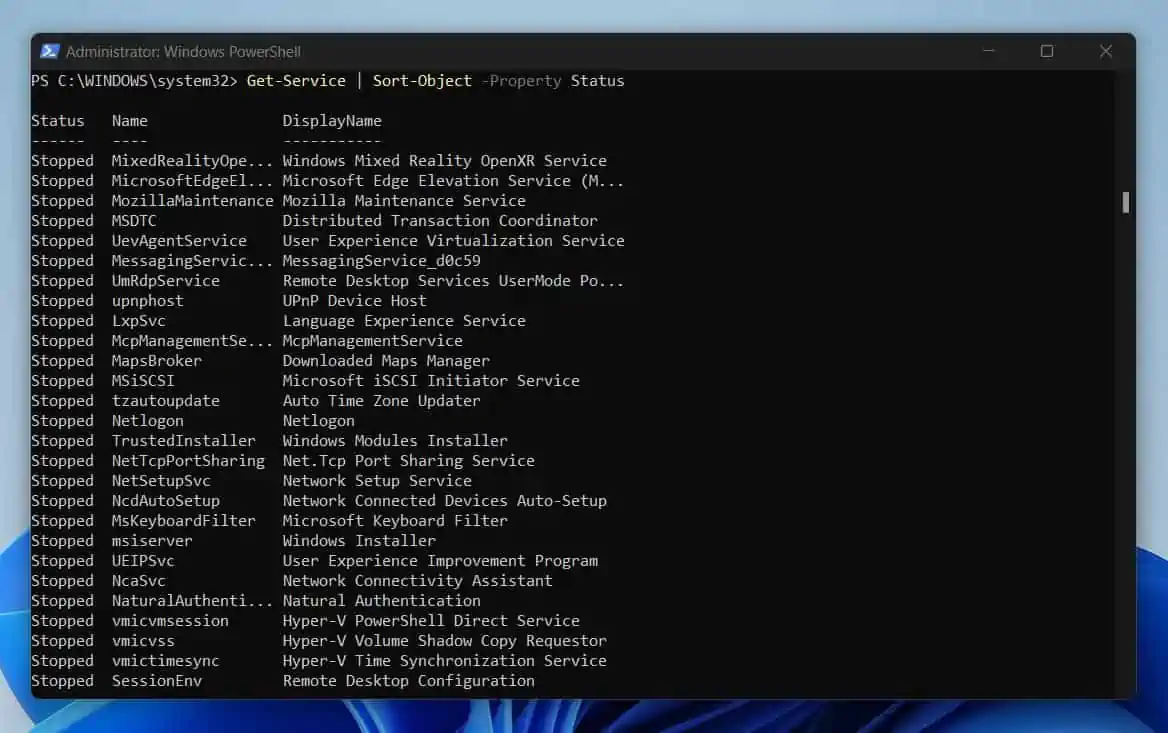
For example, in the command below, I am sorting Windows services on my PC by Status.
Get-Service | Sort-Object -Property Status
Unfortunately, even though the services are sorted, PowerShell displays the Status column first (the default view).
However, I want to display the DisplayName and Status – with the Status column displayed last. To achieve this result, I will now pipe the output of the last command to the PowerShell Format-Table command, as shown in this command…
Get-Service | Sort-Object -Property Status | Format-Table DisplayName, Status
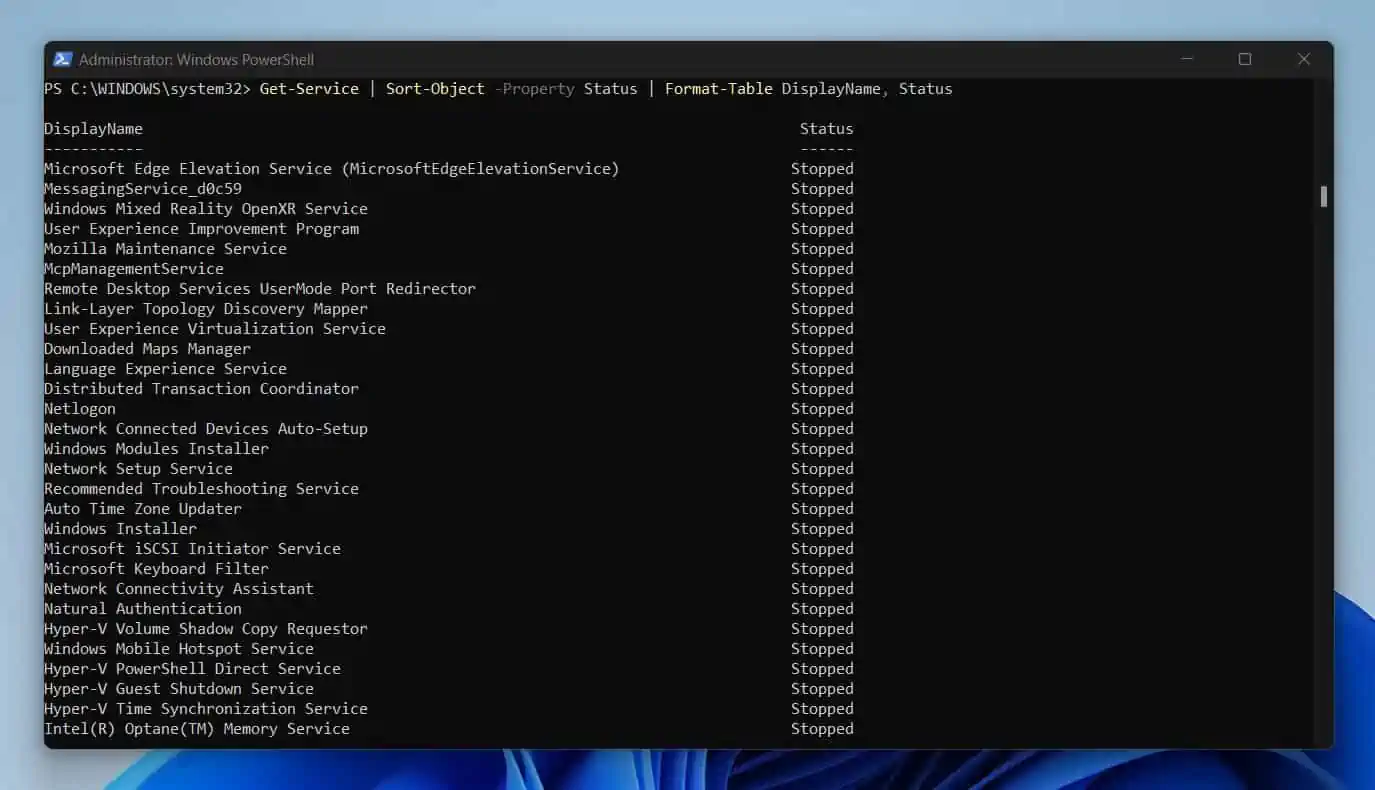
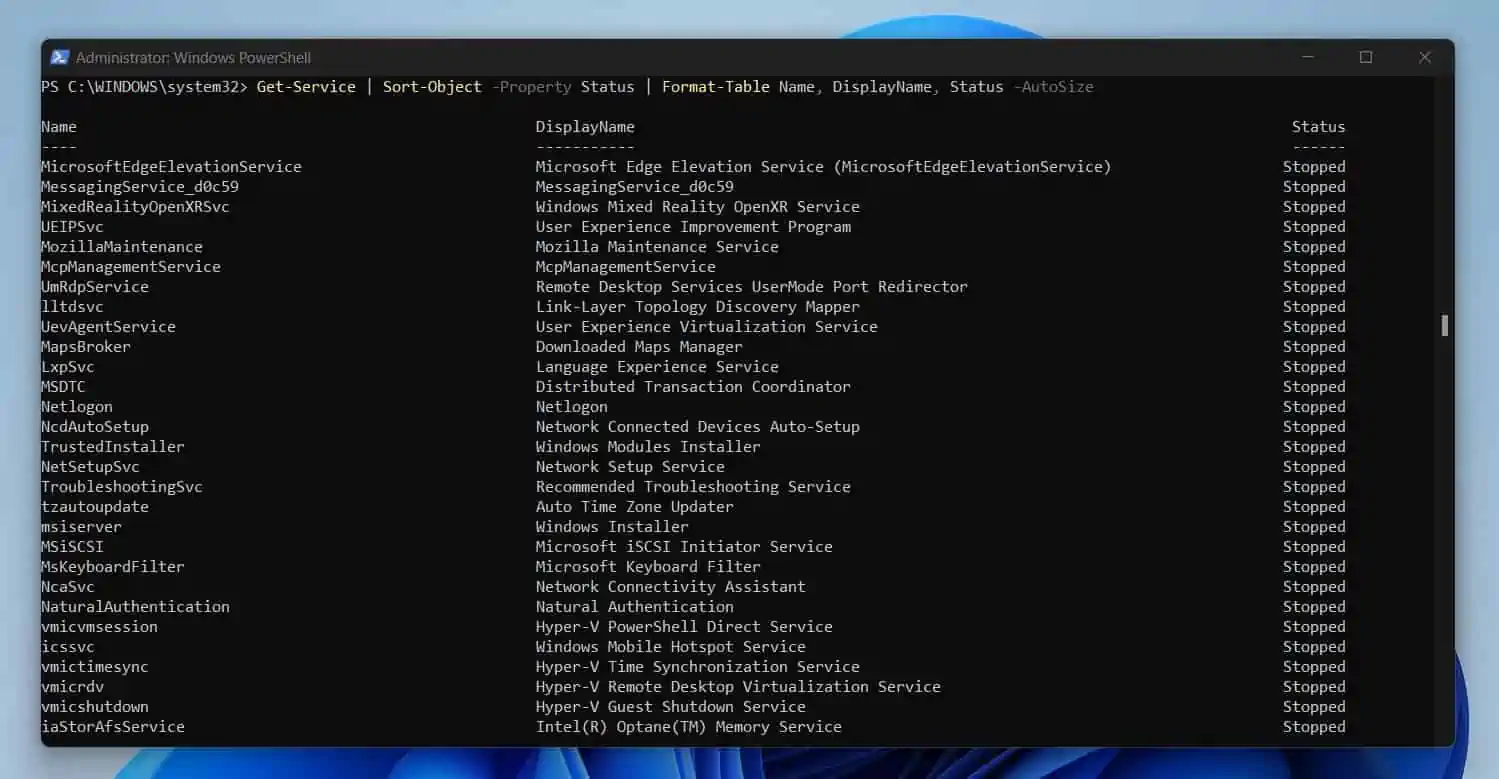
In the last command, I displayed only two of the default columns retired by the Get-Service command. However, I can display the three columns with the command below.
Get-Service | Sort-Object -Property Status | Format-Table Name, DisplayName, Status -AutoSize
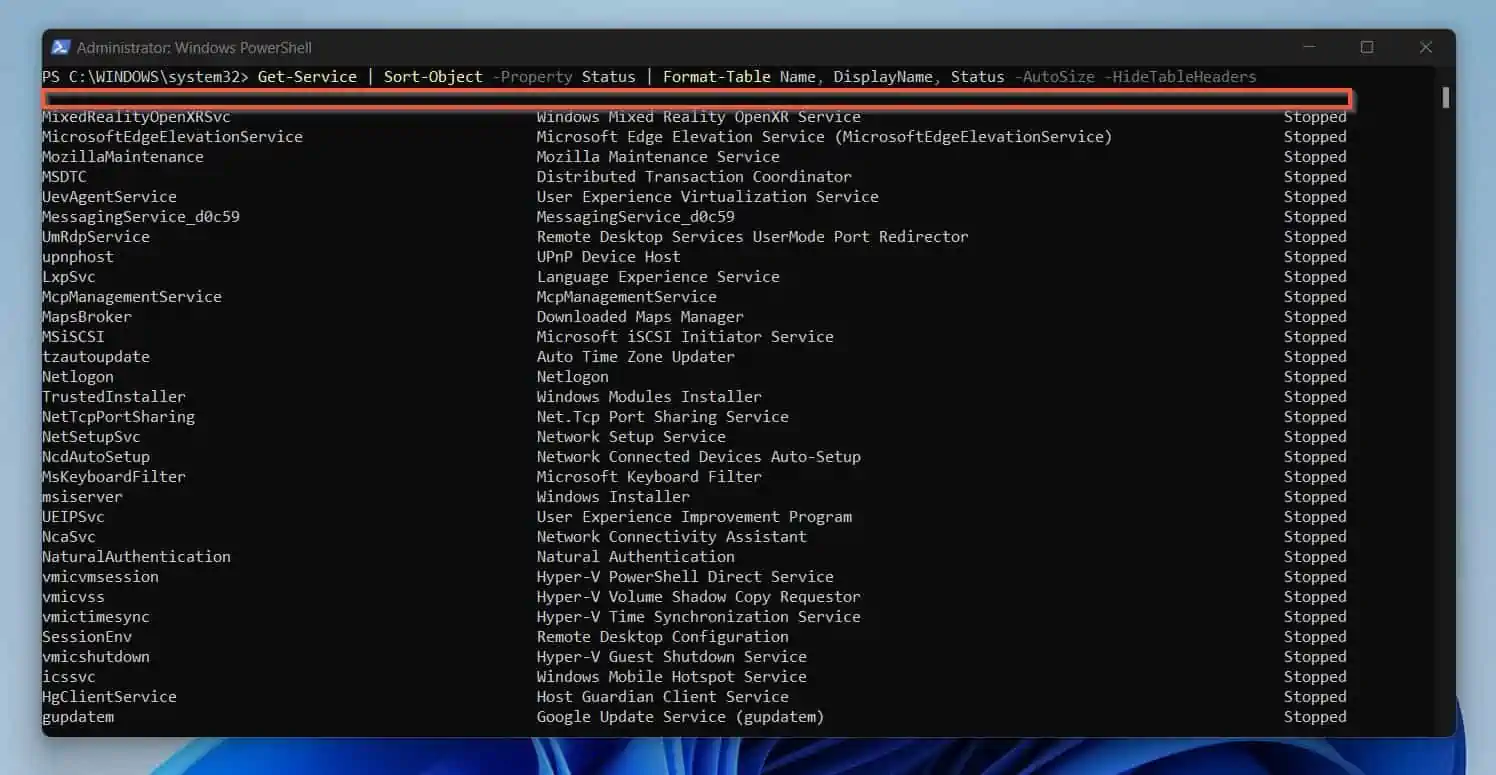
Example 4: Use the Powershell Format-Table Command to Display a Table with No Header
This example is very easy. The Format-Table command has a parameter called HideTableHeaders. If you specify this parameter, Format-Table will display the table without headers.
To show you how this works, I will run the command in the last section and include the HideTableHeaders parameter.
Get-Service | Sort-Object -Property Status | Format-Table Name, DisplayName, Status -AutoSize -HideTableHeaders
The command returns results with no header. However, it returns all the columns.
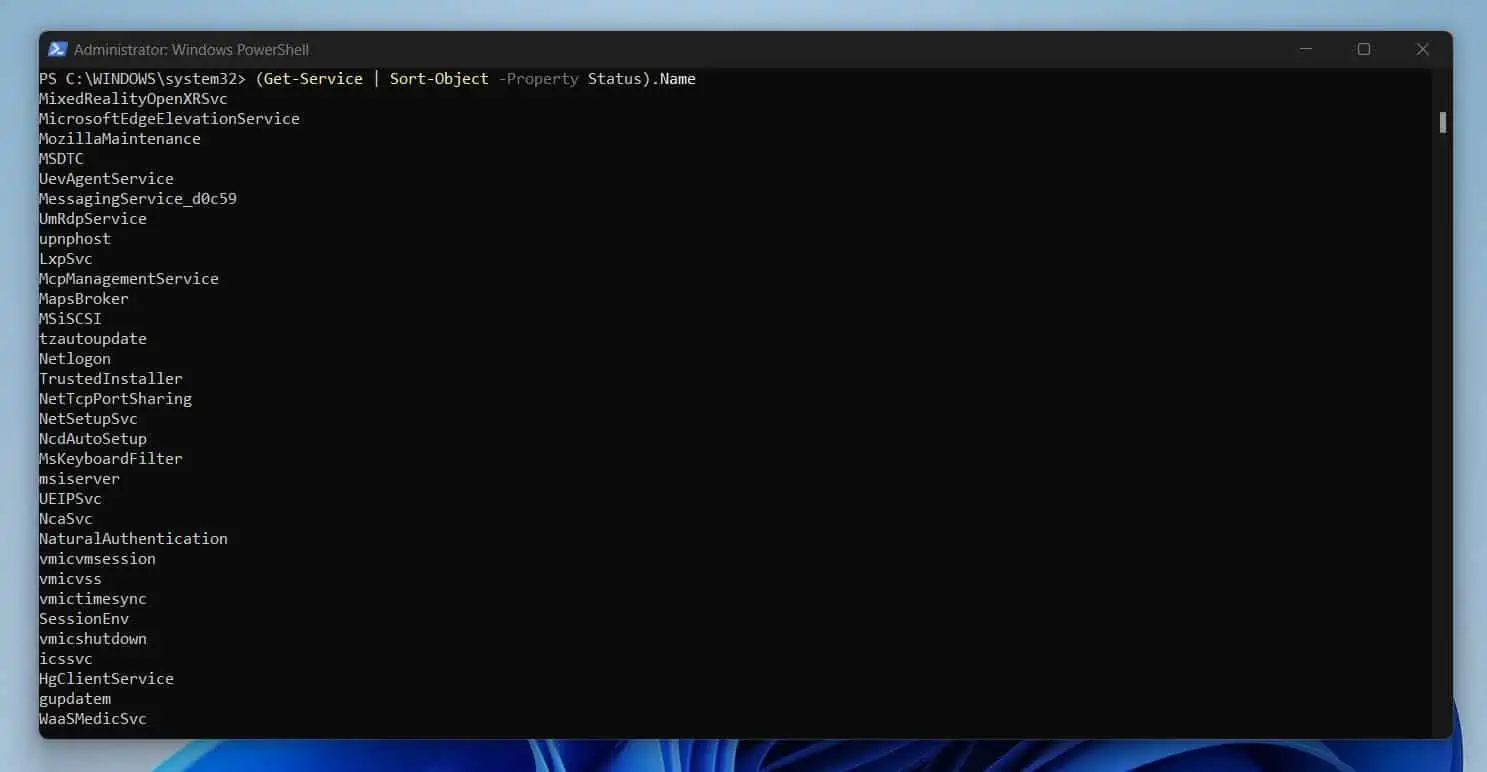
But what if I want to return one column with no header? The command below returns the Name column only without the header.
(Get-Service | Sort-Object -Property Status).Name
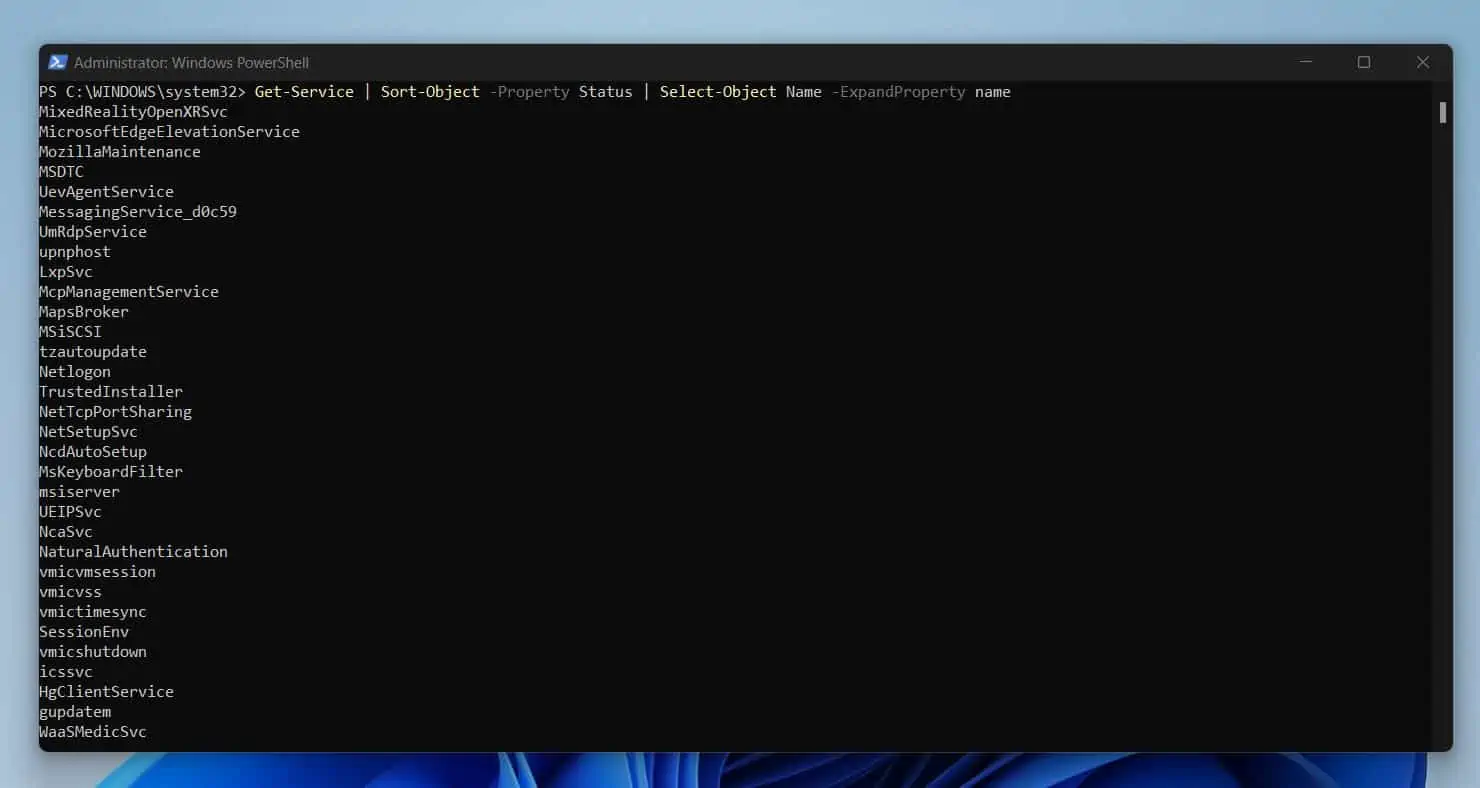
I can also remove the header of a table by piping the command to Select-Object, then specify the ExpandProperty parameter of Select-Object.
Get-Service | Sort-Object -Property Status | Select-Object Name -ExpandProperty name
The result is the same as the result from the previous command.
Example 4: Use Powershell Format-Table with Out-File or Export-CSV to Output to File or CSV
You can pipe the output of Format-Table to Out-File to output the result of a command to a text file. Unfortunately, you can NOT pipe Format-Table to Export-CSV as it results in gibberish.
To demonstrate how this works, I’ll continue with the Get-Service command used in previous examples.
The command below will send the result of the sorted and formatted Get-Service command to a text file in the path D:\report\services.txt.
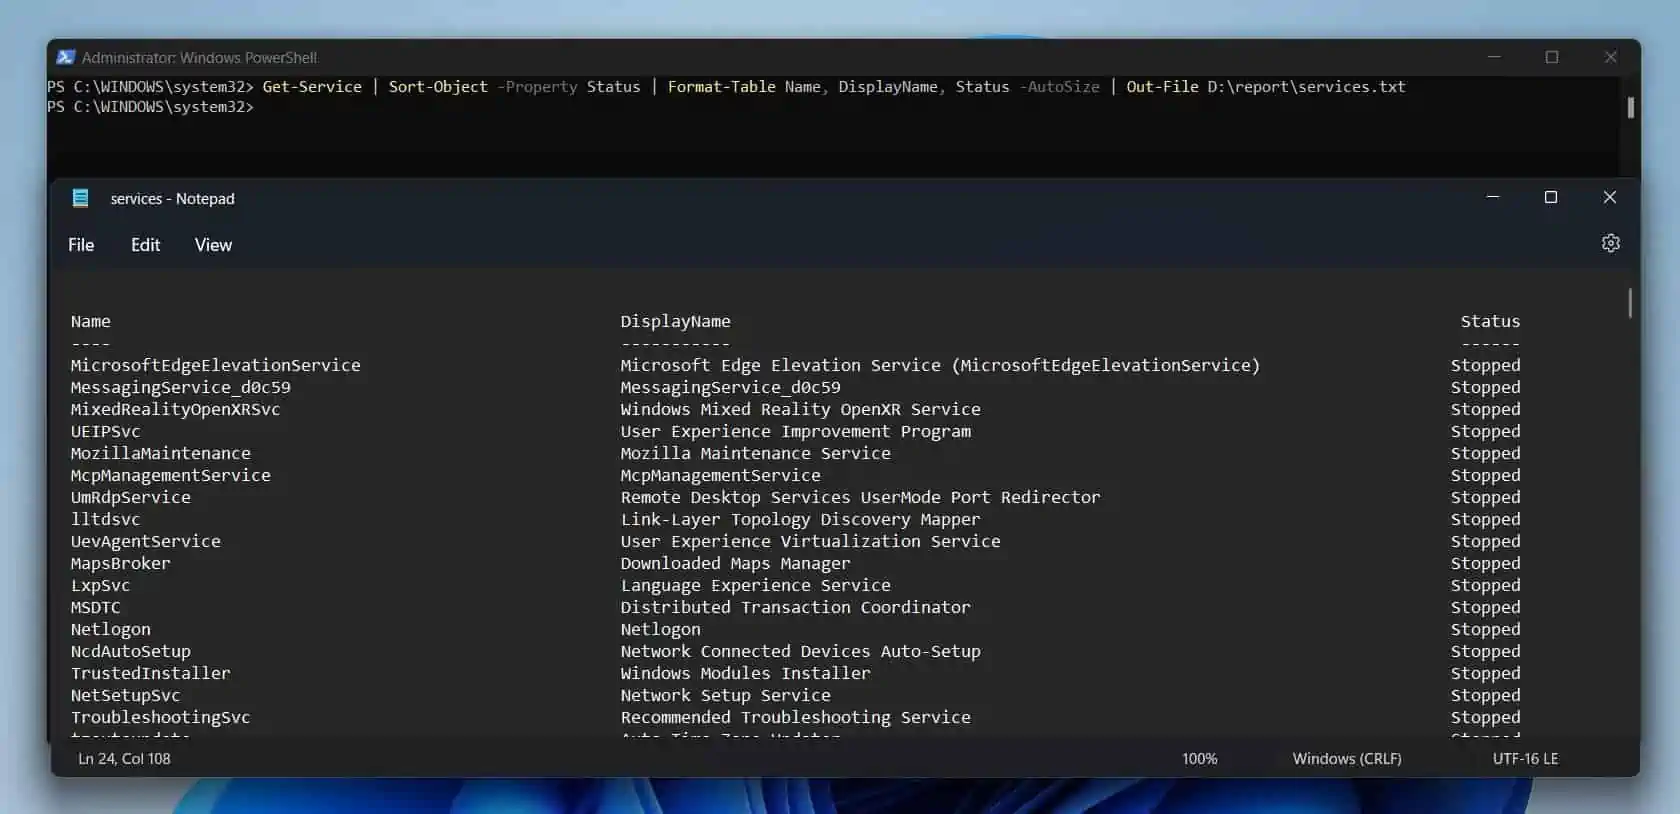
Get-Service | Sort-Object -Property Status | Format-Table Name, DisplayName, Status -AutoSize | Out-File D:\report\services.txt
In the screenshot below, I have combined an image of the command in PowerShell with the result of the text file.
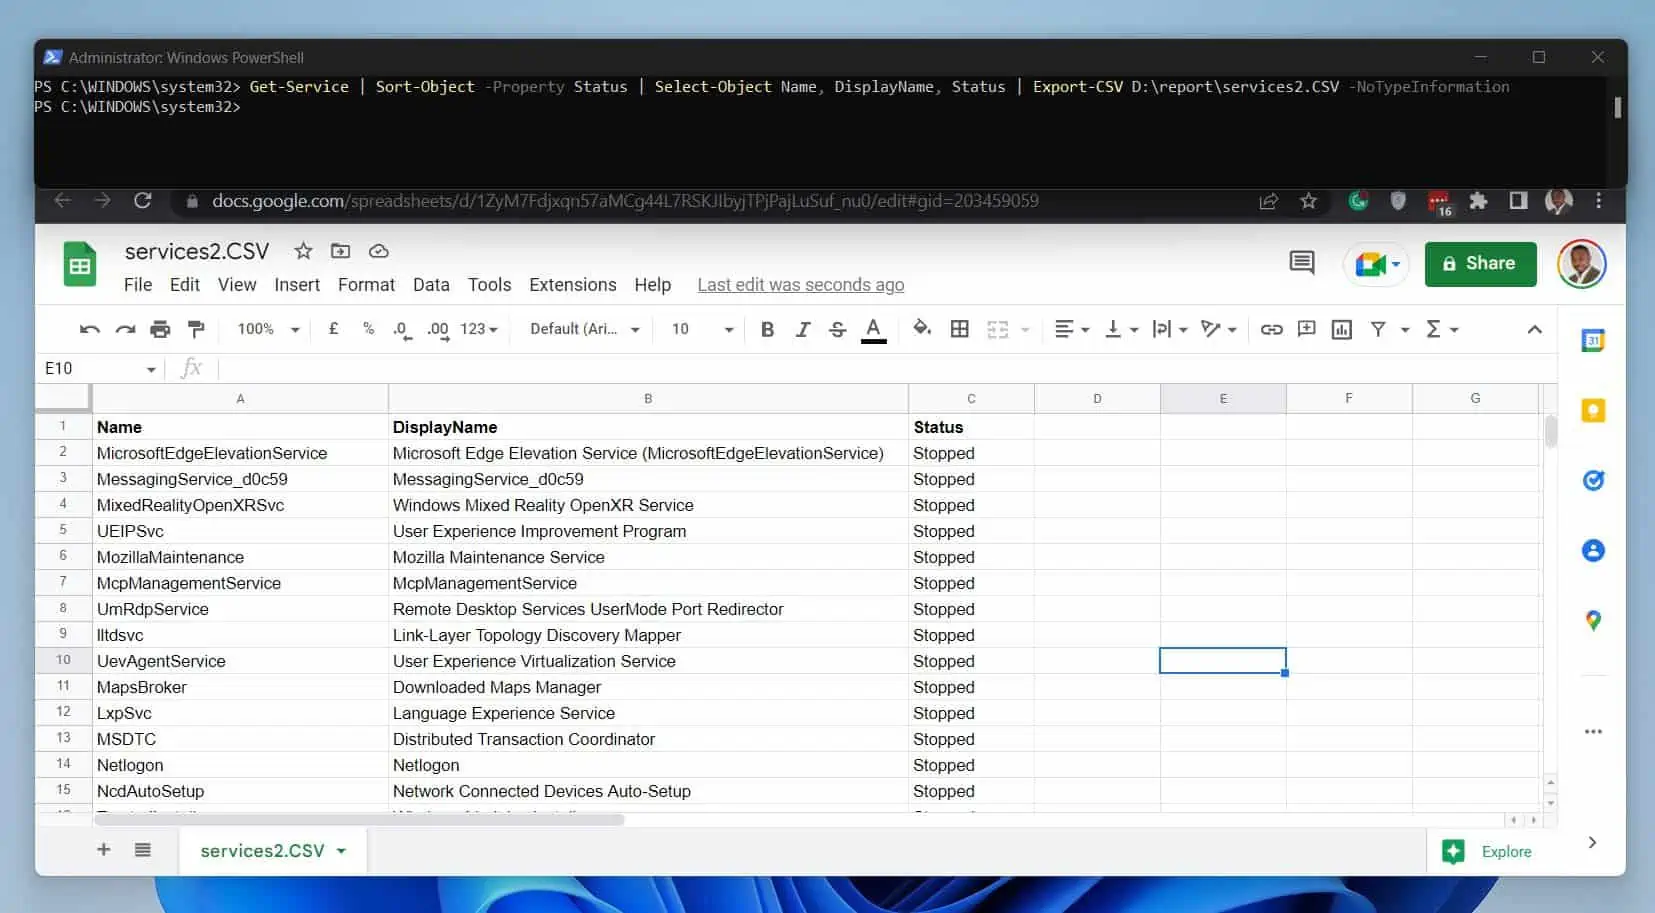
As I mentioned earlier, if you pipe Format-Table to Export-CSV, the CSV file will be gibberish. Instead of using Format-Table, use Select-Object.
Get-Service | Sort-Object -Property Status | Select-Object Name, DisplayName, Status | Export-CSV D:\report\services2.CSV -NoTypeInformation
Example 5: Use PowerShell Format-Table to Create Custom Column Name
To create a custom column name with Format-Table, you need to learn how to create calculated values. The syntax of calculated values is…
@{Name="Column_name";Expression={"column_value"}}Name is the custom column name you want to use, while Expression is the calculated column value. For the calculated column value, you could simply use the pipeline variable of the property of the objects piped to Format-Table.
To show you how this works, I’ll run the Get-Process command without any formatting. The command returns 7 columns by default.
Additionally, the column names are not necessarily user-friendly. For example, what does the “CPU(s)” column actually mean?
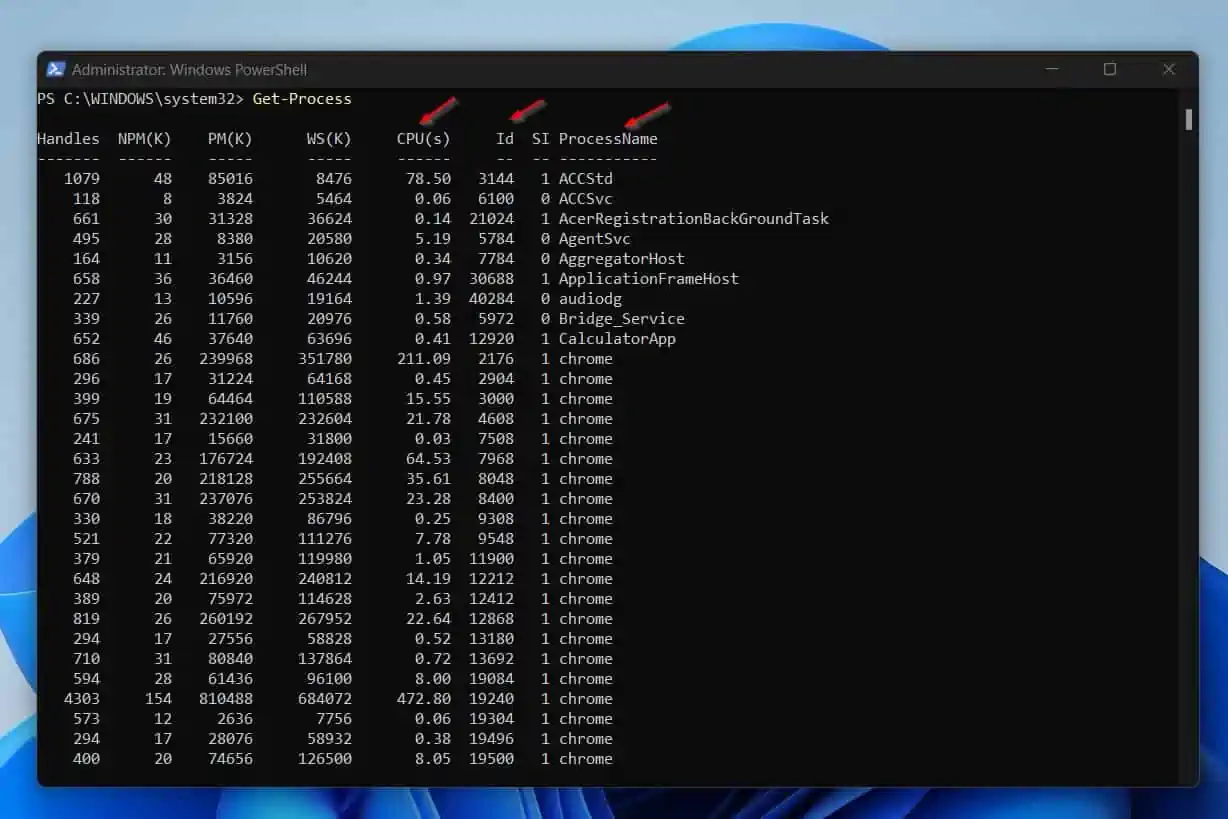
To make the report more user-friendly, I want to return 3 columns – ProcessName, Id, and Handles. However, instead of displaying the column names returned by the Get-Process command, I want to use the PowerShell Format-Table command to display the custom column names – Process Name, Process ID, and Process Handles.
Here is the command that does the magic…
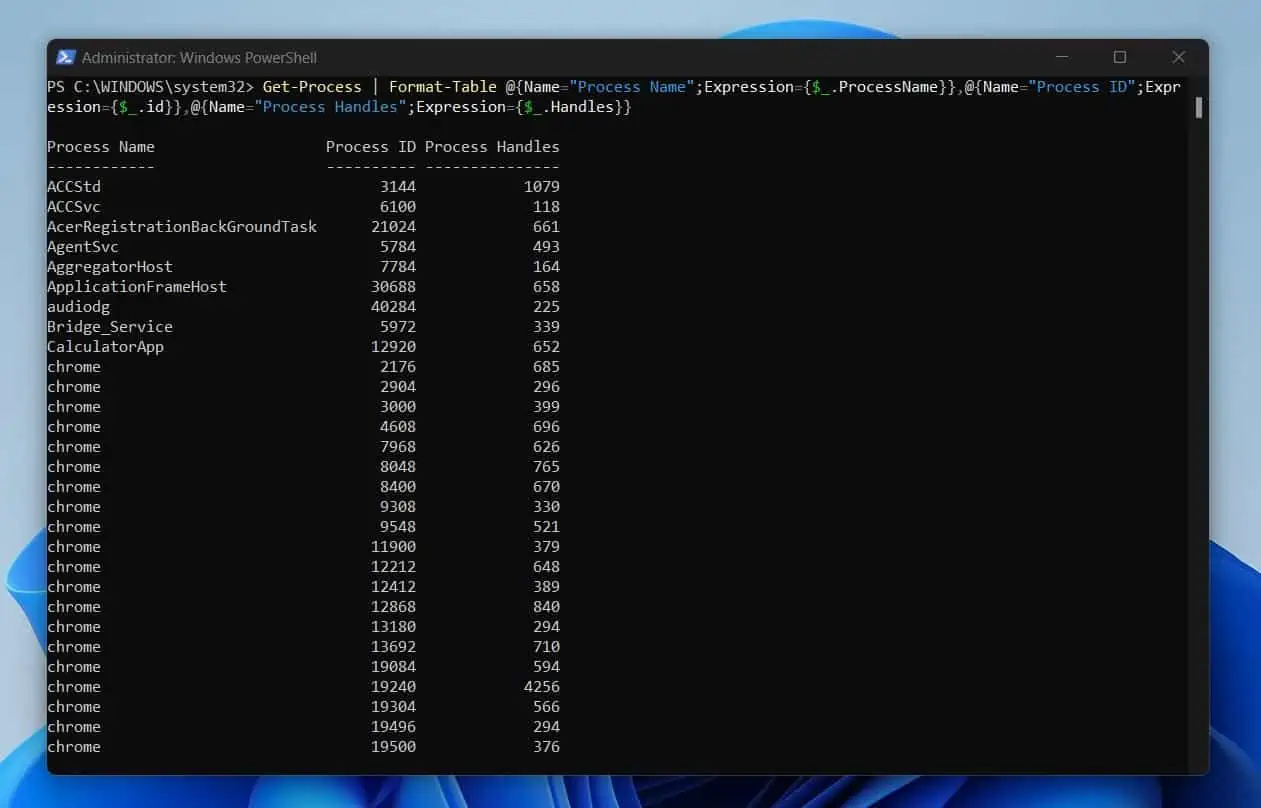
Get-Process | Format-Table @{Name="Process Name";Expression={$_.ProcessName}},@{Name="Process ID";Expression={$_.id}},@{Name="Process Handles";Expression={$_.Handles}}If you look closely, I used the Name parameter to set the new column name. Then, I used Expression to set the column values that Format-Table will display.
In the above command, I specified Expression as the pipeline variables of the property of the objects. However, in some instances, you can use calculated values in Expression.
Here is the result of the last command…
Example 6: Align Table Right, Left, or Center with the PowerShell Format-Table
In the last example, I showed you how to create custom column names with Format-Table. In this section, I’ll add one more layer to that knowledge.
Specifically, you’ll learn how to align the column information left, right, or center.
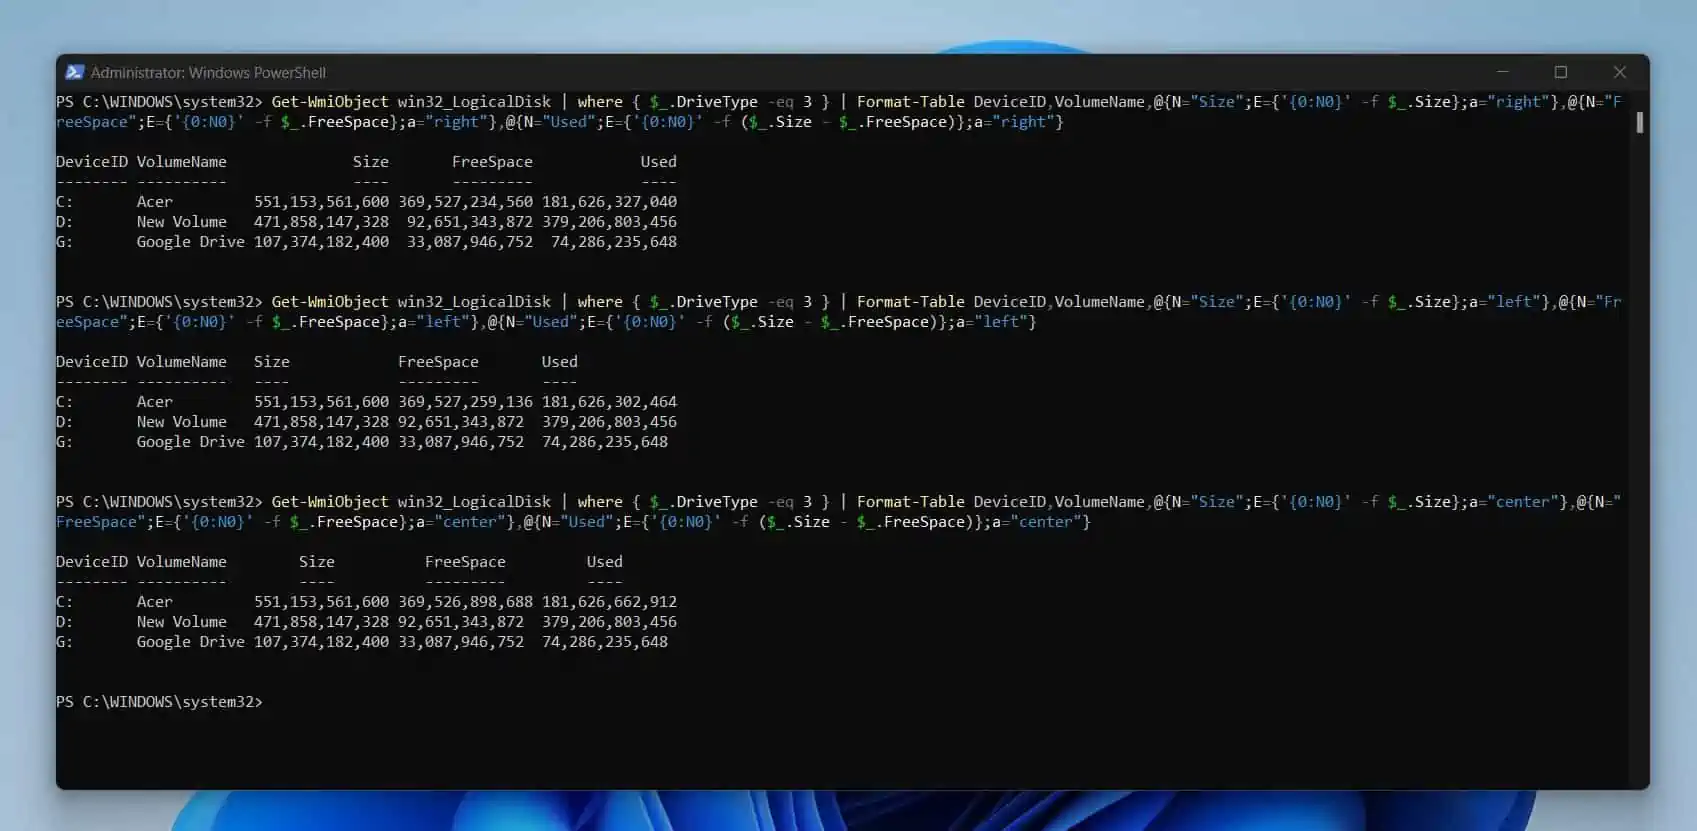
To format a table and align the results right, left, or center, use “expression” to create custom columns. Then, specify the align property as “right,” “left,” or “center” within the Expression parameter.
I got this example from this Stack Overflow thread. The first command below aligns the result of the command right.
Get-WmiObject win32_LogicalDisk | where { $_.DriveType -eq 3 } | Format-Table DeviceID,VolumeName,@{N="Size";E={'{0:N0}' -f $_.Size};a="right"},@{N="FreeSpace";E={'{0:N0}' -f $_.FreeSpace};a="right"},@{N="Used";E={'{0:N0}' -f ($_.Size - $_.FreeSpace)};a="right"}Meanwhile, when I change the “a” (“align” property) to “left,” the table result is aligned left. Similarly, the second command below aligns the result center.
Get-WmiObject win32_LogicalDisk | where { $_.DriveType -eq 3 } | Format-Table DeviceID,VolumeName,@{N="Size";E={'{0:N0}' -f $_.Size};a="left"},@{N="FreeSpace";E={'{0:N0}' -f $_.FreeSpace};a="left"},@{N="Used";E={'{0:N0}' -f ($_.Size - $_.FreeSpace)};a="left"}Get-WmiObject win32_LogicalDisk | where { $_.DriveType -eq 3 } | Format-Table DeviceID,VolumeName,@{N="Size";E={'{0:N0}' -f $_.Size};a="center"},@{N="FreeSpace";E={'{0:N0}' -f $_.FreeSpace};a="center"},@{N="Used";E={'{0:N0}' -f ($_.Size - $_.FreeSpace)};a="center"}The screenshot below shows the results of the three commands…
Example 7: Use the GroupBy Parameter of the PowerShell Format-Table Command to Order Table Properties
As you may have seen in the syntaxes and parameters section of this article, the Format-Table command has a GroupBy parameter.
However, before you can use this parameter, you must pipe the result of the original command to the Sort-Object command.
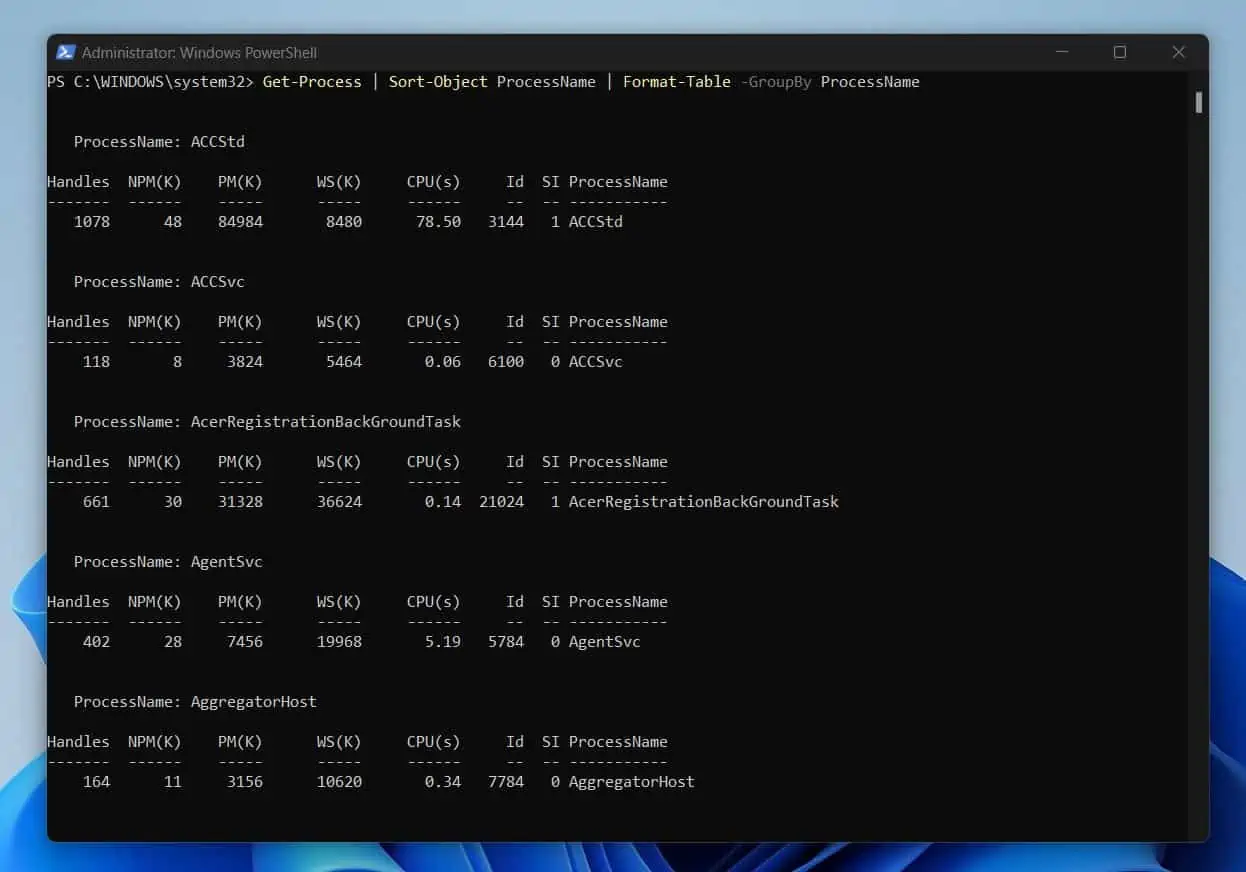
In this example, I want to group processes on my PC by process name. First, I’ll sort the result of the Get-Process command by piping it to the Sort-Object command.
Then, I’ll pipe the sorted results into Format-Table and group the result by ProcessName.
Get-Process | Sort-Object ProcessName | Format-Table -GroupBy ProcessName
By using the GroupBy parameter, you’re effectively creating a separate table for each process.
Frequently Asked Questions
As its name suggests, the PowerShell Format-Table formats the results it received from another PowerShell command.
If you want to format a disk with PowerShell, use the Format-Volume command. However, to format a table, use the Format-Table command.
The Format-List command lists the properties of a command piped into it as against displaying the result in a table.
FT is the alias of the Format-Table cmdlet. So, you can use FT instead of using Format-Table.
You can create a table in PowerShell with the New-Object cmdlet. Alternatively, you can create an empty table with Select-Object and populate it with values. Then, pipe the output to Format-Table to convert the result from a list to a table.
Conclusion
If you develop PowerShell scripts for reporting, you definitely need the Format-Table command. Apart from managing the width of tables, Format-Table can also customize table columns, including using calculated values.
This guide taught you all you need to know about the PowerShell Format-Table command. I started the guide with an overview of the cmdlet, and then I discussed its syntaxes and parameters.
Finally, I discussed multiple examples and applications of the Format-Table command. Now that you have read this guide, I hope you are now comfortable with the Format-Table command.
If you found the guide helpful, click on “Yes” beside the “Was this page helpful” question below.
You may also express your thoughts and opinions by using the “Leave a Comment” form at the bottom of this page.
Before you go, why not improve your PowerShell skills by exploring our Windows PowerShell How-To Guides or Windows PowerShell Explained guides?